1
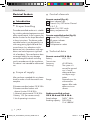
Table of contents
Introduction
Proper handling............................................................................................Page6
Scope of supply............................................................................................Page6
Control elements...........................................................................................Page6
Technical data...............................................................................................Page6
Safety
Safety advice................................................................................................Page7
Advice on use of dimmer radio-controlled socket (FSD B 20-A)..................Page8
Setting up
Preparing the remote control (FSS B 20-A)................................................Page8
Setting up the remote-controlled socket (FSE B 20-A)..............................Page8
Setting up the remote-controlled dimmer socket (FSD B 20-A)...................Page9
Meanings of the LED operating status display...........................................Page10
Setting-up operation
Using the dimmer radio-controlled socket (FSD B 20-A)..........................Page10
Using the radio-controlled socket (FSE B 20-A).............................................Page11
Using the remote-control (FSS B 20-A)............................................................... Page11
Trouble-shooting...........................................................................................Page11
Cleaning.....................................................................................................Page12
Disposal......................................................................................................Page12
Guarantee and service
Guarantee.....................................................................................................Page13
Service address............................................................................................Page13
Declaration of conformity............................................................................Page13
Manufacturer................................................................................................Page13
GB/IE
66538_silv_Funkschaltset_Content_GB-IE.indd 5
5
29.06.11 11:45
Introduction
Electrical Sockets
Q
Introduction
Q Proper
handling
The radio-controlled socket set is suitable
for switching electrical equipment on and
off by remote control. It also supports the
dimmer function for the lamps described
in these instructions. The dimmer radiocontrolled socket is not designed for use
with energysaving light bulbs and fluorescent lamps. Any alterations to this
device are not in accordance with regulations and could represent significant
risk of accidents. The manufacturer does
not accept liability for any damage
caused through the device not being
used in accordance with the regulations.
This device is not intended for commercial
use.
Q Scope
of supply
After you have unpacked this set, please
check to make sure all the contents are
complete.
2 Remote-controlled sockets FSE B 20-A
2 Remote-controlled sockets with
dimmer function FSD B 20-A
1 4-channel remote control FSS B 20-A
1 Battery 12 V (for remote control)
1 Set of operating instructions
6
Q Control
elements
Remote control (fig. A):
1 Power indicator light
2 Channel ON / OFF button Channel
A, B, C, D
3 Master ON / OFF switch
4 Battery compartment lid
Remote-controlled socket (fig. B):
5 Manual ON / OFF button
6 LED power indicator
7 LEARN button
8 Child protection socket
Q Technical
data
Remote control FSS B 20-A:
Battery:
A23, 12 V
Transmission
frequency:
433.92 MHz
Licensing:The system is licensed for general
use, is free of
charge and does
not require registration.
Range:Depending on the
circumstances
approx. 40 m under
optimum circumstances.
Radio-controlled sockets
FSE B 20-A and FSD B 20-A:
Rated voltage:
240 V~ 50 Hz
Breaking capacity:FSE B 20-A:
13 A 3.000 W
GB/IE
66538_silv_Funkschaltset_Content_GB-IE.indd 6
29.06.11 11:45
Introduction / Safety
FSD B 20-A:
1.25 A 280 W
Standby power
consumption:
Transmission
frequency:
< 0,7 W
433.92 MHz
Advice: The radio-controlled sockets
FSE B 20-A and FSD B 20-A each have
a child protection socket 8 , which significantly increases safety at home. The
contacts are protected in such a way
that children cannot stick needles or
other sharp objects into them and thus
get an electric shock. Nevertheless,
please keep the device out of the reach
of children at all times.
Q
Safety
Safety advice
Read these operating instructions and
safety advice carefully. Look at the diagram page and familiarise yourself with
all functions of the device before starting it up for the first time.
c Avoid danger to life from electric shock!
JOnly connect the radio-controlled
sockets to earthed 240 V~ domestic
sockets.
JAt all costs, avoid exposure to
damp and extreme temperatures.
JOnly use the radio-controlled sockets
in enclosed spaces. They are not
suitable for outdoor use.
JDespite the child protection socket
8 , please keep the device out of
the reach of children at all times.
JAvoid overloading the device.
Overloading can cause a fire hazard
or damage to the device. The maximum capacity is approx. 3.000 W
(FSE B 20-A) per radio-controlled
socket or 280 W (FSD B 20-A).
JPlease contact the service department
immediately operational faults arise.
JDo not open the device on any account. All necessary repairs should
only be carried out by the service
department or a specialist electrical
workshop.
JBefore cleaning always disconnect
the device from the mains supply. In
this case always remove the radiocontrolled electrical outlet socket
from the mains wall socket and
remove all plugs from the device.
JDo not have one radio-controlled
electrical outlet socket inserted
behind the other.
JDo not use any additional child
protection devices for the radiocontrolled sockets. The connection
between the plug and the radiocontrolled socket could be impaired
and risk from overheating then arises.
The radio-controlled sockets already
have a child protection device which
prevents children from putting any
objects into the socket.
JMake sure that the connected
radio-controlled electrical outlet
sockets are freely accessible and not
covered by other objects.
GB/IE
66538_silv_Funkschaltset_Content_GB-IE.indd 7
7
29.06.11 11:45
Safety / Setting up
JIf the device malfunctions, switch it
off immediately.
JThese instructions are a component
of the device. If you pass the device
on to a third party, these instructions
must also be handed on.
Q Advice
on use of dimmer
radio-controlled socket
(FSD B 20-A)
Use the remote-controlled dimmer
socket FSD B 20-A only for the following
lamps:
– 240 V~ light bulbs 20–280 W
– 240 V~ high-voltage halogen bulbs
20–280 W
Do not use the dimmer / remote-controlled
electrical outlet socket for energy-saving
lamps, fluorescent lamps, lamps with
their own dimmers and lamps with
transformers, except for incandescent
and halogen lamps with electronic
transformers (12 V / 20–50 W). Do not
use any other consumers. This may
damage the connected consumers and
the remote-controlled sockets.
Q
Setting up
Q P
reparing
the remote
control (FSS B 20-A)
(fig. A)
1.Open the battery compartment on
the back of the remote control by
8
pushing away the battery compartment cover 4 downwards. Insert a
12 V battery. Make sure you fit the
battery the right way round (polarity).
2.Press one of the ON / OFF buttons
2 or 3 to test whether the remote
control works; if it does, the power
indicator light will come on 1 .
Q S
etting
up the remotecontrolled socket
(FSE B 20-A) (fig. B)
1.Insert the remote-controlled socket
into an earthed household socket
and switch it on with the ON / OFF
switch 5 . The LED operating status
display 6 will come on.
2.Point the remote control at the remotecontrolled socket at a distance of
approx. 50 cm.
3.Press the LEARN button 7 of the
remote-controlled socket for approx. 3 seconds and release it
again. The LED operating status display 6 will flash for approx. 10
seconds. While it is flashing, press the
desired ON button of the channel
ON / OFF button 2 (A, B, C or D)
of the remote control. The LED operating status display 6 will now
shine permanently. You can now
switch a connected consumer on or
off using the remote control.
4.Repeat this procedure with the other
remote-controlled socket.
5.You can switch several remote-controlled sockets on and off at the
same time using the ON / OFF but-
GB/IE
66538_silv_Funkschaltset_Content_GB-IE.indd 8
29.06.11 11:45
Setting up
ton 2 of one channel. In addition,
you can programme six remote
controls one after the other and use
them for individual receivers. This
means you can switch one appliance
on and off from up to six different
places.
6.In this case, synchronise every remotecontrolled socket with the channel
of the remote control.
7.The coding of the remote control is
maintained when you change the
battery.
8.If you disconnect the remote-controlled socket from the power supply,
the codings will be permanently
stored.
9.In order to delete the codings again,
press the LEARN button 7 longer
than 6 seconds until the LED operating status display 6 starts to flash.
All codings will now be deleted.
10.Avoid interference: Make sure that
the distance between the various
remote-controlled sockets is approx. 50 cm.
11.Every remote-controlled socket also
has a manual ON / OFF switch 5 .
You can switch the remote-controlled
socket on and off without using the
remote control. The LED operating
status display 6 will indicate
whether the remote-controlled socket is in the ON / OFF mode.
Q S
etting
up the remotecontrolled dimmer socket
(FSD B 20-A) (fig. B)
1.Insert the remote-controlled socket
into an earthed household socket
and switch it on with the ON / OFF
switch 5 .
2.Point the remote control at the remotecontrolled socket at a distance of
approx. 50 cm.
3.Press the LEARN button 7 of the
remote-controlled socket for approx. 3 seconds and release it again.
The LED operating status display 6
will flash for approx. 10 seconds.
While it is flashing, press the desired
ON button of the channel ON /
OFF button 2 (A, B, C or D) of the
remote control. The LED operating
status display 6 will now shine
permanently. You can now switch a
connected consumer on or off using
the remote control.
4.The coding of the remote control will
be maintained even when you
change the battery.
5.When you unplug the remote-controlled sockets from the power supply,
the codings will be stored permanently.
6.Avoid interference: Make sure that
the distance between the various
remote-controlled sockets is approx. 50 cm.
7.In order to delete the codings again,
press the LEARN button 7 longer
than 6 seconds until the LED operating status display 6 starts to flash.
All codings will now be deleted.
GB/IE
66538_silv_Funkschaltset_Content_GB-IE.indd 9
9
29.06.11 11:45
Setting up / Setting-up operation
8.Every remote-controlled socket also
has a manual ON / OFF switch 5 .
You can switch the remote-controlled
socket on and off without using the
remote control. The LED operating
status display 6 will indicate
whether the remote-controlled socket
is in the ON / OFF mode.
Q M
eanings
of the
LED operating status
display
Remote-controlled socket without dimmer FSE B 20-A:
jThe LED operating status display 6
will shine when the remote-controlled
socket is switched on.
jThe LED operating status display 6
will not shine when the remote-controlled socket is switched off.
Remote-controlled socket with
dimmer FSD B 20-A:
jThe LED operating status display 6
will shine when the remote-controlled
socket is switched on.
jThe LED operating status display 6
will not shine when the remote-controlled socket is switched off.
jThe LED operating status display 6
will flash when the dimmer function
has been activated.
10
Q
Setting-up operation
Q Using
the dimmer
radio-controlled socket
(FSD B 20-A) (fig. B)
1.Insert the remote-controlled socket
into an earthed household socket
and switch it on with the ON / OFF
switch 5 .
2.Switch the lamp on. The radio-controlled socket can only carry out its
function when the lamp to be dimmed
is switched on.
3.Press the manual ON / OFF button
5 to switch the remote-controlled
socket on directly at the appliance.
The LED operating status display 6
will shine. Alternatively, you can also
switch the remote-controlled socket
on using the remote control (See
“Using the remote control FSS B
20-A”).
4.Press the manual ON / OFF button
5 to switch the remote-controlled
socket off directly on the appliance.
The LED operating status display 6
will go out. Alternatively, you can
also switch the remote-controlled
socket off using the remote control
(See “Using the remote control FSS
B 20-A”).
Adjusting the dimmer function
on remote-controlled socket
(FSD B 20-A):
1.Press the ON / OFF button 5 down.
The lamp will switch itself on and
the dimming process will start.
GB/IE
66538_silv_Funkschaltset_Content_GB-IE.indd 10
29.06.11 11:45
Setting-up operation
2.Release the manual ON / OFF button 5 when you have got the
amount of brightness you desire;
this setting will then be stored.
Adjusting the dimmer function
with remote control (FSS B 20-A):
1.Press the ON button 2 on the
appropriate channel (e.g. A). The
lamp will go on.
2.To dim, press the ON button 2
again. The dimming process will
now start.
3.Press the ON button 2 again when
you have the amount of light you
wish to have. This setting will now
be stored.
Q Using the radio-controlled
socket (FSE B 20-A)
(fig. B)
1.Put the radio-controlled socket into
any shuttered socket and connect
the appliance you want to operate.
2.Switch the electrical appliance on.
The radio-controlled socket can
only perform its switching function
when the device to be controlled is
switched on.
h Attention! Fire hazard!
Do not attach any appliances which
could cause fires or other damaged
if left unattended when switched
on. The maximum load of every
radio-controlled socket is approx.
3.000 W. Any overload could cause
a risk of fire or damage to the device.
3.Press the manual ON / OFF button
5 to switch the remote-controlled
socket on directly on the appliance.
The LED operating status display 6
will shine. Alternatively, you can also
switch the remote-controlled socket
on using the remote control (See
“Using the remote control FSS B
20-A”).
4.Press the manual ON / OFF button
5 to switch the remote-controlled
socket off directly on the appliance.
The LED operating status display 6
will go out. Alternatively, you can
also switch the remote-controlled
socket off using the remote control
(See “Using the remote control FSS
B 20-A”).
Q Using
the remote-control (FSS B 20-A) (fig. A)
1.Use the button ON / OFF 2 for
the channel whose device you would
like to switch on or off. The remote
control controls up to 4 radio-controlled sockets (individually, in groups,
or all at the same time).
2.Use the ALL-ON / OFF button 3 to
switch all radio-controlled sockets on
or off at the same time.
Q Trouble-shooting
If the remote control does not
work, please check the following points:
GB/IE
66538_silv_Funkschaltset_Content_GB-IE.indd 11
11
29.06.11 11:45
Setting-up operation / Cleaning / Disposal
Problem
The operating indicator 1 on the remote
control device illuminates but there is no
reaction
Remedy
·Check that the current
output from the battery is
adequate. If necessary
insert a new battery.
Problem
No indicator light 1
on remote control
when pressing “ON”
or “OFF”
Remedy
·Check that the battery
has been put in correctly.
·Check that the battery
has good contact with the
clamps, if need be press
it onto them.
Problem
No reaction from
consumer
Remedy
·Check that the appliance
is switched on.
·Assign a new code to the
radio-controlled socket
(see “Setting up the remote-controlled socket“,
Point 3 or “Setting up the
remote-controlled dimmer
socket“, Point 3).
·Check - by walking closer
to it - that the range is
correct for the desired
location.
12
Problem
Range is too small
Remedy
·For large ranges, ensure
that as few walls and as
little furniture as possible
are in the way of the
remote control and the
radio-controlled socket.
·If the range is too small
at times, the reason could
be a remote control which
works on a similar frequency. Whenever this remote
control is active, the range
declines (e.g. wireless
headphones, radio-controlled movement alarms,
radio gongs etc.).
Q Cleaning
JEnsure that no liquids get into the
inside of the device. Use a soft cloth
to clean the housing. Never use
petroleum, solvents or cleaners
which corrode plastics.
jBefore cleaning, always disconnect
the radio-controlled socket from the
wall socket and remove all power
plugs from the device.
Q Disposal
Electrical appliances
must not be disposed
of with domestic waste.
GB/IE
66538_silv_Funkschaltset_Content_GB-IE.indd 12
29.06.11 11:45
Disposal / Guarantee and service
In accordance with Council Directive
2002 / 96 / EC on waste electrical and
electronic equipment (WEEE), used
electrical appliances, lighting equipment
and batteries have to be collected separately and recycled in an environmentally
friendly way. Enquire at your city council
or local government regarding the possibilities of disposing of electronic waste in
a correct and environmentally friendly
way.
Environmental damage
through incorrect disposal of the batteries!
guarantee, please telephone the service
centre. Only by doing so can we ensure
that your appliance is returned free of
charge.
Q Service
address
BAT, Lindenstraße 35,
72074 Tübingen, Germany
E-mail: [email protected]
Service Tel.: +49 (0) 1805 – 720 741
(14 cents / min. from a German landline
telephone; mobile phones will be charged
at a max. rate of 42 cents / min.)
Batteries should not be disposed of with
domestic waste. They may contain toxic
heavy metals and are subject to hazardous waste treatment rules and regulations.
That is why you should dispose of used
batteries at a local collection point.
For further information, we recommend
you visit the service section / FAQs of
our home page www.dvw-service.com.
Q Guarantee
A manufacturer’s Declaration of Conformity is included with the product.
and service
Q Guarantee
This appliance comes with a 3-year
guarantee commencing on the date of
purchase. Please keep your receipt as
proof of purchase. The appliance has
been produced to the highest standards
and thoroughly checked before dispatch.
The guarantee only applies to faults in
materials or workmanship when used
properly. The guarantee lapses in cases
of unauthorized tampering. This guarantee does not restrict your legal rights.
If you wish to make a claim under the
Q Declaration
conformity
of
Q Manufacturer
BAT
Lindenstraße 35
72074 Tübingen
Germany
GB/IE
66538_silv_Funkschaltset_Content_GB-IE.indd 13
13
29.06.11 11:45
14
66538_silv_Funkschaltset_Content_GB-IE.indd 14
29.06.11 11:45
15
66538_silv_Funkschaltset_Content_GB-IE.indd 15
29.06.11 11:45
16
66538_silv_Funkschaltset_Content_GB-IE.indd 16
29.06.11 11:45