1
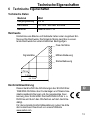
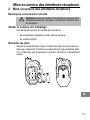
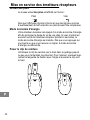
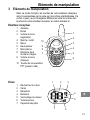
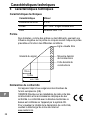
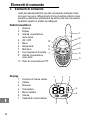
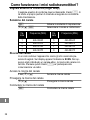
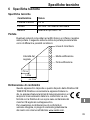
WTE 21
Bedienungsanleitung
Mode d’emploi
Istruzioni per l’uso
Operating Instructions
Bedienungsanleitung . . . . . . . . . . . 3
Mode d’emploi . . . . . . . . . . . . . . 16
Istruzioni per l’uso . . . . . . . . . . . . 29
Operating Instructions . . . . . . . . . 42
Declaration of Conformity . . . . . . . 56
2
1
1
2
3
4
5
6
7
8
Inhaltsverzeichnis
Sicherheitshinweise . . . . . . . . . . . . . 4
Funkgeräte in Betrieb nehmen . . . . . . 6
Bedienelemente . . . . . . . . . . . . . . . . 8
Wie bediene ich meine Funkgeräte? . . 9
Falls es Probleme gibt . . . . . . . . . . . . 12
Technische Eigenschaften . . . . . . . . . 13
Pflegehinweise / Garantie . . . . . . . . . 14
Stichwortverzeichnis . . . . . . . . . . . . . 15
3
Sicherheitshinweise
1 Sicherheitshinweise
Lesen Sie diese Bedienungsanleitung sorgfältig durch.
Bestimmungsgemäße Verwendung
Diese Sprechfunkgeräte sind geeignet für die Kommunikation mit
anderen Sprechfunkgeräten gleichen Standards. Jede andere Verwendung gilt als nicht bestimmungsgemäß. Eigenmächtige Veränderungen oder Umbauten sind nicht zulässig. Öffnen Sie die Geräte
in keinem Fall selbst und führen Sie keine eigenen Reparaturversuche durch.
Verwendungsbereich
Vermeiden Sie Belastungen durch Rauch, Staub, Erschütterungen,
Chemikalien, Feuchtigkeit, Hitze oder direkte Sonneneinstrahlung.
Verwenden Sie die Funkgeräte nicht in explosionsgefährdeten Bereichen.
Batterien
Achtung: Batterietypen nicht mischen! Verwenden Sie
gleichzeitig immer nur Batterien des gleichen Typs! Achten Sie auf die richtige Polung! Falls die Funkgeräte längere Zeit nicht benutzt werden, entnehmen Sie die Batterien.
Medizinische Geräte
Achtung: Benutzen Sie die Funkgeräte nicht in der Nähe
von medizinischen Geräten. Eine Beeinflussung kann
nicht völlig ausgeschlossen werden. Funkgeräte können
in Hörgeräten einen unangenehmen Brummton verursachen.
4
Sicherheitshinweise
Entsorgung
Wollen Sie Ihr Gerät entsorgen, bringen Sie es zur
Sammelstelle Ihres kommunalen Entsorgungsträgers (z. B.
Wertstoffhof). Nach dem Elektro− und Elektronikgerätegesetz
sind Besitzer von Altgeräten gesetzlich verpflichtet, alte
Elektro− und Elektronikgeräte einer getrennten
Abfallerfassung zuzuführen. Das Symbol bedeutet, dass Sie
das Gerät auf keinen Fall in den Hausmüll werfen dürfen!
Gefährdung von Gesundheit und Umwelt durch
Akkus und Batterien!
Akkus und Batterien nie öffnen, beschädigen, verschlucken oder in
die Umwelt gelangen lassen. Sie können giftige und
umweltschädliche Schwermetalle enthalten. Sie sind gesetzlich
verpflichtet, Akkus und Batterien beim batterievertreibenden Handel
bzw. über die vom zuständigen Entsorgungsträger bereitgestellten
Sammelstellen zu entsorgen. Die Entsorgung ist unentgeltlich. Die
Symbole bedeuten, dass Sie Akkus und Batterien auf keinen Fall in
den Hausmüll werfen dürfen und sie über Sammelstellen der
Entsorgung zugeführt werden müssen.
Verpackungsmaterialien entsorgen Sie entsprechend den lokalen
Vorschriften.
5
Funkgeräte in Betrieb nehmen
2 Funkgeräte in Betrieb nehmen
Sicherheitshinweise
Achtung: Lesen Sie vor der Inbetriebnahme unbedingt
die Sicherheitshinweise in Kapitel 1.
Verpackungsinhalt prüfen
Zum Lieferumfang gehören:
− zwei Funkgeräte mit Gürtelclip
− eine Bedienungsanleitung
Batterien einlegen
Öffnen Sie das Batteriefach. Legen Sie Batterien (nicht im Lieferumfang enthalten) ein. Verwenden Sie nur Batterien des Typs Alkaline
AAA 1.5V. Achten Sie auf die richtige Polung! Schließen Sie das
Batteriefach.
6
Funkgeräte in Betrieb nehmen
Batteriestand
Der aktuelle Batteriestand wird im Display angezeigt:
voll
leer
Sobald die Anzeige im Display blinkt und Warntöne zu hören sind,
müssen die Batterien ausgetauscht werden.
Energiesparmodus
Ihr Funkgerät ist mit einem Energiesparmodus ausgestattet, um die
Lebensdauer Ihrer Batterien zu verlängern. Wenn Sie 4 Sekunden
lang keine Taste am Funkgerät drücken, wird der Energiesparmodus eingeschaltet. Sobald Sie eine Taste drücken oder ein
Signal empfangen, wird der Energiesparmodus ausgeschaltet.
Gürtelclip anbringen
Schieben Sie den Gürtelclip von oben in die Führung, bis er hörbar
einrastet. Um den Gürtelclip wieder zu entfernen, heben Sie die Befestigungslasche mit dem Fingernagel etwas an und schieben den
Gürtelclip nach oben.
7
Bedienelemente
3 Bedienelemente
Die Tasten Ihres Funkgeräts werden in dieser Bedienungsanleitung
nachfolgend mit vereinheitlichten Symbolen dargestellt. Leichte Abweichungen der Tastensymbole Ihres Funkgeräts gegenüber den
hier verwendeten Tastensymbolen sind daher möglich.
Walkie−Talkie
1
2
3
Antenne
Display
Lautstärke,
Einstellung aufwärts
4 Ein / Aus
5 Menü
6 Lautsprecher
7 Mikrofon
8 Rufton senden
9 Lautstärke,
Einstellung abwärts
10 PTT−Sprechtaste
Display
1
2
3
4
5
6
7
1
2
10
3
9
8
7
4
5
mic
6
1
4
5
7
8
3
2
Kanalsuche
Kanal
Empfangen
Senden
Tastensperre
Lautstärke
Batteriekapazität
6
Wie bediene ich meine Funkgeräte?
4 Wie bediene ich meine Funkgeräte?
Darstellungen und Schreibweisen
P
2 sec M
2xM
a, P
b, P
ð
Abgebildete Taste drücken
Abgebildete Taste 2 Sekunden
drücken
Abgebildete Taste 2−mal drücken
Abgebildete Taste lange drücken
Abgebildete Taste loslassen
In das Mikrofon sprechen
Displaybeleuchtung
Nach dem Betätigen einer Taste, außer der P−Taste, wird das
Display für 4 Sekunden beleuchtet.
Ein− / Ausschalten der Funkgeräte 2
aV
Funkgerät einschalten
Es erklingt ein Signal. Im Display wird der aktuell eingestellte Kanal angezeigt.
aV
Funkgerät ausschalten
Lautstärkeregelung
+ oder ,
Lauter oder leiser
Senden und Empfangen
Senden
3
aPð
Senden
Halten Sie das Funkgerät ca. 5 bis 7 cm vom Mund entfernt und sprechen Sie mit normaler Lautstärke. Um mit
anderen Teilnehmern zu sprechen, müssen alle Funkgeräte auf den gleichen Kanal eingestellt sein.
Empfangen
4
b, P
Empfangen
Sie können keine Funksignale empfangen, wenn Sie die
P−Taste gedrückt halten.
9
Wie bediene ich meine Funkgeräte?
Bestätigungston (Roger Beep)
Der Bestätigungston erklingt, wenn Sie die P−Taste loslassen.
Dadurch wird Ihrem Gesprächspartner signalisiert, dass Ihre Übertragung beendet ist.
Kanalwahl
M
Einstellungsmodus aktivieren
+ oder ,, M
Kanal auswählen und bestätigen
Kanal
Frequenz (MHz)
Kanal
Frequenz (MHz)
1
2
3
4
446.00625
446.01875
446.03125
446.04375
5
6
7
8
446.05625
446.06875
446.08125
446.09375
Kanalsuche
In einer Endlosschleife wird auf den acht Kanälen nach Signalen
gesucht. Im Display erscheint SCAN. Wird ein aktiver Kanal gefunden, stoppt die Kanalsuche. Drücken Sie die P−Taste, um am
Funkverkehr teilzunehmen.
Kanalsuche starten
3 sec + oder ,
Kanalsuche starten
Kanalsuche fortsetzen
+ oder ,
Kanalsuche fortsetzen
Kanalsuche beenden
M
10
Kanalsuche beenden
Wie bediene ich meine Funkgeräte?
Rufton senden
Der Rufton macht andere Teilnehmer darauf aufmerksam, dass Sie
ein Gespräch beginnen möchten. Voraussetzung dafür ist, dass die
anderen Teilnehmer den gleichen Kanal verwenden.
C
Rufton senden
Monitor−Funktion
Die Monitor−Funktion ermöglicht es Ihnen auf dem aktuell eingestellten Kanal nach schwachen Signalen zu suchen. Wenn Sie ein
fremdes Signal empfangen, wechseln Sie auf einen freien Kanal.
Kommunizieren Sie mit anderen Teilnehmern immer auf einem
freien Kanal, um Störungen zu vermeiden.
M und +
Kanal abhören
M
Abhören beenden
Tastensperre
Die Tastensperre verhindert das ungewollte Ändern von Einstellun−Symbol
gen. Bei eingeschalteter Tastensperre erscheint das
im Display.
Aktivieren
5
a, M
Tastensperre aktivieren
Deaktivieren
6
a, M
Tastensperre deaktivieren
11
Falls es Probleme gibt
5 Falls es Probleme gibt
Service−Hotline
Haben Sie Probleme mit Ihrem Funkgerät, kontrollieren Sie zuerst
die folgenden Hinweise. Bei technischen Problemen können Sie
sich an unsere Service−Hotline unter Tel. 0900 00 1675 innerhalb
der Schweiz (Kosten Swisscom bei Drucklegung: CHF 2.60/min)
wenden. Bei Garantieansprüchen wenden Sie sich an Ihren Fachhändler. Die Garantiezeit beträgt 2 Jahre.
Fragen und Antworten
12
Fragen
Antworten
Keine Funktion
− Die Batterien sind nicht korrekt eingelegt
− Die Batterien sind leer
Senden nicht
möglich
− Drücken Sie die P−Taste vollständig,
um zu senden
− Ihr Kanal wird von anderen Teilnehmern
benutzt
Kein Empfang
− Lassen Sie die P−Taste los, um zu
empfangen
− Die Lautstärke ist zu gering eingestellt
− Sie befinden sich außerhalb des Empfangsbereichs, ändern Sie Ihre Position
− Hindernisse wie Bäume und Gebäude haben einen negativen Einfluss auf die
Reichweite
− Nutzen Sie die Funktion Monitor", um
nach schwachen Signalen zu suchen
Technische Eigenschaften
6 Technische Eigenschaften
Technische Daten
Merkmal
Wert
Ausgangsleistung
0.5 W
Reichweite
ca. 3 km − bei freier Sichtlinie
Batterien
Alkaline AAA 1.5V
Reichweite
Hindernisse wie Bäume und Gebäude haben einen negativen Einfluss auf die Reichweite. Die folgende Skizze zeigt die zu erwartende Reichweite bei unterschiedlichen Bedingungen.
Signalstärke
750 m
1,5 km
ÎÎ
ÎÎ
ÎÎ
ÎÎ
ÎÎ
ÎÎ
ÎÎ
Freie Sichtlinie
Mittlere Bebauung
Starke Bebauung
ca. 3 km
Konformitätserklärung
Dieses Gerät erfüllt die Anforderungen der EU−Richtlinie:
1999/5/EG Richtlinie über Funkanlagen und Telekommunikationsendeinrichtungen und die gegenseitige Anerkennung ihrer Konformität. Die Konformität mit der o. a.
Richtlinie wird durch das CE−Zeichen auf dem Gerät bestätigt.
Für die komplette Konformitätserklärung nutzen Sie bitte
den kostenlosen Download von unserer Website
www.switel.com.
13
Pflegehinweise / Garantie
7 Pflegehinweise / Garantie
Pflegehinweise
Reinigen Sie die Gehäuseoberflächen mit einem weichen und
fusselfreien Tuch.
Verwenden Sie keine Reinigungsmittel oder Lösungsmittel.
Garantie
SWITEL − Geräte werden nach den modernsten Produktionsverfahren hergestellt und geprüft. Ausgesuchte Materialien und hoch entwickelte Technologien sorgen für einwandfreie Funktion und lange
Lebensdauer. Die Garantie gilt nicht für die in den Produkten verwendeten Batterien, Akkus oder Akkupacks. Die Garantiezeit beträgt 24 Monate, gerechnet vom Tage des Kaufs.
Innerhalb der Garantiezeit werden alle Mängel, die auf Material−
oder Herstellungsfehler zurückzuführen sind, kostenlos beseitigt.
Der Garantieanspruch erlischt bei Eingriffen durch den Käufer oder
durch Dritte. Schäden, die durch unsachgemäße Behandlung oder
Bedienung, natürliche Abnutzung, durch falsches Aufstellen oder
Aufbewahren, durch unsachgemäßen Anschluss oder Installation
sowie durch höhere Gewalt oder sonstige äußere Einflüsse entstehen, fallen nicht unter die Garantieleistung. Wir behalten uns vor,
bei Reklamationen die defekten Teile auszubessern, zu ersetzen
oder das Gerät auszutauschen. Ausgetauschte Teile oder ausgetauschte Geräte gehen in unser Eigentum über. Schadenersatzansprüche sind ausgeschlossen, soweit sie nicht auf Vorsatz oder grober Fahrlässigkeit des Herstellers beruhen.
Sollte Ihr Gerät dennoch einen Defekt innerhalb der Garantiezeit
aufweisen, wenden Sie sich bitte unter Vorlage Ihrer Kaufquittung
ausschließlich an das Geschäft, in dem Sie Ihr SWITEL − Gerät gekauft haben. Alle Gewährleistungsansprüche nach diesen Bestimmungen sind ausschließlich gegenüber Ihrem Fachhändler geltend
zu machen. Nach Ablauf von zwei Jahren nach Kauf und Übergabe
unserer Produkte können Gewährleistungsrechte nicht mehr geltend gemacht werden.
14
Stichwortverzeichnis
8 Stichwortverzeichnis
A
Ausschalten, 9
B
Batterien einlegen, 6
Batteriestand, 7
Bedienelemente, 8
Bedienung, 9
Bestätigungston, 10
D
Display, 8
Displaybeleuchtung, 9
E
Einschalten, 9
Empfangen, 9
Energiesparmodus, 7
R
Reichweite, 13
Roger Beep, 10
Rufton, 11
S
Schreibweisen, 9
Senden, 9
Service−Hotline, 12
Sicherheitshinweise, 4
T
Tastensperre, 11
Technische Daten, 13
V
Verpackungsinhalt, 6
F
Fehlerbehebung, 12
Fragen und Antworten, 12
Funkgeräte in Betrieb nehmen, 6
G
Garantie, 14
Gürtelclip, 7
K
Kanalsuche, 10
Kanalwahl, 10
Konformitätserklärung, 13
L
Lautstärkeregelung, 9
M
Monitor−Funktion, 11
P
Pflegehinweise, 14
Probleme, 12
15
7
Table des matières
1
Consignes de sécurité . . . . . . . . . . . .
2
Mise en service des
émetteurs−récepteurs . . . . . . . . . . .
3
Eléments de manipulation . . . . . . . . .
4
Comment vous servir de vos
émetteurs−récepteurs ? . . . . . . . . .
5
En cas de problèmes . . . . . . . . . . . . .
6
Caractéristiques techniques . . . . . . . .
7
Remarques d’entretien / Garantie . . . .
8
Index . . . . . . . . . . . . . . . . . . . . . . . .
16
17
19
21
22
25
26
27
28
Consignes de sécurité
1 Consignes de sécurité
Lisez très attentivement ce mode d’emploi.
Utilisation conforme aux prescriptions
Ces émetteurs−récepteurs conviennent pour la communication avec
d’autres émetteurs−récepteurs de même standard. Toute autre utilisation est considérée comme non conforme à l’usage. Des modifications ou changements effectués d’un propre gré ne sont pas autorisés. N’ouvrez en aucun cas les appareils et n’effectuez aucun
essai de réparation vous−même.
Lieu d’utilisation
Evitez toute nuisance par la fumée, la poussière, les vibrations, les
produits chimiques, l’humidité, la grande chaleur ou l’ensoleillement
direct.
Ne vous servez pas des émetteurs−récepteurs dans des endroits
exposés aux explosions.
Piles
Attention : Ne mélangez pas les types de piles ! N’utilisez
simultanément que des piles du même type ! Observez
une polarisation correcte ! Si vous deviez ne pas utiliser
les émetteurs−récepteurs pendant une durée prolongée,
retirez les piles.
Appareils médicaux
Attention : N’utilisez pas les émetteurs−récepteurs à proximité d’appareils médicaux, leur influence sur ces appareils ne pouvant pas être entièrement exclue. Les émetteurs−récepteurs peuvent causer un bourdonnement
désagréable dans les prothèses auditives.
17
Consignes de sécurité
Élimination
Si vous voulez mettre votre appareil au rebut, veuillez
l’apporter au centre de collecte de l’organisme d’élimination
des déchets de votre commune (par ex. centre de
recyclage). D’après la loi relative aux appareils électriques
et électroniques, les propriétaires d’appareils électriques
et électroniques usagés sont tenus de les déposer dans un
collecteur séparé. L’icône ci−contre signifie que vous ne
devez en aucun cas jeter votre appareil dans les ordures
ménagères !
Mise en danger de l’homme et pollution de
l’environnement causée par les batteries
rechargeables et piles !
Ne jamais ouvrir, endommager, avaler les piles rechargeables et les
piles ou ne jamais faire pénétrer leur contenu dans
l’environnement. Elles peuvent contenir des métaux lourds toxiques
et nuisibles pour celui−ci. Vous êtes tenu par la loi d’éliminer les
packs de batteries et les piles auprès d’un revendeur ou en les
déposant dans les collecteurs correspondants de l’organisme
d’élimination des déchetslocal. Leur élimination est gratuite. L’icône
ci−contre signifie que vous ne devez en aucun cas jeter les piles
rechargeables et piles dans les ordures ménagères, mais que vous
devez les éliminer auprès de centres de collecte.
Éliminez les fournitures d’emballage conformément au règlement
local.
18
Mise en service des émetteurs−récepteurs
2 Mise en service des émetteurs−récepteurs
Remarques concernant la sécurité
Attention :Avant de mettre votre appareil en service, lisez
impérativement les consignes de sécurité mentionnées
au chapitre 1.
Vérifier le contenu de l’emballage
Les éléments suivants font partie de la livraison :
− deux émetteurs−récepteurs avec clip de ceinture
− un mode d’emploi
Introduire les piles
Ouvrez le compartiment à piles. Insérez les piles (ne sont pas fournies avec l’appareil). N’utilisez que des piles de type alcalines AAA,
1.5 V. Observez une polarisation correcte ! Fermez le compartiment
à piles.
19
Mise en service des émetteurs−récepteurs
Niveau des piles
Le niveau actuel des piles est affiché sur l’écran :
Plein
Vide
Dès que l’affichage clignote à l’écran et que des signaux sonores
d’avertissement se font entendre, les piles doivent être remplacées.
Mode économie d’énergie
Votre émetteur−récepteur est équipé d’un mode économie d’énergie
afin de prolonger la durée de vie de vos piles. Si vous n’actionnez
aucune touche de l’émetteur−récepteur pendant 4 secondes, le
mode économie d’énergie se branche. Dès que vous appuyez sur
une touche ou que vous recevez un signal, le mode économie
d’énergie se débranche.
Poser le clip de ceinture
Introduisez le clip de ceinture par le haut dans le guidage jusqu’à
ce que vous l’entendiez s’enclencher. Pour l’enlever, soulevez légèrement la languette de fixation avec l’ongle et poussez le clip vers
le haut.
20
Eléments de manipulation
3 Eléments de manipulation
Dans ce mode d’emploi, les touches de votre émetteur−récepteur
seront représentées par la suite par des icônes standardisées. De
ce fait, il peut y avoir de légères différences entre les icônes des
touches de votre émetteur−récepteur et celles utilisées ici.
Émetteur−récepteur
1
2
3
Antenne
Écran
Volume sonore,
augmenter
4 Marche / arrêt
10
5 Menu
6 Haut−parleur
9
7 Microphone
8
8 Émission de la
7
sonnerie d’appel
9 Volume sonore,
diminuer
10 Touche de conversation
PTT (press to talk)
Écran
1
2
3
4
5
mic
6
1
1
2
3
4
5
6
7
3
2
Recherche du canal
Canal
Réception
Émission
Verrouillage du clavier
Volumesonore
Capacité des piles
4
5
7
6
21
Comment vous servir de vos
4émetteurs−récepteurs
Comment vous servir de
? vos
émetteurs−récepteurs ?
Représentations et notations
P
2 sec M
2xM
a, P
b, P
ð
Appuyer sur la touche représentée
Appuyer pendant 2 secondes sur la
touche représentée
Appuyer 2 fois sur la touche
représentée
Appuyer longuement sur la touché
représentée
Relâcher la touche représentée
Parler dans le microphone
Éclairage de l’écran
Après l’actionnement d’une touche, exceptée la touche P,
l’écran s’allume pendant 4 secondes.
Brancher / débrancher les émetteurs−récepteurs 8
aV
Brancher l’émetteur−récepteur
Un signal sonore se fait entendre. Le canal actuellement
programmé est affiché à l’écran.
aV
Débrancher l’émetteur−récepteur
Réglage du volume sonore
+ ou ,
Plus fort ou plus faible
Émettre et recevoir
Émettre
9
aPð
Émettre
Tenez l’émetteur−récepteur à environ 5 à 7 cm de votre
bouche et parlez avec un volume sonore normal. Pour
parler avec d’autres correspondants, il faut que tous les
appareils soient réglés sur le même canal.
22
Comment vous servir de vos
émetteurs−récepteurs ?
Recevoir
10
b, P
Recevoir
Vous ne pouvez pas recevoir de signaux radio si vous
maintenez la touche P appuyée.
Signal de confirmation (Roger Beep)
Le signal de confirmation retentit quand vous relâchez la touche
P. Cela signalise à votre correspondant que votre transmission
est terminée.
Choix du canal
M
Activer le mode de programmation
+ ou ,, M
Sélectionner le canal et confirmer
Canal
Fréquence (MHz)
Canal
Fréquence (MHz)
1
2
3
4
446.00625
446.01875
446.03125
446.04375
5
6
7
8
446.05625
446.06875
446.08125
446.09375
Recherche du canal
Dans une boucle infinie, l’appareil cherche des signaux sur les huit
canaux. SCAN apparaît à l’écran. Si un canal actif est trouvé, la recherche du canal s’arrête. Appuyez sur la touche P pour participer au contact radio.
Démarrer la recherche du canal
3 sec + ou ,
Démarrer la recherche du canal
Continuer la recherche du canal
+ ou ,
Continuer la recherche du canal
Terminer la recherche du canal
M
Terminer la recherche du canal
23
Comment vous servir de vos
Émettre
une sonnerie d’appel ?
émetteurs−récepteurs
La sonnerie d’appel fait remarquer à d’autres correspondants que
vous désirez entamer une conversation, à condition toutefois que
les autres correspondants utilisent le même canal.
C
Émettre une sonneried’appel
Fonction Écran
La fonction Écran vous permet de chercher les signaux faibles sur
le canal actuellement programmé. Si vous recevez un signal étranger, passez sur un canal libre. Communiquez toujours avec d’autres
correspondants sur un canal libre pour éviter les perturbations.
M et +
Écouter le canal
M
Terminer l’écoute
Verrouillage du clavier
Le verrouillage du clavier empêche la modification involontaire des
paramétrages. Si le verrouillage du clavier est activé, le symbole
apparaît à l’écran.
Activer
11
aM
Activer le verrouillage du clavier
Désactiver
12
a, M
24
Désactiver le verrouillage du clavier
En cas de problèmes
5 En cas de problèmes
Hotline de service
Si vous avez des problèmes avec votre émetteur−récepteur,
contrôlez d’abord les remarques suivantes. En cas de problèmes
techniques, vous pouvez vous adresser à notre hotline de service
en Suisse au numéro de téléphone 0900 00 1675 (frais Swisscom à
la date d’impression de ce manuel : CHF 2.60/min). Si vous avez
des droits de garantie, adressez−vous à votre revendeur. La durée
de la garantie est de 2 ans.
Questions et réponses
Questions
Réponses
Pas de fonction
− Les piles ne sont pas placées correctement
− Les piles sont vides
Émission pas
possible
− Appuyez à fond sur la touche P pour
émettre
− Votre canal est utilisé par d’autres correspondants
Pas de réception
− Relâchez la touche P pour recevoir
− Le volume sonore est réglé trop faiblement
− Vous vous trouvez hors de la zone desservie, modifiez votre position
− Des obstacles, comme des arbres ou des
bâtiments, exercent une influence négative
sur la portée
− Servez−vous de la fonction "Écran" pour
chercher des signaux faibles
25
Caractéristiques techniques
6 Caractéristiques techniques
Caractéristiques techniques
Caractéristique
Valeur
Puissance de sortie
0.5 W
Portée
env. 3 km − si ligne visuelle libre
Piles
Alcalines AAA 1.5V
Portée
Des obstacles, comme des arbres ou des bâtiments, exercent une
influence négative sur la portée Le croquis suivant indique la portée
prévisible en fonction des différentes conditions.
Ligne visuelle libre
Intensité du signal
750 m
Î
Î
Î
Î
Î
Î
Moyenne densité
de constructions
Forte densité de
constructions
1,5 km
env. 3 km
Déclaration de conformité
Cet appareil répond aux exigences des directives de
l’union européenne (UE) :
1999/5/CE Directive sur les installations de radio et de télécommunication et la reconnaissance réciproque de leur
conformité. La conformité avec la directive mentionnée ci−
dessus est confirmée sur l’appareil par le symbole CE.
Pour visualiser la totalité de la déclaration de conformité,
veuillez la télécharger de notre site Internet
www.switel.com.
26
Remarques d’entretien / Garantie
7 Remarques d’entretien / Garantie
Remarques d’entretien
Nettoyez les surfaces du boîtier avec un chiffon doux et non
pelucheux.
N’utilisez pas de produits d’entretien ou de solvants.
Garantie
Les appareils SWITEL sont fabriqués selon les procédes les plus
modernes et sont contrôlés. Des matériels sélectionnés et des technologies de pointe ont pour effet un fonctionnement irréprochable et
une longue durée de vie. La garantie n’est pas valable pour les piles, piles rechargeables ou packs de piles utilisés dans le produits.
La durée de la garantie est de 24 mois, à partir de la date d’achat.
Pendant la durée de la garantie, tous les défauts dus à des vices de
matériel ou de fabrication seront éliminés gratuitement. Le droit à la
garantie expire en cas d’intervention de l’acheteur ou de tiers. Les
dommages provenant d’un maniement ou d’une manipulation incorrects, d’une usure naturelle, d’une mauvaise mise en place ou
d’une mauvaise conservation, d’un raccordement ou d’une installation incorrects ainsi que d’un cas de force majeure ou autres influences extérieures sont exclus de la garantie. Nous nous reservons le droit, en cas de réclamations, de réparer ou de remplacer
les composants défectueux ou d’échanger l’appareil. Les composants remplacés ou les appareils échangés deviennent notre propriété. Les demandes de dommages et intérêts sont exclues tant
qu’elles ne reposent pas sur l’intention ou une négligence grossière
du fabricant.
Si votre appareil devait malgré tout présenter une défectuosité pendant la période de garantie, veuillez vous adressez, muni de la quittance d’achat, exclusivement au magasin où vous avez acheté votre appareil SWITEL. Vous ne pouvez faire valoir vos droits à la
garantie selon ces dispositions qu’auprès de votre revendeur exclusivement. Deux ans après l’achat et la remise de nos produits, il
n’est plus possible de faire valoir les droits à la garantie.
27
Index
8 Index
B
Brancher, 22
C
Caractéristiques techniques, 26
Choix du canal, 23
Clip de ceinture, 20
Consignes de sécurité, 17
Contenu de l’emballage, 19
D
Débrancher, 22
Déclaration de conformité, 26
E
Éclairage de l’écran, 22
Écran, 21
Eléments de manipulation, 21
Émettre, 22
F
Fonction Écran, 24
G
Garantie, 27
H
Hotline de service, 25
I
Introduire les piles, 19
M
Manipulation, 22
Mise en service des émetteurs−récepteurs, 19
Mode économie d’énergie, 20
N
Niveau des piles, 20
Notations, 22
28
P
Portée, 26
Problèmes, 25
Q
Questions et réponses, 25
R
Recevoir, 23
Recherche du canal, 23
Réglage du volume sonore, 22
Remarques d’entretien, 27
Roger Beep, 23
S
Signal de confirmation, 23
Sonnerie d’appel, 24
Suppression d’erreurs, 25
V
Verrouillage du clavier, 24
13
1
2
3
4
5
6
7
8
Contenuto
Indicazioni di sicurezza . . . . . . . . . . . 30
Mettere in funzione i radiotrasmettitori . 32
Elementi di comando . . . . . . . . . . . . . 34
Come funzionano i miei
radiotrasmettitori? . . . . . . . . . . . . . 35
In presenza di problemi . . . . . . . . . . . 38
Specifiche tecniche . . . . . . . . . . . . . . 39
Consigli per la cura / Garanzia . . . . . . 40
Indice alfabetico . . . . . . . . . . . . . . . . 41
29
Indicazioni di sicurezza
1 Indicazioni di sicurezza
Leggere attentamente le presenti istruzioni per l’uso.
Impiego conforme agli usi previsti
Questi ricetrasmettitori si prestano alla comunicazione con altri apparecchi ricetrasmittenti aventi lo stesso standard. Qualsiasi altro
impiego è considerato come non conforme agli usi previsti. Non
sono consentite modifiche o trasformazioni non autorizzate. Non
aprire per nessuna ragione gli apparecchi autonomamente ed evitare di compiere riparazioni di propria iniziativa.
Ambito di impiego
Evitare l’esposizione a fumo, polvere, vibrazioni, sostanze chimiche, umidità, eccessivo calore o irradiazioni solari dirette.
Non utilizzare i radiotrasmettitori in aree esposte al rischio di deflagrazione.
Batterie
Attenzione: Evitare l’uso di batterie di tipo differente! Impiegare sempre contemporaneamente batterie dello
stesso tipo! Osservare la corretta polarità! Non utilizzando
i radiotrasmettitori per un periodo di tempo prolungato, si
consiglia di rimuovere le batterie all’interno dei dispositivi.
Apparecchiature mediche
Attenzione: Evitare di utilizzare i radiotrasmettitori nelle
vicinanze di apparecchiature mediche. Non è possibile
escludere completamente il rischio di eventuali interferenze. Radiotrasmettitori possono causare un fastidioso
ronzio in apparecchi acustici.
30
Indicazioni di sicurezza
Smaltimento
Procedete allo smaltimento dell’apparecchio esaurito
consegnandolo presso uno dei punti di raccolta istituiti dalla
propria società di smaltimento rifiuti comunale (ad es. centro
di riciclo materiali). Secondo quanto previsto dalla legge
sugli apparecchi elettrici ed elettronici, i proprietari di
apparecchi esauriti sono per legge tenuti alla consegna di
tutti gli apparecchi elettrici ed elettronici presso un centro
di rilievo rifiuti in raccolta differenziata. Il simbolo indica che
non è assolutamente consentito smaltire l’apparecchio
assieme ai normali rifiuti domestici!
Accumulatori e batterie possono provocare danni
alla salute e all’ambiente!
Non aprire, danneggiare, ingerire o disperdere nell’ambiente
accumulatori e batterie. Questi possono contenere metalli pesanti
nocivi e dannosi per l’ambiente. Per legge sussiste l’obbligo di
consegnare accumulatori e batterie presso i rivenditori di batterie
utilizzando gli appositi contenitori di raccolta e provvedendo in tal
modo al corretto smaltimento. Lo smaltimento è gratuito. I simboli
indicano che non è assolutamente consentito gettare accumulatori
e batterie nei rifiuti domestici, consegnandoli ai fini dello
smaltimento nei rispettivi punti di raccolta.
Smaltire confezioni ed imballaggi in base a quanto indicato dalle
norme in vigore a livello locale.
31
Mettere in funzione i radiotrasmettitori
2 Mettere in funzione i radiotrasmettitori
Indicazioni di sicurezza
Attenzione: Prima della messa in funzione, leggere attentamente le indicazioni di sicurezza riportate al capitolo 1.
Verificare il contenuto della confezione
La confezione comprende:
− due radiotrasmettitori con gancio per cintura
− un manuale di istruzioni per l’uso
Inserire le batterie
Aprire il vano batterie. Inserire le batterie (non fornite in dotazione).
Utilizzare solo batterie alcaline di tipo AAA 1.5V. Osservare la corretta polarità! Chiudere il vano batterie.
32
Mettere in funzione i radiotrasmettitori
Stato di carica delle batterie
L’attuale stato di carica delle batterie è visualizzato sul display:
Carico
Scarico
Non appena l’indicazione sul display lampeggia e si avvertono dei
suoni di avviso è necessario provvedere alla sostituzione delle batterie.
Modo di risparmio energetico
Il radiotrasmettitore è dotato di modo di risparmio energetico allo
scopo di prolungare la durata in vita delle batterie impiegate all’interno del dispositivo. Non premendo per oltre 4 secondi alcun tasto
sul radiotrasmettitore, l’apparecchio passa al modo di risparmio
energetico. Premendo invece un tasto o se si riceve un segnale, il
modo di risparmio energetico è di nuovo disattivato.
Montare il gancio per cintura
Introdurre il gancio per cintura dall’alto nella guida fino a farlo scattare in posizione. Per rimuovere nuovamente il gancio per cintura,
sollevare leggermente la linguetta di fissaggio con l’unghia del dito
spingendo il gancio per cintura verso sopra.
33
Elementi di comando
3 Elementi di comando
I tasti del radiotrasmettitore riportati nel presente manuale d’istruzioni per l’uso sono raffigurati sotto forma di simboli uniformi. Sono
pertanto possibili lievi scostamenti dei simboli dei tasti sul radiotrasmettitore rispetto ai simboli qui raffigurati.
Radiotrasmettitore
1
2
3
Antenna
Display
Volume, impostazione
verso sopra
4 ON / OFF
10
5 Menu
6 Altoparlante
9
7 Microfono
8
8 Invio segnale di chiamata
7
9 Volume, impostazione
verso sotto
10 Tasto di conversazione PTT
Display
1
2
3
4
5
6
7
1
2
3
4
6
1
3
2
Funzione di ricerca canale
Canale
Ricevere
Trasmettere
Blocco tastiera
Volume
Capacità di carica batterie
4
5
7
34
5
mic
6
Come funzionano i miei radiotrasmettitori?
4 Come funzionano i miei radiotrasmettitori?
Rappresentazioni e modi di scrittura
P
2 sec M
2xM
a, P
b, P
ð
Premere il tasto raffigurato
Premere il tasto raffigurato per 2
secondi
Premere il tasto raffigurato 2 volte
Premere a lungo il tasto raffigurato
Rilasciare il tasto raffigurato
Parlare rivolti verso il microfono
Illuminazione di display
Dopo aver premuto un tasto, eccezion fatta per il tasto P, il display si accende per una durata di 4 secondi.
Attivare / Disattivare i radiotrasmettitori 14
aV
Attivare il radiotrasmettitore
Si avverte un segnale acustico. Il canale attualmente impostato è visualizzato sul display.
aV
Disattivare il radiotrasmettitore
Regolazione del volume
+o,
Volume più alto o più basso
Trasmettere e ricevere
Trasmettere
15
aPð
Trasmettere
Mantenere con il radiotrasmettitore una distanza di
ca. 5 − 7 cm dalla bocca e parlare con voce normale. Per
poter comunicare con altri interlocutori, tutti i radiotrasmettitori devono essere impostati sullo stesso canale.
Ricevere
16
b, P
Ricevere
Non è possibile ricevere alcun segnale radio se si tiene
premuto il tasto P.
35
Come funzionano i miei radiotrasmettitori?
Segnale acustico di conferma (Roger Beep)
Il segnale acustico di conferma risuona rilasciando il tasto P. In
tal modo al proprio partner di chiamata si segnala la conclusione
della trasmissione.
Selezione del canale
M
Attivare la modalità di impostazione
+ o ,, M
Selezionare il canale e confermare
Canale
Frequenza (MHz)
Canale
Frequenza (MHz)
1
2
3
4
446.00625
446.01875
446.03125
446.04375
5
6
7
8
446.05625
446.06875
446.08125
446.09375
Ricerca del canale
In un ciclo continuo l’apparecchio scorre gli otto canali alla presenza di segnali. Sul display appare l’indicazione SCAN. Non appena è stato individuato un canale attivo, la ricerca del canale è interrotta. Premere quindi il tasto P per partecipare alla
comunicazione via radio.
Avviare la ricerca del canale
3 sec + o ,
Avviare la ricerca canale
Proseguire la ricerca del canale
+o,
Proseguire la ricerca canale
Concludere la ricerca del canale
M
36
Concludere la ricerca canale
Come funzionano i miei radiotrasmettitori?
Trasmettere il segnale di chiamata
Il segnale di chiamata richiama l’attenzione degli altri interlocutori
indicando che il chiamante desidera avviare una conversazione. A
tal fine è necessario che gli altri interlocutori utilizzino lo stesso canale.
C
Trasmettere un segnale di chiamata
Funzione schermo
La funzione schermo consente di individuare sul canale attualmente impostato la presenza di segnali deboli. In caso di ricezione
di un segnale estraneo, si passa ad un canale libero. Comunicazione con altri interlocutori sempre su un canale libero onde evitare
interferenze.
Me+
Ascoltare il canale
M
Concludere l’ascolto del canale
Blocco tastiera
Il blocco tastiera impedisce di compiere modifiche non intenzionali
alle impostazioni. Con blocco tastiera inserito sul display appare il
simbolo
.
Attivare
17
a, M
Attivare il blocco tastiera
Disattivare
18
a, M
Disattivare il blocco tastiera
37
In presenza di problemi
5 In presenza di problemi
Hotline di assistenza
In presenza di problemi con il radiotrasmettitore, seguire le indicazioni riportate qui di seguito. La nostra hotline di assistenza è a vostra disposizione in caso di problemi tecnici chiamando al numero
telefonico 0900 00 1675 nell’ambito della Svizzera (costi da rete
Swisscom in sede di stampa: CHF 2.60/min). In caso di reclami entro il periodo di garanzia, rivolgersi al rivenditore autorizzato. Il periodo di garanzia ricopre 2 anni.
Domande e risposte
38
Domande
Risposte
Nessuna funzione
− Le batterie non sono state inserite correttamente
− Le batterie sono scariche
Trasmissione
non è possibile
− Premere completamente il tasto P per
trasmettere
− Il canale è utilizzato da un altro interlocutore
Nessuna ricezione
− Rilasciare il tasto P per ricevere
− Il volume è impostato ad un livello troppo
basso
− Si è al di fuori del campo di ricezione, modificare la propria posizione
− Eventuali ostacoli come alberi ed edifici
hanno un influsso negativo sulla portata
− Servirsi della funzione Schermo" per individuare la presenza di segnali deboli
Specifiche tecniche
6 Specifiche tecniche
Specifiche tecniche
Caratteristica
Valore
Potenza di uscita
0.5 W
Portata
ca. 3 km − con linea di mira libera
Batterie
Alcaline di tipo AAA 1.5V
Portata
Eventuali ostacoli come alberi ed edifici hanno un influsso negativo
sulla portata. Il seguente schema indica la portata prevista tenuto
conto di differenti e possibili condizioni.
Linea di mira libera
Intensità del
segnale
750 m
ÎÎ
ÎÎ
ÎÎ
ÎÎ
ÎÎ
ÎÎ
Media edificazione
Forte edificazione
1,5 km
ca. 3 km
Dichiarazione di conformità
Questo apparecchio risponde a quanto disposto dalla Direttiva UE:
1999/5/CE Direttiva concernente le apparecchiature radio, le apparecchiature terminali di telecomunicazioni e il
reciproco riconoscimento della loro conformità. La conformità con la Direttiva di cui sopra viene confermata dal
marchio CE applicato sull’apparecchio.
Per visualizzare la dichiarazione di conformità in
versione integrale, si prega di scaricarla gratuitamente
dal nostro sito internet all’indirizzo www.switel.com.
39
Consigli per la cura / Garanzia
7 Consigli per la cura / Garanzia
Consigli per la cura
Pulire le superfici degli apparecchi con un panno morbido e
antipilling.
Non utilizzare mai detergenti o solventi.
Garanzia
Gli apparecchi SWITEL sono costruiti e collaudati in osservanza dei
processi di produzione più moderni. L’impiego di materiali selezionati e tecnologie altamente sviluppate sono garanti di una perfetta
funzionalità e lunga durata in vita. La garanzia non si estende a batterie, accumulatori o batterie ricaricabili utilizzati all’interno degli apparecchi. Il periodo di garanzia è di 24 mesi a partire dalla data di
acquisto.
Entro il periodo di garanzia si procederà all’eliminazione gratuita di
tutti i guasti dovuti a difetti di materiale o produzione. Il diritto di garanzia cessa in caso di interventi da parte dell’acquirente o di terzi.
Danni derivanti da un impiego o esercizio non conforme agli usi
previsti, a naturale usura, a errato montaggio o errata conservazione, a collegamento o installazione impropri, dovuti a forza maggiore o ad altri influssi esterni non sono coperti da garanzia. In qualità di produttore ci riserviamo il diritto, in caso di reclami, di riparare
o sostituire le parti difettose o di rimpiazzare l’apparecchio. Parti sostituite o apparecchi rimpiazzati divengono di nostra proprietà.
Sono esclusi diritti di risarcimento per danni qualora non siano dovuti a intenzione o colpa grave del costruttore.
Nel caso in cui il presente apparecchio dovesse ciò nonostante presentare un difetto durante il periodo di garanzia, si prega di rivolgersi esclusivamente al negozio di rivendita dell’apparecchio
SWITEL assieme al relativo scontrino di acquisto. In base a quanto
riportato nelle presenti disposizioni, tutti i diritti di garanzia dovranno
essere rivendicati nei confronti del rivenditore autorizzato. Decorso
il termine di due anni dalla data di acquisto e consegna dei nostri
prodotti non sarà più possibile fare valere alcun diritto di garanzia.
40
Indice alfabetico
8 Indice alfabetico
A
Attivare, 35
B
Blocco tastiera, 37
C
Consigli per la cura, 40
Contenuto della confezione, 32
D
Dichiarazione di conformità, 39
Disattivare, 35
Display, 34
Domande e risposte, 38
E
Elementi di comando, 34
Eliminare guasti, 38
Esercizio, 35
P
Portata, 39
Problemi, 38
R
Regolazione del volume, 35
Ricerca del canale, 36
Ricevere, 35
Roger Beep, 36
S
Segnale acustico di conferma, 36
Segnale di chiamata, 37
Selezione del canale, 36
Specifiche tecniche, 39
Stato di carica delle batterie, 33
T
Trasmettere, 35
F
Funzione schermo, 37
G
Gancio per cintura, 33
Garanzia, 40
H
Hotline di assistenza, 38
I
Illuminazione di display, 35
Indicazioni di sicurezza, 30
Inserire le batterie, 32
M
Mettere in funzione i
radiotrasmettitori, 32
Modi di scrittura, 35
Modo di risparmio energetico, 33
41
19
Contents
1
Safety Information . . . . . . . . . . . . . . .
2
Preparing the Walkie−Talkies for Use . .
3
Operating Elements . . . . . . . . . . . . . .
4
Operating the Walkie−Talkies . . . . . . .
5
In Case of Problems . . . . . . . . . . . . .
6
Technical Properties . . . . . . . . . . . . .
7
Maintenance / Guarantee . . . . . . . . . .
8
Index . . . . . . . . . . . . . . . . . . . . . . . .
42
43
45
47
48
51
52
53
54
Safety Information
1 Safety Information
Please read this operating instruction manual thoroughly.
Intended use
These walkie−talkies have been conceived for communication with
other walkie−talkies complying to the same standards. Any other
use is considered unintended use. Unauthorised modification or reconstruction is not permitted. Under no circumstances open the devices or complete any repair work yourself.
Ambient conditions
Prevent excessive exposure to smoke, dust, vibration, chemicals,
moisture, heat and direct sunlight.
Do not use the walkie−talkies in potentially explosive areas.
Batteries
Caution: Do not mix the types of battery! Only use batteries of the same brand at any one time! Pay attention to
correct polarity. If the walkie−talkies will be out of use for
some time, remove the batteries.
Medical equipment
Caution: Never use the walkie−talkies in the vicinity of medical equipment. Effects on such equipment cannot be
fully ruled out. Walkie−talkies can cause an unpleasant
humming sound in hearing aids.
43
Safety Information
Disposal
In order to dispose of your device, take it to a collection point
provided by your local public waste authorities (e.g. recycling
centre). According to laws on the disposal of electronic and
electrical devices, owners are obliged to dispose of old
electronic and electrical devices in a separate waste
container. The symbol indicates that the device must not be
disposed of in normal domestic waste!
Batteries represent a hazard to health and the
environment!
Never open, damage or swallow batteries or allow them to pollute
the environment. They may contain toxic, ecologically hazardous
heavy metals. You are legally obliged to dispose of power packs
and batteries at the point of sale or in the corresponding containers
at collection points provided by local public waste authorities.
Disposal is free of charge. The symbols indicate that the batteries
must not be disposed of in normal domestic waste and that they
must be brought to collection points provided by local public waste
authorities.
Packaging materials must be disposed of according to local
regulations.
44
Preparing the Walkie−Talkies for Use
2 Preparing the Walkie−Talkies for Use
Safety information
Caution: It is essential to read the Safety Information in
Chapter 1 before starting up.
Checking the package contents
The package contains:
− two walkie−talkies with belt clip
− an operating manual
Inserting the batteries
Open the battery compartment cover. Insert the batteries (not contained in the material supplied). Only use alkaline AAA 1.5V batteries. Pay attention to correct polarity. Close the battery compartment cover.
45
Preparing the Walkie−Talkies for Use
Battery status
The current battery charge status is indicated in the display:
Full
Empty
The batteries must to be replaced as soon as the indicator flashes
in the display and acoustic warning signals are issued.
Energy−save mode
Your walkie−talkies are provided with an energy−save mode to increase the service life of the batteries. If no buttons on the walkie−
talkies are pressed for a period of 4 seconds, energy−save mode is
activated. Energy−save mode is deactivated as soon as you press a
button or a signal is received.
Attaching the belt clip
Slide the belt clip in the guide from the top until it audibly snaps into
place. To detach the belt clip, prize the fastening tab up a little with
your fingernail and slide the belt clip upwards.
46
Operating Elements
3 Operating Elements
The buttons in this operating manual are subsequently depicted
with a uniform contour. Therefore, slight deviations in the appearance of the symbols on the walkie−talkie buttons compared to those
depicted here are possible.
Walkie−Talkie
1
2
3
Antenna
Display
Volume +,
Increase setting
4 On / Off
10
5 Menu
6 Loudspeaker
9
7 Microphone
8
8 Transmit ringing tone
7
9 Volume −
Decrease setting
10 PTT − Talk button
Display
1
2
3
4
5
6
7
1
2
3
4
5
mic
6
1
3
2
Channel search
Channel
Receiving
Transmitting
Key lock
Volume control
Battery charge capacity
4
5
7
6
47
Operating the Walkie−Talkies
4 Operating the Walkie−Talkies
Display and notation of operating sequences
P
2 sec M
2xM
a, P
b, P
ð
Press the button depicted
Press the button depicted for 2
seconds
Press the button displayed twice
Press and hold the button displayed
Release the button displayed
Speak into the microphone
Display illumination
The display lights up for 4 seconds after pressing any button, except the P button.
Switching the walkie−talkie on/off 20
aV
Switch the walkie−talkie on
An acoustic signal is issued. The current channel setting
appears in the display.
aV
Switch the walkie−talkie off
Volume control
+ or ,
Raise or lower the volume
Transmitting and receiving
Transmitting
21
aPð
Transmit
Hold the walkie−talkie approx. 5 to 7 cm from your mouth
and speak at a normal volume. In order to talk to other subscribers, the respective walkie−talkies must be set to the
same channel.
Receiving
22
b, P
Receive
Radio signals cannot be received when the P button
is being pressed.
48
Operating the Walkie−Talkies
Confirmation signal (Roger beep)
The confirmation signal is issued on releasing the P button.
This signals to the caller that you have ended transmission.
Selecting a channel
M
Activate Settings mode
+ or ,, M
Select the channel and confirm it
Channel
Frequency (MHz)
Channel
Frequency (MHz)
1
2
3
4
446.00625
446.01875
446.03125
446.04375
5
6
7
8
446.05625
446.06875
446.08125
446.09375
Searching for a channel
Signals are searched for in the eight channels in a continuous
cycle. SCAN appears in the display. If an active channel is detected, the channel search stops. Press the P button to enable
radio communication.
Starting channel search
3 sec + or ,
Start the channel search
Resuming search for a channel
+ or ,
Resume the channel search
Stopping channel search
M
Stop the channel search
49
Operating the Walkie−Talkies
Transmit ringing tone
The ringing tones indicate to other subscribers that you want to talk
to them. A condition for this is that the other subscribers are using
the same channel.
C
Send the ringing tone
Monitor function
The Monitor function enables the search for weak signals on the
channel currently set. If you receive an external signal, switch to a
free channel. Always communicate with other subscribers on a free
channel to prevent interference.
M and +
Start monitoring the channel
M
End monitoring
Key lock
The key lock function prevents inadvertent modification of settings.
− icon appears in
When the key lock function is activated, the
the display.
Activating
23
a, M
Activate the key lock
Deactivating
24
a, M
50
Deactivate the key lock
In Case of Problems
5 In Case of Problems
Service hotline
Should problems arise with the walkie−talkies, please refer to the
following information first. In the case of technical problems, please
contact our hotline within Switzerland under tel. 0900 00 1675 (cost
with Swisscom at time of going to print: CHF 2.60/min). In the case
of claims under the terms of guarantee, contact your sales outlet.
There is a 2 year period of guarantee.
Problems and solutions
Problems
Solutions
Equipment does
not function
− The batteries are not inserted correctly
− The batteries are empty
Transmission
not possible
− Press the P button in fully in order to
transmit
− The channel is being used by other subscribers
No reception
− Release the P button in order to receive
− The volume is set too low
− You are outside the range of reception,
change your position
− Obstructions such as trees and buildings
impair the range
− Use the Monitor" function to search for
weak signals
51
Technical Properties
6 Technical Properties
Technical data
Feature
Value
Output power
0.5 W
Range
Approx. 3 km in open space
Batteries
Alkaline AAA 1.5V
Range
Obstructions such as trees and buildings impair the range. The following diagram indicates the range which can be expected under
different conditions.
Clear view
Signal strength
750 m
Î
Î
Î
Î
Î
Î
Normal building
development
Dense building development
1,5 km
Approx.
3 km
Declaration of Conformity
This device fulfils the requirements stipulated in the EU
directive:
1999/5/EU directive on radio equipment and telecommunications terminal equipment and the mutual recognition of
their conformity. Conformity with the above mentioned directive is confirmed by the CE symbol on the device.
To view the complete Declaration of Conformity, please
refer to the free download available on our web site at
www.switel.com.
52
Maintenance / Guarantee
7 Maintenance / Guarantee
Maintenance
Clean the housing surfaces with a soft, fluff−free cloth.
Never use cleaning agents or solvents.
Guarantee
SWITEL equipment is produced and tested according to the latest
production methods. Carefully selected materials and highly developed technology ensure perfect functioning and a long service life.
The terms of guarantee do not apply to the batteries or power packs
used in the products. The period of guarantee is 24 months from the
date of purchase.
All deficiencies related to material or manufacturing errors within the
period of guarantee will be redressed free of charge. Rights to
claims under the terms of guarantee are annulled following tampering by the purchaser or third parties. Damage caused as the result
of improper handling or operation, normal wear and tear, incorrect
positioning or storage, improper connection or installation or Acts of
God and other external influences are excluded from the terms of
guarantee. In the case of complaints, we reserve the right to repair
defect parts, replace them or replace the entire device. Replaced
parts or devices become our property. Claims for damages are excluded except in cases of intent or gross negligence on the part of
the manufacturer.
If your device does show signs of a defect within the period of guarantee, please contact the sales outlet where you purchased the
SWITEL device, producing the purchase receipt as evidence. All
claims under the terms of guarantee in accordance with this agreement can only be asserted at the sales outlet. No claims under the
terms of guarantee can be asserted after a period of two years from
the date of purchase and hand−over of the product.
53
Index
8 Index
B
R
Battery status, 46
Belt clip, 46
Range, 52
Receiving, 48
Ringing tone, 50
Roger Beep, 49
C
Confirmation signal, 49
D
Declaration of Conformity, 52
Display, 47
Display illumination, 48
E
Energy−save mode, 46
G
Guarantee, 53
I
Inserting the batteries, 45
K
Key lock, 50
M
Maintenance , 53
Monitor function, 50
N
Notation, 48
O
Operating elements, 47
Operation, 48
P
Package contents, 45
Preparing the walkie−talkies, 45
Problems, 51
Problems and solutions, 51
54
S
Safety information, 43
Searching for a channel, 49
Selecting a channel, 49
Service hotline, 51
Switching off, 48
Switching on, 48
T
Technical data, 52
Transmitting, 48
Troubleshooting, 51
V
Volume control, 48
Notes
Notes
55
Declaration of Conformity 25
Diese Anlage entspricht der europäischen R&TTE Richtlinie.
Für die komplette Konformitätserklärung nutzen Sie bitte den kostenlosen
Download von unserer Website www.switel.com.
Cet équipement est conforme à la directive européenne R&TTE.
Pour obtenir la déclaration de conformité intégrale, veuillez vous servir du
téléchargement gratuit de notre site Internet www.switel.com.
Quest’apparecchiatura è conforme alla direttiva europea R&TTE.
Per la dichiarazione di conformità completa si prega di voler usufruire del
servizio gratuito di download dal nostro sito
Internet www.switel.com.
This equipment complies with the European R&TTE directive.
To view the complete Declaration of Conformity, please refer to the free
download available at our web site: www.switel.com.
Service Hotline
Bei technischen Problemen können Sie sich an unsere Service−Hotline
unter Tel. 0900 00 1675 innerhalb der Schweiz (Kosten Swisscom bei
Drucklegung: CHF 2.60/min) wenden.
S’il s’agit de problèmes techniques, vous pouvez vous adresser à notre
hotline de service en Suisse en appelant le numéro 0900 00 1675 (frais
Swisscom à la date d’impression de ce manuel : CHF 2.60/min).
In caso di problemi tecnici è possibile rivolgersi alla nostra hotline di assistenza tecnica chiamando al numero 0900 00 1675 valido per la Svizzera
(spese da rete Swisscom alla data di stampa: CHF 2.60 / min).
In the event of technical problems, you can contact our hotline service,
Tel. 0900 00 1675 within Switzerland (cost via Swisscom at time of going
to print: CHF 2.60/min).
Version 1.0 − 27.07.2010