1
Ascotel Office Terminals by a
Office 40
Bedienungsanleitung
Mode d’emploi
Istruzioni per l’uso
Operating instructions
Toutes nos félicitations!
Table des matières
Nous vous félicitons sincèrement pour
l’achat de votre Ascotel Office, un appareil
extrêmement facile d’emploi grâce à sa
touche Fox et à sa technique des menus
ingénieuse.
Ce mode d’emploi vous révélera combien
téléphoner avec l’Ascotel Office est
simple!
Un mode d’emploi succinct (format carte
de crédit) est inséré sous la base de l’appareil. Veuillez le conserver à cet endroit
prêt à être consulté!
Concept d’utilisation: la technique
des menus ....................................................1
Avant de téléphoner pour la première fois....2
Pour téléphoner ............................................3
Pour utiliser les fonctions de confort.............6
Pour programmer votre appareil .................14
Affectation des différents types de touches .20
Installation ..................................................23
Consignes de sécurité .................................24
En cas de dérangement ............................25
Auto-test ....................................................26
Codes de fonction ......................................27
Index .......................................................31
Congratulazioni!
Indice
Congratulazioni per aver acquistato il
vostro Ascotel Office, un apparecchio di
facile uso grazie al suo tasto Fox e alla tecnica intelligente a menu.
Queste istruzioni dimostrano come sia
facile telefonare con Ascotel Office!
Le istruzioni per l’uso in forma abbreviata
(dimensioni di una carta di credito) sono
inserite nella parte inferiore del vostro
telefono Office. Si consiglia di mantenerle
nella stessa posizione!
L'uso facilitato: la tecnica a menu.................1
Prima di telefonare la prima volta .................2
Come telefonare...........................................3
Come utilizzare le funzioni di comfort ..........6
Come programmare il vostro apparecchio ..14
Assegnazione dei diversi tipi di tasti............20
Installazione ................................................23
Avvertenze di sicurezza ...............................24
Malfunzionamenti ....................................25
Autotest .....................................................26
Codici di funzione.......................................27
Indice analitico ...........................................31
Congratulations!
Contents
Congratulations on the purchase of your
Ascotel Office, a telephone which is extremely easy to use thanks to its Foxkey and
ingenious menu guidance.
Read these operating instructions to find
out how simple it is to telephone with the
Ascotel Office.
You will find a credit-card-sized operating
guide in the base of your Ascotel Office.
Keep it there for quick reference!
Operation: the menu system.........................1
Before you telephone for the first time.........2
Telephoning ..................................................3
Using the extended-feature functions...........6
Programming your telephone .....................14
Assigning the various key types ..................20
Installation ..................................................23
Safety Advice ..............................................24
Troubleshooting ..........................................25
Self-test.......................................................26
Function codes............................................27
Index ..........................................................31
I
Deutsch
Das Bedienkonzept: die Menütechnik...........1
Bevor Sie das erste Mal telefonieren .............2
So telefonieren Sie ........................................3
So benutzen Sie die Komfortfunktionen .......6
So programmieren Sie Ihren Apparat..........14
Zuordnung der verschiedenen
Tastenarten .................................................20
Installation ..................................................23
Sicherheitshinweise.....................................24
Störungsfall ..............................................25
Selbsttest ....................................................26
Funktionscodes ...........................................27
Index .......................................................31
Français
Herzliche Gratulation zum Kauf Ihres
Ascotel Office, ein dank seiner Foxtaste
und seiner ausgeklügelten Menütechnik
leicht zu bedienender Apparat.
Die vorliegende Anleitung zeigt Ihnen, wie
einfach das Telefonieren mit Ascotel Office
ist!
Eine Bedienungsanleitung in Kurzform
(Kreditkartengrösse) ist auf der Unterseite
Ihres Ascotel Office eingeschoben. Bitte
bewahren Sie diese dort auf!
Italiano
Inhalt
English
Herzliche Gratulation!
1
2
3
17
16
K
anleurzbed
itun ienu
ngsg
15
Foxtas
te
Status
Menüz
zeil
eile e
MEN
U
14
13
>
>> Anruf
übe
PSA
>
rn
Gerh übern ehme
ehm
n
ard
Fra
en
n
Helm k
ut
Rita
>
M
ori
>>
Einka
Han tz
uf S L1
>
spe
üd
Einka
>> Compu ter
Tra
uf W L2
nsp ter AG
>
est
ort A
Einka
>> Hande
G
L3
ls A
We
u
f
N
G
rke
>
ord
Einka
A
>> Meier A G
uf Ü
L
Mülle
bers 4
G
ee
r AG
L
Che 5
☎ Te
f
l. No
L6
.: 03
1 99 privat
9'20
'70
>
>>
>>
123 ..
ABC ..
END
1
2
AB C
4
7
STU
DEF
5
JKL
MN
8
VW
X
O
MEN
U
3
GHI
6
PQ R
9
YZ•
0
4
0...9
5
12 11 10 9 8 7
II
6
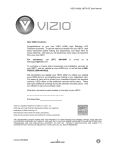
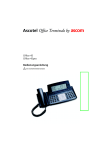
Bedienungs- und Anzeigeelemente
1
Anzeigefeld (Display)
Ihr Apparat ist mit einem zweizeiligen, alphanumerischen Anzeigefeld
ausgerüstet.
Obere Zeile: Zustandsanzeige, Nummer/Name Ihres Gesprächspartners
Untere Zeile: Zustandsabhängiges Bedienmenü
2
Foxtaste (Taste mit mehreren Funktionen)
3
Menütaste
Mit dieser Taste gelangen Sie in die verschiedenen Menüs
4
Linientasten oder frei programmierbare, 2fach belegbare Tasten
5
Alpha-numerische Wahltastatur
Tasten mit Doppelfunktion für numerische bzw. alphabetische
(durch Mehrfachdruck) Eingabe
6
Aufmerksamkeits-LED
Leuchtdiode blinkt schnell: Anzeige eines Anrufes
7
Karteitaste
Zugriff auf Privatkartei mit bis zu 100 Einträgen (00 bis 99)
8
Code-Schlosstaste
Programmierungen und Apparat schützen
9
Abwesendtaste
Teilnehmer ist anwesend/abwesend
10
Wahlwiederholungstaste
Abrufen der bis maximal 10 zuletzt gewählten Nummern
11
Lautsprechertaste
Ein- und ausschalten des Lautsprechers
12
Mikrofontaste
Ein- und ausschalten des Freisprech- bzw. des Hörermikrofons
13
Einstelltasten
Regeln der Lautstärke während des Rufs oder während eines Gespräches
14
END-Taste/Trenntaste
Wiederbelegen für neue Wahl, abbrechen einer angefangenen Funktion,
beenden der Programmierung
15
Notizregistertaste
Speichern von bis zu 10 Nummern mit Namen oder Bemerkungen während eines Anrufes oder in Ruhestellung
16
Korrekturtaste
Löschen des zuletzt eingegebenen Zeichens
17
Namenwahltaste
Namenwahl, resp. Buchstabeneingabe über die alpha-numerische Tastatur,
Zugang zur Privatkartei (Doppelklick)
III
Technische Änderungen vorbehalten.
Der Leistungsumfang ist von der Software abhängig.
20261325xx_ums_d0
Deutsch
Das Bedienkonzept, die Menütechnik
Die einfache Bedienung Ihres Apparates beruht auf der ausgeklügelten Menütechnik.
Damit Sie sich in den verschiedenen Menüs und Menüpunkten zurechtfinden, stehen
Ihnen die Foxtaste und die Menütaste zur Verfügung. Dabei gehen Sie folgendermassen
vor:
Wollen Sie eine auf dem Display auf der unteren Zeile gezeigte Funktion
aktivieren (z.B. "Anrufen" nach dem Wählen einer Nummer) drücken Sie die
Foxtaste unter dem entsprechenden Wort.
MENU
Finden Sie die gesuchte Funktion nicht, drücken Sie die Menütaste so oft,
bis Sie diese finden. Dabei erscheinen folgende Display-Anzeigen:
MENU
Menütaste
einmal drücken
Merkmalmenü 1
KW 15 Mo,12.Apr 12:35
Umleiten übernehmen
Suchen
Meldung
MENU
Menütaste ein
zweites Mal
drücken
Merkmalmenü 2
KW 15 Mo,12.Apr 12:35
Durchsage
Transparent–mode
MENU
Menütaste ein
drittes Mal
drücken
Merkmalmenü 3
Anrufschutz
Hinweis
KW 15 Mo,12.Apr 12:35
Programmieren
Ein "Long Click" der Menütaste (min. 2 Sekunden) bewirkt einen Sprung in
den Programmiermodus (dies ist von der Software und dem PBX-Typ
abhängig).
Programmierte Menüpunkte
Ihr Apparat bietet Ihnen die Möglichkeit 6 Funktionen oder Nummern/Namen, die Sie
häufig benötigen, als Menüpunkt im Display anzubieten. Die Einträge 1...3 sind im RuheDisplay sichtbar, die Einträge 4...6 können mit der Menütaste aufgerufen werden. Sie
brauchen nur noch die Foxtaste darunter zu drücken, um die vorprogrammierte Nummer
zu wählen oder die Funktion zu aktivieren. Das Kapitel "So programmieren Sie Ihren
Apparat" und eine Programmieranleitung helfen Ihnen die Leistungsmerkmale Ihres
Apparats voll auszuschöpfen.
Besondere Display-Symbole
12ß Blättern vorwärts (Die Zahl zeigt
die Nummer des Eintrags)
¥ Blättern rückwärts
®† Freisprechen
© Lautsprecher ein
œ
_>
†
L1
Mehr Information anzeigen
Schreibmarke (Cursor) um
eine Stelle nach rechts (Leerschlag)
Mikrofon aus
Liniennummer
| Funktion aktiv (Foxtaste mit Funktion)
20317861de_bat_a0
1
Bevor Sie das erste Mal telefonieren
Bitte lesen Sie zuerst das Kapitel Sicherheitshinweise in dieser Bedienungsanleitung durch!
Stellen Sie sicher, dass Ihr Apparat auf einer harten Fläche aufliegt und Sie unmittelbar vor
den Apparat keine Gegenstände stellen (die Sprachqualität beim Freisprechen könnte
sonst beeinträchtigt werden).
Sprache der Display-Anzeigen einstellen
Programmieren
MENU
MENU
*Sprache
¥ ß
Ok
END
Hinweis
Menütaste so oft drücken, bis im Display der
Menüpunkt "Programmieren" erscheint. Foxtaste unter "Programmieren" und anschliessend
Menütaste so oft drücken, bis im Display der
Menüpunkt "*Sprache" erscheint (achten Sie
dabei auf das "*" Zeichen bei einer Fremdsprache). Foxtaste unter "*Sprache" drücken,
gewünschte Sprache mit Blättern "¥ ß" wählen,
mit der Foxtaste unter "Ok" speichern und mit
Drücken der END-Taste in den Ausgangszustand
zurückkehren.
Während Sie eine Funktionen ausführen, kann es vorkommen, dass Sie eine
falsche Taste drücken; in einem solchen Fall hören Sie einen kurzen Warnton.
Ruflautstärke während des Rufs einstellen
Während des Rufs können Sie die Ruflautstärke
Ihres Apparates über die "+"-Taste (lauter) bzw.
"–"-Taste (leiser) einstellen.
Lautstärke im Hörer und im Lautsprecher während des Gesprächs einstellen
Die Lautstärke ist in Ihrem Apparat sowohl im
Hörer als auch im Lautsprecher auf "normal"
eingestellt. Während des Gesprächs können Sie
die Lautstärke im Hörer oder Lautsprecher
einstellen, über die "+"-Taste (lauter) bzw.
"–"-Taste (leiser).
2
20317861de_bat_a0
Deutsch
So telefonieren Sie
Wählen mit Wahlvorbereitung
Was Sie bisher noch kaum kannten und was Ihnen Ihr Apparat als wesentliche Neuheit
bietet, ist das Wählen mit Wahlvorbereitung. Ohne den Hörer abzuheben geben Sie die
gewünschte Nummer ein, die Sie prüfen und wenn nötig korrigieren können, und
drücken anschliessend die Lautsprechertaste. Sobald Ihr Gesprächspartner den Hörer
abhebt, können Sie über den Hörer (dazu heben Sie lediglich Ihren Hörer ab) oder über
Mikrofon und Lautsprecher (Freisprechen) telefonieren.
Mit der END-Taste kann die Wahlvorbereitung abgebrochen werden.
Ziffernwahl
☛
Ziffern eingeben, Foxtaste unter "Anrufen"
drücken oder Hörer abheben oder Lautsprechertaste drücken
oder
Wählen über Nummerntaste
Einfach- bzw. Doppelklick auf gewünschte
Nummerntaste, Foxtaste unter "Anrufen"
drücken oder Hörer abheben oder Lautsprechertaste drücken
oder
Wählen über Wahlwiederholungstaste
Wahlwiederholungstaste drücken und wenn
¥ ß
nötig mit der Foxtaste blättern, um eine der 10
zuletzt gewählten Nummern aufzurufen,
Foxtaste unter "Anrufen" drücken oder Hörer
abheben oder Lautsprechertaste drücken
oder
Wählen einer Nummer aus dem Notizregister
Notizregistertaste drücken und wenn nötig mit
¥ ß
der Foxtaste blättern, um eine der 10 gespeicherten Nummern aufzurufen, Foxtaste unter
"Anrufen" drücken oder Hörer abheben oder
Lautsprechertaste drücken
oder
Namenwahl
☛
123˙˙
23˙˙
ABC˙˙
¥ ß
20317861de_bat_a0
Namenwahltaste drücken. "Alle" sucht in allen
Karteien (falls gewünscht, Foxtaste unter "Kurzwahl", "Intern" oder "Privat" drücken, um nur
einer dieser Karteien zu suchen). Die Initialen von
Namen und Vornamen eingeben, z.B. E#A
(Einstein Albert), eventuell mit Foxtaste unter
"¥ ß" bis zum gesuchten Eintrag blättern (wenn
es mehrere Namen mit denselben Initialen gibt).
Foxtaste unter "Anrufen" drücken oder Hörer
abheben oder Lautsprechertaste drücken.
3
So telefonieren Sie
Hinweise
Das Eingeben der Initialen eines Namens ist die einfachste Art, eine in einer
Kartei gespeicherte Nummer zu wählen; Sie brauchen weder die Telefonnummer noch die Kartennummer zu kennen.
Beispiel:
123˙˙
23˙˙
ABC˙˙
2
#
2x
1x
DEF
1
ABC
•••
1x
"Einstein#Albert"
Taste 2: 2 x
Taste #: 1 x (Leerzeichen)
Taste 1: 1 x
Wenn nur der Nachname bekannt ist:
123˙˙
23˙˙
ABC˙˙
2
3
DEF
GHI
2x
3x
5
MNO •••
etc.
2x
Falls Sie an Ihrem Gerät ein Zusatztastenfeld ZTF (20 zusätzlich frei programmierbare Tasten mit LED) angeschlossen haben, muss die Buchstabeneingabe
durch das ZTF erfolgen. Die Wahltastatur ist in diesem Fall eine rein numerische Tastatur.
Mit der Foxtaste (drücken unter "->") oder mit der #-Taste können Sie ein
Leerzeichen eingeben, um danach den Anfangsbuchstaben des Vornamens
einzugeben.
In Wahlvorbereitung eingegebene Nummern oder Namen korrigieren Sie mit
der Korrekturtaste (letzte Ziffer löschen) oder den Editierfunktionen.
Natürlich können Sie mit Ihrem Apparat auch auf herkömmliche Art wählen:
Hörer abheben und Nummer eingeben. Warten Sie bei der Eingabe zwischen zwei Ziffern mehr als 10 Sekunden, wird die Wahl automatisch
abgebrochen.
Anzeige des Anrufernamens
Wenn die Nummer des Anrufers empfangen wird (CLIP) erscheint im Display auch der
zugehörige Name, vorausgesetzt dass diese Nummer mit Namen in der Privatkartei, unter
einer Nummerntaste oder als Kurzwahlnummer gespeichert ist (dies ist von der Software
und dem PBX-Typ abhängig).
4
20317861de_bat_a0
Deutsch
So telefonieren Sie
Wählen einer Nummer aus der Privatkartei
☛
Durchsehen
¥ ß
Hinweis
Anrufen
Karteitaste drücken, Nummer der gewünschten
Karte eingeben (zweistellig, d.h. 00, 01…99)
oder mit Foxtaste im Menü "Durchsehen" bis
zum gesuchten Eintrag blättern.
Foxtaste unter "Anrufen" drücken oder Hörer
abheben oder Lautsprechertaste drücken.
Im Menü "Bearbeiten" kann der Name eingegeben werden, um den
betreffenden Eintrag zu ändern (dieser Menüpunkt ist von der Software und
dem PBX-Typ abhängig).
Anrufliste bearbeiten
Ihr Apparat speichert automatisch die Namen/Nummern der letzten 10 unbeantworteten
Anrufe in der Anrufliste. Sie können die Namen/Nummern abfragen und die entsprechenden Personen über diese Liste zurückrufen.
œ
Anrufliste
Foxtaste unter "i" und danach unter "Anrufliste"
drücken.
Lauthören
Mit der Lauthöreinrichtung hören Sie Ihren Gesprächspartner sowohl über den Hörer als
auch über den Lautsprecher; so können weitere Personen in einem Raum Ihr Gespräch
mitverfolgen.
Lautsprechertaste während des Gesprächs
drücken.
Hinweis
Wollen Sie das Gespräch normal, d.h. nur über den Hörer weiterführen,
drücken Sie erneut die Lautsprechertaste.
Freisprechen
Die Freisprecheinrichtung erlaubt Ihnen, ohne Hörer zu telefonieren.
Statt den Hörer abzuheben, drücken Sie die
Lautsprechertaste.
Hinweis
Bei Ferngesprächen kann die Freisprechqualität vermindert werden.
Benutzen Sie daher in solchen Fällen den Hörer.
Mikrofon Stummschaltung
Wollen Sie sich mit der Person im gleichen Raum
unterhalten, ohne dass dies der Gesprächspartner am Telefon hört, drücken Sie die Mikrofontaste, um das Mikrofon auszuschalten (im Display
erscheint das Symbol "†").
20317861de_bat_a0
5
So benutzen Sie die Komfortfunktionen
Auf dem Display angezeigte Nummer im Notizregister speichern
Das Notizregister dient zum vorübergehenden Speichern von 10 Namen/Nummern.
Steht eine Nummer auf dem Display, drücken Sie
die Notizregistertaste. Auch während des
Gesprächs wird die im Display augezeigte
Nummer gespeichert.
Hinweis
Sie können während des Gesprächs auch eine andere Nummer im Notizregister speichern. Geben Sie dazu die Nummer ein, danach drücken Sie die
Notizregistertaste.
Kopieren von Inhalten des Notizregisters
Im Notizregister gespeicherte Namen/Nummern können direkt in die Privatkartei kopiert
oder als Meldungsziel, Umleitziel, Durchsageziel verwendet werden.
Mit Menü- und Foxtaste gewünschte Karteikarte,
Meldungs-, Umleit- oder Durchsageziel wählen.
Notizregistertaste so oft drücken bis der zu
kopierende Eintrag angezeigt wird.
MENU
Ok
Hinweise
Foxtaste unter "Ok" drücken, um den Eintrag zu
kopieren.
Die Kopierfunktion ist von der Software und dem PBX-Typ abhängig.
Sofern die Nummer im Notizregister mit einem Namen kombiniert ist und
an der Zielposition schon ein anderer Name steht, wird dieser nicht überschrieben.
Sperren/entsperren Ihres Apparates
Ihr Apparat bietet Ihnen die Möglichkeit, Ihre privaten Daten und Programmierungen vor
fremdem Zugriff zu schützen und fremde Personen davon abzuhalten, während Ihrer
Abwesenheit externe Gespräche über Ihren Apparat zu führen. Dazu steht Ihnen ein
Schloss mit persönlichem Passwort (2–10 Ziffern) zur Verfügung.
Schlosstaste drücken, anschliessend Passwort
eingeben und mit Foxtaste unter "Ok" eine
Passwort-Kontrolle veranlassen.
¥ ß
Mit Foxtaste unter "¥ ß", "Telefon: frei",
"Telefon: gesperrt" oder "Programmierung:
gesperrt" wählen, (mit "frei" wird der Apparat
entsperrt).
☛
Ok
Ok
Hinweis
6
Nach dem Drücken der Foxtaste unter "Ok"
erscheint kurzzeitig die Meldung "Ausgeführt".
Ab Werk ist als Passwort "0000" programmiert, (siehe "Passwort ändern").
20317861de_bat_a0
Deutsch
So benutzen Sie die Komfortfunktionen
Rückfrage einleiten und abschliessen
Sie sind mit einem Gesprächspartner verbunden und wollen, ohne die Verbindung
abzubrechen, mit einem anderen Gesprächspartner ein kurzes Gespräch führen.
☛
Rückfrage
END
Hinweis
Nummer des Rückfragepartners eingeben,
Foxtaste unter "Rückfrage" drücken.
Sie haben Ihre Rückfrage beendet und schliessen
diese mit der END-Taste ab.
Drücken Sie nach einer Rückfrage eine falsche Taste oder legen den Hörer
auf, ertönt während 10 Sekunden ein Dauerruf, der Sie auf den wartenden
Gesprächspartner aufmerksam macht. Heben Sie den Hörer während dieser
Zeit ab, kehren Sie in Ihre erste Gesprächsverbindung zurück.
Makeln
Sie haben eine Rückfrage eingeleitet, wollen aber nach Beenden der Rückfrage die
Verbindung aufrechterhalten und zu Ihrer ersten Gesprächsverbindung zurückkehren.
2. Gespräch
Foxtaste unter "2.Gespräch" drücken.
Gespräch übergeben
Sie haben eine Rückfrage eingeleitet und verbinden anschliessend mit Auflegen Ihres
Hörers Ihre beiden Gesprächspartner miteinander.
Hörer auflegen.
Konferenz
Sie haben eine Rückfrage eingeleitet und wollen nun zusammen mit Ihrem ursprünglichen
Gesprächspartner ein Konferenzgespräch aufbauen.
Konferenz
Foxtaste unter "Konferenz" drücken.
Hinweis
20317861de_bat_a0
Keine Angst! Beim Aufbau einer Konferenz werden keine Gespräche
unterbrochen; Verbindungen werden allein mit der END-Taste oder mit
Auflegen des Hörers abgebaut!
7
So benutzen Sie die Komfortfunktionen
Rückruf
Sie bitten einen besetzten oder nicht antwortenden internen Teilnehmer, Sie zurückzurufen.
Rückruf
Zurückstellen
Hinweis
Foxtaste unter "Rückruf" drücken. Sie hören den
Bestätigungston. Nach dem Auflegen des Hörers
erscheint im Display "Anruf erwartet" und der
Name/die Nummer des betreffenden Teilnehmers. Mit der Foxtaste unter "Zurückstellen"
kann der verlangte Rückruf gelöscht werden.
Gleichzeitig kann nur ein Rückruf aktiviert werden.
Anklopfen
Sie wollen einen Teilnehmer, der bereits in Verbindung ist, auf Ihren Anruf durch einen
Anklopfton und entsprechende Display-Anzeige aufmerksam machen.
Anklopfen
Hinweis
Foxtaste unter "Anklopfen" drücken.
Weist Ihr Partner Ihren Gesprächswunsch ab, wird die Verbindung abgebaut.
Gesprächspartner über Personensuchanlage suchen1)
Sie wollen einen Gesprächspartner direkt oder nach Anrufversuchen auf seinen Apparat
über die Personensuchanlage suchen.
MENU
☛
Suchen
Ok
Menütaste so oft drücken, bis "Suchen"
erscheint. Foxtaste an dieser Stelle drücken
und Rufnummer des gesuchten Gesprächspartners eingeben.
Mit "Ok" bestätigen.
1) PBX-Typ abhängig
8
20317861de_bat_a0
Deutsch
So benutzen Sie die Komfortfunktionen
Meldung senden1)
Sie können vorbereitete Textmeldungen an Ihren oder Ihre Partner senden.
Meldung
¥ ß
MENU
☛
☛
Ok
Ok
Hinweise
Menütaste so oft drücken, bis die Funktion
"Meldung" erscheint. Foxtaste an dieser Stelle
drücken, mit Blättern gewünschte Meldung
suchen.
Meldungsinhalt wenn nötig ergänzen (dabei
schalten Sie ggf. auf Buchstabeneingabe um),
Foxtaste unter "Ok" drücken, Ziel wählen.
Mit "Ok" bestätigen.
Die Nummer des Meldungsempfängers können Sie auch vorgängig durch
Wahlvorbereitung (z.B. Namenwahl) eingeben.
Mit der Korrekturtaste und der Editierfunktion können Sie die angezeigte
Meldung ändern.
Meldung lesen1)
Haben Sie eine Meldung erhalten, ersehen Sie dies aus der entsprechenden DisplayAnzeige im Ruhezustand des Apparates.
Lesen
œ
Mit der Foxtaste unter "i" kann die nächste Zeile
vor Ablauf der 8 Sekunden abgerufen werden.
Löschen
Mit der Foxtaste unter "Löschen" wird die
gelesene Meldung im Speicher gelöscht und die
nächste Meldung angezeigt.
END
Hinweis
Foxtaste unter "Lesen" drücken. Die Meldung
wird 8 Sekunden lang angezeigt. Bei mehrzeiligen Meldungen wird danach die nächste Zeile
angezeigt, bis zum Ende der Meldung.
Das Löschen der letzten gespeicherten Meldung
oder Drücken der END-Taste bewirkt die Rückkehr zum Ruhe-Display. Das "i" wird solange im
Display angezeigt, bis alle Meldungen gelöscht
sind.
Der Ablauf ist von der Software und dem PBX-Typ abhängig.
1) PBX-Typ abhängig
20317861de_bat_a0
9
So benutzen Sie die Komfortfunktionen
Nachricht für Anrufer hinterlassen1)
Sie wollen eine Nachricht für interne Anrufer hinterlassen.
Umleiten
ß ¥
MENU
¥ ß
☛
Ok
Ok
Hinweis
Menütaste und danach Foxtaste unter
"Umleiten" drücken. Mit Foxtaste unter "¥ ß"
bis "Umleiten zu: Nachricht" blättern.
Foxtaste unter "Ok" drücken (es erscheint die
letzte Nachricht). Mit Blättern die gewünschte
Nachricht suchen und wenn nötig ergänzen.
Foxtaste unter "Ok" drücken, um die angezeigte
Nachricht zu aktivieren.
Mit der Korrekturtaste und den Editierfunktionen können Sie die angezeigte
Nachricht ändern.
Anrufe umleiten
Sie können ankommende Anrufe auf einen anderen Apparat bzw. auf denjenigen der
Telefonistin umleiten.
Umleiten
Menütaste und danach Foxtaste unter
"Umleiten" drücken.
MENU
¥ ß
Ok
Mit Foxtaste unter "¥ ß" Umleitungsart wählen
und mit "Ok" bestätigen. Zur Auswahl stehen:
"Umleiten zu: Teilnehmer", "Umleiten: bei
besetzt", "Umleiten zu: Sucher" oder "Umleiten
zu: Nachricht"
oder
Rufweiterschalt. ¥ ß
Ok
☛
Ok
Zurückstellen
Hinweis
Foxtaste unter "Rufweiterschaltung" drücken
und mit Foxtaste unter "¥ ß" Rufweiterschaltung: Teilnehmer" oder "Rufweiterschaltung: Sucher" wählen und mit "Ok"
bestätigen.
Umleitziel eingeben (eventuell neue Rufnummer
wählen) und mit "Ok" bestätigen.
Es erscheint die Meldung "Ausgeführt" und
"Umgeleitet zu: nnnn". Die Umleitung kann mit
der Foxtaste unter "Zurückstellen" deaktiviert
werden.
Soll die Umleitung nur erfolgen wenn Sie bereits in einer Verbindung sind,
wählen Sie "Umleiten: bei besetzt" (dieser Menüpunkt ist von der Software
und dem PBX-Typ abhängig).
1) PBX-Typ abhängig
10
20317861de_bat_a0
Anruf auf Personensuchanlage beantworten1)
Sie werden über die Personensuchanlage gesucht und übernehmen den Anruf auf einem
Apparat.
übernehmen Sucher
MENU
☛
Ok
Menütaste so oft drücken, bis die Funktion
"Übernehmen" erscheint. Foxtaste an dieser
Stelle und anschliessend unter "Sucher"drücken,
Rufnummer eingeben, Foxtaste unter "Ok"
drücken.
Ringsignalanruf beantworten
Sie wollen einen Anruf via Ringsignal (Zentralwecker) beantworten.
übernehmen
MENU
Ringsignal
Menütaste so oft drücken, bis "Übernehmen"
erscheint. Foxtaste an dieser Stelle und
anschliessend unter "Ringsignal" drücken.
Anruf übernehmen
Sie hören einen Anruf auf einem anderen Apparat in Ihrer Umgebung. Sie wollen den
Anruf auf Ihrem eigenen Apparat beantworten, da der Kollege/die Kollegin abwesend ist.
übernehmen
Ok
MENU
☛
Ok
Hinweis
Menütaste so oft drücken, bis "Übernehmen"
erscheint. Foxtaste an dieser Stelle drücken. Es
erscheint die Nummer des Apparats, von
welchem Sie zuletzt einen Anruf übernommen
haben. Ist es die Nummer des gerade gerufenen
Apparats, Foxtaste unter "Ok" betätigen. Wenn
nicht, die Nummer des gerufenen Apparats
eingeben und Foxtaste unter "Ok" betätigen.
Wurde zuletzt vom Sucher oder vom Ringsignal (RS) übernommen, müssen
Sie die Foxtaste unter "Teilnehmer" drücken und dann die Nummer eingeben.
1) PBX-Typ abhängig
20317861de_bat_a0
11
Deutsch
So benutzen Sie die Komfortfunktionen
So benutzen Sie die Komfortfunktionen
Durchsage
Mit der Durchsage können Sie einen Gesprächspartner direkt über den Lautsprecher
seines Apparates ansprechen, ohne auf seine Antwort zu warten.
☛
Durchsage
MENU
Ok
Menütaste so oft drücken, bis die Funktion
"Durchsage" erscheint. Foxtaste an dieser Stelle
drücken, gewünschte Nummer eingeben oder
Zielgruppe suchen und mit Drücken der Foxtaste
unter "Ok" bestätigen.
Verlangter Rückruf
Ein Teilnehmer hat versucht, Sie zu erreichen; auf dem Display erscheint die Meldung
"Bitte Rückruf" und Nummer/Name des Anrufers.
Beantworten
Anrufen
Sie drücken die Foxtaste unter "Anrufen" und
warten, bis die Verbindung zu Ihrem Gesprächspartner hergestellt ist
oder
Abweisen
Löschen
Sie drücken die Foxtaste unter "Löschen" und
weisen damit den Rückrufwunsch ab.
Anwesend/abwesend
☛
Diese Taste aktiviert/deaktiviert die gewünschten Funktionen, wenn Sie Ihren Arbeitsplatz
verlassen, respektive wenn Sie wieder zurückkommen. Ab Werk ist die Taste als Anrufumleitungstaste programmiert.
Hinweis
12
Geben Sie die Nummer Ihrer Stellvertretung ein
und drücken Sie danach die Abwesendtaste.
Durch erneutes Drücken wird die Umleitung
wieder ausgeschaltet.
Die Abwesendtaste kann als Nummern- oder Funktionstaste programmiert
werden (vgl. "Zuordnung der verschiedenen Tastenarten").
20317861de_bat_a0
Deutsch
So benutzen Sie die Komfortfunktionen
Transparentmodus (Frequenzwahl DTMF)
Nach dem Aufbau einer Verbindung kann mit Frequenzwahl eine Funktion wie z.B. die
Fernsteuerung eines Anrufbeantworters aktiviert werden.
MENU
Hinweis
☛
Transparent
Menütaste und danach Foxtaste unter
"Transparent_mode" drücken. Zeichenfolge für
die gewünschte Funktion eingeben.
END
Mit der END-Taste verlassen Sie das Frequenzwahl-Verfahren.
Ein "Long Click" der Sterntaste
Transparentmodus.
bewirkt den direkten Sprung in den
Parken
Während einer Verbindung können Sie das Gespräch parken und sind dann frei, um ein
anderes Gespräch zu führen.
END
☛
Parken
Zurücknehmen
20317861de_bat_a0
Foxtaste unter "Parken" drücken. Der Anruf
wird geparkt. Dies wird mit der Meldung
"Ausgeführt" bestätigt.
END-Taste drücken und neue Verbindung
aufbauen.
Zum entparken drücken Sie die Foxtaste
unter "Zurücknehmen". Sie sind sofort mit dem
Gesprächspartner verbunden.
13
▼
PRG2: Weiter mit MENU Mi 12. Apr. 17:55
Tasten Foxtaste Karteieintrag
Text
▼
PRG1: Weiter mit MENU Mi 12. Apr. 17:55
Ruf Teameinstellung
Linieneinstellung
Mi 12. Apr. 17:55
Ruhetext:_Office 40
Ok Zurück _>
Ruflautstärke
¥ 4 ß
Å
Rufmelodie
¥ 4 ß
Ruftempo
¥ 3 ß
Ok Test
Tn: Teamtaste einstellen
Zurück Ruf
Beantworten
Ok Test
Ln: Linientaste einstellen
Zurück Ruf Beantw. Belegung Anrufe
Teamtaste drücken
Zurück
KW15 Mi 12. Apr. 17:55
Transparent_mode
Linientaste drücken
Zurück
Office 40
Durchsage
Office 40 KW15
Mi 12. Apr. 17:55
Umleiten Übernehmen Suchen Meldung
▼
▼
▼
▼
KW15
▼
▼
▼
▼
▼
▼
▼
▼
▼
Hörer
¥ ß
Melodie
¥ 3 ß
Ln:
Beantw:
Ok Zurück
Ln: Ruf:
Ok Test
Tempo.
¥ 3 ß
Ton
¥ 2 ß
Melodie
¥ 5 ß
Tn: Ruf:
Ein
Ok Zurück ¥ ß
Aufmerksamkeitsruf: Lautst.
Ok Test
¥ 6 ß
Priorität
¥ 1 ß
Tempo
¥ 4 ß
Priorität
¥ 1 ß
Priorität
¥ 1 ß
Hörer
¥ ß
nach 10s
¥ ß
Hörer
¥ ß
Nicht eintragen
¥ ß
KW15Mi 12. Apr. 17:55
Programmieren
Ln:
Beleg.:
Ok Zurück
Ln: Anrufliste:
Ok Zurück
Office 40
Anrufschutz
Tn: Beantw:
Ok Zurück
▼
▼
▼
14
▼
Office 40
So programmieren Sie Ihren Apparat
Menü Übersicht
20317861de_bat_a0
PRG4:Weiter mit MENU Mi 12. Apr. 17:55
Ende
Test
Service
▼
PRG3:Weiter mit MENU Mi 12. Apr. 17:55
Code *Sprache
Freisprechen
▼
Alter Code: ✱✱✱✱
Ok Zurück
Fxn:
Ok Zurück
▼
¥ ß
▼
Neuer Code: ✱✱✱✱
Ok Zurück
Fn: Taste löschen
Ok Zurück
¥ ß
▼
Fn: Funktionstaste
Ok Zurück
¥ ß
Tn: Teamtaste
Ok Zurück
Nn: Nummerntaste
Ok Zurück ¥ ß
Speicher 1 Sp. 2
Anrufschutz
¥ ß
Sp1: Nummer eingeben
OK Zurück _> Name Lesen Löschen
▼
Foxtaste: Merkmalmenü 2
Eintr. 4 Eintr. 5 Eintr. 6 Zurück Weiter
Kn: Nummer eingeben
Ok Zurück _> Name Lesen Löschen
Karte suchen, Kartennummer eing.:
Neue_Karte Name_eingeben
032 624 21 11; Müller Zip AG
Ändern Zurück NeueK. Löschen ¥ 1 ß
"Ende" kehrt aus der Programmierung zurück,
die anderen Menüpunkte sind dem Installateur vorbehalten.
Sprache, Language, Langue, Lingua: Deutsch
Ok Zurück
¥ ß
Aus
¥ ß
Freisprechautomatik:
Ok Zurück
Prog. Taste drücken
Zurück
▼
Fxn:
Taste löschen
Ok Zurück
¥ ß
▼
Fxn:
Funktionstaste
Ok Zurück
¥ ß
▼
Fxn:
Nummertaste
Ok Zurück ¥ ß Speicher 1 Sp. 2
▼
Foxtaste:
Ruhebild
Eintr. 1 Eintr. 2 Eintr. 3 Zurück Weiter
▼
▼
▼
▼
▼
▼
▼
▼
▼
▼
▼
▼
▼
▼
▼
▼
Fn:
Ok
Bestätigung: ✱✱✱✱
Ok Zurück
Zurück
Löschen
Sammelanschluss
¥ ß
Tn: 1234 Neumann Norbert
Ok
Zurück
Lesen
Sp1: 032 624 21 11: Computer ZIP AG
Ok Zurück_> Name Lesen Löschen
Sp2: Nummer eingeben;
Ok Zurück _> Name Lesen Löschen
Sp1: I*26PX
Ok Zurück _> Name Lesen Löschen
Sp1:
;Name eingeben
Ok Zurück _> Nummer Lesen Löschen Å
Kn:
;Name eingeben
Ok Zurück _> Nummer Lesen Löschen Å
Sp1: I#48PX
Ok
Zurück
Sp2: I*48PX
Ok
Zurück
Sp1:
;Name eingeben
Ok Zurück _> Nummer Lesen Löschen Å
Speicher1
▼
Speicher2
Sp2:
;Name eingeben
Ok Zurück _> Nummer Lesen Löschen Å
Menü Übersicht (Fortsetzung)
Deutsch
beliebige Taste
Löschen
Fox-Taste (Ok)
Lesen
Fox-Taste
Sp2: I#26PX
Ok
Zurück
Menü-Taste
Sp1: I*26PX
;Name eingeben
Ok Zurück _> Nummer Lesen Löschen Å
▼
▼
▼
▼
▼
▼
▼
▼
▼
▼
▼
▼
▼
▼
20317861de_bat_a0
▼
Karte suchen, Name eingeben:_
Neue_Karte Karten_Nr._eing. Suchen Å
So programmieren Sie Ihren Apparat
15
So programmieren Sie Ihren Apparat
Was Sie beim Programmieren beachten müssen
Die Programmierung ist Bestandteil des Bedienkonzeptes; bevor Sie mit dem Programmieren beginnen, lesen Sie bitte das Kapitel "Bedienkonzept" am Anfang dieser Bedienungsanleitung.
Hörer
Bei der Programmierung bleibt der Hörer aufgelegt; heben Sie während des Programmierens den Hörer ab, wird der Programmiervorgang abgebrochen. Erhalten Sie während des
Programmierens einen Anruf, müssen Sie sich zwischen dem Beantworten des Anrufs
oder dem Fortführen des Programmiervorganges entscheiden.
Programmiermodus
Zum Anfang des Programmiermodus gelangt man auf zwei Arten:
–
–
"Long Click" der Menütaste (min. 2 Sekunden)
Menütaste mehrmals drücken bis "Programmieren" angezeigt wird, Foxtaste unter
"Programmieren" drücken.
Hinweise
Ein "Long Click" der Namenwahl- oder der Karteitaste bewirkt den direkten
Sprung zum Menü für Karteieinträge.
Ein "Long Click" einer freiprogrammierbaren Taste bewirkt den direkten
Sprung zum Programmiermenü für diese Taste.
"Long Clicks" sind von der Software und dem PBX-Typ abhängig.
Menütaste
Mit der Menütaste bewegen Sie sich auf zwei Ebenen: zunächst in den Programmiermenüs (PRG 1– … ; anwählen des gewünschten zu programmierenden Bereichs, z.B.
"Tasten") und anschliessend auf der Ebene der Unterfunktionen (z.B. Belegen einer
Nummerntaste). Beide Ebenen verlassen Sie jeweils durch Drücken der END-Taste.
Speichern
Ein von Ihnen eingegebener oder geänderter Inhalt unter einem Menüpunkt ist dann
gespeichert, wenn Sie die Foxtaste unter "Ok" drücken. Drücken Sie unter "Zurück" oder
die END-Taste, wird die von Ihnen vorgenommene Programmierung nicht gespeichert.
Beispiele einer Programmierung:
Rufmelodie einstellen
Ruf
Test
¥ ß
Ok
END
Hinweis
16
Im Programmiermodus Foxtaste unter "Ruf"
drücken. Beim Menüpunkt "Rufmelodie" mit der
Foxtaste unter "¥ ß" und mit "Test" die gewünschte Einstellung wählen und überprüfen,
diese mit der Foxtste unter "Ok" speichern und
mit der END-Taste in den Ausganszustand
zurückkehren.
Auf dieselbe Weise können Sie auch die Ruflautstärke und die Geschwindigkeit einstellen.
20317861de_bat_a0
Text im Ruhe-Display einstellen
Das zur Verfügung stehende Textfeld kann dazu dienen, z.B. bei Apparaten, die oft von
mehreren Personen benutzt werden, die Telefonnummer dieses Apparates oder auch den
Firmennamen anzuzeigen.
Ok
☛
Text
END
Im Programmiermodus "Text" wählen,
gewünschten Text eingeben und diesen mit
der Foxtaste unter "Ok" speichern.
Mit Drücken der END-Taste in den Ausgangszustand zurückkehren.
Foxtaste programmieren (programmierte Menüpunkte)
Foxtaste
Eintrag 1_3
Weiter
Eintrag 4_6
¥ ß
OK
☛
OK
Hinweise
Im Programmiermodus mit Foxtaste unter
"Foxtaste" den gewünschten Eintrag wählen
(Einträge 1–3 befinden sich im Ruhe-Display,
Einträge 4–6 im Merkmalmenü 2, mit der
Foxtaste unter "Weiter" aufrufen.)
Mit Foxtaste unter "¥ ß" die gewünschte
Tastenart wählen ("Nummerntaste" oder
"Funktionstaste") und mit "Ok" bestätigen.
Je nach gewählter Tastenart Nummer/Name
eingeben oder Tastenfunktion (z.B. Umleiten)
wählen und mit Foxtaste unter "Ok" bestätigen.
Das Zeichen "|" zeigt, dass die Funktion aktiviert ist.
Ein "Long Click" der Foxtaste bewirkt den direkten Sprung zur FoxtastenProgrammierung
Eintrag 4 wird für den Transparentmodus verwendet.
Passwort ändern
Ok
☛
Code
☛
☛
Ok
Ok
END
20317861de_bat_a0
Im Programmiermodus "Code" wählen, altes
Passwort (ab Werk "0000") eingeben und mit
"Ok" bestätigen.
Neues Passwort eingeben, Foxtaste unter "Ok"
drücken, Passwort erneut eingeben und mit der
Foxtaste unter "Ok" bestätigen, um das Passwort
zu speichern. Mit Drücken der END-Taste in den
Ausgangszustand zurückkehren.
17
Deutsch
So programmieren Sie Ihren Apparat
So programmieren Sie Ihren Apparat
So programmieren Sie Ihre Privatkartei
Die Privatkartei ist Ihr persönliches elektronisches Telefonbuch, in dem Sie bis zu 100
(00...99) Nummern/Namen und/oder Funktionen speichern können. Bei Ihrer Abwesenheit können Sie die Eintragungen mit Ihrem Passwort vor fremdem Zugriff schützen.
Karteieintrag
Neue–Karte
☛
Ok
Nummer/Name eingeben und mit Foxtaste unter
"Ok" speichern.
Es gibt mehrere Möglichkeiten um einen bestehenden Eintrag zu suchen und zu ändern:
☛
Karten_Nr–
eing.
☛
Im Programmiermodus Foxtaste unter "Karteieintrag" drücken. Foxtaste unter "Neue_Karte"
drücken um die nächste freie Karte aufzurufen.
Anfangsbuchstaben eines Namens eingeben
oder Foxtaste unter "Kartennummer_eingeben"
drücken und die gewünschte Kartennummer
(00...99) eingeben.
oder
Suchen
☛
Ändern
Hinweis
¥ 99 ß
Foxtaste unter "Suchen" drücken und durch die
Kartei blättern.
Ok
Foxtaste unter "Ändern" drücken, Nummer und/
oder Namen eingeben oder ändern und mit
Foxtaste unter "Ok" speichern".
Es ist ratsam zu jeder Nummer den zugehörigen Namen und Vornamen
einzugeben, dies ermöglicht die bequeme Suche und die Wahl mit Namen
aus einer Kartei.
Editierfunktionen
Mit einem "Long Click" von min. 2 Sekunden der "+" oder "–" Taste wird der Cursor
nach links oder rechts verschoben, um einen Eintrag zu korrigieren.
Steht der Cursor am Anfang einer Zeichenkette, so springt er nach dem Betätigen der
Korrekturtaste oder einem "Long Click" der "–" Taste an das Ende. Steht er am Ende, so
springt er mit einem "Long Click" der "+" Taste an den Anfang. Nach der Korrektur eines
Zeichens muss die Editierfunktion mit einem "Long Click" für weitere Korrekturen wieder
aktiviert werden.
032 624 34 54
Beispiel:
Mit einer Zeichentaste wird das betreffende Zeichen links vom Cursor eingefügt.
Schuhmann Clara
Beispiel:
Schuhmann Claara
Mit der Korrekturtaste wird das Zeichen links vom Cursor gelöscht.
Hinweis
18
Die Editierfunktionen sind von der Software und dem PBX-Typ abhängig.
20317861de_bat_a0
Deutsch
So programmieren Sie Ihren Apparat
Makrosprache
Die Makrosprache ermöglicht verschiedene Funktionen nacheinander unter einer Taste
abzulegen.
A
Leitung mit der höchsten Priorität belegen
I
Eigene Leitung (Interntaste) belegen
X
Verbindung abbauen
_
Trennt Amtsausgang von der Nummer (z.B. 0–24 …)
P
Pause (1 Sekunde)
L01
N
In Wahlvorbereitung eingegebene Nummer einsetzen
.
Steuertastenfunktion
Z
Transparentmodus ein-/ausschalten
R
Zuletzt gewählte Nummer einsetzen
I201
Beispiele:
Linientaste 01 belegen
I*21201X
Freisprechen einschalten und 201 anrufen.
Freisprechen einschalten, Anrufumleitung auf 201
und Freisprechen ausschalten.
Automatisches Antworten
Sie können bewirken, dass bei einem ankommenden Anruf die Freisprecheinrichtung
eingeschaltet wird und Sie ohne den Hörer abzuheben antworten können.
Freisprechen
¥ ß
Hinweis
20317861de_bat_a0
Ok
Im Programmiermodus Foxtaste unter
"Freisprechen" drücken.
Danach kann gewählt werden bei welchen
Anruftypen automatisch auf Freisprechen
geschaltet werden soll. Bestätigen Sie mit "Ok".
Das automatische Freisprechen bei Teamtasten ist nur wirksam, wenn dieser
Punkt auf "Ein" programmiert ist.
19
Zuordnung der verschiedenen Tastenarten
Bevor Sie mit dem Belegen von Tasten beginnen, müssen Sie jeder Taste die entsprechende Tastenart zuordnen. Es wird nach Nummerntasten, Teamtasten, Linientasten und Funktionstasten unterschieden. Linientasten können Sie nicht selbst einrichten; diese werden in
der PBX-Konfiguration festgelegt.
¥ ß
Tasten
Ok
Hinweis
Im Programmiermodus Foxtaste unter "Tasten"
drücken, entsprechende Taste drücken, mit der
Foxtaste "¥ ß" Tastenart wählen und mit der
Foxtaste unter "Ok" bestätigen.
Drücken Sie im Ruhezustand die entsprechende Taste länger als 2 Sekunden,
erscheint direkt das Programmiermenü dieser Taste.
Nummerntasten
Mit Nummerntasten (auch als Ziel- oder Memorytasten bezeichnet) können Sie oft
benutzte interne und externe Rufnummern schnell anwählen. Jede Nummerntaste ist mit
zwei Speicherplätzen versehen (Einfach- bzw. Doppel-Click) auf denen Sie je eine Rufnummer speichern können.
Sie können die Nummerntasten mit Hilfe der Makrosprache selbstbelegend programmieren. Dabei wird automatisch das Freisprechen eingeschaltet, eine bestimmte Linie belegt
und die gewünschte Rufnummer gewählt.
Belegen von Nummerntasten
☛
Tasten
Ok
Im Programmiermodus Foxtaste unter "Tasten"
drücken, gewünschte Nummerntaste und
Speicherplatz wählen, Nummer und/oder
Funktion sowie Namen eingeben und mit der
Foxtaste unter "Ok" bestätigen.
Linientasten1)
Ist Ihr Apparat in der PBX als Linienwähler bzw. als Reihenapparat konfiguriert, können
Sie bis zu 13 Linien parallel bedienen. Dabei wird zwischen der Hauptlinie, d.h. die Linie,
die die Rufnummer Ihres Apparates identifiziert, und den übrigen Amtslinien unterschieden. Die Hauptlinie (Interntaste) entspricht immer der obersten Taste links.
Die in dieser Bedienungsanleitung beschriebenen Komfortfunktionen sind in Verbindung
mit der Hauptlinie anwendbar; für die Linientasten gelten sämtliche Wählarten sowie die
Funktionen Rückfrage, Makeln, Übergeben und Parken/Entparken. Über Linientasten
können Sie, mit Ausnahme der Hauptlinie, nur externe Anrufe bearbeiten.
1) Abhängig von der Software und dem PBX-Typ
20
20317861de_bat_a0
Deutsch
Zuordnung der verschiedenen Tastenarten
Jede Linientaste ist mit einer zweifarbigen Leuchtdiode und einem Bezeichnungsschild
versehen. Die Leuchtdiode zeigt den Zustand der Line an.
Leuchtdiode leuchtet nicht: Linie ist frei
Leuchtdiode leuchtet dauernd: Linie ist belegt
Leuchtdiode blinkt schnell: ankommender Anruf
auf dieser Linie
Leuchtdiode blinkt langsam: Linie ist geparkt
oder gehalten
Die Farbe weist auf die Herkunft bzw. das Ziel des Anrufs hin:
grün: interner Anruf bzw. internes Gespräch
rot: externer Anruf bzw. externes Gespräch
Einstellen von Linientasten
¥ ß
Ok
Entsprechende Linientasten so lange drücken, bis
das Menü zur Linieneinstellung erscheint. Unter
"Ruf" gewünschte Einstellungen wählen: "Aus",
"Ein", "Nach 10/20/30 s", Melodie und Geschwindigkeit. Mit "Ok" bestätigen.
Damit bestimmen Sie, ob und wann ein Anruf
akustisch angezeigt wird.
Weitere Einstellmöglichkeiten erhalten Sie durch Drücken der Menütaste: Unter dem
Menüpunkt "Belegen" können Sie wählen, ob die Linie beim Abheben des Hörers bzw.
Drücken der Lautsprechertaste oder durch Drücken der Linientaste belegt wird. Desgleichen wählen Sie unter "Beantworten" ob und wie ein Anruf auf einer Linie beantwortet
wird.
Hinweis
Die Einstellungen der Linientasten können auch im Programmiermodus unter
dem Punkt "Linieneinstellung" vorgenommen werden.
Anrufe über Linien ausführen und entgegennehmen
Wenn Sie den Hörer abheben oder die Lautsprechertaste drücken, belegt Ihr Apparat
automatisch eine Linie, die im Display links oben angezeigt wird. Durch Drücken einer
anderen Linientaste wechseln Sie die Linie.
Bei ankommenden Anrufen wird ebenfalls die Linie angezeigt. Erfolgen gleichzeitig
mehrere Anrufe über verschiedene Linien, wird der Anruf der obersten belegten Linientaste angezeigt.
Makeln (hin- und herschalten zwischen Linien)
Sie können zwischen Anrufen und Gesprächen auf Linien durch Drücken der Linientaste
beliebig hin- und herschalten, wobei die aktive Linie automatisch geparkt wird. Auf diese
Weise können Sie Anrufe auf anderen Linien beantworten oder zuvor geparkte Verbindungen zurücknehmen, jedoch nicht Gespräche auf belegten Linien übernehmen.
20317861de_bat_a0
21
Zuordnung der verschiedenen Tastenarten
Teamtasten
Die Teamfunktion erleichtert Mitgliedern eines Teams (z.B. Verkaufs- oder Marketingteam)
die gegenseitige Kommunikation sowie die gegenseitige Stellvertretung.
Belegen und benutzen von Teamtasten
Auf Ihrem Apparat können Sie bis zu 13 Teamtasten programmieren. Dabei gehen Sie wie
beim Belegen von Nummerntasten vor, wählen jedoch nicht "Nummern" sondern
"Teamtaste". Diese sind mit je einer zweifarbigen Leuchtdiode und einem Bezeichnungsschild versehen, wobei die Leuchtdiode den Zustand der Linie, d.h. des Apparates des
Teampartners anzeigt
Leuchtdiode leuchtet nicht: Apparat des Teampartners ist frei
Leuchtdiode leuchtet dauernd: Apparat des
Teampartners ist besetzt
Leuchtdiode blinkt schnell: Anruf für den
Teampartner; falls Teamruf programmiert ist, wird
der Anruf auch akustisch signalisiert
Die Farbe weist auf die Herkunft bzw. das Ziel des Anrufs hin:
grün: interner Anruf bzw. internes Gespräch
rot: externer Anruf bzw. externes Gespräch
Drücken Sie die Teamtaste im Ruhezustand oder bei abgenommenem Hörer, rufen Sie
damit den Teampartner an. Ein Doppelklick bewirkt eine Durchsage. Drücken Sie die
Teamtaste bei einem Anruf (Leuchtdiode blinkt), übernehmen Sie das Gespräch.
Drücken Sie die Teamtaste während des Gesprächs, leiten Sie eine Rückfrage zum
Teampartner ein, oder Sie übernehmen den auf seinem Apparat angekommenden Anruf.
Während des Gesprächs wird ein Anruf auf einer Teamtaste nur durch das Blinken der
Leuchtdiode und, falls das Rufsignal eingeschaltet ist, mit einem einmaligen
Aufmerksamkeitsruf signalisiert.
Einstellen von Teamtasten
Teamtasten können Sie wie Linientasten einstellen.
Funktionstasten
Funktionstasten ermöglichen es, häufig gebrauchte Funktionen wie z.B. Anrufumleitung
auf einer frei programmierbaren Taste abzulegen. Der Druck auf die Taste schaltet die
Funktion und die LED ein, nächster Tastendruck schaltet beide wieder aus.
Bei der Programmierung wählen Sie zuerst die Funktion, die von der LED angezeigt wird.
Der Apparat füllt automatisch die beiden Speicher der Taste mit den entsprechenden
Funktionscodes. Diese können Sie für besondere Anwendungen ergänzen.
22
20317861de_bat_a0
Deutsch
Installation
Verpackungsinhalt
Apparat
123..
ABC..
END
Hörer
1
ABC
4
JKL
2
DEF
5
MNO
Telefonanschlusskabel
3
GHI
6
Höreranschlusskabel
Säulen
Kurzbedienungsanleitung
Umleiten
☎
Tel.
END
No.:
123 ..
ABC
..
031
999
auf
Zurückstellen
Sucher
Norbert Norbert
Gerhardpriv.
<
<<
Frank
Computer Helmut << <
Transport
Rita
<
AG <<
Notruf AG
<
<<
Feuer
<
<<
20
1
2
DEF
5
MNO
8
VWX
0
Menu
70
ABC
4
JKL
7
STU
3
GHI
6
PQR
9
YZ•
0...9
12344NeumannNNorbert
Rückfrage
Foxtaste
PQR
Zustandszeile
Menüzeile
MENU
MENU
7
STU
8
VWX
• In der Menüzeile angezeigte Funktion
aktivieren:
-Taste unter dem Text
drücken (Beispiel: "Rückfrage")
9
YZ•
0
• Eine andere Funktion aktivieren:
-Taste
ein- bzw. mehrmals drücken und Menüpunkt mit
-Taste wählen
MENU
0...9
MENU
• Folgende Funktionen werden mit dazu
bestimmten Funktionstasten aktiviert:
Wahlwiederholung
Mikrofon ein/aus
Lautsprecher ein/aus
Abwesend/Anwesend
Klarsichtabdeckung
Ruf-bzw. Hörlautstärke bei Ruf bzw.
Gespräch einstellen
Abbrechen/Wiederbelegen (in Wahl od. Gespräch)
END
Bedienungsanleitung
Mode d'emploi
Istruzioni per l'uso
Operating instructions
Bedienungsanleitungen
Hörer und Apparat anschliessen
Nachdem Sie den Apparat ausgepackt haben,
schliessen Sie zuerst den Hörer an, indem Sie das
längere Ende des Höreranschlusskabels in die
kleine Buchse auf der Apparateunterseite
stecken. Prüfen Sie durch leichtes Ziehen, ob der
Kabelstecker richtig eingerastet ist. Das andere
Kabelende stecken Sie in den Hörer.
Nun schliessen Sie den Apparat an, indem Sie
den Stecker des Telefonanschlusskabels in die
grössere Buchse auf der Apparateunterseite
stecken. Prüfen Sie durch leichtes Ziehen am
Stecker, ob der Kabelstecker richtig eingerastet
ist. Führen Sie das Kabel durch die dafür vorgesehene Zugentlastung. Das andere Kabelende
stecken Sie in die Telefonanschlussdose.
Stecken Sie auf der Unterseite des Apparates am
oberen Ende die beiden Säulen ein.
Frei programmierbare Tasten beschriften
Auf dem Beschriftungsschild (siehe letzte Seite der Bedienungsanleitung) die Namen zu
den gespeicherten Nummern oder die gespeicherten Funktionen notieren. Anschliessend
das Schild neben den frei programmierbaren Tasten unter der Klarsichtabdeckung
anbringen.
Zusatztastenfeld
Zu Ihrem Apparat können Sie ein Zusatztastenfeld installieren. Dieses bietet Ihnen weitere
20 Tasten mit LED’s an, sowie eine einfachere Buchstabeneingabe (Gross-/Kleinbuchstaben, Sonderzeichen).
20317861de_bat_a0
23
Sicherheitshinweise
Lesen Sie bitte die Bedienungsanleitung und bewahren Sie diese auf.
Bei Fragen wenden Sie sich an einen Fachmann; lassen Sie Servicearbeiten durch einen
Fachmann ausführen; öffnen Sie Ihren Apparat in keinem Fall selber.
Berühren Sie die Steckerkontakte nicht mit spitzen und metallischen Gegenständen.
Stellen Sie Ihren Apparat auf eine rutschsichere Unterlage.
Vermeiden Sie, dass Ihr Apparat direkter Sonnenbestrahlung oder anderen Wärmequellen
ausgesetzt ist.
Installieren und benutzen Sie Ihren Apparat nicht in explosionsgefährdeten Räumen.
Schützen Sie Ihren Apparat vor Nässe, starkem Staub, aggressiven Flüssigkeiten und
Dämpfen.
Setzen Sie Ihren Apparat nicht elektromagnetischen Feldern (Elektromotoren, Haushaltgeräten) aus, die Sprachqualität könnte beeinträchtigt werden. Vermeiden Sie einen
Standort in unmittelbarer Nähe von Radio-, TV- und Videogeräten.
Schliessen Sie die Anschlusskabel Ihres Apparates nur an die dafür bestimmten Steckdosen an. Wechseln Sie auf keinen Fall die Stecker der Anschlusskabel aus.
Tragen Sie Ihren Apparat nie an den Anschlusskabeln.
Telefonieren Sie nie in unmittelbarer Nähe von Wasser.
Reinigen Sie Ihren Apparat mit einem weichen, leicht feuchten oder antistatischen Tuch.
Verwenden Sie zum Reinigen keine Reinigungsmittel und keine chemischen Substanzen.
Betreiben Sie Ihren Apparat nur im Temperaturbereich von +5 °C bis ca. +35 °C.
24
20317861de_bat_a0
Ihr Gesprächspartner hört Sie nicht oder Sie hören Ihren Gesprächspartner nicht
Stellen Sie sicher, dass das Höreranschlusskabel am Hörer und am Apparat richtig eingesteckt ist.
Hörer abgehoben, kein Wählton, keine Anzeige im Display
Stellen Sie sicher, dass die Telefonanschlusskabel am Apparat und an der Telefonanschlussdose richtig gesteckt ist.
Anzeige im Display, keine Verbindung
Ihr Apparat ist richtig angeschlossen aber eventuell gesperrt. Entsperren Sie Ihren Apparat
(siehe "Sperren/entsperren Ihres Apparates").
Programmierbare Tasten lassen sich nicht programmieren
Möglicherweise ist die Programmierung gesperrt. Entsperren Sie Ihren Apparat (siehe
"Sperren/entsperren Ihres Apparates").
Entsperren des Apparates wenn Passwort vergessen
Bitten Sie die Telefonistin, Ihr Passwort von der Zentrale aus zu überschreiben.
Display-Anzeige: "Falscher Apparate Typ"
Ursprünglich wurde ein anderer Apparat angemeldet. Gehen Sie in der Programmierung
ins Untermenü "Karteieintrag" oder "Tasten", wenn Sie Ihren Apparat richtig anmelden
möchten. In der Display-Anzeige sehen Sie "Neuen Apparat anmelden". Drücken Sie "Ja"
oder "Nein". Beachten Sie bitte, dass Sie bei einer Bestätigung alle persönlichen Einträge
verlieren könnten. Wenn Sie Ihren Apparat nicht neu anmelden möchten, drücken Sie
"œ". Sie können die Standard-Telefonfunktionen trotzdem nutzen.
Display-Anzeige: "trying to register"
Der Apparat kann nicht angemeldet werden. Erkundigen Sie sich bei Ihrem Fachmann.
Hinweis
20317861de_bat_a0
Bei anderen Meldungen fragen Sie bitte Ihren Systemmanager.
25
Deutsch
Störungsfall
Selbsttest
Haben Sie Ihren Apparat in bezug auf Anschlüsse, Entsperren usw. überprüft, können Sie
mit dem Selbsttest weitere mögliche Fehlerquellen herausfinden:
Selbsttest-Modus aktivieren
Telefonanschlusskabel aus der Telefonanschlussdose herausziehen; Foxtaste links aussen gedrückt halten, während Sie das Telefonanschlusskabel wieder stecken. Sie befinden sich
nun im Selbsttest-Modus. Leuchtdiode und
Display wechseln dauernd zwischen hell und
dunkel.
☛
Test
Hörer abheben, eine Taste nach der anderen
drücken; jeder Tastendruck erzeugt einen Ton im
Lautsprecher
Mikrofon und Hörmuschel sind verbunden. Sie
hören es in der Hörmuschel, wenn Sie ins
Mikrofon blasen.
Lautsprechertaste drücken. Das Freisprechmikrofon wird für kurze Zeit mit der Hörmuschel
verbunden, Sie hören die Umgebungsgeräusche.
Selsbttest-Modus verlassen
Telefonanschlusskabel herausziehen
und wieder stecken.
Stellen Sie während des Selbsttests Unregelmässigkeiten fest, benachrichtigen Sie die
Telefonistin oder einen Fachmann.
26
20317861de_bat_a0
Deutsch
Funktionscodes
Welche Ziffern muss man wählen?
Normalwahl
Tastenfolge
Amtsausgang
Geschäft ......................................................................... 0
Privat .............................................................................. 10
mit Kostenstelle-Nr ......................................................... 13 KST-Nr.
.........
.........
.........
Kurzwahlnummern PBX ................................................ 7000...7999 1)
Leitwegnummern ........................................................... 170... 199
1)
1)
Notrufnummer ............................................................... 12
Sammelanschlussnummern ........................................... 860... 888
.........
.........
1)
1)
.........
.........
Telefonistin ..................................................................... 11
Türsprechstellen ............................................................. 851... 852
.........
1)
.........
Nachwahl
Anklopfen .......................................................................
abweisen ........................................................................
beantworten, Verbindung halten ....................................
beantworten Verbindung nicht halten .............................
beantworten mit Konferenz ............................................
6 oder *43
0
2
1
3
Aufschalten .....................................................................
abweisen ........................................................................
beantworten, Verbindung halten ....................................
beantworten, Verbindung nicht halten ............................
7 oder *44
0
2
1
Coderuf aktivieren ......................................................... 8 oder *81
Konferenz
(aus Verbindung) aufbauen ............................................. 3
Teilnehmer (intern), ausschliessen .................................... *31
Makeln (hin- und herschalten
zwischen zwei Verbindungen) ......................................... 2
Message-Anzeige aktivieren ......................................... *38
Personensuchanlage aktivieren 3) ................................. 8 oder *81
Rückkehr zur Erstverbindung ........................................ 1
Rückruf
bei besetztem Teilnehmer aktivieren ................................ 9 oder *37
bei freiem Teilnehmer aktivieren ...................................... 9 oder *37
1) Definition und Bereich der Nummern sind von der Software und dem PBX-Typ abhängig
3) Funktion abhängig von der Software und dem PBX-Typ
20317861de_bat_a0
27
Funktionscodes
Umbuchen des laufenden
Gespräches auf Kostenstelle-Nr. ................................... *78 KST-Nr.
Verbindung parken ........................................................ *76
Vorwahl
Alle aktivierten Dienste deaktivieren 2) ........................ *00
(Ausser Sammelanschluss)
Amtsausgang
mit Gebührenrückruf aktivieren ...................................... *32 TN-Nr.
Anklopfen 2)
sich schützen vor ............................................................ *04
auf sich erlauben ............................................................ #04
Anruf übernehmen ........................................................ *86 TN-Nr.
Anrufumleitung AUL
sich schützen vor AUL 2) ..................................................
AUL auf sich erlauben 2) ..................................................
unbedingte AUL aktivieren 2) ...........................................
unbedingte AUL löschen 2) ..............................................
unbedingte AUL auf zuletzt progr. Nummer aktivieren ....
unbedingte AUL auf zuletzt progr. Nummer löschen .......
AUL auf vorprogrammierte Nummer aktivieren 2+3) ..........
AUL auf vorprogrammierte Nummer löschen 2+3) ..............
AUL wenn besetzt aktivieren 2) ........................................
AUL wenn besetzt löschen 2) ...........................................
AUL wenn besetzt auf zuletzt progr. Nummer aktivieren .
AUL wenn besetzt auf zuletzt progr. Nummer löschen ....
AUL auf Standardmeldung aktivieren 2+3) .........................
AUL auf Standardmeldung löschen 2+3) ............................
AUL auf Personensuchanlage PSA oder
auf Zentralwecker mit Coderuf aktivieren 2+3) ...............
AUL auf Personensuchanlage PSA oder
auf Zentralwecker mit Coderuf löschen 2+3) ...................
*02
#02
*21 Ziel-Nr.
#21
*21#
#21
*22
#22
*67 Ziel-Nr.
#67
*67#
#67
*24 Text-Nr.#
#24
*28
#28
2)
Aufschalten
sich schützen vor ............................................................ *04
auf sich erlauben ............................................................ #04
Coderuf
aktivieren ........................................................................ *81 TN-Nr.
beantworten ................................................................... *82
Courtesy (Ansage vor Melden) 3)
einschalten Gruppe 1 ......................................................
ausschalten Gruppe 1 .....................................................
einschalten Gruppe 2 ......................................................
ausschalten Gruppe 2 .....................................................
*931
#931
*932
#932
2) Fernbedienung möglich
3) Funktion abhängig von der Software und dem PBX-Typ
28
20317861de_bat_a0
Deutsch
Funktionscodes
Durchsage
an einen Teilnehmer ........................................................ *7998 TN-Nr.
an eine Gruppe ............................................................... *79 GR-Nr.
an Gruppe übernehmen ................................................. *89
Fernbedienung
einleiten (ab fremdem Apparat) ..................................... *06 TN-Nr. *21 Ziel-Nr.
Fernbedienung einleiten /
fernbedienbare Teilnehmernummer eingeben /
gewünschte *-Prozedur eingeben (z.B. *21 Ziel-Nr.)
ausschalten (ab fremdem Apparat) ................................ *06 TN-Nr. #21
Fernbedienung einleiten /
fernbedienbare Teilnehmernummer eingeben /
gewünschte #-Prozedur eingeben (z.B. #21)
ausschalten (ab eigenem Apparat) ................................ #21
#-Prozedur eingeben (z.B. #21)
Follow me
aktivieren ........................................................................ *23 TN-Nr.
löschen ........................................................................... #23
Konferenz aufbauen
variable ........................................................................... *71 TN-Nr. 1*
... TN-Nr.5# 1)
3)
vorbestimmte ............................................................... *70 Konf.-Nr.
Least Cost Routing (LCR)
Alternativen Netzbetreiber erzwingen 3) .......................... *90
Meldungen (Standardmeldungen mit/ohne Parameter) 2+3)
an Teilnehmer senden ..................................................... *3598 TN-Nr. Text-Nr.#
an Gruppe senden .......................................................... *35 GR-Nr. Text-Nr.#
an alle senden ................................................................ *3599 Text-Nr.#
Message-Anzeige 2)
aktivieren ........................................................................ *38 TN-Nr.
löschen, Ziel-Apparat ...................................................... #38 TN-Nr.
Personensuchanlage 3)
suchen ............................................................................ *81 TN-Nr.
mit einem Suchweg beantworten ................................... *82
mit mehreren Suchwegen beantw. .................................. *82 TN-Nr.
Relais
einschalten ..................................................................... *755…*757 1)
ausschalten ..................................................................... #755…#757 1)
Ruf auf Zentralwecker beantworten ............................ *83
1) Definition und Bereich der Nummern sind von der Software und dem PBX-Typ abhängig
2) Fernbedienung möglich
3) Funktion abhängig von der Software und dem PBX-Typ
20317861de_bat_a0
29
Funktionscodes
Rückruf löschen .............................................................. #37
Rufweiterschaltung RWS (Anrufumleitung wenn keine Antwort)
sich schützen vor RWS 2) ................................................. *02
RWS auf sich erlauben 2) ................................................. #02
RWS aktivieren 2) ............................................................. *61 Ziel-Nr.
RWS löschen 2) ................................................................ #61
RWS auf zuletzt progr. Nummer aktivieren ...................... *61#
RWS auf zuletzt progr. Nummer löschen ......................... #61
RWS auf vorprogrammierte Nummer aktivieren 2+3) ......... *62
RWS auf vorprogrammierte Nummer löschen 2+3) ............ #62
RWS auf Personensuchanlage oder auf
Zentralwecker mit Coderuf aktivieren 2+3) ..................... *68
RWS auf Personensuchanlage oder auf
Zentralwecker mit Coderuf löschen 2+3) ......................... #68
Ruhe vor dem Telefon (Anrufschutz) 2)
aktivieren ........................................................................ *26
löschen ........................................................................... #26
Sammelanschluss 2)
sich einschalten .............................................................. *48
sich ausschalten .............................................................. #48
Tag-, Nacht-, Wochenend-Schaltung (Umschaltgr. 1)
Tag (Position 1) ............................................................... *8511
Nacht (Position 2) ........................................................... *8512
Wochenende (Position 3) ................................................ *8513
Terminruf (Weckauftrag) 2)
Dauerauftrag aktivieren ..................................................
Dauerauftrag löschen .....................................................
Einzelauftrag aktivieren ...................................................
Einzelauftrag löschen ......................................................
*56 hh mm
#56
*55 hh mm
#55
Türe öffnen ..................................................................... *751…*752 1)
Umschaltgruppe (ankommend)
Umschaltgruppe x, Pos. 1 ............................................... *85x1 1)
Umschaltgruppe x, Pos. 2 ............................................... *85x2 1)
Umschaltgruppe x, Pos. 3 ............................................... *85x3 1)
Hinweis: x ist eine Ziffer von 2…9
Verbindung
parken ............................................................................ *76
geparkte abrufen ............................................................ #76
1) Definition und Bereich der Nummern sind von der Software und dem PBX-Typ abhängig
2) Fernbedienung möglich
3) Funktion abhängig von der Software und dem PBX-Typ
30
20317861de_bat_a0
A
N
Anklopfen .............................................. 8
Anruf übernehmen ............................... 11
Anrufe umleiten ................................... 10
Anrufliste bearbeiten .............................. 5
Anwesend/abwesend ........................... 12
Anzeige des Anrufernamens ................... 4
Automatisches Antworten .................... 19
Nachricht hinterlassen .......................... 10
Namenwahl ............................................ 3
Notizregister ....................................... 3, 6
Nummerntasten ................................... 20
B
Bedienkonzept ....................................... 1
Besondere Display-Symbole .................... 1
D
Durchsage ............................................ 12
E
Editierfunktionen .................................. 18
F
Foxtaste programmieren ....................... 17
Freisprechen ........................................... 5
Frequenzwahl DTMF ............................. 13
Funktionstasten .................................... 22
P
Parken .................................................. 13
Passwort ändern ................................... 17
Personensuche ................................. 8, 11
Privatkartei ............................................. 5
Programmieren ..................................... 16
Programmierte Menüpunkte ............. 1, 17
R
Ringsignalanruf beantworten ................ 11
Rückfrage ............................................... 7
Rückruf ............................................ 8, 12
Ruflautstärke einstellen ........................... 2
Rufmelodie einstellen ........................... 16
S
Sperren/entsperren ................................. 6
Sprache einstellen ................................... 2
G
T
Gespräch übergeben .............................. 7
Teamtasten ........................................... 22
Text im Ruhe-Display einstellen ............. 17
Transparentmodus ................................ 13
H
Hörer und Apparat anschliessen ........... 23
K
Konferenz .............................................. 7
Kopieren von Inhalten des
Notizregisters ....................................... 6
U
Übernehmen ........................................ 11
Umleiten .............................................. 10
V
L
Verpackungsinhalt ................................ 23
Lauthören ............................................... 5
Lautstärke im Hörer und im
Lautsprecher einstellen ......................... 2
Linientasten .................................... 20, 21
W
M
Makeln ................................................... 7
Makrosprache ...................................... 19
Meldung lesen ........................................ 9
Meldung senden .................................... 9
Menütechnik .......................................... 1
Mikrofon Stummschaltung ..................... 5
20317861de_bat_a0
Wählen einer Nummer aus dem
Notizregister ......................................... 3
Wählen einer Nummer aus der
Privatkartei ........................................... 4
Wählen über Nummerntaste .................. 3
Wählen über Wahlwiederholungstaste ... 3
Wahlvorbereitung ................................... 3
Z
Ziffernwahl ............................................. 3
Zusatztastenfeld ................................... 23
31
Deutsch
Index
1
2
3
17
16
K
anleurzbed
itun ienu
ngsg
15
Foxtas
te
Status
Menüz
zeil
eile e
MEN
U
14
13
>
>> Anruf
übe
PSA
>
rn
Gerh übern ehme
ehm
n
ard
Fra
en
n
Helm k
ut
Rita
>
M
ori
>>
Einka
Han tz
uf S L1
>
spe
üd
Einka
>> Compu ter
Tra
uf W L2
nsp ter AG
>
est
ort A
Einka
>> Hande
G
L3
ls A
We
u
f
N
G
rke
>
ord
Einka
A
>> Meier A G
uf Ü
L
Mülle
bers 4
G
ee
r AG
L
Che 5
☎ Te
f
l. No
L6
.: 03
1 99 privat
9'20
'70
>
>>
>>
123 ..
ABC ..
END
1
2
AB C
4
7
STU
DEF
5
JKL
MN
8
VW
X
O
MEN
U
3
GHI
6
PQ R
9
YZ•
0
4
0...9
5
12 11 10 9 8 7
II
6
Eléments d’exploitation et d’affichage
1
L’affichage
Votre appareil est muni d’un écran d’affichage alphanumérique à deux lignes.
Ligne supérieure: indications d’état, nom et numéro de votre interlocuteur.
Ligne inférieure: menu d’exploitation variant en fonction du contexte.
2
Touche Fox (touche multifonction)
3
Touche Menu
Cette touche permet d’accéder aux différents menus.
4
Touches de ligne ou touches librement programmables pour deux fonctions
5
Clavier de numérotation alphanumérique
Touches à double fonction pour entrées numériques et alphabétiques (par pressions
multiples).
6
Diodes d’attention
Diode luminescente clignotant rapidement: signale un appel
7
Touche de fichier
Accès au fichier privé pouvant contenir jusqu’à 100 (00...99) entrées.
8
Touche cadenas
Protection de la programmation et de l’appareil.
9
Touche d’absence
L’usager est présent/absent
10
Touche de répétition de la numérotation
Appel de l’un des 10 derniers numéros composés.
11
Touche de haut-parleur
Mise en et hors service du haut-parleur.
12
Touche de microphone
Mise en et hors service du microphone de mains libres et du combiné.
13
Touches de réglage
Réglage du volume durant un appel ou une conversation.
14
Touche de fin/de coupure (END)
Reprise de ligne pour nouvelle numérotation, interruption d’une fonction active,
conclusion de la programmation.
15
Touche de bloc-notes
Mémorisation d’au maximum 10 numéros avec nom ou d’autres remarques durant
une conversation ou au repos.
16
Touche de correction
Effacement du dernier caractère composé.
17
Touche de numérotation par le nom
Numérotation par le nom ou saisie d’une lettre sur le clavier alphanumérique (mode
de numérotation alpha), accès au fichier privé (double-clic).
III
32
Sous réserve de modifications techniques. Les services et fonctions disponibles dépendent du logiciel utilisé.
20317861fr_bat_a0
Concept d’utilisation: la technique des menus
La simplicité d’emploi de votre appareil repose sur une technique des menus ingénieuse.
Pour vous y retrouver à travers les différents menus et les options proposées, vous
disposez de la touche Fox et de la touche Menu. Procédez de la manière suivante:
Pour activer une fonction indiquée en bas de l’affichage (exemple:
"appeler" après composition d’un numéro), pressez la touche Fox sous
le mot correspondant.
Si vous ne trouvez pas la fonction désirée, pressez la touche Menu
autant de fois que nécessaire jusqu’à ce qu’elle apparaisse. Ainsi, les
affichages suivants apparaissent sur la version normale:
Pressez une fois
la touche Menu
Menu fonctions 1
Sw 15 Lu,12.Avr 12:35
Dévier Intercepter Recherche
Message
MENU
Pressez une
seconde fois la
touche Menu
Menu fonctions 2
Interphone
Se 15 Lu,12.Avr 12:35
Mode–transparent–DTMF
MENU
Pressez une
troisième fois
la touche Menu
Menu fonctions 3
Ne–pas–déranger
Se 15 Lu,12.Avr 12:35
Programmer
MENU
Remarque Par une longue pression sur la touche Menu (min. 2 secondes), vous entrez
directement dans le mode de programmation (spécifique au central et au
logiciel).
Options de menu programmées
Votre appareil vous offre la possibilité de programmer 6 fonctions ou noms/numéros
fréquemment utilisés et de les afficher sur l’écran. 3 des fonctions ou noms/numéros que
vous avez programmés apparaissent sur l’affichage à l’état de repos. Vous pouvez afficher
les autres en pressant la touche Menu autant de fois que nécessaire. Il vous suffira alors
de presser la touche Fox pour activer la Fonction ou composer le nom/numéro. Le chapitre
"Pour programmer votre appareil" et les instructions de programmation vous aideront à
tirer un profit maximal des caractéristiques de votre appareil.
Symboles particuliers
12ß Défilement en avant (Le chiffre indique
le numéro de l’enregistrement)
¥ Défilement en arrière
®© Mains libres
© Haut-parleur en service
œ Afficher davantage d’informations
£ Déplacer le curseur d’un rang
vers la droite (Espace)
† Microphone hors service
L1 Numéro de ligne
| Indique qu’une fonction est activée
20317861fr_bat_a0
1
Français
MENU
Avant de téléphoner pour la première fois
Veuillez lire attentivement le chapitre "Consignes de sécurité" de ce mode d’emploi!
Assurez-vous que votre appareil repose sur une surface stable et évitez de placer des
objets à proximité (car cela pourrait dégrader la qualité de conversation lors d’appel à
mains libres).
Réglage de la langue d’affichage
Programmer
MENU
MENU
*Langue
¥ ß
Ok
END
Pressez la touche Menu autant de fois que
nécessaire jusqu’à ce que l’option "Programmer"
apparaisse. Pressez la touche Fox sous
"Programmer", puis sur la touche Menu autant
de fois que nécessaire pour obtenir l’option
"*Langue" (observez le signe "*" devant une
langue étrangère). Pressez la touche Fox sous
"*Langue", sélectionnez la langue désirée par
défilement "¥ ß", enregistrez-la en pressant la
touche Fox sous "Ok" puis retournez à l’état
initial en pressant la touche de fin (END).
Remarque Sie vous pressez une touche erronée durant l’exécution d’une fonction, vous
percevrez une brève tonalité d’avertissement.
Réglage du volume des signaux de sonnerie durant un appel
Durant un appel, vous pouvez régler l’intensité
sonore des signaux de sonnerie au moyen de la
tou-che "+" (plus fort) ou de la touche "–"
(moins fort).
Réglage du volume de l’écouteur et du haut-parleur durant une conversation
Le volume de l’écouteur du combiné et du hautparleur est réglé dans l’appareil sur "normal".
Durant une conversation vous pouvez modifier ce
volume en pressant la touche "+" (plus fort) ou
de la touche "–" (moins fort).
2
20317861fr_bat_a0
Pour téléphoner
Préparation de la numérotation
Sans décrocher le combiné, composez le numéro désiré, que vous pouvez vérifier ou
même corriger au moyen de la touche de correction. Pressez ensuite la touche de hautparleur. Dès que votre interlocuteur soulève son combiné, vous pouvez téléphoner à
travers le combiné (il vous suffit de le soulever) ou à travers le microphone et le hautparleur (conversation à mains libres).
Pour annuler une préparation de numérotation en cours, pressez la touche de fin (END).
☛
Composez le numéro, puis pressez la touche Fox
sous "Appeler", ou soulevez le combiné, ou
pressez la touche de haut-parleur.
ou
Numérotation par touche de numéro
Pressez une fois ou deux fois sur la touche de
numéro désirée, puis pressez la touche Fox sous
"Appeler", ou soulevez le combiné, ou pressez la
touche de haut-parleur.
ou
Numérotation par touche de répétition de la numérotation
Pressez la touche de répétition, et si nécessaire,
défilez à travers les dix derniers numéros
composés, pressez la touche Fox sous "Appeler",
ou soulevez le combiné, ou pressez la touche de
haut-parleur.
ou
¥ ß
Numérotation depuis le bloc-notes
Pressez la touche de bloc-notes, et si nécessaire,
défiler avec la touche Fox à travers les dix
numéros enregistrés, puis pressez la touche Fox
sous "Appeler", ou soulevez le combiné, ou
pressez la touche de haut-parleur.
ou
¥ ß
Numérotation par le nom
☛
123˙˙
23˙˙
ABC˙˙
¥ ß
20317861fr_bat_a0
Pressez la touche de numérotation par le nom;
"Tous" exécute la recherche dans tous les fichiers
(si désiré, pressez la touche Fox sous
"Numérotation abrégée", "Interne" ou "Privé"
pour limiter la recherche dans ces fichiers).
Introduisez les initiales du nom et du prénom,
par ex. E#A (Einstein # Albert) et "le cas échéant"
défilez jusqu’à l’entrée désirée avec la touche Fox
sous "¥" (dans le cas où plusieurs noms sont
enregistrés avec les mêmes initiales). Pressez la
touche Fox sous "Appeler" puis soulevez le
combiné ou pressez la touche de haut-parleur.
3
Français
Numérotation de chiffres
Pour téléphoner
Remarques La composition des premières lettres du nom est la manière la plus simple
d’appeler un abonné enregistré dans le fichier. A cet effet, vous ne devez
connaître ni le numéro de téléphone, ni le numéro de fichier.
Exemple:
123˙˙
23˙˙
ABC˙˙
2
#
2x
1x
DEF
1
ABC
•••
1x
"Einstein#Albert"
Pressez deux fois la touche 2
une fois la touche # (espace)
une fois la touche 1
Si seul le nom de famille est connu:
123˙˙
23˙˙
ABC˙˙
2
3
DEF
GHI
2x
3x
5
MNO •••
etc.
2x
Si vous avez connecté un clavier supplémentaire ZTF (20 touches librement
programmables avec DEL), il faut taper les lettres sur le ZTF. Le clavier de
numérotation n’est dans ce cas qu’un clavier numérique.
La touche Fox vous permet d’insérer un espace (pressez sous "->"), afin de
pouvoir ensuite introduire le prénom.
Pour corriger un numéro ou un nom composé par préparation, utilisez la
touche de correction (effacement du dernier chiffre) ou les fonctions
d’édition.
Vous pouvez bien entendu composer un numéro de la manière habituelle:
décrochez le combiné et composez le numéro. Si vous attendez plus de 10
secondes entre l’entrée de deux chiffres successifs, la numérotation est
automatiquement interrompue.
Affichage du nom de l’appelant
Si le numéro de l’appelant est reçu (CLIP), l’affichage donne également le nom
correspondant, pour autant que ce numéro soit mémorisé avec le nom dans le fichier
privé, sur une touche de numéro ou comme numéro abrégé (la fonction est spécifique au
central et au logiciel).
4
20317861fr_bat_a0
Pour téléphoner
Numérotation depuis le fichier privé
Pressez la touche de fichier, composez le numéro
de fiche (deux chiffres, soit 00, 01...99) ou
défilez dans le menu "Consulter" avec la touche
Fox jusqu’à l’entrée désirée.
Appeler
Pressez la touche Fox sous "Appeler", ou
soulevez le combiné, ou pressez la touche de
haut-parleur.
☛
Consulter
¥ ß
Remarque Dans le menu "Traiter", vous pouvez indiquer le nom pour modifier l’entrée
correspondante (la fonction est spécifique au central et au logiciel).
Français
Traitement de la liste d’appels
Votre appareil enregistre automatiquement les noms/numéros des 10 derniers appels
auxquels vous n’avez pas pu répondre. Vous pouvez interroger ces noms/numéros et
rappeler les abonnés correspondants via cette liste.
œ
Liste d'appels
Pressez la touche Fox sous "i", puis sous
"Liste d’appels".
Ecoute amplifiée
Cette fonction vous permet d’entendre votre interlocuteur aussi bien à travers l’écouteur
du combiné qu’à travers le haut-parleur. Ceci permet à d’autres personnes présentes de
suivre la conversation.
Pressez la touche de haut-parleur durant la
conversation.
Remarque Pour reprendre la conversation normale, c’est-à-dire uniquement à travers le
combiné, pressez une nouvelle fois sur la touche de haut-parleur.
Conversation à mains libres
Le dispositif à mains libres vous permet de téléphoner sans le combiné.
Au lieu de soulever le combiné, pressez la touche
de haut-parleur.
Remarque Durant une communication à grande distance, il se pourrait que la qualité
sonore avec la fonction mains libres se dégrade. Dans ce cas, utilisez le
combiné.
Coupure microphone
Pour vous entretenir avec une personne se
trouvant dans votre bureau, sans que votre
interlocuteur téléphonique ne puisse entendre,
pressez la touche de microphone pour
déconnecter ce dernier. (Le symbole "†" apparaît
sur l’affichage.)
20317861fr_bat_a0
5
Pour téléphoner
Pour enregistrer dans le bloc-notes les numéros présents sur l’affichage
Le bloc-notes sert à enregistrer 10 numéros/noms temporairement.
Si un numéro est affiché sur l’écran, pressez la
touche bloc-notes. Le numéro affiché s’enregistre
également durant une conversation.
Remarque Lors d’une communication, vous pouvez enregistrer un autre numéro dans
le bloc-notes. A cet effet, introduisez le numéro, puis pressez sur la touche
bloc-notes.
Copie du contenu du bloc-notes
Les numéros/noms enregistrés dans le bloc-notes peuvent être directement copiés dans le
fichier privé ou être utilisés comme destination de message, de déviation ou d’annonce.
Avec les touches Menu et Fox, sélectionnez le
fichier, la destination de message, de déviation
ou d’annonce. Pressez la touche de bloc-notes
autant de fois que nécessaire pour obtenir
l’entrée à copier.
MENU
Ok
Pressez la touche Fox sous "Ok" pour copier
l’entrée.
Remarques La fonction est spécifique au central et au logiciel.
Si le numéro contenu dans le bloc-notes est associé à un nom et qu’un nom
différent est enregistré sous la destination concernée, ce nom n’est pas
remplacé.
Verrouillage et déverrouillage de votre appareil
Votre appareil offre la possibilité de protéger vos données privées et programmations
contre l’accès par des tiers, et d’interdire à des personnes étrangères d’effectuer des
appels vers l’extérieur en votre absence. Vous disposez à cet effet d’un cadenas avec mot
de passe personnel (2 à 10 chiffres).
Pressez la touche de cadenas, introduisez le mot
de passe et faites-le vérifier en pressant la touche
Fox sous "Ok".
¥ ß
En pressant la touche Fox sous "¥ ß",
sélectionnez "Téléphone: libre", "Téléphone:
bloqué" ou "Prog. bloquée". Sur "libre",
l’appareil est débloqué.
Ok
Lorsque vous avez pressé la touche Fox sous
"Ok", le message "Exécuté" apparaît un bref
instant.
☛
Ok
Remarque Par défaut, le mot de passe programmé est "0000" (voir "Modification du
mot de passe").
6
20317861fr_bat_a0
Pour utiliser les fonctions de confort
Introduction et coupure d’une rétrodemande
Vous êtes en communication avec un interlocuteur et désirez, sans interrompre celle-ci,
converser brièvement avec un autre interlocuteur.
☛
Rétrodemande
END
Composez le numéro du second interlocuteur,
puis pressez la touche Fox sous
"Rétrodemande".
Lorsque vous avez terminé votre seconde
conversation, vous pouvez couper cette
communication avec la touche de fin (END).
Français
Remarque Si après une rétrodemande vous pressez une touche erronée ou si vous
raccrochez, une tonalité continue retentit durant 10 secondes, pour vous
rappeler que vous avez un interlocuteur en attente. Si vous soulevez le
combiné durant ce laps de temps, la première communication est rétablie.
Va-et-vient
Vous avez introduit une rétrodemande, mais après avoir terminé la seconde conversation,
vous désirez retourner à la première communication tout en conservant le second
interlocuteur en ligne.
2e–conversation
Pressez la touche Fox sous "2e_conversation".
Transfert de la communication
Vous avez introduit une rétrodemande, et désirez mettre vos deux interlocuteurs en
communication directe en raccrochant votre combiné.
Raccrochez votre combiné.
Conférence
Vous avez introduit une rétrodemande et désirez établir une conférence avec votre
interlocuteur initial.
Conférence
Pressez la touche Fox sous "Conférence".
Remarque N’ayez aucune crainte! Vous ne risquez pas de perdre une communication
en établissant une conférence. Les communications sont coupées
uniquement lorsque vous raccrochez le combiné ou que vous pressez la
touche de fin (END).
20317861fr_bat_a0
7
Pour utiliser les fonctions de confort
Demande de rappel
Vous désirez qu’un interlocuteur occupé ou ne répondant pas vous rappelle.
Rappel
Désactiver
Pressez la touche Fox sous "Rappel". Vous
entendrez la tonalité de confirmation. Lorsque
vous aurez raccroché, l’affichage indiquera
"Appel attendu par" avec le numéro/nom de
l’abonné concerné. Sous "Désactiver", vous
pouvez annuler le rappel demandé avec la
touche Fox.
Remarque On ne peut activer qu’un rappel à la fois.
Signal d’annonce pour un interlocuteur occupé
Vous désirez rendre attentif un interlocuteur, occupé par une autre communication, de
votre désir de le contacter par un signal d’annonce et par un message sur l’affichage de
son appareil.
Annonce
Pressez la touche Fox sous "Annonce".
Remarque Si votre interlocuteur refuse votre demande d’appel, la communication est
coupée.
Recherche d’un interlocuteur via l’installation de recherche de personnes1)
Vous désirez atteindre un interlocuteur directement, ou après un certain nombre de
signaux de sonnerie via l’installation de recherche de personnes.
MENU
☛
Recherche
Ok
Pressez la touche Menu autant de fois que
nécessaire jusqu’à ce que la fonction "Recherche" apparaisse. Pressez la touche Fox
à cet endroit et composez le numéro de
l’interlocuteur recherché.
Confirmez par "Ok".
1) Selon le type de PBX
8
20317861fr_bat_a0
Pour utiliser les fonctions de confort
Envoi d’un message1)
Vous avez la possibilité d’envoyer des messages préparés à un ou à plusieurs partenaires.
¥ ß
MENU
☛
☛
Ok
Pressez la touche Menu autant de fois que
nécessaire jusqu’à ce que la fonction "Message"
apparaisse. Pressez la touche Fox à cet endroit, et
cherchez le message désiré à l’aide de la fonction
de défilement.
Si nécessaire, complétez le contenu du message
(pour cela, commutez en mode de numérotation
alpha au préalable). Pressez la touche Fox sous
"Ok" et sélectionnez la destination.
Ok
Confirmez avec "Ok".
Remarques Vous pouvez aussi introduire le numéro du destinataire par préparation
de la numérotation (par ex. numérotation par le nom)
Les messages peuvent être modifiés au moyen de la touche de correction ou
des fonctions d’édition.
Lire un message1)
La réception d’un message est signalée sur l’affichage au repos de l’appareil.
Lire
Pressez la touche Fox sous "Lire", et le message
sera affiché durant 8 secondes. Lorsque le
message comprend plusieurs lignes, la suivante
est affichée et ainsi de suite jusqu’à la fin.
œ
En pressant la touche Fox sous "i", vous pouvez
appeler la ligne suivante avant que les 8
secondes ne soient expirées.
Effacer
END
Une fois lu, le message peut être effacé de la
mémoire en pressant la touche Fox sous
"Effacer". Le message suivant apparaîtra.
L’effacement du dernier message ou la pression
de la touche de fin (END) commande le retour à
l’affichage de repos. Le symbole "i" reste affiché
tant que tous les messages n’ont pas été effacés.
Remarque L’operation est spécifique au central et au logiciel.
1) Selon le type de PBX
20317861fr_bat_a0
9
Français
Message
Pour utiliser les fonctions de confort
Laisser une information aux appelants1)
Vous désirez laisser une information aux appelants internes éventuels.
Dévier
ß ¥
MENU
¥ ß
☛
Ok
Ok
Pressez la touche Menu puis la touche Fox sous
"Dévier". Avec la touche Fox sous "¥ ß", défilez
jusqu’à "Dévier vers: Information".
Pressez la touche Fox sous "Ok" (la dernière
information est affichée). Défilez jusqu’à trouver
l’information désirée, que vous pourrez
compléter si nécessaire.
Pressez la touche Fox sous "Ok" pour activer
l’information.
Remarques Les informations peuvent être modifiées au moyen de la touche de
correction ou des fonctions d’édition.
Déviation des appels
Vous pouvez dévier les appels qui vous sont destinés vers un autre appareil ou vers
l’opératrice.
Dévier
MENU
MENU
¥ ß
Retransmission
d'appel
Pressez la touche de menu puis la touche Fox
sous "Dévier".
Ok
Avec la touche Fox sous "¥ ß", sélectionnez le
mode de déviation et confirmez avec "Ok".
Vous avez les possibilités suivantes: "Dévier vers:
Abonné", "Dévier: si occupé", "Dévier vers:
Recherche" ou "Dévier vers: Information".
¥ ß
ou pressez la touche Fox sous "Retransmission
d’appel", puis pressez-la sous "¥ ß" et
sélectionnez "Retransmission d’appel: Abboné"
ou "Retransmission d’appel: Recherche" et
confirmez avec "Ok".
OK
☛
OK
Désactiver
Introduisez la destination de la déviation (le cas
échéant composez un nouveau numéro) et
confirmez par "Ok". Les messages "Exécuté" et
"Dévier vers nnnn" apparaissent. La déviation
peut être désactivée en pressant la touche Fox
sous "Désactiver".
Remarque Si la déviation doit être exécutée uniquement lorsque vous êtes en
communication, sélectionnez "Dévier: si occupé". La fonction est spécifique
au central et au logiciel.
1) Selon le type de PBX
10
20317861fr_bat_a0
Pour utiliser les fonctions de confort
Réponse à un appel via l’installation de recherche de personnes1)
Vous êtes recherché via l’installation de recherche de personnes et interceptez l’appel sur
un autre appareil.
MENU
☛
Ok
Pressez la touche Menu autant de fois que
nécessaire jusqu’à ce que la fonction
"Intercepter" apparaisse. Pressez la touche Fox à
cet endroit, puis pressez sous "Recherche",
composez le numéro d’appel et pressez la
touche Fox sous "Ok".
Français
Intercepter Recherche
Réponse à un signal d’appel circulaire
Vous désirez répondre à un appel commuté sur le signal d’appel circulaire.
Intercepter
MENU
Appel–circulaire
Pressez la touche Menu autant de fois que
nécessaire jusqu’à ce que la fonction
"Intercepter" apparaisse. Pressez la touche Fox à
cet endroit, puis pressez sous "Appel_circulaire".
Interception d’un appel
Vous entendez qu’un appel aboutit à un autre appareil, et comme son usager est absent,
vous désirez le prendre sur votre propre appareil.
Intercepter
Ok
MENU
☛
Ok
Pressez la touche Menu autant de fois que
nécessaire jusqu’à ce que la fonction "Intercepter" apparaisse, puis la touche Fox à cet endroit.
Le numéro du dernier interlocuteur dont vous
avez intercepté l’appel apparaît sur l’affichage, et
s’il correspond au numéro désiré, confirmez en
pressant la touche Fox sous "Ok". Si ce n’est pas
le cas, composez le numéro désiré et pressez la
touche Fox sous "Ok" pour confirmation.
Remarque Si on a répondu à une recherche de personne ou un appel circulaire
précédemment, il faut d’abord presser la touche Fox sous "Abonné" et
ensuite entrer le numéro.
1) Selon le type de PBX
20317861fr_bat_a0
11
Pour utiliser les fonctions de confort
Interphone
Cette fonction permet de vous adresser à un interlocuteur directement à travers le hautparleur de son appareil, sans attendre sa réponse.
☛
Interphone
MENU
Ok
Pressez la touche de menu autant de fois que
nécessaire jusqu’à ce que la fonction
"Interphone" apparaisse. Pressez la touche Fox à
cet endroit, composez le numéro ou cherchez le
groupe destinataire désiré, puis pressez la touche
Fox sous "Ok" pour confirmation.
Rappel demandé
Un interlocuteur a essayé de vous atteindre; le message "Demande rappel" et le numéro/
nom apparaissent sur l’affichage.
Appeler
Activer
Pressez la touche Fox sous "Activer" et attendez
que la communication soit établie avec votre
interlocuteur.
ou
Refuser
Effacer
afin de refuser le rappel, vous pressez la touche
Fox sous "Effacer".
Présent/absent
☛
Cette touche va activer les fonctions nécessaires lorsque vous quitterez votre place de
travail, respectivement lorsque vous y reviendrez. A la livraison, cette touche est
programmée comme déviation d’appel.
Entrez le numéro de votre remplaçant puis
pressez la touche d’absence. Cette déviation est
supprimée en pressant cette touche une seconde
fois.
Remarque La touche d’absence peut être programmée comme touche de numéro ou
touche de fonction (cf. "Affectation des différents types de touches")
12
20317861fr_bat_a0
Pour utiliser les fonctions de confort
Mode transparent (numérotation en fréquences DTMF)
Durant une communication, il est possible d’activer une fonction au moyen de la
numérotation en fréquences, comme par exemple la commande à distance d’un
répondeur téléphonique.
MENU
END
Pressez la touche Menu autant de fois que
nécessaire jusqu’à ce que
"Mode_transparent_DTMF" apparaisse. Pressez
la touche Fox à cet endroit et composez ensuite
la série de chiffres.
Pressez la touche de fin (END) pour remettre le
mode transparent hors service.
Remarque Par une longue pression sur la touche
mode transparent.
, vous entrez directement dans le
Parquer
Durant une communication, vous pouvez parquer une conversation et en établir une
nouvelle.
END
☛
Parquer
Reprendre
20317861fr_bat_a0
Pressez la touche Fox sous "Parquer". Ce parcage
est confirmé par le message "exécuté".
Pressez la touche de fin (END) pour établir une
nouvelle communication.
Pour reprendre la conversation parquée, pressez
la touche Fox sous "Reprendre". Vous serez alors
directement en liaison avec votre interlocuteur.
13
Français
☛
Mode–transparent
▼
PRG2: Suite avec MENU Me 12. Avr. 13:20
Touches Touche_fox Enreg._fiche Texte
▼
PRG1: Suite avec MENU Me 12. avr. 17:55
Sonnerie
Touche_team Touche_ligne
▼
Sem. 19 Me 12. avr. 13.20
Mode_transparent_DTMF
Texte au repos:_Office 40
Ok Retour _>
Å
Rythme sonnerie
¥ 4 ß
Volume de la sonnerie
Ok Test
¥ 4 ß
Ok Test
Tn: Réglage touche team
Retour Sonnerie Réponse
Ln: Réglage touche de ligne
Retour Sonnerie Réponse Occup. Appels
Office 40
Interphone
Presser touche team
Retour
Mélodie
¥ 3 ß
Office 40 Sem. 19
Me 12. avr. 13:20
Dévier Intercepter Recherche Message
Presser touche ligne
Retour
▼
▼
▼
▼
▼
▼
▼
▼
▼
▼
▼
▼
Combiné Priorité
¥ ß
¥ 1 ß
Ret 10s
¥ ß
Ln: Rep.:
Ok Retour
Ln: Sonnerie:
Ok Test
En
¥ ß
Volume
¥ 6 ß
Tn: Sonnerie:
Ok Test
Signal d’attention:
Ok Test
Tonalité
¥ 2 ß
Mélodie
¥ 5 ß
Aucune proirité
Mélodie
¥ 3 ß
Combiné Priorité
¥ ß
¥ 1 ß
Ne pas inscrire
¥ ß
Me 12. avr. 13:20
Programmer
Ln: Occup:
Ok Retour
Ln: Liste d’appels
Ok Retour
Office 40 Sem.19
Ne_pas_déranger
Tn: Rep.: Touche
Ok Retour ¥ ß
▼
▼
▼
▼
Me 12 avr. 13:20
Rythme
¥ 4 ß
Rythme
¥ 3 ß
Ln: Sonnerie:
Ok Test
Ln: Sonnerie:
Ok Test
▼
14
▼
Office 40 Sem. 19,
Pour utiliser les fonctions de confort
Aperçu des menus
20317861fr_bat_a0
PRG4:Suite avec MENU
Fin
Test
▼
Service
PRG3:Suite avec MENU
Code *Langue
Mains_libres
▼
Ancien code: ✱✱✱✱
Ok Retour
Effacer
▼
Effacer
▼
Touche team
¥ ß
Nouveau code: ✱✱✱✱
Ok Retour
Fn:
Effacer la touche
Ok Retour
¥ ß
▼
Fn:
Touche fonction
Ok Retour
¥ ß
Tn:
Ok Retour
▼
Nn: Touche numéro
Ok Retour ¥ ß Mémoire 1 Mémoire2
Fxn:
Ne pas deranger
Ok Retour
¥ ß
Mé1: Entrer numéro
Ok Retour _> Nom Lire
▼
Touche fox:
Menu fonctions 2
Entrée4 Entrée5 Entrée6 Retour Cont.
Fn: Entrer numéro
Ok Retour _> Nom Lire
Rechercher fiche, entrer numéro:
Nouvelle_fiche
Entrer_nom
032 624 21 11; Müller Zip AG
Modifier Retour Nlle. Effacer ¥ 0 ß
Confirmation: ✱✱✱✱
Ok Retour
Mé1:
;Entrer le nom
Ok Retour _> Numéro Lire Effacer Å
Mé1: I#48PX
Ok
Retour
Mé2: I*48PX
Ok
Retour
Mé2:
;Entrer le nom
Ok Retour _> Numéro Lire Effacer Å
Mémoire 1
▼
Mémoire 2
Mé1: I*26PX
;Entrer le nom
Ok Retour _> Numéro Lire Effacer Å
Effacer
Touche quelconque
Lire
Touche Fox (Ok)
Mé2: I#26PX
Ok
Retour
Touche Menu
Touche Fox
▼
▼
▼
▼
Français
Raccord. collectif
¥ ß
Fn:
Ok
Retour
Lire
Tn: Entrer numéro
Ok
Retour
Effacer
Lire Effacer Å
Effacer
Mé2: Entrer numéro;
Ok Retour _> Nom Lire
Mé1: Entrer numéro
Ok Retour _> Nom
Effacer
_> Nom Lire
Mé: I*26PX
Ok Retour
Mé1:
;Entrer le nom
Ok Retour _> Numéro Lire Effacer Å
Fn:
;Entrer le nom
Ok Retour _> Numéro Lire Effacer Å
"Fin" permet de quitter la programmation. Les autres points sont réservés à l’installateur.
Langue, Sprache, Language, Lingua: Français
Ok Retour
¥ ß
Hors
¥ ß
Mains libres auto:
Ok Retour
Presser touche prog.
Retour
▼
▼
Fxn:
Effacer la touche
Ok Retour
¥ ß
▼
Fxn:
Touche fonction
Ok Retour
¥ ß
▼
▼
Touche fox:
Menu de séléction
Entrée1 Entrée2 Entrée3 Retour Cont.
Fxn:
Touche numéro
Ok Retour
¥ ß
Memoire 1
▼
▼
▼
▼
▼
▼
▼
▼
▼
▼
▼
▼
▼
▼
▼
▼
▼
▼
▼
▼
▼
▼
▼
▼
▼
▼
20317861fr_bat_a0
▼
Rechercher fiche, entrer nom:_
Nouvelle_fiche No_de_fiche Chercher Å
Pour utiliser les fonctions de confort
Aperçu des menus (suite)
15
Pour programmer votre appareil
Points à observer lors de la programmation
La programmation fait partie du concept d’utilisation de l’appareil. Avant de commencer
à programmer, lisez attentivement le chapitre "concept d’utilisation" situé au début de ce
mode d’emploi.
Combiné
Durant la programmation, le combiné doit être raccroché. Si vous le soulevez en cours de
programmation, le processus est interrompu. Si vous recevez un appel durant la
programmation, vous devez choisir soit de répondre à cet appel, soit de terminer
l’opération de programmation en cours.
Mode de programmation
Vous pouvez accéder au mode de programmation de deux manières:
- Par une longue pression sur la touche Menu (min. 2 secondes)
- En pressant plusieurs fois la touche Menu jusqu’à obtenir "Programmer", puis pressez
la touche Fox dessous.
Remarque Une longue pression sur la touche de numérotation alpha permet d’accéder
directement au menu d’entrée dans le fichier.
Une longue pression sur la touche librement programmable permet
d’accéder directement au menu de programmation de cette touche.
L’activation par longue pression est spécifique au central et au logiciel.
Touche Menu
La touche Menu permet de se déplacer sur deux niveaux: d’abord au niveau du menu de
programmation (PRG 1– … ; choisir le domaine de programmation, p.ex. "Touches") puis
au niveau de la sous-fonction (par exemple mémorisation d’une touche de numéro). Ces
deux niveaux peuvent être quittés en pressant la touche de fin (END).
Enregistrer
Le contenu que vous avez entré ou modifié sous une fonction donnée est enregistré par
pression de la touche Fox sous "Ok". Si vous pressez sous "Retour" ou pressez la touche
fin (END), la programmation faite n’est pas enregistrée.
Exemples de programmation:
Réglage de la mélodie de sonnerie
Sonnerie
Test
¥ ß
Ok
END
En mode de programmation, pressez la touche
Fox sous "Sonnerie". Réglez la mélodie désirée
avec "¥ ß" et testez avec "Test". Confirmez ce
réglage en pressant la touche Fox sous "Ok" puis
revenez à l’état initial en pressant la touche de
fin (END).
Remarque Le volume et le rythme de la sonnerie peuvent être réglés de la même
manière.
16
20317861fr_bat_a0
Pour programmer votre appareil
Réglage du texte affiché à l’état de repos
Ok
END
En mode de programmation, pressez la touche
Fox sous "Texte", composez le texte puis
enregistrez-le en pressant la touche Fox sous
"Ok".
Pour retourner à l’état initial, pressez la touche
de fin (END).
Programmation de la touche Fox (options de menu programmées)
Votre appareil vous offre la possibilité de programmer 6 fonctions ou noms/numéros
fréquement utilisés et de les afficher sur l’écran. Trois d’entre-eux apparaissent sur
l’affichage à l’état de repos, vous pouvez accéder aux autres en pressant la touche Menu.
Touche fox entrées–1_3
Cont.
entrées–4_6
¥ ß
OK
☛
OK
En mode de programmation, pressez la touche
Fox sous "Touche_fox" et sélectionnez l’entrée
désirée (entrées_1-3 affichées au repos,
entrées_4-6 sous "Menu fonctions 2", appelé en
pressant la touche Fox sous "Cont.").
Avec la touche Fox sous "¥ ß", sélectionnez le
type de touche désiré ("Touche de numéro" ou
"Touche fonction") puis confirmez par "Ok".
Selon le type de touche sélectionné, indiquez le
numéro/nom ou la fonction désirée (par ex.
dévier) puis confirmez avec la touche Fox sous
"Ok".
Remarques Le symbole "|" indique que la fonction est activée.
L’operation est spécifique au central et au logiciel.
Par une longue pression sur la touche Fox vous entrez directement au menu
de programmation pour cette touche.
☛
Modification du mot de passe
Ok
Code
☛
☛
Ok
Ok
END
20317861fr_bat_a0
En mode de programmation, pressez la touche
Fox sous "Code", introduisez l’ancien mot de
passe (par défaut "0000") puis confirmez par
"Ok". Introduisez le nouveau mot de passe,
pressez la touche Fox sous "Ok", réintroduisez
ce mot de passe et reconfirmez-le en pressant la
touche Fox sous "Ok" pour l’enregistrer. Pour
retourner à l’état initial, pressez la touche de fin
(END).
17
Français
Texte
☛
La cellule de texte fixe sert, par exemple pour les appareils utilisés par plusieurs personnes,
à indiquer le numéro de téléphone de l’appareil ou le nom de l’entreprise.
Pour programmer votre appareil
Programmation de votre fichier privé
Le fichier privé est votre répertoire électronique personnel vous permettant de mémoriser
jusqu’à 100 (00...99) numéros/noms et/ou fonctions. En votre absence, les entrées
peuvent être protégées au moyen d’un mot de passe.
Enreg.–fiche Nouvelle–fiche
☛
Ok
Composez le numéro/nom et mémorisez avec la
touche Fox sous "Ok".
Il y a plusieurs possibilités de chercher ou de
modifier l’enregistrement existant:
☛
No.–de–fiche
☛
En mode de programmation, pressez la touche
Fox sous "Enregistrement fiche" puis sous
"Nouvelle fiche", pour entrer une nouvelle fiche.
Composez les premières lettres du nom ou
pressez la touche Fox sous "Numéro de fiche" et
composez le numéro de fiche désiré (00 a 99).
ou
Chercher ¥ 99 ß
Modif.
☛
Ok
Pressez la touche Fox sous "Chercher" et défilez
avec la touche Fox sous "¥ ß" à travers le fichier.
Pressez la touche Fox sous "Modifier", composez
ou modifiez le numéro/nom et mémorisez avec la
touche Fox sous "Ok".
Remarque Il est conseillé d’introduire le nom et le prénom correspondants pour chaque
numéro, car cela simplifie la recherche et la numérotation par le nom.
Fonctions d’édition
Une longue pression d’au minimum 2 secondes sur la touche "+" ou "-" déplace le
curseur vers la gauche ou la droite pour corriger une entrée.
Si le curseur se trouve au début d’une série de chiffres, la pression de la touche de
correction ou une longue pression sur la touche "-" le fait sauter à la fin. S’il se trouve à
la fin, une longue pression sur la touche "+" le fait sauter au début. Après la correction
d’un caractère, la fonction d’édition doit être réactivée par une longue pression pour
effectuer d’autres corrections.
Exemple: O32 624 34 54
Le caractère introduit avec une touche de caractère vient se placer à gauche du curseur.
Exemple: Schuhmann Claara
Schuhmann Clara
La touche de correction efface le caractère situé à gauche du curseur.
Remarque Les fonctions d’édition sont spécifiques au central et au logiciel.
18
20317861fr_ba_a0
Pour programmer votre appareil
Langage macro
A
Prendre la ligne de plus grande priorité
I
Prendre la ligne interne
X
Raccrocher
_
Sépare sortie réseau et numéro (par ex. 0–24 …)
P
Pause (1 sec.)
L01
Exemples:
Français
Le langage macro permet de mémoriser sur une touche plusieurs fonctions.
Prend la touche de ligne 01
N
Compose le numéro entré par préparation de la numérotation
.
Touche de commande
Z
Encl.-/déclenchement du mode transparent
R
Compose le dernier numéro appelé
I201
I*21201X
Enclenche mains libres et appelle 201.
Enclenche mains libres, dévie vers 201 et raccroche.
Réponse automatique
Vous pouvez programmer l’appareil de sorte qu’en cas d’appel le dispositif à mains libres
soit automatiquement mis en fonction et que vous puissiez répondre sans devoir soulever
le combiné.
Mains libres
¥ ß
Ok
En mode de programmation, pressez la touche
Fox sous "Mains libres".
Ensuite vous pouvez choisir quels types d’appels
doivent être automatiquement commutés en
mode "Mains libres". Confirmez avec "Ok".
Remarque La "Mains libres" automatique pour la touche de team n’est efficace que si
ce point de programmation est sur "En" (En service).
20317861fr_ba_a0
19
Affectation des différents types de touches
Avant d’attribuer un contenu aux différentes touches, il s’agit de définir leur genre. On
effectue une distinction entre les touches de numéro, les touches de team, les touches de
ligne et les touches de fonction. Vous ne pouvez pas programmer les touches de ligne
vous-même, car elles sont définies par la programmation du central.
Touches
¥ ß
Ok
En mode de programmation, pressez la touche
Fox sous "Touches", pressez la touche désirée,
sélectionnez le genre de touche avec la touche
Fox "¥ ß", puis confirmez en pressant la touche
Fox sous "Ok".
Remarque Si à l’état de repos de votre appareil vous pressez plus que 2 secondes la
touche correspondante, le mode de programmation de cette touche
s’enclenchera automatiquement.
Touches de numéro
Les touches de numéro (également appelées touches de destination ou touches de
mémoire) permettent de sélectionner rapidement des numéros internes ou externes
fréquemment utilisés. Chaque touche de numéro est dotée de deux places de mémoire
(simple- ou double-clic) pouvant recevoir un numéro d’appel.
Vous pouvez programmer les touches de numéro avec prise de ligne automatique (à l’aide
du langage macro): de cette manière, la fonction mains libres est enclenchée automatiquement, une ligne donnée est prise et le numéro d’appel désiré est composé.
Affectation des touches de numéro
☛
Touches
Ok
En mode de programmation, pressez la touche
Fox sous "Touches", sélectionnez la touche de
numéro et la place de mémoire désirées, composez le numéro et le nom, puis confirmez en
pressant la touche Fox sous "Ok".
Touches de ligne1)
Si votre appareil est configuré dans le central comme sélecteur de ligne ou appareil en
série, vous pouvez gérer jusqu’à 13 lignes en parallèle. Il existe une distinction entre la
ligne principale, c’est-à-dire celle dont le numéro d’appel identifie l’appareil, et les autres
lignes réseau. La ligne principale (touche interne) correspond toujours à la première
touche à gauche (en haut).
Les fonctions de confort décrites dans ce mode d’emploi sont applicables uniquement
avec la ligne principale. Aux touches de ligne s’appliquent les mêmes modes de
numérotation, ainsi que les fonctions rétrodemande, va-et-vient, transfert d’appel,
parcage/déparcage. Excepté la ligne principale, vous ne pouvez traiter que des appels
externes par l’intermédiaire de la touche de ligne.
1) Dépend de la version logicielle et du type de PBX
20
20317861fr_ba_a0
Affectation des différents types de touches
Chaque touche de ligne est dotée d’une diode luminescente bicolore et d’une étiquette
d’identification. Cette diode indique l’état de la ligne.
Diode luminescente éteinte: ligne libre
Diode luminescente allumée fixement: ligne
occupée
Diode luminescente clignotant rapidement: un
appel entrant est présent sur cette ligne
La couleur des diodes donne des indications quant à l’origine et à la destination des appels:
vert:
rouge:
appel interne ou conversation interne
appel externe ou conversation externe
Réglage des touches de ligne
Maintenez la touche de ligne correspondante
enfoncée jusqu’à ce que le menu du réglage des
touches de ligne apparaisse. Sous "Sonnerie",
¥ ß
Ok
sélectionnez le réglage désiré: "Hors service",
"En service" ou "Retard 10/20/30s", "Mélodie"
et "Rythme". Confirmez par "Ok". Ce réglage
définit les conditions de signalisation des appels
entrants.
En pressant la touche menu vous aurez davantage de possibilités de réglages: sous
l’option de menu "Occupation", vous pouvez choisir si la prise de ligne a lieu lorsque le
combiné est décroché ou que la touche de haut-parleur est pressée, ou lorsque la touche
de ligne est pressée. De la même manière, vous déterminez sous "Réponse" les
conditions de réponse à un appel sur la ligne.
Remarque Les réglages des touches de ligne peuvent aussi être effectués dans le mode
de programmation sous le point "Touche ligne".
Exécution ou prise d’appel sur une ligne
Lorsque vous soulevez le combiné ou pressez la touche de haut-parleur, votre appareil
prend automatiquement une ligne, qui est alors indiquée dans le coin supérieur gauche
de l’affichage. Pour changer de ligne, pressez sur une autre touche de ligne.
La ligne occupée est également indiquée lors de la réception d’un appel. Si plusieurs
appels parviennent simultanément sur des lignes différentes, l’identité de l’appel
correspondant à la touche de ligne supérieure occupée est affichée.
Commutation entre plusieurs lignes
Vous pouvez passer librement d’un appel à un autre en pressant une autre touche de
ligne: la conversation précédemment active est alors parquée automatiquement sur la
touche de ligne correspondante. De cette manière, vous pouvez répondre à des appels
arrivant sur d’autres lignes ou reprendre des communications parquées un instant plus
tôt. Vous ne pouvez pas reprendre des conversations sur les lignes occupées depui
d’autres appareils.
20317861fr_ba_a0
21
Français
Diode luminescente clignotant lentement: ligne
parquée ou en maintien
Affectation des différents types de touches
Touches de team
La fonction de team facilite aux membres d’une équipe (par exemple une équipe de vente
ou de marketing) les communications réciproques et les suppléances respectives.
Affectation et utilisation des touches de team
Sur votre appareil, vous pouvez programmer jusqu’à 13 touches de team avec des
numéros. A cet effet, procédez de la même manière que pour les touches de numéro,
mais en pressant les touches de team au lieu de celles de numéro. Chaque touche de
team est munie d’une diode luminescente bicolore et d’une étiquette d’inscription. Cette
diode signale l’état de la ligne, et donc de l’appareil du partenaire de team.
La diode luminescente ne clignote pas: l’appareil
du partenaire de team est libre.
La diode luminescente est allumée fixement:
l’appareil du partenaire de team est occupé par
une communication.
La diode luminescente clignote rapidement:
appel destiné au partenaire de team; si la
sonnerie de team est programmée, l’appel est
également signalisé acoustiquement.
La couleur des diodes donne des indications quant à l’origine et à la destination des appels:
vert:
appel interne ou conversation interne
rouge: appel externe ou conversation externe
Si vous pressez la touche de team au repos ou lorsque le combiné est décroché, vous
appelez votre partenaire de team. Un double clic enclenche la fonction d’interphone. Lors
d’un appel entrant (la DEL clignote), l’appui sur la touche de team correspondante permet
de répondre à l’appel.
Si vous pressez la touche de team alors que votre partenaire de team est en conversation,
vous activez une demande de rappel, ou bien vous interceptez un appel entrant sur son
appareil. Durant une communication, un appel sur une touche de team est signalé
uniquement par clignotement de la diode luminescente et, si la sonnerie de team est
programmée, par un signal d’attention unique.
Réglage des touches de team
Les touches de team se règlent de la même manière que les touches de ligne.
Touches de fonction
Les touches de fonction permettent de programmer des fonctions utilisées fréquemment
sur des touches programmables libres. En pressant sur la touche, vous enclenchez la
fonction et allumez la DEL, par une deuxième pression, vous les déclenchez.
Lors de la programmation, choisissez d’abord la fonction qui sera soutenue par la DEL.
L’appareil remplira automatiquement les deux mémoires de la touche, avec les codes de
fonction correspondants. Vous pouvez les compléter pour des applications spécifiques.
22
20317861fr_ba_a0
Installation
Contenu de l’emballage
Appareil
123..
ABC..
END
1
ABC
4
JKL
7
STU
2
DEF
5
MNO
8
VWX
Combiné
3
GHI
6
Câble de raccordement
téléphonique
Câble de raccordement
du combiné
Plots
Kurzbedienungsanleitung
Umleiten
☎
Tel.
END
No.:
123 ..
ABC
..
031
999
Zur auf
Sucher
ckstellen
Norbert Norbert
Gerhardpriv.
<
<<
Frank
Computer Helmut << <
Transport
Rita
<
AG <<
Notruf AG
<
<<
Feuer
<
<<
20
1
2
DEF
5
MNO
8
VWX
0
Menu
70
ABC
4
JKL
7
STU
3
GHI
6
PQR
9
YZ•
0...9
12344NeumannNNorbert
Rückfrage
Foxtaste
PQR
Zustandszeile
Menüzeile
MENU
• In der Menüzeile angezeigte Funktion
aktivieren:
-Taste unter dem Text
drücken (Beispiel: "Rückfrage")
9
YZ•
0
-Taste
• Eine andere Funktion aktivieren:
ein- bzw. mehrmals drücken und Menüpunkt mit
-Taste wählen
MENU
0...9
• Folgende Funktionen werden mit dazu
bestimmten Funktionstasten aktiviert:
Wahlwiederholung
Mikrofon ein/aus
Lautsprecher ein/aus
Abwesend/Anwesend
Couvercle transparent
Ruf-bzw. Hörlautstärke bei Ruf bzw.
Gespräch einstellen
Abbrechen/Wiederbelegen (in Wahl od. Gespräch)
END
Bedienungsanleitung
Mode d'emploi
Istruzioni per l'uso
Operating instructions
Français
Mode
d'emploi
Raccordement du combiné et de l’appareil
Après avoir déballé l’appareil, commencez par
connecter le combiné en enfichant le bout long du
câble spiralé du combiné dans le petit connecteur
situé à la base de l’appareil. En tirant légèrement
sur le câble, vérifiez si la fiche est bien verrouillée.
Enfichez l’autre extrémité dans le combiné.
A présent, branchez l’appareil en enfichant
la fiche du câble de raccordement
téléphonique dans le grand connecteur
situé à la base de l’appareil. En tirant
légèrement sur le câble, vérifiez si la fiche
est bien verrouillée. Glissez le câble dans les
ergots prévus à cet effet. Enfichez l’autre
extrémité dans la prise de raccordement téléphonique.
Enfichez les deux plots sur la partie supérieure de la base.
Identification des touches programmables
Sur le rabat de ce mode d’emploi, vous trouverez des étiquettes détachables sur lesquelles
vous pourrez inscrire les noms correspondant aux numéros enregistrés. Placez ces
étiquettes en face des touches programmables correspondantes et recouvrez-les du
couvercle transparent.
Clavier supplémentaire ZTF
Votre appareil peut être équipé d’un module supplémentaire. Ce dernier vous offre 20
touches avec DEL supplémentaires, ainsi qu’une façon simplifiée d’introduire des lettres
(majuscules, minuscules, caractères spéciaux)
20317861fr_ba_a0
23
Consignes de sécurité
Veuillez lire attentivement ce mode d’emploi et conservez-le avec soin.
Adressez vos questions éventuelles à un spécialiste. Confiez les travaux de maintenance à
un spécialiste; n’ouvrez jamais l’appareil vous-même.
Ne touchez pas les contacts enfichables avec un objet métallique et pointu. Placez
l’appareil sur une surface antidérapante.
Evitez d’exposer votre appareil au rayonnement solaire direct ou à d’autres sources de
chaleur.
Evitez d’installer ou d’utiliser votre appareil dans un local présentant un danger
d’explosion. Protégez-le de l’humidité, de la poussière, des liquides et vapeurs corrosifs.
N’exposer pas votre appareil à des champs électromagnétiques (moteurs électriques,
appareils électroménagers). La qualité de la liaison pourrait être gênée. Evitez de l’installer
à proximité d’appareils radio, TV et magnétoscopes.
Ne branchez le câble de raccordement de votre appareil qu’à une prise prévue à cet effet.
Ne remplacez jamais la fiche du câble de raccordement.
Ne transportez jamais l’appareil suspendu au câble de raccordement.
Ne téléphonez jamais à proximité immédiate d’eau.
Nettoyez votre appareil avec un chiffon doux, légèrement humide ou antistatique.
N’employez à cet effet aucun détergent ni produit chimique quelconque. N’utilisez votre
appareil que dans une plage de température comprise entre +5 °C et +35 °C.
24
20317861fr_ba_a0
En cas de dérangement
Votre interlocuteur ne vous entend pas, ou vous ne l’entendez pas
Assurez-vous que le câble de raccordement du combiné est correctement branché.
Combiné soulevé, pas de tonalité de numérotation, pas d’affichage
Assurez-vous que le câble de raccordement téléphonique est correctement enfiché dans la
prise correspondante.
Affichage présent, pas de connexion
Français
Votre appareil est racccordé correctement, mais il est peut-être verrouillé. Déverrouillez
votre appareil, voir "Verrouillage et déverrouillge de votre appareil."
Les touches programmables ne peuvent pas être programmées
Peut-être la programmation est-elle verrouillée. Déverrouillez votre appareil, voir
"Verrouillage et déverrouillge de votre appareil."
Déverrouillage de l’appareil: oubli du mot de passe
Demandez à votre téléphoniste de vous transmettre votre mot de passe à partir du
central.
Affichage: "Type d'appareil faux"
Auparavant, un autre type d’appareil était connecté. Si vous voulez annoncer
correctement votre appareil, allez dans la programmation. Dans le sous-menu "Enreg.
fiche" ou " Touches", "Changer type d’appareil" apparaît. Pressez "Oui" ou "Non".
Si vous confirmez, toutes les données privées seront effacées. Si vous ne voulez pas
annoncer votre appareil, presser "œ". Malgré cela, les fonctions standard peuvent être
utilisées.
Affichage: "trying to register"
L’appareil ne peut pas s’annoncer; renseignez-vous auprès de votre spécialiste.
Remarque En présence d’un autre message, prenez contact avec l’administrateur du
système.
20317861fr_bat_a0
25
Auto-test
Une fois que vous avez contrôlé votre appareil en ce qui concerne les raccordements, le
verrouillage, etc., vous pouvez découvrir d’autres sources d’erreurs en exécutant un autotest.
Activer le mode d’auto-test
Débranchez le câble de raccordement
téléphonique de sa prise. Tout en maintenant la
touche fox enfoncée à gauche, rebranchez le
raccordement. Vous vous trouvez maintenant en
mode d’auto-test: les diodes luminescentes de
l’affichage alternent continuellement entre
allumé et éteint.
☛
Test
Soulevez le combiné puis pressez successivement
chacune des touches. Une tonalité doit retentir
dans le haut-parleur à chaque pression.
Le microphone et l’écouteur sont connectés l’un
à l’autre; lorsque vous soufflez dans le microphone, vous devez entendre le son dans
l’écouteur.
Pressez la touche de haut-parleur: le microphone
de mains libres est brièvement connecté à l’écouteur du combiné. Vous devriez entendre le bruit
d’ambiance.
Désactiver le mode d’auto-test
Débranchez le raccordement téléphonique et
rebranchez-le.
Si vous constatez une anomalie quelconque durant cet auto-diagnostic, avisez votre
téléphoniste ou un spécialiste.
26
20317861fr_bat_a0
Codes de fonction
Quels chiffres faut-il composer?
Séquence de touches
Interphone de porte ....................................................... 851... 852 1)
.........
Numéro de secours ........................................................ 12
1)
.........
Opératrice ....................................................................... 11
1)
.........
Raccordements collectifs ............................................... 860... 888 1)
.........
Sélection abrégée PBX ................................................... 7000...7999 1)
.........
Sortie réseau
société ............................................................................ 0
privé ............................................................................... 10
avec compte de frais ....................................................... 13 no-compte
.........
.........
.........
Voie d’acheminement .................................................... 170... 199 1)
.........
Postsélection
Activer l’affichage de messages .................................... *38
Appel codé ...................................................................... 8 ou *81
Conférence
établir à partir d’une communication .............................. 3
exclure les abonnés internes ........................................... *31
Intercalation ...................................................................
refuser ............................................................................
répondre avec maintien ..................................................
répondre sans maintien ...................................................
7 ou *44
0
2
1
Maintien multiple (commuter entre
deux communications) .................................................... 2
Parquer une communication ......................................... *76
Rappel automatique (activer)
en cas d’abonné occupé ................................................. 9 ou *37
en cas d’abonné absent .................................................. 9 ou *37
Recherche de personnes 3) ............................................. 8 ou *81
Retour à la communication ........................................... 1
Signal d’annonce ............................................................
refuser ............................................................................
répondre avec maintien ..................................................
répondre sans maintien ...................................................
répondre avec conférence ...............................................
6 ou *43
0
2
1
3
Transfert des taxes sur un compte de frais .................. *78 no-compte
1) La définition et le domaine des numéros sont spécifiques au central et au logiciel
3) La fonction est spécifique au central et au logiciel
20317861fr_bat_a0
27
Français
Sélection normale
Codes de fonction
Présélection
Annuler le rappel automatique ..................................... #37
Appel circulaire (répondre) .............................................. *83
Appel codé
activer ............................................................................ *81 no-abonné
répondre ......................................................................... *82
Appel de délai (réveil) 2)
activer ordre permanent ..................................................
désactiver ordre permanent ............................................
activer ordre unique ........................................................
désactiver ordre unique ...................................................
*56 hh mm
#56
*55 hh mm
#55
Circuit de jour, de nuit et de fin de semaine (groupe de commutation 1)
jour (position 1) .............................................................. *8511
nuit (position 2) .............................................................. *8512
fin de semaine (position 3) .............................................. *8513
Communication
parquer ........................................................................... *76
reprendre une parquée ................................................... #76
Conférence
variable ........................................................................... *71 no-abo. 1*
... no-abo.5# 1)
prédéterminée 3) ............................................................. *70 no-conférence
Courtesy (message d’accueil) 3)
enclencher groupe 1 .......................................................
déclencher groupe 1 .......................................................
enclencher groupe 2 .......................................................
déclencher groupe 2 .......................................................
*931
#931
*932
#932
Désactiver toutes les fonctions activées 2) .................... *00
(excepté raccordement collectif)
Déviation des appels DDA
se protéger contre DDA 2) ...............................................
autoriser DDA sur soi 2) ...................................................
activer DDA impérative 2) .................................................
désactiver DDA impérative 2) ...........................................
activer DDA impérative sur dernier numéro programmé ..
désactiver DDA impérative sur dernier no. programmé ....
activer DDA sur le numéro préprogrammé 2+3) .................
désactiver DDA sur le numéro préprogrammé 2+3) ............
activer DDA si occupé 2) ..................................................
désactiver DDA si occupé 2) .............................................
activer DDA si occupé sur dernier numéro progr. .............
désactiver DDA si occupé sur dernier numéro progr. .......
*02
#02
*21 no-destination
#21
*21#
#21
*22
#22
*67 no-destination
#67
*67#
#67
1) La définition et le domaine des numéros sont spécifiques au central et au logiciel
2) La télécommande est possible
3) La fonction est spécifique au central et au logiciel
28
20317861fr_bat_a0
Codes de fonction
activer DDA sur message standard 2+3) .............................
désactiver DDA sur message standard 2+3) ........................
activer DDA sur recherche de personnes IRP ou
sur réveil central avec appel codé 2+3) ............................
désactiver DDA sur recherche de personnes IRP ou
sur réveil central avec appel codé 2+3) ............................
*24 no-texte#
#24
*28
#28
Follow me
activer ............................................................................ *23 no-abonné
effacer ............................................................................ #23
Français
Groupe de commutation (entrant)
groupe de commutation x, pos. 1 ................................... *85x1
groupe de commutation x, pos. 2 ................................... *85x2
groupe de commutation x, pos. 3 ................................... *85x3
remarque: x est un chiffre entre 2 et 9 ............................
Intercalation 2)
se protéger contre .......................................................... *04
le permettre .................................................................... #04
Interception d’appel ....................................................... *86 no-abonné
Interphone
à un abonné ................................................................... *7998 no-abonné
à un groupe .................................................................... *79 no-groupe
répondre dans un groupe ............................................... *89
Least Cost Routing (LCR)
Forcer un opérateur de réseau 3) ...................................... *90
Message 2)
activer l'affichage ............................................................ *38 no-abonné
effacer la destination ...................................................... #38 no-abonné
Messages (messages standard avec/sans paramètre) 2+3)
envoyer à un abonné ...................................................... *3598 no-abo. no-texte#
envoyer à un groupe ....................................................... *35 no-groupe no-texte#
envoyer à tous ................................................................ *3599 no-texte#
Ouvrir les portes ............................................................. *751/*752 1)
Raccordement collectif 2)
se connecter ................................................................... *48
se déconnecter ............................................................... #48
Recherche de personnes 3)
chercher ......................................................................... *81 no-abonné
répondre (avec une voie de recherche) ............................ *82
répondre (avec plusieurs voies de recherche) ................... *82 no-abonné
1) La définition et le domaine des numéros sont spécifiques au central et au logiciel
2) La télécommande est possible
3) La fonction est spécifique au central et au logiciel
20317861fr_bat_a0
29
Codes de fonction
Relais
enclencher ...................................................................... *755…*757 1)
déclencher ...................................................................... #755…#757 1)
Retransmission des appels RDA (retransmission si non réponse)
se protéger contre RDA 2) ................................................ *02
autoriser RDA sur soi 2) .................................................... #02
activer RDA 2) .................................................................. *61 no-destination
désactiver RDA 2) ............................................................. #61
activer RDA sur le dernier numéro programmé ................ *61#
désactiver RDA sur le dernier no. programmé ................. #61
activer RDA sur le numéro préprogrammé 2+3) ................. *62
désactiver RDA sur le numéro préprogrammé 2+3) ............ #62
activer RDA sur recherche de personnes IRP ou
sur réveil central avec appel codé 2+3) ............................ *68
désactiver RDA sur recherche de personnes IRP ou
sur réveil central avec appel codé 2+3) ............................ #68
Signal d'annonce 2)
se protéger contre .......................................................... *04
le permettre .................................................................... #04
Sortie réseau
s'active avec rappel de frais ............................................. *32 no-abonné
Suppression des appels (ne pas déranger) 2)
activer ............................................................................ *26
désactiver ....................................................................... #26
Télécommande
activer (à partir d'un appareil tiers) ................................. *06 no-abo. *21 no-dest.
lancer la télécommande /
introduire le numéro d'abonné activable à distance /
introduire la procédure à * souhaitée (p.ex. *21 no-dest.)
désactiver (à partir d'un appareil tiers) ........................... *06 no-abonné #21
lancer la télécommande /
introduire le numéro d'abonné activable à distance /
introduire la procédure à # souhaitée (p.ex. #21)
désactiver (à partir du propre appareil) .......................... #21
introduire la procédure à # (p.ex. #21)
1) La définition et le domaine des numéros sont spécifiques au central et au logiciel
2) La télécommande est possible
3) La fonction est spécifique au central et au logiciel
30
20317861fr_bat_a0
A
Affichage du nom de l’appelant ............. 4
Annonce ................................................ 8
Auto-test .............................................. 26
Numérotation en fréquences DTMF ...... 13
Numérotation par le nom ....................... 3
Numérotation par touche de numéro ..... 3
Numérotation par touche de répétition ... 3
B
O
Bloc-notes .......................................... 3, 6
Options de menu programmées ....... 1, 17
C
P
Clavier supplémentaire ZTF ................... 23
Conférence ............................................ 7
Consignes de sécurité ........................... 24
Contenu de l’emballage ....................... 23
Conversation à mains libres .................... 5
Copie du contenu du bloc-notes............. 6
Coupure microphone ............................. 5
Parquer ................................................ 13
Préparation de la numérotation .............. 3
Présent/absent ...................................... 12
Programmation de la touche Fox .......... 17
Programmer ......................................... 16
D
Demande de rappel ................................ 8
Déviation des appels ............................. 10
E
Ecoute amplifiée ..................................... 5
Envoi d’un message ................................ 9
F
Fichier privé ............................................ 5
Fonctions d’édition ............................... 18
I
Interception d’un appel ........................ 11
Interphone ........................................... 12
L
Laisser une information ........................ 10
Langage macro ..................................... 19
Langue d’affichage ................................. 2
Lire un message ...................................... 9
Liste d’appels .......................................... 5
M
Mains libres ............................................ 5
Message ................................................. 9
Mode transparent ................................. 13
Modification du mot de passe .............. 17
N
R
Raccordement du combiné et de
l’appareil ............................................ 23
Rappel demandé .................................. 12
Recherche de personnes ................... 8, 11
Réglage de la langue d’affichage ............ 2
Réglage de la mélodie d’appel .............. 16
Réglage des touches de team ............... 22
Réglage du texte affiché ....................... 17
Réglage du volume de l’écouteur et du
haut-parleur ......................................... 2
Réglage du volume des signaux d’appel
durant un appel ................................... 2
Réponse automatique ........................... 19
Rétrodemande ........................................ 7
S
Signal d’annonce .................................... 8
Signal d’appel circulaire ........................ 11
Symboles particuliers .............................. 1
T
Touches de fonction ............................. 22
Touches de ligne ................................... 20
Touches de numéros ............................. 20
Touches de team .................................. 22
Transfert de la communication ................ 7
V
Va-et-vient .............................................. 7
Verrouillage et déverrouillage ................. 6
Numérotation de chiffres ........................ 3
Numérotation depuis le bloc-notes ......... 3
20317861fr_bat_a0
31
Français
Index
1
2
3
17
16
K
anleurzbed
itun ienu
ngsg
15
Foxtas
te
Status
Menüz
zeil
eile e
MEN
U
14
13
>
>> Anruf
übe
PSA
>
rn
Gerh übern ehme
ehm
n
ard
Fra
en
n
Helm k
ut
Rita
>
M
ori
>>
Einka
Han tz
uf S L1
>
spe
üd
Einka
>> Compu ter
Tra
uf W L2
nsp ter AG
>
est
ort A
Einka
>> Hande
G
L3
ls A
We
u
f
N
G
rke
>
ord
Einka
A
>> Meier A G
uf Ü
L
Mülle
bers 4
G
ee
r AG
L
Che 5
☎ Te
f
l. No
L6
.: 03
1 99 privat
9'20
'70
>
>>
>>
123 ..
ABC ..
END
1
2
AB C
4
7
STU
DEF
5
JKL
MN
8
VW
X
O
MEN
U
3
GHI
6
PQ R
9
YZ•
0
4
0...9
5
12 11 10 9 8 7
II
6
Comandi e visualizzazioni
1
Visualizzatore (Display)
Il vostro apparecchio è munito di un display alfanumerico a due righe.
Prima riga: segnalazione di stato, nome e numero dell’interlocutore
Seconda riga: menu dipendente dallo stato
2
Tasto Fox (tasto con diverse funzioni)
3
Tasto Menu
Con questo tasto potete raggiungere i diversi menu
4
Tasti di linea e tasti programmabili con doppia memoria.
5
Tastiera di selezione alfanumerica
Tasti a funzione doppia con immissione numerica o alfabetica (mediante pressione
ripetuta)
6
LED di avviso
Il fotodiodo si accende rapidamente: segnalazione di chiamata
7
Tasto agenda privata
Accesso alla agenda privata fino a 100 immissioni
8
Blocco telefono
Blocco della selezione e della programmazione del telefono (con codice segreto)
9
Tasto Assenza
L’utente è presente/assente
10
Tasto Riselezione
Richiamo degli ultimi 10 numeri selezionati
11
Tasto Altoparlante
Inserzione/disinserzione dell’altoparlante
12
Tasto Microfono
Attiva/disattiva il microfono del Viva Voce o del microtelefono
13
Tasti Volume
Regolazione del volume di ricezione, Viva Voce o microtelefono
14
Tasto END (fine)/tasto interruzione
Impegno per una nuova selezione, interruzione di una funzione (iniziata), conclusione della programmazione
15
Tasto Registrazione appunti
Memorizzazione fino a 10 numeri con nomi o annotazioni durante una telefonata
o nella posizione di riposo
16
Tasto Correzione
Cancellazione dell'ultimo carattere digitato
17
Tasto Numeri/Lettere
Utilizzo della tastiera numerica per la selezione di numeri o di lettere, accesso
alla agenda privata (doppio clic)
III
32
Ci riserviamo il diritto di apportare modifiche tecniche.
La funzionalità sono specifiche alla versione del software.
20317861it_bat_a0
L'uso facilitato: la tecnica a menu
La semplicità di impiego del vostro apparecchio è basata sulla tecnica intelligente a menu.
Per ogni operazione il Sistema presenta menu e sottomenu diversi. Il tasto Fox e il tasto
MENU vi consentono un’agevole navigazione. Procedete nel modo seguente:
Se volete attivare una funzione mostrata nella parte inferiore del display, (ad
esempio "Chiamare" dopo aver selezionato un numero) premere il tasto Fox
situato sotto alla corrispondente parola.
MENU
Se non trovate la funzione desiderata, premete il tasto MENU ripetutamente
finché questa compare. Se premete il tasto MENU più volte, sul display compaiono le seguenti segnalazioni:
MENU
Tasto MENU premuto
una volta.
Menu 1
Dev. R.x–ass
Setti.15, Lu 12 Apr
Ricerc.p.
MENU
Tasto MENU premuto
una seconda volte.
Menu 2
Annuncio
Setti.15, Lu 12 Apr 12:35
Selezione–multifreq.
MENU
Tasto MENU premuto
una terza volta.
Menu 3
Setti.15, Lu 12 Apr 12:35
Non–disturbare
Programmare
Nota
12:35
Con un "Click lungo" del tasto MENU (min. 2 secondi) si attiva il modo di
programmazione (ciò dipende dalla versione del software e dal tipo di PABX).
Il vostro apparecchio vi offre la possibilità di visualizzare nel display 6 nomi/numeri e/o
funzioni che usate frequentemente. Nello stato di riposo appaiono le tre nomi/numeri o
funzioni che avvete programmato, dovete solo premere il tasto Fox in corrispondenza per
attivarle. Le successive tre programmazioni sono accessibili nel secondo menu (premere
due volte il tasto MENU). Il capitolo "Come programmare il vostro apparecchio" e le
istruzioni per la programmazione possono aiutarvi a sfruttare appieno tutte le potenzialità
del vostro apparecchio.
Simboli del display
12ß Scorrimento in avanti (il numero
corrisponde alla posizione del registro)
¥ Scorrimento in indietro
®© Viva voce
© Altoparlante
œ Visualizzare più informazioni
£ Il segno di scrittura (cursore) si sposta
di una posizione verso destra (Space)
† Microfono disattivato
L1 Numero della linea
| Funzione attiva sul tasto Fox
20317861it_bat_a0
1
Italiano
Punti del menu programmati
Prima di telefonare la prima volta
Leggete per favore in primo luogo il capitolo degli avvisi di sicurezza contenuto in questo
manuale! Assicuratevi che il vostro apparecchio poggi su di una superficie solida e che
davanti all’apparecchio non vi siano oggetti che potrebbero compromettere la qualità del
servizio "viva voce".
Impostazione della lingua per le segnalazioni del display
Programmare
MENU
MENU
*Lingua
¥ ß
Ok
END
Nota
Premete ripetutamente il tasto MENU fino a che
nel display compare il punto di menu "Programmare". Premete il tasto Fox al di sotto di "Programmare e successivamente il tasto MENU
finché sul display compare il punto di menu
"*Lingua" (notate che il carattere "*" appare
anche con le lingue straniere). Premete il tasto
Fox sotto "*Lingua", scegliete la lingua facendo
scorrere la lista "¥ ß", memorizzate con il tasto
Fox sotto "Ok". Premete il tasto di fine (END),
per tomare alla situazione iniziale.
Mentre eseguite una funzione, vi può capitare di premere un tasto sbagliato; in
un caso del genere si sente un breve suono di avviso.
Regolazione del volume della suoneria durante la chiamata
Durante la chiamata potete regolare il volume
della suoneria del vostro apparecchio mediante il
tasto "+" (più alto) oppure "–" (più basso).
Regolazione del volume di ascolto (microtelefono/altoparlante del viva voce)
durante la conversazione
Il volume del vostro apparecchio è impostato su
"normale", sia nel microtelefono che nell’altoparlante. Durante la conversazione è possibile
modificare il volume mediante il tasto "+" (più
alto) oppure "–" (più basso).
Nota
2
Se dopo una richiamata premete un tasto sbagliato o riagganciate il microtelefono, per 15 secondi si attiva un segnale acustico che vi ricorda l’interlocutore
in attesa.
20317861it_bat_a0
Come telefonare
Selezione con preparazione di selezione
Una possibilità offerta dal vostro apparecchio come novità importante è la selezione con
preparazione di selezione. Senza sollevare il microtelefono potete comporre il numero
desiderato che potrà essere controllato e, se necessario, corretto con il tasto di correzione,
e poi premere il tasto Altoparlante. Appena il vostro interlocutore solleva il suo
microtelefono, voi potete scegliere di effettuare la telefonata con il microtelefono (a tale
scopo sollevate semplicemente il vostro microtelefono) oppure in viva voce.
Per interrompere una preparazione di selezione già iniziata premere il tasto di fine (END).
Selezione numerica
☛
Comporre il numero, premere il tasto Fox sotto
"Chiamare" oppure sollevare il microtelefono o
premere il tasto Altoparlante oppure
Selezione mediante un Tasto numero
Clic semplice o doppio sul Tasto numero desiderato, premere il tasto Fox sotto "Chiamare"
oppure sollevare il microtelefono o premere il
tasto Altoparlante oppure
Selezione mediante tasto Riselezione
Selezione di un numero dal registro appunti
Premere il tasto di registro appunti e, se necessario, scorrere la lista con il tasto Fox, per richiamare uno degli quattro numeri memorizzati,
premere il tasto Fox sotto "Chiamare" oppure
sollevare il microtelefono o premere il tasto
Altoparlante oppure
¥ ß
Selezione per nome
☛
123˙˙
23˙˙
ABC˙˙
¥ ß
20317861it_bat_a0
Premere il Tasto Numeri/Lettere; "Tutti" cerca in
tutti i registri, premere il tasto Fox per attivare il
registro desiderato "Interno", "Sel. Abbr." o
"Agenda". Introdurre le iniziali di cognome e
nome, p.es. E#A (Einstein # Albert). Eventualmente con il tasto Fox sotto a "¥ ß" si può
avanzare fino alla registrazione cercata (se ci
sono vari nomi con le medesime iniziali). Premete
il tasto Fox sotto "Chiamare" oppure sollevate il
microtelefono o premete il tasto Altoparlante.
3
Italiano
Premere il tasto di ripetizione selezione
oppure, se necessario, scorrere la lista con il
tasto Fox, per richiamare uno dei quattro numeri
selezionati per ultimi, premere il tasto Fox sotto
"Chiamare" oppure sollevare il microtelefono o
premere il tasto Altoparlante oppure
¥ ß
Come telefonare
Nota
L’immissione delle prime lettere di un nome è il modo più semplice di selezionare
un numero memorizzato in un’agenda. Non avete bisogno né del numero di
telefono né del numero della registrazione.
Esempio di immissione di lettere:
123˙˙
23˙˙
ABC˙˙
2
#
2x
1x
DEF
1
ABC
•••
1x
"Einstein#Albert"
premere il tasto 2: 2 volte
il tasto #: 1 volta
il tasto 1: 1 volta
Se siete al corrente del solo cognome:
123˙˙
23˙˙
ABC˙˙
2
3
DEF
GHI
2x
3x
5
MNO •••
etc.
2x
Se avete collegato un Modulo ZTF (tastiera supplementare con 20 tasti )
dovete immettere le lettere tramite questo modulo. In tal caso la tastiera
dell’apparecchio è utilizzabile solo come tastiera numerica.
Con il tasto # o Fox (premere sotto "->") è possibile immettere caratteri
vuoti, per poi potere immettere le iniziali del nome.
Correggete un numero o un nome immesso con la preparazione di selezione
mediante il tasto di correzione (cancellare l’ultima cifra/lettera) e le funzioni
di editazione.
Naturalmente con il vostro apparecchio è possibile eseguire la selezione
anche nel modo solito: sollevare il microtelefono e selezionare il numero
secondo il tipo di selezione. Se durante l’immissione attendete più di 10
secondi tra due numeri, la preparazione della selezione viene automaticamente interrotta.
Visualizzazione del nome del chiamante
Quando viene ricevuto il numero del chiamante (CLIP), nel display appare anche il nome
corrispondente, a condizione che tale numero sia memorizzato con i nomi nell’agenda
privata, sotto un tasto numerico o come numero a selezione abbreviata. (Questa funzione
dipende dal software e dal centralino.)
4
20317861it_bat_a0
Come telefonare
Selezione di un numero dell’agenda privata
Premete il tasto agenda privata, introducete il
numero della scheda desiderata (00, 01 ... 99)
oppure con il tasto Fox sfogliate dal menu
"Vedere" fino a trovare la registrazione desiderata.
Chiamare
Premete il tasto Fox sotto a "Chiamare" oppure
sollevate il microtelefono o premete il tasto
Altoparlante.
☛
Vedere
¥ ß
Nota
Nel menu "Elaborare" si può introdurre il nome, per modificare la corrispondente
registrazione.
Lista chiamate
Il vostro apparecchio memorizza automaticamente nella lista delle chiamate i nomi/numeri
delle ultime 10 chiamate che non hanno ricevuto risposta. Successivamente potete
visualizzare i nomi/numeri e richiamare le persone tramite questa lista.
œ
Chiamate
Premete il tasto Fox sotto "i", successivamente
premerlo sotto "Chiamate".
Con il dispositivo di ascolto amplificato potete ascoltare il vostro interlocutore sia attraverso il microtelefono sia attraverso l’altoparlante; in tal modo anche altre persone nella
stanza possono seguire la vostra conversazione.
Premete il tasto Altoparlante durante la conversazione.
Nota
Se volete continuare la conversazione in modo normale, cioè attraverso il
microtelefono, premete nuovamente il tasto Altoparlante.
Viva voce
Il dispositivo di viva voce vi permette di telefonare senza microtelefono.
Invece di sollevare il microtelefono premere il
tasto Altoparlante.
Nota
In caso di conversazioni a grande distanza è possibile che la qualità nella viva voce
sia inferiore. In questi casi si consiglia di usare il microtelefono.
Disinserire il microfono
Se volete parlare con altre persone nella stessa
stanza senza che il vostro interlocutore ascolti
attraverso il telefono, premere il tasto microfono
per disinserire il microfono (nel display appare il
simbolo "†")
20317861it_bat_a0
5
Italiano
Ascolto amplificato
Come utilizzare le funzioni di comfort
Memorizzazione nel registro degli appunti del numero visualizzato sul display
Il registro appunti serve a memorizzare provvisoriamente 10 nomi/numeri
Se sul display vi è visualizzato un numero,
premere il tasto Registro appunti. Il numero
visualizzato viene memorizzato anche durante
una conversazione.
Nota
Durante una conversazione potete memorizzare anche un numero nuovo nel
registro degli appunti. Basta immettere il numero e poi premere il tasto Registro
appunti.
Per copiare i contenuti del registro appunti
I nomi/numeri memorizzati nel registro appunti possono essere copiati direttamente
nell’agenda privata oppure essere utilizzati come destinazione del messaggio, della
deviazione o dell’annuncio.
MENU
Ok
Nota
Con il tasto MENU e Fox scegliete la scheda o la
destinazione di messaggio, deviazione o annuncio. Premere ripetutamente il tasto del registro
appunti, finché non appare la registrazione da
copiare.
Premere il tasto Fox sotto a "Ok", per copiare la
registrazione.
Se il numero nel registro appunti è combinato con un nome e nella posizione di
destinazione c’è già un altro nome, quest’ultimo non viene sovrascritto.
Questa funzione dipende dal software e dal centralino.
Blocco e sblocco del vostro apparecchio
Il vostro apparecchio vi offre la possibilità di evitare che persone estranee possano avere
accesso ai vostri dati privati e alle vostre programmazioni o che possano telefonare con il
vostro apparecchio mentre siete assenti. A tale scopo è disponibile la funzione di blocco
con un codice segreto (PSWD) da 2 a 10 caratteri.
☛
Ok
Nota
6
Premere il tasto Blocco telefono. Introdurre il
codice segreto e confermate con il tasto Fox
sotto a "Ok".
¥ ß
Con il tasto Fox sotto a "¥ ß", selezionate
"Telefono: libero", "Telefono: bloccato" oppure
"Programmazione: bloccato" (con "libero"
l’apparecchio viene sbloccato).
Ok
Dopo aver premuto il tasto Fox sotto a "Ok"
appare per un momento il messaggio "Eseguito".
Inizialmente è programmato il codice segreto "0000", (Vedere "Modifica del
codice segreto/password PSWD).
20317861it_bat_a0
Come utilizzare le funzioni di comfort
Attivazione/conclusione di una richiamata
Siete già collegati con un interlocutore e volete, senza interrompere il collegamento, avere
una breve conversazione con un altro interlocutore.
☛
Richiamata
Immettere il numero del nuovo interlocutore.
Premere il tasto Fox sotto a "Richiamata";
l’utente viene chiamato (la conversazione
precedente viene posta in attesa).
Dopa aver ricevuto l’informazione desiderata:
END
Nota
Premete il tasto di fine (END) per ritornare alla
conversazione con il primo interlocutore.
Se dopo una richiamata premete un tasto sbagliato o riagganciate il
microtelefono, per 15 secondi si attiva un segnale acustico, che vi ricorda
l’interlocutore in attesa.
Richiamata alternata
Avete eseguito una richiamata e volete avere la possibilità di passare da una conversazione all’altra.
Ch. in attesa
Premete il tasto Fox sotto "Chiamata in attesa"
Italiano
Trasferimento della conversazione
A seguito di una richiamata volete collegare tra loro i vostri due interlocutori.
Riagganciate
Conferenza
Avete eseguito una richiamata e volete ora realizzare una conferenza telefonica insieme
con il vostro primo interlocutore.
Conferenza
Premere il tasto Fox sotto a "Conferenza".
Nota
Niente paura! Realizzando una conferenza nessuna conversazione può "andare
persa"; le chiamate vengono interrotte soltanto con il tasto di fine (END) oppure
riagganciando!
20317861it_bat_a0
7
Come utilizzare le funzioni di comfort
Prenotazione automatica su libero o occupato
Volete prenotare una chiamata su un utente interno occupato o che non risponde.
Prenot.
Cancellare
Nota
Premere il tasto Fox sotto a "Prenotazione".
Ascoltate il tono di conferma. Dopo aver
riagganciato il microtelefono nel display appare
"Chiamata attesa da", insieme con il nome/
numero dell’utente corrispondente. Con il tasto
Fox sotto a "Cancellare" si può cancellare la
richiesta di chiamata.
Si può attivare una sola prenotazione alla volta.
Avvisare l’interlocutore occupato
Volete avvertire un interno interlocutore occupato in altra conversazione che desiderate
parlare con lui inviandogli un segnale di chiamata e una segnalazione sul display.
Avviso
Nota
Premere il tasto Fox sotto "Avviso".
Se il vostro interlocutore respinge la vostra chiamata, la connessione viene
interrotta.
Ricerca dell’interlocutore mediante l’impianto ricerca-persone1)
Volete cercare un interlocutore direttamente oppure, dopo alcuni tentativi di chiamarlo sul
suo apparecchio, mediante l’impianto ricerca-persone.
MENU
☛
Ricerca
persone
Ok
Premere ripetutamente il tasto MENU finché
compare la funzione "Ricerca persone". Premere
a questo punto il tasto Fox e comporre il numero
dell’interlocutore cercato.
Confermare con "Ok".
1) Dipende dal tipo di PBX
8
20317861it_bat_a0
Come utilizzare le funzioni di comfort
Invio di messaggio1)
Potete inviare messaggi standard o editati a un interno o ad un gruppo di interni.
Messaggio
¥ ß
MENU
☛
☛
OK
OK
Nota
Premere ripetutamente il tasto MENU finché
compare la funzione "Messaggio". Premere a
questo punto il tasto Fox, cercare il messaggio
desiderato scorrendo la lista di quelli standard.
Completare se necessario il contenuto del messaggio (se dovete inserire delle lettere, utilizzate
prima il tasto Numeri/lettere), premere il tasto Fox
sotto "Ok" ed immettere il numero di destinazione.
Confermare con "Ok".
Il numero del distinatario del messaggio può essere immesso anche in
preselezione (p.e. tramite selezione con nome)
Con il tasto di correzione e le funzione di editazione potete modificare il messaggio visualizzato.
Se avete ricevuto un messaggio, il desplay dell’apparecchio nello stato di riposo ve lo
segnala.
Leggere
œ
Cancell.
END
Nota
Premere il tasto Fox sotto a "Leggere". Il messaggio viene visualizzato per 8 secondi. Nel caso dei
messaggi di più righe, dopo i primi 8 secondi
viene visualizzata la riga successiva, e cosi via fino
alla visualizzazione di tutto il messaggio.
Con il tasto Fox sotto a "i" l'eventuale riga
successiva viene visualizzata subito.
Con il tasto Fox sotto a "Cancellare" il messaggio viene cancellato dalla memoria, visualizzando
il messaggio successivo.
Cancellando l’ultimo messaggio memorizzato o
premendo il tasto di fine (END), il display ritorna
nello stato di riposo. La "i" resta visualizzata nel
display finché tutti i messaggi non sono stati
cancellati.
La funzione dipende dal centralino e dalla versione del Software.
1) Dipende dal tipo di PBX
20317861it_bat_a0
9
Italiano
Lettura dei messaggi1)
Come utilizzare le funzioni di comfort
Lasciare un’informazione in caso d’assenza1)
Volete desiderate lasciare un’informazione per gli eventuali chiamanti interni.
Dev.
ß ¥
MENU
¥ ß
☛
Ok
Ok
Nota
Premete il tasto MENU e successivamente il tasto
Fox sotto a "Deviazione". Con il tasto Fox sotto a
"¥ ß" sfogliate fino a "Devia su informazione".
Premete il tasto Fox sotto a "Ok" (compare
l’ultima informazione). Continuate a sfogliare,
finché non trovate l'informazione desiderata,
che, se necessario, potete completare.
Premere il tasto Fox sotto a "Ok", per attivare
l'informazione visualizzata.
Con il tasto di correzione e le funzioni di editazione potete modificare l'informazione visualizzata.
Deviazione delle chiamate
Potete deviare le chiamate in arrivo su un altro apparecchio, o sul Posto Operatore.
Dev.
Premete il tasto MENU e successivamente il tasto
Fox sotto a "Deviazione".
MENU
¥ ß
Deviare su:
Ok
¥ ß
☛
Ok
Cancellare
Nota
Con il tasto Fox sotto a "¥ ß" selezionate il
modo di deviazione e confermate con "Ok".
Potete scegliere fra "Deviaz. Utente", "Dev. a
tempo", "Dev. se occ." oppure "Dev. su Info".
Oppure premete il tasto Fox sotto a "Dev." e con
il tasto Fox sotto a "¥ ß" scegliete "Deviare su:
Utente", o "Deviare su: Informazione", oppure
"Deviazione: se occupato".
Introdurre la destinazione della deviazione
(eventualmente selezionate dei nuovi numeri di
chiamata) e confermare con "Ok".
Compare il messaggio "Eseguito" e "Deviato su:
nnnn". La deviazione può essere disattivata con il
tasto Fox sotto a "Cancellare".
Se la deviazione deve avvenire soltanto se avete già un collegamento attivo,
scegliete "Deviazione: se occupato (questo tipo di deviazione dipende dal
software e dal centralino).
1) Dipende dal tipo di PBX
10
20317861it_bat_a0
Come utilizzare le funzioni di comfort
Risposta ad una chiamata dell’impianto ricerca-persone1)
Siete chiamati attraverso l’impianto ricerca-persone e rispondete alla chiamata su di un
apparecchio.
Ricerca–
R.x–ass persone
MENU
☛
Ok
Premere ripetutamente il tasto MENU finché
compare la funzione "Risposta per assente"
(R.x_ass). Premere in tale posizione il tasto Fox, e
successivamente sotto "Ricerca_persone".
Comporre il numero e premere il tasto Fox sotto
"Ok".
Risposta a chiamata su suoneria centralizzata
Volete rispondere ad una chiamata che agice sulla suoneria centralizzata.
R.x–ass
MENU
Suoneria–central.
Premere ripetutamente il tasto MENU finché non
appare la funzione "Risposta per assente"
(R.x_ass). Premere a tale posizione il tasto Fox e
successivamente sotto "Suoneria centralizzata".
Udite che c’è una chiamata su di un altro apparecchio nella vostra zona e, poiché la
persona chiamata è assente, volete rispondere alla telefonata dal vostro apparecchio.
☛
R.x–ass
MENU
Premere ripetutamente il tasto MENU finché
compare la funzione "Risposta per assente"
(R.x_ass). Premere in tale posizione il tasto Fox.
Sul display compare l’ultimo numero di interno
per il quale avete effettuato la risposta per
assente. Se questo coincide con il numero
desiderato, confermare con il tasto Fox sotto
"Ok".
Ok
Altrimenti, comporre il nuovo numero e confermare con il tasto Fox sotto "Ok".
Nota
Se l'ultima volta avete risposto ad una chiamata su suoneria centralizzata o dal
ricerca persone premete il tasto Fox sotto "Utente" e successivamente introducete il numero.
1) Dipende dal tipo di PBX
20317861it_bat_a0
11
Italiano
Risposta per assente
Come utilizzare le funzioni di comfort
Annuncio su altoparlante
L’annuncio consente di parlare direttamente ad un interlocutore (o ad un gruppo) attraverso l’altoparlante del suo apparecchio senza attenderne la risposta.
☛
Annuncio
MENU
Ok
Premete ripetutamente il tasto MENU finché
compare la funzione "Annuncio";
premete in questa posizione il tasto Fox, inserite
il numero desiderato o cercate il gruppo di
destinazione e confermate premendo
il tasto Fox sotto "Ok".
Prenotazione di chiamata
Un interlocutore ha tentato di telefonarvi; sul display compare il messaggio "Prenotazione
da", seguito dal numero e dal nome del prenotante.
Chiamare
Chiamare
Premete il tasto Fox sotto "Chiamare" e attendete fino a che è pronto il collegamento con il
vostro interlocutore
oppure
Respingere
Cancellare
Premere il tasto Fox sotto "Cancellare" per
respingere la richiesta.
Assenza
☛
Questo tasto è destinato ad eseguire delle funzioni programmate per la vostra assenza dal
posto di lavoro. Inizialmente è programmato con la funzione deviazione di chiamata.
Nota
12
Comporre il numero del vostro sostituto e
premere il tasto di Assenza. La deviazione è
attivata. Premendo una seconda volta il tasto
Assenza, la deviazione sarà disattivata.
Il tasto Assenza può essere programmato come tasto numero oppure come tasto
funzione (vedere: "Assegnazione dei diversi tipi di tasti")
20317861it_bat_a0
Come utilizzare le funzioni di comfort
Modo trasparente (selezione multifrequenza: DTMF)
Modo–
trasparente
MENU
Nota
☛
Durante un collegamento una post-selezione DTMF può attivare una funzione, come p.es.
il telecomando di una segreteria telefonica.
Premere il tasto MENU e successivamente il tasto
Fox sotto "Modo trasparente", introdurre la
sequenza desiderata.
END
Con il tasto di fine (END) uscite dal modo
trasparente.
Con un "Click lungo" del tasto asterisco
trasparente.
saltate direttamente al modo
Parcheggio
Durante una conversazione potete "parcheggiare" la chiamata, dopo di che potete
stabilire un altro collegamento.
Riprendere
20317861it_bat_a0
Premere il tasto Fox sotto a "Parcheggiare". La
chiamata viene parcheggiata. Questo viene
confermato dal messaggio "Eseguito".
Premere il tasto di fine (END) e stabilite un nuovo
collegamento.
Per riprendere la chiamata, premere il tasto Fox
sotto a "Riprendere". Sarete subito collegati con
l’interlocutore.
13
Italiano
END
☛
Parcheggiare
▼
PRG2 Cont. con MENU Me 12 Apr. 17:55
Tasti Tasto_Fox Regis.agenda
Testo
▼
Testo a riposo:
Ok Ritorno _>
Volume suoneria
¥ 3 ß
Melodia
¥ 4 ß
Å
Ritmo suoneria
Ok Test ¥ 3 ß
Ok Test
Tn: Regolazioni tasto team
Ritorno Suoneria Risp.
Premere tasto team
Ritorno
Ln: Regol. tasto di linea
Ritorno Suoneria Risp. Occup. Chiam.
Premere tasto linea
Ritorno
▼
▼
▼
▼
PRG1: Cont. con MENU Me 12 Apr. 17:55
Suon. P. tast. team
Regolazione_linee
Setti. 15, Me 12 Apr. 17:55
Annuncio
Selezione_multifreq.
Tn:
OK
Segnale d’avviso.:
Ok Test
Tono
¥ 2 ß
Melodia
¥ 5 ß
Priorita
¥ 1 ß
Melodia
¥ 1 ß
Priorita
¥ 1 ß
Priorita
¥ 1 ß
Non inserire
¥ ß
Vol.
¥ 6 ß
Ins.
¥ ß
Microtel
¥ ß
Tn: Risp.:
Ok Ritorno
Suoneria
Test
Rit 10 s
¥ ß
Ln: Suoneria
OK Test
Microtel
¥ ß
Microtel
¥ ß
Ln: Occup.:
Ok Ritorno
Ln: Lista chiamate:
Ok Ritorno
Menu 3 Setti. 15, Me 12 Apr. 17:55
Non_disturbare
Programmare
Ln:Risp.:
Ok Ritorno
▼
Setti. 15, Me 12 Apr. 17:55
Dev. R.x_ass Ricerc.p. Messagio
▼
▼
▼
▼
▼
▼
▼
▼
▼
▼
▼
▼
Ritmo
¥ ß
Tn: Suoneria:
OK Test
.
Ritmo
¥ ß
Ln: Suoneria:
OK Test
▼
14
▼
Office 40 Setti. 15, Me 12 Apr. 17:55
Come programmare il vostro apparecchio
Vista d’Insieme
20317861it_bat_a0
▼
PRG4:Cont. con MENU Me 12. Apr. 17:55
Fine
Testo
Servizio
▼
PRG3: Cont. con Menu Me 12. Apr. 17:55
PSWD *Lingua
Viva voce
▼
PSWD corrente: ✱✱✱✱
Ok Ritorno
Nuova PSWD: ✱✱✱✱
Ok Ritorno
Fn:
Cancellare tasto
Ok Ritorno
¥ ß
▼
Fn:
Tasto funzione
Ok Ritorno
¥ ß
▼
Tn:
Tasto team
Ok Ritorno
¥ ß
▼
Nn:
Tasto numero
Ok Ritorno ¥ ß Memoria 1 Mem. 2
Fxn:
Non disturbare
Ok Ritorno
¥ ß
▼
Me1: Introd. numero
Ok Ritorno _> Nome Legg. Cancell.
▼
Tasto Fox:
Menu 2
Scheda4 Scheda5 Scheda6 Ritorno Cont.
Rn: Introd. numero
Ok Ritorno _> Nome Legg. Cancell.
Cercare registro, introd. numero:
Nuova_scheda Introd. nome
0 - 032 624 21 11; Miller ZIP
Modific Ritorno Nuova Cancel ¥ 0 ß
15
Italiano
"Fine" deriva della programmazione,
gli altri punti del menu sono riservati all’installatore.
Sprache, Language, Langue, Lingua: Italiano
Ok Ritorno
¥ ß
Dis.
¥ ß
Risposta automatica:
Ok Ritorno
Premere tasto da programm.
Ritorno
Fxn:
Cancellare tasto
Ok Ritorno
¥ ß
▼
▼
Fxn:
Tasto funzione
Ok Ritorno
¥ ß
▼
Fxn:
Tasto numero
Ok Ritorno
¥ ß
Memoria 1
▼
Tasto Fox: Menu di selezione
Scheda1 Scheda2 Scheda3 Ritorno Cont.
▼
▼
▼
▼
▼
▼
▼
▼
▼
▼
▼
▼
▼
▼
▼
▼
Fn:
Ok
Conferma: ✱✱✱✱
Ok Ritorno
Ritorno
Cancellare
Gruppo di chiam.
¥ ß
Tn: Introd. numero
Ok Ritorno _> Leggere
Me1: Introd. numero
Ok Ritorno _> Nome Legg. Cancel Å
Me2: Introd. numero;
Ok Ritorno_> Nome Leggere Cancell.
Me1: I*26PX
Ok Ritorno _> Nome Legg. Cancell.
Me1:
;Introd. nome
Ok Ritorno _> Numero Legg. Cancel Å
Rn:
;Introd. nome
Ok Ritorno _> Numero Legg. Cancel Å
Tasto a piacere
Me1: I#48PX
Ok
Ritorno
Me2: I*48PX
Ok
Ritorno
Me1:
;Introd. nome
Ok Ritorno _> Numero Leggere Cancel Å
Memoria 1
▼
Memoria 2
Me2:
;Introd. nome
Ok Ritorno _> Numero Leggere Cancel Å
Cancelllare
Tasto Fox (Ok)
Leggere
Tasto Fox
Me2: I#26PX
Ok Ritorno
Tasto Menu
Me1: I*26PX
;Introd. nome
Ok Ritorno _> Numero Legg. Cancel Å
▼
▼
▼
▼
▼
▼
▼
▼
▼
▼
▼
▼
▼
▼
20317861it_bat_a0
▼
Cercare registro, introd. nome:_
Nuova_scheda Numero_scheda Cercare Å
Come programmare il vostro apparecchio
Vista d’Insieme
Come programmare il vostro apparecchio
Cosa occorre osservare nella programmazione
La programmazione è un elemento costituente del modo di funzionamento del vostro
telefono; prima di iniziare con la programmazione si consiglia di leggere il capitolo "L'uso
facilitato" all’inizio di queste istruzioni per l’uso.
Microtelefono
Durante la programmazione il microtelefono resta agganciato; se sollevate il
microtelefono durante la programmazione, questa viene interrotta. Se durante la programmazione ricevete una chiamata, dovete decidere se rispondere alla chiamata o
proseguire l’operazione di programmazione.
Modo programmazione
Ci sono due modi per entrare nel modo programmazione:
– "Click lungo" sul tasto MENU (min. 2 secondi)
– Pressione ripetuta sul tasto MENU, finché non viene visualizzato "Programmare",
premere a questo punto il tasto Fox sotto a "Programmare".
Nota
Un "Click lungo" sul tasto Numeri/Lettere porta direttamente al menu delle
registrazioni dell’agenda.
Un "Click lungo" di un tasto liberamente programmabile permette di saltare
direttamente al menu di programmazione di questo tasto.
La funzione "Click lungo" dipende dal software e dal centralino.
Tasto MENU
Con il tasto MENU vi muovete su due piani: dapprima sul piano funzionale (scelta del
punto di menu da programmare, ad esempio "tasti") e successivamente sul piano delle
funzioni secondarie (ad esempio assegnazione di un tasto di numero). Entrambi i piani
vengono abbandonati mediante pressione sul tasto di fine (END).
Memorizzare
Un contenuto da voi immesso in un punto del menu è memorizzato solo quando premete
il tasto Fox sotto "Ok". Se premete sotto "Ritorno", oppure premete il tasto END, la
programmazione da voi effettuata non viene memorizzata.
Esempi di programmazione:
Regolazione della melodia della suoneria
Suoneria
¥ ß
Nel modo programmazione premere il tasto Fox
sotto "Suoneria". Con il tasto Fox sotto a
"¥ ß" scegliere la regolazione desiderata e con
"Test" controllarla; memorizzare quest’ultima
Test
Ok
con il tasto Fox sotto "Ok". Premendo il tasto di
END
fine (END), tornare nella situazione di partenza.
Nota
16
Nello stesso modo è possibile regolare anche il volume ed il ritmo della suoneria.
20317861it_bat_a0
Come programmare il vostro apparecchio
Impostazione del testo sul display a riposo
Il campo disponibile per un testo può servire, ad esempio negli apparecchi che vengono
spesso utilizzati da diverse persone, per visualizzare il numero di telefono di questo
apparecchio o anche il nome della ditta.
Testo
☛
Ok
END
Nel modo programmazione premere il tasto Fox
sotto "Testo", comporre il testo, memorizzarlo
poi con il tasto Fox sotto "Ok".
Premendo il tasto di fine (END) ritornate nella
situazione di partenza.
Programmazione del tasto Fox (punti del menu programmati)
Scheda1
Cont.
Scheda4
ß ¥
OK
☛
OK
Nota
Nel modo programmazione premere il tasto Fox
sotto a "Tasto fox" e selezionate la registrazione
desiderata (le registrazioni 1-3 si trovano nel
"Menu di selezione", le registrazioni 4-6 nel
"Menu 2", e possono essere richiamate con il
tasto Fox sotto a "Continua").
Con il tasto Fox sotto a "¥ ß" selezionate il tipo
di tasto desiderato ("Tasto" o "Tasto funzione")
e confermate con "Ok".
Secondo il tipo di tasto scelto, introdurre il
numero/nome oppure scegliere la funzione del
tasto e confermare con il tasto Fox sotto a "Ok".
Il simbolo "|" indica che la funzione è attiva.
Un "Click lungo" del tasto Fox attiva il modo di programmazione del tasto.
La funzione dipende dal software e dal centralino.
Modifica del codice segreto/password (PSWD)
Ok
☛
PSWD
☛
☛
Ok
Ok
END
20317861it_bat_a0
Nel modo programmazione premete il tasto Fox
sotto "PSWD", componete il vecchio codice
segreto (inizialmente "0000") e verificatelo con
"Ok". Componete il nuovo codice segreto,
premete il tasto Fox sotto "Ok", componete
nuovamente il nuovo codice segreto e confermatelo con il tasto Fox sotto "Ok". Premete di
nuovo il tasto Fox sotto "Ok", per memorizzare il
nuovo codice segreto. Premendo il tasto fine
(END) si torna nella posizione di partenza.
17
Italiano
Tasto–Fox
Come programmare il vostro apparecchio
Come programmare e utilizzare la vostra agenda privata
L’agenda privata è un elenco elettronico personale, in cui potete memorizzare fino a 100
(00 a 99) numeri/nomi e/o funzioni. In vostra assenza potete proteggere tali registrazioni
con il codice segreto, dall’accesso di persone estranee.
Regis.agenda
Nuova
☛
Ok
Nel modo programmazione selezionare "Registrazione agenda". Premere il tasto Fox sotto a
"Nuova_scheda".
Introdurre il numero/nome e memorizzare con il
tasto Fox sotto a "Ok".
Per cercare o modificare una scheda esistente:
☛
☛
123˙˙
23˙˙
ABC˙˙
Digitare le inizali del nome che cercate o premete
il tasto di selezione nomi e digitare il numero
della scheda desiderata (00 a 99).
o
Cercare ¥ 99 ß
Modifi_
care
☛
Ok
Nota
Premere il tasto Fox sotto "Cercare" e muoversi
con le frecce del tasto Fox fino alla scheda
cercata.
Premere il tasto Fox sotto "Modificare".
Modificare o registrare il nome/numero e
confermare premendo il tasto Fox sotto "Ok".
Si consiglia di introdurre per ogni numero il relativo nome e cognome.
È consigliato associare un nome ad ogni numero per poter selezionare con il
nome.
Funzioni di editazione
Con un "Click lungo" di almeno 2 secondi sul tasti "+" o "-" il cursore viene spostato
verso sinistra o verso destra, in modo di poter correggere la registrazione. Se il cursore è
all’inizio di una stringa di caratteri, premendo il tasto di correzione o con un "Click lungo"
del tasto "-" salta alla fine. Se è alla fine della stringa, con un "Click lungo" del tasto "+"
salta all’inizio. Dopo la correzione di un carattere, la funzione di editazione deve essere
riattivata con un "Click lungo" per effettuare altre correzioni.
Esempio:
032 624 34 54
Premendo un tasto, il carattere corrispondente viene inserito a sinistra del cursore.
Esempio:
Schuhmann Claara
Schuhmann Clara
Con il tasto di correzione il carattere a sinistra del cursore viene cancellato.
Nota
18
La funzione di editazione dipende dal software e dal centralino
20317861it_bat_a0
Come programmare il vostro apparecchio
Linguaggio macro
Con il linguaggio macro si possono programmare delle funzioni diverse sotto un solo
tasto.
A
Impegnare il tasto di linea che ha la priorità più alta
I
Impegnare la propria linea (tasto interno)
X
Riagganciare
_
Separare il codice di impegno di urbana dal numero (p.es. 0–24 …)
P
Pausa (1 secondo)
N
Introdurre il numero visualizzato sul display
.
Premere il tasto di comando
Z
Attivare il modo trasparente (selezione DTMF)
R
Ripetizione di selezione
I201
Esempi:
Impegnare il tasto di linea 01
I*21201X
Inserire la viva voce e chiamare l’utente 201
Italiano
L01
Inserire la viva voce, deviare su l’utente 201 e riagganciare.
Risposta automatica
Potete fare in modo che, in caso di chiamata interna in arrivo venga automaticamente
inserito il dispositivo di viva voce e rispondere così senza dover sollevare il microtelefono.
Viva–voce
¥ ß
Nota
Ok
Nel modo programmazione, premere il tasto Fox
sotto "Viva_voce". Scegliete per quale tipo di
chiamata la Risposta automatica deve attivarsi
automaticamente e confermate con "Ok".
La Risposta automatica per un tasto team è attiva solo se per quel tasto si è
programmato "Risposta: Viva voce".
20317861it_bat_a0
19
Assegnazione dei diversi tipi di tasti
Prima di iniziare con la memorizzazione dei tasti, dovete assegnare a ciascun tasto il
corrispondente tipo. Si fa distinzione tra tasti numero, tasti team, tasti linea e tasti
funzione. Dall apparecchio non è possibile programmare i tasti di linea; questi vengono
definiti nella Configurazione del sistema.
Tasti
¥ ß
Ok
Nota
Nel modo programmazione premere il tasto Fox
sotto "Tasti", premere il tasto da programmare,
selezionare il tipo di tasto con il tasto Fox sotto
"¥ ß" e confermare con il tasto Fox sotto "Ok".
Nello stato di riposo del vostro apparecchio, premendo per oltre 2 secondi un
tasto programmabile, si accede automaticamente al menu di programmazione del
tasto.
Tasti numero
I tasti numero (contrassegnati anche come tasti di destinazione o memoria) permettono di
selezionare velocemente numeri telefonici utilizzati frequentemente, sia interni che
esterni. Ogni tasto numero è provvisto di due posizioni di memoria (clic semplice o
doppio) su ciascuno dei quali è possibile memorizzare un numero telefonico.
Potete programmare in modo autonomo i tasti numero (con l’aiuto del linguaggio macro):
in questo modo viene inserita automaticamente la viva voce, impegnata una certa linea e
selezionato il numero di telefono desiderato.
Programmazione dei tasti numero
☛
Tasti
Ok
Nel modo programmazione premere il tasto Fox
sotto "Tasti", scegliere il tasto desiderato per
numeri e la posizione di memoria, comporre
numero/nome, confermare con il tasto Fox sotto
"Ok".
Tasti di linea1)
Se il vostro apparecchio è configurato come selettore di linea (apparecchio
intercomunicante), potete gestire fino a 13 linee in parallelo. In tal caso si distingue tra la
linea principale (tasto interno), cioè la linea che identifica il numero di telefono del vostro
apparecchio, e le altre linee esterne. La linea principale (tasto interno) è situata sempre sul
primo tasto in alto.
Le funzioni di comfort descritte in queste istruzioni d’uso possono essere usate in collegamento con la linea principale (tasto interno); per i tasti di linea valgono tutti i tipi di
selezione e le funzioni richiamata, richiamata alternata, trasferimento e parcheggio/fine
parcheggio. Ad eccezione della linea principale, i tasti di linea consentono la sola gestione
delle chiamate esterne.
1) Dipende dalla versione software e dal tipo di PBX
20
20317861it_bat_a0
Assegnazione dei diversi tipi di tasti
Ogni tasto di linea è provvisto di un fotodiodo a due colori e di una targhetta di identificazione. Il fotodiodo (LED) segnala lo stato della linea.
LED spento: la linea è libera
LED permanentemente acceso:
la linea è occupata
LED con lampeggio veloce:
c’è una chiamata in arrivo sulla linea
LED con lampeggio lento:
la linea è parcheggiata o in attesa
Il colore si riferisce alla provenienza e alla destinazione della chiamata
verde:
rosso:
chiamata interna o conversazione interna
chiamata esterna o conversazione esterna
Regolazione dei tasti di linea
Ok
Premendo il tasto MENU avete altre possibilità di regolazioni:
Sotto il punto di menu "Occupare" potete scegliere se la linea viene impegnata al
sollevamento del microtelefono o premendo il tasto dell’altoparlante oppure premendo il
tasto di linea. Ugualmente sotto "Rispondere" scegliete se e come ad una chiamata si
risponde su di una linea.
Nota
La regolazione dei tasti di linea può essere effettuata anche nel modo programmazione sotto "Regolazione linee".
Esecuzione e gestione di chiamate sulle linee
Se sollevate il microtelefono e premete il tasto di altoparlante, il vostro apparecchio
impegna automaticamente una linea che viene segnalata a sinistra in alto sul display.
Premendo un altro tasto di linea cambiate la linea.
Per le chiamate in arrivo viene ugualmente visualizzata la linea. Se si hanno contemporaneamente diverse chiamate su diverse linee, viene segnalata la chiamata che corrisponde
al tasto di linea situato più in alto.
Passare da una linea all’altra
Premendo il tasto di linea potete a piacere passare tra chiamate e conversazioni su linee
diverse, dove la linea attiva viene automaticamente parcheggiata. In questo modo è
possibile rispondere a chiamate su altre linee oppure riprendere collegamenti precedentemente parcheggiati ma non prendere conversazioni su linee occupate.
20317861it_bat_a0
21
Italiano
¥ ß
Premere il tasto di linea da predisporre finché
appare il menu "Regolazione linea". Sotto
"Suoneria" scegliere la predisposizione desiderata: ins., disins., ritardato di 10/20/30 secondi,
melodia e ritmo. Confermare con "Ok". In tal
modo stabilite se e quando una chiamata in
arrivo viene segnalata acusticamente.
Assegnazione dei diversi tipi di tasti
Tasti team
La funzione di team facilita ai membri di un gruppo (ad esempio team di vendita o di
marketing), la loro reciproca comunicazione e la risposta per assente.
Programmazione ed utilizzo dei tasti team
Sul vostro apparecchio è possibile programmare fino a 13 tasti team. Si procede come per
i tasti di numero; selezionando "Tasto team" invece che "Tasto numero".
Ogni tasto team è provvisto di un fotodiodo (LED) a due colori e di una targhetta di
identificazione. Il LED segnala lo stato della linea, cioè dell’apparecchio programmato sul
tasto.
LED spento:
l’apparecchio programmato sul tasto è libero
LED acceso in modo continuo:
l’apparecchio programmato sul tasto è occupato.
LED lampeggiante:
chiamata in arrivo per il telefono programmato
sul tasto, se programmata, la chiamata viene
segnalata anche acusticamente.
Il colore si riferisce alla provenienza e alla destinazione della chiamata
verde: chiamata interna o conversazione interna
rosso: chiamata esterna o conversazione esterna
Se premete il tasto team con il microtelefono a riposo o sganciato, effettuate una chiamata verso il partner programmato. Un doppio click produce una chiamata su altoparlante.
Se premete il tasto team quando c’è una chiamata in arrivo (LED lampeggiante) rispondete alla chiamata del vostro partner (risposta per assente).
Se premete il tasto team durante una conversazione, indirizzate una richiamata verso il
partner programmato o prendete la chiamata che giunge sul suo apparecchio. Durante la
conversazione una chiamata su un tasto team viene segnalata soltanto mediante
lampeggio del LED e, nel caso di suoneria inserita, si riceve anche un breve segnale di
avviso (bip).
Regolazione dei tasti team
Potete regolare i tasti team come i tasti di linea.
Tasti funzione
I tasti funzione permettono di utilizzare facilmente delle funzioni come p.es. deviazione di
chiamate programmandoli su dei tasti liberamente programmabili. Premere una volta
questo tasto per attivare la funzione ed il fotodiodo (LED), premere una seconda volta per
disattivarli.
Durante la programmazione, scegliete la funzione desiderata (lo stato della funzione vi
sarà indicato dal LED). L’apparecchio programma automaticamente le due memorie del
tasto con gli appositi codici di funzione. Per applicazioni speciali è possibile completare la
funzione con numeri o codici.
22
20317861it_bat_a0
Installazione
Contenuto dell’imballo
Apparecchio
1
123..
ABC..
ABC
4
END
JKL
7
STU
2
DEF
5
MNO
8
VWX
Microtelefono
3
GHI
6
Cavo di collegamento
del telefono
Cavo di collegamento
del microtelefono
Colonne
Kurzbedienungsanleitung
Umleiten
auf
Zurckstellen
Sucher
Norbert Norbert
Gerhard
priv.
031
<<
999
20
1
2
DEF
5
MNO
8
VWX
0
<
<
<
<<
Menu
<
<
70
ABC
4
JKL
7
STU
<<
Rita
AG
Notruf AG
<<
Feuer
No.:
123 ..
ABC
..
<<
Frank
Helmut
Computer
Transport
☎
Tel.
END
3
GHI
6
PQR
9
YZ•
0...9
12344NeumannNNorbert
Rückfrage
Foxtaste
PQR
Zustandszeile
Menüzeile
MENU
• In der Menüzeile angezeigte Funktion
aktivieren:
-Taste unter dem Text
drücken (Beispiel: "Rückfrage")
9
YZ•
0
-Taste
• Eine andere Funktion aktivieren:
ein- bzw. mehrmals drücken und Menü-Taste wählen
punkt mit
MENU
0...9
• Folgende Funktionen werden mit dazu
bestimmten Funktionstasten aktiviert:
Bedienungsanleitung
Mode d'emploi
Istruzioni per l'uso
Operating instructions
Wahlwiederholung
Mikrofon ein/aus
Lautsprecher ein/aus
Copertura trasparente
Abwesend/Anwesend
Ruf-bzw. Hörlautstärke bei Ruf bzw.
Gespräch einstellen
Abbrechen/Wiederbelegen (in Wahl od. Gespräch)
END
Istruzioni
per l'uso
Collegamento tra microtelefono e apparecchio
Dopo aver estratto l’apparecchio dalla confezione,
collegate dapprima il microtelefono, inserendo
l’estremità più lunga del cavo di collegamento a
spirale nella presa piccola sul fondo dell’apparecchio. Tirando leggermente, controllate se il
connettore è inserito correttamente. Infilate l’altra
estremità del cavo nel microtelefono.
Italiano
A questo punto collegate l’apparecchio, inserendo il
connettore del cavo di collegamento del telefono
nel connettore più grande sul fondo dell’apparecchio. Tirando leggermente, controllate che il
connettore sia inserito correttamente. Fate passare il
cavo attraverso l’apposito sistema di scarico della
trazione. Collegate l’altra estremità del cavo a una presa telefonica. Infilate sul fondo
dell’apparecchio le due colonnine in corrispondenza dell’estremita superiore.
Applicare le scritte di identificazione sui tasti liberamente programmati
Accanto ai tasti liberamente programmabili, sulle targhette d’identificazione che potrete
estrarre dal lato posteriore della busta di queste istruzioni d’uso, annotate i nomi per i
numeri memorizzati. Successivamente applicate la copertura trasparente.
Tastiera supplementare ZTF
Il vostro apparecchio vi da la possibilità di installare una tastiera supplementare ZTF con
20 tasti (e LED associati) supplementari. La tastiera ZTF, rende più semplice l’inserimento
dei caratteri alfabetici (lettere maiuscole/minuscole, caratteri speciali).
20317861it_bat_a0
23
Avvisi di sicurezza
Leggete attentamente le istruzioni per l'uso e custoditele.
In caso di domande, rivolgetevi ad un esperto; fate eseguire i lavori di manutenzione da
un esperto; non aprite in nessun caso da soli il vostro apparecchio.
Non toccate i contatti delle spine con oggetti appuntiti e metallici.
Posizionate il vostro apparecchio su di una base non scivolosa.
Evitate che il vostro apparecchio sia esposto direttamente ai raggi solari o ad altre sorgenti
di calore.
Non installate né utilizzate il vostro apparecchio in ambienti con pericolo di esplosione.
Proteggete il vostro apparecchio dall’umidità, dalla polvere intensa, da liquidi e vapori
corrosivi.
Non esponete il vostro apparecchio a campi elettromagnetici (motori elettrici, elettrodomestici). La qualità vocale potrebbe risultarne compromessa. Evitate di posizionarlo nelle
immediate vicinanze di apparecchi radio, TV e video.
Collegate i cavi di collegamento del vostro apparecchio soltanto alle apposite prese. Non
scambiate in nessun caso le spine del cavo di collegamento.
Non usare il cavo di collegamento per tirare o sollevare l’apparecchio.
Evitate che l’apparecchio venga bagnato da acqua o da qualsiasi altro liquido.
Pulite il vostro apparecchio con un panno morbido, leggermente umido o antistatico. Per
la pulizia non usate detergenti né sostanze chimiche. Usate il vostro apparecchio solo nel
campo di temperatura da +5 °C a +35 °C.
24
20317861it_bat_a0
Malfunzionamenti
Il vostro interlocutore non vi sente oppure voi non sentite lui
Assicuratevi che il cavo di collegamento del microtelefono sia inserito correttamente nel
microtelefono e nella base dell’apparecchio.
Microtelefono sollevato, nessun segnale di linea, nessuna indicazione sul display
Assicuratevi che il cavo di collegamento telefonico sia inserito in modo corretto sia
all’apparecchio che alla presa telefonica.
Display acceso, nessun collegamento
Il vostro apparecchio è collegato correttamente, ma probabilmente è bloccato. Sbloccate
l’apparecchio (vedere "Blocco e sblocco del vostro apparecchio").
I tasti programmabili non possono essere programmati
È possibile che la programmazione sia bloccata. Sbloccate il vostro apparecchio
(vedere "Blocco e sblocco del vostro apparecchio").
Sblocco dell’apparecchio: avete dimenticato il codice segreto
Pregate l’operatore di ripristinare il codice segreto iniziale (0000).
A questo attacco d’utente, precedentemente era collegato un altro tipo di apparecchio.
Per registrare il nuovo apparecchio, entrate nel modo programmazione e premete il tasto
Fox sotto "Tasti" oppure sotto "Regis. agenda". Nel display sarà visualizzato "Cambiare
tipo d’app." Confermate con "Si" oppure uscite con "No". Attenzione, cambiando il tipo
d’apparecchio è possibile che ci sia una perdita di dati della agenda privata. Se questo
apparecchio non è destinato a rimanere fisso a questo attacco, premete soltanto il tasto
Fox sotto "œ" e le funzioni principali dell’apparecchio potranno essere utilizzate.
Segnalazione sul display : “trying to register“
Il sistema non accetta l’apparecchio. Informatevi presso il vostro tecnico.
Nota
In caso di altri messaggi, consultate il vostro gestore di sistema.
20317861it_bat_a0
25
Italiano
Segnalazione sul display: “Apparecchio errato“
Autotest
Se avete già controllato il vostro apparecchio per quanto riguarda i collegamenti, lo stato
di blocco ecc., potete trovare altre possibili cause di guasto con l’autotest:
Attivare l'autotest
Estrarre il cavo di collegamento del telefono dalla
presa telefonica; tenere premuto il tasto Fox a
sinistra in basso mentre inserite nuovamente il
cavo di collegamento del telefono. Vi trovate nel
modo autotest; i LED ed il display cambiano
continuamente da accesi a spenti.
☛
Test
Sollevare il microtelefono, premere un tasto dopo
l’altro; ciascuna pressione di tasto genera un
suono nell’altoparlante.
Il microfono ed il ricevitore del microtelefono
sono collegati tra loro; soffiate nel microfono,
dovete sentirvi nel ricevitore e nell’altoparlante.
Premere il tasto Altoparlante: il microfono del
viva voce sarà collegato per breve tempo con
l’auricolare; si devono sentire i rumori dell’ambiente.
Fine dell’autotest
Estrarre e inserire nuovamente il cavo di collegamento del telefono
Se durante l’autotest notate irregolarità avvisate l’operatore o un esperto.
26
20317861it_bat_a0
Codici di funzione
Le cifre che bisogna comporre?
Selezione normale
Sequenza di tasti
L’operatore ....................................................................... 11 1)
.........
Citofono ............................................................................ 851… 852
1)
.........
Instradamento .................................................................. 170… 199
1)
.........
Numeri gruppi di chiamata .............................................. 860… 888
1)
.........
Numero di soccorso .......................................................... 12
1)
Selezione abbreviata in generale (PBX) ......................... 7000…7999
.........
1)
Uscita per linea urbana
ditta ................................................................................ 0
privato ............................................................................. 10
con centro di costo .......................................................... 13 N. C.d.C.
.........
.........
.........
.........
Postselezione
Attivare impianto ricerca persone 3) ............................... 8 o *81
Attivare la chiamata codificata ....................................... 8 o *81
6 o *43
0
2
1
3
Italiano
Avviso ...............................................................................
rifiuto ..............................................................................
risposta con messa in attesa .............................................
risposta con abbattimento ...............................................
risposta con conferenza ...................................................
Richiamata alternata ........................................................ 2
Conferenza
stabilire (da una conversazione) ....................................... 3
escludere un interlocutore (interno) ................................. *31
Inclusione ..........................................................................
rifiuto ..............................................................................
risposta con messa in attesa .............................................
risposta con abbattimento ...............................................
7 o *44
0
2
1
Parcheggio di urbana ....................................................... *76
Prenotazione da N./ MESSAGE
attivare segnalazione ....................................................... *38
Prenotazione automatica
attivare se l’utente è occupato ......................................... 9 o *37
attivare se l’utente è libero ............................................... 9 o *37
Ripresa della conversazione ............................................ 1
Trasferire gli addebiti su centro di costo no. .................. *78 N. C.d.C.
1) La definizione e il campo di numerazione dipendono dal centralino e dalla versione del Software
3) La funzione dipende dal centralino e dalla versione del Software
20317861it_bat_a0
27
Codici di funzione
Preselezione
Annuncio
per un utente .................................................................. *7998 N. utente
per un gruppo ................................................................. *79 N. gruppo
rispondere a un annuncio su gruppo ................................ *89
Aprire la porta .................................................................. *751… *752 1)
Avviso 2)
inibizione ......................................................................... *04
attivazione ....................................................................... #04
Cancellare prenotazione ................................................... #37
Chiamata codificata
attivare ............................................................................ *81 N. utente
rispondere ....................................................................... *82
Chiamata per appuntamento (servizio sveglia) 2)
attivare un appuntamento permanente ............................
cancellare un appuntamento permanente ........................
attivare un appuntamento singolo ...................................
cancellare un appuntamento singolo ...............................
*56 hh mm
#56
*55 hh mm
#55
Conferenza
libera ............................................................................... *71 N. ut. 1*
… N. utente 5# 1)
pre-programmata 3) .......................................................... *70 N. conf.
Deviazione di chiamata DDC
proteggersi dalle deviazioni 2) ...........................................
permettere le deviazioni sul proprio apparecchio 2) ...........
attivare DDC incondizionata 2) ..........................................
cancellare DDC incondizionata 2) ......................................
attivare DDC incondizionata sull’ultimo numero progr. .....
cancellare DDC incondizionata sull’ultimo numero progr. .
attivare DDC sul numero preprogrammato 2+3) ..................
cancellare DDC sul numero preprogrammato 2+3) ..............
attivare DDC se occupato 2) ..............................................
cancellare DDC se occupato 2) ..........................................
attivare DDC se occ. sull’ultimo numero programmato .....
cancellare DDC se occ. sull’ultimo numero programmato.
attivare DDC su messaggio standard 2+3) ...........................
cancellare DDC su messaggio standard 2+3) .......................
attivare DDC sull’impianto cercapersone o
sulla suoneria centralizzata con chiamata codificata 2+3) ....
cancellare DDC sull’impianto cercapersone
o sulla suoneria centralizzata con chiamata codificata 2+3) .
*02
#02
*21 N. dest.
#21
*21#
#21
*22
#22
*67 N. dest.
#67
*67#
#67
*24 N. testo
#24
*28
#28
1) La definizione e il campo di numerazione dipendono dal centralino e dalla versione del Software
2) Telecomando possibile
3) La funzione dipende dal centralino e dalla versione del Software
28
20317861it_bat_a0
Codici di funzione
Deviazione condizionata di chiamata DCC (deviazione per mancata risposta)
proteggersi dalle deviazioni 2) ........................................... *02
permettere le deviazioni sul proprio apparecchio 2) ........... #02
attivare DCC 2) ................................................................. *61 N. dest.
cancellare DCC 2) .............................................................. #61
attivare DCC sull’ultimo numero progr. ........................... *61#
cancellare DCC sull’ultimo numero progr. ......................... #61
attivare DCC sul numero preprogrammato 2+3) .................. *62
cancellare DCC sul numero preprogrammato 2+3) .............. #62
attivare DCC sull’impianto cercapersone
sulla suoneria centralizzata con chiamata codificata 2+3) .... *68
cancellare DCC sull’impianto cercapersone
sulla suoneria centralizzata con chiamata codificata 2+3) .... #68
Disattivare tutti i servizi attivati 2) .................................. *00
(escluso l'appartenenza ad un gruppo di chiamata)
Funzionamento giorno, notte, fine settimana (gr. servizi 1)
giorno ............................................................................. *8511
notte ............................................................................... *8512
fine settimana .................................................................. *8513
Gruppo di chiamata 2)
inserirsi ............................................................................ *48
disinserirsi ........................................................................ #48
Italiano
Gruppo servizi (in entrata)
gruppo servizi x, pos. 1 .................................................... *85x1
gruppo servizi x, pos. 2 .................................................... *85x2
gruppo servizi x, pos. 3 .................................................... *85x3
Nota: x è una cifra compresa tra 2 a 9.
Impianto ricerca persone 3)
cercare ............................................................................. *81 N. utente
rispondere con un canale di ricerca .................................. *82
rispondere con più canali di ricerca ................................... *82 N. utente
Inclusione 2)
proteggersi dall'inclusione ................................................ *04
permettere l'inclusione sul proprio apparecchio ................ #04
Least Cost Routing (LCR)
Forzare un gestore die rete alternativo 3) ................................................ *90
Messaggi (messaggi standard con/senza parametri) 2+3)
invio ad un utente ............................................................ *3598 N. utente N. testo #
invio ad un gruppo .......................................................... *35 N. gruppo N. testo #
invio a tutti ...................................................................... *3599 N. testo #
Non disturbare (blocco chiamate in arrivo) 2)
attivare ............................................................................ *26
cancellare ........................................................................ #26
2) Telecomando possibile
3) La funzione dipende dal centralino e dalla versione del Software
20317861it_bat_a0
29
Codici di funzione
Parcheggio chiamata
attivare ............................................................................ *76
riprendere la chiamata ..................................................... #76
Prenotazione da N./ MESSAGE 2)
attivare segnalazione ....................................................... *38 N. utente
cancellare, apparecchio destinazione ............................... #38 N. utente
Relè
attivare ............................................................................ *755…*757 1)
disattivare ........................................................................ #755…#757 1)
Risposta alla chiamata su suoneria centralizzata .......... *83
Risposta per assente ........................................................ *86 N. utente
Seguimi (Follow me)
attivare ............................................................................ *23 N. utente
cancellare ........................................................................ #23
Servizio cortesia 3)
attivare gruppo 1 .............................................................
disattivare gruppo 1 .........................................................
attivare gruppo 2 .............................................................
disattivare gruppo 2 .........................................................
*931
#931
*932
#932
Telecomando
avviare (da un telefono interno) ..................................... *06 N. d’utente *21 N. dest.
avviate il telecomando /
introducete il numero d’utente il cui
apparecchio volete programmare a distanza /
introdurre la procedura * desiderata (p.e. *21 N. dest.)
disattivare (da un telefono interno) ................................ *06 N. d’utente #21
avviate il telecomando /
introducete il numero d’utente il cui
apparecchio è usato a distanza /
introdurre la procedura # desiderata (p.e. #21)
disattivare (dal proprio apparecchio) .............................. #21
introdurre la procedura # (p.e. #21)
Uscita per linea urbana di un apparecchio semi-abilitato 2)
attivare con richiamo per addebiti .................................... *32 N. utente
1) La definizione e il campo di numerazione dipendono dal centralino e dalla versione del Software
2) Telecomando possibile
3) La funzione dipende dal centralino e dalla versione del Software
30
20317861it_bat_a0
Indice analitico
Agenda privata ................................... 18
Annuncio su altoparlante .................... 12
Ascolto amplificato ............................... 5
Autotest ............................................. 26
Avvisare l’interlocutore occupato .......... 8
Avvisi di sicurezza ............................... 24
Prenotazione di chiamata ................... 12
Preparazione di selezione ...................... 3
Presente/assente ................................. 12
Programmazione ................................ 16
PSWD ................................................. 17
Punti del menu programmati ......... 1, 17
R
Collegamento tra microtelefono
e apparecchio ................................... 23
Conferenza .......................................... 7
Contenuto dell’imballo ....................... 23
Copiare i contenuti
del registro appunti ............................ 6
Registro appunti .............................. 3, 6
Regolazione del volume ........................ 2
Regolazione del volume
del microtelefono ............................... 2
Regolazione della melodia
della suoneria ................................... 16
Ricerca-persone ............................. 8, 11
Richiamata alternata ............................. 7
Risposta a chiamata su
suoneria centralizzata ....................... 11
Risposta automatica ........................... 19
Risposta per assente ........................... 11
D
S
Deviazione .......................................... 10
Disinserire il microfono ......................... 5
Selezione di un numero
dal registro appunti ............................ 3
Selezione mediante tasto Riselezione .... 3
Selezione mediante un Tasto numero .... 3
Selezione multifrequenza DTMF .......... 13
Selezione numerica ............................... 3
Selezione per nome .............................. 3
Simboli del display ................................ 1
B
Blocco e sblocco del
vostro apparecchio ............................. 6
C
F
Funzioni di editazione ......................... 18
I
Impostazione del testo ........................ 17
Impostazione della lingua ..................... 2
Invio di messaggio ................................ 9
L
Lasciare un’informazione .................... 10
Lettura dei messaggi ............................. 9
Linguaggio macro ............................... 19
Lista chiamate ...................................... 5
M
Messaggio ............................................ 9
Modifica del codice segreto ................ 17
Modo trasparente ............................... 13
P
T
Tasti di linea ................................. 20, 21
Tasti funzioni ...................................... 22
Tasti numero ....................................... 20
Tasti team ........................................... 22
Tastiera supplementare ZTF ................. 23
Tasto Fox ............................................ 17
Testo sul display a riposo ..................... 17
Trasferimento della conversazione ........ 7
V
Visualizzazione del nome
del chiamante .................................... 4
Viva voce .............................................. 5
Parcheggio ......................................... 13
Prenotazione automatica ...................... 8
20317861it_bat_a0
31
Italiano
A
1
2
3
17
16
K
anleurzbed
itun ienu
ngsg
15
Foxtas
te
Status
Menüz
zeil
eile e
MEN
U
14
13
>
>> Anruf
übe
PSA
>
rn
Gerh übern ehme
ehm
n
ard
Fra
en
n
Helm k
ut
Rita
>
M
ori
>>
Einka
Han tz
uf S L1
>
spe
üd
Einka
>> Compu ter
Tra
uf W L2
nsp ter AG
>
est
ort A
Einka
>> Hande
G
L3
ls A
We
u
f
N
G
rke
>
ord
Einka
A
>> Meier A G
uf Ü
L
Mülle
bers 4
G
ee
r AG
L
Che 5
☎ Te
f
l. No
L6
.: 03
1 99 privat
9'20
'70
>
>>
>>
123 ..
ABC ..
END
1
2
AB C
4
7
STU
DEF
5
JKL
MN
8
VW
X
O
MEN
U
3
GHI
6
PQ R
9
YZ•
0
4
0...9
5
12 11 10 9 8 7
II
6
Operation and display elements
1
Display
Your telephone is equipped with a two-line, alphanumeric display.
Upper line: Status display, name and number of your call partner.
Lower line: Status-dependant menu.
2
Foxkey (multi-function key)
3
Menu key
Selects the different menus
4
Line keys or programmable keys for two numbers each
5
Alphanumeric dialling keypad
Dual-function keys for numerical and/or alphabetic (with multiple pressing) entry
6
Alert LED
LED blinks fast: Shows an incoming call
7
Directory key
Access to private directory with up to 100 entries (00 to 99)
8
Code lock key
Protects the programming and the telephone
9
Absence key
Subscriber is absent/present
10
Last number redial key
Calls up the last 10 numbers dialled
11
Loudspeaker key
Switches loudspeaker on and off
12
Microphone key
Switches the handsfree function or the microphone in the handset on and off
13
Volume adjustment keys
Adjust the volume during ringing or conversation
14
END key / Disconnect key
Reset for new call, break off a started function, end programming
15
Notepad key
Saves up to 10 numbers with name or comments, both during a call and when idle
16
Correction key
Deletes the last character entered
17
Name dialling key
Dialling by name or by letter entry via the alphanumeric dialling keypad.
"Double click" provides access to private directory.
III
34
Specifications subject to change without notice.
The usuable services and features depend on the installed software release.
20317861en_bat_a0
Operation: the menu system
The ingenious high-tech menu system makes your telephone very simple to operate. The
Foxkey and Menu key allow you to find the different menus and menu items with ease.
Use them as follows:
If you wish to activate one of the displayed functions on the lower line (for
example, "Call" after selecting a number), press the Foxkey below the
corresponding word.
Note
MENU
If you cannot find the function that you want, press the Menu key
repeatedly until you find it. The following display strings will appear:
MENU
Press Menu
key once
Diversion
MENU
Press Menu key
a second time
Announcement
Week 15 Mo,12.Apr 12:35
Tone–dial–mode
MENU
Press Menu key
a third time
Do–not–disturb
Week 15 Mo,12.Apr 12:35
Programming
Week 15 Mo,12.Apr 12:35
Pick–up
Page
A "long click" of the Menu key (at least 2 seconds) advances the program to the
programming mode (this is software and PBX dependant).
Programmed menu items
Your telephone offers you the possibility of programming six functions or numbers/names
that you frequently use as menu items. In the idle state display appear three functions or
numbers that you have programmed and you only have to press the Foxkey to select or
activate them. The three further programmed menu items can be found in features menu
2 (press Menu key twice). The chapter "Programming your telephone" and the special
programming instructions help you to make full use of the features of your Office 40.
Special display symbols
¥ Scrolling backwards
®† Handsfree
© Loudspeaker on
œ
_>
†
L1
Show more information
English
12ß Scrolling forwards (the digit
shows the entry number)
Move writing marker (Cursor)
one position to the rigth (Space)
Microphone off (mute)
Line number
| Function active (Foxkey with function)
20317861en_bat_a0
1
Before you telephone for the first time
Please first read the chapter "Safety advice" in this operating handbook!
Ensure that your telephone is placed on a firm surface with no objects directly in front of
it which might impair the speech quality during "handsfree"operation.
Setting the display language
Programming
MENU
MENU
*Language
¥ ß
Ok
END
Note
Press the Menu key repeatedly until the menu
item "Programming" appears. Press the Foxkey
under "Programming" and then press the Menu
key repeatedly until the menu item "*Language"
appears in the display (look for the "*" with a
foreign language).
Press the Foxkey under "*Language", select the
required language by scrolling "¥ ß", press the
Foxkey under "Ok" to save and press the END
key to quit.
When executing a function, you may press an incorrect key. If you do, a short
warning tone will sound.
Adjusting the ring volume during ringing
You can adjust the ringing volume of your
telephone during ringing using the keys "+" (up)
and "–" (down).
Adjusting the volume of the receiver and the loudspeaker during a conversation
The volume of the receiver and of the
loudspeaker are preset to "normal". To adjust
the volume during a conversation, press the "+"
(up) or "–" (down) key.
2
20317861en_bat_a0
Telephoning
Dialling with dialling preparation
Dialling with dialling preparation is an important new feature offered by your telephone
which you have probably not come across before. Without to lift the handset enter the
desired number, which you can check and, if necessary, correct using the Correction key,
and then press the Loudspeaker key. As soon as the call is answered you can use your
handset or the loudspeaker (handsfree function).
To abort a dialling preparation operation, press the END key.
Dialling by digits
☛
Enter digits, and either press the Foxkey under
"Call" or lift the handset or press the
Loudspeaker key
or
Dialling using Number keys
Single or double click the desired Number key
and either press the Foxkey under "Call" or lift
the handset or press the Loudspeaker key
or
Dialling using Last number redial key
Press the Last number redial key and, if
necessary, scroll with the Foxkey to call one of
the last 10 dialled numbers, then either press the
Foxkey under "Call" or lift the handset or press
the Loudspeaker key
¥ ß
or
Dialling a number from the notepad
Press the Notepad key and, if necessary, scroll
with the Foxkey to call one of the last 10
numbers saved, then either press the Foxkey
under "Call" or lift the handset or press the
Loudspeaker key
¥ ß
or
☛
123˙˙
23˙˙
ABC˙˙
¥ ß
20317861en_bat_a0
Press the Name dialling key; "All" runs a search
in all directories (press the Foxkey under
"Abbreviated", "Internal" or "Private" if you
wish to limit the search to just that directory).
Enter the initials of the surname and first name,
e.g. E#A (Einstein#Albert); where approp-riate,
you can page to the desired entry using the
Foxkey under "¥" (i.e. if there are several names
with the same initials). Then press the Foxkey
under "Call" or lift the handset or press the
Loudspeaker key.
3
English
Dialling by name
Telephoning
Notes Entering the first letter of a name is the simplest way to select a number saved in
a directory. You need to know neither the telephone number nor the card
number.
Example:
123˙˙
23˙˙
ABC˙˙
2
DEF
2x
#
1
ABC
1x
•••
1x
"Einstein#Albert"
Press Key 2 twice
Key # once (space)
Key 1 once
If you only know the surname:
123˙˙
23˙˙
ABC˙˙
2
3
DEF
GHI
2x
3x
5
MNO •••
etc.
2x
If you have the additional keypad ZTF (20 freely programmable keys with LED)
connected to your telephone then alphabetic entries must made on it, while the
telephone keypad is reserved for numerical entries.
By pressing the Foxkey under "->" or the #-key you can enter a space in order to
write e.g. the first letters of the first name.
Numbers or names entered during dialling preparation can be corrected using the
Correction key (deletes the last number/letter) and the editing functions.
You can of course also dial in the normal way; lift the handset and dial the
number as required. If you wait more than 10 seconds between dialling two
digits, the dialling function will be automatically interrupted.
Display of caller’s name
When the caller’s number is received (CLIP), the name appears in the display along with it,
provided this number is stored with the name in the private directory, under a digit key or
as an abbreviated dialling number (this is software and PBX dependant).
4
20317861en_bat_a0
Telephoning
Dialling a number from the private directory
Press the Directory key; enter the number of the
desired card (two-digits, i.e. 00, 01...99) or press
the Foxkey under "View" to scroll to the entry
you are looking for.
Call
Press the Foxkey under "Call" or lift the handset
or press the Loudspeaker key.
☛
View
¥ ß
Note
Use the "Treat" menu to modify an entry (this menu item is software and PBX
dependant).
Utilising the call list
Your telephone automatically stores the names/numbers of the last 10 unanswered calls
in the call list. You can check these names/numbers and use this list to call back the
corresponding persons.
œ
Call–list
Press the Foxkey under "i", and then
under "Call list".
Listening by loudspeaker
The loudspeaker allows you to listen through the receiver in the handset and through the
loudspeaker, so that other persons in the room can listen in on your call.
Press the Loudspeaker key at any time during the
call.
Note
If you wish to continue the call with the loudspeaker off, press the Loudspeaker
key again.
Handsfree operation
The handsfree facility allows you a conversation without using the handset
With handset on-hook press the Loudspeaker
key.
For long-distance calls the speech quality may be reduced. If this is the case, use
the handset.
English
Note
Microphone mute
If you wish to talk to someone in the room
without the calling party hearing, press the
Microphone key to switch to mute (the "†"
symbol is displayed).
20317861en_bat_a0
5
Using the extended-feature functions
Saving the displayed number in the notepad
The notepad is used to store 10 names/numbers temporarily.
If the number is displayed, press the Notepad
key. The displayed number is saved even during a
call.
Note
You can store another number in the notepad during a telephone conversation by
entering the number and then pressing the Notepad key.
Copying the contents of the notepad
The numbers/names stored in the notepad can be copied directly into the private directory
or used as the destination for a message, call diversion, or an announcement.
MENU
Ok
Use the Menu key and the Foxkey to select the
desired directory entry or destination for
message, call diversion or announcement. Press
the Notepad key repeatedly until the entry you
wish to copy is displayed.
Press the Foxkey under "Ok" to copy the entry.
Notes The copying function is software and PBX dependant.
If the number is combined with a name in the notepad and another name is
already present at the destination position, this latter name is not overwritten.
Barring and unbarring your telephone
Your telephone enables you to protect your private data and programming from
unauthorized access, and prevent it being used by others during your absence. To do this,
a lock with a personal password (between 2 and 10 characters) is available.
Press the "Code lock key", then enter the code
(password) and verify it by pressing the Foxkey
under "Ok".
¥ ß
Press the Foxkey under "¥ ß" to select "Phone:
free", "Phone: barred" or "Programming:
barred" ("free" cancels a barred state).
☛
Ok
Ok
Note
6
After you press the Foxkey under "Ok", the
message "Executed" appears briefly on the
display.
The password is programmed at the factory as "0000" (see "Changing the
password").
20317861en_bat_a0
Using the extended-feature functions
Enquiry call
You are conversing with one party and wish to make a brief call to another party while
holding the existing connection.
☛
Enquiry–call
END
Note
Enter the number for the enquiry, press the
Foxkey under "Enquiry_call".
At the end of your enquiry call press the END key.
If you press the wrong key or replace the handset after terminating the enquiry
call, a continuos ringing tone is emitted for around 10 seconds to remind you that
the first call is stil connected. If you lift the handset during this time you will
return to the first call.
Brokering
To switch between the first call and the enquiry call.
2nd–conversation
Press the Foxkey under "2nd_conversation".
Transferring the call
After initiating an enquiry call you wish to connect the two call partners.
Replace the handset.
Conference
After initiating an enquiry call you wish to set up a conference together with your original
call partner.
English
Conference
Press the Foxkey under "Conference"
Note
Don’t worry! When you are setting up a conference call, none of your call
partners will be disconnected. The connections will only be disconnected if the
END key is pressed or if the handset is replaced!
20317861en_bat_a0
7
Using the extended-feature functions
Call back
You request a call back from an internal subscriber whose line is busy or who is not
answering.
Call–back
Reset
Note
Press the Foxkey under "Call_back"; you will
hear the confirmation tone. After replacing the
handset, you will see "Call expected from" on
the display and the number/name of the
corresponding subscriber. You can press the
Foxkey under "Reset" to cancel the requested
call back.
Only one call back can be activated at a time.
Call waiting
To alert a busy subscriber to your call by using the "Call waiting" tone and an appropriate
display.
Call–waiting
Note
Press the Foxkey under "Call_waiting".
If the called party rejects your call, the connection will be disconnected.
Paging1)
To page a person directly or after trying to telephone him.
MENU
☛
Page
Ok
Press the Menu Key repeatedly until "Page"
appears. Press the Foxkey at this position and
enter the number of the person sought.
Confirm with "Ok".
1) Depends on the PBX-type
8
20317861en_bat_a0
Using the extended-feature functions
Sending a message1)
You can send prepared messages as follows.
Message
¥ ß
MENU
☛
☛
Ok
Ok
Press the Menu key repeatedly until "Message"
appears. Press the Foxkey at this position, and
select the required message by scrolling.
If necessary, complete the message (if necessary
changing to alphabetic entry), press the Foxkey
under "Ok" and select the destination.
Confirm with "Ok".
Notes You can enter the number of the recipient by dialling preparation
(e.g. dialling by name).
You can use the Correction key and editing functions to change the message
displayed.
Reading messages1)
You can see whether a message has been received from the relevant display in the
telephone’s idle state.
i
Delete
END
Note
Press the Foxkey under "Read"; the message will
appear on the display for 8 seconds. If the
message has several lines, the next line will then
appear and so on until the end of the message is
reached.
If you press the Foxkey under "i", the next line
will appear before the 8 seconds are up.
Pressing the Foxkey under "Delete" causes the
read message to be deleted from the memory
and the next message to appear.
If you delete the last message stored or press the
END key, the display returns to idle state. The "i"
remains on the display until all messages have
been deleted.
The procedure is sofware and PBX dependant.
1) Depends on the PBX-type
20317861en_bat_a0
9
English
Read
Using the extended-feature functions
Leaving a message for callers1)
To leave a message for any possible internal callers.
Diversion
ß ¥
MENU
ß ¥
☛
Ok
Ok
Note
Press the Menu key and then the Foxkey under
"Diversion". Press the Foxkey under "¥ ß" to
scroll to "Divert to: Message".
Press the Foxkey under "Ok" (the last message
appears). Scroll to the message you are looking
for and add to it, if necessary.
Press the Foxkey under "Ok" to activate the
displayed message.
You can use the Correction key and the editing functions to change the message
displayed.
Call diversion
You can divert incoming calls to another telephone or to the switchboard operator or
leave a message for callers.
Diversion
Press the Menu key and then the Foxkey under
"Diversion".
MENU
¥ ß
Ok
Press the Foxkey under "¥ ß" to select the type
of diversion and confirm with "Ok". You can
choose between: Divert to: "Subscriber",
"Diversion: if busy", "Divert to: Pager" or "Divert
to: Messages"
or
Call forwarding
¥ ß
Ok
☛
Ok
Note
Reset
Press the Foxkey under "Call forwarding" and
use the Foxkey under "¥ ß" to select: Forward
to: "Subscriber" or "Forward to: Pager" and
confirm with "Ok"
Enter the diversion destination (dial new number
if necessary) and confirm with "Ok". The
message appears: "Executed" and "Diverted to:
nnn". To deactivate call diversion, press the
Foxkey under "Reset".
If you want calls to be diverted only when you are busy with another call , select
"Diversion: if busy" (this menu item is sofware and PBX dependant).
1) Depends on the PBX-type
10
20317861en_bat_a0
Using the extended-feature functions
Answering a paging call1)
You are being paged and wish to take the call on another telephone.
Pager
Pick–up
MENU
☛
Ok
Press the Menu key repeatedly until "Pick_up"
appears. Press the Foxkey at this position and
then under "Pager", enter the extension number
and press the Foxkey under "Ok".
Answering a circular call (with coded ring signal)
To answer a call that has been relayed to a central bell.
Pick–up
MENU
Bell
Press the Menu key repeatedly until "Pick_up"
appears. Press the Foxkey at this position and
then under "Central bell".
Call pick up
You hear another telephone in your area ringing, and, as the person being called is
absent, you wish to intercept the call on your telephone.
Pick–up
Ok
MENU
☛
Ok
If the last call was picked up from a pager or a central bell, you must first press
the Foxkey under "Subscriber", then enter the number.
English
Note
Press the Menu key repeatedly until "Pick_up"
appears. Press the Foxkey at this position. The
number of the terminal appears from which you
picked up a call the last time. Press the Foxkey
unter "Ok" if this is the number of the actually
called terminal. If not, enter the number of the
called terminal and press the Foxkey under
"Ok".
1) Depends on the PBX-type
20317861en_bat_a0
11
Using the extended-feature functions
Announcement
Announcement allows you to speak to a person directly over the loudspeaker of his
telephone, without having to wait for a reply.
☛
Announcement
MENU
Ok
Press the Menu key repeatedly until
"Announcement" appears. Press the Foxkey at
this position, enter the desired number or look
for a target group, and confirm by pressing the
Foxkey under "Ok".
Call back requested
A caller has tried to reach you. The message "Call back requested" along with the
number and the name is shown on your display.
Calling back
Call
Press the Foxkey under "Call" and wait until the
connection to your caller is made
or
Deleting call back
Delete
Press the Foxkey under "Delete" to reject the call
back.
Present/absent
☛
This key activates/deactivates the desired functions if you are leaving your office or
returning to it. Ex factory this key is programmed as the call diversion key.
Note
12
Enter the number of your deputy and then press
the Absence key. Pressing the key again
deactivates call diversion.
The Absence key can be programmed as a Number or Function key
(see also "Programming your telephone").
20317861en_bat_a0
Using the extended-feature functions
Transparent mode (Tone dial mode, DTMF)
After setting up a connection the tone dial mode can be used to activate a function such
as, for example, the remote control of an answering machine.
☛
Tone–dial–mode
MENU
END
Note
Press the Menu key and then the Foxkey under
a"Tone_dial_mode"; enter the character
sequence needed for the desired function.
Press the END key to leave the tone dial mode.
A "Long click" of the "Star key"
tone dial mode.
causes the set to switch automatically to the
Parking a call
END
Park
Press the Foxkey under "Park" and the call is
parked. This is confirmed by the message
"Executed".
☛
You can park a call during a conversation. This frees you up to take a second call.
Press the END key to take a new call.
To unpark press the Foxkey under "Take_back".
You are immediately connected to the first call
again.
English
Take–back
20317861en_bat_a0
13
PRG2: Cont. with MENU We 15 Apr. 17:55
Keys Foxkey
Dir. entry
Text
▼
PRG1: Cont. with MENU We 15 Apr. 17:55
Ring Teamkey_setting
Linekey_setting
▼
Week 15, We 15 Apr. 17:55
▼
Ringing signal volume
Ok Test
¥4ß
Idle text_
Ok Back _>
Å
Press teamkey
Back
Melody
¥ 4 ß
Week 15, We 15 Apr. 17:55
Diversion Pick_up Page Message
Press linekey
Back
▼
▼
▼
▼
▼
▼
▼
▼
Ok Test
Answer
Seizure
Ring.signal speed
¥ 3 ß
Tn: Set teamkey
Back
Ring
L12: Set linekey
Back
Ring Answer
Calls
Week 15, We 15 Apr. 17:55
Announcement
Tone_dial_mode
▼
▼
▼
Tn: Ring:
Ok
Back
Attention signal:
Ok
Test
Priority
¥ 1 ß
Vol.
¥ 6 ß
Tone
¥ 2 ß
Melody
Speed
¥ 5 ß ¥ 3 ß
Handsfr.
¥ ß
On
¥ ß
Tn: Answer:
Ok Back
Speed
¥ 4 ß
Priority
¥ 2 ß
Priority
¥ 1 ß
Don’t insert
¥
ß
Melody
¥ 3 ß
Handset
¥ ß
Ln: Answer:
Ok Back
Del 10s
¥ ß
Handset
¥ ß
Ln: Seize:
Ok Back
Ln: Call list:
Ok
Back
Week 15, We 15 Apr. 17:55
Do_not_disturb
Programming
Ln: Ring:
Ok Test
▼
▼
▼
▼
14
▼
Office 40
Programming your telephone
Menu Overview
20317861en_bat_a0
PRG4: Cont. with MENU
End
Test
▼
15
▼
Delete key
¥ ß
Read Delete
Fxn:
Ok Back
New code: ✱✱✱✱
Ok Back
Fn:
Delete key
Ok Back ¥ ß
▼
Fn:
Function key
Ok Back ¥ ß
▼
Tn:
Teamkey
Ok Back ¥ ß
▼
Nn: Number key
Ok Back ¥ ß Memory 1 Memory 2
Do not disturb
¥ ß
Me1: Enter number
Ok Back _>
Name Read Delete
▼
Foxkey:
Menu 2
Entry 4 Entry 5 Entry 6 Back Continue
En: Enter number
Ok Back _> Name
Search entry, enter number:
New_entry
Enter_name
032 624 21 11; Miller Zip
Modify Back New_entry Delete ¥ 0 ß
Read
Me2: Enter number;
Ok Back _> Name
Delete
Delete
Fn:
Ok Back
Confirm: ✱✱✱✱
Ok Back
User group
¥ ß
Tn: Enter number
Ok Back
Read
Delete
Me1: Enter number;
Ok Back _>
Name Read Delete
Read
Name
Me1: I*26PX;
Ok Back _>
Me1:
; Enter name
Ok Back _> Number Read Delete Å
En:
; Enter name
Ok Back _> Number Read Delete Å
"End" returns you from the programming, the other menu points are
reserved for the installer.
Old code: ✱✱✱✱
Ok Back
Off
¥ ß
Sprache, Language, Langue, Lingua: English
Ok Back
¥ ß
Press key to be programmed
Back
Fxn:
Ok Back
Function key
¥ ß
▼
Number key
¥ ß
Memory 1
▼
Automatic handsfree:
Ok Back
English
Service
PRG3: Cont. with MENU
Code *Language Handsfree
▼
▼
Back
Fxn:
Ok Back
Fxn:
Ok
▼
Foxkey:
Select menu
Entry 1 Entry 2 Entry 3 Back Continue
Å
▼
▼
▼
▼
▼
▼
▼
▼
▼
▼
▼
▼
▼
▼
▼
▼
any key
Me1: I#48PX
Ok
Back
Me2: I*48PX
Ok
Back
Me1:
; Enter name
Ok Back _> Number Read Delete Å
Memory 1
▼
Memory 2
Me2:
; Enter name
Ok Back _> Number Read Delete Å
Delete
Foxkey (Ok)
Read
Foxkey
Me2: I#26PX
Ok
Back
Menu key
Me1: I*26PX
; Enter name
Ok Back _> Number Read Delete Å
▼
▼
▼
▼
▼
▼
▼
▼
▼
▼
▼
▼
▼
▼
20317861en_bat_a0
▼
Search entry, enter name:_
New_entry
Entry_no.
Search
Programming your telephone
Menu Overview (continuation)
Programming your telephone
Points to remember when programming
Programming is an integral part of the operating concept; before you start programming,
read the chapter "Operation: the menu system" at the beginning of this booklet.
Handset
While programming, the handset remains on hook. If you lift the handset during
programming, the programming sequence will be interrupted. If you receive a call during
programming, you must decide whether to answer the call or to continue with the
programming.
Programming mode
You can advance to the beginning of the programming mode in one of two ways:
–
"Long click" of the Menu key (at least 2 seconds)
–
Press the Menu key repeatedly until "Programming" appears; press the Foxkey under
"Programming"
Note
A "long click" of the Name dialling key or the Directory key advances the
program directly to the menu for entries into the private directory.
A "long click" of a variably programmable key advances the program directly to
the programming menu for this key.
"Long clicks" are software and PBX dependant.
Menu key
With the Menu key you can move at two levels: Firstly at the programming level
(PRG 1–…; selection of the "PRG" point that you wish to program, for example, "Keys")
and secondly at its sub-function level (for example, allocation of a Number key). You can
leave both levels by pressing the END key.
Storing
Store the contents of a menu item that you have programmed or changed by pressing the
Foxkey under "Ok". If you press the Foxkey under "Back" or the END key, the
programming will not be stored.
Programming example:
Setting the ringing melody
Ring
Test
¥ ß
Ok
END
Note
16
In the Programming mode press the Foxkey
under "Ring". Select with the Foxkey under
"Melody" and "¥ ß" one of the 16 melodies.
Press the Foxkey under "Test" to switch on the
selected melody and confirm the selection by
pressing the Foxkey under "Ok". Return to the
initial state by pressing the END key.
You can adjust the volume and speed of the ring signal in the same way.
20317861en_bat_a0
Programming your telephone
Editing text display in idle state
The text field available can be used, for example, to display the telephone number or the
name of the company on telephones which are often used by several people.
☛
Text
Ok
END
In the Programming mode, press the Foxkey
under "Text", enter text, and save it by pressing
the Foxkey under "Ok".
Return to the initial state by pressing the END
key.
Programming the Foxkey (programmed menu items)
You can have six frequently used names/numbers appear on the display; three in the idle
state display and three in the feature menu 2.
Foxkey
Entry 1_3
Cont
Entry 4_6
ß ¥
OK
☛
OK
In the programming mode press the Foxkey
under "Foxkey" and select the desired entry
(Entries 1-3 are in the idle state display; Entries
4-6 are in the feature menu 2; call up with the
Foxkey under "Continue").
Press the Foxkey under "ß ¥" to select the
desired key type ("Number key" or "Function
key") and confirm with "Ok".
Enter number/name or select key function (such
as "Diversion" or "Prog. fct" i.e. Programming
function) depending on the type of key selected
and confirm with the Foxkey under "Ok".
Notes The "|" symbol indicates that the function is activated.
A "Long clic" of the Foxkey advances the program directly to the programming
mode for this key.
Entry 4 is used by default for "Tone_dial_mode".
Ok
☛
Code
☛
☛
Ok
Ok
In the programming mode, press the Foxkey
under "Code", enter the old password (initially
"0000") and confirm with "Ok". Enter the new
password, confirm by pressing the Foxkey under
"Ok", enter the new password again and
confirm by pressing the Foxkey under "Ok" to
save the password. Press the END key to return
to the initial state.
END
20317861en_bat_a0
17
English
Changing the password
Programming your telephone
How to program your private directory
The private directory is your own personal electronic directory in which you can store up
to 100 (00 to 99) numbers/names and/or functions. When you are away, you can use your
password to protect the entries from being accessed by unauthorised parties.
Dir.–entry
New–entry
☛
Ok
In the programming mode, press the Foxkey
under "Directory_entry".
Press the Foxkey under "New_entry" to advance
to the next free card.
Enter number/name and store them with the
Foxkey under "Ok".
To search for and to modify an existing entry
there are several possibilities:
☛
☛
Entry–no
Search
¥ 99 ß
Ok
☛
Modify
Note
Enter the initials of the name you are looking for
or press Foxkey under "Entry_no" to enter the
number of the desired card.
Or press the Foxkey under "Search" and scroll to
the searched entry.
Press the Foxkey under "Modify", enter or
modify number and/or name and store them
with the Foxkey under "Ok".
Whenever you enter a number, it is recommended that you also input the last
name and the first name that go with it.
Editing functions
A "long click" of at least 2 seconds of the "+" or "-" key causes the cursor to move to
the left or right, allowing you to correct an entry.
If the cursor is at the beginning of a string of characters, pressing the Correction key or a
"long click" of the "-" key moves the cursor to the end of the string. If it is at the end of
a string of characters, a "long click" of the "+" key moves the cursor back to the
beginning. After a character is corrected, the editing function must be activated for
further corrections with a "long click".
Example: 032 624 34 54
A press of a character key inserts the corresponding character to the left of the cursor.
Example:
Schuhmann Claara
Schuhmann Clara
Pressing the Correction key deletes the character to the left of the cursor.
Note
18
The editing functions are software and PBX dependant.
20317861en_bat_a0
Programming your telephone
Macro language
The macro language allows you to store several functions in succession under one key.
A
Seizes line which has the highest priority
I
Seizes main line (internal key)
X
Disconnects call
_
Separates the number of the public exchange access number
from the telephone number (e.g. 0–24 …)
P
Pause (1 sec.)
L01
N
Inserts the number displayed
.
Activates control key
Z
Switches transparent mode
R
Redials last number dialled
I201
Examples:
Seizes Line key 01
I*21201X
Setting up of a handsfree call to subscriber number 201.
Handsfree activating of call diversion to subscriber number 201
and disconnection of handsfree call.
Automatic answering
Handsfree
¥ ß
Note
Ok
In the Programming mode press the Foxkey
under "Handsfree".
Then you can choose which type of calls should
be switched automatically on handsfree. Confirm
with "Ok".
Handsfree for Team keys is only activated if this has been programmed
as "on".
20317861en_bat_a0
19
English
You can set the telephone so that an incoming call will switch on the hands-free function,
enabling you to answer the call without to lift up the handset.
Assigning the various key types
Before you begin to assign keys, you must first allocate every key to a key type. A
distinction is made between Number keys, Team keys, Function keys and Line keys. You
cannot define Line keys yourself; these are determined in the PBX configuration.
Keys
¥ ß
Ok
Note
In the Programming mode, press the Foxkey
under "Keys", press the corresponding key,
select the key type using the Foxkey "¥ ß", and
confirm with the Foxkey under "Ok".
If in the idle state you press the corresponding key for more than 2 sec. the
programming menu to this key will appear directly.
Number keys
Number keys (also described as target or memory keys) permit internal and external
numbers which are frequently used to be dialled quickly. Every number key is provided
with two memory places (single and double click) in which you can store one call number
each.
You can program number keys to be self-engaging (with help of the macro language), so
that the handsfree function is automatically selected, a particular line is engaged and the
desired number is dialled.
Allocation of Number keys
☛
Keys
Ok
In the Programming mode, press the Foxkey
under "Keys", select the desired Number key and
memory, enter the number and name, and
confirm with the Foxkey under "Ok".
Line keys1)
If your telephone has been configured in the PBX as a multi-line keyset, you can handle
up to 13 telephone lines in parallel. A distinction is made between the main line, i.e., the
line which identifies the call number of your telephone and the other exchange lines. The
main line (internal key) is always the top left-hand key.
The extended-feature functions described in this booklet can be used with the main line;
all types of dialling can be used with the line keys, as well as the functions enquiry call,
brokering, call transfer and park/unpark. With the exception of the main line, only
external calls can be handled using line keys.
1) Depends on the software and on the PBX-type
20
20317861en_bat_a0
Assigning the various key types
Each line key is provided with a two-coloured light emitting diode (LED) and an
identification label. The LED indicates the status of the line.
LED unlit : line is free
LED is permanently lit : line is busy
LED blinks fast: incoming call being received on
this line
LED blinks slow: line is parked or on hold
The colours indicate the origin or destination of the call
green: internal call, or internal conversation
red: external call or external conversation
Line key setting
¥ ß
Ok
Press Line key until the menu "Line seizure"
appears. Select the desired adjustment under
"Ring": off, on, after 10/20/30 s, melody and
speed. Confirm with "Ok". In this way you can
determine whether and how an incoming call is
to be indicated acoustically.
Other settings are available by pressing the Menu key: Under the menu point "Allocate",
you can select whether the line will be allocated by either lifting the handset, pressing the
Loudspeaker key or by pressing the Line key. In the same way you can select whether and
how a call will be answered on a line, under "Answer".
Note
Line keys can also be set in the programming mode under "Line setting"
Making and receiving calls over lines
The line will also be indicated for incoming calls. If several calls arrive at the same time on
different lines, the call corresponding to the highest engaged Line key will be displayed.
Switching between lines
You can switch between calls on lines by pressing the line key. The active line is
automatically parked. This allows you to answer calls on other lines or take up parked
connections again. You cannot, however, take up conversations on engaged lines.
20317861en_bat_a0
21
English
If you lift the handset or press the Loudspeaker key, your telephone automatically
allocates a line, which is then displayed in the upper left of the display. By pressing
another line key, you will change the line.
Assigning the various key types
Team keys
The team functions simplify communication between members of a team, as well as
deputising.
Allocation and use of Team keys
You can program up to 13 team keys on your telephone. Proceed as for allocating
Number keys but pressing "Team key" instead of "Number key". Team keys are provided
with a two-coloured light emitting diode (LED) and an identification label, with the LED
indicating the status of the telephone of the team member.
LED unlit: team member’s telephone
is free
LED permanently lit: team member’s telephone is
busy with a call
LED blinking: call for team member; if team call is
programmed, the call will be signalled
acoustically
The colours indicate the origin or destination of the call
green: internal call, or internal conversation
red: external call or external conversation
Press the Team key in the idle state or when off-hook to call the team member. A double
click will activate an announcement. If you press the Team key while the phone is ringing
(LED blinking fast) you will answer the call.
If you press the Team key during a telephone conversation, you will initiate an enquiry call
to your team member, or you will pick up an incoming call from his telephone. During the
telephone conversation a call on a team key will only be indicated by the blinking LED,
and, if team call is programmed, by a single alert tone.
Setting Team keys
Team keys can be set in the same way as Line keys.
Function keys
Function keys allow you to store commonly used functions such as call diversion in a
freely-programmable key. Pressing this key switches the function and the LED on, pressing
again switches both off.
While programming, choose first the function which is shown by the LED. The telephone
automatically fills in both memories of the key with the corresponding function codes.
You can complete these for special applications.
22
20317861en_bat_a0
Installation
Contents of packaging
Telephone
123..
ABC..
END
Handset
1
ABC
4
JKL
7
STU
2
DEF
5
MNO
8
VWX
Telephone
connecting cable
3
GHI
6
Feet
Handset
connecting cable
Kurzbedienungsanleitung
Umleiten
auf
Zurückstellen
Sucher
☎
Tel.
END
No.:
123 ..
ABC
..
031
999
Norbert Norbert
Gerhardpriv.
<
<<
Frank
Computer Helmut << <
Transport
Rita
<
AG <<
Notruf AG
<
<<
Feuer
<
<<
20
1
2
DEF
5
MNO
8
VWX
0
Menu
70
ABC
4
JKL
7
STU
3
GHI
6
PQR
9
YZ•
0...9
12344NeumannNNorbert
Rückfrage
Foxtaste
PQR
Zustandszeile
Menüzeile
MENU
• In der Menüzeile angezeigte Funktion
-Taste unter dem Text
aktivieren:
drücken (Beispiel: "Rückfrage")
9
YZ•
0
• Eine andere Funktion aktivieren:
-Taste
ein- bzw. mehrmals drücken und Menüpunkt mit
-Taste wählen
MENU
0...9
• Folgende Funktionen werden mit dazu
bestimmten Funktionstasten aktiviert:
Wahlwiederholung
Mikrofon ein/aus
Lautsprecher ein/aus
Abwesend/Anwesend
Transparent cover
Ruf-bzw. Hörlautstärke bei Ruf bzw.
Gespräch einstellen
Abbrechen/Wiederbelegen (in Wahl od. Gespräch)
END
Bedienungsanleitung
Mode d'emploi
Istruzioni per l'uso
Operating instructions
Operating
instructions
Connecting handset and telephone
After you have unpacked the telephone, connect
the handset first, by inserting the straight end of
the handset connecting cable into the small
socket on the base of the telephone.
By gently pulling, check that the cable connector
is in place. Insert the other end of the cable into
the handset.
Now connect the telephone by inserting the
connector on the telephone connecting cable
into the large socket on the base of the
telephone. By gently pulling, check that the cable
connector is correctly in place. Put the cable
through the provided tension relief channel.
Insert the other end of the cable into the
telephone connection socket. Insert the two
support feet into the top of the telephone base.
Labelling the freely-programmable keys
English
Alongside the freely-programmable keys note down the name of the number saved onto
the removable identification label on the last page of this booklet. Finally cover label using
the transparent cover.
Additional keypad (ZTF)
You can install with your telephone a ZTF which provides 20 additional keys with LEDs
and simplified alphabetic entry (small/upper case letters, special characters).
20317861en_bat_a0
23
Safety Advice
Read this booklet carefully, and keep it in a safe place.
If you have questions, please ask a specialist. Have your service work carried out by a
specialist. Never open up the telephone yourself.
Do not touch the connector contacts with sharp or metallic objects.
Place your telephone on a non-slip surface.
Ensure that the telephone is not positioned in direct sunlight or near other heat sources.
Do not install or use your telephone in areas where there is a risk of explosion.
Protect your telephone from moisture, heavy dust, aggressive liquids and steam.
Do not place your telephone near electro-magnetic fields (electrical motors, household
units ) which can impair voice quality. Avoid positions close to radios, TV and video units.
Only connect the connecting cable of your telephone to sockets intended for this use.
Never replace the connector of the connecting cable.
Never carry your telephone by the connecting cable.
Do not use the telephone in the vicinity of water.
Clean your telephone using a soft, slightly damp or anti-static cloth. Do not use any
cleaning solvents or chemical substances for cleaning. Only use the telephone in a
temperature range from +5 °C to +35 °C.
24
20317861en_bat_a0
Troubleshooting
Your call partner cannot hear you or you cannot hear him
Ensure that the handset cable is correctly plugged into the handset and the telephone.
Handset off-hook, no dialling tone, no display
Ensure that the telephone connecting cables on the telephone and at the telephone
socket are correctly plugged in.
Display showing, but no connection
Your telephone is connected correctly but it might be barred. Unbar it (see "Barring and
unbarring your telephone").
Programmable keys cannot be programmed
It is possible that the programming function has been barred. Unbarr your telephone (see
"Barring and unbarring your telephone").
Unbarring the telephone if password is forgotten
Ask the operator to overwrite your password from the exchange.
Display: "Wrong Terminal Type"
Another terminal has been logged in initially. If you wish to log in your new terminal
correctly, then go into the submenu "Dir. entry" or "Keys" of the programming mode.
"Set new Term" is shown type "yes" or "no". Note that by pressing "yes" you may
loose all your data. If you do not wish to log in your new terminal, press "i". Standard
telephone functions can still be used.
Display: "trying to register"
The telephone cannot be logged in; check with your telephonist or a specialist.
If other messages appear, ask your system manager for help.
English
Note
20317861en_bat_a0
25
Self-test
When you have checked your telephone regarding connections, blockages and so on, you
can check other possible malfunction causes using the self-test.
Enter the self-test mode
Pull the telephone connection cable out of the
telephone socket; Hold down the far-left Foxkey
while plugging in the connecting cable again.
You will now be in the self-test mode. The LEDs
and the display continually change from light to
dark.
☛
Test
Lift the handset and press one key after the
other. For every key action a sound should be
heard from the loudspeaker.
The microphone and the receiver are connected
together. If you blow into the microphone, you
should hear the sound in the receiver.
Press the Loudspeaker key. The handsfree
microphone will be connected to the receiver for
a short time; you should be able to hear the
surrounding noises.
Quit the self-test mode
Pull out the telephone connecting cable and plug
it in again.
If you find any abnormalities during the self-test, inform the switchboard attendant or a
specialist.
26
20317861en_bat_a0
Function codes
Which prefix code numbers to dial
Standard dialling
Key sequence
Abbreviated dialling numbers generally PBX .............. 7000…7999 1)
.........
Door intercoms ............................................................... 851… 852 1)
.........
Emergency codes ............................................................ 12
1)
.........
External line
business .......................................................................... 0
private ............................................................................ 10
to include cost centre code ............................................. 13 CC no.
.........
.........
.........
Routing codes ................................................................. 170… 199 1)
.........
Switchboard attendant .................................................. 11 1)
.........
User group codes ........................................................... 860… 888 1)
.........
Suffix dialling
Brokering (switching between
two connections) ............................................................ 2
Call back
activate while subscriber is busy ...................................... 9 or *37
activate while subscriber is free ....................................... 9 or *37
Call waiting .....................................................................
reject ..............................................................................
answer with hold ............................................................
answer without hold .......................................................
answer with conference ..................................................
6 or *43
0
2
1
3
Coded ringing
activate ........................................................................... 8 or *81
Conference
establish from connection ............................................... 3
exclude internal subscribers ............................................ *31
7 or *44
0
2
1
English
Intrusion ..........................................................................
reject ..............................................................................
answer with hold ............................................................
answer without hold .......................................................
Message display on ........................................................ *38
Paging system on 1) ........................................................ 8 or *81
1) The definition and the number range are software and PBX dependant
3) The function is software and PBX dependant
20317861en_bat_a0
27
Function codes
Re-booking ongoing call to cost centre number ......... *78 CC no.
Parking connection ........................................................ *76
Transfer call .................................................................... 1
Prefix dialling
Announcement
to a single subscriber ...................................................... *7998 subs. no.
to a group ...................................................................... *79 group no.
answer announcement to a group .................................. *89
Answer circular call ........................................................ *83
Appointments reminder call (wake-up call) 2)
activate standing order ...................................................
cancel standing order ......................................................
activate one-off order .....................................................
cancel one-off order .......................................................
*56 hh mm
#56
*55 hh mm
#55
Call diversion
suppress incoming 2) .......................................................
enable incoming 2) ..........................................................
activate unconditional 2) ..................................................
cancel unconditional 2) ....................................................
activate to most recently defined subs. no., uncond. .......
cancel to most recently defined subs. no., uncond. .........
activate to pre-defined subs. no. 2+3) ................................
cancel to pre-defined subs. no. 2+3) ..................................
activate when busy 2) ......................................................
cancel when busy 2) .........................................................
activate to most recently
defined subs. no., when busy .......................................
cancel to most recently
defined subs. no., when busy .......................................
activate to standard text 2+3) ............................................
cancel to standard text 2+3) ..............................................
activate to pager or circular call with ring code 2+3) ..........
cancel to pager or circular call with ring code 2+3) ............
#67
*24 text no.#
#24
*28
#28
Call forwarding (automatic call transfer if no answer)
suppress incoming 2) .......................................................
enable incoming 2) ..........................................................
activate 2) ........................................................................
cancel 2) ..........................................................................
activate to most recently defined subs. no. ......................
cancel to most recently defined subs. no. ........................
activate to pre-defined subs. no. 2+3) ................................
cancel to pre-defined subs. no. 2+3) ..................................
activate to pager or circular call with ring code 2+3) ..........
cancel to pager or circular call with ring code 2+3) ............
*02
#02
*61 dest. no.
#61
*61#
#61
*62
#62
*68
#68
*02
#02
*21 dest. no.
#21
*21#
#21
*22
#22
*67 dest. no.
#67
*67#
2) Remote control possible
3) The function is software and PBX dependant
28
20317861en_bat_a0
Function codes
Call pick up ..................................................................... *86 subs.no.
Call waiting indication 2)
suppress incoming .......................................................... *04
enable incoming ............................................................. #04
Cancel call back .............................................................. #37
Code call
activate ........................................................................... *81 subs. no.
answer ........................................................................... *82
Conference
variable ........................................................................... *71 subs. no. 1*
… subs. no. 5# 1)
pre-defined 3) .................................................................................................................... *70 conf. no
Connection
park ................................................................................ *76
recall parked ................................................................... #76
Courtesy Service 3)
switch on group 1 ...........................................................
switch off group 1 ..........................................................
switch on group 2 ...........................................................
switch off group 2 ..........................................................
*931
#931
*932
#932
Day, night, weekend answer connection (Switch group 1)
day (Position 1) ............................................................... *8511
night (Position 2) ............................................................ *8512
weekend (Position 3) ...................................................... *8513
Deactivate all activated services 2) ................................ *00
(except user group)
Do not disturb (station guarding) 2)
activate ........................................................................... *26
cancel ............................................................................. #26
External line
activate with charge recall ............................................... *32 subs. no.
Follow me
activate ........................................................................... *23 subs. no.
cancel ............................................................................. #23
English
Intrusion 2)
suppress incoming .......................................................... *04
enable incoming ............................................................. #04
Least Cost Routing (LCR)
Force an alternative network operator 3) .......................... *90
1) The definition and the number range are software and PBX dependant
2) Remote control possible
3) The function is software and PBX dependant
20317861en_bat_a0
29
Function codes
Messages (standard messages with/without defined parameters) 2+3)
send to a single subscriber .............................................. *3598 subs. no text no.#
send to a group .............................................................. *35 group no. text no.#
broadcast ........................................................................ *3599 text no.#
Message display 2)
activate ........................................................................... *38 subs. no.
cancel (target terminal) ................................................... #38 subs. no.
Open doors ..................................................................... *751… *752 1)
Paging 3)
page ............................................................................... *81 subs. no.
answer with one search path .......................................... *82
answer with multiple search paths .................................. *82 subs. no.
Relays
activate ........................................................................... *755… *757 1)
deactivate ....................................................................... #755… #757 1)
Remote control
activate (from another set) ............................................ *06 subs. no. *21 dest. no.
activate remote control /
enter remotely controllable number /
enter desired *-procedure (e.g. *21 dest. no.)
deactivate (from another set) ........................................ *06 subs. no. #21
activate remote control /
enter remotely controllable number /
enter desired #-procedure (e.g. #21)
deactivate (from own set) ............................................. #21
enter #-procedure (e.g. #21)
Switch groups (incoming)
switch group x, pos. 1 ..................................................... *85x1 1)
switch group x, pos. 2 ..................................................... *85x2 1)
switch group x, pos. 3 ..................................................... *85x3 1)
Note: x = 2 to 9
User group 2)
join ................................................................................. *48
leave ............................................................................... #48
1) The definition and the number range are software and PBX dependant
2) Remote control possible
3) The function is software and PBX dependant
30
20317861en_bat_a0
Index
A
L
Additional keypad (ZTF) ........................ 23
Adjusting the ring volume ...................... 2
Adjusting the volume of the receiver
and the loudspeaker ............................ 2
Announcement .................................... 12
Automatic answering ........................... 19
Line keys ........................................ 20, 21
Listening by loudspeaker ........................ 5
B
Barring and unbarring ............................ 6
Brokering ............................................... 7
C
Call back .......................................... 8, 12
Call diversion ........................................ 10
Call list ................................................... 5
Call pick up .......................................... 11
Call waiting ............................................ 8
Changing the password ........................ 17
Conference ........................................ 7, 8
Connecting handset and telephone ...... 23
Contents of packaging ......................... 23
D
Dialling a number from the notepad ....... 3
Dialling a number from the private
directory ............................................... 5
Dialling by name ..................................... 3
Dialling using Last number redial key ...... 3
Dialling using Number keys ..................... 3
Dialling with dialling preparation ............ 3
Display of caller’s name ........................... 4
Diversion .............................................. 10
M
Macro language ................................... 19
Menu system .......................................... 1
Message ........................................... 9, 10
Microphone mute ................................... 5
N
Notepad ............................................. 3, 6
Number keys ........................................ 20
P
Paging .............................................. 8, 11
Parking a call ........................................ 13
Password .............................................. 17
Present/absent ...................................... 12
Private directory ................................ 5, 18
Programmed menu items ................. 1, 17
Programming ....................................... 16
Programming the Foxkey ...................... 17
S
Setting the display language ................... 2
Setting the ringing melody ................... 16
Special display symbols ........................... 1
T
Team keys ............................................. 22
Tone dial mode, DTMF .......................... 13
Transferring the call ................................ 7
Transparent mode ................................. 13
E
Editing functions .................................. 18
Editing text display in idle state ............. 17
Enquiry call ............................................. 7
English
F
Function keys ....................................... 22
H
Handsfree operation ............................... 5
20317861en_bat_a0
31
Notes
32
20317861en_bat_a0
Office 20
Office 30
Office 40
Office 130
Office 150
a thinks ahead
ABSC_20261325_A.120_V4.50
Office 10