
1
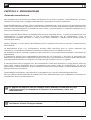
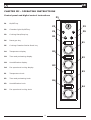
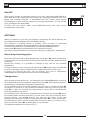
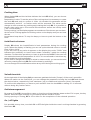
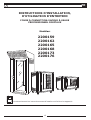
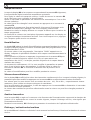
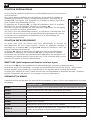
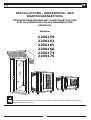
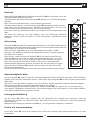
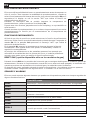
IT
ISTRUZIONI PER L’INSTALLAZIONE,
L’USO E LA MANUTENZIONE
FORNI A CONVEZIONE-VAPORE
AD USO PROFESSIONALE
DIGITALI
Modelli:
2200159
2200162
2200165
2200168
2200173
2200176
Leggere attentamente le seguenti istruzioni prima di installare ed avviare le apparecchiature
1
IT
CAPITOLO I - INTRODUZIONE
Guida alla consultazione
Nel ringraziare per la fiducia accordataci nell’acquisto di un nostro prodotto, raccomandiamo, prima di
mettere in funzione i forni, di leggere attentamente i manuali che trovate in dotazione.
Questa pubblicazione contiene tutte le informazioni necessarie per l’uso corretto e la manutenzione del
forno. Scopo del presente manuale è quello di consentire all’utente, soprattutto al diretto utilizzatore di
prendere ogni provvedimento e predisporre tutti i mezzi, le risorse umane e i materiali necessari per un
uso sicuro e duraturo del forno.
Questo manuale deve essere consegnato alla persona preposta all’uso, il quale provvederà alla sua
conservazione in luogo adeguato, al fine di renderlo disponibile per la consultazione e per la
manutenzione ordinaria del forno. In caso il forno fosse rivenduto, il libretto dovrà essere fornito a
corredo dello stesso.
Questo manuale è rivolto anche all’installatore per le operazioni di messa in servizio e manutenzione
straordinaria.
La destinazione d’uso e le configurazioni previste delle macchine sono le uniche ammesse dal
costruttore, non tentare di utilizzare le macchine in disaccordo con le indicazioni fornite.
La destinazione d’uso indicata è valida solo per macchine in piena efficienza strutturale, meccanica ed
impiantistica.
Il costruttore declina ogni responsabilità derivante da uso improprio o da parte di personale non
addestrato, da modifiche e/o riparazioni eseguite in proprio o da personale non autorizzato e dall’utilizzo
di componenti di ricambio non originali o non specifici per il modello di forno in oggetto.
Il manuale deve essere custodito sino allo smaltimento finale della macchina in luogo idoneo, affinché
esso risulti sempre disponibile per la consultazione nel miglior stato di conservazione. In caso di
smarrimento o deterioramento, la documentazione sostitutiva dovrà essere richiesta direttamente alla
ditta produttrice o rivenditore.
Queste pagine contengono, nello specifico, le spiegazioni per l’uso dei comandi digitali dei forni.
Devono sempre essere abbinate al manuale dei forni elettromeccanici per completare le istruzioni di
installazione, d’uso e di manutenzione.
Le pagine che seguono devono sempre essere abbinate al manuale dei forni
elettromeccanici per completare le istruzioni di installazione, d’uso e di
manutenzione.
Per qualsiasi incomprensione nelle traduzioni che seguono, si prega di fare
riferimento al testo in lingua italiana.
2
IT
CAPITOLO III - ISTRUZIONI PER L’USO
Pannello di controllo ed istruzioni comandi
digitali
P1
P1
Tasto accensione/spegnimento
P2
P2
Tasto accensione/ spegnimento luce camera
P4
P3
Tasto start/stop cottura
D1
P4
Tasto reset gas
P5
Tasto apertura/chiusura sfiato
P3
START
STOP
P5
RESET
E1
D2
D1
Display temperatura
D2
Display tempo e funzione preriscaldo
D3
Display umidificazione
D4
Display velocità ventole e raffreddamento rapido
E1
Manopola regolazione temperatura
E2
Manopola tempo e funzione preriscaldo
E3
Manopola umidificazione
E4
Manopola velocità ventole e raffredamento rapido
E2
D3
E3
D4
E4
3
IT
ACCENSIONE E SPEGNIMENTO
P1
Dopo aver dato tensione tramite l'interruttore di rete, il tasto P1 lampeggia per
indicare che il forno è attivo ma in stato di attesa.
Premendo questo tasto, l'apparecchio si accende; la camera di cottura viene
illuminata e il pannello di comando si porta automaticamente nella modalità di
inserimento dei parametri di cottura.
Per spegnere il forno premere nuovamente il tasto P1.
Se non viene eseguita alcuna operazione, dopo un tempo prestabilito il forno si
porta automaticamente in stato di attesa.
IMPOSTAZIONI PARAMETRI
All'accensione del forno, il pannello display viene attivato; i tasti attivi vengono
illuminati e i display visualizzano i valori di default.
L'inserimento dei parametri di cottura avviene in maniera guidata; in
automatico quando viene confermato un valore si passa da un parametro
all'altro in fase di inserimento dati.
Per confermare subito dopo l'accensione i parametri di default visualizzati
premere il tasto P3 start/stop.
A questo punto P3 inizia a lampeggiare perché è possibile avviare una cottura.
E' possibile comunque sia prima di avviare la cottura che durante la cottura
modificare i parametri inseriti.
Avvio/arresto di un ciclo di cottura
Dopo aver impostato tutti i parametri di cottura, il tasto P3 risulterà
lampeggiante a segnalare che con la pressione dello stesso si può avviare il ciclo
con i parametri inseriti.
Durante la cottura si possono modificare tutti i parametri inseriti in qualsiasi
momento.
Per arrestare una cottura basta premere il tasto P3, il forno bloccherà la cottura
in corso mostrando i parametri inseriti all'avvio del ciclo.
Se durante la cottura viene aperta la porta, il ciclo in corso verrà
momentaneamente sospeso per essere poi ripreso alla chiusura della stessa.
Temperatura
Dopo l'accensione il display temperatura D1 lampeggia, così come i led
corrispondenti alla manopola di regolazione E1. Questo ad indicare che si sta
modificando il parametro relativo alla temperatura.
Per impostare il dato desiderato diverso da quello di default ruotare la manopola
E1 e premerla per confermare. Se invece si accetta il dato di default premere
subito E1.
Dopo 10 secondi viene automaticamente confermato il dato relativo alla
temperatura se non vengono fatte altre operazioni.
Il valore della temperatura può essere variato in qualsiasi momento; premendo
la manopola relativa E1 il display lampeggia e si può inserire il valore
desiderato.
Durante la cottura sul display D1 viene visualizzata la temperatura rilevata; se
viene premuto E1 si visualizza invece il dato impostato e può essere variato
ruotando la manopola. Per la conferma ripremere E1 o attendere 10 secondi.
Il valore di temperatura massimo che si può selezionare è di 270°C .
4
P3
START
STOP
D1
RESET
E1
IT
Tempo di cottura
Quando il display D2 e i led corrispondenti alla manopola E2 lampeggiano, si
può impostare il valore di temperatura desiderato.
Per regolare il valore del tempo di cottura basta ruotare la manopola E2 e
premerla per confermare il dato inserito.
Trascorsi 10 secondi il parametro viene memorizzato in automatico se non si
esegue nessuna operazione.
Il valore può essere variato in qualsiasi momento premendo e ruotando la
manopola E2.
Si può inserire un valore di tempo fino a 9 ore e 59 minuti ma anche selezionare
la modalità di tempo infinito (scritta “Inf” sul display).
Durante la cottura il display esegue un conto alla rovescia per il valore del tempo
impostato.
Al termine della cottura compare una scritta lampeggiante sui display e viene
emesso un segnale acustico intermittente. Per interrompere il suono premere
un qualsiasi tasto o manopola.
Umidificazione
Il display D3 indica il grado di umidificazione impostato durante la cottura. A
display lampeggiante si può impostare il valore desiderato su una scala che va
da 10 a 100.
Se non viene impostato alcun valore sul display compare la scritta “PUSH” che
sta ad indicare la possibilità di immettere del vapore in camera manualmente.
Questa operazione si esegue tenendo premuta la manopola E3 per il tempo
desiderato di immissione vapore. Se il forno non ha raggiunto almeno una
temperatura di 100°C non viene permesso di inserire vapore in camera di
cottura.
Al rilascio se si vuole modificare il parametro e quindi passare ad una
immissione di acqua automatica, basta regolare il valore ruotando la manopola
E3 e confermare il dato con la pressione della manopola.
Il valore di umidificazione si può modificare anche durante la cottura.
P2
P5
START
STOP
RESET
D2
E2
D3
E3
D4
E4
Velocità ventole
Sul display D4 viene visualizzato il valore di velocità delle ventole del forno.
A display lampeggiante si può modificare il parametro premendo la manopola E4 e selezionando il valore
desiderato. I valori che si possono scegliere sono tre 100, 50 e Min; rispettivamente velocità massima,
mezza velocità e velocità minima della ventola.
Per la conferma del parametro basta ripremere la manopola E4 oppure attendere 10 secondi senza
eseguire nessuna operazione.
La velocità delle ventole può essere selezionata prima della cottura oppure può essere variata durante la
cottura.
Gestione sfiato
Attraverso il tasto P5, si agisce sull'apertura o la chiusura dello sfiato dei vapori della camera di cottura.
Se il meccanismo risulta aperto il tasto è lampeggiante, quando l'illuminazione è fissa vuol dire che lo
sfiato è chiuso.
Durante al movimentazione P5 si spegne per permettere il termine dell'operazione selezionata.
Accensione/spegnimento luci
Attraverso il tasto P2 è possibile in qualsiasi momento accendere o spegnere le luci che illuminano la
camera di cottura del forno.
5
IT
FUNZIONE PRERISCALDO
Il forno offre la possibilità di eseguire un preriscaldo prima di avviare un ciclo di
cottura.
Per entrare nella modalità preriscaldo, al momento dell'impostazione del
parametro del tempo di cottura, se si tiene premuto per 5 secondi la manopola
E2, sul display compare la scritta “PrE” che sta ad indicare l'attivazione della
funzione preriscaldo del forno.
Attraverso la pressione della manopola E1 si regola la temperatura che si vuole
raggiungere nel preriscaldo e che viene visualizzata sul display D1.
Il termine di questo ciclo viene segnalato con una scritta lampeggiante sui
display e con un segnale acustico intermittente.
Una volta finito il ciclo di preriscaldo, se l'operatore non interagisce con il forno
aprendo la porta o impostando i parametri di cottura, automaticamente viene
attivato il mantenimento della temperatura impostata per il preriscaldo.
P4
D1
RESET
E1
FUNZIONE RAFFREDDAMENTO
Al termine di un ciclo di cottura può essere selezionata la funzione di
raffreddamento del forno. Questa si attiva tenendo premuto per 5 secondi la
manopola E4. Sul display D4 verrà visualizzata la scritta “raFF” che sta ad
indicare l'attivazione della funzione.
Sul display D1 viene visualizzata la temperatura che si vuole raggiungere con il
raffreddamento, impostabile con la pressione della manopola E1 e successiva
regolazione.
All'avviamento del raffreddamento comparirà una scritta sui display che indica
di aprire la porta del forno, se non è già aperta, per poter avviare la funzione
selezionata.
D4
E4
RESET GAS(attivo solo nelle versioni a gas)
Con il tasto P4 nei modelli di forno alimentati a gas, si procede allo sblocco della centralina di gestione del
riscaldamento. Il tasto in funzionamento normale risulta spento; si accende solo quando compare
un'anomalia sulla parte gas e segnalata dalla centralina di controllo.
Se dopo aver eseguito il reset con il relativo tasto il problema si ripresenta consultare la tabella “Diagnosi
di alcuni guasti” o contattare il servizio di assistenza.
SEGNALAZIONI ED ALLARMI
L'apparecchio prevede la segnalazione di alcuni allarmi che possono essere bloccanti o meno, questi sono
sempre accompagnati da un segnale acustico.
Possibili cause
ERR1
•Intervento o mal funzionamento del termostato di sicurezza.
ERR2
•Intervento dei relè termici del motore
ERR3
•Blocco della centralina di controllo gas.
ERR4
•Sonda di temperatura camera non rilevata per mancanza o mal
funzionamento .
ERR5
•Errore di comunicazione con la scheda di potenza.
ERR6
•Segnalazione porta aperta.
ERR8
•Parametri inseriti per la cottura non validi.
ERR12
ERR13
•Mancato segnale di intervento dello sfiato fumi per guasto
o malfunzionamento.
•Temperatura della scheda di potenza troppo elevata.
6
GB
INSTRUCTIONS FOR INSTALLATION, USE
AND MAINTENANCE
CONVECTION STEAM OVENS
WITH DIGITAL CONTROL FOR
PROFESSIONAL USE
Models:
2200159
2200162
2200165
2200168
2200173
2200176
Read the following instructions carefully before installing and switching on the appliances
7
GB
CHAPTER I - INTRODUCTION
About this manual
In thanking you for the trust you have shown us in buying one of our products, we wish to suggest that
you read the provided instruction booklets very carefully before using the oven.
This manual contains all the information you may need for a proper use and maintenance of the oven.
The purpose of this manual is to let the user take every step and to arrange all the means, human
resources and materials necessary for a safe and lasting use of the oven.
This manual must be handed over to the person in charge of the use and of the regular maintenance of
the appliances, who is required to keep it in a safe, dry and suitable place, available for consultation and
for routine oven maintenance. In the event the oven is sold, the handbook must always accompany the
appliance.
This manual is also addressed to the operators for installation and extraordinary maintenance service..
The intended purpose and configurations of the provided appliances are the only ones allowed by the
manufacturer: do not attempt to use the appliances in any other way.
The intended purpose indicated is valid only for appliances in a perfect state of repair in terms of
construction, mechanics and engineering.
The Manufacturer declines any and all responsibility due to improper use or operation by untrained
personnel, from changes and/or repairs performed by the user or by unauthorized personnel, and from
use of non-original spare parts or spare parts that are not specific for the oven model.
The manual must be kept until the final accurate disposal of the appliance, it must be kept in good
conditions and available for consultation all the time. In case of lost or damage of this manual, an extra
copy can be provided directly by the Manufacturer or the retailer.
These pages specifically contain explanations for the use of the oven digital controls.
They must always accompany the electromechanical oven manual to complete installation, operation
and maintenance instructions.
The pages below must always accompany the electromechanical oven manual
to complete installation, operation and maintenance instructions.
In case of misunderstandings in the following translation, please refer to the Italian
version.
8
GB
CHAPTER III - OPERATING INSTRUCTIONS
Control panel and digital control instructions
P1
P1
On/Off key
P2
P2
P3
Chamber light On/Off key
P4
Cooking Start/Stop key
P4
Reset gas key
P5
Cooking Chamber Outlet Stack key
D1
Temperature display
D2
Time and preheating display
D3
Humidification display
D4
Fan speed and cooling display
E1
Temperature knob
E2
Time and preheating knob
E3
Humidification knob
E4
Fan speed and cooling knob
P3
D1
START
STOP
P5
RESET
E1
D2
E2
D3
E3
D4
E4
9
GB
ON/OFF
P1
After giving voltage by network supply to the unit, the button P1 flashes to
show that the oven is activated but in stand-by. Pushing this button, the oven
lights; the cooking chamber is illuminated and the control panel moves
automatically on the mode for insertion of cooking parameters. To turn off the
oven, push again the button P1.
If there isn't any action, after a per-established time, the oven moves
automatically in stand-by.
SETTINGS
When you switch on the oven, the display is activated; the active buttons are
illuminated and the displays show the default values.
The insertion of setting values is guided; when a value is confirmed
automatically it switches from a parameter to another during insertions.
To confirm the default or new parameters, push the key P3 start/stop.
At this point P3 starts blinking because you can start cooking.
Anyway, it is possible before or during the cooking, to change any parameters.
Start/stop of cooking cycle
After introducing all the cooking parameters, the button P3 starts blinking and
it shows that you can start the cooking cycle with the included parameters by
pushing it.
During the cooking, it is possible to change at any time all the included
parameters.
To stop cooking it is only necessary to push button P3 and the oven will stop the
current cooking showing the parameters included at the start of the cycle.
If during the cooking the door will be opened, the cycle is temporarily
suspended and it starts when the door will be closed again.
Temperature
After having turned on the unit, the temperature's display D1 blinks, as well as
the led associated to the respective adjustment knob E1. This indicates that you
are allowed to change the temperature's parameter.
To set a different value from the default's one you have to rotate the knob E1
and push it to confirm. If you accept the default's value you have to push the
knob E1 or after 10 seconds the temperature's value will be automatically
confirmed without any action.
The temperature's value can be changed at any moment by pushing E1 knob.
Its display starts blinking and then you can insert the new preferred value.
During cooking, on the D1 display, you can see the value of the real
temperature inside the chamber; if you push the button E1 you can see the preset temperature which can be changed by turning the knob. To confirm it you
have to push the button E1 and wait approx. 10 seconds.
The highest temperature's value is 270°C .
10
P3
START
STOP
D1
RESET
E1
GB
Cooking time
When display D2 and the led that indicate the knob E2 blink, you can choose
your desired
temperature's valor. To set the value of the cooking time it is necessary to rotate
the knob E2 and push to confirm it. After 10 seconds this parameter will be
automatically saved if no further action will be executed. The value can be
change in each moment by pushing and rotating the knob E2. It is possible to
insert a time value up to 9 hours and 59 minutes as well as the infinity mode
(“Inf” on the display).
During cooking, on the display appears a countdown of the chosen pre-set time.
At the end of cooking appears a blinking notice on the display and you can hear
also an
intermittent beep alarm. To stop the beep you have to push the button or the
knob.
Umidification & steam
P2
P5
START
STOP
RESET
D2
E2
D3
Display D3 shows the humidification's level parameters during the cooking
cycle. When the display is flashing you can set up the desired value on a scale
from 10% to 100%.
If you don't set up any value it appears on the display the notice “PUSH” that
indicates the possibility to insert some steam “manually” inside the cooking
chamber. To make this operation you have to push the knob E3. If the oven has
not reached at least the temperature of 100°C it is not allowed to introduce any
steam inside the cooking chamber.
If you wish to change the setting to mixed or steam mode, you can set the new
values by rotating the knob E3 and confirm them by pushing it.
You can change the humidification values at any time during the cooking cycle.
E3
D4
E4
Velocità ventole
On the right side of the display D4 you can see a graduate led scale (3 steps) of the oven's speed fan.
When the marks on the scale blink, you can change the parameter turning the knob E4 and choose
the desired value, respectively from maximum (up) to middle and minimum (down) fan speed.
To confirm this parameter you have to push another time the knob E4 or waiting for 10 seconds
without doing any further action
Outlet management
By means of key P5 it is possible to open or close the cooking chamber steam outlet. If it is open, the key
flashes. When the light is steady on, this means that the outlet is closed.
During opening or closing, P5 is off to allow for the completion of the selected operation.
On / off lights
It is possible, at any time, to switch ON or OFF the lights inside the oven's cooking chamber by pressing
the button P2.
11
GB
PREHEATING
The oven control gives you the possibility to set the preheating before start
cooking.
To enter the preheating, when you choose cooking time parameters, you may
push for 5 seconds the knob E2 until appears on the display the notice “PrE” that
indicates the preheating activation function.
With the pressure of the knob E1 you may enter the preheating temperature
which will be displayed on D1. The end of this function is indicated with a
blinking notice and an acoustic beep.
When the preheating cycle ends, if you don't open the oven door or you don't set
up any different cooking temperature, it will be automatically saved the
preheating temperature for cooking.
P4
D1
RESET
E1
COOLING
When cooking cycle ends, you can decide for fast cooling function of the oven by
pushing for 5 seconds the knob E4. On display D4 you will see the notice “raFF”
that shows the activation of this mode.
On display D1 appears the temperature that you decide for cooling; you can set
up it by pushing the knob E1.
When cooling starts, a notice to open the oven's door appears on the display, to
enter the desired function.
D4
E4
RESET GAS (in gas verions only)
With key P4 in the gas oven models, you can reset the heating management unit. During normal
operation the key is off. It only lights up in case of anomaly of the gas part, which is indicated by the
control unit.
If the problem occurs again after reset with the reset key, please consult table “Troubleshooting” or
contact the customer service.
WARNING SIGNALS
The oven has some allarm and they stop or not the working of the oven. This allarm are always combined
with an acoustic signal.
Possibili cause
ERR1
•Intervention or failure of the safety thermostat
ERR2
•Intervention of motor thermic protection.
ERR3
•Failure of control gas board.
ERR4
•Chamber probe open or short-circuited.
ERR5
•Error of power board connection.
ERR6
•Signal of “door open”.
ERR8
•Error on cooking parameter settings.
ERR12
•No fume outlet operation signal due to fault or failure.
ERR13
•High mother-board temperature
12
FR
INSTRUCTIONS D’INSTALLATION,
D’UTILISATION D’ENTRETIEN
FOURS À CONVECTION-VAPEUR À USAGE
PROFESSIONNEL DIGITAUX
Modèles:
2200159
2200162
2200165
2200168
2200173
2200176
Lire attentivement les instructions avant d’installer et d’utiliser les appareils
13
FR
CHAPITRE I - INTRODUCTION
Nous vous remercions pour la confiance que vous nous avez accordée en achetant l'un de nos produits.
Avant de faire fonctionner les fours, nous vous recommandons de lire attentivement les manuels fournis.
Il contient toutes les informations nécessaires à l’utilisation et à l’entretien des fours.
Le but de ce manuel est de permettre à l’utilisateur, surtout à l’utilisateur direct de prendre toutes les
mesures et de prévoir tous les moyens, les ressources humaines et les matériaux nécessaires pur une
utilisation sûre et durable des fours. Il est remis à la personne à la quelle sont confiés, l’utilisation et
l’etretien du four et doit être conservé en bon état, à un endroit à l’abri de l’humidité de telle sorte qu’il
puisse être consulté à tout moment.
Ce manuel doit être remis à la personne qui s’en sevira et qui se chargera de le garder en un lieu approprié
afin de le rendre disponible pour la consultation et pour l’entretien ordinaire du four. Au cas où le four
devrait être revendu, le manuel devra accompagner ce dernier.
Ce manuel est destiné à l’installateur, à la mise en service et la maintenance.
L’utilisation et les configurations indiquées dans le présent manuel sont les seules admises par le
fabricant: en uaucun cas le four ne doit être utilisé sans respecter les indications et recommandations
fournies.
L’utilisation prévue suppose que les appareils soient en parfait état, au plan structurel et mécanique ainsi
qu’en ce qui concrene les circuits d’alimentation.
Le fabricant décline toute responsabilité en cas d’utilisation impropre, en cas d’utilisation par un
personnel ne possédant pas les compétences nécessaires à cet effet ainsi qu’en cas d’utilisation de piéces
détachées non originale voire non adatées aux modèles spécifiques de four.
Le manuel doit être conservé pendant toute la durée de vie de l’appareil, à un endroit prévu à cet effet de
telle sorte qu’il puisse être consulté en bon état. En cas de perte ou de détérioration, adresser au
fabricant ou au revendeur une demande de fourniture d’un nouvel exemplaire.
Cette publication contient toutes les explications pour l'utilisation des commandes digitales des fours.
Il faut toujours l'associer au manuel des fours électromécaniques pour compléter les instructions
d'installation, d'utilisation et de maintenance.
Les pages suivantes doivent toujours être associées au manuel des fours
électromécaniques pour compléter les instructions d'installation, d'utilisation et de
maintenance.
Pour tout malentendu dans la traduction, s’il vous plaît se référer à la langue
italienne.
14
FR
CHAPITRE III - INSTRUCTIONS
D’UTILISATION
P1
Panneau de contrôle et instructions de
commandes digitales
P2
P1
P3
Touche marche/arrêt
P4
P2
P5
Touche marche/arrêt lumière chambre
D1
P3
START
STOP
RESET
Touche marche/arrêt cuisson
E1
P4
Touche reset gaz
P5
Touche cheminée d'évacuation chambre de cuisson
D1
Display température
D2
Display temps et fonction préchauffage
D3
Display gestion vapeur
D4
Display vitesse ventilateurs et fonction refroidissement
rapide
E1
Manette réglage température
E2
Manette réglage temps et sélection préchauffage
E3
Manette réglage vapeur
E4
Manette réglage vitesse moteur et sélection
refroidissement rapide
D2
E2
D3
E3
D4
15
E4
FR
MARCHE ET ARRÊT
P1
Après avoir fourni la tension par le biais de l'interrupteur de réseau, la touche
P1 clignote pour indiquer que le four est actif mais en phase d'attente.
En appuyant sur cette touche, l'appareil se met en marche ; la chambre de
cuisson est illuminée et le panneau de commande se met automatiquement
dans la modalité d'activation des paramètres de cuisson.
Pour éteindre le four, appuyer de nouveau sur la touche P1.
Si aucune opération n'est effectuée, après un temps donné, le four se met
automatiquement en phase d'attente.
PROGRAMMATION PARAMÈTRES
Le display est activé à l'allumage du four ; les touches actives sont illuminées et
les display affichent les valeurs par défaut.
La saisie des paramètres de cuisson se fait de manière guidée ; en
automatique lorsqu'est confirmée une valeur, on passe d'un paramètre à
l'autre en phase de saisie des données.
Pour confirmer immédiatement après l'allumage les paramètres par défaut
affichés, appuyer sur la touche P3 marche/arrêt.
À ce stade P3 commence à clignoter et il est possible de commencer une
cuisson.
Il est de toute façon possible de modifier les paramètres tant avant de
commencer la cuisson que pendant.
Marche/arrêt d'un cycle de cuisson
Dopo aver impostato tutti i parametri di cottura, il tasto P3 risulterà
lampeggiante a segnalare che con la pressione dello stesso si può avviare il ciclo
con i parametri inseriti.
Durante la cottura si possono modificare tutti i parametri inseriti in qualsiasi
momento.
Per arrestare una cottura basta premere il tasto P3, il forno bloccherà la cottura
in corso mostrando i parametri inseriti all'avvio del ciclo.
Se durante la cottura viene aperta la porta, il ciclo in corso verrà
momentaneamente sospeso per essere poi ripreso alla chiusura della stessa.
Température
Après l'éclairage le display température D1 clignote ainsi que les voyants
correspondants à la manette de réglage E1. Cela indique que le paramètre
relatif à la température est en train de se modifier.
Pour régler la donnée souhaitée, différente de la donnée par défaut, tourner
la manette E1 et appuyer pour confirmer. Si la donnée par défaut convient,
appuyer immédiatement sur E1.
Après 10 secondes, la donnée relative à la température est
automatiquement confirmée si aucune autre opération n'est effectuée.
La valeur de la température peut être changée à tout moment ; en appuyant
sur la manette correspondante E1 le display clignote et la valeur souhaitée
peut être saisie.
Pendant la cuisson, le display D1 affiche la température relevée ; en
appuyant sur E1 est en revanche affichée la donnée programmée qui peut
être changée en tournant la manette. Pour la confirmation appuyer à
nouveau E1 ou attendre 10 secondes.
La valeur de température maximum que l'on peut sélectionner est 270°C.
16
P3
START
STOP
D1
RESET
E1
FR
Temps de cuisson
Lorsque le display D2 et les voyants correspondants à la manette E2 clignotent,
il est possible de régler la valeur de température souhaitée.
Pour régler la valeur du temps de cuisson, il suffit de tourner la manette E2
et de l'enfoncer pour confirmer la donnée saisie.
Après 10 secondes le paramètre est mémorisé en automatique si l'on ne fait
aucune opération.
La valeur peut être changée à tout moment en appuyant et en tournant la
manette E2.
Une valeur de temps peut être saisie jusqu'à 9 heures et 59 minutes et la
modalité de temps infini (abrégée “Inf” sur le display) sélectionnée.
Pendant la cuisson le display effectue un compte à rebours pour la valeur de
temps programmé.
Au terme de la cuisson une inscription clignotante apparaît sur les display et
un signal acoustique intermittent est émis. Pour interrompre le son, appuyer
sur n'importe quelle touche ou manette.
Humidification
P2
P5
START
STOP
RESET
D2
E2
D3
Le display D3 indique le degré d'humidification programmé pendant la cuisson.
Lorsque le display clignote, la valeur souhaitée peut être programmée sur une
échelle allant de 10 à 100.
Si aucune valeur n'est programmée, l'inscription "PUSH" apparait sur le
display, indiquant la possibilité d'émettre de la vapeur manuellement dans la
chambre.
Cette opération s'effectue en appuyant longuement sur la manette E3 pour
le temps souhaité d'injection vapeur. Si le four n'a pas atteint une
température de 100°C, il n'est pas possible d'injecter de la vapeur dans la
chambre de cuisson.
Au moment du relâchement, s'il l'on veut modifier le paramètre et passer
ainsi à une injection d'eau automatique, il suffit de régler la valeur en
tournant la manette E3 et confirmer la donnée avec la pression de la
manette.
La valeur d'humidification peut être modifiée pendant la cuisson.
E3
D4
E4
Vitesse des ventilateurs
Sur le display D4 est affichée la valeur de vitesse des ventilateurs du four. Lorsque le display clignote, le
paramètre peut être modifié en appuyant sur la manette E4 et en sélectionnant la valeur souhaitée.
Les valeurs que l'on peut choisir sont au nombre de trois : 100, 50 et Min. ; respectivement vitesse
maximum, demi vitesse et vitesse minimum du ventilateur.
Pour la confirmation du paramètre, il suffit de rappuyer sur la manette E4 ou d'attendre 10 secondes
sans effectuer aucune opération.
La vitesse des ventilateurs peut être sélectionnée avant la cuisson ou peut être changée pendant la
cuisson.
Gestion évacuation
Avec la touche P5, on agit sur l'ouverture ou la fermeture de l'évacuation des vapeurs de la chambre de
cuisson. Si le mécanisme est ouvert la touche clignote, lorsque l'éclairage est fixe, cela signifie que
l'évacuation est fermée.
Pendant le mouvement, P5 s'éteint pour permettre la conclusion de l'opération sélectionnée.
Éclairage / extinction des lumières
La touche P2 sert à éclairer ou éteindre à tout moment les lumières qui illuminent la chambre de cuisson
du four.
17
FR
FONCTION PRÉCHAUFFAGE
Le four offre la possibilité d'effectuer un préchauffage avant de commencer un
cycle de cuisson.
Pour entrer dans la modalité de préchauffage, au moment du réglage du
paramètre du temps de cuisson, en appuyant pendant 5 secondes sur la
manette E2, l'inscription “PrE” apparaît sur le display et indique l'activation
de la fonction de préchauffage du four.
En appuyant sur la manette E1, on règle la température que l'on souhaite
atteindre lors du préchauffage, affichée sur le display D1.
La fin de ce cycle est signalée par une inscription clignotante sur les display
et par un signal acoustique intermittent.
Une fois le cycle de préchauffage terminé, si l'opérateur n'interagit pas avec
le four en ouvrant la porte ou en programmant des paramètres de cuisson,
le maintien de la température programmée pour le préchauffage est
automatiquement activé
P4
D1
RESET
E1
FONCTION REFROIDISSEMENT
Au terme d'un cycle de cuisson peut être sélectionnée la fonction de
refroidissement du four. Cette fonction s'active en appuyant pendant 5
secondes sur la manette E4. Le display D4 affichera l'inscription “raFF” qui
indique l'activation de la fonction.
Le display D1 affiche la température à atteindre avec le refroidissement,
saisissable en appuyant sur la manette E1 puis en effectuant le réglage.
Au moment de l'activation du refroidissement apparaîtra une inscription sur
les display qui indique d'ouvrir la porte du four, si elle n'est pas déjà ouverte,
pour pouvoir activer la fonction sélectionnée.
D4
E4
RESET GAZ (actif uniquement dans les versions à gaz)
Avec la touche P4 dans les modèles de four alimentés au gaz, procéder au déblocage de la
centrale de gestion du chauffage. La touche en fonctionnement normal est éteinte ; elle s'éclaire
lorsque apparaît une anomalie sur la partie gaz et est signalée par la centrale de contrôle.
Si après avoir effectué le reset à l'aide de la touche correspondante le problème persiste, consulter
la grille “Diagnostic des pannes” ou contacter le service d'assistance.
SIGNAUX ET ALARMES
L'appareil prévoit des alarmes qui peuvent être bloquantes ou pas, toujours accompagnées d'un signal
acoustique.
Possibili cause
ERR1
•Signal d'intervention ou de dysfonctionnement du thermostat de sécurité
ERR2
•Signal d'intervention des relais thermiques du moteur
ERR3
•Blocage de lacentrale de gestion du chauffage
ERR4
•Sonde de température chambre non détectée car absente ou dysfonctionnante
ERR5
•Erreur de communication avec la carte de puissance
ERR6
•Signal porte ouverte
ERR8
•Paramètres saisis pour la cuisson non valables
ERR12
ERR13
•Absence de signal d'intervention de l'évacuation des fumées pour
cause de dommage ou dysfonctionnement
•Température carte trop élevée
18
DE
INSTALLATIONS-, BEDIENUNGS- UND
WARTUNGSANLEITUNG
KONVEKTIONSBACKÖFEN MIT DAMPFFUNKTION UND
DIGITALSTEUERUNG FÜR DEN GEWERBLICHEN
GEBRAUCH
Modelle:
2200159
2200162
2200165
2200168
2200173
2200176
Die folgenden Anleitungen sind vor der Installation und der Inbetriebnahme der Geräte
aufmerksam durchzulesen
19
DE
KAPITEL I - EINLEITUNG
Hinweise
Wir gratulieren Ihnen zum Kauf eines unserer Geräte und danken Ihnen für das Vertrauen, das Sie
unserem Unternehmen entgegengebracht haben. Bitte lesen Sie diese inbegriffen Handbuche vor der
Inbetriebnahme des Gerätes aufmerksam durch.
Dieses Handbuch enthält alle für eine sachgemäße Bedienung und Wartung des Gerätes erforderlichen
Informationen. Zweck der vorliegenden Bedienungsanleitung ist es, den Benutzer, vor allem die direkte
Bedienungsperson, in die Lage zu versetzen. Alle Maßnahmen ergreifen und alle Mittel, Arbeitskräfte und
die erforderlichen Materialien bereitstellen zu können, um einen sicheren und dauerhaften Gebrauch der
Öfen zu gewährleisten.
Dieses Handbuch ist der für die Bedienung und die ordentliche Wartung des Gerätes zuständigen Person
zu übergeben, die dieses an einem geschützten und trockenen sowie leicht zugänglichen Ort für eine
zukünftige Einsichtnahme aufzubewahren hat.
Dieses Handbuch richtet sich aber auch an den Installateur, der die Inbetriebnahme und die
außerordentliche Wartung vorzunehmen hat.
Das Gerät ist für den vom Hersteller vorgesehenen Gebrauch bestimmt. Jeder Gebrauch, der über die
beschriebene Verwendung hinausgeht, ist nicht zulässig.
Der einwandfreie und sichere Betrieb des Gerätes setzt eine funktionsfähige Struktur, Mechanik und
Anlagentechnik voraus.
Der Hersteller kann auf keinen Fall für einen unsachgemäßen Gebrauch (beispielsweise durch nicht in die
Funktionsweise des Gerätes eingewiesenes Personal), für Umrüstungen u/o Reparaturen, die nach
eigenem Ermessen oder von nicht befugtem Personal vorgenommen wurden, für die Anwendung von
Nicht-Originalersatzteilen oder nicht für das Gerät geeigneten Ersatzteilen zur Verantwortung gezogen
werden.
Das Handbuch ist bis zur Verschrottung des Gerätes in dessen Nähe und zwar an einem leicht
zugänglichen Ort sorgfältig aufzubewahren. Im Falle eines Verlustes oder einer Beschädigung desselben
ist direkt beim Hersteller oder Händler ein Ersatzhandbuch anzufordern.
Diese Seiten enthalten, insbesondere, Erläuterungen für die Verwendung von digital gesteuerten Öfen.
Die Seiten müssen immer mit manueller elektromechanische Öfen, um die Installation, Gebrauch und
Wartung abzuschließen kombiniert werden.
Die folgenden Seiten müssen immer mit manueller elektromechanische Öfen, um
die Installation, Gebrauch und Wartung abzuschließen kombiniert werden.
Für alle Missverständnisse in Übersetzungen, die folgen, entnehmen Sie bitte den
Text auf Italienisch.
20
DE
KAPITEL III - BEDIENUNGSANLEITUNG
P1
Bedienblende
P1
Einschaltung/Auschaltung taste
P2
P2
Einschaltung/Auschaltung Garkammer Licht
P4
P3
Start/stop Kochung Taste
D1
P4
Taste Gas Reset
P5
Taste Auswahl Kernmessfühler
P3
START
STOP
P5
RESET
E1
D2
D1
Temperatur Display
E2
D2
Zeitanzeige und Vorheizfunktion
D3
Display Dampfregelung mit Angabe der Garmethode
D4
Display Lüftergeschwindigkeit und Schnellabkühlung
E1
Drehknopf zur Temperaturregelung
E2
Drehknopf zur Zeit- und Vorheizungsfunktion
E3
Drehknopf zur Dampfregelung
E4
Drehknopf zur Regelung der Motorgeschwindigkeit
und Wahl der Schnellabkühlung
D3
E3
D4
E4
21
DE
EINSCHALTUNG UND AUSCHALTUNG
P1
Nach der Spannung des Grid-Schalter. der taste P1 blinkt ,um anzuzeigen, das
der Ofen in einem Wartenzustand aktiv ist.
Dieser Taste drücken für das Gerät einzuschalten; der Garraum schaltet sich
ein und das Bedienfeld bringt sich in Automatisch im Einfügmodus für die
Brennparameter.
Für den Ofen auszuschalten, den P1 Taste wieder drücken.
Wenn es kein anderes Betrieb durchgeführt wird, nach einer eingestellter Zeit,
öffnet sich der Ofen in automatisch in einem Wartezustand.
PARAMETER-EINSTELLUNG
Wenn man der Ofen einschaltet, aktiviert sich die Anzeigetafel ; die aktivierten
Tasten beleuchten sich und die Displays zeigen die Standwerte .
Das Einsetzen
des Garparameter, wird in geführter Weise erfolgt; in
automatisch
,wenn ein Wert bestätigt wird, so gehen Sie, bei der
Datenangabe, von einem Parameter zum anderen.
Um sofort nach der Einschaltung der bestätigung desAngezeigten default
Parameter , der Taste P3 Start/Stop drücken.
In diesem Moment, blinkt P3 und die Kochung kann beginnen.
Es ist aber immer möglich for und nach der Kochung die Parameter zu ändern.
Starten/Anhalten eines Kochforgangs
Nach der Einschaltung des Koch-Parameter, blinkt der Taste P3 und berichtet
das mit dem gleichem Druck ein Zyklus mit dem eingefügte
Parameter eingeben kann
Während der Kochung, kann man alle eingefügten Parameter in Jederzeit
ändern.
Um de Garvorgang zu stoppen, der Taste P3 drücken, der Ofen blockiert die
Kochung und die eingegebenen Parameter warden angezeigt.
Wenn durch die Kochung, die Türe geöffnet wird, stellt sich der Zyklus im
Augenblick aus und wird der mit der selber Schlüssung, , wieder eingestellt.
Temperatur
D1 blinkt,
Nach de Eischalten
der Temperaturanzeige
sowie die
E1. Dieses bedeutet, dass die
entsprechenden LEDs am Bedienknopf
Parameter ,der relativen temperatur ,sich verändern.
Für die gewünschte Einricht des Daten von verschiedene Standart, den Regler
E1 drehen und um zu bestätigen, Drücken. Wenn man aber den Standart-Daten
akzeptiert, sofort E1 drücken.
Nach 10 sec. wenn keine andere Geschäftstätikeite gemacht wird, werden in
automatisch die Daten bestätgt.
Der Tempraturwert, kann jederzeit variirt werden ;drücken Sie den Knopf E1,
so leuchtet sich das Display ein und so kann man den gewünschten Wert
eingeben.
Durch der Kochung, auf dem Display D1 wird die Gemessene Temperatur
angezeigt, wenn man E1 drückt, sehen Sie die Datenmenge, kann auch durch
die Drehung des Knopfes, geendert werden. Für die Bestätigung, E1 für 10 sec.
Drücken.
Der maxmale Wert, der ausgewählt werden kann, ist 270° C .
22
P3
START
STOP
D1
RESET
E1
DE
Kochzeit
Wenn das Display D2 und die Entschprechende Led E2 sich anzünden, kann der
Temperaturwert eingestellt werden.
Für die Garzeit- Wert einstellung der Knopf E2 drehen und für Daten bestätigen
drücken.
Nach 10 sec wird der Parameter in automatisch gespeichert.
Der Wert kann Jederzeit durch die Drehung des E2 Knopfes geendert werden.Man kann auch ein Zeitwert bis 9 Stunden und 59 Minuten, oder die auch
Endlos-Modus eistellen (geschrieben”Inf” auf dem Display).
Durch der Kochung, das Display macht ein Coutdown für den eingestellter Zeit
Wert.
Am Ende der Kochung, auf dem Display, wird eine blinkende Aufschrift
angezeigt und Sie hören ein Piepton. Für ihn auszustellen, irgendeiner Knopf
drücken.
Befeuchtung
Das Display D3 zeigt den Prozentsatz des Dampfes an, der während des Garens
eingestellt wurde. Bei blinkendem Display kann man den gewünschten Wert auf
einer Skala von 10% bis 100% einstellen.
Falls kein Wert eingestellt wird, wird das Display die Angabe „PUSH”
anzeigen, das bedeutet, dass Sie die Möglichkeit haben, manuell Dampf in
den Garraum zu geben.
Dies erfolgt, indem man den Drehknopf E3 für die gewünschte Zeit der
Dampfeingabe drückt. Falls der Ofen eine Mindesttemperatur von 100°C
nicht erreicht hat, ist es nicht möglich Dampf in den Garraum zu geben.
Falls man danach den Parameter ändern und zu einer automatischen
Wassereingabe übergehen möchte, brauchen Sie nur den Wert zu regeln,
indem Sie den Drehknopf E3 drehen und den Wert mit dem Druck des
Drehknopfes bestätigen.
Den Prozentsatz des Dampfes kann man auch während des Garens ändern.
P2
P5
START
STOP
RESET
D2
E2
D3
E3
D4
E4
Geschwindigkeit Lüfter
Auf dem Display D4 wird der Wert der Geschwindigkeit der Lüfter des Ofens angezeigt. Bei blinkendem
Display kann man den Parameter ändern, indem man den Drehknopf E4 drückt und den gewünschten
Wert wählt.
Man kann unter drei Werten wählen: 100, 50 und Min; beziehungsweise maximale Geschwindigkeit,
halbe Geschwindigkeit und Mindestgeschwindigkeit des Lüfters.
Zur Bestätigung der Parameter drücken Sie einfach wieder E4 oder warten Sie 10 Sekunden lang
ohne andere Tätigkeiten durchzuführen. Die Geschwindigkeit der Lüfter kann vor dem Garen gewählt
oder während des Garens geändert werden.
Leitung der Entlüftung
Mit der Taste P5 öffnet oder schließt man die Entlüftung der Dämpfe des Garraums. Falls der
Mechanismus geöffnet ist, blinkt die Taste. Wenn das Licht fest ist, bedeutet es, dass die Entlüftung
geschlossen ist.
Während der Zubringung schaltet sich P5 aus, um die gewählte Tätigkeit zu beenden.
Lichter ein und ausschalten
Durch dem Taste P2, kann man Jederzeit die Lichte der leuchtung des Garraum des Ofens' ein oder
ausschalten.
23
DE
VORHEIZFUNKTION
Vor dem Start des Kochen, bietet der Ofen, die Möglichkeit, eine Vorwärmung
durchzuführen.Um die Vorwährmung geben, am moment der Einstellung des
Garzeit Parameter, wenn Sie den Knopf E2 für 5 secunden drücken, erscheint
auf dem Display “ PrE” das zeigt die Aktivierung der Funktion der Vorheizung
an.Durch den Druck des Knopfes E1, regelt es, die gewünschte Temperatur
die auf dem Display D1 angezeigt wird.
Das Ende dieses Zyklus, wird durch einer blinkender geschriebener und mit
einem intermittirendem Signalton, angezeigt.
Sobald das Vorwärmzyklus fertig ist, wenn der Bediener nicht mit der Eröffnung
des Ofens oder durch die Einstellung der Garparameter interagiert, in
automatisch , wird die Aufrechterhaltung der Temperatur der Set zur
Vorwärmung, aktiviert.
P4
D1
RESET
E1
KÜHLFUNKTION
Am Ende eines Kochzyklus, kann man die Kühlfunktion des Ofens
auswählen.Diese aktiviert sich, mit der Pressung für 5 sec.dem Taste E4 .Auf
dem Display D4 wird die Schrifft “raff” aufgezeigt, das zeigt die die Aktivierung
der Funktion an.
Auf dem Display D1, erscheint die Temperatur, die man mit der Kühlfunktion
erreichen möchte, einstellbar mit dem Druck des Knopfes E1.
Am Beginn der Bekältung, erscheint auf dem Display, eine Meldung, dass
Anzeigt der Ofen aufzumachen und die ausgewählte Funktion auswählen.
D4
E4
RESET GAS (nur für Gasversionen)
Mit der Taste P4 kann man in den Gasöfen die Freigabe der Steuereinheit der Heizung durchführen. Die
Taste der Normalfunktion ist ausgeschaltet; diese wird nur im Falle einer Störung in der Gasvorrichtung
aufleuchten und von der Steuereinheit signalisiert werden.
Falls das Problem nach dem Reset mit der diesbezüglichen Taste nochmals auftreten sollte, schauen
Sie auf die Tabelle „Diagnose einiger Störungen” oder kontaktieren Sie den Kundendienst.
MELDUNGEN UND ALARME
Das Gerät liefert das Signal von einigen Alarme die wenieger oder nicht blockiert können werden, diese
sind immer durch ein akustisches Signal begleitet.
Mögliche Ursachen
ERR1
•Eingestellt oder eine Fehlfunktion der Sicherheits-Thermostat.
ERR2
•Einschalten der Thermomagnetrelais des Motors
ERR3
•Signalisierung der Blockierung der Steuereinheit der Gaskontrolle
ERR4
•Temperaturmessfühler des Garraums nicht erhoben, weil er nicht da
ist oder wegen Störung
ERR5
•Error-Funktion mit Power Board.
ERR6
•Tür offen .
ERR8
•Eingegebene ungültige Koch-Parameter.
ERR12
ERR13
•Fehlende Signalisierung des Startens der Rauchentlüftung wegen Fehler
oder Störung
•Temperatur der Platine zu hoch.
24
ES
INSTRUCCIONES PARA LA
INSTALACIÓN,
HORNOS DE CONVECCIÓNVAPOR DIGITALES PARA USO
PROFESIONAL
Modelos:
2200159
2200162
2200165
2200168
2200173
2200176
Leer atentamente las siguientes instrucciones antes de instalar y de poner enmarcha los equipos
25
ES
CAPÍTULO I - INTRODUZIONE
Agradeciéndoles la confianza depositada en nosotros a través de la compra de uno de nuestros
productos, les recomendamos que lean atentamente los manuales suministrados antes de poner en
marcha los hornos.
Le aconsejamos que lea atentamente este manual antes de poner en marcha los hornos, ya que contiene
toda la información necesaria para usarlos correctamente y para las operaciones de mantenimiento. La
finalidad del presente manual es la de permitir al usuario, sobre todo al directo utilizador, de tomar todas
las medidas y predisponer todos los medios, los recursos humanos y los materiales necesarios para una
utilización segura y duradera de los hornos.
Este manual debe entregarse a la persona encargada del uso y del mantenimiento rutinario de las
máquinas, que deberá conservarlo siempre en un lugar protegido y seco, de fácil acceso para ser
consultado. In caso il forno fosse rivenduto, il libretto dovrà essere fornito a corredo dello stesso.
Tambièn está dirigido al instalador para las operaciones de puesta en servicio y mantenimiento
extraordinario.
La destinación de uso y las configuraciones previstas por las máquinas son las únicas que admite el
fabricante; no debe intentarse utilizarlas en desacuerdo con las indicaciones proporcionadas.
La destinación de uso indicada es válida sólo para máquinas en plena eficiencia estructural, mecánica y
de instalación.
El fabricante declina toda responsabilidad que derive de un uso impropio o por parte de personal no
preparado, de modificaciones y/o reparaciones realizadas autónomamente o por personal no autorizado
y del empleo de piezas de recambio no originales o no específicas para los modelos de los hornos.
Hasta la eliminación final de la máquina, el manual debe guardarse en un lugar idóneo para ser
consultado siempre en el mejor estado de conservación. En caso de pèrdida o deterioro, la
documentación sustitutiva podrá solicitarse directamente a la compaáía productora o al revendedor.
Estas páginas contienen las explicaciones acerca del uso de los mandos digitales de los hornos.
Por este motivo, tienen siempre que ir unidas al manual de los hornos electromecánicos, ya que
completan las instrucciones de instalación, uso y mantenimiento.
Las páginas que siguen tienen siempre que ir unidas al manual de los hornos
electromecánicos, ya que completan las instrucciones de instalación, uso y
mantenimiento.
Para cualquier malentendido en las traducciones que siguen, por favor consulte el
texto en italiano.
26
ES
CAPÍTULO III - INSTRUCCIONES DE USO
Panel de mandos e instrucciones de los mandos
digitales
P1
P1
P2
P3
Tecla cebado/apagamiento
P4
P2
START
STOP
P5
Tecla de encendido/apagado de la luz de la cámara
D1
P3
Tecla de inicio/fin de cocción
P4
Tecla reset gas
P5
Tecla de selecion respiradero para los vapores de
cocción
D1
Pantalla de la temperatura
D2
Pantalla de tiempo, precalentamiento
D3
Pantalla de humidificación
D4
Pantalla de velocidad de los ventiladores y enfriamiento
rápido
E1
Mando de regulación de la temperatura
RESET
E1
D2
E2
D3
E3
D4
E2
Mando de tiempo y precalentamiento
E4
E3
Mando de humidificación
E4
Mando de velocidad de los ventiladores y enfriamiento
rápido
27
ES
CEBADO Y APAGAMIENTO
P1
Despuès de haber provisto tensiòn con el interruptor de la red, la tecla P1
parpadea para indicar que el horno es activo pero en la espera.
Pulsando esta tecla , el horno se enciende; la camara de cocciòn se ilumina y el
panel de control pasa automáticamente al modo de inserción de los parámetros
de cocción.
Por apagar el horno tienes que pulsar de nuevo esta tecla P1.
Si no haces ninguna operaciòn, despuès de un tiempo preestablecido el horno
se pone automaticamente en el estado de espera.
CONFIGURACION DE LOS PARAMETROS
Al enciendamiento del horno,el panel de visualización se enciende;las teclas se
iluminan y las pantallas mostrar los valores por defecto.
El inserimento de los parametros de cocciòn es guidado; en automatico cuando
se confirma un valòr se pasa de un parámetro a otro durante la inserción de los
datos.
Para confirmar despuès de el cebado los valores por defecto tienes que pulsar la
tecla P3 start/stop.
Ahora P3 se ilumina porquè es posible comenzar una cocciòn.
Es posible modificar los parametros antes y durante la cocciòn.
Inicio/arresto de un ciclo de coccion
Despuès de haber configurado los parametros de cocciòn,la tecla P3 parpadea
para indicar que con su pressiòn se puede iniciar el ciclo con los parametros
estabilidos.
Durante la cocciòn se pueden modificar los parametros.
Para arresta una cocciòn es necesario pulsar la tecla P3,el horno arrestarà la
cocciòn mostrando los parametros integrados al inicio del ciclo.
Si durante la cocciòn se abre la puerta,el ciclo se arrestarà momentaneamente
y iniciarà de nuevo cuando la puerta se cierrarà.
Temperatura
Despuès del encendido el display temperatura D1 parpadea,como los led del
interruptor E1. Esto para indicar que estas modificando el parametro de la
temperatura.
Para impostar el parametro diferente de aquel de default tienes que girar el
interruptor E1 y presarlo para confirmar. Si,al contrario,se acepta el valòr de
default,tienes que presar sùbito E1.
Despuès 10 segundos se confirma en automatico el dato de la temperatura si no
se hace alguna operaciòn.
Se puede cambiar la temperatura en cualquier momento;presando el
interruptor E1 el display parpadea y puedes inserir el valòr que quieres.
Durante la cocciòn en el display D1 es indicada la temperatura ; si se pulsa E1
se visualiza el dato imposrado y se puede cambiar girando el interruptor. Para
confirmar tienes que pulsar E1 o esperar 10 segundos.
El valòr maximo de temperatura que se puede impostar es 270°C.
28
P3
START
STOP
D1
RESET
E1
ES
Tiempo de coccion
Cuando el display D2 y los led del interruptor E2 parpadean,se puede impostar
el valòr de la temperatura que se quiere.
Para regolar el tiempo de cocciòn tienes que girar el interruptor E2 y pulsarlo
para confirmar el dato inserido.
Despuès 10 segundos,el valòr se memoriza automaticamènte se no se hace
ninguna operacòn.
El valòr puede se variado en qualquier momento pulsando y girando el
interruptor E2.
Es posible inserir un valòr de tiempo hasta 9 horas y 59 minutos pero es posible
tambièn selecionar un tiempo infinido( palabra “Inf” en el display).
Durante la cocciòn el display hace una cuenta atràs por el valòr de tiempo
impostado.
Al final de la cocciòn parpadea una escrita en los display y se oye una sinal
acùstica intermittente. Para interrumpirla tienes que pulsar un interruptor.
P2
P5
START
STOP
RESET
D2
E2
Humidificacion
D3
La pantalla D3 indica el nivel de humidificación programado durante la cocción.
Cuando la pantalla parpadea se puede ajustar el valor, programando un nivel
del 10 al 100.
Si no se programa ningún valor en la pantalla aparece "PUSH" lo cual
significa que se puede introducir manualmente vapor en la cámara.
Para ello, mantener pulsado el mando E3 durante el tiempo por el cual se
desea aportar vapor. Si el horno no ha alcanzado una temperatura de al
menos 100ºC no se puede introducir vapor en la cámara de cocción.
Una vez soltada la tecla para cambiar el parámetro y, por lo tanto, pasar al
sistema de aporte de agua automático es suficiente programar el valor y
luego confirmarlo, respectivamente girando y pulsando el mando E3.
El valor de humidificación se puede modificar incluso durante la cocción.
E3
D4
E4
Velocidad de los ventiladores
En la pantalla D4 aparece la velocidad de los ventiladores del horno. Cuando la pantalla parpadea se
puede modificar el parámetro, pulsando el mando E4 y seleccionando el valor deseado.
Los valores seleccionables son tres: 100, 50 y min. que corresponden, respectivamente, a velocidad
máxima, media y mínima del ventilador.
Para confirmar el parámetro pulsar otra vez el mando E4 o bien esperar 10 segundos sin realizar
ninguna operación.
Se puede seleccionar la velocidad de los ventiladores antes de la cocción o modificar dicho valor
durante la cocción.
Control del respiradero
Mediante la tecla P5 se controla la apertura y el cierre del respiradero para los vapores de la cámara de
cocción. Si el respiradero está abierto la tecla parpadea, mientras que si está cerrado la luz está fija.
Durante dichos movimientos la tecla P5 queda apagada con tal de permitir la finalización de la
operación seleccionada.
Cebado / apagamiento de las luces
Con el interruptor P2 es posible,el qualquier momento, empezar y acabar las luces que iluminan la
camara de cocciòn del horno.
29
ES
FUNCION DE PRECALENTAMIENTO
El horno te dà la posibilidad de hacer un precalentamiento antes de empezar un
ciclo di cocciòn. Para impostar la modalidad de precalentamiento, cuando se
selecciòna el parametro del tiempo de cocciòn,si se pulsa el interruptor E2 por 5
segundos,en el display se vee la escrita “PrE” que indica la funciòn de
precalentamiento del horno.
Pulsando el interruptor E1 es posible impostar la temperatura de
precalentamiento y esta se puede ver en el display D1.
Cuando este ciclo termina, parpadea una luz en el display y se oye tambièn un
señal acustico.
Cuando termina el precalentamiento,si no se hace ninguna operaciòn,se activa
automaticamente la funciòn por el mantenimiento de la temperatura de
precalentamiento.
P4
D1
RESET
E1
FUNCION DE ENFRIAMIENTO
Al final de un ciclo de cocción se puede seleccionar la función de enfriamiento
del horno. Dicha función se activa manteniendo pulsado durante 5 segundos el
mando E4. En la pantalla D4 aparecerá el mensaje "raFF" que indica la
activación de dicha función.
En la pantalla D1 aparece la temperatura a alcanzar durante la fase de
enfriamiento. Para ajustar dicho valor pulsar el mando E1 y realizar la
regulación correspondiente.
Al principio del enfriamiento en las pantallas aparecerá un mensaje que
recordará la necesidad de abrir la puerta del horno, si todavía permanece
cerrada, para poder poner en marcha la función seleccionada.
D4
E4
RESET GAS (opción disponible sólo en los modelos de gas)
Pulsando la tecla P10 en los modelos de hornos de gas se consigue desbloquear la unidad de gestión de
calentamiento. Durante el funcionamiento normal del horno esta tecla está apagada, se enciende sólo
cuando se produce una anomalía en el circuito del gas y la unidad de control la detecta.
Si después del reset, realizado pulsando la tecla correspondiente, el problema volviera a aparecer
consultar la tabla "Diagnóstico de algunos fallos" o contactar con el servicio técnico.
SENALES Y ALARMAS
El horno puede reportar algunas alarmas que pueden ser bloqueadores,estas son siempre seguidas da
algunos senales acusticos.
Possibili cause
ERR1
•Activación o funcionamiento incorrecto del termostato de seguridad.
ERR2
•Activación de los relés térmicos del motor.
ERR3
•Bloqueo de la unidad de control del gas.
ERR4
•Sonda de temperatura de la cámara no detectada por funcionamiento
ausente o incorrecto.
ERR5
•Error de comunicación con la placa madre.
ERR6
•Señalización de puerta abierta.
ERR8
•Los parámetros de cocción introducidos no son válidos.
ERR12
ERR13
•Ausencia de la señal de activación del respiradero para los vapores de
cocción por avería o mal funcionamiento
•Temperatura de la placa demasiado elevada.
30
31
32
904.31007-00
Cod. LIB904.31007


![[XX OC] Manual de instalación y manutención](http://vs1.manualzilla.com/store/data/006222191_1-4f1409e282aefa3d271872dd749bc27d-150x150.png)