1
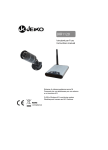
SISTEMA DI VIDEO-SORVEGLIANZA SENZA FILI
CON TELECAMERA E SENSORE DI MOVIMENTO
JKS5056 MANUALE D’USO
INTRODUZIONE
Gentile Cliente,la ringraziamo di aver scelto un nostro prodotto e confidiamo che questa scelta soddisfi a pieno le
Sue aspettative. Prima di utilizzare questo apparecchio, La invitiamo a leggere attentamente il presente “libretto
di istruzioni per l’uso” al fine di ottimizzarne le caratteristiche funzionali ed eliminare qualsiasi inconveniente che
potrebbe insorgere da un uso errato o non conforme dello stesso.
AVVERTENZE D’USO
Leggere attentamente le avvertenze contenute nelle presenti istruzioni in quanto forniscono importanti indicazioni
riguardanti la sicurezza di installazione, d’uso e di manutenzione.
•Il presente “libretto di istruzioni per l’uso” è parte integrante dell’apparecchio, pertanto conservatelo con cura per
ogni ulteriore consultazione.
•Dopo aver tolto l’apparecchio dall’imballo, assicurarsi della sua integrità e di quella di tutti i componenti in
dotazione prima di utilizzarli.In caso si verifichino rotture o semplici screpolature in uno o più componenti, riporre
l’apparecchio nel suo imballo originale e riconsegnarlo al punto vendita per le necessarie verifiche.
•Non utilizzare l’apparecchio se è caduto e/o presenta evidenti rotture o anomalie di funzionamento.
•I componenti dell’imballo (eventuali sacchetti in plastica, cartoni, ecc.) devono essere tenuti lontani dalla portata
dei bambini, invalidi ecc.
•Questo apparecchio è stato concepito per essere utilizzato come SISTEMA DI VIDEOSORVEGLIANZA.
•Per evitare scosse elettriche, non utilizzare l’apparecchio nelle immediate vicinanze di una vasca da bagno, di
una doccia, di una piscina o di un lavello pieno di acqua, e in luoghi dove possa subire urti .
•Le eventuali riparazioni devono essere eseguite solo da specialisti che dispongano dei pezzi di ricambio originali
forniti dal fabbricante.
•Non utilizzare l’apparecchio in ambienti saturi di gas o dove ci sia rischio di esplosione.
•Questo prodotto è studiato per un funzionamento ottimale e duraturo a condizione che venga
maneggiato con cura.
•Non immergere l’apparecchio in acqua.
•Non pulire l’apparecchio con sostanze abrasive o corrosive, poichè possono scalfire i componenti di plastica e
corrodere il circuito elettronico.
•Non sottoporre l’apparecchio a forza eccessiva, urti, polvere o temperature eccessive o umidità che possano
provocare malfunzionamenti, ridurre la durata dei circuiti elettronici, danneggiare le batterie o distorcere i
componenti.
•Non manomettere i componenti interni dell’apparecchio. Così facendo si rende nulla la garanzia e si possono
causare danni. L’apparecchio non contiene componenti che possono essere riparati dall’utente.
•Usare solo batterie nuove, come specificato nelle istruzioni del produttore.
•Non mischiare batterie nuove con batterie vecchie, poichè queste ultime possono rilasciare sostanze corrosive
per i circuiti.
La casa costruttrice declina ogni responsabilità per uso improprio o non conforme alle istruzioni fornite,
manomissione e manutenzione inadeguata dell’apparecchio.
1
FONTI ALIMENTAZIONE
Questo apparecchio funziona collegato elettricamente tramite
l’alimentatore in dotazione.
1. Collegare l’alimentatore AC/DC alla presa di corrente.
2. Collegare il jack dell’alimentatore alla presa dell’apparecchio
3. Assicurarsi che il voltaggio sia uguale a quello riportato sulla targa
dei dati caratteristici posizionata sull’alimentatore.
Collegare il rispettivo
alimentatore al monitor
e alla telecamera
2
CARATTERISTICHE ///
1) Tecnologia Wireless da 2.4 GHz.
2) Selettore “Source” per visionare immagini delle telecamere senza file e con fili
3) Il sistema supporta fino a 3 telecamere
4) Se il monitor è utilizzato con telecamere dotate di sensore di movimento, ogni sensore
puo’ essere indipendentemente attivato/disattivato dal monitor.
5) La luminosità,contrasto colore e tinta regolabili mediante tasto menu.
6) Il monitor LCD può funzionare in 3 modalità: Scan, Auto e Manual
7) Formato capovolgimento immagine verticale.
8) Funzione capovolgimento immagine orizzontale.
9) Orientamento immagine selezionabile permette l’installazione del Monitor capovolto.
10) Pacco batterie ricaricabili per monitor e camera (opzionali)
11) Possibilità d’installazione del monitor e della telecamera a parete o in appoggio mediante apposito
supporto.
12) Ingressso AV , Uscita AV
13) Installazione plug & play
CONTENUTO DELLA CONFEZIONE ///
Verificare tutti i componenti a seguito rappresentati prima di procedere all’utilizzo
TELECAMERA
MONITOR
STAFFA PER
TELECAMERA
STAFFA E VITI ADATTATORE ADATTATORE
DI FISSAGGIO TELECAMERA
MONITOR
TELECOMANDO
MONITOR
NOTE DA CONSIDERARE PRIMA DI PROCEDERE ALL’INSTALLAZIONE ///
Per ottenere un miglior funzionamento del dispositivo, segua i passi specificati a seguito:
· La telecamera dovrà essere posizionata di modo che possa monitorare la massima area.
· Per migliorare la trasmissione, evitare l’installazione in posti dove il segnale debba oltrepassare pareti
di grosso spessore o dove ci siano ostacoli tra il trasmettitore e il ricevitore
COME INSTALLARE LA TELECAMERA (trasmettitore) ///
1. Estrarre la telecamera dalla confezione
2. la telecamera deve essere posizionata su una superficie piana
( tavolo, scrivania) o fissata a parete come riportato nella figura a lato.
La telecamera puo’ essere regolata ruotando la testa della stessa
nella posizione desiderata.
3
INSTALLAZIONE
INSTALLAZIONE A
SUPERFICIE
PARETE
PIANA
3. Utilizzare l’adattatore di corrente AC/DC 12Volt della telecamera, consigliamo collegare, prima la
spina, per assicurarsi che la telecamera non superi i due metri di distanza dalla presa di corrente più
vicina.
TELECAMERA SENZA FILI
SUPPORTO
MONTAGGIO
PER
A
INSTALLAZIONE A
INSTALLAZIONE
PARETE
A PARETE
SUPERFICIE
4. Inserire il Jack di alimentazione nella presa jack posta nel retro del supporto della telecamera.
Selezionare il canale di funzionamento della telecamera tramite gli interruttori DIP Select 1, 2 e 3 posti
all’interno del compartimento portabatterie della telecamera muovendoli verso il basso.. Il settaggio di
fabbrica prevede il funzionamento sul canale 1.
IMPORTANTE : Per accedere agli interruttori DIP è necessario aprire lo sportello del compartimento
batterie premendo e spingendo lo sportello come mostrato a seguito.
PREMERE E FAR SLITTARE LO
INTERRUTORI DIP POSIZIONATI
SPORTELLO BATTERIE
SUL CH1
L’ESTERNO
VERSO
TELECAMERA VISTA DAL RETRO
5. L’installazione della telecamera (Transmitter) è ora completata.
VISIONE NOTTURNA ///
La telecamera include LED infrarossi, che permettono la visione oltre 3 metri di distanza nell’oscurità.
Regoli la luminosità nel monitor per ottenere una miglior immagine con la visione notturna
COME INSTALLARE IL MONITOR LCD (Ricevitore)///
1. Togliere il monitor LCD dall’imballaggio.
4
2. Collegare il cavo adattatore al terminale con presa miniDin del monitor.
3. Collegare l’adattatore di corrente del monitor LCD alla presa situata sul retro del supporto e inserire
l’adattatore nella presa a muro.
4. Accendere il monitor LCD premendo il pulsante POWER .
Scegliere il luogo dove posizionare il monitor LCD fissato a parete o in appoggio su mobile o scrivania.
Per il fissaggio a parete, fate riferimento alla dima di foratura che troverete all’interno del manuale.
Regolare l’angolo di inclinazione attraverso il supporto del monitor per migliorare la visione
dell’immagine riprodotta.
5. Nel caso di utilizzo del pacco batterie ricaricabile (opzionale) , inserire il pacco batterie seguendo le
istruzioni a seguito riportate:
ESTRARRE PREMENDO
VERSO IL BASSO
RUOTA
SNODO MONITOR
SNODO
ATTENZIONE: SE SI UITLIZZA IL PACCO BATTERIE INSERIRE
IL JACK DELL’ADATTATORE DIRETTAMENTE NEL PACCO
SUPPORTO MONITOR
PACCO BATTERIE
BATTERIE
6. La presa per auricolare è posizionata sul lato destro del monitor.
OTTIMIZZAZIONE DEL SISTEMA WIRELESS ///
* Il segnale video da 2.4 GHz passa facilmente attraverso le pareti interiori di casa, ma lo stesso
segnale potrebbe essere riflessa dai cavi o tubi situati all’interno delle pareti.
* Le fonti più comuni di interferente sono provocate da microonde e dai prodotti WiFi. Eviti l’installazione
del monitor LCD vicino a questi dispositivi o altre fonti di interferenza RF, come per esempio, telefoni
cordless e prodotti WiFi.
* Per evitare interferenze della telecamera, raccomandiamo sintonizzare la sua WIFi sul canale 10
5
FUNZIONAMENTO MULTI-CAMERA ///
Il sistema di sorveglianza Wireless JKS5056 è stato disegnato per funzionare con 3 telecamere senza
filo. In modo da consentire il funzionamento con telecamere addizionali che potrà acquistare .
IMPORTANTE:
Quando vengono utilizzate più telecamere, dovrà assicurarsi che le telecamere vengano assegnate al
canale specifico, regolando l’interruttore DIP corrispondente.
C1
IN USO
VISTA POSTERIORE DELLA
TELECAMERA
C2
IN USO
C3
IN USO
INTERRUTTORI DIP SETTATI
PER DEFAULT SUL CANALE 1
Di conseguenza, gli interruttori DIP situati nella parte inferiore del Monitor LCD devono essere regolati
secondo il canale /i canali che si intende utilizzare.
VISTA POSTERIORE
DEL MONITOR LCD
C1
IN USO
C1 & C2
IN USO
TUTTI
IN USO
SENSORE DI MOVIMENTODELLA TELECAMERA///
La telecamera è dotata di sensore di movimento. Quando il sensore rileva un movimento, la spia rossa
luminosa posta sulla telecamera lampeggia ed il monito emette un segnale d’allarme.
MODALITA’ DI FUNZIONAMENTO ///
SEZIONE FRONTALE
DEL MONITOR
VISTA FRONTALE DEL
TELECOMANDO
Il sistema può essere configurato in 3 modi diversi: SCAN, AUTO o MANUALE
Il modo di funzionamento viene selezionato usando il pulsante situato nella parte frontale del Monitor
LCD.
6
SCAN
Premendo il pulsante SCAN, il sistema entrerà nel modo scanner. Il display del monitor diventerà buio
posizionandosi in modo standby mentre il sistema analizza costantemente le telecamere attive. Nel
momento in cui il dispositivo rilevasse un rumore o suono a un livello superiore a quello prefissato nella
telecamera, il monitor visualizzerà le immagini ed emetterà un segnale acustico di allerta.
Passati quattro minuti dall’ultimo rilevamento lo schermo tornerà in modalità standby. Per uscire da
questa modalità premere i pulsanti MANUAL o AUTO.
AUTO
Se viene premuto il pulsante AUTO, il sistema si attiverà automaticamente, In questo modo, il sistema
inizierà a visualizzare in sequenza le immagine di tutte le telecamere attive Quando la telecamera
dotata di sensore di movimento o acustico (non disponibile nella JKC520) rileverà un rumore o un
movimento , il monitor visualizzerà l’immagine proveniente da quella telecamera ed emetterà un
segnale acustico.
Per evitare la ricerca su canali a cui non sono state assegnate telecamere, gli interruttori DIP dei canali
inutilizzati (che si trovano nella parte inferiore del monitor)dovranno essere posti in posizione OFF.Il
tempo di intercambio delle immagini nel monitor é stato programmato a 4 secondi, é possibile
configurarlo da 2 a 30 secondi. Per effettuare la nuova configurazione dovrà premere
contemporaneamente i pulsanti AUTO e MANUAL. Ogni lampeggio dei LED indica che il tempo di
intercambio aumenta di 1 secondo
MANUAL
Per selezionare una delle telecamere in uso dovrà premere il pulsante MANUAL che si trova nello
stesso monitor. Il monitor visualizzerà le immagini del canale selezionato ogni volta che verrà premuto il
pulsante MANUAL.
Per evitare la ricerca su canali a cui non sono state assegnate telecamere, gli interruttori DIP dei canali
inutilizzati (che si trovano nella parte inferiore del monitor)dovranno essere posti in posizione OFF.
ATTIVARE/DISATTIVARE LE TELECAMERE
Premendo I tasti CAM1, CAM2 e CAM3 buttons, si possono attivare o disattivare ogni singola
telecamera.Premendo uno dei tasti CAM1, CAM2 e CAM3 la spia nel tasto cambierà di colore.
Verde: telecamera attiva
Rosso: telecamera disattivata
FUNZIONI DEL MONITOR///
VISTA SUPERIORE DEL MONITOR
7
TASTO ACCENSIONE (Power)
Premere per accendere o spegnere il monitor LCD
TASTO SOURCE
Premere per selezionare la sorgente di provenienza delle immagini (AV1 telecamera a filo, WIRELESS
CAM telecamere senza filo).
TASTO MENU
Premendo il tasto Menu sequenzialmente si accede alle regolazioni del livello sonoro di allarme,
Luminosità, Contrasto, Colore, Tinta, capovolgimento immagine orizzontale, capovolgimento
immagine verticale.
TASTO VOLUME/ADJ
Consente di regolare il volume ed /o le funzioni soprariportate.
Premere i pulsanti “+” o “-”
GUIDA ALLA RISOLUZIONE DEI POSSIBILI PROBLEMI///
Nel caso di malfunzionamento, consultare la guida seguente:
SINTOMO
RIMEDIO
1. Controllare tutti i collegamenti. La telecamera(e) e il monitor devono
Non si
immagini
vedono
le
essere in posizione On
2. Controllare la configurazione. La telecamera(e) e il Monitor devono
essere configurati nel canale o canali corretti
3. Controllare la posizione della telecamera. La Telecamera si deve
trovare nel raggio d’azione del monitor.
Il Monitor é bianco
1. Verificare se il monitor é acceso (ON).
2. Se sta usando un adattatore DC dovrà accertarsi che la
spina
sia
stata ben collegata alla corrente.
3. Controllare la posizione delle batterie e verificare lo stato della carica
delle stesse.
Interferenze
immagini
sulle
1. Controllare la distanza di ogni telecamera e che si trovino dentro del
raggio d’azione. Accertarsi che non ci sia nulla che possa ostacolare il
segnale
2. Provi a cambiare la posizione della telecamera, monitor o entrambe
per migliorare la qualità di ricezione
3. Cambiare di posto a tutti quei dispositivi che funzionano a frequenza
da 2.4Ghz
Problemi di audio
1. Controllare il volume del monitor, se é troppo basso preghiamo di
aumentarlo
2. Verificare la sensibilità del rilevatore in modo che i suono/rumori
possano essere rilevati dai microfoni
3. Se l’unitá emette un suono alto e continuo, dovrà allontanare la
telecamera dal monitor o dovrà cambiare l’angolo di posizione dello
stesso.
8
Alimentazione
Controllare che la fonte di alimentazione corrisponda a quella indicata sulla targa dei dati caratteristici
posizionata sul fondo dell’apparecchio e sull’alimentatore.
PULIZIA - MANUTENZIONE – SMALTIMENTO
PULIZIA E MANUTENZIONE •
Per pulire l’apparecchio usare un panno umido senza utilizzare materiali o detergenti abrasivi.
Attenzione
•Non bagnare l’apparecchio
•Non immergere l’apparecchio in acqua o altri liquidi.
SMALTIMENTO DELL’APPARECCHIO
•Se si decide di rottamare l’apparecchio, portarlo presso un apposito centro di raccolta,osservando le
opportune disposizioni legislative (disposizioni locali e/o particolari possono essere richieste presso i
competenti uffici del vostro Comune).
SMALTIMENTO DELLE BATTERIE
•Disposizioni Internazionali, a difesa e tutela dell’ambiente, impongono che batterie ed accumulatori
esausti devono essere gettati in appositi contenitori preposti per la loro raccolta e non dispersi nei
comuni rifiuti urbani.
•Questo apparecchio utilizza batterie che una volta esauste devono essere rimosse e smaltite secondo
le prescrizioni di legge.
INFORMAZIONE AGLI UTENTI DI APPARECCHIATURE DOMESTICHE
.
Ai sensi dell’art. 13 del Decreto Legislativo 25 luglio2005, n. 151 “Attuazione delle Direttive
2002/95/CE,2002/96/CE e 2003/108/CE, relative alla riduzione dell’uso di sostanze pericolose
9
nelle apparecchiature elettriche ed elettroniche, nonché allo smaltimento dei rifiuti”.Il simbolo
del cassonetto barrato riportato sull’apparecchiatura o sulla sua confezione indica che il
prodotto alla fine della propria vita utile deve essere raccolto separatamente dagli altri rifiuti.
L’utente dovrà, pertanto, conferire l’apparecchiatura giunta a fine vita agli idonei centri di raccolta
differenziata dei rifiuti elettronici ed elettrotecnici, oppure riconsegnarla al rivenditore al momento
dell’acquisto di una nuova apparecchiatura di tipo equivalente, in ragione di uno a uno. L’adeguata
raccolta differenziata per l’avvio successivo dell’apparecchiatura dismessa al riciclaggio, al trattamento
e allo smaltimento ambientalmente compatibile contribuisce ad evitare possibili effetti negativi
sull’ambiente e sulla salute e favorisce il reimpiego e/o riciclo dei materiali di cui è composta
l’apparecchiatura.Lo smaltimento abusivo del prodotto da parte dell’utente comporta l’applicazione
delle sanzioni di cui alla corrente normativa di legge
SPECIFICHE///
Telecamera (Transmitter):
Sistema TV
PAL/NTSC
Sensore d’immagine
1/4" CMOS
Obiettivo incorporato
4.3mm, F1,8 fuoco fisso
Risoluzione
360 linee TV orizzontali
Rapporto Segnale/Rumore
48db
Gamma di frequenza
2.41-2.47GHZ
ILLUMINATORE
Interno 8 LED
Illuminazione minima
0.1Lux
Consumo di corrente
180mA
Modulazione
FM
Dimensioni
58W*175H*96Dmm
Dstanza di trasmissione
100 metri in campo aperto
Alimentazione
DC 12V, 0.4 A
Monitor (Receiver)
Sistema TV
PAL or NTSC
Gamma di frequenza
2.41~2.47GHz
Dimensione schermo
5.6 pollici
Risoluzione
1440 x 234 dot
Alimentazione
DC 9V, 2.0 A
Luminosità
300cd/ m2
Rapporto di Contrasto
150:1
Configuratione colore
RGB Stripe, full color
Temperatura di funzionamento
-10°C+40°C
Dimensioni
160W*135H*26Dmm
Sorgente segnale
Wireless, sensori movimento entrate A/V
10
Batteria:
Batteria ricaricabile Opzionale (per
Autonomia 2 ore in modalità continua
Monitor)
Autonomia 3 ore in modalità stand-by
Batteria ricaricabile Opzionale (per
Autonomia 10 ore in modalità continua
Batteria)
Generale:
Temperatura di funzionamento:
-10°C + 40°C
U m i di t à
M e no d i 8 5 %
Le caratteristiche sono soggette a variazioni senza preavviso.
Al fine di migliorare il prodotto e/o per esigenze costruttive,il produttore si riserva di apportare
variazioni tecnologiche,estetiche e dimensionali senza obbligo di preavviso
DICHIARAZIONE DI CONFORMITA’ ///
Il Produttore dichiara sotto la propria responsabilità che il prodotto a cui si riferisce il presente“Libretto
di istruzioni” è conforme ai requisiti essenziali delle Direttive Comunitarie Europee che lo coinvolgono.
Dichiarazione di conformità redatta in forma completa potrà essere fornita su esplicita richiesta.
GARANZIA ///
La presente Garanzia non pregiudica i diritti dell’acquirente stabiliti con D. Lgs. 02/022002,n.24. Con la
presente Garanzia, il produttore offre all’Acquirente che si rivolge direttamente ad un Punto Vendita il
ripristino della conformità tecnica dell’apparecchio in modo rapido, sicuro e qualitativamente
ineccepibile. La presente Garanzia è operativa indipendentemente dalla prova che il difetto derivi da
vizi di fabbricazione presenti all’atto dell’acquisto dell’apparecchio, fatta eccezione per quanto previ-sto
al punto “d” del presente testo.
a)Durata della garanzia: 12 mesi dalla data di acquisto. Trascorsi i primi 12 mesi di Garanzia, gli
interventi in garanzia sull’apparecchio saran-no gestiti di Punti Vendita nei successivi 12 mesi di
garanzia legale in stretta applica-zione di quanto previsto dal D. Lgs. 02/022002, n. 24.
b)Validità della garanzia: In caso di richiesta di assistenza, la garanzia è valida solo se verrà esibito
il certificato di garanzia unitamente ad un documento, valido agli effetti fiscali, che riporti gli estremi
d’identificazione del rivenditore, del prodotto e la data incui è stato effettuato l’acquisto.
c)Estensione della garanzia: La riparazione NON interrompe nè modifica la durata della garanzia
che decadrà alla sua scadenza legale.
d)Limiti della garanzia:
La garanzia non copre in nessun caso guasti derivanti da:
-negligenza, imperizia, imprudenza e trascuratezza nell’uso (inosservanza di quanto prescritto nel
libretto delle “istruzioni d’uso”);
-manutenzioni non previste nel libretto delle “istruzioni d’uso” o effettuate da personale non
autorizzato;
-manomissioni o interventi per incrementare la potenza o l’efficacia del prodotto;
11
-errata installazione (alimentazione con voltaggio diverso da quello riportato sulla targhetta dati e sul
presente libretto);
-uso improprio dell’apparecchio;
-danni dovuti a normale usura dei componenti, urti, cadute, danni di trasporto.
e)Costi: Nei casi non coperti da garanzia il produttore si riserva il diritto di addebitare al Cliente le
spese relative alla riparazione o sostituzione dell’apparecchio.
f)Responsabilità del produttore: Il produttore declina ogni responsabilità per eventuali danni che
possono, direttamente o indirettamente, derivare a persone, cose o animali domestici in conseguenza
della mancata osservanza di tutte le prescrizioni indicate nel “manuale d’istruzioni” e concernenti
specialmente le avvertenze in tema d’installazione, uso e manutenzione dell’apparecchio.
ATTIVAZIONE DEL SERVIZIO DI ASSISTENZA IN GARANZIA:
Ogni prodotto JEIKO, coperto da garanzia, al quale sia stato riscontrato un malfunzionamento,viene
ritirato e riconsegnato tramite corriere convenzionato direttamente al domicilio del consumatore. Per
usufruire di questo servizio, contattare il Service Support:
•
Tel. +39 031 712304•
Fax. + 39 031 782838
e-mail: [email protected]
www.jeiko.eu
INSTALLAZIONE
TELECAMERA A PARETE
Per installare la telecamera alla parete, dovrà realizzare due fori con un trapano elettrico, prendendo
come riferimento la seguente dima.
Introdurre i ganci nei fori e fissare la telecamera alla parete usando le viti disponibili nella confezione.
12
INSTALLAZIONE
MONITOR
A PARETE
Per installare il monito alla parete, dovrà realizzare due fori con un trapano elettrico, prendendo come
riferimento la seguente dima.Utilizzare i tasselli e le viti a corredo per fissare il monitor sulla parete.
13
2,4Ghz WIRELESS MONITORING SYSTEM
5,6” MONITOR & MOTION SENSOR CAMERA
JKS5056
INTRODUCTION
Dear Customer,
We would like to thank you for selecting our product and hope this choice thoroughly satisfies your
requirements .Before operating the units we would like you to read this “instruction manual” carefully in
order to apply all features at their best and to avoid any inconvenience due to improper use
WARNING
Please read all information included in this manual carefully as it supplies important safety indications
for installation, use and maintenance of the product.
•As this “instruction manual” is part of the item you purchased please store it carefully in case of further
need
•After opening the box and before using the product make sure all parts listed are included and in good
condition. In case you note damages in one or more components, please set the unit back into its
original gift box and give it back to the reseller for test
•Do not use the appliance if it fell and /or it presents damages or functioning anomalies.
•Package components (i.e.: plastic bags, cartons and so on)must be kept away from children, disabled
persons, etc.
•This appliance has been designed to be used as a VIDEO SURVEILLANCE.
•In order to avoid electric shock do not use the product near bathtubs, showers, swimming pools or
wash-hand basins full of water or in places where it could be subject to bumps .
•Only experienced technicians must carry out product repairing with original spare parts supplied by
the manufacturer.
•Do not use the product in rooms full of gas or where there is a risk of explosion.
•This product has been worked out for an optimum and lasting functioning provided that it is handled
with great care.
•Do not immerse the appliance in water.
•Do not clean the appliance with abrasive or corrosive materials. They may scratch the plastic parts
and corrode the electronic circuits.
•Do not subject the appliance to excessive force, shock, dust, temperature or humidity, which may
result in malfunction, shorter electronic life span, damaged battery and distorted parts
•Do not tamper with the appliance’s internal components. Doing so will invalidate the warranty on the
product and may cause unnecessary damage. The appliance contains no user- serviceable parts.
•Only use fresh batteries as specified in the user’s manual. Do not mix new and old batteries as the old
ones may leak.
The manufacturer declines all responsibilities in case of product improper maintenance,
misuse or use that does not comply with the given instructions.
1
POWER SUPPLY ///
This product needs to be connected with the AC/DC adapter included
1. Connect the AC/DC adapter with the female plug in the wall..
2. Connect the jack plug from AC/DC adapter to female jack of the
unit.
3. Ensure that the voltage is as indicated on the rating plate on the
AC/DC adapter.
Chose the proper
AC/DC adapter and
connect it to monitor
and camera
2
FEATURES///
1). 2.4GHz wireless technology, 5.6-inch LCD for good picture display
2). Manual switch wired and wireless camera via pressing the button “Source”.
3). Supports up to 3 cameras
4). If the monitor is used together with our cameras with motion detection function, each camera’s
motion can be armed and disarmed independently on the monitor.
5). Friendly menu can adjust the contrast, brightness, color and tint.
6). LCD monitor can work with 3 modes: Scan, Auto & Manual
7). Up/down reverse function
8). Mirror function for vehicle rear view camera.
9). Up/down reverse & mirror functions allow the installation monitor upside down.
10). Optional rechargeable battery pack for monitor and camera portable use.
11). LCD monitor and camera can be wall mounted or table standing
12). One A/V input and one A/V output available.
13). Plug & play installation
SYSTEM CONTENTS///
Identify all parts before proceeding with installation.
THINGS TO BE CONSIDER BEFORE INSTALLATION///
For best performance, follow these simple guidelines:
*The camera should be aimed accordingly to optimize viewing area.
*For best transmission, avoid installations where there are thick walls or major obstructions between
the camera & LCD monitor.
INSTALLING THE CAMERA (Transmitter)///
1. Unpack the Camera.
2. Decide whether the Camera will be wall-mounted or sit on a
desk/tabletop. If wall mounting, use drilling template on the back
cover of these instructions. If using the tabletop base, attach the
camera to the stand as shown. The Camera can be adjusted for
either mounting scenario by rotating the Camera head to the required
position.
3
3. Use the camera 12V power adaptor, connect power jack to the rear of the tabletop base. Make sure
the camera is within reach of an AC power outlet.
4. Select the Camera operating channel on the DIP switch in the battery compartment by moving
switches 1, 2, or 3 to the down position. Switch is preset to channel 1.
IMPORTANT: In order to access the DIP switch in the battery compartment, press the battery
compartment and pull down (as shown) in order to easily remove the Camera from the tabletop base.
5. The Camera (Transmitter) installation is now complete.
NIGHT VISION ///
The Camera includes IR LEDs, which allows viewing in the dark up to 10 feet when used with the
adapter. It can automatically turn on night vision in low light.
INSTALLING THE LCD MONITOR///
1. Unpack the LCD monitor.
4
2. Connect the adapter cable to the LCD monitor..
3. Plug the LCD monitor AC power plug into the power jack on the rear of the LCD base.
4. Turn on the LCD monitor by pressing the top POWER button.
5. If using the rechargeable battery pack (for your option), when changing the LCD bracket with that,
please follow the schematic as below:
6. The earphone jack is available.
OPTIMIZING THE WIRELESS CAMERA SYSTEM///
The 2.4 GHz signal passes easily through walls, but the signal may be reflected by power wires or
plumbing inside the wall. The most common source of interference is microwave ovens. Try to avoid
mounting the LCD monitor near a microwave oven or other source of RF interference.
MULTI-CAMERA OPERATION///
The Wireless monitoring System is designed to work with up to three cameras. Additional cameras are
sold separately.
IMPORTANT: When using more than one camera, make sure each camera is assigned to a
specific/different channel by moving the DIP switch to the right position.
5
The LCD monitor’s DIP switch located on the Bottom panel of the LCD monitor should be adjusted to
reflect the channel in use.
MOTION-SENSING CAMERAS///
The cameras are equipped with a motion sensor PIR. When a camera detects motion, a red light
flashes on the camera and an audio alert sounds on the LCD monitor.
OPERATING MODES///
The wireless system can be set to operate in one of three modes: Scan, Auto or Manual. The desired
operating mode can be selected using the buttons on the front panel of the LCD monitor.
SCAN
Pressing the Scan button places the system in Scan mode. The LCD monitor screen blanks into a
standby mode while the system continuously scans the active cameras. If used together with our
cameras with motion detection function and the camera detects motion, the LCD monitor displays
picture from the camera and the beeper will sound. Several minutes after the last detection, the screen
returns to standby mode while the LCD monitor resumes scanning. Pressing the Manual or Auto button
will cancel this mode.
6
AUTO
Pressing the Auto button places the system in Auto mode. In this mode, the system automatically
rotates through all active cameras. When a camera detects motion, the LCD monitor will display the
picture from the camera for a few seconds, and the beeper will sound. To avoid searching channels
that do not have cameras/transmitters assigned to them, set the DIP switches (located on the bottom
panel of the LCD monitor) for those corresponding channels to the off position.
The dwell time (time taken to switch between cameras) is preset to 4 seconds and can be adjusted
between 2 - 30 seconds. To adjust the dwell time, press both the Auto and Manual buttons
simultaneously. Each flash of the LED increases the dwell time by one second.
MANUAL
To select a specific camera to LCD monitor, press the Manual button. The LCD monitor will switch to a
different camera each time the Manual button is pressed. When used together with our cameras with
motion detection function and the camera detects motion, the beeper on the LCD will sound. To avoid
searching channels that do not have cameras assigned to them, set the dip switches (located on the
bottom panel of the LCD monitor) for those corresponding channels to the OFF position.
ARM/DISARM
By using the Cam1, Cam2 and Cam3 buttons, you can arm or disarm each camera independently.
When pressing one of the buttons, it will turn green. This means the camera is armed. By pressing
again, the camera is disarmed.
MONITOR FUNCTIONS///
POWER
Press to turn the monitor on/off.
SOURCE
Press to switch the monitor to work as wired monitor only or wireless.
MENU
By pressing the Menu button, you can cycle through the Alarm Volume, Brightness, Contrast, Color,
Tint, Mirror, Up/Down ..
VOLUME ADJUST
Adjust Volume setting and parameters as above.
7
TROUBLE SHOOTING///
If you are having trouble operating this product, please consult the guide below:
Symptom
No Camera picture
Remedies
1. Check all connectors. Make sure camera(s) & monitor switched ON.
2. Ensure camera(s) & monitor are set to correct channel(s).
3. Make sure camera(s) is within range of monitor (receiver).
Blank Monitor
1. Make sure monitor is switched ON.
2. If using AC adaptor, make sure it is plugged in.
3. Make sure rechargeable battery is charged.
Interference on Camera
1. Make sure each camera (transmitter) is within range, and that no large
picture
obstructions are blocking the signal.
2. Try repositioning the camera, monitor or both to improve the reception
quality.
3. Reposition other nearby equipment transmitting on the 2.4 GHz
frequency.
Audio Problems
1. Ensure the volume is turned up sufficiently on the monitor.
2. Make sure the sound is within the microphone range.
3. If the units emit a loud wailing sound (feeds back), try moving the
camera away from the monitor or angle the monitor differently.
POWER
Ensure that supply corresponds to the information on the rating label on the bottom of the unit.
CLEANING - MAINTENANCE – DISPOSAL///
CLEANING AND MAINTENANCE
•Use a soft moist cloth to clean the product without using cleaning abrasive detergent. Warning- Do not
wet the product. Do not dip the product in water or other liquids.
UNIT DISPOSAL
•If you decide to dispose of the units make sure they are taken to the special collection points as
indicated by your local authorities (your council will be able to give you all necessary information).
BATTERY DISPOSAL
•According to International regulations for environmental safeguard, all discharged batteries and
adapters must be disposed of in special containers and not thrown in the usual bin.
•This unit operates with rechargeable batteries that must be disposed according to law.
8
INFORMATION FOR PURCHASE OF DOMESTIC APPLIANCES///
This marking shown on the product or its literature, indicates that it should not be disposed with other
household wastes at the end of its working life. To prevent possible harm to the environment or human
health from uncontrolled waste disposal, please separate this from other types of wastes and recycle it
responsibly to promote the sustainable reuse of material resources. Household users should contact
either the retailer where they purchased this product, or their local government office, for details of
where and how they can take this item for environmentally safe recycling. Business users should
contact their supplier and check the terms and conditions of the purchase contract. This product should
not be mixed with other commercial wastes for disposal.
9
SPECIFICATION///
Camera (Transmitter):
TV System
PAL/NTSC
standard Image Sensor
1/4" CMOS
Integrated Lens
4.3mm, F1.8 fixed focus
Resolution
360 horizontal TV lines
Signal/Noise Ratio
48db
Frequency Range
2.41-2.47GHZ
Illuminator
LED 8pcs
Mini. Illumination
0.1Lux
Current Consumption
180mA
Modulation
FM
Power Supply
DC 12V, 0.4 A
Overall size
58W*175H*96Dmm
Transmission Range
100 m.
Monitor (Receiver)
TV System
PAL or NTSC
standard Frequency Range
2.41~2.47GHz
Screen Size
5.6 inch
Resolution
1440 x 234 dot
Power Supply
DC 9V, 2.0 A
Brightness
300cd/ m2
Contrast Rate
150:1
Color Configuration
RGB Stripe, full color
Operating Temperature
-10°C+40°C
overall Size
160W*135H*26Dmm
Signal Source
Wireless A/V, PIR
Battery:
Rechargeable Battery(For Monitor)
Optional
Rechargeable Battery(For Camera)
Approx 2 hr. continuous
3 hrs. standby
Approx 10 hr. continuous
Optional
General:
Operating temperature:
-10°C to 40°C
14°F to 104°F
Humidity:
Less than 85%
Design and specifications are subject to change without notice.
With the object to improve the product or in case of specific technical needs, the manufacturer shall
apply technological, aesthetical and mechanical changes without previous information.
10
DECLARATION OF CONFORMITY ///
The manufacturer under is responsibility declares that the product which is referred this “Instruction
manual” is comply with the related European Community Directives.
Complete Conformity declaration shall be provided with specific request.
WARRANTY CONDITIONS ///
This Warranty does not prejudice the customer’s rights as established by Italian Decree 02/022002, no.
24.Under this warranty the manufacturer offers the customer who applies directly to an approved Sales
Point a fast, safe and high quality technical re-establishment of the product. This Warranty is valid
independently from the proof of factory damage encountered at the moment of purchase, except for
what indicated under section “d” of this text.
a)Warranty expiry: 12 months from date of purchase After the first 12 months the Sales Points
will continue to provide assistance for the following 12 months of legal warranty but under strict
application of what established by the above mentioned Decree 02/022002, no. 24.
b) Warranty Validity: In case technical assistance is required the present warranty is valid only if
accompanied by a valid document and the Warranty Certificate indicating seller’s name, product code
and date of purchase.
c) Warranty extension: Assistance given for damaged product DOES NOT interrupt or modify
warranty validity which will extend as provided for legally.
d) Warranty limitations:
This warranty covers in no case damage caused by:
-negligence, inexperience, carelessness during use (non-observance of the user manual);
-maintenance not defined in the user manual or carried out by non-approved personnel;
-tampering or alterations to improve product power or efficiency;
-wrong installation (power supply with different voltage from what indicated in this manual and on the
unit rear label);
-unit improper use;
-damage caused by component normal wear, shock, falls or damage occurred during transportation.
e) Costs: When not covered by the present warranty the manufacturer reserves the right to debit the
customer all charges related to the repairing or substitution of the product.
f) Manufacturer Responsibility: The manufacturer declines all responsibilities for possible damage
caused by the non-compliance with this instruction manual, especially all warnings/indications related
to product installation, use and maintenance, deriving or caused directly or indirectly by people, objects
or pets.
How the Warranty Service Support works:
In case of technical fault found on a product covered by warranty, the manufacturer offers an express
door to door postage service for collecting and delivering the goods directly to the end user home. This
service is totally free of charges. For this service please contact Service Support.:
•
Tel. +39 031 712304•
Fax. + 39 031 782838
e-mail: [email protected]
www.jeiko.eu
11
WALL MOUNTING CAMERA ///
Drilling Template for Wall Mounting Camera (s) ///
For wall-mounting Camera (s), drill two holes using a 1/4” drill bit and the template below.
Insert supplied wall anchors into holes and secure Camera to wall with supplied screws.
12
DRILLING TEMPLATE FOR WALL MOUNTING MONITOR///
For wall-mounting Monitor, drill two holes using a 1/4” drill bit and the template below.Insert supplied
wall anchors into holes and secure monitor to wall with supplied screws.
13
Reseller stamp
Please attached purchase receipt
Distributed by
DK DIGITAL ITALIA s.r.l.
Via Bisbino 29
22072 Cermenate (CO)
[email protected]
www.jeiko.eu
Cod. JKS5056 - Ed 1/2008