1
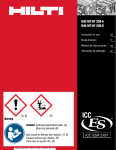
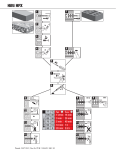
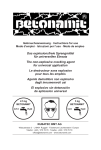
Hilti
HIT-HY 150-FR
Istruzioni per l‘uso
it
Istruction for use
en
Gebrauchsanweisungde
Hilti Italia S.p.A.
Piazza Montanelli 20
IT-20099 Sesto San Giovanni (Milano)
Tel +39 02 212 72
Hilti (Thailand) Ltd.
No. 1858/31-32, 8th Floor, Nation Tower,
Bangna-Trad Road,
Kweang Bangna, Khet Bangna,
TH-Bangkok 10260
Tel: +66 2 714 5300
Hilti
Institut für
Massivbau
Technische
Universität
Darmstadt
Certified to
ANSI-NSF 61
– Le approvazioni hanno precedenza.
– Approvals take precedence.
– Zulassungen sind vorrangig zu beachten.
Made in Germany
www.hilti.com
Hilti = Registered trademark of Hilti Corp., Schaan LI
Printed: 07.07.2013 | Doc-Nr: PUB / 5145634 / 000 / 00
Artikel-NR. 361638-V4 06.2013
Z-21.8-1648
Hilti HIT-HY 150-FR
1
Compressed Air Cleaning
2
2x
3
2x
4
6 bar at
6 m 3 /h
2x
6 bar at
6 m 3 /h
o / or / oder
d0 ≤ 18 mm
h0 max ≤ 10 x d
Manual Cleaning
2
3
4x
4x
5
6
4
4x
7
2
3
1
8
330 ml = 2x
500 ml = 3x
9
10
11
o / or / oder
9
*
+
11
*) Fare riferimento alla letteratura technica (approvazioni, manuali d`uso) per dettagli
*) Please refer to technical literature (approvals, setting instructions) for detail
*) Details entnehmen Sie bitte der technischen Literatur (Zulassungen, Setzanweisung).
12
12
13
t gel
F
23
32
41
68
86
104
C
t gel
-5
0
5
20
30
40
1,5 h
45 min
25 min
6 min
4 min
2 min
13
14
t cure
F
23
32
41
68
86
104
Printed: 07.07.2013 | Doc-Nr: PUB / 5145634 / 000 / 00
C
t cure
-5
0
5
20
30
40
9h
4,5 h
2h
90 min
50 min
40 min
Tmax
Hilti HIT-HY 150-FR
Tabella 1
Table 1
Tabelle 1
Ø [mm]
10
12
14
16
18
20
22
24
25
28
30
32
35
HAS
HIT-V
HIS
Rebar
Ø [mm]
8
10
12
Ø [mm]
Ø [mm]
16
10
12
24
27
20
16
20
30
HIT-RB
10
12
14
16
18
20
22
24
25
28
30
32
35
8
10
12
14
16
8
20
HIT-RB
25
HIT-SZ
Item no.
380917
336548
336549
336550
336551
336552
370774
380918
336553
380919
380920
336554
380921
HIT-SZ
12
14
16
18
20
22
24
25
28
30
32
35
Dettagli di posa di Hilti HIT-HY 150-FR con ferri di ripresa
Setting Details of Hilti HIT-HY 150-FR with reinforcement bars
Setzdaten Hilti HIT-HY 150-FR mit Bewehrungsstab
d
d0
hef = h0 ≤ 20 d
hmin
Tabella 2
Table 2
Tabelle 2
d
[mm]
8
10
12
14
16
20
25
d0
[mm]
10-12
12-14
14-16
18
20
25
32
Printed: 07.07.2013 | Doc-Nr: PUB / 5145634 / 000 / 00
def
min-max
[mm]
60 - 160
60 - 200
70 - 240
75 - 280
80 - 320
90 - 400
100 - 500
dmin
[mm]
hef + 30 ≥ 100
hef + 2 d0
Item no.
335022
335023
335024
335025
335026
380922
380923
335027
380924
380925
335028
380926
Hilti HIT-HY 150-FR
Dettagli di posa di Hilti HIT-HY 150-FR con barre filettate
Setting details of Hilti HIT-HY 150-FR with threaded rods
Setzdaten Hilti HIT-HY 150-FR mit Gewindestange
df d
Tmax
d0
hef = h0 ≤ 20 d
hmin
Tabella 3: HAS
Table 3: HAS
Tabelle 3: HAS
d
d0
[mm]
[mm]
M8
M10
M12
M16
M20
M24
M27
M30
d
d0
[mm]
[mm]
M8
M10
M12
M16
M20
M24
M27
M30
Tmax
df
hmin
80
90
110
125
170
210
240
270
[Nm]
10
20
40
80
150
200
270
300
[mm]
[mm]
[mm]
10
12
14
18
24
28
30
35
Tabella 4: HIT-V
Table 4: HIT-V
Tabelle 4: HIT-V
def
min-max
hef + 30
hef + 2 d0
def
min-max
Tmax
df
hmin
60 - 160
60 - 200
70 - 240
80 - 320
90 - 400
100 - 480
110 - 540
120 - 600
[Nm]
10
20
40
80
150
200
270
300
[mm]
[mm]
[mm]
10
12
14
18
24
28
30
35
9
12
14
18
22
26
30
33
9
12
14
18
22
26
30
33
hef + 30 ≥ 100
hef + 2 d0
Dettagli di posa di Hilti HIT-HY 150-FR con barre a filetto interno HIS-N e HIS-RN
Setting Details of Hilti HIT-HY 150-FR with HIS-N and HIS-RN Inserts
Setzdaten Hilti HIT-HY 150-FR mit HIS-N und HIS-RN Innengewindehülse
d
df
Tmax
d0
hef = h0
hmin
Tabella 5: HIS-R(N)
Table 5: HIS-R(N)
Tabelle 5: HIS-R(N)
d
M8
M10
M12
M16
M20
[mm]
12,5
16,5
20,5
25,4
27,6
d0
[mm]
14
18
22
28
32
hef
Tmax
90
110
125
170
205
10
20
40
80
150
[mm]
Printed: 07.07.2013 | Doc-Nr: PUB / 5145634 / 000 / 00
[Nm]
df
[mm]
9
12
14
18
22
hmin
[mm]
120
150
170
230
270
Hilti HIT-HY 150-FR
Sistema con resina ad iniezione per fissaggi nel calcestruzzo
Prima di utilizzare il prodotto leggere le presenti istruzioni per l‘uso e le prescrizioni di sicurezza.
Controllare la data di scadenza: vedere dati stampati sulla cartuccia (mese/anno). Una volta trascorsa
la data di scadenza, il prodotto non deve più essere utilizzato.
Temperatura della cartuccia: per l‘applicazione la temperatura deve essere tra +5 °C e 40 °C.
Temperatura del materiale di base: per l‘applicazione la temperatura deve essere tra –5 °C e 40 °C.
Trasporto e magazzinaggio: in un locale fresco, asciutto e buio, ad una temperatura compresa tra 5
°C e 25 °C.
Scheda tecnica dati di sicurezza: prima di procedere all‘utilizzo attenersi alle informazioni riportate nella
scheda tecnica dati di sicurezza!
Istruzioni di montaggio: rappresentazione delle operazioni: vedere figure a pagina 1; Dati di messa
in opera: vedere tabelle a pagina 2–3. In caso di applicazioni che non sono descritte nelle presenti
Istruzioni per l‘uso, rivolgersi a Hilti.
1 Esecuzione di un foro con martello perforatore e relativa punta in metallo duro con percussione rotante. Per l‘esecuzione del foro con altre punte, ad es. con la carotatrice, rivolgersi
a Hilti.
2 + 4 Pulizia del foro: Immediatamente prima di introdurre il tondino per calcestruzzo/tassello,
pulire il foro da polvere, acqua, residui di foratura ed altre eventuali impurità. Il metodo di
pulizia è subordinato alle caratteristiche del foro:
metodo 1 – adeguato per calcestruzzo asciutto o saturo d‘acqua (vedere pittogrammi):
Compressed Air Cleaning (pulizia con aria compressa): la pulizia del foro con aria compressa
è consentita per tutti i diametri e le profondità di foratura.
• Soffiare all‘interno del foro due volte con aria compressa senza olio (6 bar peri 6 m3/h).
A tale scopo inserire ed estrarre l‘ugello per l‘aria compressa fino al fondo del foro finché
l‘aria che fuoriesce non risulti priva di polvere.
• Spazzolare due volte utilizzando spazzole d‘acciaio Hilti HIT-RB della dimensione adatta
(spazzole ≥ foro ), introducendo ed estraendo la spazzola d‘acciaio fino al fondo del foro
con un movimento rotatorio. Quando la spazzola viene introdotta nel foro, si dovrebbe
avvertire una certa resistenza – se così non fosse, significa che la spazzola è troppo
piccola e dev‘essere sostituita con un‘altra dal diametro adatto.
• Soffiare nuovamente due volte all‘interno del foro con l‘aria compressa, finché l‘aria che
fuoriesce non risulti priva di polvere. Utilizzare, all‘occorrenza, le necessarie prolunghe
per l‘ugello dell‘aria e le spazzole, in modo da potere raggiungere il fondo del foro.
Manual Cleaning (pulizia manuale):
il metodo di pulizia manuale del foro è consentito unicamente fino ad un diametro di foratura max. di 18 mm ed una profondità di foratura fino a max. 10 x il diametro dell‘elemento
• Soffiare all‘interno del foro quattro volte con la pompa di soffiaggio Hilti. A tale scopo
inserire ed estrarre il tubo flessibile per l‘aria compressa fino al fondo del foro finché l‘aria
che fuoriesce non risulti priva di polvere.
• Spazzolare – quattro volte utilizzando spazzole d‘acciaio Hilti HIT-RB della dimensione
adatta (spazzole ≥ foro ), introducendo ed estraendo la spazzola rotonda d‘acciaio fino
al fondo del foro con un movimento rotatorio.
• Soffiare nuovamente all‘interno del foro quattro volte con la pompa di soffiaggio Hilti,
finché l‘aria che fuoriesce non risulti priva di polvere.
Metodo 2 – adatto in caso di acqua stagnante (ad es. acqua che scorre nel foro ripulito):
• Lavare due volte il foro con acqua, finché non ne fuoriesce acqua pulita – a tal scopo introdurre fino al fondo del foro il tubo flessibile dell‘acqua (pressione condutture idrauliche).
• Spazzolare due volte utilizzando spazzole d‘acciaio Hilti HIT-RB della dimensione adatta
(spazzola ≥ foro), introducendo ed estraendo la spazzola d‘acciaio tonda fino al fondo
del foro con un movimento rotatorio. Quando la spazzola viene introdotta nel foro, si
dovrebbe avvertire una certa resistenza – se così non fosse, significa che la spazzola è
troppo piccola e dev‘essere sostituita con un‘altra dal diametro adatto.
• Lavare nuovamente il foro per due volte, finché non ne fuoriesce acqua pulita. Importante!
Eliminare completamente eventuali residui d‘acqua presenti nel foro (ad es.: aspiratore
per acqua, aria compressa o altro procedimento). Per ottenere un foro asciutto, è raccomandato un ugello per l‘aria Hilti HIT-DL per fori con una profondità ≤ 250 mm; tale ugello
è, invece, necessario per fori con una profondità maggiore di 250 mm.
• Proseguire con la pulizia del foro come descritto nel Metodo 1.
5 Inserire la cartuccia nel portacartucce nero. Non utilizzare mai cartucce danneggiate e/o
caricatori danneggiati/sporchi. Prima di utilizzare una nuova cartuccia avvitare un nuovo
miscelatore (accertarsi che sia saldamente inserito).
6 Avvitare saldamente il miscelatore Hilti HIT-M 1 sulla cartuccia. Non modificare in alcun
caso il miscelatore. Accertarsi che l‘elemento di miscelazione sia presente all‘interno del
miscelatore. Utilizzare esclusivamente il tipo di miscelatore fornito con la resina.
7
Inserire il caricatore con la cartuccia nel dispenser HIT.
Premere il tasto di sblocco, tirare indietro la barra di avanzamento ed inserire il caricatore
nel dispenser Hilti adatto.
8 Scartare le prime pompate di resina. La cartuccia si apre automaticamente quando inizia la
pressione. Non aprire manualmente la cartuccia (ciò potrebbe causare un inceppamento
del sistema). La quantità iniziale di resina è subordinata alla dimensione della cartuccia;
numero delle corse: vedere figura 8. Smaltire le prime pompate di resina utilizzando l‘imballo vuoto. Anche nel caso in cui venisse avvitato un nuovo miscelatore su di una cartuccia
già aperta, le prime pompate – come precedentemente descritto – devono essere scartate.
Per ogni nuova cartuccia utilizzare un nuovo miscelatore.
9 - 11 Riempire il foro con la resina evitando di lasciare bolle d‘aria:
• Riempimento del foro in presenza di profondità ≤ 250 mm:
Inserire il miscelatore fino al fondo del foro (per i fori profondi utilizzare una prolunga)
ed estrarre lentamente il miscelatore dopo ogni pompata. Riempire il foro fino a ca. 2/3
oppure quanto necessario al fine di garantire che la fenditura anulare tra il tassello/il ferro
di armatura ed il calcestruzzo sia completamento piena di resina dopo l‘assestamento.
Una volta riempito il foro, azionare il tasto di sblocco sul dispenser, in modo da evitare
una tardiva fuoriuscita della resina.
Printed: 07.07.2013 | Doc-Nr: PUB / 5145634 / 000 / 00
Hilti HIT-HY 150-FR
• Riempimento del foro con tappi di ritenuta: Raccomandato per profondità di foratura >
250 mm e per applicazioni sopra-testa. Assemblare il miscelatore HIT-M1, la(le) prolunga(prolunghe) ed i tappi di ritenuta HIT-SZ adeguati. Inserire il tappo di ritenuta HIT-SZ
fino al fondo del foro ed iniettare la resina come descritto in precedenza. Durante il riempimento, il tappo di ritenuta viene automaticamente spinto verso l‘esterno dalla pressione
della resina iniettata nel foro.
12 Inserimento del tassello/ferro d‘armatura nel foro. Contrassegnare la profondità di
ancoraggio „h ef“ sul tassello/ferro d‘armatura e introdurre l‘elemento fino a tale contrassegno esercitando una leggera rotazione. Verificare inizialmente che il tassello/ ferro
d‘armatura sia asciutto e privo da olio o altre impurità. Utilizzare solamente elementi di
fissaggio Hilti o prodotti equivalenti. Dopo aver introdotto il tassello/ferro d‘armatura, lo
spazio anulare risultante dev‘essere completamente riempito di resina.
13 Rispettare il tempo di lavorazione „t gel“ in funzione della temperatura della superficie di
fondo. Durante il tempo di lavorazione „t gel“ è possibile effettuare un leggero allineamento
del tassello/ferro d‘armatura. vedere tabella 12. Una volta trascorso il tempo di lavorazione
„t gel“ e fino al termine del tempo di indurimento „t cure“ non è consentito manipolare/
sollecitare l‘elemento di fissaggio.
14 Solamente quando è trascorso il tempo di indurimento „t cure“ sarà possibile applicare sul
tassello/ferro d‘armatura il carico o il momento torcente previsti. Vedere tabella 13.
Le cartucce parzialmente utilizzate devono essere riutilizzate entro quattro settimane. Lasciare
avvitato il miscelatore ed immagazzinare la cartuccia secondo le prescrizioni. In caso di
riutilizzo, avvitare un nuovo miscelatore e scartare la prima resina pompata, come descritto al
punto 8.
La Hilti non assume nessuna responsabilità per danni causati da:
- condizioni di magazzinaggio e trasporto scostantisi da quelle delle specifiche.
- non osservanza delle istruzioni per l‘uso.
- l‘uso di ancoraggi non adeguatamente dimensionati.
- inadeguata capacità di carico del materiale di base.
- applicazione non corretta.
- come risultato di effetti non noti o non accettabili per il fabbricante, per esempio uso di
prodotti di altri fabbricanti.
Istruzioni di sicurezza:
O Comburente
Xi Irritante
contiene: dibenzoilperossido, idrossipropile metacrilato
R 36 Irritante per gli occhi.
R 43 Posibilidad de sensibilización en contacto con la piel.
R 7 Può provocare un incendio.
S3
S 24/25
S 26
S 28
S 36/37/39
Conservare in luogo fresco.
Evitare il contatto con gli occhi e la pelle.
In caso di contatto con gli occhi, lavare immediatamente e abbondantemente con
acqua e consultare un medico.
In caso di contatto con la pelle lavarsi immediatamente ed abbondantemente con
acqua e sapone.
Usare indumenti protettivi e guanti adatti e proteggersi gli occhi e il viso.
Istruzioni per lo smaltimento:
– Confezioni vuote: Sistemi di raccolta nazionali
o codice rifiuto EAK: 150106 imballi misti
– Le cartucce piene/parzialmente vuote devono essere smaltite, in conformità alle normative ufficiali,
come rifiuto speciale.
Codice rifiuto EAK: 200127* vernici, inchiostri da stampa, colle e resine sintetiche che contengono
materiali perico losi. Oppure codice EAK 080409* rifiuti di colle o di mastice che contengono solventi
organici o altre sostanze pericolose.
Contenuto: 330 ml / 500 ml Printed: 07.07.2013 | Doc-Nr: PUB / 5145634 / 000 / 00
Peso: 550 g / 830 g
Hilti HIT-HY 150-FR
Adhesive anchoring system for fastenings in concrete
Prior to use of product, follow instructions for use and recommended safety precautions.
Check expiration date: See expiration date imprint on foilpack manifold. (Month/Year). Do not use an
expired product.
Foil pack temperature: Must be between 5 °C - 40 °C when in use.
Base material temperature at time of installation: Must be between -5 °C - 40 °C.
Instructions for transport and storage: Keep in a cool, dry and dark place between 5 °C - 25 °C.
Material Safety Data Sheet: Review the MSDS before use.
Installation instructions: Follow the illustrations on page 1 for the sequence of operations and refer to
tables on page 2-3 for setting details. For any application not covered by this document, contact Hilti.
1
D rill hole with a hammer-drill set in rotation hammer mode using an appropriately sized
carbide drill bit. For holes drilled with other drill types contact a Hilti representative.
2 - 4 Clean hole: Cleaning method has to be decided based on borehole condition.
Just before setting an anchor/rebar, the borehole must be free of dust and debris by one of
the following methods:
Method 1 - for dry or water saturated concrete (refer to pictograms):
Compressed air cleaning is permissible for all diameters and embedment depths.
• Blow from the back of the borehole with oil-free compressed air (min. 6 bar at 6 m3/h) fully
retracting the air extension 2 times until return air stream is free of noticeable dust.
• Brush 2 times with the specified brush size (brush ≥ bore hole ) by inserting the round
steel brush to the back of the borehole in a twisting motion and removing it. The brush
should resist insertion into the borehole - if not, the brush is too small and must be
replaced with a brush of appropriate brush diameter.
• Blow again with compressed air 2 times until return air stream is free of noticeable dust.
If required use extensions for air nozzle and brushes to reach back of deep hole.
Manual cleaning method is limited to max. 18mm borehole diameter and a max. borehole
depth of 10 x element diameter.
• Blow - 4 strokes with Hilti blow-out pump with the nozzle extended to the back of the hole
until return air stream is free of noticeable dust.
• Brush - 4 times with the specified brush size (brush ≥ borehole ) by inserting the round
steel brush to the back of the hole with a twisting motion.
• Blow - 4 strokes with Hilti blow-out pump with the nozzle extended to the back of the hole
until return air stream is free of noticeable dust.
Method 2 - for standing water (e.g. water flows into cleaned borehole):
• Flush hole 2 times by inserting a water hose (water-line pressure) to the back of the
borehole until water runs clear.
• Brush 2 times with the specified brush size (brush ≥ borehole ) by inserting the round
steel brush to the back of the borehole with a twisting motion and removing it. The brush
should resist insertion into the borehole - if not, the brush is too small and must be
replaced with a brush of appropriate brush diameter.
• Flush again 2 times until water runs clear. Remove all standing water completely (i.e.
vacuum, compressed air or other appropriate procedure). To attain a dried borehole, a
Hilti HIT-DL air nozzle attachment is recommended for borehole depth ≤ 250 mm and
required for borehole depth > 250 mm.
• Continue with borehole cleaning as described in Method 1.
5
Insert foil pack in black foil pack holder. Never use damaged foil packs and/or damaged or
unclean foil pack holders. Attach new mixer prior to dispensing a new foil pack (snug fit).
6 Tightly attach Hilti HIT-M1 mixer to foil pack manifold. Do not modify the mixer in any way.
Make sure the mixing element is in the mixer. Use only the type of mixer supplied with the
anchor adhesive.
7 Insert foil pack holder with foil pack into HIT-dispenser. Push release trigger, retract plunger
and insert foil pack holder into the appropriate Hilti dispenser.
8 Discard initial anchor adhesive. The foil pack opens automatically as dispensing is initiated.
Do not pierce the foilpack manually (can cause system failure). Depending on the size of
the foil pack an initial amount of anchor adhesive has to be discarded. See pictogram 8 for
discard quantities. Dispose discarded anchor adhesive into the empty outer packaging. If
a new mixer is installed onto a previously-opened foil pack, the first trigger pulls must also
be discarded as described above. For each new foil pack a new mixer must be used.
9 - 11 Inject anchor adhesive from the back of the borehole without forming air voids:
• Injection method – for borehole with depth ≤ 250 mm:
Inject the anchor adhesive starting at the back of the hole (use the extension for deep
holes), slowly withdraw the mixer with each trigger pull. Fill holes approximately 2/3 full,
or as required to ensure that the annular gap between the anchor/rebar and the concrete
is completely filled with anchor adhesive along the embedment length. After injection is
completed, depressurize the dispenser by pressing the release trigger. This will prevent
further anchor adhesive discharge from the mixer.
• Piston plug injection is recommended for overhead applications and borehole depth > 250
mm. Assemble HIT-M1 mixer, extension(s) and appropriately sized piston plug. Insert
piston plug HIT-SZ to back of the hole, and inject anchor adhesive as described in the
injection method above. During injection the piston plug will be naturally extruded out of
the bore hole by the anchor adhesive pressure.
12 Insert anchor/rebar into bore hole. Mark and set anchor/rebar to the required embedment
depth. Before use, verify that the anchor/rebar is dry and free of oil and other contaminants.
To ease installation, anchor/rebar may be slowly twisted as they are inserted. Use only
Hilti anchor rods or equivalent. After installing an anchor/ rebar, the annular gap must be
completely filled with anchor adhesive.
13 Observe the gel time “t gel”, which varies according to temperature of base material. Minor
adjustments to the anchor/rebar position may be performed during the gel time. See table
12. Once the gel time has elapsed, do not disturb the anchor/rebar until the curing time “t
cure” has elapsed.
14 Apply designed load/torque after ”t cure” has passed, and the fixture to be attached has
been positioned. See table 13.
Printed: 07.07.2013 | Doc-Nr: PUB / 5145634 / 000 / 00
Hilti HIT-HY 150-FR
Partly used foil packs must be used up within four weeks. Leave the mixer attached on the foil pack
manifold and store under the recommended storage conditions. If reused, attach a new mixer and
discard the initial quantity of anchor adhesive as described by point 8.
Hilti accepts no liability for damage or failure caused by:
- Storage and transport not in accordance with the specified conditions.
- Failure to observe the instructions for use and setting data.
- Inadequate design of the anchor points (number of anchors, loadbearing capacity /
dimesions).
- Inadequate loadbearing capacity of the base material.
- Incorrect use.
- Other influences of which Hilti is not aware or on which Hilti has no influence, e.g. use with
products from a third party.
Safety instructions:
O Oxidizing
Xi Irritant
Contains: Hydroxypropyl methacrylate, dibenzoyle peroxide
R 36 Irritating to eyes.
R 43 May cause sensitization by skin contact.
R 7 May cause fire.
S3
S 24/25
S 26
S 28
S 36/37/39
Keep in a cool place.
Avoid contact with skin and eyes.
In case of contact with the eyes, rinse immediately with plenty of water and seek
medical advice.
After contact with the skin, wash immediately with plenty of water and soap.
Wear suitable protective clothing, gloves and eye/face protection.
Disposal instructions:
– Empty packs: May be disposed via the local Green Dot collecting system
or EAK waste material code 150106 (mixed packaging materials)
– Full or only partially emptied packs must be disposed of as special waste in accordance with official
regulations.
EAK waste material code: 200127* paint, inks, adhesives and resins containing dangerous
substances. Or EAK 080409* waste adhesives and sealants containing organic solvents or other
dangerous substances.
Net content: 330 ml / 500 ml Printed: 07.07.2013 | Doc-Nr: PUB / 5145634 / 000 / 00
Net weight: 550 g / 830 g
Hilti HIT-HY 150-FR
Verbundmörtelsystem für Befestigungen in Beton
Vor Anwendung des Produktes diese Gebrauchsanleitung und die Sicherheitsvorschriften lesen.
Haltbarkeitsdatum prüfen: siehe Aufdruck auf dem Foliengebinde (Monat/Jahr). Produkt darf nach
Ablauf des Haltbarkeitsdatums nicht mehr verwendet werden.
Gebindetemperatur: muss bei der Anwendung zwischen +5°C und 40°C betragen.
Untergrundtemperatur: muss bei der Anwendung zwischen -5°C und 40°C betragen.
Transport und Lagerung: kühl, trocken und dunkel, zwischen 5°C und 25°C.
Sicherheitsdatenblatt: Informationen aus dem Sicherheitsdatenblatt vor der Anwendung beachten!
Montageanweisung: Darstellung der Arbeitsschritte: siehe Piktogramme auf Seite 1; Setzdaten: siehe
Tabellen auf Seite 2–3. Bei Anwendungen, die nicht in vorliegender Gebrauchsanleitung beschrieben
werden, wenden Sie sich bitte an Hilti.
1
B ohrloch mit Bohrhammer und passendem Hartmetallbohrer drehschlagend erstellen. Bei
Erstellung des Bohrlochs mit anderen Bohrern, z.B. Diamantbohrgerät, wenden Sie sich
bitte an Hilti.
2 - 4 Bohrlochreinigung: Unmittelbar vor dem Setzen des Betoneisens/Dübels ist das Bohrloch
von Staub, Wasser, Bohrklein und anderen Verunreinigungen zu reinigen.
Die Reinigungsmethode hängt von der Bohrlochbeschaffenheit ab:
Methode 1 – geeignet für trockenen oder wassergesättigten Beton (siehe Piktogramme):
Compressed Air Cleaning:
Die Bohrlochreinigung mit Druckluft ist zulässig für alle Bohrlochdurchmesser und -tiefen.
• Bohrloch zweimal mit ölfreier Druckluft ausblasen (6 bar bei 6 m3/h). Dabei die Druckluftdüse bis zum Bohrlochgrund einführen und zurückziehen bis rückströmende Luft staubfrei ist.
• Zweimal ausbürsten mit Stahlbürste Hilti HIT-RB in passender Größe (Bürsten ≥ Bohrloch ), wobei die Stahlbürste mit einer Drehbewegung in das Bohrloch bis zum Bohrlochgrund eingeführt und wieder herausgezogen wird. Beim Einführen der Bürste in das
Bohrloch sollte ein Widerstand zu spüren sein – falls nicht, ist die Bürste zu klein und
muss durch eine Bürste mit geeignetem Durchmesser ersetzt werden.
• Bohrloch erneut zweimal mit Druckluft ausblasen, bis rückströmende Luft staubfrei ist.
Verwenden Sie erforderlichenfalls Verlängerungen für Luftdüse und Bürsten, um den Bohrlochgrund erreichen zu können.
Manual Cleaning:
Die manuelle Reinigungsmethode ist nur zulässig bis zum max. Bohrlochdurchmesser 18
mm und Bohrlochtiefe bis max. 10 x Elementdurchmesser
• Bohrloch viermal ausblasen mit der Hilti-Ausblaspumpe. Dabei den Luftschlauch bis zum
Bohrlochgrund einführen und zurückziehen bis rückströmende Luft staubfrei ist.
• Ausbürsten – viermal mit Stahlbürste Hilti HIT-RB in passender Größe (Bürste ≥ Bohrloch ), wobei die runde Stahlbürste mit einer Drehbewegung bis zum Bohrlochgrund in
das Bohrloch eingeführt und wieder herausgezogen wird.
• Bohrloch erneut viermal ausblasen mit der Hilti-Ausblaspumpe, bis rückströmende Luft
staubfrei ist.
Methode 2 – geeignet bei stehendem Wasser (z.B. Wasser fließt in gereinigtes Bohrloch):
• Bohrloch zweimal mit Wasser spülen, bis klares Wasser ausfließt – hierzu Wasserschlauch bis zum Bohrlochgrund einführen (Wasserleitungsdruck).
• Zweimal ausbürsten mit Stahlbürste Hilti HIT-RB in passender Größe (Bürste ≥ Bohrloch
), wobei die runde Stahlbürste mit einer Drehbewegung in das Bohrloch bis zum Bohrlochgrund eingeführt und wieder herausgezogen wird. Beim Einführen der Bürste in das
Bohrloch sollte ein Widerstand zu spüren sein – falls nicht, ist die Bürste zu klein und
muss durch eine Bürste mit geeignetem Durchmesser ersetzt werden.
• Bohrloch erneut zweimal spülen, bis klares Wasser abläuft. Wichtig! Vorhandenes
Wasser vollständig aus dem Bohrloch entfernen (Bsp.: Wassersauger, Druckluft oder
anderes geeignetes Verfahren). Um ein trockenes Bohrloch zu erhalten, ist eine Hilti
HIT-DL-Luftdüse für Bohrlöcher mit einer Tiefe ≤ 250 mm empfohlen und für Bohrlöcher
einer Tiefe größer als 250 mm erforderlich.
• Bohrlochreinigung wie in Methode 1 beschrieben fortsetzen.
5
Foliengebinde in die schwarze Kassette einschieben. Niemals beschädigte Foliengebinde
und/oder beschädigte oder verschmutzte Kassetten verwenden. Vor Auspressen eines
neuen Foliengebindes neuen Mischer aufschrauben (auf festen Sitz achten).
6 Hilti HIT-M 1 Mischer fest auf Foliengebinde aufschrauben. Den Mischer unter keinen
Umständen verändern. Sicher stellen, dass sich das Mischelement im Mischer befindet.
Ausschließlich den mit dem Mörtel gelieferten Mischertyp verwenden.
7
Kassette mit dem Foliengebinde in das HIT-Auspressgerät einlegen. Entriegelungstaste
drücken, Vorschubstangen zurückziehen und Kassette in das passende Hilti Auspressgerät einlegen.
8 Mörtelvorlauf verwerfen. Das Öffnen des Foliengebindes erfolgt automatisch bei
Auspressbeginn. Foliengebinde nicht manuell öffnen (kann zu Systemversagen führen).
Die Mörtel-Vorlaufmenge ist abhängig von der Gebindegröße; Anzahl der Hübe: siehe
Piktogramm 8. Den Mörtelvorlauf in die leere Umverpackung entsorgen. Wird ein neuer
Mischer auf ein bereits geöffnetes Foliengebinde aufgeschraubt, müssen die ersten Hübe
ebenfalls – wie oben beschrieben – verworfen werden. Für jedes neue Foliengebinde
einen neuern Mischer verwenden.
9 - 11 Das Bohrloch luftblasenfrei mit Mörtel verfüllen:
• Bohrlochverfüllung bei Bohrlochtiefen ≤ 250 mm:
Mischer bis zum Bohrlochgrund in das Bohrloch stecken (bei tiefen Bohrlöchern die
Verlängerung verwenden) und nach jedem Hub den Mischer langsam zurückziehen.
Das Bohrloch zu ca. 2/3 verfüllen bzw. so viel wie benötigt wird, um sicher zu stellen,
dass der Ringspalt zwischen Dübel/Bewehrungsstab und Beton nach dem Setzen vollständig mit Mörtel ausgefüllt ist. Nach der Bohrlochverfüllung die Entriegelungstaste am
Auspressgerät betätigen, um Mörtelnachlauf zu vermeiden.
• Bohrlochverfüllung mit Stauzapfen: Empfohlen für Bohrlochtiefen > 250 mm und Überkopfanwendungen. HIT-M1 Mischer, Verlängerung(en) und passenden HIT-SZ Stauzapfen zusammenstecken. Stauzapfen HIT-SZ bis zum Bohrlochgrund in das Bohrloch
stecken und Mörtel, wie oben beschrieben injizieren. Während des Verfüllens wird der
Stauzapfen durch den Druck des eingespritzten Mörtels automatisch aus dem Bohrloch
herausgedrückt.
Printed: 07.07.2013 | Doc-Nr: PUB / 5145634 / 000 / 00
Hilti HIT-HY 150-FR
12 Dübel/Bewehrungsstab in das Bohrloch einführen. Verankerungstiefe „h ef“ am Dübel/
Bewehrungsstab markieren und leicht drehend bis zur Markierung einführen. Zuvor prüfen,
ob der Dübel/Bewehrungsstab trocken und frei von Öl oder anderen Verunreinigungen ist.
Nur Hilti-Befestigungselemente oder gleichwertige Produkte verwenden. Nach Einführen
des Dübels/Bewehrungsstabes muss der Ringspalt vollständig mit Mörtel ausgefüllt sein.
13 Je nach Untergrundtemperatur die Verarbeitungszeit „t gel“ beachten. Während der Verarbeitungszeit „t gel“ ist ein leichtes Ausrichten des Dübels/des Bewehrungsstabes möglich.
Siehe Tabelle 12. Nach Ablauf der Verarbeitungszeit „t gel“ und bis zum Ablauf der
Aushärtezeit „t cure“ jede Manipulation/Belastung am Befestigungselement unterlassen.
14 Erst nach Ablauf der Aushärtezeit „t cure“ die Dübel/Bewehrungsstäbe mit der vorgesehenen Last beaufschlagen oder Drehmoment aufbringen. Siehe Tabelle 13.
Nicht vollständig aufgebrauchte Foliengebinde müssen innerhalb von vier Wochen weiterverwendet
werden. Den Mischer aufgeschraubt lassen und das Gebinde vorschriftsmäßig lagern. Bei Weiterverwendung einen neuen Mischer aufschrauben und den Mörtelvorlauf, wie unter Punkt 8 beschrieben,
verwerfen.
Hilti übernimmt keine Haftung für Schäden verursacht durch:
- von den Vorschriften abweichende Lagerungs- und Transportbedingungen
- Missachtung der Gebrauchsanweisung und der Setzdaten
- nicht ausreichende Bemessung der Verankerung
- ungenügende Tragfähigkeit des Untergrundes
- fehlerhafte Anwendung
- andere Einflüsse, die Hilti nicht bekannt oder von Hilti nicht zu vertreten sind, wie z.B. die
Verwendung von Drittprodukten
Sicherheitsvorschriften
O randfördernd
Xi reizend
enthält: Hydroxypropylmethacrylat, Dibenzoylperoxid
R 36 Reizt die Augen.
R 43 Sensibilisierung durch Hautkontakt möglich.
R 7 Kann Brand verursachen.
S3
S 24/25
S 26
S 28
S 36/37/39
Kühl aufbewahren.
Berührung mit den Augen und der Haut vermeiden.
Bei Berührung mit den Augen sofort gründlich mit Wasser abspülen und Arzt
konsultieren.
Bei Berührung mit der Haut sofort mit viel Wasser und Seife abwaschen.
Bei der Arbeit geeignete Schutzkleidung, Schutzhandschuhe und Schutzbrille/
Gesichtsschutz tragen.
Hinweis zur Entsorgung::
– Entleerte Gebinde: Nationale Sammelsysteme
oder EAK-Abfallcode: 150106 gemischte
Verpackungen
– Volle/teilentleerte Gebinde sind unter Beachtung der behördlichen Vorschriften als Sonderabfall
zu entsorgen.
EAK-Abfallcode: 200127* Farben, Druckfarben, Klebstoffe und Kunstharze, die gefährliche Stoffe
enthalten. oder EAK- 080409* Klebstoff- und Dichtmassenabfälle, die organische Lösemittel
oder andere gefährliche Stoffe enthalten.
Inhalt: 330 ml / 500 ml Printed: 07.07.2013 | Doc-Nr: PUB / 5145634 / 000 / 00
Gewicht: 550 g / 830 g