1
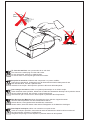
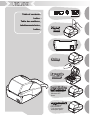
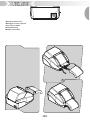
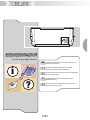
ww w
.custom
.biz
USER'S GUIDE
GUIDA OPERATIVA
GUIDE D'UTILISATION
BEDIENUNGSANLEITUNG
GUIA OPERATIVA
Blank Page
alcohol, solvent
GB
I
F
D
E
To clean the machine, use a pneumatics air or soft cloth.
First remove the mains plug from the wall socket.
Do not use alcohol, solvents, or hard brushes.
Do not let water or other liquids get inside the machine.
Per pulire la macchina, utilizzare aria compressa o un panno morbido..
Prima di ogni operazione, scollegare il cavo di alimentazione elettrica dalla presa di rete.
Non utilizzare alcol, solventi o spazzole dure.
Assicurarsi che acqua o altri liquidi non penetrino all'interno della stampante..
Pour nettoyer la machine, utiliser un système pneumatique ou un chiffon souple.
Avant d'effectuer toute opération, débrancher la câble de l'alimentation électrique de la prise de réseau.
Ne pas utiliser de l'alcool, des solvants, ni des brosses dures.
Vous assurer que ni l'eau ni aucun autre liquide ne pénètrent dans l'imprimante.
Zum Reinigen der Maschine einen Pressluft oder einen weichen Lappen benutzen.
Zuersten den Hauptstecker aus der Netzsteckdose ziehen.
Keinen Alkohol, Lösungsmittel oder harte Bürsten verwenden.
Darauf achten, dass kein Wasser oder andere Flüssigkeiten in die Maschine eindringen.
Para limpiar la máquina, utilíce una neumatica o un paño suave.
Antes de cualquier operación, desconécta el cable de alimentación eléctrica de la toma de red.
No utilíce alcohol, solventes o cepillos duros.
Asegúrese de que agua u otros líquidos no penetren dentro de la impresora.
GB
I
The
mark affixed to the product certify that the product satisfies the basic safety requirements.
Il marchio
sicurezza.
applicato al prodotto certifica che il prodotto stesso soddisfa i requisiti base di
F
Le label
securité
appliqué sur le produit certifie que le produit même satisfait les qualités requises de
D
Die sicherheit dieses Produkts werden durch die
angebracht ist.
E
La marca
-Kennzeichnung bescheinigt,die am Produkt
applicada al producto certifica que el mismo producto tiene los requisitos de seguridad.
GB
Your attention is drawn to the following actions that could compromise the characteristics of the product:
! Read and retain the instructions which follow;
! Follow all indications and instructions given on the printer;
! Make sure that the surface on which the printer rests is stable. If it is not, the printer could fall, seriously damaging it;
! Make sure that the printer rests on a hard (non-padded) surface and that there is sufficient ventilation;
! When positioning the printer, make sure its cables will not be damaged;
! Use the type of electrical power supply indicated on the printer label. If uncertain, contact your dealer;
! Make sure the electrical system that supplies power to the printer is equipped with a ground wire and is protected by a differential switch;
! If power is supplied to the printer using an extension cord, make sure that the total electrical input of the connected devices does not exceed the maximum current permitted by the
type of extension in use;
! Do not block the ventilation openings;
! Do not insert objects inside the printer as this could cause short-circuiting or damage components that could jeopardize printer functioning;
! Do not carry out repairs on the machine yourself, except for the normal maintenance operations given in the user manual;
! Make sure that there is an easily-accessible outlet with a capacity of no less than 15A in the vicinity of where the printer is to be installed;
! Periodically perform scheduled maintenance on the printer to avoid dirt build-up that could compromise the correct, safe operation of the unit.
! Using a serial cable it’s better to install a ferrite at the end of the same cable.
I
Si richiama l'attenzione sulle seguenti azioni che possono compromettere la conformità sopra attestata, oltre, naturalmente, le caratteristiche del prodotto:
! Leggete e conservate le istruzioni seguenti;
! Seguite tutti gli avvisi e le istruzioni indicate sulla stampante;
! Non collocate la stampante su una superficie instabile. Essa potrebbe cadere e danneggiarsi seriamente;
! Non collocate la stampante su superfici morbide o in ambienti che non garantiscono la necessaria ventilazione;
! Collocate la stampante in modo da evitare che i cavi ad essa collegati possano essere danneggiati;
! Utilizzate il tipo di alimentazione elettrica indicato sull'etichetta della stampante;
! Assicuratevi che l'impianto elettrico che alimenta la stampante sia provvisto del conduttore di terra e che sia protetto da interruttore differenziale;
! Se la stampante è alimentata tramite una prolunga, assicuratevi che l'assorbimento totale degli apparecchi collegati non superi la corrente massima ammessa dal tipo di prolunga;
! Non ostruite le aperture per la ventilazione;
! Non introducete oggetti all'interno della stampante in quanto essi possono cortocircuitare o danneggiare parti che potrebbero compromettere il funzionamento della stampante;
! Non intervenite personalmente sulla stampante, eccetto che per le operazioni di ordinaria manutenzione, espressamente riportate nel manuale utente;
! Assicurarsi che nel luogo in cui si vuole installare la stampante, vi sia una presa di corrente facilmente accessibile e di capacità non inferiore ai 15A;
! Eseguire periodicamente la manutenzione ordinaria della stampante al fine di evitare che accumuli di sporcizia possano compromettere il corretto e sicuro funzionamento
dell'unità.
! Nel caso di utilizzo di cavo seriale, si consiglia il montaggio di una ferrite sulla parte terminale dello stesso cavo.
F
Nous attirons l'attention sur certaines opérations qui pourraient compromettre la conformité attestée ci-dessus et le caractéristiques du produit même:
! Lire et conserver les instructions suivantes;
! Suivre tous les avertissements et les instructions indiqués sur l'imprimante;
! Ne pas positionner l'imprimante sur une surface instable. Elle pourrait tomber et s'endommager sérieusement;
! Ne pas positionner l'imprimante sur des surfaces molles ou dans des atmosphères où la ventilation nécessaire n'est pas assurée;
! Mettre en place l'imprimante de manière à éviter que les câbles qui y sont raccordés puissent être endommagés;
! Utiliser le type d'alimentation électrique indiqué sur l'étiquette de l'imprimante;
! vérifier que le circuit électrique qui alimente l'imprimante est muni d'un câble de terre et qu'il est protégé par un interrupteur différentiel;
! Si l'imprimante est alimentée par une rallonge, vérifier que l'absorption totale des appareils raccordés ne dépasse pas le courant maximal admis pour ce type de rallonge;
! Ne pas obstruer les ouvertures servant à la ventilation;
! Ne pas introduire d'objets à l'intérieur de l'imprimante car ils peuvent court-circuiter ou endommager des pièces qui pourraient compromettre le fonctionnement de l'imprimante;
! Ne pas intervenir personnellement sur l'imprimante, excepté pour les opérations d'entretien ordinaire expressément indiquées dans le manuel utilisateur;
! vérifier que le lieu d'installation de l'imprimante est équipé d'une prise de courant facilement accessible et d'une capacité non inférieure à 15A;
! procéder régulièrement à l'entretien ordinaire de l'imprimante afin d'éviter qu'un excès de saleté ne compromette le bon fonctionnement et la sécurité de l'appareil.
! On utilisé un câble sériel il vaut mieux monter une ferrite sur le côte terminal du même cable
D
Wir möchten Sie darauf hinweisen, daß folgende Aktionen die oben bescheinigte Konformität und die Eigenschaften des Produkts beeinträchtigen können:
! Lesen Sie die nachstehenden Anleitungen und bewahren Sie diese gut auf;
! Beachten Sie alle am Drucker angebrachten Hinweise und Anleitungen;
! Den Drucker nicht auf eine wenig stabile Unterlage stellen, denn er könnte herunterfallen und stark beschädigt werden;
! Den Drucker nicht auf weiche Unterlagen stellen und nicht in Räumen aufstellen, in denen die erforderliche Belüftung nicht gewährleistet ist;
! Den Drucker derart aufstellen, dass die verschiedenen Kabel desselben nicht beschädigt werden;
! Den Drucker an eine Stromleitung mit den auf dem Druckeretikette angegebenen Eigenschaften anschließen;
! Es ist sicherzustellen, dass die den Drucker speisende Stromleitung über einen Erdleiter verfügt und durch einen Differenzialschalter abgesichert ist;
! Wenn ein Verlängerungskabel verwendet wird ist sicherzustellen, dass die Gesamtaufnahme der angeschlossenen Geräte nicht den zulässigen Höchststrom der Verlängerung;
! Die Belüftungsschlitze nicht abdecken;
! Keine Gegenstände in den Drucker einführen, da diese einen Kurzschluss auslösen oder zu Beschädigungen führen können, die den einwandfreien Druckerbetrieb
beeinträchtigen;
! Keine eigenmächtigen Eingriffe am Drucker vornehmen, ausgenommen die ausdrücklich im Anwenderhandbuch aufgeführten Wartungseingriffe;
! Sicherstellen, dass am Aufstellort des Druckers eine leicht zugängliche Steckdose vorhanden ist, deren Leistung nicht unter 15 Ampere liegen darf;
! Den Drucker regelmäßig warten und reinigen, damit keine Schmutzablagerungen den einwandfreien und sicheren Betrieb der Einheit beeinträchtigen.
! Im falle daß jebrauch von seriel kable, zusammenbau wird empfhlen von das ferrite über die endesite der dasselbe kable.
E
Le rogamos que preste mucha atención a las siguientes acciones que pueden comprometer la conformidad arriba certificada, y obviamente las caraterísticas del producto:
! Lea y conserve las siguientes instrucciones;
! Respete los avisos e instrucciones indicadas en la impresora;
! No coloque la impresora sobre una superficie inestable; podría caerse o averiarse seriamente;
! No coloque la impresora sobre superficies blandas o ambientes que no garanticen la ventilación necesaria;
! Coloque la impresora de manera tal que los cables a ella conectados no se averíen;
! Utilice el tipo de alimentación eléctrica indicada en la etiqueta de la impresora;
! Asegurarse que la instalación eléctrica que alimenta la impresora posea un conductor de tierra y que esté protegida por un interruptor diferencial;
! Si para la alimentación de la impresora se utiliza una extensión, asegurarse que la absorción total de los aparatos conectados no sea mayor a la corriente máxima admitida por el
tipo de extensión y que;
! No obstruya las aberturas de ventilación;
! No introduzca objetos dentro de la impresora, pueden causar cortocircuitos o dañar partes que podrían comprometer el buen funcionamiento de la impresora;
! No efectúe personalmente operaciones de reparación a la impresora, excepto aquellas de mantenimiento ordinario indicadas expresamente en el manual del usuario;
! Asegurarse que en el sitio de trabajo en el cual se quiere instalar la impresora exista una toma de corriente de fácil acceso y de capacidad no inferior a los 15A;
! Efectuar periódicamente el mantenimiento ordinario de la impresora con el propósito de evitar acumulaciones de suciedad que puedan comprometer el correcto y seguro
funcionamiento.
! Si se utiliza lo serial cable, se necessita el montaje de una ferrite sobre la parte terminal del mismo cable.
TK100
Table of contents
Indice
Table des matières
Inhaltsverzeichnics
Indice
Paper
load
Setup
Bar code
reader
Installation
for drivers
Windows NT4/2K
Windows XP
Linux
Appendix :
- A.1 Technical
specifications
- A.2 Accessories
and spare parts
TK100
Blank Page
TK100
GB
UNPACKING THE PRINTER
1. Carton
2. Lower foam packing shell
3. Printer
4. Cables cover
5. Upper foam packing shell
6. Manual
7. Guarantee sheet
8. Power supply
9. FanFold Paper module
10. Power supply cable
11. Serial data cable
7
6
11
10
I
DISIMBALLO DELLA STAMPANTE
1.
2.
3.
4.
5.
6.
7.
8.
9.
10.
11.
5
Scatola
Imballo sagomato di protezione inferiore
Stampante
Scivolo copricavi
Imballo sagomato di protezione superiore.
Manuale utente
Foglio garanzia
Alimentatore
Modulo carta FanFold
Cavo per alimentatore
Cavo dati seriale
4
9
3
8
2
1
<1>
TK100
Blank Page
<2>
TK100
STATUS LED
COLOR
DESCRIPTION
NONE
PRINTER OFF
GREEN
PRINTER ON : NO ERROR
COMMUNICATION STATUS
NR. FLASHING
DESCRIPTION
1
COVER OPENED
2
RECEPTION ERRORS (PARITY, FRAME
ERROR, OVERRUN ERROR)
3
MISINTERPRET COMMAND
RECOVERING ERROR
NR. FLASHING
DESCRIPTION
2
HEADING OVER TEMPERATURE
3
PAPER END
4
PAPER JAM
5
POWER SUPPLY VOLTAGE INCORRECT
6
HEAD UP
UNRECOVERING ERROR
NR. FLASHING
DESCRIPTION
3
RAM ERROR
4
EEPROM ERROR
GREEN
YELLOW
RED
Connection
·
If USB port is connected, the serial port hangs up.
GB
·
Se è connessa l’USB la seriale si disabilita.
I
·
Insert USB connector
·
Inserire il connettore USB
·
Introduire le connecteur USB
·
Das verbinder USB ensetzen
·
Introducir el conectador USB
·
Si la port USB est connecteè la port seriale se
F
deshabilite.
·
Wenn me fur USB verbinden, ist die seriellenfur
D
unbewohnt.
·
Si la puerta USB esta conectida la puera serial
E
se desabilita.
·
Insert serial interface connector
·
Inserire il connettore di interfaccia seriale
·
Introduire le connecteur d'interface en série
·
Den seriellen Schnittstellenverbinder einsetzen
·
Introducir el conector de interfaz serial
·
Insert the power supply cable
·
Inserire il cavo di alimentazione
·
Introduire le câble de l'alimentateur adéquat
·
Das Kabel in das spezielle Speisegerät stecken
·
Conectar el cable del alimentador
<3>
TK100
·
Connector.
·
Connettore.
·
Connecteur.
·
Schnittstellen.
·
Conectador.
- RS232 Serial Connector (RJ45)
PIN SIGNAL
N.C.
1
2
N.C.
3
DT
GND
4
TX
5
6
RX
7
RT
N.C.
8
DESCRIPTION
Not connected
Not connected
Ready
Ground signal
Data trasmission
Data reception
Busy
Not connected
Pin 1
Back View
- USB Connector (Receptacle series B)
PIN SIGNAL
VBUS
1
D2
D+
3
4
GND
Shell Shield
DESCRIPTION
N.C.
Data Data +
Segnale di massa
Schermatura cavo
Pin 1
Back View
<4>
TK100
GB
USB CONNECTION
I
WARNING : To prevent conflict when
you connect a Tk100 printer to the
PC through USB interface connect
one and only one Tk100 printer.
CONNESSIONE USB
AVVISO : Per evitare conflitti quando si
collega una stampante Tk100 al PC
utilizzando l’interfaccia USB, collegare
una ed una sola stampante Tk100.
USB
PC
USB
<5>
USB
TK100
Blank Page
<6>
TK100
·
Switch printer ON/OFF
·
Accendere/Spegnere la stampante
·
Brancher/Éteindre l'imprimante
·
Den Drucker einwieden/ausschlaten
·
Encender/Apagar la impresora
·
Switch printer On pressing key On/Off
·
Accendere la stampante premendo il tasto On/Off
·
Brancher l'imprimante en appuyant sur la touche On/Off
·
Schalten sie den Drucker ein drücken sie das taste On/Off
·
Conectar la impresora en apretando la tecla On/Off
·
Switch printer Off pressing key On/Off
·
Spegnere la stampante premendo il tasto On/Off
·
Eteindre l'imprimante en appuyant sur la touche On/Off
·
Schalten sie den Drucker aus drücken sie das taste On/Off
·
Apagar la impresora en apretando la tecla On/Off
<7>
TK100
Blank Page
<8>
TK100
·
Mounting cables cover
·
Montaggio scivolo copricavi
·
Fixer couvre câbles
·
Kabelabdeckung
·
Montaje cubrecable
<9>
TK100
Blank Page
<10>
TK100
·
Ticket insertion
·
Inserimento del ticket
·
Introduire le ticket
·
Einsetzen der ticket
·
Introducir el ticket
Ticket loading
<11>
TK100
·
Ticket Tear-Off
·
Strappo del biglietto
·
Découpe du ticket
·
Karte reißen ab
·
Extracción del ticket
GB
Note using fan-fold with non comply pre-splitting :
Before pulling out the ticket, help its collection holding up the ticket in.
·
I
Nota sull’uso di moduli fan-fold con fincatura non conforme :
·
Al prelevamento del ticket in uscita, prima di strappare il bilgietto, agevolare
l’operazione tenendo fermo con la mano anche il biglietto in ingresso.
Non thermal side (non printable side)
Lato non termico (lato non stampabile)
<12>
TK100
Customer Service Department:
Monday-Friday at 9-12 and 14-17
e-mail: [email protected]
GB
i
@
?
Contact Customer Service if the printer is not
functioning normally.
I
Chiamate l'Assistenza tecnica in caso di
malfunzionamento della stampante.
F
Contactez le Service après-vente si l’imprimante
ne marche pas bien.
D
Kontaktieren sie den Kundendienst, daß
Betriebsstörung
E
Llamar al Servicio de Asistencia Técnica si la
impresora funciona màl.
<13>
TK100
Blank Page
<14>
TK100
GB
I
1 Go into SETUP mode by starting to press the
LineFeed Key before switch on the printer and
wait 3 acustic signal before release the key
2 The printer should print all list of the parameters.
3 Follow the instructions printed on the paper for
the key functionality.
1 Entrare nel SETUP tenendo premuto il tasto
Feed
prima dell’accensione della
stampante ed attendere tre segnali acustici, dopo
di che rilasciarlo .
2 La stampante stamperà la lista di tutti i
parametri.
3 Seguire le indicazioni stampate direttamente
sulla carta per la funzionalità dei tasti.
Setup
GB
(1)
D
·
RS232 Baud Rate : 115200, 57600,38400, 19200 ,
9600, 4800, 2400, 1200.
·
RS232 Data length(1): 7, 8D bits/char.
·
RS232 Parity(1): NoneD, even or odd.
·
RS232 Handshaking(1): XON/XOFF or HardwareD.
·
Busy condition(1): OffLine/RxFull or RxFullD .
·
Autofeed: CR disabledD or CR enabled.
·
Print mode: NormalD or Reverse.
·
Chars/inch: A=11 B=15 cpi, A=15 B=20 cpiD.
·
Speed/Quality(2) : NormalD, High Quality or High
Speed.
·
Notch alignment: DisabledD, Enabled.
·
Notch Threshold(3): 2.0, 2.25, 2.5, 2.75, 3.0, 3.25,
3.5D, 3.75, 4.0.
·
Print Offset(4)[mm]: 11,0,
·
PaperEnd Buffer Clear: DisabledD, Enabled.
·
Print Density: -50%, -37%, -25%, -12%, 0D ,+12%,
+25%,+37%, +50%.
Notes: The parameters indicates with a D symbol are the
default values.
Note (1) : Parameter valid only on serial printer.
Note (2) : “Current consumption” parameter is not setted
by the user but it depends on the “Speed/Quality”
parameter in this way: choosing the normal or high
speed parameter, the current consumption will be setted
as high current; choosing the low speed parameter, the
current consumption will be setted in low current.
Note (3) : The parameter “Notch distance” is displayed
and enabled only in case that the notch alignment
parameter is enabled. The parameter “Notch distance” is
used to set the exact distance of the notch entering the
desired value in millimetre and in deci-millimetre.
Note (4) : The parameter “Print Offset” is the distance of
the notch from printing line, entering the desired value in
millimetre and in deci-millimetre.
<15>
TK100
I
Note generali: i parametri contrassegnati con il
simbolo D costituiscono i valori di default.
Nota (1): Questi parametri sono validi solo per la
versione con interfaccia seriale.
Nota (2) : Il parametro “Consumo Corrente” non è
configurabile dall’utente ma è legato al parametro
“Speed/Quality” in questo modo: scegliendo il
parametro Normal o High Speed si imposterà il
consumo di corrente come High current; scegliendo il
parametro Low Speed si imposterà il consumo di
corrente in Low Current.
Setup
Nota (3) : Il parametro “Distanza Notch” viene
visualizzato e abilitato solo nel caso in cui il parametro
di allineamento Notch è abilitato. Il parametro
“Distanza Notch” serve per settare la distanza esatta
del notch immettendo il valore desiderato in millimetri e
decimi di millimetri.
Nota (4) : Il parametro Print Offset” è la distanza esatta
della tacca (notch) dalla linea di stampa, immettendo il
valore desiderato in millimetri e decimi di millimetri.
<16>
TK100
LETTURA DEL BAR CODE
I
The printer is equipped with bar code reader.
To read the bar code it’s necessary that the
“notch alignment” parameter is enabled, that bar
code is located by the notch as indicated in the
figure, and the maximum dimensionsare the
same of those indicated.
To execute a scanning load the ticket, when this
is aligned, the printer emits an acoustic signal to
indicate that correct scanning has happened.
To set the barcode reader consult the printer
commands reference.
Ticket size / Formato Biglietto
mm. 65 x 155 mm.
65 (2.559")
31,5 (1.240")
42 (1.653")
10 (0.393")
155 (6.102") Dollar length / Lunghezza dollaro
A
B
C
15 (0.590")
Bar code
reader
La stampante è predisposta per la lettura dei bar
code.
Per leggere i bar code è necessario che il parametro
“Notch Alignment” sia abilitato, che il codice a barre
sia disposto come in figura rispetto al notch e che
abbia come dimensioni massime quellle riportate.
Per effettuare una lettura si carica un ticket, quando
questo è allineato, e se il lettore è pronto, la
stampante emette un segnale acustico per indicare
che è avvenuta una lettura corretta. Per settare il
lettore barcode consultare l’elenco comandi della
stampante.
5 (0.196")
BAR CODE READING
40 (1.574")
GB
7,5 (0.295")
50 (1.968")
7,5 (0.295")
NON THERMAL SIDE /
LATO NON TERMICO
Legend / Legenda :
A:
B:
C:
(1)
Black mark / Tacca Nera
Presplitting line / Linea di pretaglio (1)
Area where position the barcode /
Zona dove inserire il codice a barre
Note :Use fan-fold with good pre-splitting in order to detach the ticket easily.
(1)
Nota : Si consiglia una fincatura ben definita per agevolare il distacco del ticket.
<17>
TK100
Blank Page
<18>
TK100
GB
1 Download the SW from the
“www.custom.biz” web site.
2 Use the following procedure to install
the printer software:
a) WINDOWS 95/98/ME/NT/2000/XP
! From the START menu, press Enter
and key-in the path where the SW was
saved on your PC, then click OK.
! Follow the instructions that appear on
the screen to install the driver.
B) LINUX
! For the installation of the software
follows the instruction get back on the
README.TXT file you can find it in the
software package downloaded in
advance.
I
1 Prelevare il SW dal sito Internet “www.custom.biz”.
2 Installare il software della stampante come indicato
nella seguente procedura :
A) WINDOWS 95/98/ME/NT/2000/XP
! Nel menù Avvio selezionate Esegui e digitate il
percorso del SW, precedentemente salvato sul vostro
PC, fate click su OK.
! Lasciatevi poi guidare dalle istruzioni che compaiono
sullo schermo per installare il driver.
B) LINUX
! Per l’istallazione del software seguire le istruzioni
riportate nel file README.txt contenuto nel pacchetto
software scaricato precedentemente.
F
1 Télécharger le logiciel à partir du site Internet
“www.custom.biz”
2 Installer le logiciel de l'imprimante selon la
procédure suivante :
A) WINDOWS 95/98/ME/NT/2000/XP
! Dans le menu Démarrer, sélectionner Effectuer et
taper le parcours du logiciel, précédemment
sauvegardé sur votre PC, puis cliquer sur OK.
! Laissez-vous ensuite guider par les instructions qui
apparaissent sur l'écran afin d'installer le driver.
B) LINUX
! Pour l’installation du logiciel suivre les instructions
rapportés sur le file README.txt contenu dans le
paquet logiciel déchargé précédemment.
D
1 Die SW von der Internet-Seite “www.custom.biz”
downloaden.
2 Die Drucker-Software wie nach dem folgenden
Verfahren installieren :
A) WINDOWS 95/98/ME/NT/2000
! Im START-Menü Ausführen anklicken und den
Verlauf der SW eingeben, die zuvor in Ihrem PC
gespeichert wurde. OK anklicken.
! Nun die auf dem Monitor angezeigten Anleitungen
befolgen, um den Driver zu installieren.
B) LINUX
! Folgen sie die gebravchsan wei sung für die
installation software im das file README.txt diese file
ist inhalt im softwarepaket entladen früher.
E
1 Descargar el SW del sito Internet
“ww.custom.biz”.
2 Instalar el software de la impresora siguiendo las
indicaciones como sigue :
A) WINDOWS 95/98/ME/NT/2000
! En el menù Start seleccionar Enter y digitar el
recorrido del SW, precedentemente almacenado en
vuestro PC, hacer clic sobre OK.
! Seguir las instrucciones que aparecen en pantalla
para instalar el driver.
B) LINUX
! Para la installación del software es necesario seguir
las instrucciones en el file README.txt contenuto en
el paquete software descargado.
Installation for
drivers
Win 95
Win 98/
Win ME
Win NT4
_
_
_
Win 2K
Win XP
Linux
<19>
TK100
Blank Page
<20>
TK100
Appendix
A.1 TECHNICAL SPECIFICATION
A.1.1 TECHNICAL SPECIFICATIONS
Resolution
Print method
Paper Specifications
Type of paper
Paper thickness
Paper width
Sensors
Print direction
Print format
Character fonts
Standard interfaces
Baud rate
Data buffer
Flash memory
Graphic memory
203 DPI (8 dot/mm)
Thermal fixed head (8 dot/mm)
(1)
Printing Speed
Print head reliability
Electric specifications
Power supply
Electrical input
Medium consumption
Peak consumption
Stand-by consumption
Environmental conditions
Operating temperature
Operating humidity
Storage temperature/humidity
Width [mm]
Dimensions
Length [mm]
Height [mm]
Weight (w/o paper roll) [gr]
Emulation
Character density
Number of columns
Printing speed
Character / sec
Lines /sec
Character (L x H mm)
Normal
Character set
Fan-fold thermal paper with notch
2
2
60 g/m – 90 g/m
65 mm
Paper end, head open, head temperature, notch, anti-jamming
Normal, 90°, 180°, 270°
Height/width from 1 to 8, expanded, negative, underlined, script
PC437, PC850, PC860, PC 863, PC865, PC858 (euro)
RS232 serial / USB
From 1200 to 115200 bps
64 Kbytes
384 Kbytes
1 logo of 512 x 1024 dots
High quality = 80 mm/sec.
Normal = 100 mm/sec.
High speed= 120 mm/sec.
>50 Km
24 Vdc ±
10%
(2)
1,5 A
3A
0,05 A
11 cpi
28
0-50°C
10-80% Rh
-20 °C – 70 °C / 10% - 90% Rh
128
172
122 (with cover closed)
700
TM
ESC/POS , CUSTOM
15 cpi
36
20 cpi
51
1130
40
1460
40
2048
40
2,25 x 3
1,75 x 3
3
1,25 x 3
Note (1): Use fan-fold with good pre-splitting in order to detach the ticket easily.
Note (2): 50% dots on.
The table below gives the main technical specifications of the barcode reader integrated inside the printer.
Electrical Characteristics
Scan rate
Optical Characteristics
Sensor
Light Source
Ambient Light
Performance
Resolution
Readable Barcode
100 scans/sec
Liner CCD Sensor
Red Leds, 632 nm
1500 LUX MAX (Fluorescent lamp)
5 mil. (0.127 mm)
ALL UPC/EAN/JAN , Code 39, Code 128, Interleave 25,
CODABAR/NW7. Other codes upon request
<A-1>
TK100
A.1.2 DMENSIONS
The figures A.1 and A.2 illustrate the overall dimensions for the tabletop printer; the figure A.2 with cables cover.
128
(Fig. A.1)
57
17
56
122
172
62
82
99,5
(Fig. A.2)
235
128
17
62
82
99,5
<A-2>
57
56
122
172
TK100
A.2 ACCESSORIES AND SPARE PARTS
A.2.1 POWER SUPPLY
The following figure shows the power supply, that can be used to operate the printer.
(Fig. A.2)
PPPW-060-24
Power Supply 24V 60W
Input specifications
Input voltage
90 Vac to 264 Vac
Input frequency
47 Hz to 63 Hz
Output specifications
Output voltage
24 V
Power specifications
Maximum power
60 W
A.2.2 SPARE PARTS
- Paper
RCTFF-155X65-0103
RCTFF-B-155X65-0103
MODULE FANFOLD PAPER 155x65
MODULE FANFOLD PAPER 155x65 WITH BARCODE
<A-3>
TK100
Blank Page
<A-4>
www.custom.biz
Pubblication issued by:
Pos
CUSTOM ENGINEERING SPA
Via Berettine, 2 - 43010 Fontevivo, Parma ITALY
Tel. +39 0521 680111 - Fax +39 0521 610701
[email protected] www.custom.biz
Fiscal
All rights reserved
Oem
Part Number : DOMM-TK100
REV.1.00
Kiosk
Gaming &
Lottery
Auto ID
Wireless
Pos
Fiscal
Oem
Kiosk
Gaming
Auto ID
e le
Wir ss