1
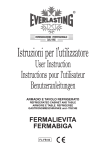
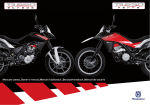
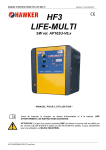
CARICABATTERIE AUTOMATICO
CHARGEUR AUTOMATHIQUE
AUTOMATIC BATTERY CHARGER
MOD.
ITALCAR INDUSTRIAL S.r.l.
Via Reano, 18 - 10040 Rivalta di Torino - TO - (ITALIA)
Tel. +39 011 9040225 - Fax +39 011 9032986
[email protected] www.itarcar.com
G1
NORME D’USO
MODE D’EMPLOI
INSTRUCTIONS
INFORMAZIONI GENERALI
Questo apparecchio permette la ricarica di batterie al piombo a elettrolito libero
comunemente utilizzate nel settore della trazione elettrica.
La corrente di carica è autodecrescente (DIN 41774).
Il contenitore e le parti metalliche in esso contenute sono messe a terra come prescritto
dalle normative vigenti.
PRECAUZIONI
L’apparecchio non deve essere usato per altri scopi se non quello per cui è stato costruito;
es: non deve essere utilizzato come alimentatore per lampade, autoradio o altri accessori,
(il costruttore declina qualsiasi responsabilità per eventuali danni arrecati da un uso
scorretto o improprio).
Non deve essere utilizzato allo scoperto o in ambienti che lo espongano a spruzzi, pioggia,
neve, nebbia o altri eventi che potrebbero danneggiarlo o comprometterne la sicurezza.
Durante la carica le batterie emanano gas esplosivi (non avvicinarsi con fiamme libere, non
fumare) quindi scegliere ambienti dove esista un buon ricambio d’aria e non collocare il
caricabatterie troppo vicino, in quanto alcuni componenti durante il loro normale
funzionamento generano archi voltaici.
Controllare che la tensione e la corrente di carica dell’apparecchio siano appropriate alla
batteria alla quale viene collegato.
Qualora si dovessero riscontrare anomalie o manca
to funzionamento non accedere
all’interno del caricabatterie ma rivolgersi al punto vendita o a personale qualificato per tali
interventi.
DICHIARAZIONE DI CONFORMITA’ Dichiariamo sotto la nostra responsabilità che l’apparecchio
accompagnato dalla presente dichiarazione di conformità, identificato per modello, codice e matricola
(vedi talloncino sottostante) è stato costruito in osservanza delle attuali legg i in vigore, come descritto
nella documentazione conservata presso la nostra sede; ed è in conformità con le seguenti direttive
comunitarie:
73/23/CEE e s.m.i. bassa tensione
89/336/CEE e s.m.i. compatibilità elettromagnetica (per la parte applicabile)
93/68/CEE di modifica alle precedenti direttive e in accordo alle norme EN 60335-1, EN 60335-229 (per la parte applicabile)
DÉCLARATION DE CONFORMITÉ Nous déclarons sous notre responsabilité que l’appareil avec
cette déclaration de comformité, identifié par modèle, code et matricule, a été fabriqué en observance
des lois actuellment en vigueur, comme décrit dans la documentation conservée chez notre bureau; et
il est en conformité avec les suivantes directives de la Communauté Européenne :
73/23/CEE basse tension
89/336/CEE compatibilité électromagnétique (pour la partie applicable)
93/68/CEE de modification aux dernières directives et en accord aux réglementation EN 60335-1,
EN 60335-2-29 (pour la partie applicable)
COMFORMITY DECLARATION We declare on our own responsability that the devices with this
conformity declaration, identified by model, code and number has been designed in compliance with
the present law in force, as described in the documentation preserved at our office; and it is in
conformity with the following directives of the European Community:
73/23/CEE low tension
89/336/CEE electromagnetic compatibility (for the enforceable part)
93/68/CEE of modification to previous directives and in accordance with the regulations EN
60335-1, EN 60335-2-29 (for the enforceable part)
INSTALLAZIONE
Se non presente installare una spina sul cavo di alimentazione (rispettando
scrupolosamente il collegamento di terra ) di portata adeguata alla potenza
dell’apparecchio in questione. Assicurarsi che la presa alla quale verrà collegato il
caricabatterie sia di potenza adeguata e che sia presente il collegamento di terra; accertare
pure che la tensione fornita dall’impianto sia quella richiesta per l’alimentazione
dell’apparecchio.
Installare sui cavi batteria un connettore irreversibile appropriato alle esigenze e alla
corrente di carica, rispettando attentamente la polarità indicata.
Made in Italy
Non smaltire come rifiuto urbano, conferire a centri autorizzati per la
raccolta differenziata.
Lo smaltimento abusivo è sanzionato in quanto nuoce all’ambiente.
OPERAZIONI PRELIMININARI
Aver cura di mantenere puliti i contatti del connettore.
Controllare il livello del liquido della batteria (deve coprire le piastre, in caso contrario
aggiungere acqua distillata fino a raggiungere il livello ottimale) nell’eseguire tale
operazione munirsi di guanti, per evitare di venire a contatto con l’acido della batteria che è
corrosivo.
Ne pas jeter avec vos déchets normaux domestiques. Attention,
apportez-les dans une déchetterie pour étre recyclé. Sachez qu’il est
interdit et punissable par la loi de déposer des déchets nuisibles à
l’environnement.
Please do not dispose with your domestic garbage, bring it to an
authorized centre for the separate disposal of waste. The illegal disposal
of waste will be punished because it is hazardous for the natural
environment.
CERTIFICATO DI GARANZIA La ditta costruttrice garantisce il buon funzionamento del
prodotto e si impegna ad effettuare gratuitamente riparazioni o sostituzioni delle parti che
risultino difettose o deteriorate entro 12 mesi dalla data di acquisto, comprovata dalla
compilazione del presente certificato che dovrà accompagnare sempre il prodotto. Tutti gli
eventuali guasti derivanti da uso improprio, manomissione o incuria, sono esclusi dalla
garanzia. Si declina ogni responsabilità per eventuali danni diretti ed indiretti cagionati a
persone, animali o cose, causa la non osservanza delle norme allegate. I resi, anche in
garanzia dovranno pervenire in porto franco e verranno restituiti in porto assegnato.
N.B. Il presente certificato è valido per la richiesta di intervento in garanzia solo se
debitamente compilato e accompagnato da scontrino fiscale o d.d.t. .
BULLETIN DE GARANTIE Le fabricant garantit un bon fonctionnement du produit et
s’engage à faire gratuitement les réparations des éléments endommagés ou détériorés
dans 12 mois de la date d’achat, attestée par la compilation de ce bulletin qui devra
accompagner toujours l’appareil. Toutes les pannes éventuelles dérivantes pour l’usage
impropre, altération, ou bie n incurie, sont exclues de la garantie. On décline toute
résponsabilité en cas de possibles dommages directs et indirects causés à personnes,
animaux ou choses, pour ne pas avoir observé les normes ici incluses. Les appareils
refusés, mème si en garantie, vont rendus en port franc chez notre usine et seront remis en
port dù chez votre maison.
N.B. Le present bulletin de garantie est valide seulement si dùment rempli et accompagné
avec un bon de livraison.
WARRANTY CERTIFICATE The Firm warrants the goodsfunctioning of the devices and
engages to repair gratis or to replace those faulty or demaged components within one year
from purchase date, confirmed by the compilation of this warranty certificate that will be
always to accompany the device. The warranty certificate does not cover materials
undergoing self consumption and damages resulting from improper handling, lack of care,
manumission, accidents, as well as possible consequential damage resulting from the
inaccuracy or the non functioning of the cha rger, or actions contrary to the Company’s
operating instructions. The Firm declines all responsability for possible direct and indirect
damages caused to people, animals or things, by the non- compliance with the enclosed
instructions for use. The refused devices, even if under manufacturer’s warranty, will be to
return free port and will be rendered carriage on delivery.
N.B. This warranty certificate is valid only if duly completed and associated by cash
voucher or by delivery note.
ITALCAR INDUSTRIAL S.r.l.
Via Reano, 18 - 10040 Rivalta di Torino - TO - (ITALIA)
Tel. +39 011 9040225 - Fax +39 011 9032986
[email protected] www.itarcar.com
IT
1 – Amperometro
3 - Spia carica finale
5 - Cavi per collegamento batteria
7 - Commutatore (MIN - MAX)
9 - Cavo c/spina
2 - Spia carica voltmetrica
4 - Spia fine carica
6 - Protezione termica
8 - Interruttore
10 - Portafusibile
COLLEGAMENTI E CARICA
1 - Controllare che la tensione monofase di rete sia 230V. e che la presa sia munita del
terminale di terra di sicurezza.
2 - Controllare che il modello di apparecchio corrisponda per tensione e corrente alle
caratteristiche della batteria che si deve ricaricare.
Collegare il connettore alla batteria, simultaneamente si accende la spia carica voltmetrica.
3 - Inserire la spina nella presa di corrente, posizionare il
commutatore di regolazione (MIN - MAX) su MIN, quindi
accendere l’apparecchio portando l’interruttore ON /OFF sulla posizione ON , l’accensione
è segnalata dalla spia dell’interruttore, e l’amperometro indica la corrente di carica. Se la
corrente di carica indicata dall’amperometro risulta troppo bassa, aumentare posizionando
il commutatore di regolazione su MAX.
La corrente di carica diminuisce con il passare del tempo in funzione dello stato di caric a
della batteria, raggiunto il valore di 2,42 V. per elemento si spegne la spia carica
voltmetrica e si accende lampeggiando la spia carica finale a segnalare che è entrato in
funzione un timer elettronico il quale spegne l’apparecchio dopo 3,30 h. circa e accende la
spia fine carica, che indica che il ciclo di carica è terminato.
Se la tensione della batteria non raggiunge i 2,42V per elemento entro 16 ore dall’inizio
della carica l’apparecchio si spegne, segnalando con l’accensione permanente della spia
carica finale che il ciclo si è concluso in modo anomalo.
4 - A carica ultimata prima di scollegare la batteria ricordarsi sempre di spegnere
l’apparecchio e scollegare la spina dalla presa di corrente.
IT
L’apparecchio è dotato di una protezione che spegne l’apparecchio nel caso in cui
mancasse la connessione alla batteria.
L’apparecchio è dotato di una protezione termica con riarmo manuale a pulsante che
provvede a interrompere la carica quando questa risulti troppo gravosa ( es: batteria
difettosa, tensione di alimentazione troppo alta, cortocircuito, regolazione di carica
eccessiva ecc.)
Per ripristinare la carica, attendere due minuti circa, premere leggermente il pulsante
della protezione il quale rientra nella sua sede e controllare che l’apparecchio eroghi
corrente entro i parametri consentiti.
L’apparecchio è dotato di fusibile di alimentazione.
Se dovete sostituire il fusibile, accertate che l’apparecchio sia spento e scollegato dalla
rete e dalla batteria.
Attenzione
- non ostruire le bocchette o i fori di ventilazione quando l’apparecchio è acceso, un
surriscaldamento eccessivo potrebbe comprometterne il funzionamento o la sicurezza.
- evitare di invertire la polarità nel collegamento alla batteria
- non inserire la spina prima di collegare il connettore alla batteria
- spegnere e disinserire sempre la spina prima di scollegare la batteria.
Difetti e rimedi
- l’apparecchio non eroga corrente (la spia dell’interruttore è spenta)
1) controllare che la spina sia bene inserita nella presa di corrente
- l’apparecchio non eroga corrente (l’ago dell’amperometro rimane a zero, la spia
dell’interruttore è accesa ma la spia carica voltmetrica è spenta)
1) i terminali del connettore non fanno contatto (pulire i
punti di contatto)
2) la protezione termica è intervenuta bloccando l’uscita della corrente (ripristinare)
- l’apparecchio non eroga corrente (l’ago dell’amperometro rimane a zero, la spia
dell’interruttore e la spia carica voltmetrica sono accese)
1) il fusibile di alimentazione è bruciato (sostituire)
2) la batteria potrebbe essere interrotta o solfatata (rivolgersi all’assistenza per un
controllo)
3) il caricabatterie è guasto (rivolgersi all’assistenza, non improvvisare riparazioni che
potrebbero compromettere oltre all’efficienza anche la sicurezza dell’apparecchio).
- la spia carica finale non si accende
1) corrente di carica troppo bassa dovuta a insufficienza di rete
2) batteria con uno o piø elementi difettosi che assorbono corrente ma non alza
no il
valore di tensione complessivo (controllare la batteria)
3) alterazione della taratura del dispositivo automatico (rivolgersi esclusivamente
all’assistenza ).
Elenco ricambi serie G1
I
TR
PD
A
Interruttore
Trasformatore
Ponte Diodi
Amperometro
D
F
S3.1
PT
Commutatore MIN – MAX
Fusibile alimentazione
Dispositivo automatico
Protezione termica
N.B. : nella eventuale richiesta di parti ricambio oltre alla descrizione del componente
citare sempre il numero di codice e matricola im presso sulla targa di identificazione
dell’apparecchio.
FR
INFORMATIONS GENERALES
Cet appareil est destiné à étre utilisé pour la recharge de batteries au plomb ou à
électrolyte libre usagées dans le domaine de la traction électrique.
Le courant est auto décroissant (DIN 41774).
Le boîtier et ses parties ont le contact de terre, comme selon les normes.
PRÉCAUTIONS
Le chargeur de batteries ne doit jamais étre utilisé pour des buts différents de ceux pour
lesquels il a été fabriqué. Il ne doit pas alimenter des lampes, des radios ou autres (le
fabricant décline toutes responsabilités en cas de dommage causé à l’appareil ou en cas
d’usage impropre)
N’exposé pas l’appareil à jets d’eau, à la pluie, à la neige ou au brouillard, puisque ces
agents pourraient endommager l’appareil et aussi sa sécurité pourrait étre compromise.
Pendant la charge les batteries dégagent des gaz inflammables (ne vous approchez pas
avec des flammes libres ou d’étincelles. Ne fumez pas). Il va mieux, alors, choisir des
places aérées et ne placez pas le chargeur près de la batterie puisque certains
composants provoquent des arcs voltaïques pendant leurs normal fonctionnement.
Contrôlez que la tension et le courant de charge de l’appareil sont aptes à la batterie
qu’on vient de connecter.
En cas de disfonctionnement il faut s’adresser au distributeur ou à des techniciens. Si
l’appareil ne marche plus, ou fonctionne irrégulièrement ne pas ouvrir le boîtier.
INSTALLATION
Placez une fiche sur le câble d’alimentation (en faisant attention à la connexion de terre),
apte à la puissance de l’appareil . Contrôlez que le socle de courant qu’on veut utiliser ait
le contact de terre et une puissance apte; contrôlez aussi que la tension du réseau soit
apte à l’alimentation de l’appareil.
Placez sur les câbles de la batterie un connecteur irréversible apte au courant de charge,
en faisant attention aux polarités.
OPERATIONS PRELIMINAIRES
Prendre soin de bien nettoyer les terminales du connecteur.
Contrôlez le liquide de la batterie (il faut qu’il couvre les plaques, au contraire ajouter de
l’eau distillé jusqu’à rejoindre le niveau indiqué sur le boîtier de la batterie). En opérant
dans cette façon il faut utiliser des gants au fin d’èviter des contac ts avec l’acide de la
batterie qui est très dangereux.
1 - Ampèremètre
2 - Indicateur lumineux de charge voltmètric
3 - Indicateur lumineux de charge finale 4 - Indicateur lumineux de fin de charge
5 - Câbles pour la connexion à la batterie 6 - Disjoncteur thermique
7- Commutateur (MIN – MAX)
8 - Interrupteur
9 - Câble avec fiche
10 - Porte fusible
CONNEXIONS ET CHARGE
1 - Contrôlez la tension monophasé du réseau : elle doit étre 230V. Contrôlez aussi que le
socle de la prise du courant ait un contact de terre approprié.
2 - Contrôlez que l’appareil correspond par tension et courant aux caractéristiques de la
batterie qu’on va recharger.
Connecter le connecteur à la batterie, en méme temps l’indicateur lumineux de charge
voltmètric s’allume.
3 - Connectez la fiche au la socle de prise de courant, placez le commutateur de
régulation (MIN - MAX) sur MIN, allumer l’appareil en plaçant l’interrupteur sur la position
ON, l’indicateur lumineux de l’interrupteur signale que l’appareil est allumé et
l’ampèremètre signale le courant de charge. Si le courant de charge indiqué par
l’ampèremètre est trop baisse augmentez-le en plaçant le commutateur de régulation sur
MAX.
Le courant de charge décroît pendant le temps en fonction de l’état de charge de la
batterie, quand le valeur de 2,42V. par élément est rejoint, l’indicateur lumineux du charge
voltmètric s’éteint, et l’indicateur lumineux de charge finale s’allume en clignotant à
signaler que le timer électronique est entré en fonction et il éteindra l’appareil après 3.30
h. et l’indicateur lumineux fin de charge s’allumera à indiquer que le cycle de charge est
terminé.
Si la tension de la batterie ne rejoint pas le valeur de 2,42V. par élément dans 16 h. de
commencement de la charge l’appareil s’éteint, et avec l’indicateur lumineux de charge
finale allumé s’indique que la cycle de charge est terminé en façon anomale.
FR
4 - Quand la charge est terminée, avant de débrancher le connecteur, arrét tez l’appareil
en plaçant l’interrupteur sur OFF et débranchez la connexion du socle de courant.
L’appareil est doué d’une protection qui arréte l’appareil en cas la connexion à la batterie
vient à manquer.
L’appareil est aussi doué d’un disjoncteur thermique avec rétablissement manuel qui
coupe la charge si elle est trop lourde (ex : batterie ennuyée, tension d’alimentation trop
haute, court-circuit, régulation de charge excessive, etc…).
Pour reprendre la charge attendez quelques minutes et puis poussez doucement le
bouton du disjoncteur : celui ci retourne dans sa place et contrôlez que l’appareil donne
courant comme selon les paramètres.
L’appareil est doué d’un fusible d’alimentation.
S’il faut substituer le fusible, contrôlez que l’appareil est éteint et débranché du réseau et
de la batterie.
Attention
- N’obstruez jamais les trous de ventilation quand l’appareil est en marche, un excessif
sur chauffage peut compromettre le fonctionnement ou la sécurité de l’appareil.
- N’inversez jamais les polarités pendant la connexion de la batterie.
- N’insérez pas la fiche dans la socle de prise de courant avant de connecter le
connecteur à la batterie.
- Arrét ez et débranchez la fiche de courant avant de déconnecter la batterie.
Ennuis et remèdes
- Il n’y a pas de courant en sortie (l’indicateur lumineux de l’interrupteur est éteint)
1) Contrôlez que la fiche soit bien insérée dans le socle de la prise de courant
- Il n’y a pas de courant en sortie (l’aiguille de l’ampèremètre est au zéro mais le signal
lumineux de l’interrupteur est allumé et l’indicateur de charge voltmètric est éteint)
1) les terminales du connecteur ne font pas contact (nettoyez les terminales du
connecteur )
2) le disjoncteur thermique a coupé la sortie de courant (repositionner)
- Il n’y a pas de courant en sortie (l’aiguille de l’ampèremètre est au zéro mais le signal
lumineux de l’interrupteur et l’indicateur de charge voltmètric sont allumés.
1) Le fusible d’alimentation est coupé (substituer)
2) La batterie pourrait étre coupée (s’adresser au technicien)
3)Le chargeur est endommagé (s’adresser au distributeur, ne pas faire des tentatives
d’entretien qui peuvent compromettre l’efficacité de l’appareil).
- L’indicateur lumineux de charge finale ne s’allume pas
1) Le courant de charge est trop baisse à cause d’ un réseau insuffisant
2) Batterie avec un ou deux éléments ennuies qui absorbent courant mais n’augmentent
pas le valeur de tension (contrôlez la batterie)
3) Anomalie dans la ratures du dispositif (s’adresser à des techniciens)
Liste des pieces detachees mod. G1
I
TR
PD
A
Interrupteur
Transformateur
Pont à diodes
Ampèremètre
D
F
S3.1
PT
Commutateur MIN – MAX
Fusible d’alimentation
Dispositif automatique
Disjoncteur thermique
En cas de demande d’éléments de rechange, indiquer toujours le numéro de code et
matricule imprimés sur la plaque d’identification de l’appareil, outre à la des cription du
composant.
GENERAL INFORMATION
GB
This electrical device enables the recharge of lead batteries, usually used in the electric
traction field.
The current of charge is auto-decreasing (DIN 41774).
The box and its metal parts are ground connected as per the rules in force.
CAUTION
This battery charger must not be used for any other purposes but for those it has been
built.
- It must not be used to supply electric lamps, car radios or other devices (the constructor
declines any responsibility for any damage caused by improper use.)
- It must not be used outside or anywhere there may be humidity, rain, snow, fog, or
any agent which may cause damage or may affect the safety.
- During the charging phase, batteries exhale explosive gas (do not get any near it with a
flame; do not smoke): that’ s why to it is better to settle it in places where the air can
be regularly changed, and do not place the battery charger too near the battery as some
components generate voltaic arches during their normal functioning.
- Check that the tension and the current of charge of the electrical device are suitable to the
battery to which it will be connected.
- In case you should notice anomalies or misfunctionings do not try to get inside the battery
charger, but go to the nearest selling point or address to qualified engineers for these
intervenctions.
INSTALLATION
If you must put a plug on the supply wire, be careful to the ground "green and yellow"
connection, and thus choose a plug suitable to the power of the elctrical device.
Be sure that the socket to which the battery charger will be connected has a suitable power
and that the ground connection exhists; check, as well, that the tension supplied by the
system is that required by the supply of the battery charger.
Put on the exit wires of the battery charger an irreversible polarized connector suitable for
the requires and for the current of charge, being as well careful to the polarity shown.
PRELIMINARY OPERATIONS
Take care of the contacts of the connector and keep them clean. Check the level of the
battery liquid (it must be over the plates, if not, add some distilled water until an acceptable
level will be reached).
When operating as said, wear rubber gloves in order to avoid a contact with the battery
acid which is highly corrosive.
1 - Ammeter
3 - Final light
5 - Wires for battery connections
7 - Switch (MIN - MAX)
9 - Wire with plug
2 - Voltmetric light
4 - Charged light
6 - Thermic protection
8 - Switch (ON - OFF)
10 - Supply fuse
CONNECTIONS AND CHARGE
1 - Check that the single phase tension of the system is 230V and that the socket has
the safety ground terminal.
2 - Check that the battery charger model is suitable for tension and current to the
characteristics of the battery which you must recharge.
Connect the electric device to the battery, at the same time the voltmetric light will switch
on.
3 - Plug the battery charger and set the (MIN-MAX) regulation switch on the MIN
position.
Switch on the battery charger by setting the switch on the ON position. When the
instrument is on, a signalling light on the switch will flash and the ammeter will show the
current supplied.
If the current of charge shown by the amm eter is too low, set the regulation switch on the
MAX position.
The current of charge decresas as time goes on, according to the state of charge of the
battery. Once the 2.42V value for each element is reached, the voltmetric light switches
off and the final light switches on flashing, in order to signal that an electronic timer is now
working and it will switch the electrical device off after 3.30 hours roughly, thus switching
on the charged light showing that the charged cycle has ended.
If the battery te nsion does not reach the value of 2.42V. for each element within 16 hours
from the starting of the recharge, the device switches off, in signalling, with the final light
permanently turned on, that the charge cycle is concluded in anomalous way.
4 - Before disco nnecting the battery, once the charge has been done, always remember
to switch this electric device OFF and to unplug it.
GB
The device has been equipped with a protection stopping the output current in case there
was wanting the connection with the battery.
This electrical device has a thermic protection with manual reset which will suspend the
charge when this goes over (eg. faulted battery, too high alimentation tension, short
circuit, eccessive charge regulation, etc...).
In order to restore the charge, wait for two minutes roughly, then slightly push the button
of the protection which will go back in its original position, and check if the battery
charger delivers current inside the allowed parameter.
The device has an input protection with a fuse.
In case you need replacing the fuse, make sure that the device is switched OFF, that it is
unplugged from the system and that the connector is disconnected from the battery.
Caution
- do not obstruct the ventilation holes when this electric device is on: over-heating
it could affect its functioning and its safety.
- avoid inverting the polarities while connecting to the battery.
- do not plug it before connecting the battery.
- switch it off and always unplug it before disconnecting the battery.
Faults and remedies
- This electric device does not deliver current (the signalling light on the switch is off)
1) check that the plug is properly plugged in the socket
- The battery charger does not deliver current (the pointer of the ammeter is on the zero
position, the signalling light on the switch is on but the voltmetric light is off).
1) the terminals of the connector do not create a contact (clean the terminals)
2) the thermic protection is stopping the exit of the current (reset).
- The battery charger does not deliver current (the pointer of the ammeter is on the zero
position, the signalling light on the switch and the voltmetric light is on).
1) the supply fuse is cut off (replace with a new one of the same value.
2) the battery could be faulted (address to customer service for a check up).
3) the battery charger is damaged (address to customer service for a check up, do not try
to mend it because this operation could affect not only its reliability but its safety too).
- The final light does not switch on.
1) the current of charge is too low due to a deficiency in the system.
2) battery with one or more damaged elements which absorb current but do not increase
the tension value all together (check the battery).
3) alteration of the calibration of th e electronic automatic control (only go to the
customer service).
List of spare parts in the G1 series
I
TR
PD
A
Switch ON – OFF
Transformer
Diode bridge
Ammeter
D
F
S3.1
PT
Switch MIN - MAX
Supply protection
Automatic control
Thermic protection
Please note: In case you should need any spare elements, further to the description of the
components required, mention the code and the serial number printed on the identification
plaque of the battery charger.