1
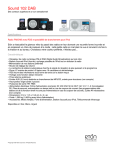
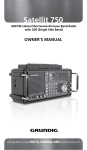
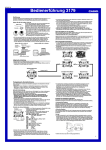
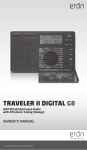
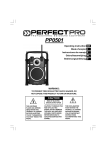
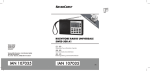
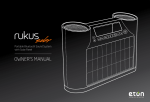
TRAVELER III The Go Anywhere, Hear Everything AM/FM/LW and Shortwave Radio OWNER’S MANUAL TRAVELER III OWNER’S MANUAL MEET THE TRAVELER III Thank you for purchasing the Etón Traveler III. We want you to thoroughly enjoy the use of this product. To take advantage of its many excellent and unique features, we urge you to carefully read the user’s manual. 2 FRONT 3 4 5 1 7 6 8 9 10 11 BACK 12 13 14 2 TRAVELER III OWNER’S MANUAL RIGHT SIDE LEFT SIDE 17 15 18 16 Features: 1 Speaker grill 12 Whip Antenna 2 LCD panel 13 Back Stand 3 Power/sleep button 14 Battery compartment 4 DISPLAY Mode/Lock button 15 Tuning dial 5 G.M.T. cover 16 Volume knob 6 Up button 17 Earphone jack 7 Down button 18 DC jack 8 AM/LW button 9 FM/RDS button 10 Snooze/Light button 11 Step button 3 TRAVELER III OWNER’S MANUAL POWER/SLEEP BUTTON 1. Short press to turn on radio and press again to turn off 2. Long press this button, the icon flashes in the LCD. Rotate “Tuning” knob to select the desired auto shut-down time with 1~120 minutes. 3. Select “ON” indicates the radio will be on all the time. Note: If the alarm is ringing,quick press this button to shut down alarm function. DISPLAY MODE/LOCK BUTTON Quick press to display Alarm, temperature,local/world time,signal strength,S/N ratio Long press: lock/unlock buttons and tuning knob VF/VM FREQUENCY/ADDRESS,TUNING STEP BUTTON With the radio on: Quick press:Switch between frequency or address. When Switching to Frequency, the “tuning” will flash; When switching to address, the “Preset” will flash. Long press to change tuning step fast or slow, u icon indicates slow step, uu icon indicates fast step. u uu Slow Step Fast Step Band Slow tuning knob Fast tuning knob Slow tuning knob Fast tuning knob FM 0.01MHZ 0.1MHZ 0.1MHZ 1MHZ LW 1KHZ 3KHZ 3KHZ 100KHZ MW 1KHZ 9/10KHZ 9/10KHZ 100KHZ SW 1KHZ 5KHZ 5KHZ 100KHZ 4 TRAVELER III OWNER’S MANUAL HOME BUTTON Rotate “time zone indicator knob” to your city. Long press “HOME” button,the hour will flash, rotate tuning knob to change hour. Short press Home button,the minute will flash,rotate tuning knob to change minute. Quick press again to confirm local time. ALARM - SETTING UP ALARM TIMER The setting method is the same as local time setting,only the difference is that the user needs to re-press ALARM button after reset alarm,then tune up TUNING knob to set up auto-power off timer with the range of 1~90 minutes. •Alarm method selection , Quick press ALARM button without alarm timer setting. If icon flashes to activate alarm to radio feature. •With the radio on, firstly search your desired station which is used for your favorite station for alarm,also set up the suitable volume. •Long press ALARM button,when the user heard a “Beep” sound,also icon flashes,the user can set up alarm by this station. If the alarm is up,the unit will power on automatically and receive preset station,then it will shut down automatically when it reaches the desired time. During the listening, if the alarm is on,the unit will switch to preset station automatically. If icon flahes indicates alarm by buzzer, the following feature is new: •If the user is not familiar with local station frequency and play time, suggest to use alarm by buzzer. If the alarm is up, the unit will have “Beep-Beep” sound and it will shut down with the preset time automatically. 5 TRAVELER III OWNER’S MANUAL •If the above icons don’t be displayed,which indicates the alarm is off. Note: Alarm timer matches the time of the indicator of time zone. If the user sets up the alarm is on at 7:00 a.m.,and the time of time zone indicator will be New York time, the unit will be alarmed at 7:00 a.m. of New York time. LIGHT/SNOOZE BUTTON Quick press [Light/Snooze]button to select brightness level (OFFLOW-High) If no operation, the brightness of backlight will light up your selected level or turn off backlight in 10 minutes. If the backlight is off, when the user operate any button,quick press to light up the backlight in the first time, quick press again means button operation. SNOOZE FUNCTION: The alarm is on, quick press Light/snooze button to shut down alarm temporarily, the alarm will ring after 10 minutes. So the snooze function can repeat 3 times. For alarm ringing in the 4th time, press Light/Snooze button again to shut down alarm. SHORTWAVE BAND/ AUTO DISPLAY BUTTON With the radio on: •Quick press [p]or [q] button to select SW band •Continuously quick press [p]or [q] button to select SW meter band •In Frequency auto-search status: long press[p]or [q] button to auto-display station 6 TRAVELER III OWNER’S MANUAL •In address search status, long press [p]or [q] button to autodisplay preset stations AM/LW BAND/ATS BUTTON With the radio on: •Quick press[AM/LW]button select AM(MW) or LW band •Long press [AM/LW] button to auto tuning stoarge AM(MW) or LW band FM RDS /ATS BUTTON With the radio on: •Quick press FM/RDS button to select FM band •Long press FM RDS button to proceed with ATS function RDS INFORMATION DISPLAY In FM band, quick press FM RDS button to display different RDS information in cycle. If any RDS information in the LCD, icon will be displayed. Quick press FM RDS button to display :PS/PTY/RT/DATA PS : program name if no station, just display NO PS PTY: Program type if no program,just display NO PTY RT: Program text if no text, just display NO RT DATA: Time/Date/Weekly program callsign information, if no any information,just display NO DATA 7 TRAVELER III OWNER’S MANUAL If any information available, just display format is: NORTH AMERICA: Station Callsign Weekday (MON, TUE, WED, THU, FRI, SAT, SUN) Mon-Day-Year Hour:Minute WGSS 03-25-2014 02 :15 TUE INTL: Station Callsign Weekday (MON, TUE, WED, THU, FRI, SAT, SUN) Mon,Day,Year Hour:Minute WGSS Mar,25,2014 02 :15 TUE Note: If no station callsign, then display PI CODE of current station. MEMORY BUTTON With the radio on: When pick up the station,quick press Memory button,then will flash. Rotate TUNING knob to find the preset address and quick press Memory button again to confirm preset. QUICK PRESS [p] OR [▼] BUTTON AND MEMORY PRESET BUTTON Use ATS function to fast preset stations 1. When auto scan frequency, long press [p] or [q] button to auto scan station. 8 TRAVELER III OWNER’S MANUAL 2. When pick up your favorite station,just quick press MEMORY button once to save this station,and then auto scan other stations. DELETE BUTTON Delete one station With the radio on: 1. In address scan status,long press [delete] button, icon will flash, also ”PXX DEL “ will flash in the LCD (XX indicates preset address); 2. Release this button,rotate Tuning button to find your desired deleted address and frequency. 3. Quick press [DELETE] button to confirm delete. Delete all stations With the radio off: Long press [delete] button for 2 seconds until the LCD displays “ALL DEL” flashing, release this button and quick press this button again to delete all preset stations. With the radio on: In address search status,long press [delete] for 2 seconds until LCD displays “ALL DEL” flashing,release this button then quick press [delete]button to delete all stations. Quick press [p] or [q] button and DELETE button: 1. In address search status,long press [p] or [q] button to enter into auto presets station; 9 TRAVELER III OWNER’S MANUAL 2. When the user finds unfavorite stations,just quick press DELETE button to delete it then check the next one. RESET BUTTON Use a toothstick or other sharp stick to press RESET button to reset the unit completely when the unit malfunction or down. DST If the user wants to use summer time, then the time will be 1 hour in advance. i.e.“DST” =daytime summer time TIME INDICATOR KNOB After set up local time,rotate Time Indicator Knob, if the indicator is at your desired time zone,the LCD will display the time of Time Zone. - TUNING + KNOB Rotate this knob to adjust time,frequency and preset address When set up time, the user can use HOME or ALARM button to set up clock Rotate this knob to change frequency when tuning Rotate this knob to select the preset address in preset address mode. - VOLUME + KNOB Rotate this knob to change volume up or down. Earphone Jack: 3.5mm DC Jack 10 TRAVELER III OWNER’S MANUAL System setting 1. Set up MW step With the radio off, long press [9/10k] button, the LCD will display AM-10K,which means MW step -10K; AM-9K means MW step-9K. Note: When MW step is 10K, temperature display format is Fahrenheit, when MW step is 9k,temperature display format is Celsius 2. Set up FM frequency range With the radio off, long press FM SET and then release it, quick press to select FM frequency range as under: 87,5-108MHz 87.0-108MHz 64.0~108MHZ 76.0~108MHZ 3. Turn on or off LW band With the radio off,long press AM/LW button ,the LCD displays “LW ON”,which means LW is on.VS LOW OFF 4. Turn on or off buzzer With the radio off,long press SNOOZE/LIGHT button, the LCD displays Beep on,means beep is activated,VS Beep off 11 TRAVELER III OWNER’S MANUAL SPECIFICATIONS 1. Supported Frequencies: US/CAN/MEXINTL FM : 87 - 108 MHz AM(MW) : 520 - 1710 kHz LW: 153 - 513 kHz SW1: 2.3 - 26.1 MHz DAB: 64 - 108 MHz 522 - 1620 kHz 153 - 513 kHz 2.3 - 26.1 MHz 174.928 - 239.200 MHz 2. Noise Limited Sensitivity: FM ≤ 3μv MW ≤ 1mv/m SW ≤ 10mv/m LW ≤ 18μv 3. Speaker: 50mm 8ohm 0.5W 4. Earphone: D 3.5mm 5. Power Supply: Batteries: 4 x AA size (4x1.5V) DC: 6V 6. Dimension: 135(L)x87(H)x27(D)mm 7. Weight: approx 213g (excluding batteries) NEED HELP? CONTACT US. Etón Corporation 1015 Corporation Way, Palo Alto, CA 94303, USA 1-800-872-2228 (U.S.) 1-800-637-1648 (Canada) 650-903-3866 (worldwide) 12 TRAVELER III OWNER’S MANUAL M-F, 8:00AM-4:30PM, Pacific Standard Time www.etoncorp.com. WARNING •Do not expose this appliance to rain or moisture. •Do not submerge or expose for extended period to water. •Protect from high humidity and rain. •Only operate within specified temperature range (0 °C to 40 °C). •Unplug or remove batteries immediately if liquid has been spilled or any object has fallen into the apparatus. •Clean only with a dry cloth. Do not use detergents or chemical solvents as this might damage the finish. •Do not remove cover [or back]. •Refer servicing to qualified service personnel. ENVIRONMENT Disposal According to the European Directive 2002/96/EC all electrical and electronic products must be collected separately by a local collection system. Please act according to your local rules and do not dispose of your old products with your normal household waste. Please dispose of all types of batteries per your Government, State or Local rules and/or regulations. If you are unsure, please call the 13 TRAVELER III OWNER’S MANUAL appropriate local authority to find out how to dispose of them safely and help protect the environment. WARRANTY REGISTRATION To ensure full warranty coverage or product updates, registration of your product should be completed as soon as possible after purchase or receipt. Please go to http://www.etoncorp.com/productregistration to register your product. LIMITED WARRANTY Retain your proof of purchase or the receipt. Limited Warranty information can be viewed at www.etoncorp.com in the Support section. SERVICE FOR YOUR PRODUCT To obtain service for your product, we recommend first contacting an Etón service representative at 800-872-2228 US, 800-6371648 Canada or (650) 903-3866 for problem determination and trouble-shooting. If further service is required, the technical staff 14 TRAVELER III OWNER’S MANUAL will instruct how to proceed based on whether the radio is still under warranty or needs non-warranty service. WARRANTY If your product is still in warranty and the Etón service representative determines that warranty service is needed, a return authorization will be issued and instructions for shipment to an authorized warranty repair facility. Do not ship your radio back without obtaining the return authorization number. NON-WARRANTY If your product is no longer under warranty and requires service our technical staff will refer you to the nearest repair facility that will be able to best handle the repair. For service outside of North America, please refer to the distributor information included at time of purchase/receipt. 15 TRAVELER III MANUEL DU PROPRIÉTAIRE FAITES CONNAISSANCE AVEC LA TRAVELER III Merci d’avoir acheté la Traveler III Nous voulons que vous appréciez complètement l’utilisation de ce produit. Pour prendre avantage de ses nombreuses excellentes et uniques fonctionnalités, nous vous prions instamment de lire soigneusement ce manuel d’utilisateur. AVANT 2 3 4 5 1 7 6 8 9 10 11 ARRIÈRE 12 13 14 16 TRAVELER III MANUEL DU PROPRIÉTAIRE CÔTÉ DROIT CÔTÉ GAUCHE 17 15 18 16 Caractéristiques : 1 Grille de haut-parleur 9 Bouton FM/RDS [MF/RDS] 2 Panneau LCD 10 Bouton Snooze/Light [Répétition 3 Bouton Power/sleep (Mise en de réveil/Éclairage] marche/Sommeil] 11 Bouton Sleep [Sommeil] Bouton DISPALY Mode/ 12 Antenne fouet Lock [Mode d’AFFICHAGE/ 13 Support arrière Verrouiller] 14 Compartiment de piles 5 Couvercle G.M.T. 15 Cadran d’accord 6 Bouton Up [Vers le haut] 16 Bouton de volume 7 Bouton Down [Vers le bas] 17 Prise d’écouteur 8 Bouton AM/LW [MA/OL] 18 Prise de CC. 4 17 TRAVELER III MANUEL DU PROPRIÉTAIRE BOUTON POWER/SLEEP (MISE EN MARCHE/SOMMEIL] 1. Appuyez brièvement pour mettre la radio en marche et appuyez de nouveau pour éteindre 2. Appuyez longtemps sur ce bouton, l’icône sur le panneau LCD clignote Tournez le bouton d’accord [Tuning] pour choisir le délai voulu avant l’extinction automatique avec 1~120 minutes. 3. Choisir “ON” gardera la radio allumée tout le temps. Remarque : Si le réveil sonne, appuyez brièvement ce bouton pour arrêter la fonction de réveil. BOUTON DISPALY MODE/LOCK [MODE D’AFFICHAGE/ VERROUILLER] Appuyez brièvement pour afficher Alarm, Temperature, Local/World Time, Signal strength, S/N ratio [Réveil, Température, Heure Locale/ Monde, Force du signal, Rapport signal/bruit] Appuyez longtemps sur : les boutons Lock/Unlock [Verrouiller/ Déverrouiller] et sur le bouton Tuning [Accord] BOUTON VF/VM FREQUENCY/ADDRESS,TUNING STEP [FRÉQUENCE/ADRESSE FV/MV, PAS D’ACCORD] Avec la radio allumée : appuyez brièvement sur : Swith between frequency or address [Changer entre fréquence et adresse] En passant à fréquence, “tuning” va clignoter; en passant à adresse, “Preset” va clignoter. Appuyez longtemps pour changer entre pas d’accord long ou court, l’icône indique un pas court, l’icône indique un pas long. 18 TRAVELER III MANUEL DU PROPRIÉTAIRE u uu Pas long Pas court Bande Bouton d’accord long Bouton d’accord rapide Bouton d’accord long Bouton d’accord rapide FM 0.01MHZ 0.1MHZ 0.1MHZ 1MHZ LW 1KHZ 3KHZ 3KHZ 100KHZ MW 1KHZ 9/10KHZ 9/10KHZ 100KHZ SW 1KHZ 5KHZ 5KHZ 100KHZ BOUTON HOME [ACCUEIL] Faites tourner le “bouton de fuseau horaire” sur votre ville. Appuyez longtemps sur le bouton “HOME”, les heures vont clignoter, faites tourner le bouton d’accord pour modifier l’heure. Appuyez brièvement sur le bouton “HOME”, les minutes vont clignoter, faites tourner le bouton d’accord pour modifier les minutes. Appuyez de nouveau brièvement pour confirmer l’heure locale. RÉVEIL - RÉGLAGE DU RÉVEIL La méthode de réglage est la même que pour le réglage de l’heure locale, la seule différence est que l’utilisateur doit ré appuyer sur le bouton ALARM [RÉVEIL] après avoir réglé le réveil, puis faites tourner le bouton TUNING [Accord] pour régler le délai pour l’extinction automatique dans la plage de 1~90 minutes. •Sélection de la méthode de réveil , Appuyez brièvement sur le bouton ALARM [RÉVEIL] sans régler l’heure de réveil. Si l’icône clignote pour activer la fonction réveil radio. •Avec la radio en marche, recherchez d’abord votre station voulue utilisée comme votre station favorite pour le réveil et réglez aussi le volume à votre convenance. 19 TRAVELER III MANUEL DU PROPRIÉTAIRE •Appuyez longtemps sur le bouton ALARM [Réveil], après que entendiez un “bip” l’icône clignote, vous pouvez entendre cette station à l’heure du réveil. Si le réveil est enclenché, l’unité va s’allumer automatiquement et commencera à recevoir la station puis elle s’éteindra automatiquement au moment choisi. Durant l’écoute, si le réveil sonne, l’unité va passer automatiquement à la station préréglée. Si l’icône clignotant indique réveil par sonnerie, la fonctionnalité suivante est nouvelle : •Si l’utilisateur ne connait pas la fréquence de la station locale et ses heures de transmission, il est recommandé d’utiliser le réveil par sonnerie. Si le réveil est enclenché, l’unité émettra un son “bip-bip” et elle s’éteindra automatiquement après le délai préréglé. •Si les icônes ci-dessus ne sont pas affichées, cela indique que le réveil n’est pas enclenché. Remarque : Le réveil est réglé selon le fuseau horaire choisi. Si l’utilisateur règle le réveil pour 7 heures du matin, et que l’indicateur de fuseau horaire est sur heure de New York, l’unité sonnera le réveil à 7 heure du matin, heure de New York. BOUTON LIGHT/SNOOZE [ÉCLAIRAGE/RÉPÉTITION] Appuyez brièvement sur le bouton Light/Snooze [Éclairage/ Répétition] pour choisir le niveau de brillance 0FF-LOW-HIGH [ÉTEINT-BAS-ÉLEVÉ] En absence d’utilisation, le rétroéclairage restera allumé au niveau de brillance choisi pendant 10 minutes. Si le rétroéclairage est éteint, quand l’utilisateur appuie rapidement sur un bouton quelconque la première fois, le rétroéclairage s’allume, un second appui sur le bouton activera la fonctionnalité du bouton. 20 TRAVELER III MANUEL DU PROPRIÉTAIRE FONCTION SNOOZE [RÉPÉTITION] Avec le réveil déclenché, appuyez rapidement sur le bouton Light/ Snooze [Éclairage/Répétition] pour arrêter temporairement le réveil, le réveil sonnera de nouveau après 10 minutes. La fonction répétition peut être répétée 3 fois. Quand le réveil sonne une 4e fois, appuyez de nouveau sur le bouton Light/Snooze [Éclairage/ Répétition] pour arrêter le réveil. BOUTON BANDE ONDES COURTES / AFFICHAGE AUTO Avec la radio allumée : •Appuyez rapidement sur le bouton [p] or [q] pour choisir la bande SW [OC] •Appuyez rapidement sur le bouton [p] or [q] pour choisir la bande SW [OC] •Sur l’indicateur d’état de la recherche automatique de fréquences : appuyez longtemps sur le bouton [p] ou [q] pour afficher automatiquement la station •Sur l’indicateur d’état de la recherche d’adresse : appuyez longtemps sur le bouton [p] ou [q] pour afficher automatiquement les stations préréglées BOUTON AM/LW BAND/ATS [BANDES MA/OL/ATS] Avec la radio allumée : • Appuyez rapidement sur le bouton AM/LW [MA/OL], choisissez la bande AM(MW) [MA(OM] ou LW [OL] 21 TRAVELER III MANUEL DU PROPRIÉTAIRE • Appuyez longtemps sur le bouton AM/LW [MA/OL], pour la recherche et le préréglage automatique des stations de la bande AM(MW) [MA(OM] ou LW [OL] BOUTON FM RDS / ATS Avec la radio allumée : •Appuyez rapidement sur le bouton FM/RDS pour choisir la bande FM [MF] •Appuyez longtemps sur le bouton FM RDS pour continuer avec la fonction ATS AFFICHAGE DES INFORMATIONS RDS Dans la bande FM [MF] appuyez rapidement sur le bouton FM RDS pour afficher de façon cyclique les différentes informations RDS. Si des informations RDS existent une panneau LCD. icône sera affichée sur le Appuyez rapidement sur le bouton FM RDS pour afficher PS/PTY/RT/ DATA PS : Nom du programme, en absence de station, affiche NO PS PTY : Type de programme, en absence de programme affiche NO PTY RT : Texte de programme, en absence de texte, affiche NO RT 22 TRAVELER III MANUEL DU PROPRIÉTAIRE DATA [DONNÉES] : Informations Heure/Date/Hebdomadaire/ Indicatif, en absence d’informations, affiche NO DATA Si des informations existent, le format d’affichage est le suivant : Amérique du Nord: Indicatif de station Jour de semaine (MON, TUE, WED, THU, FRI, SAT, SUN) Mois-Jour-An Heure:Minute WGSS TUE 03-25-2014 02 :15 International: Indicatif de station Jour de semaine (MON, TUE, WED, THU, FRI, SAT, SUN) Mois,Jour,An Heure:Minute WGSS TUE Mar,25,2014 02 :15 Remarque : En absence d’indicatif de station, le PI CODE de la station actuelle sera affiché. BOUTON MÉMOIRE Avec la radio allumée : Après avoir choisi une station appuyez rapidement sur le bouton Mémoire, va clignoter. Faites tourner le bouton TUNING [Accord] pour trouver l’adresse préréglée et appuyea rapidement sur le bouton Mémoire pour confirmer le préréglage. APPUYEZ RAPIDEMENT SUR LE BOUTON [p] OU [q] ET SUR LE BOUTON MÉMOIRE POUR PRÉRÉGLER Utilisez lafonction ATS pour prérégler rapidement les stations. 23 TRAVELER III MANUEL DU PROPRIÉTAIRE 1. Pour un balayage automatique des fréquences : appuyez longtemps sur le bouton [p] ou [q] pour balayer automatiquement les stations. 2. Pour choisir votre station favorite, appuyez rapidement une fois sur le bouton MÉMOIRE pour mémoriser cette station et balayer ensuite les autres stations. BOUTON DELETE [SUPPRIMER] Supprimer une station Avec la radio allumée : 1. Dans l’affichage d’état du balayage d’adresses, appuyez longtemps sur le bouton DELETE [SUPPRIMER], l’icône clignotera et PXX DEL clignotera sur l’écran LCD (XX indique l’adresse de la station préréglée] 2. Relâchez ce bouton, faites tourner le bouton TUNING [ACCORD] pour trouver l’adresse et la fréquence à supprimer. 3. Appuyez rapidement sur le bouton DELETE pour confirmer la suppression. Supprimer toutes les stations Avec la radio éteinte : Appuyez pendant 2 secondes sur le bouton DELETE [SUPPRIMER] jusqu’à ce que l’affichage LCD affiche ALL DEL [SUPP TOUTES] qui clignote, relâchez ce bouton et appuyez de nouveau rapidement sur ce bouton pour supprimer toutes les stations préréglées. 24 TRAVELER III MANUEL DU PROPRIÉTAIRE Avec la radio allumée : Dans l’état de recherche d’adresses, appuyez pendant 2 secondes sur DELETE [SUPPRIMER] jusqu’à ce que l’affichage LCD affiche ALL DEL [SUPP TOUTES] qui clignote, relâchez ce bouton et appuyez de nouveau rapidement sur ce bouton pour supprimer toutes les stations préréglées. Appuyez rapidement sur le bouton [p] ou [q] et sur le bouton DELETE [SUPPRIMER] : 1. Sur l’indicateur d’état de la recherche d’adresse : appuyez longtemps sur le bouton [p] ou [q] pour passer en préréglage automatique des stations : 2. Quand une station préférée est trouvée, appuyez rapidement sur le bouton DELETE [SUPPRIMER] pour la supprimer puis passez à la suivante. BOUTON RESET [REMETTRE] Utilisez un cure-dent ou une petite tige pointue pour appuyer sur le bouton REST [REMETTRE] pour réinitialiser complètement l’unité en cas de mauvais fonctionnement ou de panne. DST [HEURE D’ÉTÉ] Si l’utilisateur veut utiliser l’heure d’été, 1 heure en avance, BOUTON DE FUSEAU HORAIRE Après avoir réglé l’heure locale, faites tourner le bouton de fuseau horaire, quand l’indicateur est mis sur un fuseau horaire donné, l’écran LCD affichera l’heure du fuseau horaire. 25 TRAVELER III MANUEL DU PROPRIÉTAIRE BOUTON D’ - ACCORD + Faites tourner ce bouton pour régler l’heure, la fréquence et les adresses préréglées. Pour régler l’heure, l’utilisateur peut utiliser le bouton HOME [ACCUEIL] ou ALARM [RÉVEIL] pour régler l’horloge. Faites tourner ce bouton pour changer de fréquence d’accord. Faites tourner ce bouton pour choisir l’adresse de préréglage en mode adresse de préréglage. BOUTON - VOLUME + Faites tourner ce bouton pour augmenter ou diminuer le volume. Prise d’écouteur : 3,5 mm Prise de CC Paramètres de système 1. Réglage du pas MW [OM] Avec la radio arrêtée, appuyez longtemps sur le bouton 9/10k, l’affichage indiquera AM - 10K, ce qui signifie OM pas - 10K; AM-9K signifie OM pas - 9K. Remarque : Quand le pas pour les OM est de 10K, l’affichage de température est en degrés Farhrenheit, quand le pas pour les OM est de 9K, la température est affichée en degrés Celsius. 26 TRAVELER III MANUEL DU PROPRIÉTAIRE 2. Réglage de la plage de fréquence MF Avec la radio arrêtée, appuyez longtemps sur le boutonFM SET puis relâchez-le, appuyez rapidement pour choisir la plage de fréquences MF comme cidessous : 87,5-108MHz 87.0-108MHz 64.0~108MHZ 76.0~108MHZ 3. Pour passer ou quitter la bande MW [OL] Avec la radio arrêtée, appuyez longtemps sur le bouton AM/LW [MA/OL] ,l’affichage indique “LW ON”,ce qui signifie que la radio est sur MW [OM].par opposition à LOW OFF [La radio n’set pas sur MW [OM] 4. Pour enclencher ou arrêter la sonnerie Avec la radio arrêtée, appuyez longtemps sur le bouton SNOOZE/LIGHT, l’affichage affiche ‘Beep on’ ce qui signifie que la sonnerie est activée, par opposition à ‘Beep off’. SPÉCIFICATIONS 1. Fréquences prises en charge US/CAN/MEXINTL FM(MF) : 87 - 108 MHz AM(OM) : 520 - 1710 kHz LW(OL) : 153 - 513 kHz SW1(OC): 2.3 - 26.1 MHz DAB: 64 - 108 MHz 522 - 1620 kHz 153 - 513 kHz 2.3 - 26.1 MHz 174.928 - 239.200 MHz 27 TRAVELER III MANUEL DU PROPRIÉTAIRE 2. Sensibilité limitée par le bruit : MF ≤ 3µv OM ≤ 1mv/m OC ≤ 10mv/m OL ≤ 18µv 3. Haut-parleur : 50 mm 8 ohm 0.5 W 4. Écouteur : D 3,5 mm 5. Alimentation : Piles : 4 x AA (4x1,5 V) CC: 6 V 6. Dimensions : 135(L)x87(H)x27(D)mm 7. Poids : 213 g environ (sans piles) AVEZ-VOUS BESOIN D’AIDE? CONTACTEZ-NOUS : Etón Corporation 1015 Corporation Way, Palo Alto, CA 94303, USA 1-800-872-2228 (U.S.) 1-800-637-1648 (Canada) 1650-903-3866 (Monde) L-V, 08:00-16:30, heure normale du Pacifique www.etoncorp.com. AVERTISEMENT •N’exposez pas cet appareil à la pluie ou à l’humidité. •Ne le plongez pas dans l’eau ou ne l’exposez pas longtemps à l’eau. •Protégez le de l’humidité forte et de la pluie. •Ne l’utilisez que dans la plage de température spécifiée (0°C à 40°C) 28 TRAVELER III MANUEL DU PROPRIÉTAIRE •Débranchez-le immédiatement ou enlevez immédiatement les piles si du liquide a été renversé dessus ou si un objet est tombé dans l’appareil. •Ne nettoyez qu’avec ubn tissu sec. N’utilisez pas de détergents ou de solvants chimiques car ils peuvent endommager le fini. •N’enlevez pas le couvercle (au dos) •Faites effectuer le service par un personnel qualifié. ENVIRONNEMENT Élimination Selon la Directive européenne 2002/96/EC, tous les produits électriques et électroniques doivent être collectés séparément par un système local de collecte. Veuillez agir selon vos règles locales et n’éliminez pas vos vieux produits avec vos déchets ménagers normaux. Veuillez éliminer tous les types de piles elon les règles ou les règlementations de votre gouvernement, état ou locales. Si vous n’êtes pas sûr, veuillez appeler l’autorité locale pertinente pour savoir comment les éliminer en sécurité et aider à protéger l’environnement. ENREGISTREMENT DE LA GARANTIE Pour assurer une couvertue complète par la garantie ou les mises à jour du produit, l’enregistrement de votre produit doit être effectué dès que possible après l’achat ou la réception. 29 TRAVELER III MANUEL DU PROPRIÉTAIRE Veuillez visiter http://www.etoncorp.com/productregistration pour enregistrer votre produit. GRANTIE LIMITÉE Conservez une preuve de votre achat ou le reçu. Les informations sur la garantie limitée peuvent être lues surwww.etoncorp.com dans la section Assistance. SERVICE POUR VOTRE PRODUIT Pour obtenir un service de votre produit nous vous recommandons de contacter d’abord un représentant de service d’Etón au 800872-2228 É.U., 800-637-1648 Canada ou (650) 903-3866 pour la détermination du problème et le dépannage. Si un service plus poussé est nécessaire, le personnel technique vous dira comment procéder selon que la radio est encore sous garantie ou nécessite un service hors garantie. GARANTIE Si votre produit est encore sous garantie et que le représentant de service d’Etón détermine qu’un service sous garantie est nécessaire, une autorisation de retour sera émise et des instructions pour l’expédition à une installation de réparation sous garantie vous 30 TRAVELER III MANUEL DU PROPRIÉTAIRE seront données. Ne renvoyez pas votre radio sans avoir obtenu le numéro d’autorisation de retour. HORS GARANTIE Si votre produit n’est plus sous garantie et nécessite un service notre personnel technique vous orientera vers l’installation de réparation la plus proche pouvant s’occuper au mieux de votre réparation. Pour un service hors d’Amérique du Nord, veuillez consulter les insformations sur le distributeur incluses au moment de l’acahat/ réception. 31 MANUAL DEL USUARIO DE TRAVELER III CONOZCA LA TRAVELER III Gracias por adquirir Etón Traveler III. Queremos que disfrute del uso de este producto en su totalidad. Para aprovechar todas sus magníficas y exclusivas funciones, le recomendamos que lea cuidadosamente el manual del usuario. FRENTE 2 3 4 5 1 7 6 8 9 10 11 PARTE POSTERIOR 12 13 14 32 MANUAL DEL USUARIO DE TRAVELER III LATERAL DERECHO LATERAL IZQUIERDO 17 15 18 16 Características: 1 Rejilla para altavoz 10 Botón de repetición de alarma/luz 2 Panel LCD 11 Botón de paso 3 Botón de encendido/ 12 Antena de látigo 13 Base de apoyo Visualización de los modos y 14 Compartimento de baterías el botón de bloqueo 15 Sintonizador de dial 5 Cobertura G.M.T. 16 Perilla de volumen 6 Botón Siguiente 17 Toma de audífonos 7 Botón Anterior 18 Toma de CC 8 Botón AM/OL 9 Botón FM/RDS descanso 4 33 MANUAL DEL USUARIO DE TRAVELER III BOTÓN DE ENCENDIDO/DESCANSO Presione el botón rápidamente para encender la radio y presiónelo nuevamente para apagarla. Presione este mismo botón prolongadamente y aparecerá el ícono en el LCD. Gire la perilla de “sintonización” para seleccionar el tiempo de desconexión automático deseado entre 1 y 120 minutos. Si selecciona “ON” la radio permanecerá encendida de continuo. Nota: si la alarma está sonando, presione este botón rápidamente para apagar la alarma. VISUALIZACIÓN DE LOS MODOS Y EL BOTÓN DE BLOQUEO Presione rápidamente para visualizar la alarma, temperatura, hora local/mundial, intensidad de la señal, relación señal/ruido Presione prolongadamente: botones de bloqueo/desbloqueo y perilla de sintonización FRECUENCIA /DIRECCIÓN PARA VF/VM, BOTÓN DE PASO DE SINTONIZACIÓN Con la radio encendida: Presione rápidamente: cambie entre frecuencia y dirección. Cuando Cambia a Frecuencia, aparecerá “tuning” (sintonización); cuando cambie a dirección, aparecerá “Preset” (presintonía). Presione rápidamente para cambiar el paso de sintonización a rápido o lento; el ícono indica paso lento, el ícono indica paso rápido. 34 MANUAL DEL USUARIO DE TRAVELER III u uu Paso lento Paso rápido Banda Bouton d’accord long Bouton d’accord rapide Bouton d’accord long Bouton d’accord rapide FM 0.01MHZ 0.1MHZ 0.1MHZ 1MHZ OL 1KHZ 3KHZ 3KHZ 100KHZ OM 1KHZ 9/10KHZ 9/10KHZ 100KHZ OC 1KHZ 5KHZ 5KHZ 100KHZ BOTÓN HOME Gire la “perilla indicadora de la zona horaria” para que coincida con su ciudad. Presione prolongadamente el botón “HOME” y la hora destellará; luego gire la perilla de sintonización para cambiar la hora. Presione rápidamente el botón Home, los minutos destellarán; luego gire la perilla de sintonización para cambiar los minutos. Presione rápidamente de nuevo para confirmar el horario local. ALARMA: CONFIGURACIÓN DEL TEMPORIZADOR DE LA ALARMA El método de configuración es el mismo que el del horario local, la única diferencia es que el usuario debe presionar nuevamente el botón ALARM luego de haber restablecido la alarma; luego girar la perilla de sintonización para establecer el temporizador de apagado automático con un rango de 1 a 90 minutos. •Método de selección de alarma , presione rápidamente el botón ALARM sin establecer el temporizador de alarma. Si el ícono destella, se activará la alarma con la función de radio. 35 MANUAL DEL USUARIO DE TRAVELER III •Con la radio prendida, busque primero la estación deseada, que se usará como su estación favorita para la alarma; también establezca el volumen adecuado. •Presione prolongadamente el botón ALARM, cuando el usuario escuche el sonido “bip”, el ícono destellará y el usuario podrá establecer esta estación para la alarma. •Si la alarma está establecida, el dispositivo se encenderá automáticamente y recibirá la estación preestablecida, luego se apagará automáticamente cuando se cumpla el tiempo deseado. Durante la sintonización de la radio, si la alarma está prendida, el dispositivo cambiará a la estación preconfigurada automáticamente. •Si el ícono destella, indica alarma con zumbador. La siguiente característica es nueva: •Si el usuario no conoce las frecuencias de las estaciones locales y el tiempo de reproducción, le sugerimos que utilice la alarma con zumbador. Si la alarma está establecida, el dispositivo producirá el sonido “bip bip” y se apagará en el momento preestablecido automáticamente. •Si los íconos antes mencionados no aparecen, la alarma está apagada. Nota: el temporizador de la alarma coincide con la hora del indicador de la zona horaria. Si el usuario establece la alarma para las 7:00 a.m., y la hora del indicador de la zona horaria es la de Nueva York, el dispositivo tendrá la alarma configurada para las 7:00 a.m. de la hora de Nueva York. BOTÓN DE LUZ/REPETICIÓN DE ALARMA Presione rápidamente el botón [Luz/Repetición de alarma] para seleccionar el nivel de brillo (APAGADO-BAJO-Alto) 36 MANUAL DEL USUARIO DE TRAVELER III Si no se utiliza el dispositivo, el brillo de la luz de fondo permanecerá en el nivel seleccionado o la luz de fondo se apagará en los 10 minutos siguientes. Si la luz de fondo está apagada, cuando el usuario presione cualquier botón, si presiona rápidamente para encender la luz de fondo por primera vez y presiona rápidamente de nuevo significará que se está utilizando el dispositivo. FUNCIÓN DE REPETICIÓN DE ALARMA: Con la alarma prendida, presione rápidamente el botón Luz/repetición de alarma para apagar la alarma temporalmente; la alarma sonará luego de 10 minutos. De esta manera, la función de repetición de alarma se puede repetir 3 veces. Cuando la alarma suene una cuarta vez, presione el botón Luz/repetición de alarma nuevamente para apagar la alarma. BOTÓN DE BANDA DE ONDA CORTA/VISUALIZACIÓN AUTOMÁTICA Con la radio prendida: •Presione rápidamente el botón [] o [] para seleccionar la banda de OC •Presione rápida y continuamente el botón [] o [] para seleccionar la banda de metros de OC •En estado de búsqueda automática de frecuencias: presione prolongadamente el botón [] o [] para visualizar automáticamente la estación •En el estado de búsqueda de dirección, presione prolongadamente el botón [] o [] para visualizar automáticamente las estaciones preestablecidas 37 MANUAL DEL USUARIO DE TRAVELER III BOTÓN DE BANDAS/SINTONIZACIÓN AUTOMÁTICA AM/OL Con la radio encendida: •Presione rápidamente el botón [AM/OL] para seleccionar bandas AM (OM) u OL •Presione prolongadamente el botón [AM/OL] para guardar la sintonización de bandas AM(OM) u OL automáticamente BOTÓN FM RDS (SISTEMA DE RADIODIFUSIÓN DE DATOS)/ATS (SISTEMA DE SINTONIZACIÓN AUTOMÁTICA) Con la radio encendida: Presione rápidamente el botón FM/RDS para seleccionar la banda FM Presione prolongadamente el botón FM RDS para proceder con la función ATS VISUALIZACIÓN DE INFORMACIÓN DEL RDS En la banda FM, presione rápidamente el botón FM RDS para visualizar la información del RDS en ciclo. Si existe información del RDS en el LCD, aparecerá el ícono. Presione rápidamente el botón FM RDS para visualizar: PS/PTY/RT/ DATA 38 MANUAL DEL USUARIO DE TRAVELER III PS: nombre de la emisora si no existe una estación, se visualizará NO PS PTY: tipo de programa si no hay programa, se visualizará NO PTY RT: radio texto si no hay texto, se visualizará NO RT DATA: información sobre hora/fecha/distintivo de llamada de programa semanal; si no hay ninguna información, se visualizará NO DATA. Si no hay información disponible, el formato que se visualizará será: Norteamérica: Distintivo de llamada de estación Día de la semana (MON, TUE, WED, THU, FRI, SAT, SUN) Mes-Día-Año Hora:Minutos WGSS TUE 03-25-2014 02 :15 Internacional: Distintivo de llamada de estación Día de la semana (MON, TUE, WED, THU, FRI, SAT, SUN) Mes,Día,Año Hora:Minutos WGSS TUE Mar,25,2014 02 :15 Nota: si no hay distintivo de llamada de estación, se visualizará el código de identificación del programa de la estación actual. BOTÓN DE MEMORIA Con la radio encendida: Cuando escoja la estación, presione rápidamente el botón Memoria, luego destellará . 39 MANUAL DEL USUARIO DE TRAVELER III Gire la perilla de SINTONIZACIÓN para encontrar la dirección preestablecida y presione rápidamente el botón Memoria de nuevo para confirmar la configuración. PRESIONE RÁPIDAMENTE EL BOTÓN [] O [q] Y EL BOTÓN DE PREESTABLECIMIENTO DE MEMORIA Utilice la función ATS para pasar rápidamente a las estaciones preestablecidas 1. Cuando realice la exploración automática de frecuencias, presione prolongadamente el botón [] o [], para realizar la exploración automática de estaciones. 2. Cuando elija su estación favorita, solo presione rápidamente el botón MEMORIA una vez para guardar la estación y luego podrá explorar automáticamente otras estaciones. BOTÓN DELETE (ELIMINAR) Elimine una estación Con la radio prendida: 1. En el estado de exploración de direcciones, presione prolongadamente el botón [delete], el ícono destellará y aparecerá “PXX DEL” en el LCD (XX indica la dirección preestablecida); 2. Suelte el botón, gire el botón de sintonización para encontrar la dirección y frecuencia eliminadas que desea. 3. Presione rápidamente el botón [DELETE] (Eliminar) para confirmar la eliminación. 40 MANUAL DEL USUARIO DE TRAVELER III Eliminación de todas las estaciones Con la radio apagada: Presione prolongadamente el botón [delete] por dos segundos hasta que el LCD muestre “ALL DEL” destellando, suelte el botón y presione rápidamente el botón de nuevo para eliminar todas las estaciones preestablecidas. Con la radio prendida: En el estado de búsqueda de dirección, presione prolongadamente [delete] por dos segundos hasta que en el LCD se muestre “ALL DEL” destellando, suelte el botón y presione rápidamente el botón [delete] para eliminar todas las estaciones. Presione rápidamente el botón [] o [] y el botón DELETE: 1. En el estado de búsqueda de dirección, presione prolongadamente el botón [] o [] para entrar en la estación preestablecida automáticamente. 2. Cuando el usuario encuentre estaciones que no desea, solo presione rápidamente el botón DELETE para eliminarla y luego verificar la próxima. BOTÓN DE REINICIO Utilice un palillo para los dientes u otro palillo puntiagudo para presionar el botón RESET (Reinicio) para reiniciar el dispositivo por completo cuando el dispositivo no funcione bien o no funcione. 41 MANUAL DEL USUARIO DE TRAVELER III DST Si el usuario desea utilizar el horario del verano, el horario estará 1 hora adelantado. Es decir, “DST”=horario de verano PERILLA INDICADORA DE LA HORA Luego de establecer el horario local, gire la perilla indicadora de la hora, si el indicador muestra la zona horaria deseada, el LCD mostrará el horario de la zona horaria. - SINTONIZADOR + PERILLA Gire la perilla para ajustar el horario, la frecuencia y dirección preestablecida Cuando configure el horario, el usuario puede usar el botón HOME o ALARM para configurar el reloj Gire esta perilla para cambiar la frecuencia de sintonización Gire esta perilla para seleccionar la dirección preestablecida en el modo de dirección preestablecida. - VOLUMEN + PERILLA Gire la perilla para aumentar o disminuir el volumen. Toma de audífonos: 3.5 mm Toma de CC Configuración del sistema 42 MANUAL DEL USUARIO DE TRAVELER III 1. Configuración del paso de OM Con la radio apagada, presione prolongadamente el botón [9/10k], el LCD mostrará AM-10k, que significa paso de OM -10k; AM-9k significa OM paso-9k. Nota: cuando el paso de OM es 10k, el formato de la visualización de la temperatura será Fahrenheit, cuando el paso de OM es 9k, el formato de la visualización de la temperatura será Celsius 2. Configuración del rango de frecuencia FM Con la radio apagada, presione prolongadamente FM SET y luego suelte, presione rápidamente para seleccionar el rango de frecuencia FM 87.5-108MHz 87.0-108MHz 64.0~108MHZ, 76.0~108MHZ 3. Encienda o apague la banda de OL Con la radio apagada, presione prolongadamente el botón AM/OL, el LCD mostrará “LW ON”, que significa que la OL está encendida, en oposición a LW OFF (onda larga apagada) 4. Encienda o apague la banda de OL Con la radio apagada, presione prolongadamente el botón Luz/ repetición de alarma, el LCD mostrará “Beep on”, que significa que el sonido está activado, en oposición a “Beep off” (sonido apagado) 43 MANUAL DEL USUARIO DE TRAVELER III ESPECIFICACIONES 1. Frecuencias compatibles US/CAN/MEXINTL FM : 87 - 108 MHz AM(OM) : 520 - 1710 kHz LW(OL): 153 - 513 kHz SW1(OC): 2.3 - 26.1 MHz DAB: 64 - 108 MHz 522 - 1620 kHz 153 - 513 kHz 2.3 - 26.1 MHz 174.928 - 239.200 MHz 2. Límite de sensibilidad de ruido: FM ≤ 3µv OM ≤ 1mv/m OC ≤ 10mv/m OL ≤ 18µv 3. Altavoz: 50mm 8ohm 0.5W 4. Auriculares: D 3.5mm 5. Suministro de energía: Baterías: 4 x tamaño AA (4x1.5V) CC: 6V 6. Dimensiones: 135(largo) x 87(alto) x 27(profundidad)mm 7. Peso: aprox. 213 g (no se incluyen baterías) ¿NECESITA AYUDA? CONTÁCTENOS. Etón Corporation 1015 Corporation Way, Palo Alto, CA 94303, Estados Unidos 1-800872-2228 (Estados Unidos) 44 MANUAL DEL USUARIO DE TRAVELER III 1-800-637-1648 (Canadá) 650-903-3866 (En todo el mundo) M-F, 8:00 A.M. - 4:30 P.M., hora estándar del pacífico www.etoncorp.com. ADVERTENCIA No exponga este dispositivo a lluvia o humedad. •No lo sumerja o exponga al agua por periodos prolongados. •Protéjalo de los altos niveles de humedad y lluvia. •Debe funcionar solo dentro del rango de temperaturas especificado (0 °C a 40 °C). •Desenchúfelo o quítele las baterías inmediatamente si se ha derramado líquido o algún objeto ha caído sobre el aparato. •Límpielo solo con un paño seco. No use detergente o solventes químicos, ya que esto podría dañar el acabado. •No le quite la tapa o cobertor trasero. •Solo personal de servicio calificado podrá repararlo. MEDIO AMBIENTE Eliminación Según la Directiva Europea 2002/96/CE, todos los productos eléctricos y electrónicos se deben recolectar por separado mediante un sistema local de recolección. Actúe de acuerdo con las reglas locales y no elimine los productos viejos junto con el desecho habitual del hogar. 45 MANUAL DEL USUARIO DE TRAVELER III Elimine todos los tipos de baterías según las reglas y/o normas de su gobierno, estado o localidad. Si no está seguro, llame a la autoridad local adecuada para averiguar cómo eliminar los desechos de manera responsable y así ayudar a proteger el medio ambiente. REGISTRO DE GARANTÍA Para asegurar la cobertura completa en la garantía o actualizaciones de productos, debe completar la registración de su producto lo antes posible luego de la compra o de obtener la factura. Diríjase a http://www.etoncorp.com/productregistration para registrar el producto. GARANTÍA LIMITADA Conserve la evidencia de compra o la factura. Puede ver la información de la Garantía Limitada en www.etoncorp.com en la sección Support (Asistencia). SERVICIO DE REPARACIÓN DEL PRODUCTO Para recibir el servicio de reparación de su producto, recomendamos que primeramente se contacte con un representante de atención de Etón al 800-872-2228 Estados Unidos, 800-637-1648 Canadá o (650) 903-3866 para determinar el problema y obtener un diagnóstico. Si se precisa de otro servicio, el personal técnico brindará instrucciones sobre cómo proseguir, basadas en si la radio está bajo garantía o precisa de un servicio no cubierto por la garantía. 46 MANUAL DEL USUARIO DE TRAVELER III GARANTÍA Si el producto continúa bajo la cobertura de la garantía y el representante de atención determina que se precisa del servicio de garantía, se emitirá una autorización de devolución e instrucciones para el envío a un taller de reparación autorizado por la garantía. No envíe la radio sin obtener un número de devolución autorizado. SIN GARANTÍA Si el producto no está cubierto por la garantía y debe ser reparado, nuestro personal técnico lo derivará al taller de reparación más cercano apto para realizar la reparación. Para acceder al servicio de reparación fuera de Norteamérica, tome como referencia la información del distribuidor incluida al momento de la compra o cuando haya obtenido la factura. 47 TRAVELER III-BENUTZERHANDBUCH HIER IST DER TRAVELER III FÜR SIE Vielen Dank für den Kauf des Etón Traveler III. Wir möchten, dass Sie den Einsatz dieses Produkts in vollen Zügen genießen können. Um die Vorteile der vielen exzellenten und einzigartigen Funktionen zu nutzen, bitten wir Sie, die Bedienungsanleitung sorgfältig zu lesen. VORDERSEITE 2 3 4 5 1 7 6 8 9 10 11 HINTEN 12 13 14 48 TRAVELER III-BENUTZERHANDBUCH RECHTE SEITE LINKE SEITE 17 15 18 16 Leistungsmerkmale: 1 Lautsprechergitter 13 Aufsteller 2 LCD-Bildschirm 14 Batteriefach 3 Taste für Betriebs/Ruhezustand 15 Sendereinstellungsknopf 4 Taste für ANZEIGEModus/Sperre 16 Lautstärkeknopf 5 G.M.T.-Abdeckung 17 Kopfhöreranschluss 6 Aufwärtstaste 18 Gleichstrombuchse 7 Abwärtstaste 8 Taste für MITTELWELLE/ LANGWELLE 9 Taste für UKW/RDS 10 Taste für Schlummer/Licht 11 Taste für schrittweises Vorgehen 12 Peitschenantenne 49 TRAVELER III-BENUTZERHANDBUCH TASTE FÜR BETRIEBS/RUHEZUSTAND Drücken Sie kurz, um das Radio einzuschalten und drücken Sie erneut, um es auszuschalten Bei langem Drücken dieser Taste blinkt das Symbol in der LCD-Anzeige. Drehen Sie den “Sender”-Einstellungsknopf, um die gewünschte Auto-Abschaltzeit zwischen 1 ~ 120 Minuten auszuwählen. Wählen Sie “ON”, bleibt das Radio die ganze Zeit eingeschaltet. Hinweis: Wenn der Alarm ertönt, drücken Sie schnell Sie diese Taste, um die Alarmfunktion abzuschalten. TASTE FÜR ANZEIGEMODUS/SPERRE Schnell drücken, um Alarm, Temperatur, Lokal/Weltzeit, Signalstärke, S/N-Verhältnis anzuzeigen Lange gedrückt: Tasten und Drehknopf zum Sperren/Entsperren SCHRITTTASTE FÜR VF/VM-FREQUENZ/STATION, EINSTELLUNG Bei eingeschaltetem Radio: Schnell drücken: Umschalten zwischen Frequenz und Sender. Beim Umschalten auf Frequenz blinkt “Tuning” Beim Umschalten auf Sender blinkt “Preset”. Lange drücken, um Abstimmungsschritt schnell oder langsam zu ändern, u Symbol zeigt langsame Änderung an, uu Symbol zeigt schnelle Änderung an. 50 TRAVELER III-BENUTZERHANDBUCH u uu Langsame Änderung Schnelle Änderung Band Knopf für langsame Einstellung Knopf für schnelle Einstellung Knopf für langsame Einstellung Knopf für schnelle Einstellung UKW 0.01MHZ 0.1MHZ 0.1MHZ 1MHZ LANGWELLE 1KHZ 3KHZ 3KHZ 100KHZ MITTELWELLE 1KHZ 9/10KHZ 9/10KHZ 100KHZ KURZWELLE 1KHZ 5KHZ 5KHZ 100KHZ HOME-TASTE Stellen Sie die “Zeitzonenanzeige” auf Ihre Stadt. Drücken Sie so lange auf die Taste “HOME”, bis die Stundenanzeige blinkt, und drehen Sie den Knopf für die Sendereinstellung, um die Stunde zu ändern. Drücken Sie kurz auf die Taste “HOME”, bis die Minutenanzeige blinkt, und drehen Sie den Knopf für die Sendereinstellung, um die Minute zu ändern. Drücken Sie schnell noch einmal, um die Ortszeit zu bestätigen. ALARM - ALARM EINRICHTEN Die Einstellung ist gleich wie bei der lokalen Zeiteinstellung, der einzige Unterschied ist, dass Sie die Taste ALARM drücken müssen, nachdem der Alarm eingestellt wurde, und dann den Knopf für die Sendereinstellung (TUNING), um die automatische Abschaltung im Bereich von 1 bis 90 Minuten einzustellen. •Alarmmethodenauswahl , Drücken Sie schnell die Taste ALARM, ohne die Alarmeinstellung einzustellen. Das Symbol Alarmradiofunktion aktivieren blinkt. 51 TRAVELER III-BENUTZERHANDBUCH •Mit eingeschaltetem Radio suchen Sie zunächst den gewünschten Sender, den Sie als Lieblingssender für einen Alarm hören möchten, und stellen auch die passende Lautstärke ein. •Drücken Sie lange die Taste ALARM, bis Sie einen “Piepton” hören. Das Symbol blinkt, und Sie können einen Alarm mit diesem Sender einrichten. Wenn die Alarmzeit kommt, wird das Gerät automatisch eingescahltet und spielt solange den voreingestellten Sender, bis die gewünschte Zeit erreicht wurde; dann schaltet sich das Gerät ab. Wenn der Alarm während des Zuhörens aktiv ist, schaltet das Gerät automatisch auf den voreingestellten Sender um. Wenn das Symbol einen Summeralarm anzeigt, ist die folgende Funktion neu: •Wenn Sie sich nicht mit lokalen Senderfrequenzen und Sendezeiten auskennen, empfehlen wir, den Summeralarm zu verwenden. Wenn der Alarm eingerichtet ist, verursacht das Gerät “Piep-Piep”-Töne und wird nach der voreingestellten Zeit automatisch abgeschaltet. •Wenn die oben genannten Symbole nicht angezeigt werden, bedeutet das, dass der Alarm ausgeschaltet ist. Hinweis: Der Alarmzeitmesser entspricht der Zeitanzeige der Zeitzone. Wenn Sie den Alarm auf 7:00 Uhr einstellen und die Zeit der Zeitzonenanzeige steht auf New Yorker Zeit, wird das Gerät um 7:00 Uhr New Yorker Zeit den Alarm einschalten. TASTE FÜR LICHT/SCHLUMMER (LIGHT/SNOOZE) Drücken Sie schnell die Taste [LIGHT/SNOOZE], um die Helligkeit einzustellen (AUS-NIEDRIG-HOCH) Wenn nicht in Betrieb, wird die Helligkeit der Hintergrundbeleuchtung Ihre gewählte Ebene beleuchten, oder die Hintergrundbeleuchtung nach 10 Minuten abschalten. Wenn die Hintergrundbeleuchtung 52 TRAVELER III-BENUTZERHANDBUCH ausgeschaltet ist, und Sie eine beliebige Taste drücken, drücken Sie schnell zum Einschalten der Hintergrundbeleuchtung, ein weiteres Drücken aktiviert dann die Knopfbedienung. SCHLUMMERFUNKTION (SNOOZE): Wenn der Alarm eingeschaltet ist, drücken Sie schnell die Taste LICHT/SCHLUMMER (LIGHT/SNOOZE), um den Alarm zu unterbrechen; er wird nach 10 Minuten wieder eingeschaltet. Sie können die Schlummerfunktion (SNOOZE) dreimal wiederholen. Wenn der Alarm zum 4. Mal aktiviert ist, drücken Sie die Taste LICHT/ SCHLUMMER (LIGHT/SNOOZE) erneut, um den Alarm abzuschalten. TASTE FÜR KURZWELLENBAND/AUTOANZEIGE Bei eingeschaltetem Radio: Drücken Sie schnell die Taste [p] oder [q], um das KURZWELLENBAND zu wählen Drücken Sie schnell kontinuierlich die Taste [p] oder [q], um das KURZWELLEN-Meterband zu wählen Im Frequenzautosuchstatus: Drücken Sie lange die Taste [p] oder [q], um die Sender automatisch anzuzeigen Im Sendersuchstatus drücken Sie lange die Taste [p] oder [q], um die voreingestellten Sender automatisch anzuzeigen TASTE FÜR MITTELWELLE/LANGWELLE/ATS (AM/LW/ ATS) Bei eingeschaltetem Radio: 53 TRAVELER III-BENUTZERHANDBUCH •Drücken Sie schnell die Taste [AM/LW] und wählen Sie AM (MW) oder LW-Band •Drücken Sie lange die Taste [AM/LW], um automatisch auf gespeichertes AM (MW) oder LW-Band zuzugreifen TASTE FÜR UKW-RDS/ATS (FM RDS/ATS) Bei eingeschaltetem Radio: Drücken Sie schnell die Taste FM/RDS, um das UKW/RDS-Band (FM) zu wählen Drücken Sie lange auf die Taste FM RDS, um mit der ATS-Funktion fortzufahren RDS-INFORMATIONSANZEIGE Im UKW-Band, drücken Sie schnell die Taste FM RDS, um verschiedene RDS-Informationen reihum anzuzeigen. Wenn es RDS-Informationen auf dem LCD gibt, wird ein Symbol angezeigt. Drücken Sie schnell auf die Taste UKW-RDS, um PS/PTY/RT/DATA anzuzeigen PS : Programmname, wenn kein Sender, nur Anzeige NO PS PTY: Programmtyp, wenn kein Programm, nur Anzeige NO PTY RT: Programmtext, wenn kein Text, nur Anzeige NO RT 54 TRAVELER III-BENUTZERHANDBUCH DATA: Zeit/Datum/Wochenprogramm Rufzeicheninformationen, wenn keine Informationen, nur Anzeige NO DATA Wenn Informationen zur Verfügung stehen, sehen Sie: Nordamerika: Sender Rufzeichen Wochentag (MON, TUE, WED, THU, FRI, SAT, SUN) Mo-Tag-Jahr Stunde:Minute WGSS TUE 03-25-2014 02 :15 International: Sender Rufzeichen Wochentag (MON, TUE, WED, THU, FRI, SAT, SUN) Mo,Tag,Jahr Stunde:Minute WGSS TUE Mar,25,2014 02 :15 Hinweis:: Wenn kein Rufzeichen vorhanden ist, wird der PI-Code des aktuellen Senders angezeigt. TASTE FÜR SPEICHER (MEMORY) Bei eingeschaltetem Radio: Wenn ein Sender eingestellt ist, schnell die Speichertaste (MEMORY) drücken, dann blinkt der Sender. Drehen Sie den Knopf für die Sendereinstellung (TUNING), um den voreingestellten Sender zu finden und drücken Sie schnell die Speichertaste erneut, um die Voreinstellung zu bestätigen. DRÜCKEN SIE SCHNELL DIE TASTE [p] ODER [q] UND DIE MEMORY-SPEICHERTASTE Verwenden Sie die ATS-Funktion, um schnell Sender voreinzustellen 55 TRAVELER III-BENUTZERHANDBUCH 1. Wenn Sie die Auto-Scan-Frequenzfunktion benutzen, drücken Sie lange die Taste [p] oder [q], um automatisch nach Sendern zu suchen. 2. Wenn Sie Ihren bevorzugten Sender eingestellt haben, drücken Sie schnell einmal die Taste MEMORY, um diesen Sender zu speichern, und dann nach anderen Sendern zu suchen. TASTE ZU LÖSCHEN (DELETE) Einen Sender löschen Bei eingeschaltetem Radio: 1. Im Sender-Scan-Status, drücken Sie lange auf die Taste [Löschen] (DELETE), das Symbol und auch “PXX DEL” wird auf dem LCD blinken (XX steht für voreingestellte Sender); 2. Lassen Sie diese Taste los, drehen Sie den Knopf für die Sendereinstellung (Tuning), um den gewünschten gelöschten Sender und die Frequenz zu finden. 3. Drücken Sie schnell die Taste [DELETE], um das Löschen zu bestätigen. Alle Sender löschen Bei ausgeschaltetem Radio: Die Taste [Entf] 2 Sekunden lang drücken, bis auf der LCD-Anzeige “ALL DEL” blinkt, dann lassen Sie diese Taste los und drücken diese Taste schnell erneut, um alle gespeicherten Sender zu löschen. Bei eingeschaltetem Radio: Im Sendersuchstatus drücken Sie [Entf] (Delete) 2 Sekunden lang, bis auf der LCD-Anzeige “ALL DEL” blinkt, lassen Sie diese Taste los und drücken kurz die Taste [Entf] (Delete), um alle Sender zu löschen. 56 TRAVELER III-BENUTZERHANDBUCH Drücken Sie schnell die Taste [p] oder [q] und DELETE: Im Sendersuchstatus, drücken Sie lange die Taste [p] oder [q], um die automatisch voreingestellten Sender anzuzeigen; Wenn Sie einen nicht gewünschten Sender finden, drücken Sie nur schnell die Taste DELETE, um ihn zu löschen; dann aktivieren Sie den nächsten. TASTE FÜR ZURÜCKSETZEN (RESET) Verwenden Sie einen Zahnstocher oder einen anderen spitzen Gegenstand, um die Taste RESET zu drücken und das Gerät vollständig zurückzusetzen, wenn das Gerät Fehlfunktionen aufweist. DST Wenn Sie die Sommerzeit verwenden, geht die Zeit 1 Stunde vor. “DST” = Sommerzeit ZEITANZEIGEKNOPF Nach dem Einrichten der Ortszeit, drehen Sie den Zeitanzeigeknopf; wenn der Indikator auf der von Ihnen gewünschten Zeitzone steht, zeigt das LCD die Zeit der Zeitzone an. KNOPF FÜR - SENDEREINSTELLUNG + (TUNING) Drehen Sie diesen Knopf, um Zeit, Frequenz und voreingestellten Sender einzustellen 57 TRAVELER III-BENUTZERHANDBUCH Zum Einstellen der Zeit können Sie die Taste HOME oder ALARM benutzen Drehen Sie diesen Knopf, um beim Einstellen des Senders die Frequenz zu ändern Drehen Sie diesen Knopf, um den voreingestellten Sender im Modus voreingestellter Sender auszuwählen. KNOPF FÜR - LAUTSTÄRKE + (VOLUME) Drehen Sie diesen Knopf, um die Lautstärke zu erhöhen oder zu verringern. Kopfhöreranschluss: 3,5 mm Gleichstrombuchse Systemeinstellungen 1. Einrichtung der MITTELWELLE Bei ausgeschaltetem Radio drücken Sie lange die Taste [9/10 k], und das LCS zeigt 10 K an; das bedeutet MW-Schritt -10 K; AM-9 K bedeutet MW-Schritt -9 K. Hinweis: Wenn MW-Schritt 10 K ist, steht die Temperaturanzeige auf dem Fahrenheit-Format, wenn MW-Schritt 9 k ist, wird die Temperatur in Celsius angezeigt 2. Einrichten von UKW-Frequenzbereich (FM) Bei ausgeschaltetem Radio drücken Sie lange auf FM SET und lassen dann los, und drücken wieder schnell auf FM-Frequenzbereich (FM frequency range), wie unten gezeigt: 87.5-108MHz 58 TRAVELER III-BENUTZERHANDBUCH 87.0-108MHz 64.0~108MHZ, 76.0~108MHZ 3. LANGWELLENBAND aktivieren oder deaktivieren Bei ausgeschaltetem Radio drücken Sie lange auf Taste MITTELWELLE/LANGWELLE (AM/LW), und das LCD zeigt “LW ON”, d. h. LANGWELLE eingeschaltet. VS NIEDRIG AUS 4. Summer EIN oder AUS schalten Bei ausgeschaltetem Radio drücken Sie lange die Taste Schlummer/Licht (SNOOZE/LIGHT), das LCD zeigt “Beep On”, d. h. Piepton ist aktiviert. VS PIEPSEN AUS SPEZIFIKATIONEN 1. Unterstützte Frequenzen US/CAN/MEXINTL FM(UKW) : 87 - 108 MHz AM(MW) : 520 - 1710 kHz LW: 153 - 513 kHz SW1(KW): 2,3 - 26.1 MHz DAB: 64 - 108 MHz 522 - 1620 kHz 153 - 513 kHz 2,3 - 26.1 MHz 174,928 - 239,200 MHz 2. Rauschenbegrenzungs-Empfindlichkeit: UKW ≤ 3 µv MITTELWELLE ≤ 1 mv/m KURZWELLE ≤ 10 mv/m LANGWELLE ≤ 18 µv 3. Lautsprecher: 50 mm 8 Ohm 0,5 W 4. Kopfhörer: D 3,5 mm 59 TRAVELER III-BENUTZERHANDBUCH 5. Netzteil: Batterien: 4 x AA Größe (4x 1,5 V) Gleichstrom: 6 V 6. Abmessungen: 135 (L) x 87 (H) x 27 (T) mm 7. Gewicht: ca. 213 g (ohne Batterien) BENÖTIGEN SIE HILFE? KONTAKTIEREN SIE UNS. Etón Corporation 1015 Corporation Way, Palo Alto, CA 94303, USA 1-800-872-2228 (U.S.) 1-800-637-1648 (Canada) 650-903-3866 (worldwide) M-F, 8:00-16:30, Pacific Standard Time www.etoncorp.com. WARNUNG •Dieses Gerät darf nicht mit nicht Regen oder Feuchtigkeit in Berührung kommen. •Tauchen Sie nicht unter und setzen Sie es nicht für längere Zeit Wasser aus. •Schützen Sie es vor hoher Feuchtigkeit und Regen. •Es darf nur innerhalb des angegebenen Temperaturbereichs (0 ° C bis 40 ° C) betrieben werden. •Trennen Sie es sofort von der Energieversorgung oder entfernen Sie die Batterien, wenn Flüssigkeit verschüttet wurde oder ein Gegenstand in das Gerät gelangt ist. 60 TRAVELER III-BENUTZERHANDBUCH •Nur mit einem trockenen Tuch reinigen. Keine Reinigungsmittel oder chemische Lösungsmittel verwenden, da dies die Oberfläche beschädigt. •Entfernen Sie die Abdeckung [oder Rückwand] nicht. •Überlassen Sie die Wartung qualifiziertem Fachpersonal. UMGEBUNG Entsorgung Gemäß der EU-Richtlinie 2002/96/EG müssen alle elektrischen und elektronischen Produkte separat von einem örtlichen Sammelsystem erfasst werden. Bitte richten Sie sich nach den örtlichen Bestimmungen und entsorgen Sie Ihre alten Produkte nicht mit dem normalen Hausmüll. Bitte entsorgen Sie alle Arten von Batterien entsprechend den staatlichen oder lokalen Regeln und/oder Bestimmungen. Wenn Sie unsicher sind, rufen Sie bitte die entsprechende lokale Behörde an, um herauszufinden, wie man das Gerät sicher entsorgen und die Umwelt schützen kann. 61 TRAVELER III-BENUTZERHANDBUCH GARANTIE Um die volle Garantieabdeckung und Produkt-Updates zu gewährleisten, sollten Sie die Registrierung Ihres Produktes so bald wie möglich nach dem Kauf oder dem Erhalt vornehmen. Bitte gehen Sie zu http://www.etoncorp.com/productregistration, um Ihr Produkt zu registrieren. BEGRENZTE GARANTIE Bewahren Sie Ihren Kaufbeleg oder Ihre Quittung gut auf. Informationen zur begrenzten Garantie finden Sie unter www. etoncorp.com im Support-Bereich. SERVICE FÜR IHR PRODUKT Um Service für Ihr Produkt zu bekommen, empfehlen wir Ihnen, zunächst einen Etón Servicemitarbeiter unter 800-872-2228 USA, Kanada oder 800-637-1648 (650) 903-3866 zur Fehlerbestimmung und Fehlersuche zu kontaktieren. Wenn weiterer Service erforderlich ist, wird Sie das technische Personal anweisen, wie Sie weiter vorgehen sollen, das geschieht in Abhängigkeit davon, ob das für Gerät noch Garantie besteht oder nicht. 62 TRAVELER III-BENUTZERHANDBUCH GEWÄHRLEISTUNG Wenn Ihr Produkt noch in der Garantie ist und der Kundendienst von Etón bestimmt, dass ein Garantieservice benötigt wird, wird eine Rücksendegenehmigung erteilt und Sie erhalten Informationen für den Versand an einen autorisierten Reparaturdienst. Schicken Sie Ihr Radio nicht zurück, ohne eine Reparaturnummer erhalten zu haben. GARANTIEENDE Wenn Ihr Produkt ist nicht mehr unter die Garantie und fällt und Service erforderlich ist, wird Sie ein technischer Mitarbeiter zur nächsten Reparaturwerkstatt verweisen, die in der Lage ist, die Reparatur vorzunehmen. Für Service außerhalb von Nordamerika wenden Sie sich bitte an den Händler, dessen Informationen Sie zum Zeitpunkt des Kaufs/ Quittung erthalten haben. 63 MANUALE UTENTE TRAVELER III TI PRESENTO TRAVELER III Grazie per aver acquistato Etón Traveler III. Vogliamo farvi apprezzare a fondo l’uso di questo prodotto, pertanto vi invitiamo a leggere attentamente il manuale utente, per sfruttare le svariate caratteristiche di questa radio unica ed eccellente. VISTA FRONTALE 2 3 4 5 1 7 6 8 9 10 11 VISTA POSTERIORE 12 13 14 64 MANUALE UTENTE TRAVELER III LATO DESTRO LATO SINISTRO 17 15 18 16 Caratteristiche: 9 Tasto FM/RDS Griglia altoparlante 10 Tasto Pausa/Luminosità Pannello LCD 11 Tasto di passo Tasto di Alimentazione/ 12 Antenna a stilo Riposo 13 Supporto posteriore Tasto DI BLOCCO / MODALITÀ 14 Vano batteria visualizzazione 15 Manopola della sintonia 5 Copertura G.M.T. 16 Manopola del volume 6 Tasto Su 17 Jack auricolare 7 Tasto Giù 18 Jack CC 8 Tasto AM/LW 1 2 3 4 65 MANUALE UTENTE TRAVELER III TASTO DI ALIMENTAZIONE/RIPOSO 1. Premere brevemente per accendere la radio e premere di nuovo per spegnerla. 2. Tenendo premuto il pulsante, sul display LCD l’icona lampeggia. Ruotare la manopola della sintonia per selezionare il tempo di auto spegnimento desiderato, compreso tra 1 ~ 120 minuti. 3. Selezionando “ON” la radio resterà accesa tutto il tempo. Nota: se l’allarme si attiva, premere rapidamente il tasto per disattivarlo. TASTO DI BLOCCO / MODALITÀ VISUALIZZAZIONE Premere brevemente per visualizzare allarme, temperatura, ora locale / internazionale, potenza del segnale e rapporto S/N. Tenendo premuto si visualizzano i tasti di blocco/sblocco e la manopola della sintonia. TASTO DEL PASSO DI SINTONIA, INDIRIZZO/ FREQUENZA/VF/VM Con la radio accesa: Premendo brevemente, si commuta tra frequenza e indirizzo. In modalità di frequenza, la “sintonia” lampeggia, mentre in quella di indirizzo, lampeggia “Preset” (Impostazione predefinita). Tenere premuto per cambiare la sintonia da passo veloce a passo lento: l’icona u indica passo lento, mentre l’icona uu indica passo veloce. 66 MANUALE UTENTE TRAVELER III u uu Passo lento Passo veloce Banda Manopola di sintonia lenta Manopola di sintonia veloce Manopola di sintonia lenta Manopola di sintonia veloce FM 0.01MHZ 0.1MHZ 0.1MHZ 1MHZ LW 1KHZ 3KHZ 3KHZ 100KHZ MW 1KHZ 9/10KHZ 9/10KHZ 100KHZ SW 1KHZ 5KHZ 5KHZ 100KHZ TASTO HOME Ruotare la “manopola di indicazione del fuso orario” sulla propria città. Tenendo premuto il tasto “HOME” l’ora lampeggia: ruotare la manopola della sintonia per modificare l’ora. Premendo brevemente il tasto “HOME” i minuti lampeggiano: ruotare la manopola della sintonia per modificare i minuti. Premere brevemente di nuovo per confermare l’ora locale. ALLARME - IMPOSTAZIONE DEL TIMER DI ALLARME Il metodo di impostazione è lo stesso dell’impostazione dell’ora locale, l’unica differenza è che si deve premere nuovamente il tasto “ALARM” (ALLARME) dopo l’impostazione dell’allarme, quindi ruotare la manopola “TUNING” (SINTONIA) per impostare il timer dell’auto spegnimento nell’intervallo 1 ~ 90 minuti. •Selezione del metodo di allarme : •Premere brevemente il tasto “ALARM” senza impostazione del timer di allarme. Se l’icona lampeggia, si può attivare l’allarme sulla funzione radio. 67 MANUALE UTENTE TRAVELER III •Con la radio accesa, in primo luogo selezionare la stazione desiderata da utilizzare come stazione preferita per l’allarme, impostando, inoltre, il volume adatto. •Tenere premuto il tasto “ALARM”; quando si avverte un segnale acustico e l’icona lampeggia, è possibile impostare l’allarme su questa stazione. •Con l’allarme attivato, l’unità si accenderà automaticamente sintonizzandosi sulla stazione preselezionata, per poi spegnersi automaticamente appena raggiunto il tempo desiderato. Durante l’ascolto, se l’allarme è attivo l’unità passa automaticamente alla stazione preselezionata. •Se l’icona lampeggia indica che l’allarme è attivato sul segnale acustico, con la seguente nuova funzione: •Se l’utente non conosce la frequenza della stazione locale e il tempo di ascolto, si suggerisce di utilizzare l’allarme acustico. Con l’allarme attivato, l’unità emetterà due brevi segnali acustici e si spegnerà automaticamente dopo il tempo predefinito. •Se le icone descritte non sono visualizzate, l’allarme è spento. Nota: il timer di allarme corrisponde all’orario dell’indicatore del fuso orario. Se l’utente imposta la sveglia alle ore 7.00 e l’indicatore del fuso orario è impostato su New York, l’unità attiverà l’allarme alle 7.00 di New York. TASTO LUMINOSITÀ/PAUSA Premere brevemente il tasto [Luminosità/Pausa] per selezionare il livello di luminosità (OFF-LOW-HIGH) (SPENTO-BASSO-ALTO). In assenza di operazioni, la luminosità della retroilluminazione si attiverà al livello selezionato o si disattiverà dopo 10 minuti. Se la retroilluminazione è disattivata, premere brevemente una prima volta 68 MANUALE UTENTE TRAVELER III qualsiasi tasto per attivare la retroilluminazione, premere brevemente di nuovo per attivare la funzione del tasto. FUNZIONE PAUSA: Con l’allarme attivo, premere brevemente il tasto Luminosità/Pausa per disattivare temporaneamente l’allarme, che si attiverà dopo 10 minuti. La funzione Pausa può ripetersi 3 volte. Se l’allarme si attiva una quarta volta, premere nuovamente il tasto Luminosità/Pausa per disattivarlo. TASTO BANDA A ONDE CORTE/ VISUALIZZAZIONE AUTOMATICA Con la radio accesa: Premere brevemente il tasto [p] o [q] per selezionare la banda SW. Continuare con la breve pressione di [p] o [q] per selezionare la lunghezza di banda SW. In modalità ricerca automatica della frequenza, tenere premuto il tasto [p] o [q] per la visualizzazione automatica della stazione. In modalità ricerca dell’indirizzo, tenere premuto il tasto [p] o [q] per la visualizzazione automatica della stazione preselezionata. TASTO AM/LW BANDA/ATS Con la radio accesa: •Premere brevemente il tasto [AM/LW] per selezionare la banda AM (MW) o LW. •Tenere premuto il tasto [AM/LW] per memorizzare la sintonizzazione automatica della banda AM (MW) o LW. 69 MANUALE UTENTE TRAVELER III TASTO FM RDS /ATS Con la radio accesa: •Premere brevemente il tasto FM/RDS per selezionare la banda FM. •Tenere premuto il tasto FM/RDS per procedere con la funzione ATS. VISUALIZZAZIONE DELLE INFORMAZIONI In modalità di banda FM, premere brevemente il tasto FM/RDS per visualizzare le diverse informazioni RDS in sequenza. Verrà visualizzata l’icona sul display LCD. se è presente qualsiasi informazione RDS Premere brevemente il tasto FM/RDS per visualizzare: PS/PTY/RT/ DATI. PS (Program Service): indica il nome della stazione. Quando non sono disponibili le informazioni sulla stazione, viene visualizzato solo “NO PS”; PTY (Program Type): è la categoria di programmi. In assenza di programma, viene visualizzato solo “NO PTY”; RT (Radio Text): invio di testo libero dalla stazione radio. In assenza di testo, viene visualizzato solo “NO RT”; DATI: informazioni su orario/data/codice del programma. In assenza di indicazioni, viene visualizzato solo “NO DATA”. Se le informazioni sono disponibili, il formato di visualizzazione è: 70 MANUALE UTENTE TRAVELER III Nord America: Codice della Giorno feriale (MON, TUE, WED, THU, FRI, SAT, SUN) stazione Mese-Giorno-Anno Ore : Minuti WGSS 03-25-2014 02 :15 TUE Internazionale: Codice della stazione Giorno feriale Mese,Giorno,Anno (MON, TUE, WED, THU, FRI, SAT, SUN) Ore : Minuti WGSS TUE 02 :15 03,25,2014 Nota: se non viene visualizzato nessun codice di stazione, apparirà il codice PI della stazione attuale. TASTO MEMORY (MEMORIA) Con la radio accesa: Quando si seleziona la stazione, premendo brevemente il tasto “MEMORY” (MEMORIA), l’icona lampeggia. Ruotare la manopola “TUNING” (SINTONIA) per trovare l’indirizzo predefinito e premere brevemente di nuovo il tasto “MEMORY” per confermare la preselezione. PRESSIONE BREVE DEL TASTO [p] O [q] E TASTO DI IMPOSTAZIONE PREDEFINITA MEMORY Utilizzare la funzione ATS per preselezionare rapidamente le stazioni. 4. In modalità di scansione automatica della frequenza, tenere premuto il tasto [p] o [q] per la scansione automatica delle stazioni. 71 MANUALE UTENTE TRAVELER III 5. Quando si raggiunge la stazione preferita, basta premere brevemente il tasto “MEMORY” per memorizzarla e quindi procedere con la scansione automatica delle altre stazioni. TASTO DELETE (ELIMINA) Per eliminare una stazione, con la radio accesa: 1. In modalità scansione indirizzi, tenendo premuto il tasto [DELETE] (ELIMINA), l’icona e il testo “PXX DEL” lampeggeranno sul display LCD (XX indica l’indirizzo preselezionato); 2. Rilasciare il tasto e ruotare la manopola della sintonia per trovare l’indirizzo e la frequenza che si desidera eliminare. 3. Premere brevemente il tasto [DELETE] per confermare l’eliminazione. Per eliminare tutte le stazioni, con la radio spenta: Tenere premuto il tasto [DELETE] per 2 secondi fino a quando il testo “ALL DEL” non lampeggia sul display. Rilasciare il tasto e premerlo brevemente di nuovo per cancellare tutte le stazioni preselezionate. Con la radio accesa: In modalità ricerca indirizzo, tenere premuto il tasto [DELETE] per 2 secondi fino a quando il testo “ALL DEL” non lampeggia sul display. Rilasciare il tasto e premerlo brevemente di nuovo per cancellare tutte le stazioni. Premere brevemente il tasto [p] o [q] e il tasto [DELETE]: 72 MANUALE UTENTE TRAVELER III 1. In modalità ricerca indirizzo, tenere premuto il tasto [p] o [q] per entrare in auto preselezione delle stazioni; 2. Quando si incontrano stazioni non desiderate, basta premere brevemente il tasto [DELETE] per eliminarle e passare a quelle successive. TASTO RESET (RIPRISTINA) Utilizzare uno stuzzicadenti o altro bastoncino appuntito per premere il tasto RESET e ripristinare completamente l’unità in caso di malfunzionamento o arresto dell’unità stessa. DST (ORA ESTIVA DIURNA) Se si vuole utilizzare l’ora legale (“DST” = ora estiva diurna), l’orario sarà in anticipo di 1 ora. MANOPOLA DELL’INDICATORE DEL FUSO ORARIO Dopo aver impostato l’ora locale, ruotando la manopola dell’indicatore del fuso orario. Se l’indicatore è sul fuso orario desiderato, il display visualizzerà il fuso orario. MANOPOLA DELLA SINTONIA Ruotare la manopola per regolare l’orario, la frequenza e l’indirizzo predefinito. Quando si regola l’orario, si può utilizzare il tasto “HOME” o “ALARM” per impostare l’orologio. Ruotare la manopola per cambiare frequenza durante la sintonizzazione. 73 MANUALE UTENTE TRAVELER III Ruotare la manopola per selezionare l’indirizzo predefinito in modalità impostazione predefinita dell’indirizzo. MANOPOLA DEL VOLUME Ruotare questa manopola per regolare il volume. Jack auricolare: 3,5 mm Jack CC Impostazione del sistema 1. Impostazione del passo MW Con la radio spenta, tenendo premuto il tasto [9/10 k], il display LCD visualizzerà AM - 10 k o AM - 9 k, che significa MW - passo di 10 k e MW - passo di 9 k. Nota: quando il passo MW è 10 K, il formato di visualizzazione della temperatura è in gradi Fahrenheit, mentre quando il passo MW è 9 k, il formato di visualizzazione della temperatura è in gradi Celsius. 2. Impostare l’intervallo di frequenza FM Con la radio spenta, tenere premuto il tasto SET FM e poi rilasciarlo. Premere brevemente il tasto per selezionare l’intervallo di frequenze FM come segue: 87,5 - 108 MHz 87,0 - 108 MHz 74 MANUALE UTENTE TRAVELER III 64,0 ~ 108 MHz, 76,0 ~ 108 MHz 3. Attivare o disattivare la banda LW Con la radio spenta, tenendo premuto il tasto AM/LW, il display LCD visualizzerà “LW ON” (LW ATTIVO) (“LW OFF” = LW DISATTIVO). 4. Attivare o disattivare il segnale acustico Con la radio spenta, tenendo premuto il tasto PAUSA/LUMINOSITÀ, il display LCD visualizzerà “BEEP ON”, che indica il segnale acustico attivato (“BEEP OFF” = segnale acustico disattivato). SPECIFICHE TECNICHE 1. Frequenze supportate: US/CAN/MEXINTL FM : 87 - 108 MHz AM(MW) : 520 - 1710 kHz LW: 153 - 513 kHz SW1: 2,3 - 26,1 MHz DAB: 64 - 108 MHz 522 - 1620 kHz 153 - 513 kHz 2,3 - 26,1 MHz 174,928 - 239,200 MHz 2. Sensibilità limitata di rumore: FM ≤ 3 µV MW ≤ 1 mV/m SW ≤ 10 mV/m LW ≤ 18 µV 3. Altoparlante: 50 mm, 8 ohm, 0,5 W 4. Auricolare: diam. 3,5 mm 75 MANUALE UTENTE TRAVELER III 5. Alimentazione: Batterie: 4 x formato AA (4 x 1,5 V) CC: 6 V 6. Dimensioni: 135 (L) x 87 (A) x 27 (P) mm 7. Peso: appross. 213 g (batterie escluse) DATI DI CONTATTO PER ASSISTENZA Etón Corporation 1015 Corporation Way, Palo Alto, CA 94303, USA 1-800-872-2228 (U.S.) 1-800-637-1648 (Canada) 650-903-3866 (Internazionale) Lun - Ven, 08.00 - 16.30, Pacific Standard Time www.etoncorp.com. AVVERTENZE •Non esporre l’apparecchio a pioggia o umidità. •Non immergere o lasciare l’apparecchio a contatto con l’acqua per un periodo prolungato. •Usare l’apparecchio solo all’interno del campo di temperatura specificato (da 0 °c a 40 °c). •Disconnettere immediatamente l’alimentazione se viene versato del liquido sull’apparecchio o se un oggetto è caduto dentro l’apparecchio. •Pulire solo con un panno asciutto. Non utilizzare detergenti o solventi chimici per il rischio di danni alla finitura. •Disconnettere e spegnere le antenne esterne durante i temporali. 76 MANUALE UTENTE TRAVELER III •Non rimuovere il coperchio [o il retro]. •Per l’assistenza rivolgersi a personale qualificato. RISPETTO PER L’AMBIENTE Smaltimento Secondo la Direttiva Europea 2002/96/CE tutti i prodotti elettrici ed elettronici devono essere raccolti separatamente tramite un sistema di raccolta locale. Attenersi alle normative locali e non smaltire i prodotti usati nei normali rifiuti domestici. Si prega di smaltire tutti i tipi di batterie secondo le norme e/o i regolamenti locali, regionali o nazionali. In caso di dubbi, contattare l’autorità locale competente per informazioni sullo smaltimento sicuro nel rispetto dell’ambiente. REGISTRAZIONE DELLA GARANZIA Per garantire aggiornamenti completi di copertura della garanzia del prodotto, la registrazione del prodotto deve essere completata al più presto possibile dopo l’acquisto o il ricevimento. Si prega di visitare il sito: 77 MANUALE UTENTE TRAVELER III http://www.etoncorp.com/productregistration per registrare il prodotto. LIMITI DELLA GARANZIA Conservare la prova di acquisto o ricevuta. Le informazioni sui limiti della garanzia possono essere visionate sul sito www.etoncorp.com nella sezione Supporto. ASSISTENZA CLIENTI Per ottenere assistenza per il prodotto, si consiglia di contattare un rappresentante del servizio Etón ai numeri 800-872-2228 dagli Stati Uniti, 800-637-1648 dal Canada o (650) 903-3866 dal resto del mondo per la determinazione del problema e la risoluzione. Se è necessario un ulteriore servizio, il personale tecnico fornirà le istruzioni su come procedere a seconda che la radio sia ancora in garanzia o abbia bisogno di assistenza fuori garanzia. GARANZIA Se il prodotto è ancora in garanzia e il servizio di assistenza Etón determina che il servizio di garanzia è necessario, verrà rilasciata un’autorizzazione di ritiro e verranno fornite istruzioni per la spedizione a un centro autorizzato di riparazioni in garanzia. 78 MANUALE UTENTE TRAVELER III Non spedire la radio senza prima aver ottenuto il numero di autorizzazione. ASSISTENZA FUORI GARANZIA Se il prodotto non è più in garanzia e necessita di assistenza il nostro staff tecnico farà riferimento alla struttura di riparazione più vicina che sarà in grado di gestire al meglio la riparazione. Per l’assistenza al di fuori del Nord America, si prega di fare riferimento alle informazioni di distribuzione incluse al momento dell’acquisto/ricezione. 79 Etón Corporation Corporate Headquarters 1015 Corporation Way Palo Alto, California 94303 USA tel +1 650-903-3866 tel +1 800-872-2228 fax +1 650-903-3867 Etón Canada 5580 Explorer Drive, Suite 503 Mississauga, Ontario L4W 4Y1 Canada tel +1 416-214-6885 tel +1 800-637-1648 fax +1 416-214-6886 www.etoncorp.com Designed by Etón Corporation and assembled in China. © Copyright 2014 Etón Corporation. All rights reserved. v.01162015