1
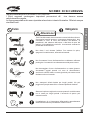
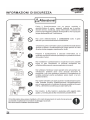
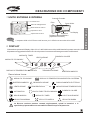
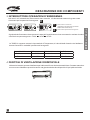
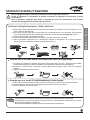
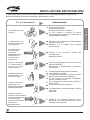
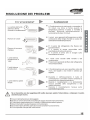
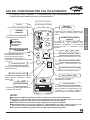
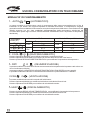
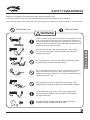
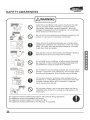
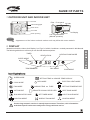
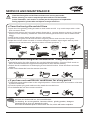
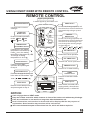
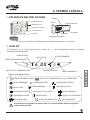
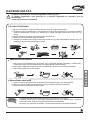
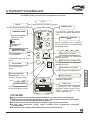
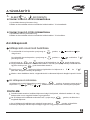
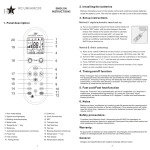
“ALLEGRO”
AIRSSA-09H, AIRSSA-12H, AIRSSA-18H
CONDIZIONATORI D’ARIA
SPLIT A PARETE
MANUALE UTENTE
Grazie per aver scelto il nostro Condizionatore. Vi preghiamo di leggere
con attenzione il presente Manuale Utente prima di utilizzarlo e di
conservarlo sempre per ulteriori consultazioni.
Il Manuale Utente si riferisce a tutti i condizionatori con Split a parete la
cui capacità di raffrescamento sia compresa tra i 2700W (9000BTU/H) e
i 5000W (18000 BTU/H).
INDICE
Indice
1
Informazioni di Sicurezza
2
Descrizione dei Componenti
4
Servizio & Manutenzione
7
Risoluzione dei Problemi
8
Dati Tecnici
9
Uso del condizionatore con Telecomando
1
10
10
NORME DI SICUREZZA
Leggere attentamente le NORME DI SICUREZZA .
I punti seguenti contengono importanti precauzioni di
che devono essere
assolutamente seguite.
Le figure presentate sotto sono riportate ad esclusivo intento illustrativo .Riferirsi sempre
ai modelli reali.
Obbligatorio
Vietato
Attenzione!
Tutti i Condizionatori devono essere connessi alla linea di terra.
Connessioni parziali possono comportare elettrocuzioni. Non
connettere il cavo di terra alle tubature del Metano, ai
parafulmini, alle tubature dell’acqua o alla linea di terra del
telefono. Ad installazione conclusa è necessario verificare le
perdite sul circuito di terra.
Non tirare i cavi durante l’utilizzo. Per estrarre la spina,
spegnere il condizionatore, afferrarla ed estrarla.
Non Connettere il cavo di alimentazione a ciabatte o utilizzare
prolunghe. Connettere il cavo direttamente sulla presa a muro.
Non danneggiare il cavo di alimentazione o creare giunture.
Accatastare oggetti pesanti sul cavo di alimentazione,
avvicinarlo a fonti di calore o creare giunzioni può essere causa
di elettrocuzione o incendio.
Non sottoporsi all’aria fredda per lunghi periodi. Ciò può
peggiorare il proprio stato fisico e causare problemi di salute.
Staccare la spina o togliere la corrente quanto il condizionatore
non è usato per lunghi periodi. L’accumulo di sporco può
causare incendi.
L’installazione di un’interruttore differenziale appositamente
dimensionato riduce la possibilità di elettrocuzioni.
2
DESCRIZIONE DEI COMPONENTI
1.UNITA’ ESTERNA E INTERNA
Pannello Frontale
Presa d’Aria
Filtro
Tubo di collegamento
Presa d’Aria
Manichetta di scarico
Espulsione Aria
Apertura di scarico
NOTA
Deflettore
Deflettore Destro&Sinistro
(Operazioni manuali)
Display
L’aspetto delle unita’ Esterna ed Interna puo’ differire a seconda dei modelli
2. DISPLAY
L’illustrazione presenta il Display di tipo ‘A Led’ dell’Unità Interna dei modelli descritti in questo manuale. Sotto
è riportata una leggenda di tutte le icone che si possono incontrare nell’intera gamma di Condizionatori.
MODALITA’ TIMER
VENTILAZIONE
POMPA DI CALORE
MODALITA’ “ECONOMY”
DISPLAY DI TEMPERATURA IMPOSTATA
DEUMIDIFICAZIONE
RAFFRESCAMENTO
Descrizione Icone:
MODALITA’ “ECONOMY”
RAFFRESCAMENTO
VENTILAZIONE
AUTOMATICO
SPIA DI MARCIA
VELOCITA’ MASSIMA
DISPLAY DI TEMPERATURA IMPOSTATA O INTERNA
DEUMIDIFICAZIONE
TEMPERATURA INTERNA
RISCALDAMENTO ELETTRICO
IMPOSTAZIONE TEMPERATURA
RICEVITORE TELECOMANDO
MODALITA’ TIMER
VELOCITA’ MEDIA
POMPA DI CALORE
LIGHT-WAVE MODE
VELOCITA’ BASSA
La Ricerca continua produce costanti miglioramenti, quindi le istruzioni e le
specifiche qui presentate sono suscettibili di modifiche prive di preavviso
4
DESCRIZIONE DEI COMPONENTI
3. INTERRUTTORE OPERAZIONI D’EMERGENZA
Nel caso in cui le batterie del Telecomando siano esaurite o il telecomando stesso sia guasto usare
l’interrutore per le operazioni d’emergenza
.
Interruttore di Controllo
A.
B.
(Interruttore riservato al solo personale
addetto alla manutenzione)
C.
Interruttore Operazioni Emergenza
Ogniqualvolta l’interruttore viene premuto lo stato del Condizionatore viene commutato in maniera circolare
secondo la sequenza seguente : COOL
HEAT
STOP
La TABELLA seguente mostra le impostazioni di Temperatura, di velocità della Ventola e del deflettore
durante l’esercizio in modalità “operazione d’emergenza”
Modalità
Temperatura
V elocità V entola
Def lettore
Raf f rescamento
24°C
A lta
Oscillazione
Riscaldamento
24°C
A lta
Osclillazione
4. FERITOIA DI VENTILAZIONE ORIZZONTALE
Afferrare la levetta e spostare il deflettore per indirizzare il flusso d’aria a destra/sinistra. Prestare attenzione
a non muovere il deflettore quando la ventola sta girando ad alta velocità perché ci si può pizzicare le dita.
5
SERVIZIO E MANUTENZIONE
Pulire la griglia frontale e i filtri dell’aria almeno una volta ogni due settimane.
Prima di effettuare le operazione di pulizia assicurarsi di spegnere la macchina e aprire
l’interruttore.
Nelle illustrazioni seguenti ogni parte è riportata per puri fini dimostrativi; fare sempre
riferimento agli oggetti reali durante ogni operazione.
Pulire la Griglia frontale e i filtri dell’aria
1. Aprire il Pannello frontale tirando le linguette da entrambi ii lati e alzarla fino a che si blocca con un
‘click’. Estrarre i filtri dell’aria.
2. Rimuovere la polvere dai filtri e dal pannello con un aspirapolvere o una spazzola. Se la polvere
non si toglie facilmente lavarli con detergenti naturali in acqua tiepida non superiore ai 45°C.
3. Lavarli in acqua pulita e asciugarli all’ombra.
4. Inserire i filtri dell’aria nella posizione originale e chiudere il Pannello Frontale
5. Pulire la superfice dell’unità con un detergente naturale e asciugarlo con un panno asciutto.
(Assicurarsi di non utilizzare benzene o altri prodotti chimici).
Quando non si intende usare il condizionatore per un lungo tempo
1. Far girare la ventola per qualche ora al fine di asciugare bene l’interno. (Selezionare modalità
RAFFFRESCAMENTO o RISCALDAMENTO e impostare la temperatura al massimo)
2.Spegnere il condizionatore e staccare la spina dalla presa a parete. Pulire i filtri e le superfici
esterne
3. Togliere le batterie dal Telecomando.
OP
FAN
ION
ERAT
Quando non si e’ usato il condizionatore per tanto tempo
1. Pulire i filtri e reinserirli nella loro sede, Pulire le unita’ esterne e interne con un panno morbido.
2.Inserire la spina e assicurarsi che il collegamento di terra sia ancora presente.
3. Inserire le batterie nel Telecomando.
NOTICE Le prese d’aria di entrata ed espulsione non devono mai essere coperte o ostacolate.
Per la pulizia non usare mai gasolio, benzina, solvente, pasta abrasiva, insetticida etcc.. poiché
possono danneggiare l’apparecchio.
Non lacerare le batterie o gettarle nel fuoco perché possono esplodere.
6
RISOLUZIONE DEI PROBLEMI
I casi che seguono non presentano problemi che determinino l’impossibilità di utilizzare l’apparecchio.
Seguire le analisi delle anomalie e riprendere l’utilizzo della macchina.
C’e’ un’anomalia?
Analizziamola!
Il condizionatore non
funziona
E’ mancata la corrente?
Si è staccata la spina?
E’ saltato l’interruttore o il fusibile?
Ci sono ostacoli o sorgenti di rumore
elettromagnetico nel locale che disturbano il
segnale del telecomando?
Il Telecomando non
risponde ed il display
non si accende
Verificare che le batterie del Telecomando
siano ancora cariche.
Verificare che le batterie siano inserite
correttamente.
Il condizionatore
non riprende a
funzionare
rapidamente dopo
averlo spento e
riacceso con il
pulsante I/O.
Questa è una protezione interna del
condizionatore.
Attendere 3 minuti.
Dopo che si spegne
il condizionatore il
vano non si chiude
completamente.
Il motore passo-passo non riesce a ritornare
nel punto di RESET.
Riaccendere il condizionatore e spegnerlo
nuovamente.
Il Raffrescamento o il
riscaldamento non
funzionano bene.
L’aria non fuoriesce
subito dopo aver
impostato la modalità
RISCALDAMENTO.
Manca la corrente
durante il funzionamento.
Al ritorno della stessa
il condizionatore
riprende a funzionare
come prima
dell’interruzione.
7
E’ stata impostata la temperatura adatta?
I filtri dell’aria sono puliti?
C’è qualcosa che ostacola l’ingreso e l’uscita
dell’aria dalle unità Interna o Esterna?
Si sta usando la modalità ECONOMY
(SLEEP) anche di giorno?
Si è impostata la velocità della ventola su
basso ‘LOW’?
Le porte e le finestre sono chiuse?
Il condizionatore si sta preparando a soffiare
l’aria calda.
Attendere.
Questa è una funzione chiamata “AUTO
RESTART” ed è disponibile solo con alcuni
modelli di Condizionatore.
DATI TECNICI
M O DELLO
A IR SSA -09H
A IR SSA -12H
2700
220-240V ~
3500
3800
5000
1220
1650
ALIMEN TAZIO NE
Capacità di Raffrescamento(W )
A IR SSA -18H
Raffrescamento
2850
1050
Pompa di Calore
1110
1300
1850
4 .7
5 .2
5.4
5.75
7.6
8.5
Volume flusso d’aria(m 3 /h)
430
450
850
Capacità Deum idificante (l/h)
0.8
1 .2
Capacità di Riscaldamento(W )
P o te n z a
A s s o r b ita
(W )
C o r re n te
A s s o r b ita
(A)
Riscaldamento Aux
Raffrescamento
Pompa di Calore
Riscaldamento Aux
IN D IC E D I P R O TE ZIO N E (IP )
U N IT A ’ IN T E R N A IP 20
Classe di Protezione
I
Tipo di Climatizzazione
T1
Peso
Netto(kg)
Dimensioni
LxH xP
(m m xm m xm m
)
2.4
U N IT A ’ E S T E R N A IP 40
0.78
0.95
1 .0 8
Unità Interna
39
40
46
Unità Esterna
50
51
56
Unità Interna
10
10
12
Unità Esterna
26
37
50
Unità Interna
800x290x196
800x290x196
860x292x205
Unità Esterna
600x480x250
790x540x245
813x680x310
Refrigerante (R410A ) contenuto (g)
Rum orosità
(dB(A))
6000
NOTA
1.I valori di rumorosità sono misurati in laboratorio prima dell’uscita dalla fabbrica.
2.La capacità di raffrescamento/riscaldamento è misurata alle seguenti condizioni
Raffrescamento
Riscaldamento
Interno
27
(DB)
19
(WB)
Esterno
35
(DB)
24
(WB)
Interno
20
(DB)
15
(WB)
Esterno
7
(DB)
6
(WB)
3.Grazie alla nostra politica di costante sviluppo e miglioramento ci riserviamo di modificare i dati tecnici senza
preavviso. Nonostante ci possano essere errori o omissioni, abbiamo comunque fatto ogni ragionevole sforzo
per rendere questo manuale corretto.
4.Intervallo di Temperatura di Funzionamento
Max Raffrescamento Min.Raffrescamento Max.Riscaldamento Min.Riscaldamento
Indoor side DB/WB( C )
Outdoor side DB/WB( C )
32/23
21/15
27/--
20/--
43/26
21/15
24/18
-5/-6
5.Gli schemi di collegamento del Condizionatore (unità Interne/esterna) sono attaccati alle unità
interne/esterne rispettivamente.
6.Se il cavo di alimentazione è danneggiato deve essere sostituito dal produttore, dai suoi centri assistenza o da
altro personale qualificato al fine di evitare pericoli.
9
USO DEL CONDIZIONATORE CON TELECOMANDO
Di seguito viene descritto il Funzionamento del condizionatore attraverso
l’utilizzo del telecomando fornito con l’apparecchio.
Emettitore di Segnale
DISPLAY
Invia il Segnala all’Unità
PULSANTE
OSCILLAZIONE
Visualizza le impostazioni attuali
PULSANTE
MODALITA’
Premere per far osclillare il deflettore su
e giù e variare di conseguenza il flusso
d’aria
SWING
Premere per impostare la
modalita’di Funzionamenrto
AUTOMATICA
RISCALDAMENTO
RAFFRESCAMENTO
DEUMIDIFICAZIONE
VENTILAZIONE
MANUAL
OPERATION
MODE
PULSANTI REGOLAZIONE
TEMPERATURA
(1)
OFF
Ad ogni pressione del tasto
La temperatura sale di 1°C.
Ad ogni pressione del tasto
La temperatura scende di 1°C.
L’intervallo di Temeperatura possibile
è 16-31°C
PULSANTE DI ON\OFF
Premere per Accendere\Spegnere
il condizionatore
PULSANTE OSCILLAZIONE
MANUALE
Consente di regolare manualmente
l’inclinazione
del deflettore sino
all’angolo desiderato. L’inclinazione
varia secondo la sequenza sotto
riportata.
(2)
(3)
(4)
(5)
ON
PULSANTE ATTIVAZIONE TIMER
TIME
CANCEL
Consultare ‘Funzionamento con Timer’
SET
PULSANTE DISATTIVAZIONE TIMER
I/O
FAN SPEED SLEEP
Consultare ‘Funzionamento con
Timer’
PULSANTE IMPOSTAZIONE TIMER
Premere per impostare il timer
PULSANTE VELOCITA’ VENTOLA
Premere per modificare la velocità
della ventola, nell’ordine: Basso,
Medio, Alto
-Auto (
).
PULSANTE ECONOMY
Premere per attivare\disattivare la
modalita’ ECONOMY
ANNULLAMENTO TIMER
Premere per cancellare le
impostazioni del timer
PIAZZOLE DI RESET
Se il telecomando dovesse presentare
delle anomalie di funzionamento, per
ripristinare in normale esercizio
cortocircuitare le Piazzole di RESET.
NOTE:
I modelli solo a Raffrescamento (COOL) non hanno la funzione Riscaldamento.
Utilizzare il Telecomando entro 6 metri dall’unità interna assicurandosi che non ci siano
oggetti frapposti tra il Telecomando e l’Unità Interna del Condizionatore.
Se il Telecomando non viene usato per lunghi periodi, estrarre le batterie.
Nell’illustrazione di cui sopra il display è rappresentato con tutti i simboli attivi per fini
dimostrativi. Alcuni modelli potrebbero non presentare alcuni dei simboli di cui sopra.
Non lacerare le batterie o gettarle nel fuoco perché potrebbero esplodere.
10
USO DEL CONDIZIONATORE CON TELECOMANDO
MODALITA’ DI FUNZIONAMENTO
1. AUTO
(AUTOMATICO)
O
In questa modalità il condizionatore regola la temperatura della stanza automaticamente al fine di
individuare la più adatta. Non appena impostata la Modalità Automatica il condizionatore sceglierà
automaticamente la modalità di funzionamento secondo la temperatura della stanza. Fare riferimento alla
Tabella seguente (se non siete soddisfatti dell’impostazione della temperatura selezionata dal
Condizionatore potete agire sul tasto ‘REGOLAZIONE TEMEPERATURA’ e impostare la temperatura
desiderata).
Modello solo Raffrescamento
Modalita’
Tempratura iniziale
Temperatura
Locale (RT)
26
25
RT 26
RT 25
RT 23
RT 23
Cool
Dry
2. COOL
24
RT-2
RT-2
21
Modello ‘Pompa di Calore’
Modalita’
Temepratura iniziale
24
Cool
RT-2
Dry
RT-2
26
Heat
(RAFFRESCAMENTO)
O
Premere il pulsante MANUAL per modificare la direzione verticale del flusso.
Premere il pulsante FAN SPEED per modificare la velocita’ della ventola dell’unita’ interna.
Premere i pulsanti REGOLAZIONE TEMPERATURA per modificare l’impostazione di temperatura.
3. DRY
O
(DEUMIDIFICAZIONE)
In questa modalita’ il condizionatore decide autonomamente la temperatura da impostare e tale valore non
viene visualizzato sul display.
In questa modalita’ i pulsanti REGOLAZIONE TEMPERATURA & FAN SPEED non sono perativi.
E’ possibile modificare la direzione verticale del flusso attraverso i pulsanti MANUAL O SWING.
4.FAN
O
(VENTILAZIONE)
In questa modalità funziona solo la ventola dell’unità interna.
Premere il pulsante MANUAL per modificare la direzione verticale del flusso d’aria.
Premere il pulsante FAN SPEED per modificare la velocità della ventola.
5.HEAT
o
(RISCALDAMENTO)
Premere i pulsante REGOLAZIONE TEMPERATURA per modificare le impostazioni di temperatura
Premere il pulsante MANUAL per modificare la direzione verticale del flusso d’aria.
Premere il pulsante FAN SPEED per modificare la velocità della ventola.
11
TELECOMANDO
6. SLEEP
o
(ECONOMY)
Modalita’ ECONOMY in RAFFRESCAMENTO
A. La ventola interna gira a bassa velocità
B.Dopo un’ora di funzionmento in questa modalità il condizionatore aumenta l’impostazione della
temperatura di 1 °C e nell’ora successiva di un altro grado. Da questo momento in poi il condizionatore
continuerà a lavorare con questa temeperatura.
Modalita’ ECONOMY in RISCALDAMENTO
A. La ventola interna gira a bassa velocità
B.Dopo un’ora di funzionmento in questa modalità il condizionatore diminuisce l’impostazione della
temperatura di 1 °C e nell’ora successiva di un altro grado. Da questo momento in poi il condizionatore
continuerà a lavorare con questa temeperatura.
Funzionamento con Timer
Impostazione modalita’
1. Quando il Condizionatore è spento, premere il pulsante
ON
, la
del simbolo
, la
del simbolo
comincerà
a lampeggiare sul display del telecomando.
Quando il Condizionatore è acceso premere il pulsante
comincerà a lampeggiare sul display del telecomando.
ON
OFF
ON
OFF
OFF
il pulsante
o
per inserire l’ora. Ogni pressione del pulsante
o
(a
2. Premere
seconda si stia impostando la funzione On o Off, rispettivamente) aumenterà l’impostazione di un’ora
e verrà visualizzata sul display del telecomando.
Premere il pulsante SET per fissare l’ora impostata. L’ora e i simboli
3. lampeggiare
sul display del Telecomando.
e
smetteranno di
4.Una volta impostata la Modalità Timer, il Condizionatore si attiverà o disattiverà (a seconda che si sia
impostata la modalità On o Off o entrambe) una volta trascorso il tempo preimpostato per ciascuna
modalità .
Annullamento Funzionamento con Timer
Se si vuole annullare il Funzionamento con Timer, premere il pulsante CANCEL
simboli
o
scompaiono dal display del telecomando.
finché l’ora e i
NOTA:
L’ora deve essere reimpostata ogniqualvolta venga a mancare la corrente altrimenti il ‘Funzionamento
1. con
Timer’ non sarà corretto.
2. Se si vuole modificare l’impostazione del timer dopo averla già fissata è necessario premere il
pulsante
e reimpostare il Timer
CANCEL
Se si preme per errore il pulsante
3. dall’ora
impostata sul display .
dopo aver impostato il Timer il condizionatore ricomincia
SET
12
SPLIT WALL MOUNTED TYPE
AIR CONDITIONERS
OWNER'S MANUAL
Thank you for choosing our Air Conditioner. Please read this OWNER'S
MANUAL carefully prior to using and keep it for further reference.
This owner's manual is applicable to those split wall mounted models whose
cooling capacity is between 2700W(9000BTU/h) and5000W(18000BTU/h).
CONTENTS
Contents
1
Safety Awareness
2
Name of Parts
4
Service and Maintenance
6
Trouble Shooting
7
Performance Parameters
9
Using conditioner with Remote Control
1
10
SAFETY AWARENESS
Read and understand thoroughly this safety awareness before use.
The items indicated here are very important safety precautions, Which must be followed.
The following pictures are presented just for the purpose of illustration. Take real objects as a reference.
Absolutely not
Must be done
WARNING
The air conditioner must be grounded. Incomplete grounding
may result in electric shocks. Do not connect the earth wire
to the gas pipeline, water pipeline, lightning rod, or telephone
earth wire. After installment, earth leakage examination must
be carried on through electrifying.
Do not pull the power cable during operation. It can cause
fire. To pull out the plug, please turn off the unit and hold
the plug to pull it out.
Do not connect the wire from the middle of the power cable
or extend it. Do not use multi-hole sockets.
Do not damage the power cord, or do joint work. Piling up
heavy objects on the power cable, approaching high
temperature supply objects, or doing joint work will cause
electric shock and fire.
Do not apply the cold air to the body for a long time. It will
deteriorate your physical conditions and cause health problems.
Pull out the power plug or turn off the power supply when
not using the air conditioner for a long time. (Accumulated
dirt might cause fire.)
An earth leakage breaker with rated capacity must be
installed to avoid possible electric shocks.
2
NAME OF PARTS
1.OUTDOOR UNIT AND INDOOR UNIT
Air inlet
Connecting pipe
Filter Front panel Air inlet
Drain hose
Air outlet
Deflector
Left / Right deflector
(Manual operation)
Drain opening
NOTICE
Display
Appearance of the indoor unit and outdoor unit may differ with some models.
2. DISPLAY
Illustration shows the Indoor Unit Display “Led Type” of all Air Conditioner models presented in this Manual.
The following table shows all icons you can find with their descriptions.
TIMER
VENTILATION
HEATING PUMP MODE
SLEEP MODE
TEMPERATURE
DRY MODE
COOL MODE
Icon illustrations:
SLEEP MODE
COOL MODE
FAN MODE
AUTO MODE
SETTING TEMP or INDOOR TEMP DISPLAY
DRY MODE
INDOOR TEMPERATURE
REMOTE SIGNAL RECEIVER
ELECTRIC-HEAT MODE
SETTING TEMPERATURE
HEAT PUMP MODE
RUN INDICATOR LAMP
SET TIMER MODE
LIGHT-WAVE MODE
HIGH FAN MODE
MIDDLE FAN MODE
LOW FAN MODE
Continuing research results in steady improvement. Therefore, this information
and these specifications are subject to change without notice.
4
NAME OF PARTS
3. EMERGENCY OPERATION SWITCH
In case the batteries in the remote controller are wore out, or remote controller is at fault, use
.
Emergency operation switch
A.
B.
Check switch
(Please leave this
button to be used
by the maintenance
C.
Heat pump type
Every time the switch is pressed, it changes in sequence of :
COOL
HEAT
Emergency
Operation switch
STOP.
The following table shows the condition of set temperature, fan speed and deflector during
emergency operation.
Mode
Set temperature
Fan speed
Deflector
Cooling
24 C
High
Swing
Heating
24 C
High
Swing
4. HORIZONTAL LOUVER BLADE
Hold the knob and move the deflector to change right/left airflow direction. Be careful not to adjust
the deflector during operation as the fan is rotating at a high speed and may pinch your fingers
5
.
SERVICE AND MAINTENANCE
Clean the front grille and air filters at least once in every two weeks.
Before cleaning, be sure to stop the operation and turn off the breaker.
In this illustration, each section is shown just for the purpose of explanation.
During operation, please take real objects as major reference.
Clean the front grille and air filters
1.Open the front grille by pulling the tabs on both sides and lift it up until it stops with a click.
Pull out the air filters.
2.Remove all dust on the front grille and air filters with a vacuum cleaner or brush. (If the dust
does not come off easily, wash them with neutral detergent dissolved in warm water below
45 .)
3.Wash them in clean water and dry them in the shade.
4.Insert the front grille and air filters at their original position and close the front grille.
5.Wipe the surface of the unit with a neutral detergent and then wipe it again with dry cloth.
(Be sure not to use benzene, solvent or other chemical products .)
If you will not be using the air conditioner for a long idle period
1.Set the fan going for a few hours to dry out the inside thoroughly. (Choose COOL mode or
HEAT mode and select the highest set temperature, then the fan rotates.)
2.Switch the air conditioner off and unplug it from the wall socket. Clean the filters and outer
surface.
3.Take out the batteries from the remote controller.
OP
FAN
ION
ERAT
If you have not used the air conditioner for a long period
1.Clean filters and replace them to the original position. Clean the indoor and outdoor units with
a piece of soft cloth.
2.Insert the power plug and make sure the earth wire not be loose.
3.Put the batteries into the remote controller.
NOTICE Air inlets and outlets shall not be covered/blocked.
For cleaning, do not use gasoline, benzene, thinner, grinding powder, detergent
insecticide etc as they can damage the units.
Don't tear the batteries apart or throw them into fire, which will lead to explosion.
6
TROUBLE SHOOTING
The following cases are not troubles that will obstruct you in using please follow the fault analysis
and continue using.
Is there a fault?
Air conditioner does
not operate.
Remote controller is
not available and
does not display .
Fault analysis!
Is it a power failure?
Has the power plug fallen off?
Has the circuit br eaker or fuse shut off
Are there any obstacles or disturbance
supply oscillators in the room to disturb the
signal fro m remote controller?
Check whether the batteries of remote
controller are usable.
Check whether the batteries are positioned
correctly.
Operation does not
start soon when I/O
button is pressed
after operation was
stopped.
This is a way to protect the air conditioner.
Please wait 3 minutes.
After operation
terminates, the vane
appears not to close
completely.
Stepping motor could not find the RESET
point, please restart the air conditioner
and stop again.
Cooling and heating
effect is not good.
Is temperature setting appropriate?
Are the air filters clean?
Are there any obstacles to block the inlets
and outlets of the indoor and outdoor units?
Is sleep mode used during daytime?
Is the indoor fan speed set low?
Are doors and windows closed?
Air will not
immediately blow
out at the start of
HEAT mode.
The power supply may
be suddenly cut off,
when the power is
normal again; the air
conditioner will automatically
resume the same mode
operation as setting before
power failure.
7
The air conditioner is ready to blow out
enough warm air. Please wait.
This is called auto-restart function and this
function is only accessible for certain types of
air conditioners with the function of auto-restart.
PERFORMANCE PARAMETERS
Model
AIRSSA-09H
AIRSSA-12H
2700
2850
830
790
220-240V~
3500
3800
1050
1110
Power
Rated cooling capacity(W)
Rated heating capacity(W)
Cool
Rated input
Heat pump
power(W)
Aux-heat
Cool
Rated input
Heat pump
CURRENT(A)
Aux-heat
Air flow volume(m /h)
Dehumidifying capacity (L/h)
Waterproof class
Protection class
Climate type
Refrigerant (R410A) charge amount(g)
3
Noise(dB(A))
Net weight(kg)
Dimensions WxHxD
(mmxmmxmm)
Indoor
Outdoor
Indoor
Outdoor
Indoor
Outdoor
AIRSSA-18H
5000
6000
1650
1850
3.7
3.4
4.7
5.2
7.6
8.5
430
0.8
450
1.2
850
2.4
IP20INDOOR
IP40OUTDOOR
I
T1
0.78
39
50
10
26
800x290x196
600x480x250
1.08
40
51
10
37
800x290x196
790x540x245
1.56
46
56
12
50
860x292x205
813x680x310
NOTICE
1.The indicated noise parameter is measured in laboratories before leaving factory.
2.The rated cooling/heating capacity is tested under the following conditions:
Cooling operation
Heating operation
Indoor
27
(DB)
19
(WB)
Outdoor
35
(DB)
24
(WB)
Indoor
20
(DB)
15
(WB)
Outdoor
7
(DB)
6
(WB)
3.Due to the policy of constant development, we reserve the right to modify technical data without
notice. While errors and omissions are a possibility, every reasonable effort has been made to
ensure that the information in this manual is correct.
4.Operating temperature range:
Maximum cooling Minimum cooling Maximum heating Minimum heating
Indoor side DB/WB( C )
Outdoor side DB/WB( C )
32/23
21/15
27/--
20/--
43/26
21/15
24/18
-5/-6
5.Wiring diagram of air conditioner (indoor unit/outdoor unit) are attached to the indoor/ outdoor unit
respectively.
6.If the supply cord is damaged, it must be replaced by the manufactu rer, its service agent or similarly
qualified persons in order to avoid a hazard.
9
USINGCONDITIONER WITH REMOTE CONTROL
REMOTE CONTROL
Signal ejecting window
It sends signals to the indoor unit.
OPERATION DISPLAY
SWING button
It displays the current
settings.
OPERATION
MODE button
SWING
MANUAL
SWING button
Press it to select operation
mode:
AUTO
COOL
HEAT
FAN
MANUAL
DRY
OPERATION
MODE
TEMPERATURE
ADJUSTMENT buttons
SLEEP button
Press it to start sleep running
and press again to stop it.
(3)
(4)
(5)
ON TIMER button
Please see “ timer operation
CANCEL
SET
OFF TIMER button
I/O
Press it to change the fan speed
in the order of low-medium -high
-auto (
).
(2)
ON
TIME
RUN/STOP button
FAN SPEED button
Press it to change up/down air
flow direction and the deflector
moves at a certain angle. You
can change the moving angle
in the order of:
(1)
OFF
Press once, the setting
temperature increases by 1 .
Press once, the setting
temperature decreases by 1 .
The range of setting
temperature is 16-31 .
Press it once to Start
operation and press again
to stop it.
Press it to change up/down air
flow direction and the deflector
automatically swings up and
down.
FAN SPEED SLEEP
Please see “ timer operation”.
TIMER SET button
Press it to fix timer setting.
TIMER
CANCEL button
Press it to cancel the timer
setting.
RESET pieces
If the remote controller can’t
work normally, short the two
RESET pieces, it will be OK.
NOTICE:
Cool only type has no HEAT mode.
Keep the remote controller within 6 metres in front of the indoor unit without any blockage.
If the air conditioner is not used for a long time, take the batteries out.
In this illustration, each section is shown with all its displays ON for the purpose of
explanation. Some models may not show all its indications.
Don't tear the batteries apart or throw them into fire, which will lead to explosion.
10
USING CONDITIONER WITH REMOTE CONTROL
MODALITA’ DI FUNZIONAMENTO
1. AUTO
O
In this mode, the air conditioner can automatically adjust the room temperature to decide the most suitable
temperature. At the start of operation, the air conditioner will automatically select the operation mode
according to the room temperature. Please see the following table for reference.(If you are not satisfied
with the setting temperature decided by the air conditioner, you can press TEMPERATURE
ADJUSTMENT button until the temperature setting reaches the point you like.)
Modello solo Raffrescamento
Modalita’
Tempratura iniziale
Temperatura
Locale (RT)
26
25
RT 26
RT 25
RT 23
RT 23
Cool
Dry
2. COOL
24
RT-2
RT-2
21
Modello ‘Pompa di Calore’
Modalita’
Temepratura iniziale
24
Cool
RT-2
Dry
RT-2
26
Heat
O
Press MANUAL SWING button or SWING button to change up/down air flow direction.
Press FAN SPEED button to change the fan speed of indoor unit.
Press TEMPERATURE ADJUSTMENT button to change the setting temperature.
3. DRY
O
In this mode, the air conditioner automatically decides the setting temperature and this setting
temperature will not appear on display. TEMPERATURE ADJUSTMENT button and FAN SPEED button
don't work. Press MANUAL SWING button or SWING button to change up/down air flow direction.
4.FAN
O
In this mode, only the indoor unit runs like the fan.Press MANUAL SWING button or SWING button to
change up/down air flow direction. Press FAN SPEED button to change the fan speed of indoor unit.
5.HEAT
o
Press MANUAL SWING button or SWING button to change up/down air flow direction.Press FAN SPEED
button to change the fan speed of indoor unit. Press TEMPERATURE ADJUSTMENT button to change
the setting temperature.
11
USING CONDITIONER WITH REMOTE CONTROL
6. SLEEP
o
(ECONOMY)
Sleep Mode in cooling running
A. The indoor fan runs at low speed.
B. One hour later, the setting temperature will automatically increase by 1
and one hour later again, the
setting temperature will automatically increase by 1
once more, then the air conditioner will keep
running.
Sleep Mode in heating running
A. The indoor fan runs at low speed.
B. One hour later, the setting temperature will automatically decrease by1
and one hour later again, the
setting temperature will automatically decrease by 1 once more, then the air conditioner will keep
running.
Timer Operation
Timer operation SET
ON
Press button
1.controller
display.
when conditioner is off and
of
will start flickering on the remote
OFF
Press button
controller display
ON
when conditioner is on and
of
wil start flickering on the remote
OFF
ON
button
or
to enter time setting. Every pressing of button
2. Press
setting time by one hour and setting time will be displayed on remote controller.
button SET to fix the setting time. The setting time and
3. Press
the remote controller display.
or
OFF
increses the
will stop flickering on
4.Once Timer mode is set, conditioner will activate or disactivate after the setting time is elapsed.
Time Operatin Cancellation
To cancel Timer Operation press button CANCEL untill
time will disappear from the remote controller display.
,
and the setting
NOTES:
1. Timer must be set again after a power failure. otherwise, timer operation is not right.
If you want to change the time after the setting time is fixed , you should cancel the previous setting
2. time
by pressing
button and then set time again.
CANCEL
If you press buttom SET uncautiously, once the setting time is fixed, the sistem will count time anew
3. on
the current displayed time.
12
OLDALFALI SPLIT
LÉGKONDICIONÁLÓ KÉSZÜLÉK
HASZNÁLATI UTASÍTÁS
Köszönjük, hogy Tekno Point terméket választott!
Kérjük, olvassa el figyelmesen jelen használati utasítást, és õrizze meg
késõbbi használatra.
Az útmutató a sorozat minden olyan oldalfali légkondícionálójára vonatkozik,
melyek hûtõteljesítménye 2,7- 5kW (9000 - 18000 BTU) közötti tartományban
van.
TARTALOM
Tartalom
1
Biztonságvédelmi információk
2
A termék leírása
4
Karbantartás
7
Problémamegoldás
8
Mûszaki adatok
9
A távirányító használata
1
10
10
BIZTONSÁGVÉDELEM
Olvassa el figyelmesen a BIZTONSÁGVÉDELMI INFORMÁCIÓK FEJEZETET!
Az alábbi pontokban olvasható szabályok betartása minden esetben kötelezõ!
A képek illusztráció jellegûek, az egyes modellek különbözhetnek a lenti rajztól.
KÖTELEZÕ
TILOS
FIGYELEM!
Minden légkondicionálót megfelelõ földeléssel kell ellátni. A
hibás elektromos csatlakoztatás áramütés veszélyét keltheti.
Ne csatlakoztassa a földelés kábelt a földgáz csatornához, a
villámhárítóhoz, a vízelvezetõ csatornához vagy a
telefonkészülék földeléséhez.
Az elektromos csatlakoztatások befejeztével mindenképpen
ellenõrizze, hogy a földelés megfelelõ-e.
Használat közben ne húzza meg a vezetéket! A villásdugó
kihúzása elõtt kapcsolja ki a légkondícionálót, egyik kézzel
tartsa erõsen az aljzatot, másik kezével húzza ki a villásdugót.
Az áramellátás vezeték csatlakoztatásához ne használjon
elosztókat vagy hosszabbítókat.
Csatlakoztassa közvetlen az aljzathoz.
Ne károsítsa meg az áramellátás kábelt, ne hosszabbítsa meg
azt, ne helyezzen rá nehéz tárgyakat, ne tartsa hõforrás
közelében! Ezek a körülmények áramütés vagy tûzeset
kialakulását eredményezhetik!
Ne tartózkodjon huzamos ideig a hideg levegõben.
Egészségügyi problémákhoz vezethet.
Húzza ki a villásdugót, szüntesse meg az áramellátást, ha a
légkondícionálót hosszabb ideig nem használja. A felgyülemlett
por tûzveszélyt okozhat!
Egy megfelelõen méretezett leválasztó kapcsoló használata
jelentõsen csökkenti az áramütés veszélyét.
2
A TERMÉK LEÍRÁSA
1. KÜLTÉRI ÉS BELTÉRI EGYSÉG
Elõlap
Levegõ bemenet
Szûrõ
Csatlakozó csõ
Levegõ bemenet
Cseppvíz kivezetés
Levegõ kimenet
Légterelõ
Kivezetés
Kijelzõ
Függõleges légterelõ
Figyelem:
Az egyes modellek esztétikailag minimálisan eltérhetnek a fenti rajztól.
2. KIJELZÕ
Az illusztráció az “A” típusú kijelzõ panelt mutatja be. A
jelmagyaràzatot tartalmaznak.
IDÕKAPCSOLÓ
VENTILÁTOR
lenti piktogrammok minden lehetsèges
FÛTÉS ÜZEMMÓD
ENERGIATAKARÉKOS MÓD
BEÁLLÍTOTT HÕMÉRSÉKLET
PÁRAMENTESÍTÉS
HÛTÉS ÜZEMMÓD
Egyéb piktogrammok:
ENERGIATAKARÉKOS MÓD
HÛTÉS ÜZEMMÓD
VENTILÁTOR
AUTOMATIKUS MÓD
MÛKÖDÉS KIJELZÕ
MAX. SEBESSÉG
BEÁLLÍTOTT HÕMÉRSÉKLET (vagy SZOBA HÕM.)
PÁRAMENTESÍTÉS
SZOBA HÕMÉRSÉKLET
ELEKTROMOS FÛTÉS
HÕM. BEÁLLÍTÁSA
TÁVIRÁNYÍTÓ JELVEVÕ
IDÕKAPCSOLÓ
KÖZEPES SEBESSÉG
FÛTÉS ÜZEMMÓD
LASSÚ LEVEGÕÁRAM
MIN. SEBESSÉG
A termékcsoport folyamatos fejlesztés alatt áll, a mûszaki adatok elõzetes bejelentés
nélkül módosulhatnak.
4
KARBANTARTÁS
Tisztítsa le az elõlapot és a szûrõket legalább 2 hetente egyszer!
A tisztítás megkezdése elõtt kapcsolja ki a készülék fõgombját és szüntesse meg az
áramellátást.
A lenti rajzok illusztráció jellegûek.
A szûrõ tisztítása
1.Nyissa fel a fedõlapot, amíg egy kattanó hangot nem hall. Vegye ki a légszûrõt.
2. Távolítsa el a port a fedõlapról és a szûrõrõl porszívó vagy kefe segítségével. Ha a szennyezõdés
nehezen eltávolítható, mossa le az elõlapot és a szûrõt semleges mosószerrel max. 45°C-os
vízzel.
3. Öblítse le a szûrõt és napfénytõl védett helyen szárítsa meg.
4. Helyezze vissza a szûrõt és zárja le a fedelet.
5. Tisztítsa le a fedõlapot semleges mosószeres vízzel és egy puha ruhadarabbal szárítsa meg. Ne
használjon benzint vagy más kémiai anyagot.
Szezonon kívüli tárolás
1. Hagyja forogni a járókereket egy rövid ideig, hogy a készülék belseje kiszáradjon. (Válassza ki a
hûtés vagy a fûtés üzemmódot és állítsa be a legmagasabb hõmérsékletet)
2. Kapcsolja ki a légkondicionálót és húzza ki a villásdugót. Tisztítsa ki a szûrõt és a fedõlapot.
3. Vegye ki az elemeket a távirányítóból.
TION
OPERA
FAN
Használatba vétel elõtt
1. Helyezze vissza a tiszta szûrõket. Tisztítsa le a készülék házát egy puha ruhadarabbal.
2. Helyezze vissza a villásdugót és ellenõrizze, hogy a földelés nem szenvedett kárt.
3. Helyezze vissza az elemeket a távirányítóba.
Figyelem:
A levegõ kimenetét és bemenetét biztosító nyílásokat soha ne zárja el!
A tisztítás során soha ne használjon gázolajat, benzint, más oldószereket, súrolóport,
rovarirtószert stb. Ezek az anyagok kárt okoznak a készülékben!
Ne sértse meg a távirányító elemeit, ne dobja azokat tûzbe, mert felrobbanhatnak!
6
PROBLÉMAMEGOLDÁS
Az alábbiakban felsorolunk néhány hibalehetõséget.
A probléma feltárása és megoldása után ismét használható a berendezés.
Hibás mûködés?
Keressük meg honnan ered!
A légkondicionáló
nem mûködik
Nincs áramellátás?
A villásdugó nincs a helyén?
Tönkre ment a kismegszakító vagy az
olvadóbiztosíték?
A szobában lévõ akadályok vagy
elektromágneses terek megzavarják a
távirányítóból a jelek leadását?
A távirányító nem
mûködik és a kijelzõ
panel nem világít
Ellenõrizze, hogy a távirányítóban lévõ
elemek mûködõképesek-e.
Ellenõrizze, hogy az elemek megfelelõen
kerültek-e elhelyezésre.
Az ON/OFF gomb
megnyomása után a
légkondicionáló
nem kezdi meg a
mûködést elég
gyorsan.
Kikapcsolás után
úgy tûnik, mintha a
készülék nem állt
volna le
A hûtés vagy a fûtés
nem megfelelõ
intenzitású
Fûtés üzemmódban a
meleg levegõ nem
áramlik ki azonnal a
készülékbõl
Az áramellátás
megszûnik. Miután az
áramszolgáltatás
visszatér, a
légkondicionáló az
elõzetesen beállított
paraméterek szerint kezd
mûködni
7
Ez egy gyári beállítás mely a készülék
védelmét szolgálja.
Várjon 3 percig.
A step motor nem találja a RESET pontot.
Kapcsolja vissza a készüléket, majd ismét
állítsa le a mûködést.
Megfelelõ hõmérsékletet állított be?
A szûrõk tiszták?
A levegõ szabadon áramlik ki és be a beltéri
és a kültéri egységben?
Nappal is használja az energiatakarékos
üzemmódot ECONOMY (SLEEP) ?
Alacsony “LOW” ventillátor sebességet állított
be?
Az ablakok és az ajtók zárva vannak?
A légkondicionáló mûködésre készül elõ.
Várjon egy rövid ideig.
A funkció neve: Automatikus újraindítás
“AUTO RESTART” , csak bizonyos modellek
rendelkeznek ezzel a funkcióval.
MÛSZAKI ADATOK
Figyelem:
1. A zajszint adatok gyári mérés eredményei.
2.A hûtõ- vagy fûtõ teljesítmény az alábbi paraméretek mellett került megállapításra
Hûtés
Fûtés
Belsõ
27
(DB)
19
(WB)
Külsõ
35
(DB)
24
(WB)
Belsõ
20
(DB)
15
(WB)
Külsõ
7
(DB)
6
(WB)
3.A termék állandó fejlesztés alatt áll minõségének javítása érdekében. A használati utasításban található
esetleges nyomdai hibákért nem vállalunk felelõsséget és elnézésüket kérjük.
4.Hõmérséklet határok
Beltérben
Kültérben
DB/WB( C )
DB/WB( C )
Max Hûtés
Max Hûtés
32/23
43/26
Max. Fûtés
Max. Fûtés
21/15
27/--
20/--
21/15
24/18
-5/-6
5.A beltéri és a kültéri egység elektromos bekötési rajzai az egyes egységeken találhatók, azokra felragasztva.
6.Ha az áramellátás kábel sérült, csak eredeti a gyártótól, a hivatalos szervízszolgálattól vagy más
szakembertõl származó darabbal helyettesíthetõ.
9
A TÁVIRÁNYÍTÓ HASZNÁLATA
Az alábbi leírás a távirányító használatát mutatja be.
Jelátvitel
Továbbítja a jelet a beltéri egységhez
KIJELZÕ
SWING gomb
Az aktuális paramétereket mutatja
A vízszintes légterelõ lemez
folyamatos mozgását állíthatja be
vele
ÜZEMMÓD GOMB
SWING
A kívánt üzemmódot
állíthatja be vele
SWING kézi beállítása
gomb
AUTOMATIKUS
FÛTÉS
HÛTÉS
PÁRAMENTESÍTÉS
VENTILÁCIÓ
MANUAL
OPERATION
MODE
HÕMÉRSÉKLET
BEÁLLÍTÓ GOMB
Kézzel beállíthatja vele a légterelõ
lemez pozícióját a kívánt dõlésszögig
az alábbiak szerint:
(1)
OFF
1°C-kal emelkedik
1°C-kal csökken
(2)
(3)
(4)
(5)
ON
TIMER (idõkapcsoló) gomb
TIME
Hõmérséklet tartomány: 16-31°C
között
CANCEL
Bõvebb információ az idõkapcsoló
beállítása pontban
TIMER (idõkapcsoló) kikapcsolása
ON\OFF GOMB
I/O
Ki- és bekapcsoló
gomb
SET
FAN SPEED SLEEP
Bõvebb információ az idõkapcsoló
beállítása pontban
TIMER (idõkapcsoló) beállítása
Nyomja meg az idõ beállításához
VENTILÁTOR SEBESSÉG
Beállított idõ törlése
FOKOZATOK:
Alacsony, Közepes, Nagy
-Auto (
).
ECONOMY FUNKCIÓ
Az ECONOMY funkció kiés bekapcsolására szolgál
Nyomja meg az eredeti
beállítások törléséhez
RESET gomb
A távirányító nem megfelelõ
mûködése esetén nyomja meg a
RESET gombot ahhoz, hogy
tovább használhassa
FIGYELEM:
Egyes modellek nem rendelkeznek hõszivattyúval, így csak hûtésre használhatók!
A távirányító használatakor gyõzõdjön meg arról, hogy a jelek leadása 60m-es távolságon
belül történik és nem áll akadály a leadott jel útjában.
Ha a távirányítót hosszabb ideig nem használja, vegye ki belõle az elemeket.
A fenti ábra illusztráció jellegû, egyes modellek nem rendelkeznek mindegyik
nyomógombbal.
Ne sértse meg és ne dobja tûzbe az elemeket mert felrobbanhatnak!
10
A TÁVIRÁNYÍTÓ HASZNÁLATA
ÜZEMMÓDOK
1. AUTO
(AUTOMATIKUS)
O
Ebben az üzemmódban a légkondicionáló automatikusan beállítja a szoba hõmérsékletét egy ideális
értékre. A mûködési paramétereket az alábbi táblázat tartalmazza. Amennyiben nem elégedett a
hõmérséklettel, beállíthatja saját igényei szerint.
Csak hûtõ modell
Üzemmód Kiindulási hõmérséklet
Szoba hõm.
(RT)
26
25
RT 26
RT 25
RT 23
RT 23
24
RT-2
RT-2
21
Cool
Dry
2. COOL
Hûtõ-fûtõ modell
Üzemmód Kiindulási hõmérséklet
24
Cool
RT-2
Dry
RT-2
26
Heat
(HÛTÉS)
O
Nyomja meg a MANUAL gombot a függõleges légáram beállításához.
Nyomja meg a FAN SPEED a ventillátor sebesség beállításához.
Nyomja meg a HÕM. BEÁLLÍTÁSA gombot a megfelelõ érték beállításához
3. DRY
O
(PÁRAMENTESÍTÉS)
Ebben az üzemmódban a készülék maga választja ki a megfelelõ hõmérsékletet, de nem jeleníti meg az
értékét a kijelzõn.
Páramentesítõ üzemmódban a VENTILLÁTOR SEBESSÉG és a HÕM. BEÁLLÍTÁS gombok nem
aktívak.
4.FAN
O
(VENTILÁCIÓ)
Ventiláció üzemmódban csak a ventilátor mûködik.
Nyomja meg a MANUAL gombot a vízszintes légáram beállításához.
Nyomja meg a FAN SPEED gombot a ventillátor sebesség beállításához.
5.HEAT
o
(FÛTÉS)
Nyomja meg a HÕM. BEÁLLÍTÁSA gombot a kívánt érték beállításához.
Nyomja meg a MANUAL gombot a vízszintes légáram beállításához.
Nyomja meg a FAN SPEED gombot a ventillátor sebesség beállításához.
11
A TÁVIRÁNYÍTÓ
6. SLEEP
o
(ECONOMY)
ECONOMY FUNKCIÓ HÛTÉS ÜZEMMÓDBAN
A. A ventillátor alacsony fokozaton forog.
B.Ebben az üzemmódban minden óra leteltével a hõmérséklet 1 °C-kal emelkedik.
ECONOMY FUNKCIÓ FÛTÉS ÜZEMMÓDBAN
A.A ventillátor alacsony fokozaton forog.
B.Ebben az üzemmódban minden óra leteltével a hõmérséklet 1 °C-kal csökken.
Az idõkapcsoló
Idõkapcsoló üzemmód beállítása
1. Ha a készülék ki van kapcsolva nyomja meg az ON
gombot, a
szimbólum
jele
villogni kezd.
Ha a készülék be van kapcsolva, nyomja meg az
jele villogni kezd.
OFF
gombot, a
OFF
ON
szimbólum
ON
meg az
vagy
gombot az idõ beviteléhez. Az
gomb minden egyes
2.Nyomja
megnyomásakor az idõpont 1 órával halad elõbbre. A távirányító kijelzõje mutatja a beállított órát.
Ugyanez érvényes az
OFF
gomb használata esetén is.
3.Nyomja meg a
gombot az idõpont rögzítéséhez. Az idõpont és a
SET
jelek nem villognak a távirányító kijelzõjén.
és
4.Miután a timer beállításra került, a légkondicionáló a választott idõpontok alapján kapcsol ki és be.
Az idõkapcsoló kiiktatása
Az idõkapcsoló funkció kiiktatásához nyomja meg a CANCEL gombot, és tartsa nyomva amíg az
idõpont és a
vagy
szimbólumok el nem tûnnek a távirányító kijelzõjérõl.
FIGYELEM:
esetén a beállított idõpontot mindig ki kell javítani, ellenkezõ esetben a ki- vagy
1.Áramkimaradás
bekapcsolás nem a megfelelõ órában fog megtörténni.
az idõkapcsoló beállításait módosítani kell, nyomja meg a CANCEL
2.Ha
megfelelõ idõpontot.
Ha az idõkapcsoló beállítása után véletlenül megnyomja a
gombot, és állítsa be a
gombot, a készülék a
SET
3.távirányító kijelzõjén látható idõpont alapján fogja a ki- vagy bekapcsolást
számítani.
12