1
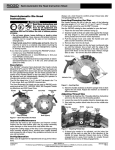
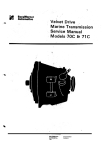
Roscadora de Tubos
Threading Machine
Manual de Usuario y Garantía.
User’s Manual and Warranty.
TRM300
ATENCIÓN: Lea, entienda y siga las instrucciones de seguridad contenidas en este
manual, antes de operar esta herramienta.
WARNING: Read, understand and follow the safety rules in this manual, before operating this tool.
TRM300 manual.indd 1
09/06/15 15:10
E S P A Ñ O L
E N G L I S H
CONTENIDO
CONTENT
Normas generales de seguridad
3
General safety rules
12
Características
6
Features
14
Instrucciones de operación
6
Operation instructions
15
Mantenimiento
9
Maintenance
17
Solucionador de problemas
11
Troubleshooting
18
Especificaciones técnicas
11
Technical data
19
Garantía
20
Warranty policy
20
2
TRM300 manual.indd 2
09/06/15 15:10
E S P A Ñ O L •
NORMAS GENERALES DE SEGURIDAD
• Asegúrese de observar las precauciones de
Seguridad descritas más adelante para prevenir accidentes como incendios, choques eléctricos y lesiones.
• Lea cuidadosamente estas Precauciones de
Seguridad antes de utilizar la máquina, y manéjela de acuerdo con las instrucciones.
• No utilice la máquina de ninguna otra forma
que no sea la que se describe en este manual
de operación.
ADVERTENCIAS GENERALES
1. Asegúrese de estar utilizando el voltaje correcto indicado en la placa de características de
la unidad principal o lo que se encuentra en el
manual de operación. Si el voltaje es diferente al indicado, puede producirse sobrecalentamiento, humo o un incendio.
2. Verifique que el interruptor esté en la posición de APAGADO (OFF) antes de insertar el
enchufe en el tomacorriente del suministro
eléctrico. Si el enchufe se inserta en el tomacorriente cuando el interruptor está en la posición de ENCENDIDO (ON), la máquina puede
comenzar a funcionar abruptamente, y es posible que cause accidentes. Asegúrese de verificar que el interruptor siempre esté en la posición APAGADO (OFF).
3. Asegurese de evitar el choque eléctrico. No
toque el enchufe con sus manos húmedas. No
utilice la máquina bajo la lluvia o en lugares en
los que pueda entrar agua en la máquina con
facilidad. Asegúrese de conectar la máquina a
tierra para evitar el choque eléctrico.
4. Observe las condiciones del sitio de trabajo.
No utilice la máquina bajo la lluvia, en lugares
húmedos o mojados, o en lugares en los que
pueda entrar agua en la máquina con facilidad. La humedad disminuirá el aislamiento del
motor y puede provocar un choque eléctrico.
No utilice la máquina cerca de fluidos o gases
inflamables, como gasolina y diluyente (thiner.
de pintura. Puede producirse un incendio o
una explosión.
5. Utilice los accesorios y aditamentos indicados. No utilice aquellos que no son indicados
en el manual de operación o en nuestros catálogos. De lo contrario, podrían producirse accidentes o lesiones.
Manual de U suario
6. En los casos que siguen, apague la unidad
principal llevando el interruptor a la posición
APAGADO (OFF) y desenchufe la máquina del
tomacorriente sino, cuando la máquina no esté
en uso, o cuando se estén cambiando, reparando, limpiando o inspeccionando piezas, cuando se cambien accesorios, cuando se esperen
fenómenos peligrosos (incluida la falla de la
alimentación eléctrica., cuando el enchufe está
insertado, la unidad principal puede comenzar
a funcionar inesperadamente y provocar accidentes.
7. Si se observa cualquier anormalidad, detenga la operación de inmediato. Cuando el funcionamiento de la máquina no es uniforme o
se producen anormalidades como olores, vibración o ruido inusuales, detenga de inmediato la operación de la máquina, revise los
síntomas, compárelos con los puntos indicados en ‘Antes de solicitar reparaciones y servicios’ en el manual de operación, y observe las
instrucciones correspondientes. Si la máquina
se utiliza en forma continua puede producirse sobrecalentamiento, humo o un incendio,
y provocar accidentes o lesiones. Si se produce
sobrecalentamiento o humo en la unidad principal, no intente revisarla; solicite inspecciones
y reparación.
8. Mantenga limpio el sitio de trabajo. Asegúrese de mantener la mesa de trabajo, y el sitio
de trabajo en general, ordenados y bien iluminados. Un sitio y una mesa de trabajo desordenados son propensos a causar accidentes.
9. No permita que se acerque a la máquina personal no autorizado. No permita que ninguna
persona que no esté autorizada toque la unidad principal o el cordón de alimentación eléctrica, o maneje la máquina. No permita que
ninguna persona que no esté autorizada ingrese al sitio de trabajo, especialmente los niños.
De lo contrario, podrían producirse lesiones.
10. No utilice la máquina en forma forzada. Utilice la máquina únicamente para el fin
para el que se la diseñó. Maneje la máquina
de acuerdo con la capacidad de la unidad principal, para garantizar una operación segura y
efectiva. La operación forzada puede no sólo
provocar daños al producto sino también accidentes. No utilice la máquina de ningún modo
que pudiera hacer que el motor se bloquee, o
produzca humo o un incendio.
3
TRM300 manual.indd 3
09/06/15 15:10
11. Use vestimenta apropiada. No use corbatas,
ropa con mangas abiertas, ropa suelta, accesorios como collares, etc., que podrían quedar
atrapados en las piezas rotativas. Al trabajar en
exteriores se recomienda usar guantes de caucho y zapatos con protectores (stoppers). Los
guantes y zapatos resbaladizos son propensos
a provocar lesiones. Cubra el cabello largo con
una gorra o redecilla, para evitar que quede
atrapado en piezas rotativas. Use gorras de seguridad, zapatos de seguridad, etc., de acuerdo con el ambiente de trabajo.
12. No trabaje en una postura antinatural.
Mantenga sus pies bien asentados y su cuerpo
en equilibrio, para evitar caer y lastimarse.
13. Retire las herramientas como llaves, etc.
Antes de pasar el interruptor a la posición ENCENDIDO (ON) verifique que las herramientas
utilizadas para inspección y ajustes se hayan retirado. Si utiliza la máquina cuando se han dejado herramientas dentro de ella, pueden producirse accidentes y lesiones.
14. Maneje la unidad con gran cuidado. Trabaje siempre prestando gran atención a los métodos de manejo y de trabajo, así como a las
condiciones ambientales. La falta de cuidado
puede provocar accidentes y lesiones.
No maneje la máquina si su concentración está
disminuida por cansancio, haber bebido alcohol, enfermedad, efecto de medicamentos, etc.
15. Maneje con cuidado el cordón de alimentación eléctrica. No acarree el producto tomándolo de su cordón, ni extraiga el enchufe del
tomacorriente tirando del cordón. No coloque
el cordón cerca de objetos calientes, grasas y
aceites, cortadoras y otros objetos con bordes
aguzados. Cuide de no pisar el cordón, tirar
de él o aplicar fuerza innecesaria que pueda
dañarlo. De lo contrario puede producirse un
choque eléctrico, o un cortocircuito que provoque un incendio.
16. Realice un cuidadoso mantenimiento diario. Cuando cambie accesorios y piezas, siga las
instrucciones del manual de operación. Inspeccione periódicamente el cordón de alimentación eléctrica y el enchufe. Si observa daños,
solicite una reparación a su centro de servicio
autorizado. Si se utiliza un cable de extensión
inspeccione el mismo periódicamente, y si estuviera dañado, reemplácelo. Si debe utilizar
cables de extensión en exteriores, para preve-
nir el riesgo de choque eléctrico, cortocircuito
e incendio utilice cables diseñados para uso en
exteriores. Mantenga las empuñaduras secas y
limpias, y libres de aceite y grasa. El resbalamiento puede provocar lesiones.
17. Verifique si hay piezas dañadas. Antes de
utilizar la máquina haga una revisión cuidadosa para ver si hay daños en la cubierta protectora y otras piezas, verifique el funcionamiento
normal y las funciones especificadas.
Verifique las anormalidades que pudiera haber
en el ajuste de piezas móviles y el apriete de
sujetadores, vea si hay piezas dañadas, y revise
todas las piezas que afecten la operación. No
utilice la máquina si los interruptores de arranque y paro no funcionan. Al reemplazar o reparar una cubierta protectora rota y otras piezas,
siga las instrucciones del manual de operación.
Si no se especifican instrucciones en el manual
de operación, solicite una reparación a su centro de servicios autorizado.
18. Guarde la máquina cuidadosamente cuando no se la esté utilizando. Guarde la máquina
en un lugar seco, lejos de los niños y encerrada
con llave.
19. Para la revisión y reparación de la máquina, diríjase a un centro de servicio autorizado.
Si las reparaciones son realizadas por personal
que no esté capacitado o calificado, el desempeño de la unidad se verá afectado desfavorablemente, y pueden producirse accidentes o
lesiones.
TRABAJO DE ROSCADO
1. Tomar precaudones cuando se manipulan
hojas y otros objetos afilados.
• Para evitar accidentes y lesiones, tomar precauciones especiales al manipular hojas y otros
objetos cortantes como peines, escariadores,
cortadores de tubo y cuchillas cementadas, etc.
2. No poner las manos ni la cara cerca de piezas giratorias mientras la máquina esté funcionando.
• El acercar las manos dentro de piezas giratorias y peines puede ser motivo de accidentes y
lesiones graves.
3. No realice la siguiente operación hasta que
la máquina haya parado de girar completamente.
• Si la máquina no para de girar completamente al poner el interruptor en OFF)
4
TRM300 manual.indd 4
09/06/15 15:10
E S P A Ñ O L •
• Antes de proceder al trabajo siguiente, compruebe que las piezas están completamente
detenidas, el no hacer esto puede ser motivo
de accidentes y lesiones.
4. Manejar la máquina sin guantes.
• Los guantes podrían ser atrapados en piezas
o cuchillas giratorias y puede ser motivo de accidentes o lesiones graves.
5. No abandone la máquina mientras todavía
esté girando. Otras personas se podrian lesionar.
6. Si la máquina se cae o se golpea, compruebe
detenidamente que no haya daños como grietas, piezas rotas o deformaciones.
• Si se detecta cualquier anomalía, llame al centro de servicio autorizado para su inspección y
reparación. El continuar utilizando la máquina
en condiciones inadecuadas puede ser motivo
de accidentes o lesiones.
7. No toque los peines inmediatamente después de roscar;
• Los peines están muy calientes al finalizar el
roscado. Espere hasta que se enfríen antes de tocarlas para evitar quemaduras y otras lesiones.
8. Portapeines y peines.
• Utilice el porta peines y los peines correspondientes al diámetro del tubo que se va a roscar.
• Monte correctamente el portapeines en el
carro.
• Antes de comenzar a roscar, coloque el portapeines en posición de roscar, encienda la máquina y asegúrese de que el aceite de roscar
fluya correctamente por el cabezal y los peines. Asegúrese también de que haya aceite
suficiente en el depósito cubriendo completamente el colador. Esto no solo evita un roscado
defectuoso sino también las averías de la máquina, los accidentes y las lesiones.
9. Asegurarse de que se comience a roscar
desde la posición correcta.
• Comience siempre a mecanizar las roscas con
el carro a la derecha de la línea roja de la barra
de soporte delantera para que el portapeines
no pegue contra el plato, y cause daños a la
máquina, accidentes o lesiones.
10. Utilizar un soporte de tubos para roscar
tubos largos.
• Al roscar tubos largos, utilice el soporte de
tubos especial para evitar vibraciones debidas
a las deformaciones producidas por el giro del
tubo. El soporte también evita la inestabilidad
de la máquina debida al peso del material.
Manual de U suario
• El no usar el soporte de tubos puede ser motivo de roscas imperfectas y averías de la máquina, pudiendo incluso producir accidentes y
lesiones serios.
11. Asegurarse de instalar los accesorios según
el Manual de Operación.
• Si no se montan correctamente los accesorios y aditamentos, estas piezas se pueden desprender durante el funcionamiento, o la unidad puede volcarse produciendo accidentes y
lesiones.
12. Utilizar protección auditiva para trabajar
con la máquina.
• El no hacer esto puede ser motivo de pérdida
de audición o de daños en los oídos.
13. Utilizar guantes de protección para quitar
virutas u otros cuerpos extraños.
• Puede causar accidentes.
TRABAJO DE ACHAFLANADO
Para prevenir lesiones no toque la hoja del escariador directamente con sus manos, ya que
es extremadamente puntiaguda.
ACEITE PARA ROSCADO
1. Use solamente aceite de roscar apropiado.
2. Llevar gafas de seguridad. El contacto del
aceite con los ojos causa inflamación.
Tratamiento de emergencia: lave los ojos con
agua limpia durante unos 15 minutos, y procure atención médica.
3. Cuide de no respirar la niebla o vapor del
aceite. La aspiración de la niebla o vapor del
aceite puede provocar náuseas.
Tratamiento de emergencia: lleve a la persona
al aire fresco, cúbrala con una manta, manténgala abrigada y relajada, y en seguida busque
atención médica.
4. No disuelva el aceite ni lo mezcle con aceite
para roscado producido por otras compañías.
5. Si el aceite para roscado se contamina con
agua durante la operación de roscado y su
color cambia a blanco lechoso, o su calidad se
deteriora significativamente y da como resultado un mal acabado de la rosca, reemplace el
aceite inmediatamente.
6 No beba el aceite. Si bébe el aceite puede sufrir diarrea o vómitos.
Tratamiento de emergencia: no deje que la
persona fuerce el vómito; procure busque
atención médica de inmediato.
5
TRM300 manual.indd 5
09/06/15 15:10
7. No coloque el aceite donde los niños pequeños puedan alcanzarlo fácilmente.
8. Tenga particular cuidado en relación con el
riesgo de incendio. Según sea el país de uso, el
aceite puede clasificarse como un material peligroso. Para prevenir incendios o explosiones,
familiarícese y cumpla siempre con las leyes y
regulaciones locales que correspondan al manejo de esos materiales.
9. Almacenamiento. Después de su uso, cierre
siempre la tapa, para impedir que el aceite se
contamine con polvo, agua u otros materiales
extraños. Almacene el aceite en un lugar oscuro, donde no reciba luz solar directa.
10. Manejo del aceite residual y sus latas. El
manejo del aceite residual y sus latas está gobernado por las leyes y regulaciones locales.
Cumpla siempre con las leyes y regulaciones
que gobiernan los métodos de eliminación y
limpieza.
11. Precauciones con los tambores de aceite de
200 L. No aplique presión a los tambores de
aceite vacíos, porque pueden estallar.
Nunca intente soldar, calentar, agujerear o cortar los tambores, ya que esto podría ocasionar
una explosión o incendio a causa de los residuos que pudieran haber quedado en el tambor.
3. TAPÓN DE VACIADO DEL ACEITE.
4. VOLANTE DEL CARRO.
5. PEDAL DE ENCENDIDO.
6. VOLANTE.
7. PORTA TARRAJAS.
INSTRUCCIONES DE OPERACIÓN
TRANSPORTE DE LA MÁQUINA
No hay necesidad de desagotar el aceite para
corte antes de mover y transportar la máquina.
1. Introducir un tubo
corto y cerrar con firmeza el plato.
2. Sujetar el tubo con
el cortador, fijar el
carro, y llevar por el
asa.
MONTAJE DE LA MÁQUINA
1. Al montar la máquina, las patas se deben
ajustar de forma que el plato posterior esté
más alto que el plato de mordazas para que el
aceite no fluya hacia atrás por la tubería que
está cortando.
2. Quite la cubierta superior del tanque, y verifique el nivel de aceite cubra perfectamente el
colector de viruta.
Plato posterior
Plato de mordazas
CARACTERÍSTICAS
La TRM300 fue desarrollada para proporcionar
a los usuarios una máquina que sea segura y
que puedan usar con confianza.
1. CORTADORA DE TUBOS.
2. ESCAREADOR.
1
7
Colector de viruta
2
6
3
4
5
3. Coloque la cubierta
del aceite y el colector
de viruta en la posición correcta.
Tapa superior de la
cubierta de aceite
COLOCANDO EL PORTAPEINES
Instalar el portapeines en la maquina. Montar
el eje soporte del portapeines en el alojamiento del carro y movimiento el portapeines, empujarlo hasta que haga tope en el carro (1).
6
TRM300 manual.indd 6
09/06/15 15:10
E S P A Ñ O L •
Bajar el portapeines comprobando que está correctamente montado (2).
Portapeines
1
2
Manual de U suario
Empuje la placa (2) en dirección del juego de
peines, apriete la tuerca de palanca (3) a la posición de tamaño del tubo.
En seguida empuje la placa hacia arriba en dirección del juego de peines (4).
3
Tuerca de
palanca
Apretar
Eje soporte
de portapeines
Carro
DESMONTAJE Y CAMBIO DE PEINES
DESMONTAJE DE PEINES
Empujar la palanca de apertura automática A
en la dirección de la flecha (1) y poner el portapeines en posición abierta.
Aflojar la tuerca de palanca girando según la
flecha (2) y girar completamente la palanca
leva en el sentido de posición abiertas de los
peines (3).
Tuerca
de palanca 2
Aflojar
Palanca de
apertura
automática A
1
Empujar
Placa leva
3
Empujar
4
2
Empujar
Empujar
ADVERTENCIA: Asegúrese de utilizar peines para la TRM300. No se pueden utilizar
otros peines que no sean para esta roscadora.
COLOCANDO LOS TUBOS EN LA ROSCADORA
1. Abrir los dos platos sobradamente para que
pase el tubo que se va cortar e introducirlo
siempre que se pueda por el plato posterior.
2. Cerrar el plato porterior y agarrando el tubo
con la mano derecha, cerrar el plato de mordazas para sujetar el tubo. Tirar bruscamente del
volante de mano hacia el cuerpo para fijarlo.
3. Un empuje brusco en sentido opuesto soltará el tubo después de realizada la operación
de corte.
Plato posterior
Cerrar
Peine
Cerrar
Tubo
Sacar
REEMPLAZANDO LOS PEINES
Inserte cada peine en el número de orificio
correspondiente, tanto como la cabeza de la
peine lo permita (1).
Número
de ranura
1
Introducir
Plato de
mordazas
CONSEJOS PARA CORTES DE TUBOS CORTOS
Montaje de tubo corto (que no llega al plato
posterior). Con el plato de mordazas ligeramente flojo, desplace el tubo hasta que toque
a los peines como se muestra en la imagen.
Esto ayuda a sujetar el
Borde de corte
tubo centrado mientras
se aprietan las mordazas.
De esta forma se asegura
siempre un corte ligeraTubo corto,
mente cónico.
80 mm
7
TRM300 manual.indd 7
09/06/15 15:10
TUBO LARGO
Al cortar roscas en tubos largos, utilizar un soporte para el tubo para evitar la vibración del
tubo debida a la deformación producida por el
giro, y para evitar la inestabilidad de la máquina debida al peso del tubo.
Si no se utiliza un soporte para el tubo, puede
resultar imposible hacer roscas correctas, o
puede dañarse la máquina y producir accidentes o lesiones.
Tubo
Soporte
para tubo
CORTE DE TUBO, ESCARIADO
ALIMENTACIÓN DE CORRIENTE
Antes de utilizar la máquina, compruebe la
tensión en la placa de características.
Utilizar solamente una fuente de alimentación
de CA y poner a tierra la máquina antes de utilizarla. Si se usa un alargador, debe ser lo más
corto posible y tener suficiente capacidad de
corriente.
ATENCIÓN: Antes de enchufar la clavija en
el enchufe de corriente, asegurarse de que la
máquina está desconectada con el interruptor
en OFF para evitar movimientos bruscos que
pueden ser motivo de lesiones o accidentes.
CORTE DE TUBOS
1 . Levantar el portapeines y el escariador para
apartarlos y montar el tubo a la longitud que
se quiere cortar.
Manija del cortador
2. Abrir el cortador de
tubos a una abertura
mayor que el diámetro del tubo bajándoTubo
lo a su posición.
3. Apretar girando la manilla hacia la derecha
hasta que la rueda de corte se acople firmemente sobre el tubo, arrancar la máquina, y
girar la manilla 1/4 de vuelta por cada vuelta
del tubo a cortar hasta que se termine de cortar el tubo.
PELIGRO: Si se gira la manilla del cortador
demasiado rápidamente cuando la rueda de
corte está cortando el tubo, se puede deformar el tubo.
PRECAUCIONES ESPECIALES CON LA RECTIFICADORA DE CORTES
Recomendamos encarecidamente que solamente se utilice el cortador de tubo unido a
la máquina para el corte de tubos que se van
a roscar.
Si se utiliza una rectificadora, asegurarse de
que la cara del tubo
esté a escuadra y no
tenga escalones como
se representa en la siguiente figura.
ESCARIADO
1. Cuando se haya terminado de cortar, levantar el cortador para separarlo. Bajar el brazo
del escariador y empujar la manilla del escariador hacia el tubo (1).
2. Los tubos muy salidos del plato se pueden
escariar a veces con la manilla del escariador en
su posición más retraída.
3. Fijar el escariador en posición girando la manilla en sentido contrario a las agujas del reloj (2).
1 Empujar
3
2
Mango
4. Arrancar la máquina y girar la manilla del
carro hacia la derecha para avanzar el escariador (3).
5. Cuando se termina el escariado, apagar la
máquina, retraer la manilla del escariador y levantar el brazo del escariador a la posición de
reposo.
INSTRUCCIONES DE ROSCADO
Ajuste del diámetro de la rosca
1. Montar el porta peines apropiado como se
muestra en la siguiente imagen.
2 Empujar la placa leva hacia arriba y poner en
su lugar el pasador de apertura automática.
3. Aflojar la tuerca de palanca y ajustar la linea
de graduación en el diámetro deseado y apretar firmemente.
8
TRM300 manual.indd 8
09/06/15 15:10
E S P A Ñ O L •
4. Empujar el asa de la placa leva hacia delante
para ajustar la palanca de apertura automática
y a continuación ajustar el diámetro de la rosca
llevando la tuerca de palanca a la posición correcta.
Tuerca de palanca
Aflojar
Apretar
Placa de
diámetros
Empujar
Palanca de
apertura
automática
Placa de levas
Manija de la placa
de levas
ROSCADO
5. Conectar la máquina, con lo que el aceite
de roscar saldrá automáticamente del portapeines.
6. Girar la manilla del carro en el sentido de
las agujas del reloj hasta que los peines se acoplen al tubo por 3 ó 4 filetes de rosca. A partir
de aquí, se puede soltar la manilla del carro.
A continuación se corta automáticamente una
rosca cónica normalizada.
7. A medida que los peines avanzan a lo largo
del tubo, el extremo del tubo se pone en contacto con la palanca de apertura automática e
empujándola fuera de su ranura para soltar los
peines. (1 X2).
8. Cuando se ha terminado de roscar, desconectar la máquina poniendo el interruptor en OFF,
y girar la manilla del carro hacia la izquierda.
Retirar el portapeines del tubo.
Palanca de
apertura
automática
Manilla
del carro
PRECAUCIONES DE ROSCADO
ave
1 . A medida que los
o su
tact
con
peines se ponen en
contacto con el tubo,
se debe girar la manilla cada vez con más
suavemente
fuerza hasta que las
peines muerdan firmemente. Después de que
los peines se acoplan totalmente al tubo, avanzan suavemente por si mismas, pero el corte
perfecto se consigue girando la manilla con
una ligera presión para seguir al avance de los
peines.
PRECAUCIÓN: Si la máquina se para bruscamente durante el roscado, apagarla inme-
Manual de U suario
diatamente (un retraso puede provocar que se
queme el motor).
2. Para detener el roscado, girar la palanca
de apertura automática hacia la izquierda.
Palanca de
apertura
automática
AJUSTE DE LA LONGITUD DE ROSCA
PORTAPEINES UNI-AUTO V
Se adjunta un dispositivo para el ajuste de la
longitud de rosca . Se utiliza para hacer roscas
de la longitud deseada como sigue.
Capacidad de ajuste
1" - 2" (3 filetes.
1 1/2" - 3/4" (4 filetes.
AJUSTE
1. Aflojar el tornillo de
cabeza hueca de la paTornillo
lanca de apertura aude
cabeza
tomática (C).
hueca
2. Desplazar la palanca de apertura automática hacia la izPalanca
quierda para roscas
de apertura
más largas o hacia la
automática
(c.
derecha para roscas
más cortas según se
indica por las flechas
Mas larga
Mas corta
en el diagrama.
3. Volver a apretar el tornillo de cabeza hueca.
MANTENIMIENTO
Para asegurar una vida larga y sin problemas
de la máquina, recomendamos los procedimientos de mantenimiento siguientes.
1. Lubricación del eje principal
Los cojinetes del eje principal están fabricados
con metal lubricante de diseño especial, pero
deben lubricarse mensualmente con aceite
para husillos o aceite de máquinas para asegurar un funcionamiento suave.
Aceitar
aquí
9
TRM300 manual.indd 9
09/06/15 15:10
2. Lubricación del cortador de tubos
El husillo de avance del cortador y los rodillos
deben lubricarse diariamente con aceite para
husillos. La falta de aceite no solo dificulta el
manejo sino que resta eficiencia a la máquina.
Aceitar
aquí
3. Carbones de grafito con desconexión automática
Esta máquina utiliza carbones de grafito con
dispositivo de desconexión automática. Si se
excede la vida útil de los carbones, se garantiza
un funcionamiento seguro de la máquina parando el motor automáticamente.
Cambio de carbones:
1. Cambiar siempre los dos carbones al mismo
tiempo.
2. Asegurarse de que el motor está desconectado al cambiar los carbones.
3. Desmontar las tapas laterales, girar a la izquierda las tapas utilizando un destornillador
pequeño y saque los carbones.
4. Mantener limpio el sistema de aceite como
se indica a continuación:
1. Vaciar el aceite y compruebe si está contaminado.
2. Desmontar y limpiar el recibidor de virutas,
la tapa superior del depósito, el filtro de aceite y el colador, y limpiar el depósito de aceite.
Manteniendo limpio el sistema de aceite, se
prolonga la vida de la bomba de engranajes.
3. Después de limpiar el depósito, poner un sellador en el tapón de vaciado para reducir la
posibilidad de fugas.
Bomba
Colector de viruta
Tubería de aspiración
del circuito de aceite
Tapa superior
del depósito
Filtro de
aceite
Sistema de aceite de corte.
1. Asegurarse de que el aceite fluye libremente. Compruebe que hay aceite suficiente en el
depósito y que las tuberlas de aceite estén libres de obstrucciones.
2. Si el aceite se decolora o contamina, vaciar el
depósito y llenarlo con aceite de corte limpio.
3. Limpiar el filtro de aceite después de 8 a 12
horas de trabajo.
4. Durante las operaciones de roscado, se acumulan en el depósito pequeñas virutas del roscado de forma que es necesario limpiarlo a
fondo una vez al mes para garantizar el correcto funcionamiento de la roscadora.
5. Estructura del plato de mordazas y mantenimiento.
Las mordazas del plato constan de 3 piezas y
cuando los dientes de las mordazas están gastados y no sujetan el tubo correctamente se
debe cambiar el juego completo de mordazas.
Quitar el conjunto de tornillos de cabeza hueca
hexagonal.
Como se muestra en la ilustración siguiente, el
plato de mordazas está unido al eje principal
por medio de seis tornillos de cabeza hueca.
Si estos tornillos se aflojan el roscado se verá
afectado, por tanto debe asegurarse de mantener estos tornillos apretados en todo momento.
lnserción
de plato de
mordazas
6. Anillo de empuje auto-ajustable
Absorbe automáticamente el tableteo debido
al desgaste en la dirección del eje principal,
para obtener un roscado más estable.
Anillo de ajuste +
anillo de empuje
Tapón de
vaciado
Tornillo
10
TRM300 manual.indd 10
09/06/15 15:10
E S P A Ñ O L •
SOLUCIONADOR DE PROBLEMAS
Si se presentan anomalías, comprobar lo siguiente e informar al distribuidor o a nuestra
división de ventas.
PELIGRO: Los problemas que no se relacionan a continuación. no se deben intentar resolver ni reparar por uno mismo, sino que debe
llamarse a nuestro distribuidor o división de
ventas.
Si las reparaciones las realiza personal sin formación o inexperto, no se podrá obtener el
rendimiento óptimo de la máquina pudiendo
dar lugar a accidentes y lesiones.
LA MÁQUINA NO FUNCIONA CON EL
INTERRUPTOR EN ENCENDIDO "ON"
MOTOR PARADO
Clavija desenchufada. Enchufar la clavija.
Carbones de grafito gastados. Cambiar carbones por unas nuevas segun las instrucciones.
Tensión baja. Comprobar tensión.
Motor quemado. Necesita reparación.
Interruptor estropeado. Necesita reparación.
MOTOR EN MARCHA
Reductor roto. Necesita reparación.
LA ROTACIÓN DEL EJE PRINCIPAL ES DEFECTUOSA
Tensión baja. Comprobar tensión.
Motor quemado. Necesita reparación.
EL ACEITE NO FLUYE CORRECTAMENTE
Bajo nivel de aceite. Llenar de aceite.
Tuberías de aceite obstruidas con virutas. Limpiar virutas del depósito de aceite.
Portapeines mal montado. Montar correctamente el portapeines.
Manual de U suario
LAS PIEZAS MÓVILES NO SE MUEVEN SUAVEMENTE
Obstrucción de virutas en alguna parte. Quitar virutas.
LOS PEINES NO SE ACOPLAN CORRECTAMENTE AL TUBO
Peines gastados. Cambiar por un juego nuevo.
Peines partidos. Cambiar por un juego nuevo.
Peines mal introducidas. Introducir los peines
según el No. correspondiente del portapeines.
EL ROSCADO NO ES EL CORRECTO
GRUESO, DELGADO
Portapeines mal ajustado. Ajustar elportapeines según los procedimientos.
LARGO, CORTO
Portapeines mal ajustado. Ajustar elportapeines según los procedimientos.
Peines gastados. Cambiar por un juego nuevo.
Peines partidos. Cambiar por un juego nuevo.
Aceite de roscar deteriorado. Cambiar aceite.
Peines mal introducidos. Introducir los peines
según el No. correspondiente del portapeines.
ESPECIFICACIONES TÉCNICAS
VOLTAJE-FRECUENCIA
120 V ~ 60 Hz
VELOCIDAD DE ROTACIÓN
40 r/min
CAPACIDAD DE ROSCA
1/2"-2" (12,7 mm - 50,8 mm)
CORRIENTE
17 A
POTENCIA
600 W
PESO
49 kg (108 lb)
GOTAS DE ACEITE DE LA PARTE POSTERIOR
DEL TUBO
Plato posterior demasiado bajo. Elevar el plato
posterior.
EL PORTAPEINES SE MONTA CON DIFICULTAD
Obstrucción de virutas en alguna parte. Quitar
las virutas pegadas al eje de soporte y alojamiento del portapeines.
Portapeines toca tubería etc. de la tapa superior del depósito. Desmontar la tuberla, etc.
11
TRM300 manual.indd 11
09/06/15 15:10
GENERAL SAFETY RULES
• Be sure to observe these warnings carefully as
they greatly affect safety.
• If this operation manual is lost or damaged,
promptly order a replamcement from our
agent or sales agent.
• Parts and specifications are subjet to change
without prior notice, due to improvements in
quality, performance or safety standards. In
such cases, the contents, photographs, illustrations, etc., of this manual may be different to
the product you have purchased.
1. Apply correct voltage of power supply being
used. Be sure to use voltage indicated as rated
voltage in the main unit name plate or the instruction manual. If voltage different from the
indicated voltage is used, heating, smoking or
firing may occur.
2. Check on OFF of the switch, before inserting the plug to the power supply plug socket.
If the plug is inserted to the power supply in
switch ON state, the machine may start operation abruptly, liable to cause unexpected accidents. Be sure to check on switch OFF.
3. Take notice for preventing electric shock. Do
not touch the plug with wet hands. Do not use
the machine in rain or at places where water
might enter easily into the machine. Be sure to
ground to earth. Electric shock might occur.
4. Take notice of environment conditions of
the work site. Humidity will lower insulation
of the motor and cause electric shock. Do not
use at places affected by flammable fluids or
gases, such as gasoline and thinner. Firing or
explosion might occur.
5. Use designated accessories and attachments.
Do not use accessories and attachments other
than those designated in the instruction manual or our catalogs. Accidents or injuries might
be caused.
6. In the following cases, turn OFF the main
unit switch and pull out the plug from the
power supply plug socket. In case the machine
is not used or parts are changed, repaired,
cleaned or inspected.
In case accessories are changed. In case hazards are expected. (including electric power
failure). If the plug is being inserted, the main
unit starts operation unexpectedly, causing accidents.
7. lf abnormality is sensed, immediately stop
operation). When operation of the machine
is not smooth or abnormalities such as abnormal smell, vibration and noise are detected
during running, immediately stop operation
of the machine. By checking symptoms with
the items of [Troubleshooting] section in the
manual, observe corresponding instructions. lf
the machine is being used continuously, heating, smoking or firing might occur, causing accidents and injuries. If heating or smoking of
the main unit occurred, do not overhaul but
ask for inspection and repair.
8. Keep the working site clean. Take care for always ordering well the working table and the
working site, and keeping high illuminance.
Disordered site and working table are liable to
cause accidents.
9. Do not let people other than the workers
come near the machine. Do not let people
other than workers touch the main unit or the
power supply cord or operate the machine.
Do not let people other than workers enter
the working site. Among others, take care of
children. Injuries might occur.
10. Do not use the machine forcibly. Do not use
the machine in usage not designated. Operate
according to the capacity of the main unit, for
assuring safe and effective operation. Forced
operation causes not only damages of the
products but also accidents. Do not use the
machine in the way causing motor locking, liable to cause smoking and firing.
11. Wear neat clothing in working site. Do not
wear necktie, clothes with open sleeves, loose
clothes, omaments such as necklace, etc., to
prevent inclusion into the rotating part. When
working outdoors, it is recommendable to
wear rubber globes and shoes with stoppers.
Slippery globes and shoes are liable to cause
injuries. Cover long hair with caps and hair covers, to prevent inclusion into the rotating part.
Wear safety caps, safety shoes, etc. according
to working environment.
12. Do not work in unnatural posture. Keep
footings firmly and keep balance, to prevent
overturning and injuries.
13. Remove tools such as a wrench. Before
tuming ON the switch, check that tools used
for inspection and adjustment are removed. If
operation is made when tools are left, accidents and injuries may occur.
12
TRM300 manual.indd 12
09/06/15 15:10
E N G L I S H •
14. Perform operation with great care. Carefully work with great consideration to handling
methods, working methods and surrounding
conditions. Carelessness will cause accidents
and injuries. Do not operate the machine when
concentration is lowered in case of being tired,
drinking alcohol, being sick, affected by medicines, etc., to prevent accidents and injuries.
15. Do not treat the power supply cord carelessly. Do not carry the product by holding
the cord, and pull out the plug from the plug
socket by pulling the cord. Do not bring the
cord near heated objects, fats & oils, cutters
and objects with acute edges. Take consideration into wiring places to prevent treading the
cord, pulling the cord or applying unnecessary
force up to damage the cord. Electric shock,
short-circuit may occur, causing firing.
16. Take careful maintenance daily. In changing accessories and parts, observe the instruction manual. Periodically inspect the power
supply cord and plug. If damaged, request
repair to yoursales agent or our sales branch.
Electric shock and short-circuit may occur.
In case extension cord is used, inspect the cord
periodically, and if damaged, replace. In case
extension cords are used outdoors, use extension cords for outdoor use, to prevent electric
shock or short-circuit and firing. Keep the gripping parts dry and clean not to be attached by
oil aod grease. Slipping may cause injuries.
17. Check for damaged parts. Before using the
machine, carefully check for damages of the
protection cover and other parts, and check
on nomal operation and exertion of specified
functions. Check for abnormalities such as
in adjustments of movable parts, tightening
state, damage of parts, fitting state and conditions of all parts affecting operation. Do not
use the machines causing damages of the plug
and cord. Electric shock and short-circuit may
occur, causing firing. Do not use machines not
started and stopped by switches. In replacing
or repairing broken protection cover and other
parts, observe the instruction manual.
In case instruction is not specified in the instruction manual, request your sales agent or
our sales branch for repairing.
18. When the machine is not used, carefully
store it. Store at dry place not touched by children and locked by the key.
U ser’s manual
19. As for overhauling and repair of the machine, request to special agents. Our products
comply with corresponding safety standards.
Do not remodel. As for repair, be sure to asks
for repair to your sales agent or out sales
branch.lf repair is made by unskilled persons
with less knowledge on repair, sufficient performances can not be exerted and further, accidents and injuries may be invited.
THREADING WORK
1. Take care in handling the blades.
• Take special care in handling the blades such
as chaser, reamer, pipe cutter and carbide cutter, to prevent accidents and injuries by handling incorrectly.
2. Do not put your hands and face near the
rotating parts during operating.
• Inclusion into rotating parts and chips cause
accidents and injuries.
3. Do not perform the next work until rotation
stops completely.
• In turning OFF the switch, rotation does not
stop instantly. Perform the next work after
checking on complete stopping, to prevent biting causing accidents and injuries.
4. Do not wear gloves during operating.
• Biting into the rotating parts and blades
causes accidents and injuries.
5. Do not leave the machine rotating.
• Other persons may be injured.
6. If dropping or hitting occurred by mistake,
carefully check for breakage, cracks and deformation of the machine.
• If abnormalities are detected, request inspection and repair to your sales agent or our
company sales office. Using the machine as it
is continuously causes troubles of the machine,
accidents and injuries.
7. Do not touch the chaser and chips just after
threading work.
• Temperature of the chaser and chips is raised
very high just after threading, causing burns
and injuries.
8. Die head and chaser.
• Use the die head and chaser matching with
diameter of the pipe to be threaded.
• Be sure to use only the TRM300 die head and
dies. The die heads and dies for other models
cannot be used with TRM300.
• Fit the die head correctly to the shuttle bench.
13
TRM300 manual.indd 13
09/06/15 15:10
• Before starting working, set the die head to
threading state, turn ON the switch and check
on correct supplying of threading oil fluid from
the die head (Oil fluid is applied to the chaser),
to prevent incorrect threading of the pipe,
troubles of the machine, accidents and injuries.
9. Be sure to observe the threading start position.
• In threading, start the shuttle bench from
the right side of the red line put on the pipe
receive on the front side (in viewing from
the machine working position). If the shuttle
bench is not started from the correct position,
the die head bits the main unit during threading, causing troubles of the machine, accidents
and injuries.
10. Use the pipe support in threading long size
pipes.
• In threading long size pipes, use the pipe
support to prevent vibration due to warping
during rotating and instability of the machine
due to material weight.
• If the pipe support is not provided, threading
can not be made correctly or troubles of the
machine, accidents and injuries occur.
11. Surely fit the accessories according to the
Instruction Manual.
• Insufficient fitting causes dropping and falling of the units, accidents and injuries.
CHAMFERING WORK
Since the reamer blade tip is acute, do not
touch it directly with hands, to prevent injuries.
FLUID FOR THREADING
1. Use only the appropiate threading fluid.
2. Wear goggles. Touch to the eyes may cause
inflammation. For an emergency treatment,
wash your eyes with clean water for about 15
mins., and receive medical check.
3. Wear protection gloves. Touching to the skin
may cause inflammation. If do, carefully wash
the touched part with water and soap.
4. Take care to not suck oil mist and steam.
Sucking oil mist and steam may cuase a sick
feeling. In case you do, go to a place with fresh
air, cover the body with a blanket etc., to keep
a good body temperature and rest, receive
medical treatment immediately.
5. Do not thin the oil fluid or mix it with
threading oil fluids of other companies.
6. When water is mixed during the use of
threading oil fluid and color is changed to
milky white or the oil fluis is excessively deteriorated and the surface finishing is worse,
change these fluids immediately.
7. Do not drink the oil. Drinking it may cause
loose bowels and vomiting. In case someone
else drink, do not let the person vomit forcibly
and immediately receive medical treatment.
8. Do not put the oil at places easily available
for children.
9. Storing method:
Close the lid after using, this will prevent the
entry of dust, water and other substances.
Since the oil is chemical, store in a dark place,
and make sure it will not be exposed to direct
sun light.
10. Treating waste oil and waste cases. Treating
methis are stipulated by laws and regulations.
Thread according to the laws and regulations
on waste disposal and cleaning. When uncertain, consult with your sales agent or our company sales office for treatment.
11. Notices in drums (200 L). Do not apply pressure to vacant drums, to prevent bursting. Do
not perform welding, heating, drilling and
cutting to the drums, to prevent bursting and
firing due to residues.
FEATURES
KNOW YOUR TOOL
1. CUTTER.
2. REAMER.
3. DRAIN PLUG.
4. CARRIAGE HANDLE.
5. FOOT SWITCH.
6. REAR CHUCK.
7. HEAD WHEEL.
1
7
2
6
3
4
5
14
TRM300 manual.indd 14
09/06/15 15:10
E N G L I S H •
OPERATION INSTRUCTIONS
TRANSPORTATION
lt is necessary to drain off the oil during transportation.
1. Insert a short pipe
and close the chuck
finnly.
2. Grip the pipe with
the cutter for cutting,
fix the caniage, and carry the pipe.
SETTING UP
1. When setting up the machine, the legs
should be adjusted with the rear chuck higher
than the hammer chuck so that oil does not
flow back down the pipe being cut.
2. Remove the tank upper cover, and check
that the level of the oil adequately covers the
strainer.
Scrap receiver
3. Set the oil cover and
scrap receiver in the
right position.
PUT DOWN THE DIE HEAD
Fit the die head to the machine.
1. Adjust the die head post to the carriage fitting hole, and while moving the die head, push
it until hitting the carriage.
2. Put down the die head and check on correct
setting.
U ser’s manual
REMOVAL AND REPLACEMENT OF THE DIES
REMOVING THE DIES
Push the auto-open lever A in the direction of
the arrow (1) and put the die head into the
open position.
Loosen the lever nut by tuming in the arrow (2)
and fully tum the cam plate in the direction of
the dies open position (3).
Lever nut 2
Loosen
Auto-open
lever A
1
Push
Pull 3
Dies
Next, pull the knob
and open the cam
plate as far as the
release position, and
then remove the dies
from the diehead.
Pull out
REPLACING THE DIES
Insert each die into its corresponding slot number in the die head as far as the line marked
on the die (1).
Tum the cam plate in the direction of the dieset (2) and tighten the lever nut on the appropriate pipe size position (3).
Next push the cam plate upwards in the direction of the die-set and set in position (4).
CAUTION: Be sure to use only the TRM300
die head and dies. The die heads and dies for
other models cannot be used with TRM300.
1
Insert
Die
number
1
2
3
Lever nut
Thighten
2
Push
4
Push
15
TRM300 manual.indd 15
09/06/15 15:10
SETTING THE PIPE
1 . Open both chucks wider than the size of the
pipe to be cut and insert the pipe from the rear
chuck side where possible.
2. Close the rear chuck and, holding the pipe
in your right hand, close the hammer chuck
to grip the pipe. Jerk the hand-wheel sharply
towards you to lock.
3. A sharp jerk in the opposite direction will
release the pipe after cutting has been completed.
Rear chuck
SWITCH, PIPE CUTTING, REAMING
POWER SUPPLY
Before using, check the voltage on the nameplate. Use only an AC power supply and always
ground the machine before use. In an extension cord is used, it must be as short as possible and of sufficient capacity of the power
supplied.
CAUTION: Before connecting the plug
socket, check that the machine switch is turned
OFF, to prevent abrupt moving, causing injuries
and accidents.
PIPE CUTTING
1. Raise the die head and reamer out of the
way and set the pipe at the length to be cut.
Pipe
Cutter handle
Head
wheel
HINTS FOR SHORT-PIPES
Setting a short pipe (which does not reach the
rear chuck). With the hammer chuck slightly
loose, move the pipe into contact with the dies
as shown in the diagram.
Cutting edge
This will help hold the
pipe on center while
the hammer chuck is
tightened. In this way
a smooth taper cut is
Short pipe,
80 mm
ensured every time.
LONG-PIPE
In case of long size pipes. In case of threading
long size pipes, use the pipe support to prevent vibration during rotating due to warping
or instability of the machine due to material
weight.
If the pipe support is not provided, threading
can not be made correctly, or the machine is
troubled, causing accidents and injuries.
Pipe
Pipe
support
2. Open the pipe cutter wider than the
diameter of the pipe
and lower it into posiPipe
tion.
3. Tighten by turning the handle to the right
until the cutter wheel firmly engages the pipe,
start the machine, and tum the handle 1/4 of a
revolution for each revolution of the pipe being cut until the pipe is completely cut.
WARNING: If the cutter handle is tumed too
violently, when the cutter wheel cuts into pipe,
it can distort the shape of the pipe.
SPECIAL CUT GRINDER PRECAUTIONS
We strongly recommend
that only the pipe cutter
attached to the machine
be used to cut pipes that
are to be threaded.
If a grinder is used, malee
sure that the cut face is
square and without steps as in the next illustration.
REAMING
1. When cutting is complete, raise the cutter
out of the way. Lower reamer arm and push
the reamer handle toward the pipe (1).
2. Long-chucked pipe can sometimes be
reamed with the reamer handle in the recessed
position.
3. Lock the reamer in position by turning the
reamer handle anti-clockwise (2).
16
TRM300 manual.indd 16
09/06/15 15:10
E N G L I S H •
1 Push
3
2
Handle
4 . Start the machine and tum the caniage handle to the right to advance the reamer (3).
5 . When reaming is complete tum off the machine, retract the reamer handle and raise the
reamer arm into the rest position.
THREADING INSTRUCTIONS
Setting the thread size
Loosen the lever nut and set the index line to
the desired thread size and tighten firmly.
1. Fit the appropriate die head as shown in the
next illustration.
Loose
Tighten
Size plate
Empujar
Cam plate handle
2. Push the cam-plate handle forward to set
the auto-open lever, then set the thread size
by fitting the lever nut to the appropriate position.
3. Switch on the machine and the thread cutting oil will automatically flow out from the
die head.
4. Turn the carriage handle clockwise until the
dies have engaged the pipe for 3 or 4 threads.
From this point the carriage handle may be
released. A standard taper thread will then be
cut automatically.
5. Once threading has been completed, switch
OFF, and turn the carriage handle to the left.
Retract the die head from the pipe.
Auto open
lever
Carriage
handle
PRECAUTIONS FOR THREADING
1 . As the dies come into contact with the pipe,
the lever should be turned gradually increasing strength until the dies are biting firmly.
After the dies fully engage the pipe will travel
U ser’s manual
smoothly by itself, but optimum cutting will be
assured if the Iever is turned with slight pressure to keep pace with die movement.
CAUTION: If the machine suddenly stops
during threading, tum off immediately (a delay will result in the motor buming up).
2. To stop threading, turn the auto-open lever
to the left.
Soft
ch
tou
Push
Smoothly
ADJUSTMENT OF THE THREADING LENGTH
A device for adjustment of the threading
Iength is attached. Use this for making threads
of the desired length as follows.
Adjustable capacity:
1-2" (3 threads)
1/2-3/4" (4 threads)
ADJUSTMENT
1. Loosen the socket
head cap screw on the
auto-open lever (C).
2. Move the autoopen lever to the right
for longer threads or Auto-open
to the Ieft for shorter lever (C).
threads as indicated
by the arrows in the
Longer
Shorter
diagram.
3. Retighten the socket head cap screw.
MAINTENANCE
Our products are made with the finest materials throughout, but even the best needs attention sometimes. To ensure a long and troublefree working life for your machine, we recommend the following maintenance procedures.
1. Main shaft lubrication.
Grease here
The main shaft bearings
are made with specially
designed oiled metal, but
should be lubricated once
every six months with
spindle oil or machine oil to ensure smooth
running.
17
TRM300 manual.indd 17
09/06/15 15:10
2. Pipe cutter lubrication.
The cutter feed screw Grease
here
and the rollers need
to be oiled once a day
with spindle oil. Lack
of oil not only makes
use more difficult, but
detracts from the efficiency of the machine.
Clean oil pot after every 8 to 12 hours of actual
use. During thread cutting operations, small
chips from the threads will accumulate in the
tank so efficierit cleaning is essential once a
month to ensure proper operation of threading machine.
3. Carbon brushes with Automatic Cut-off.
This machine employs carbon brushes with an
automatic cut-off facility. If the working life of
the brushes (approx. 250 hrs.) is exceeded, safe
operation of the machine is assured as the motor will stop automatically.
Changlng the Brushes:
1. Always change both carbon brushes at the
same time.
2. Ensure the motor is off before changing the
brushes.
3. Remove the side covers, tum the carbon
brush caps to the left using a minus screw
driver and remove the brushes.
4. Keep oil system clean as follows.
1. Drain oil and check for contamination.
2. Remove and clean scrap receiver, tank upper cover, oil pot and strainer, and clean the
oil tank. lf the oil system is kept clean, this will
prolong the working life of the gear-pump.
3. After cleaning the tank, put sorne sealing
substance on tbe plug to decrease any possibiliry of leakage.
5. Hammer chuck structure and maintenance.
The hammer chuck jaw incorporares 4 parts
and when the teeth on the jaw inserts become
worn and fail to hold the pipe or rod during
threading, replace the entire set of jaw inserts.
Remove the hex socket set screw.
As shown in the illustration bellow, the hammer chuck is fixed to main shaft by six socket
head cap screws.
Because loosening of these bolts affects
threading, be sure to keep these six bolts permanently tight.
6. Self-adjusting thrust ring.
Automatically absorbs rattle due to wear in
the thrust direction of the main shaft, for more
stable thread cutting.
Thrust ring
Pump
Scrap receivera
Upper tank
cover
Oil filter
Bolt
Drain
plug
Oil line intake
suction tube
Cutting oil system.
Be sure oil flows freely. See that there is
enough oil in the tank and all oillines are free
from obstruction.
If oil becomes discolored or contaminated,
drain the tank and refill with fresh cutting oil.
TROUBLESHOOTING
When abnormalities occur in products, examine the following and contact your authorized
service center.
CAUTION: In the case of indications, or
problems not dealt with next instructions, do
not overhaul or repair by yourself, contact your
nearest authorized service center.
18
TRM300 manual.indd 18
09/06/15 15:10
E N G L I S H •
If repair is made by a person with no knowledge and skill for repairs, optimun performance cannot be obtained, and also accidents
and injuries can occur.
NOT OPERATING WHEN TURNING THE
SWITCH "ON".
• The motor is not running.
1be power supply plug is disconnected. Insert
the power supply plug into the plug socket.
The carbon is worn. Replace to a new one according to the procedures in the maintenance
section.
Voltage is low. Check on voltage.
The motor is burned. Repair is necessary.
The switch is damage. Repair is necessary.
• The motor is running.
The gear is broken. Repair is necessary.
• Rotation of the main shaft is defective.
Voltage is low. Check on voltage.
The motor is burned. Repair is necessary.
• Not stopped immediately even when
turning OFF the switch.
The carbon is worn. Replace to a new one according to the instructions in the maintenance
section.
The lead wire is disconnected. Repair is necessary.
U ser’s manual
• The chaser is not engaged to the pipe.
The cbaser is wom. Replace to a new one.
The chaser is chipped. Replace to a new one.
The chaser is fit to incorrect position. Fit the
chaser according to the die head instructions.
THREADING CAN NOT BE MADE CORRECTLY.
• Thick, Thin.
The die head is not adjusted correctly. Adjust
the die head according to the instructions in
the operation section.
• Long, Short.
The die head is not adjusted correctly. Adjust
the die head according to the instructions in
the operation section.
The chaser is worn. Replace to a new one.
The chaser is chipped. Replace to a new one.
Tluead cutting oil is deteriorated. Replace to
new thread cutting oil.
The chaser is fit to incorrect position. Fit the
chaser according to the die head number.
TECHNICAL DATA
VOLTAGE-FREQUENCY
120 V ~ 60 Hz
SPINDLE SPEED
40 r/min
THREADING CAPACITY
1/2"-2" (12,7 mm -50,8 mm)
CURRENT
17 A
POWER
600 W
WEIGHT
49 kg (108 lb)
• Oil is not supplied appropiately.
Oil amount is low. Replenish oil.
Chips are clogged. Rcmove chips in the oil tank.
The die head is not fitted correctly. Fit the die
head to correct position.
• Oil drops from the pipe back.
The back scroll side is set lowly. Set the back
scroll side to be high.
• The die head can not be fit.
Chips are attached. The die head touches the
pipe piece, etc. on the tank top cover.
Remove chips attaching to the die head fitting
shaft and hole. Remove the pipe piece, etc.
• The movable part does not move
smoothly.
Chips are clogged. Remove chips.
19
TRM300 manual.indd 19
09/06/15 15:10
E S P A Ñ O L
E N G L I S H
POLIZA DE GARANTÍA
WARRANT POLICY
Urrea Herramientas Profesionales S.A. de C.V.
garantiza este producto por el termino de 1 año
en sus piezas, componentes y mano de obra contra cualquier defecto de fabricación a partir de la
fecha de entrega.
Urrea Herramientas Profesionales S.A. de C.V.
Warranties this product for a period of 1 year in
its parts, components and manual labour against
any manufacture defect from the purchasing date.
Fecha de venta: ____/____/____
Producto: ___________________
Marca: ______________________
Modelo: ____________________
Purchase date: ____/____/____
Product:____________________
Brand:______________________
Model:______________________
______________________________
Sello y firma de distribuidor
______________________________
Distributor seal and signature
Comercializado e Importado por:
Urrea Herramientas Profesionales S.A. de C.V.
km 11,5 Carretera A El Castillo, El Salto, Jalisco, México. C. P. 45680, Tel. (33) 3208 7900,
RFC UHP900402Q29
Sold and Imported by:
Urrea Herramientas Profesionales S.A. de C.V.
km 11,5 Carretera A El Castillo, El Salto, Jalisco, México. C. P. 45680, Tel. (33) 3208 7900,
RFC UHP900402Q29
Condiciones:
Para hacer efectiva la garantía deberá presentar
el producto junto con la poliza de garantia debidamente firmada y sellada por el establecimiento
donde la adquirio, en cualquiera de los centros de
servicio autorizados.
Los gastos de transportación que se deriven del
cumplimiento de la garantía seran cubiertos por:
Urrea Herramientas Profesionales S.A. de C.V.
Terms:
In order to make warranty effective you must present the product along with the warranty properly
fillled and signed to an authorized distributor or
service center.
Esta garantía no será valida en los siguientes
casos:
· Cuando el producto haya sido utilizado en condiciones distintas a las normales o al desgaste natural de sus partes.
· Cuando el producto no haya sido operado de
acuerdo al instructivo de uso que lo acompaña.
· Cuando el producto haya sido alterado o reparado por personas no autorizadas.
This warranty is not applicable in the following cases:
· When the product has not been used according
to normal conditions or natural wear of its parts.
· When the product has not been used according
with this user’s manual instructions.
· When the product has been fixed or modified by
unauthorized or unqualified person.
TRM300
Urrea Herramientas Profesionales S.A. de C.V.
will cover the transportation cost related to the
warranty.
20
TRM300 manual.indd 20
09/06/15 15:10