1
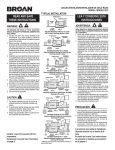
MANUAL DE INSTRUCCIONES
VENTILADOR DE PISO DE 16”
AB-5029PM
ESTIMADO CLIENTE
Con el fin de que obtenga el mayor desempeño de su producto, por favor lea este manual de
instrucciones cuidadosamente antes de comenzar a utilizarlo, y guárdelo para su futura referencia.
Si necesita soporte adicional, no dude en escribir a: [email protected]
ÍNDICE
INSTRUCCIONES DE SEGURIDAD ......................................................................................................... 2 DESCRIPCIÓN .......................................................................................................................................... 2 INSTRUCCIONES DE INSTALACIÓN ...................................................................................................... 3 INSTRUCCIONES DE OPERACIÓN ......................................................................................................... 3 DIAGRAMA DE CIRCUITOS ..................................................................................................................... 3 PRECAUCIÓN
RIESGO DE CHOQUE
ELÉCTRICO , NO ABRA
Precaución: Para reducir el riesgo de choque eléctrico, no
retire la cubierta, no hay partes manipulables por el usuario al
interior de la unidad.
Refiera todo mantenimiento o
intervención técnica a personal técnico calificado.
Este símbolo indica la existencia de voltaje peligroso al
interior de esta unidad, que constituye un riesgo de choque
eléctrico.
Este símbolo indica que hay importantes instrucciones de
operación y mantenimiento en la literatura que acompaña a
esta unidad.
LÍNEAS DE SERVICIO AL CLIENTE PREMIER
Venezuela:
Panamá:
Sitio Web:
E-mail:
0800 – ELECTRIC (353-2874)
300-5185
www.premiermundo.com
[email protected]
NOTA
Nos reservamos el derecho de modificar las especificaciones, características y/u operación de este
producto sin previo aviso, con el fin de continuar las mejoras y desarrollo del mismo.
P-1
INSTRUCCIONES DE SEGURIDAD
•
•
•
•
•
•
•
•
•
•
•
•
•
•
•
Para prevenir el riesgo de choque eléctrico, no introduzca el cable de poder o el ventilador en agua
o en otros líquidos.
No utilice el ventilador para un propósito diferente para el que fue diseñado.
Asegúrese de que el voltaje del ventilador coincide con el del área donde lo va a conectar.
Desconecte el cable de poder cuando no esté utilizando el ventilador y antes de limpiarlo.
Evite que el cable de poder quede en una posición donde las personas puedan enredarse al
caminar.
El ventilador no está diseñado para uso en exteriores.
Se requiere estricta supervisión si se encuentran niños cerca.
Utilice el ventilador sobre una superficie plana y estable.
Evite colocar el ventilador en un lugar donde esté propenso a caerse.
Si el ventilador llega a caer al agua, no lo toque, sino que desconecte el cable de poder.
No introduzca objetos dentro de la rejilla del ventilador cuando esté funcionando.
Evite utilizar el ventilador si observa alguna falla en el cable de poder o en el ventilador mismo.
No cubra la rejilla.
Si el ventilador no va a ser utilizado por un período prolongado desconéctelo, límpielo y guárdelo en
el empaque original o uno similar. Antes de utilizarlo de nuevo, verifique que el ventilador está limpio
y seco, y que las aspas giren libremente.
No intente reparar la unidad usted mismo. Remita toda revisión, mantenimiento y reparación a
personal de servicio técnico calificado.
DESCRIPCIÓN
1. Rejilla
2. Aspas
3. Rejilla
4. Cubierta del motor
5. Botón de oscilación
6. Motor
7. Tornillo D
8. Tubo de extensión
9. Anillo de ajuste de altura
10. Cubierta de la base
11. Tubo de la base
12. Tornillo A
13. Eje
14. Botones
15. Cierre de rejilla
16. Cubierta del aspa
17. Clip
18. Tornillo de cubierta de rejilla
19. Cubierta de rejilla
20. Base cruzada
P-2
INSTRUCCIONES DE INSTALACIÓN
•
•
•
Verifique que el contenido del producto esté completo.
Verifique que el voltaje de la unidad corresponde con el del área donde la va a conectar.
Verifique que el motor puede moverse suavemente.
1. Coloque el tubo en la base con 4 tornillos M5x10.
2. Fije la base en la base inferior negra con 4 tornillos M4x16 (si está disponible).
3. Desatornille el bloqueador del tubo. Hale el tubo para lograr una altura adecuada y luego apriete de
nuevo.
4. Desatornille el soporte del tubo. Coloque el cuerpo del ventilador firmemente sobre el tubo y apriete
de nuevo el soporte.
5. Retire la tuerca y coloque la rejilla posterior en frente de la carcasa del motor, y apriete con firmeza.
Coloque el aspa en el eje del motor (asegurándose de que encaje correctamente) y apriete el tornillo
del aspa.
6. Coloque la rejilla frontal y cierre con el clip o atornille las rejillas para asegurarlas.
INSTRUCCIONES DE OPERACIÓN
1.
2.
3.
4.
Conecte el cable de poder.
Gradúe la altura que desee utilizando los tubos.
Gradúe la dirección del aspa.
Utilice los botones para graduar la velocidad del aire.
DIAGRAMA DE CIRCUITOS
Voltaje
Potencia
•
AC110V/60Hz
40 a 45W
Las personas y/o Marcas registradas en este manual de instrucciones no están afiliadas a Premier Electric Japan Corp. y aparecen en
este Manual con propósitos ilustrativos únicamente.
P-3
INSTRUCTION MANUAL
16” STAND FAN
AB-5029PM
DEAR CUSTOMER
In order to achieve the best performance of your product, please read this instruction manual carefully
before using, and keep it for future reference.
If you need extra support, please write to [email protected]
CAUTION
RISK OF ELECTRIC
SHOCK, DO NOT
OPEN
Caution: To reduce the risk of electric shock do not open
this device, there are not serviceable parts for customers.
Please refer any maintenance or repair to qualified
personnel.
This sign means the existence of dangerous voltage at
the inside of the unit, which states a risk of electric shock.
This sign means that there are important instructions of
operation and handling in the manual that comes with this
device.
PREMIER CUSTOMER SERVICE
Venezuela:
Panama:
Website
E-mail:
0800 – ELECTRIC (353-2874)
300-5185
www.premiermundo.com
[email protected]
NOTE
This unit may be submitted to changes in specifications, characteristics and/or operation without prior
notice to the user, in order to continue improving and developing its technology.
P-1
IMPORTANT SAFEGUARDS
When using this electrical appliances, basic safety precaution should always be followed, including the
following
-
Read all instruction carefully and save these instruction manual for reference.
To protect again electric shock, do not immerse cord, plug or fan into water or any other liquid.
Do not use appliance for other than intended use.
Use the appliance only on the voltage specified on it rating plate (AC110V/60Hz)
Unplug from outlet when not in use and before cleaning.
Do not pull the connection cord over sharp edges and never jam it.
Do not pull the plug out of the socket by pulling the connection cord.
Do not use outdoors
Do not use and extension cord, unless the cord has been checked and tested by your electrical
authority or a qualified technician.
Close supervision is necessary when any appliance is used by or near Children.
Always use your appliance on a suitable level and dry platform.
Avoid using an appliance where it can fall or be pushed into water.
Never reach for an appliance after it has fallen into water. Switch off at the mains power point and
unplug immediately
Never attempt to insert any object through the grill when the fan is operating.
Always disconnect fan when moving from one location to another.
Do not operate any appliance with a damaged cord or plug or after the appliance malfunction. Or has
been damaged in any manner, please connect with manufacturer or local distributor.
Do not cover the grill.
If the fan is to be stored for an extended period of time or not used regularly, replace it in the original
packaging (or Similar) and store it in a dry and clean place. Before using again, check if the unit is
clean and dry if the fan blades rotates freely.
P-2
Drawing :
1. Grill
2. Blade
3. Grill
4. Motor cover
5. Oscillating knob
6. Motor
7. Screw D
8. Extension pole
9. Height adjustment ring
10. Base cover
11. Base tube
12. Screw A
13. Shaft
14. Piano keys
15. Grill lock
16. Blade cap
17. Clip
18. Grill cover screw
19. Grill cover
20. Cross base
P-3
INSTRUCTION MANUAL OF STAND FAN
***********************************************************
1. Put the end cap at the end of the cross base.
2. Fasten the lower pipe on the cross base with screw A(4pcs).
3. Slide the base cover onto the cross base along the lower pipe
4. Pull the extension pole out, and then tighten the out-joint.
5. Place the motor and switch box firmly on the top of the extension pole, and tighten screw B.
6. To finish assemble the guard and blade on the front part of the motor.
7. To change the direction and height, loosen the out joint and adjust the extension pole at a suitable
position then tighten the out-joint again.
8. If the blade is shaking , please change the blade into another direction, then, try it again.
How to install
Check before installation :
1. Unpack the product to check if all the accessories are availabel
2. Check the voltage shown in the name plate to see if it accords with the local situation.
3. Check the motor if it can move smoothly
Install :
1. Assemble the pole on the base with 4 screw of M5 X10
2. Fix the base on the black bottom with 4 screw of M4X16. (if it is available)
3. Unscrew Pipe Locker, Pull the stainless pipe at proper height and then tighten the pipe locker again.
4. Unscrew the pipe holder, connect the fan body firmly on the top of the stainless pipe and fasten the
pipe holder again.
5. Please take off the nut and put the rear guard into the front of the motor house, tighten the nut firmly,
then put the fan blade into the motor axis (be sure to put Horizontal bolt into blade groove) and
tighten the blade screw anti-clookwise.
6. Put front guard and close clip or screw grills ring to secure guards together.
P-4
Circuit diagram
Voltage : AC110V/60Hz
Power : 40 to 45W
P-5