1
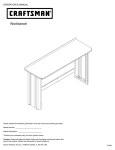
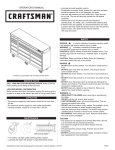
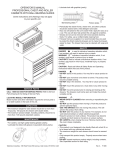
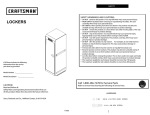
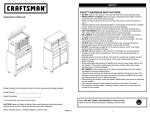
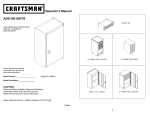
Lengüeta
SAFETY
SAFETY RULES AND WARNINGS:
Tool Storage RollAway
THIS OPERATING INSTRUCTION MANUAL
COVERS ALL THE PROFESSIONAL SERIES
ROLL-AWAYS.
PROFESSIONAL SERIES
Please indicate the following information
from the service part drawing provided.
Model
Number:__________________________
Model
Description:_______________________
CAUTION: Read and follow all Safety
Rules and Operating Instructions before
first use of this product. Retain this
document for future reference.
Sears, Roebuck & Co.
Hoffman Estates, IL 60179 USA
F1374A3
C DO NOT stand on this product. You may fall which may cause personal injury.
C WEAR SAFETY GLASSES AND GLOVES when cutting the banding material. The bands may snap
which may cause personal injury.
C Stacked products should be bolted together. The products could become unstable and tip, which may
cause personal injury or product damage.
C WEAR SAFETY GLASSES when removing or repositioning the slides. The tool could slip which may
cause personal injury.
C When moving this product, do not pull it. Push the product to prevent personal injury.
C Handle and swivel casters must be attached on the same side of the product.
C USE THE BRAKES when not moving this product. This will prevent the product from rolling, which may
cause personal injury or product damage.
C BE CAREFUL when opening more than one drawer. The product may become unstable and tip, which
may cause personal injury or product damage.
C DO NOT mount this product on a truck bed or any other moving object. This may cause personal injury
or product damage.
C DO NOT step in the drawers. You may fall which may cause personal injury.
C Appropriately secure this product before moving it with a forklift.
C DO NOT tow with power equipment. The product could tip, which may cause personal injury or product
damage.
C DO NOT alter this product in any manner. For example, do not weld external lockbars or attach electrical
equipment. This may cause product damage or personal injury.
C A heavy duty side cabinet must be used on an equally heavy duty roll-away.
C Keep the product on level surfaces. The product may become unstable and tip if stored or moved on an
un-level surface, which may cause personal injury or product damage.
C Lock the drawers and doors before moving this product. The drawers or doors could come open and
make the product unstable and tip, which may cause personal injury or product damage.
C The maximum weight for each drawer should be no more than 50 pounds.
C The maximum product weight, including contents, should be no more than 1180 pounds.
DRAWER REMOVAL:
• Empty the drawer.
• Fully extend the drawer. Push it back a quarter of an inch,
(6 mm).
• Insert a screwdriver into the slot in the slide and push in
on the stop until it clears the lance.
• Repeat the procedure on the other slide. Remove the
drawer.
• To reinstall the drawer, pry the stop far enough out to
engage the lance and push the drawer onto the slides
until the stops pass over the lances.
Slot
Stop
Lance
Lubricate
LUBRICATION:
Lubricate the top and bottom channels of the drawer slides at least twice a year.
HANDLE INSTALLATION: (dependant on model)
C Insert the handle tabs into the slots in the end of the roll-away.
C Attach the handle using four 1/4-20 x 3/8 slotted round head screws.
C Insert one plug in each end of the side handle.
LOCKING THE UNIT:
If the unit has no panel, the lock activates the locking mechanism.
C To unlock, turn the key to the right and the unit is unlocked.
C To lock, make sure all drawers are fully closed, turn the key, then remove the key.
If the unit has a panel, the panel activates the locking mechanism.
C To unlock the unit, turn the key to the right and the panel automatically springs open at the bottom.
Pull out, lift up and push the panel back into the unit.
C To lock, pull panel straight out, then lower, press lightly at the bottom and turn the key.
CASTER INSTALLATION:
Call 1-800-4MY-HOME
(1-800-469-4663)
for Service Parts.
Refer to Service Parts drawing for
full listing of service parts
Note: Failure to install caster angles may result in premature cabinet
failure.
• Place the unit on its top. Use packaging material to protect the paint
finish.
• Position caster angles on the cabinet. Flanges should be toward the
inside and pointed up.
• Attach casters and caster angles using (4) #14-10 X 5/8 screws in each
caster. Mount both swivel casters on the same side of the cabinet as
the side handle.
• Wrench tighten all screws. Do not overtighten.
• Return the unit to its upright position.
Caster angles.
(Flanges inside)
SEGURIDAD
REGLAMENTOS DE SEGURIDAD Y ADVERTENCIAS:
Caja deslizable para
herramientas
ESTE MANUAL DE
INSTRUCCIONES DE OPERACION
CUBRE TODAS LAS
SERIE PROFESIONAL
SERIE PROFESIONAL
Sírvase indicar la siguiente información
que encontrará en el dibujo suministrado
de la pieza de servicio.
C NO se ponga de pie sobre la unidad. Podría caerse y lesionarse.
• UTILICE GAFAS DE SEGURIDAD Y GUANTES cuando corte el material de encintado. Las bandas pueden
saltar lo cual podría ocasional lesiones personales.
• Los productos apilados deberían sujetarse unos a otros mediante tornillos. Los productos podrían
desestabilizarse y volcar lo que podría causarle lesiones personales o dañar el producto.
• USE GAFAS DE SEGURIDAD al quitar o volver a poner las correderas. Se podría resbalar la herramienta y
causar lesiones personales.
• Cuando mueva la unidad, no la hale. Empújela para evitar lesiones personales.
• La manija y las ruedecillas giratorias deben instalarse en el mismo lado del producto.
• UTILICE LOS FRENOS cuando el producto no esté en movimiento. Esto impedirá que se deslice, lo que podría
causar lesiones personales u ocasionar daños al producto.
• SEA CUIDADOSO cuando abra más de una gaveta. Las unidades podrían quedar inestables y volcarse, lo cual
podría ocasional lesiones personales o daño a la unidad.
• NO monte esta unidad en la plataforma de carga de la camioneta ni en ningún otro objeto móvil. Podría causar
lesiones personales o daño a la unidad.
• NO se ponga de pie en las gavetas. Podría caerse y lesionarse.
• Asegure adecuadamente la unidad antes de moverla con un montacargas.
• NO arrastre la unidad con equipo eléctrico. La unidad podría volcarse, lo cual podría ocasional lesiones
personales o daño a la unidad.
• NO altere la unidad en modo alguno. Por ejemplo, no suelde las barras de sujeción externas ni le incorpore
equipos eléctricos. Podría causar daño a la unidad o lesiones personales.
• Un gabinete lateral extrafuerte se debe usar en una caja deslizable que también sea extrafuerte.
• Mantenga el producto sobre superficies planas. El producto puede desestabilizarse y volcar si se almacena o se
mueve en superficies no llanas, lo cual podría causar lesiones personales o dañar el producto.
• Asegure las gavetas y puertas antes de mover este producto. Estas se podrían abrir y hacer que el producto
quede inestable y se vuelque, lo cual podría causar lesiones personales o daños al producto.
• El peso máximo en cada gaveta no debe ser mayor de 22.7 kg.
• El peso máximo del producto, incluyendo su contenido, no debe ser mayor de 535.7 kg.
RETIRO DE LA GAVETA:
• Vacíe la gaveta.
• Abra por completo la gaveta. Hágala retroceder un cuarto de
pulgada, (6 mm).
• Introduzca un destornillador dentro de la abertura en la
corredera y empuje el Lengüeta hasta que sobrepase la
tope.
• Repita el procedimiento en la otra corredera. Quite la gaveta.
• Para volver a instalar la gaveta, fuerce el Lengüeta lo
suficiente para enganchar la tope y empuje la gaveta dentro
de las correderas hasta que los Lengüetas sobrepasen las
topes.
Abertura
Lengüeta
Tope
Lubricar
Número de modelo:______________
Descripción del modelo:___________
CUIDADO: Antes de utilizar este
producto por primera vez, lea y observe
todos los reglamentos de seguridad y las
instrucciones de operación. Guarde este
documento para referencia futura.
Sears, Roebuck & Co.
Hoffman Estates, IL 60179 USA
F1374A3
Para solicitar piezas de
repuesto, llame al
1-800-659-7084
Consulte el Dibujo de las piezas de
servicio para obtener una lista
completa delas piezas de servicio.
LUBRICACION:
Lubrique los canales superior e inferior de las correderas de la gaveta cuando menos dos veces al año.
INSTALACION DE LA MANIJA: (según del modelo)
C Introduzca las pestañas de la manija en las aberturas en el extremo de la caja deslizable.
• Asegure la manija usando cuatro tornillos de cabeza redonda ranurada de 1/4-20 x 3/8.
• Inserte un tapón en cada extremo de la manija lateral.
PONER SEGURO A LA UNIDAD:
Si la unidad no tiene panel, el seguro activa el mecanismo de cierre.
C Para quitar el seguro, gire la llave a la derecha y la unidad quedará sin seguro.
• Para poner seguro, compruebe que todas las gavetas estén completamente cerradas, gire la llave y
luego quítela. Si la unidad tiene un panel, éste activará el mecanismo de cierre.
Si la unidad tiene un panel, éste activa el mecanismo de cierre.
C Para quitar el seguro a la unidad, gire la llave a la derecha y el panel se abre automáticamente en la
parte inferior. Tire del panel hacia afuera, levántelo y empújelo dentro de la unidad.
• Para poner seguro a la unidad, tire del panel derecho hacia afuera, bájelo, presione ligeramente en la
parte inferior y gire la llave.
INSTALACION DEL TIRADOR:
Nota: No instalar los ángulos de las ruedas giratorias puede ocasionar
falla prematura del gabinete.
• Coloque la unidad sobre su parte superior. Utilice el material de
empaque para proteger el acabado de la pintura.
• Ubique los ángulos de las ruedas giratorias en el gabinete. Las
pestañas deben ir hacia el interior y apuntando hacia arriba.
• Fije las ruedas giratorias y los ángulos de las ruedas giratorias
utilizando (4) tornillos No. 14-10 X 5/8 en cada rueda giratoria. Monte
ambas ruedas pivotantes en el mismo lado del gabinete donde se
encuentra la manija lateral.
• Apriete todos los tornillos con una llave. No apriete demasiado.
• Vuelva a colocar la unidad en su posición vertical.
Ángulos de ruedas
giratorias
(Pestañas hacia
adentro)