1
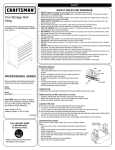
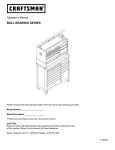
Operator’s Manual
ADD-ON UNITS
THIS OPERATING INSTRUCTION
MANUAL COVERS ALL
ADD-ON UNITS.
Please indicate the following
information from the service
part drawing provided.
Model Number:_____________________
Hang-On Cabinet
Model Description:_________________
CAUTION:
Read and follow all Safety Rules and Operating
Instructions before first use of this product.
Retain this document for future references.
Sears, Roebuck and Co., Hoffman Estates, IL 60179 USA
F896A4
2
SAFETY
SAFETY WARNINGS AND CAUTIONS:
C DO NOT STAND in or on unit. Failure to adhere to this warning may cause unit to
become unstable and tip, resulting in personal injury.
C WEAR SAFETY GLASSES when removing and repositioning slides. Screwdriver
could slip or metal shavings could be produced, possibly causing personal injury.
C USE CAUTION when opening multiple drawers, unit may become unstable and tip,
causing product damage or personal injury.
C DO NOT MOUNT unit on truck bed or any other moving object. Failure to adhere to
this warning may void warranty and cause damage to unit or personal injury.
C DO NOT STEP in or on drawers. Unit may become unstable and tip resulting in
damage to unit or personal injury.
C USE EXTREME CAUTION if moving unit with forklift. Unit could fall causing personal
injury or product damage.
C DO NOT ALTER unit in any manner, for example, do not weld external lock bars or
dollies onto unit. Failure to adhere to this warning may cause damage to unit or
personal injury.
C MAXIMUM LOAD capacity for each drawer is 35 pounds.
C A HEAVY DUTY side cabinet must be used on an equally heavy duty cart.
C Lock the drawers and doors before moving this product. The drawers or doors could
come open and make the product unstable and tip, which may cause personal injury or
product damage.
C Position the rubber bumpers in the lower
corners,on the same side of the cabinet
as the bracket. Remove the paper
backing from the bumper and press it
firmly into place.
C The assembled cabinet is now ready to
hang on the side of a cart.
SLIDE CARRIER INSTALLATION:
(Dependant on model)
C Determine the desired drawer location.
C Position the slide carrier at the desired
location in the cabinet.
DOOR INSTALLATION:
(Dependant on model)
NOTE: It will be necessary to remove
any shelves or slide carrier hardware
from the front of the cabinet where the
door will be hinged.
C Align the door with the cabinet.
C Attach the slide carrier at the rear of the
cabinet using two screws. Secure with
two nuts. Finger tighten.
C Repeat the procedure for the front of the
cabinet.
C Repeat the process for the second slide
carrier.
C Wrench tighten all screws and nuts.
C Install the drawers per drawer installation
instructions.
Call 1-800-366-7278 for Service Parts
Refer to Service Parts Drawing for full listing of Service Parts
C Insert two screws through the door hinge
and into the top and the bottom holes of
the cabinet. Square up the door and
secure using nuts. Wrench tighten.
DOOR HANDLE INSTALLATION:
ASSEMBLY
(Dependant on model)
C Insert the handle into the large hole in the
door.
C Align the holes in the lock and the door.
Attach the handle with screws provided.
C With the handle in a vertical position,
place the lock cam on the square shaft of
the lock in a horizontal position and
secure the lock cam with a set screw.
C Adjust the lock cam position on the
square shaft to obtain the desired closing
action.
MOUNTING BRACKET
INSTALLATION:
(Dependant on model)
NOTE: the bracket may be mounted on
either side or on the back of the add-on
unit.
C If necessary, remove the drawer from the
add-on unit (see drawer removal
instructions).
C Attach the bracket to the unit using two
screws and two nuts provided.
3
SHELF INSTALLATION:
(Dependant on model)
C Position the shelf in the desired location,
with the flanges down.
C Align the holes in the shelf with the holes
in the cabinet.
C Attach the shelf using four screws and
four nuts (two screws in the rear and two
in the front).
4
C Wrench tighten screws.
C Repeat for any other shelves.
OPERATION
REMOVING AND INSTALLING
DRAWERS:
(Dependant on model)
C Fully extend the drawer. Then push it
back a quarter of an inch.
C Insert a screwdriver into the slot in the
slide and depress the stop until it clears
the lance. Repeat the procedure for the
other slide. Remove the drawer.
INTENTIONALLY LEFT BLANK
C To reinstall the drawer, pry the stop far
enough out to engage the lance (3/16" to
1/4") and push the drawer onto the slides
until the stops pass over the lances.
MAINTENANCE
(Dependant on model)
C Lubricate the slides, (twice yearly).
C Lubricate lock with graphite, (yearly).
C Auto wax will preserve the storage unit’s
luster finish. Apply the wax as to a car.
The wax will also help protect the unit
against scratches.
C Grease and oil can be removed with most
standard cleaning fluids. For safety, use a
nonflammable cleaning fluid.
5
Manual del Operador
UNIDADES PARA AÑADIR
ESTE MANUAL DE INSTRUCCIONES
DE OPERACION CUBRE TODAS
LAS UNIDADES PARA AÑADIR
Sírvase indicar la siguiente información
que encontrará en el dibujo suministrado
de la pieza de servicio.
Gabinete para colgar
Número de modelo:____________________
Descripción del modelo:________________
CUIDADO:
Antes de utilizar este producto por primera vez, lea y observe
todos los reglamentos de seguridad y las instrucciones de operación.
Guarde este documento para referncia futura.
Sears, Roebuck and Co., Hoffman Estates, IL 60179, EE.UU.
F896A4
2
SEGURIDAD
ADVERTENCIAS Y PRECAUCIONES DE SEGURIDAD:
C NO SE PARE en o sobre este producto. La negligencia en observar esta advertencia
puede originar que la unidad quede inestable y se vuelque, causando lesiones
personales.
C USE GAFAS DE SEGURIDAD al quitar o volver a situar las correderas. Se podría
resbalar el destornillador o se podrían producir virutas metálicas, y posiblemente causar
lesiones personales.
C TENGA CUIDADO al abrir varias gavetas, la unidad podría quedar inestable y volcarse,
causando lesiones personales o daños al producto.
C NO INSTALE este producto sobre la plataforma de un camión ni sobre ningún otro
objeto móvil. La negligencia en observar esta advertencia podría anular la garantía y
causar lesiones personales o daños a la unidad.
C NO SE PARE en o sobre las gavetas. La unidad puede quedar inestable y volcarse,
causando lesiones personales o daños a la unidad.
C TENGA SUMO CUIDADO al mover este producto con un montacargas. Se puede
caer la unidad y causar lesiones personales o daños al producto.
C NO MODIFIQUE este producto de ninguna forma. Por ejemplo, no suelde barras de
bloqueo externas ni carretillas a la unidad. La negligencia en observar esta advertencia
podría causar lesiones personales o daños al producto.
C LA CARGA MAXIMA en cada gaveta no debe ser mayor de 35 libras.
C Un gabinete lateral EXTRAFUERTE se debe usar en un carro que también sea
extrafuerte.
C Asegure las gavetas y puertas antes de mover este producto. Estas se podrían abrir y
hacer que el producto quede inestable y se vuelque, lo cual podría causar lesiones
personales o daños al producto.
C Fije el soporte a la unidad con dos
tornillos y tuerca o dos.
C Sitúe los protectores de caucho en las
esquinas inferiores, en el mismo lado del
gabinete que el soporte. Quite la cubierta
de papel del protector y presiónelo
firmemente en su sito.
C El gabinete armado ya se puede colgar
en el lado de un carro.
Tornillo
hexagonal
Leva del
seguro
Tornillo de
fijación
INSTALACION DE LA PUERTA:
(Según el modelo)
NOTA: Será necesario quitar las repisas
y los accesorios de fijación del soporte
de correderas de la parte delantera del
gabinete en que se colgará la puerta.
C Alinee la puerta con el gabinete.
Puerta
Para solicitar piezas de repuesto,
llame al 1-800-659-7084
C Ajuste la posición de la leva del seguro
en el eje cuadrado para obtener la acción
de cierre deseada.
INSTALACION DEL SOPORTE DE
CORREDERAS:
(Según el modelo)
C Determine la ubicación deseada de la
gaveta.
C Sitúe el soporte de correderas en la
ubicación deseada en el gabinete.
Repisa
Consulte el Dibujo de las piezas de servicio para
obtener una lista completa de las piezas de servicio.
Soporte de
correderas
C Fije el soporte de correderas en la parte
trasera del gabinete usando dos tornillos.
Asegúrelos con dos tuercas. Apriete con
los dedos.
C Repita el procedimiento para el lado
delantero del gabinete.
C Repita el procedimiento para el segundo
soporte de correderas.
C Apriete con una llave todos los tornillos y
tuercas.
C Instale las gavetas siguiendo las
instrucciones de instalación de gavetas.
C Introduzca dos tornillos en la bisagra de
la puerta y dentro de los agujeros
superior e inferior del gabinete. Enderece
la puerta y asegûrela usando tercas.
Apriete con una llave de tuercas.
MONTAJE
INSTALACION DE LA MANIJA DE LA
PUERTA:
(Según el modelo)
C Inserte la manija en el agujero grande de
la puerta.
C Alinee los agujeros en el seguro y la
puerta. Fije la manija con tornillos
suministrar.
C Con la manija en posición vertical,
coloque la leva del seguro sobre el eje
cuadrado del seguro en posición
horizontal, y asegure la leva del seguro
con un tornillo de fijación.
INSTALACION DEL SOPORTE DE
MONTAJE:
(Según el modelo)
NOTA: El soporte se puede instalar en
uno de los dos lados o en la parte
posterior de la unidad para añadir.
C Si es necesario quite la gaveta de la
unidad para añadir (véanse las
instrucciones para retirar la gaveta).
3
INSTALACION DE REPISAS:
(Según el modelo)
C Sitúe la repisa en la ubicación deseada,
con las aletas hacia abajo.
C Alinee los agujeros en la repisa con los
del gabinete.
4
C Fije la repisa usando cuatro tornillos y
cuatro tuercas (dos tornillos en la parte
trasera y dos en la parte delantera).
MANTENIMIENTO
(Según el modelo)
C Lubrique las correderas, (dos veces al
año).
C Lubrique el seguro con grafito, (una vez
al año).
C La cera para autos preservará el
acabado lustroso de las unidades de
almacenaje. Aplique cera como a un
auto. Esta también ayudará a proteger la
unidad contra arañazos.
C La grasa y el aceite se pueden eliminar
con la mayoría de líquidos normales de
limpieza. Por seguridad, utilice un líquido
de limpieza no inflamable.
Repisa
C Apriete los tornillos con una llave de
tuercas.
C Repita el procedimiento para las otras
repisas.
OPERACION
RETIRO E INSTALACION DE LAS
GAVETAS:
SE HA DEJADO EN BLANCO INTENCIONALMENTE
(Según el modelo)
C Abra por completo la gaveta. Luego,
hágala retroceder 1/4 de pulgada.
C Introduzca un destornillador dentro de la
abertura en la corredera y empuje el tope
hasta que sobrepase la lanceta. Repita el
procedimiento en la otra corredera y quite
la gaveta.
Tope
Abertura
Lanceta
Lubricar
C Para volver a instalar la gaveta, fuerce el
tope lo suficiente para enganchar la
lanceta (3/16" a 1/4") y empuje la gaveta
dentro de las correderas hasta que los
topes sobrepasen las lancetas.
5