1
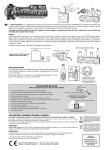
PartsColor
and
Accessories
of pieces may vary
Partes
y Accesorios
El color de las piezas puede variar
18 x 1
20 x 2
2 x3
13 x 88
14 x 24
9 x 42
10 x 35
11 x 20
12 x 16
24 x 2
assorted colors
colores surtidos
35 x 4
assorted colors
colores surtidos
42 x 4
assorted colors
colores surtidos
73 x 4
6 x 40
17 x 2
70 x 4
16 x 70
23 x 2
43 x 2
59 x 2
47 x 2
80 x 2
61 x 1
53 x 8
assorted colors
colores surtidos
82 x 2
81 x 4
1
www.TechnoGearsMarbleMania.com
62 x 1
19 x 1
DECORATIVE CARDS
tarjetas Decorativas
x 13
GETTING STARTED
BATTERY INFORMATION FOR PARENTS AND KIDS
INICIO
INFORMACIÓN DE LAS BATERÍAS PARA PADRES Y NIÑOS
ON Button
botÓn de encendido
Front
Back
Frente
Revés
Start Button
Botón de Inicio
Countdown/Race Time Display
Pantalla de la Cuenta Regresiva/
Tiempo de la Carrera
Speaker
Winner’s Screen
Altavoz
Pantalla del Ganador
Electronic trophy uses 2 “AA” (UM3/LR6) size battery, (not included).
Trofeo electrónico requiere 2 “AA” (UM3/LR6) tamaño la batería, (no incluida).
AG13
AG13
1.5V
1.5V
LR44
Light
Luz
1 flashing light uses 2 button cell batteries (AG13 or LR44), included.
Las 1 luces intermitente requiere 2 baterías tipo botón (AG13 o LR44), incluidas.
LR44
Marble Chamber
On/Off/Volume Switch
Cámara de Canicas
Interruptor de Encendido/Apagado/Volumen
BATTERY INSTALLATION:
• Make sure the toy is switched OFF.
• Remove the battery cover at the bottom of the toy. Use a screwdriver to open the battery cover.
• Install the required batteries according to the diagram inside the battery compartment.
• Alkaline batteries are recommended.
• Replace and secure the battery cover.
• After inserting the batteries, switch the toy ON.
• Batteries must be installed and replaced by an adult.
INSTALACIÓN DE LAS BATERÍAS:
• Asegúrese de que el juguete esté APAGADO.
• Quite la cubierta de las baterías en la parte inferior del juguete. Use un desarmador para abrir la cubierta de las baterías.
• Instale las baterías requeridas de acuerdo con el diagrama dentro del compartimiento para las baterías.
• Se recomienda usar baterías alcalinas.
• Vuelva a colocar y asegure la cubierta de las baterías.
• Después de colocar las baterías, ENCIENDA el juguete.
• Las baterías deben ser instaladas y cambiadas por un adulto.
NOTICE CONCERNING BATTERIES:
• Do not use rechargeable batteries.
• Non-rechargeable batteries are not to be recharged.
• Do not mix old and new batteries.
• Batteries should be removed and replaced by adults only.
• Do not mix alkaline, standard (carbon zinc) or rechargeable (nickel cadmium) batteries.
• Only batteries of the same or equivalent type as recommended are to be used. Batteries are to be inserted
according to the correct polarity (+ and -). Incorrect insertion can damage the unit, provoke fire or cause the
batteries to explode.
• Exhausted batteries are to be removed from the unit.
• Remove batteries when the unit is not to be used for a long period of time.
• Do not throw batteries into a fire.
• Do not attempt to open normal or rechargeable batteries.
• The supply terminals are not to be short-circuited.
• Batteries are harmful if swallowed, so keep them away from young children.
• Never leave button-cell batteries within reach of young children.
AVISO SOBRE LAS BATERÍAS:
• No use baterías recargables.
• No recargue las baterías que no son recargables.
• No mezcle baterías usadas y nuevas.
• Únicamente un adulto debe sacar y cambiar las baterías.
• No mezcle baterías alcalinas, estándar (carbón-zinc) o recargables (níquel-cadmio).
• Sólo se deben usar baterías del mismo tipo o su equivalente, como se recomienda. Las baterías deben ser inserta
das de acuerdo con la polaridad correcta (+ o -). La colocación incorrecta puede dañar la unidad, causar un incendio
o que las baterías exploten.
• Debe sacar las baterías usadas de la unidad.
• Saque las baterías cuando no vaya a utilizar la unidad por un largo periodo de tiempo.
• No tire las baterías en fuego.
• No intente abrir las baterías normales o recargables.
• No debe causar cortos circuitos en las terminales de alimentación.
• Las baterías son dañinas si se tragan, por lo que debe conservarlas fuera del alcance de niños pequeñ.
• Nunca deje las baterías de botón dentro del alcance de niños pequeños.
flashing light OPERATING INSTRUCTIONS:
To activate the flashing LED light with sound, simply press the On Button. The fun light will blink for
approximately one minute before turning itself off.
Las luces intermitente INSTRUCCIONES DE OPERACIÓN:
Para activar la Luz LED Intermitente con sonido, simplemente presiona el Botón de Encendido. La luz parpadeará
por un minuto aproximadamente antes de que se apague automáticamente.
Electronic trophy OPERATING INSTRUCTIONS:
1) To use the Electronic Trophy, turn the unit on using the On/Off/Volume Switch. Place your marbles in the
marble launchers (80).
2) When you are ready to begin the race, push the Start Button on the top of the Electronic Trophy. A friendly
voice provides instructions, and begins the racing countdown. Exciting music and fun phrases play until one
marble reaches the Electronic Trophy, which will declare a winner.
3) The Winner’s Display flashes. Retrieve the marbles from the front of the Electronic Trophy and get ready to
race again!
Trofeo electrónico INSTRUCCIONES DE OPERACIÓN:
1) Para usar el Electrónico de Trofeo, enciende la unidad con el Interruptor de Encendido/Apagado/Volumen.
Coloca las canicas en la parte superior de la pista, detrás de las rejillas de liberación de canicas (80).
2) Cuando estés listo para empezar la carrera, presiona el Botón de Inicio en la parte superior del Electrónico de
Trofeo. Una voz amigable te dará las instrucciones y empezará la cuenta regresiva. Escucharás música emocionante
y frases divertidas hasta que la canica llega al Electrónico de Trofeo, el cual declarará a un ganador.
3) El Ganador mostrará un mensaje parpadeante. ¡Saca las canicas de la parte frontal del Electrónico de Trofeo y
alístate para competir de nuevo!
www.TechnoGearsMarbleMania.com
2
iMPORTANT PRE-BUILD STEPS
Step 1
pASO 1
Separate and count all your pieces carefully.
Separar y contar todas las piezas con cuidado.
Step 2
pASO 2
Step 3
pASO 3
previa importante pasos de compilación
Familiarize yourself with the parts.
Familiarícese con las partes.
To ensure a proper build, only use exact part numbers listed.
Para asegurar una construcción adecuada, utilice sólo el número exacto de la pieza detallada.
13
9
10
13
13 x 3
3
9 x1
10 x 1
www.TechnoGearsMarbleMania.com
13
Helpful Hints
Consejos Útiles
Remove part 13 by
snapping it off at an angle
as shown.
Press to ensure alignment
between
two connectors.
Press to ensure alignment
between
two connectors.
Quite la parte 13 al
zafarla en ángulo como se
muestra.
Presione para asegurarse
que los conectores están
bien alineados.
Presione para asegurarse
que los conectores están
bien alineados.
Step 1
Step 2
Paso 1
Paso 2
For further detailed instructions, please visit us at
www.TechnoGearsMarbleMania.com
View a detailed 3D animation of this Techno Gears Marble Mania build and others.
Para instrucciones màs detalladas, visìtenos en:
NOW LET’S
Start BUILDING!
¡Ahora vamos empezar a construir!
www.TechnoGearsMarbleMania.com
Ve una animaciòn en 3D detallada de esta construcciòn de Techno Gears Marble Mania y otras màs.
www.TechnoGearsMarbleMania.com
4
Building Marble Mania
1. Make sure all base plates are facing the same direction. Base plates direction is labeled on the reverse side.
1. Asegurese que todas las platáformas de la base hayan sido colocadas hacia la misma dirección.
2. Use below diagram and color paint marks to place connectors in proper location on base plates, ensuring proper operation.
2. Usa el siguiente diagrama y marcadores de color para colocar los conectores en el lugar correcto en las placas base, aegurando así
su operación correcta.
Construye el Marble Mania
3. Make sure unit is built on a flat surface.
3. Asegúrese de que la estructura es construida en una superficie plana.
4. 6 way connectors (part 13 ) have multiple connecting ends. Make sure part is placed onto Techno Gears Marble Mania correctly as illustrated in each specific image step.
4. Los conectores de 6 entradas (parte 13 ) tienen múltiples puntos de conexión. Asegúrese de que la parte haya sido colocada correctamente sobre Techno Gears Marble Mania tal y como se muestra en cada una de las ilustraciones.
Front side
Lado frontal
Back side
Lado trasero
Note: When specific placement of the 6 way connector is required, blue and red dots will be shown in the instructions, indicating the required direction of the front and/or back
of the 6 way connector.
Nota: Cuando se requiere la colocación específica del conector de 6 vías, aparecerán puntos azules y rojos en las instrucciones indicando la dirección requerida de la parte
frontal y/o trasera del conector de 6 vías.
Note: A compass icon on the page indicates the current direction of the base. The red arrow always indicates the top edge of the base (as shown above).
Nota: El icono de una brújula en la página indica la dirección actual de la base. La flecha roja siempre indica la orilla superior de la base (como se indica arriba).
Note: A compass icon with 2 circular black arrows indicates that the build needs to be turned around 180 degrees.
Nota: El icono de una brújula con dos flechas circulares negras indica que la construcción debe ser girada 180 grados.
Note: An exclamation mark on the page indicates to take note. The note could be a direction change, specific areas where parts need to be connected or a clip position on a track.
For example,
indicates the third slot position is required for a part placement.
3
Nota: Un signo de exclamaciòn en la pàgina indica que se debe tomar nota. La nota puede ser un cambio de direcciòn, àreas especìficas donde se necesita conectar las partes, la posiciòn de un clip en un
riel. Por ejemplo, el
indica que se requiere la posición del tercer agujero para la colocación de una parte.
3
2 x3
2
2
2
5
www.TechnoGearsMarbleMania.com
10
10
13 x 1
14 x 2
9 x2
10 x 6
10
10
1
2
9
13
9
10
14
10
14
www.TechnoGearsMarbleMania.com
6
13
13
12
13 x 3
9
14 x 2
9 x2
10 x 2
12 x 1
13
9
10
1
14
10
14
2
7
www.TechnoGearsMarbleMania.com
10
10
10
10 x 4
10
1
2
www.TechnoGearsMarbleMania.com
8
2
80 x 1
1
80
9
www.TechnoGearsMarbleMania.com
13
13 x 6
11 x 1
12 x 2
12
13
1
13
12
13
13
13
11
2
www.TechnoGearsMarbleMania.com
10
1
13 x 4
12 x 2
13
12
13
13
12
13
11
www.TechnoGearsMarbleMania.com
2
80 x 1
1
80
2
www.TechnoGearsMarbleMania.com
12
1
62 x 1
62
2
13
www.TechnoGearsMarbleMania.com
13 x 1
16 x 2
73 x 2
70 x 2
18 x 1
70
2
70
18
73
1
73
3
4
13
16
16
www.TechnoGearsMarbleMania.com
14
1
2
15
www.TechnoGearsMarbleMania.com
9 x3
9
10
10 x 1
9
9
1
2
www.TechnoGearsMarbleMania.com
16
1
19 x 1
19
2
17
www.TechnoGearsMarbleMania.com
2
13
9
13 x 4
9 x2
10 x 6
10
3
10
13
10
1 x2
4
5
www.TechnoGearsMarbleMania.com
18
13
10
13
9
13 x 10
14 x 2
9 x3
10 x 2
13
11 x 4
14
11
1
9
13
11
13
2
13
13
11
11
14
13
9
13
10
13
19
www.TechnoGearsMarbleMania.com
13 x 2
9 x1
12 x 1
12
13
9
13
3
4
www.TechnoGearsMarbleMania.com
20
2
1
21
www.TechnoGearsMarbleMania.com
16 x 4
70 x 2
43 x 2
1
43
x2
70
16
16
2
www.TechnoGearsMarbleMania.com
22
1
2
23
www.TechnoGearsMarbleMania.com
2
1
www.TechnoGearsMarbleMania.com
24
13 x 2
9 x2
1
9
13
2
13
9
3
25
www.TechnoGearsMarbleMania.com
1
9
13
13 x 2
9 x2
2
13
9
3
www.TechnoGearsMarbleMania.com
26
16 x 6
53 x 2
1
x2
2
53
16
1
16
16
27
www.TechnoGearsMarbleMania.com
4
1
2
www.TechnoGearsMarbleMania.com
28
1
2
29
www.TechnoGearsMarbleMania.com
11
13
13 x 4
9 x2
10 x 2
11 x 2
81 x 2
9
81
13
10
1
x2
2
3
www.TechnoGearsMarbleMania.com
30
14
13 x 4
14 x 4
9 x4
13
23
14
13
9
1
2
x2
9
3
4
31
www.TechnoGearsMarbleMania.com
23 x 2
61
61 x 1
9 x1
9
1
2
www.TechnoGearsMarbleMania.com
32
13
13 x 6
2
9
1
13
x2
13
9
12
14
3
33
www.TechnoGearsMarbleMania.com
14 x 2
9 x4
12 x 2
1
2
www.TechnoGearsMarbleMania.com
34
2
13 x 2
10 x 2
1
13
10
35
www.TechnoGearsMarbleMania.com
13
10
16 x 4
42 x 2
42
1
x2
16
16
2
2
www.TechnoGearsMarbleMania.com
36
1
2
37
www.TechnoGearsMarbleMania.com
2
1
www.TechnoGearsMarbleMania.com
38
13 x 4
14 x 2
10 x 2
11 x 2
13
14
10
13
13
1
14
10
11
13
11
2
39
www.TechnoGearsMarbleMania.com
42
16 x 6
42 x 2
53 x 2
53
1
16
2
x2
16
16
2
4
www.TechnoGearsMarbleMania.com
40
2
1
41
www.TechnoGearsMarbleMania.com
2
1
www.TechnoGearsMarbleMania.com
42
13 x 2
14 x 2
10 x 2
2
11 x 2
1
11
13
13
10
10
14
14
11
43
www.TechnoGearsMarbleMania.com
13
12
1
13
11
13 x 7
9 x1
11 x 2
12 x 3
13
2
9
13
12
13
11
13
12
13
3
www.TechnoGearsMarbleMania.com
44
13 x 2
9 x2
1
13
9
13
9
2
45
www.TechnoGearsMarbleMania.com
16 x 4
17
59
17 x 2
59 x 2
53 x 2
1
x2
2 x2
16
52
16
www.TechnoGearsMarbleMania.com
46
16 x 2
24 x 2
5
24
2
16
1
x2
4
47
www.TechnoGearsMarbleMania.com
1
2
16 x 1
16
www.TechnoGearsMarbleMania.com
48
1
16 x 1
2
16
49
www.TechnoGearsMarbleMania.com
13 x 6
1 x2
14 x 2
9 x4
10 x 2
12 x 2
2
13
13
12
9
3
9
13
14
10
4
www.TechnoGearsMarbleMania.com
50
13
9
13
13 x 4
14 x 4
9 x2
47 x 2
1
x2
2
14
3
47
14
4
51
www.TechnoGearsMarbleMania.com
11
13
13 x 2
10
10 x 2
11 x 2
81 x 2
2
81
1
x2
3
www.TechnoGearsMarbleMania.com
52
2
13 x 4
1
14 x 2
9 x2
13
11 x 2
13
11
14
9
13
13
14
11
3
4
53
www.TechnoGearsMarbleMania.com
9
16 x 8
20 x 2
53 x 2
7
20
53
16
16
16
16
1 x2
2
2
www.TechnoGearsMarbleMania.com
54
1
2
3
4
55
www.TechnoGearsMarbleMania.com
1
82
82
13
12
13
3
2
82 x 2
13 x 2
11 x 1
12 x 1
4
11
www.TechnoGearsMarbleMania.com
56
6
6
6
6 x8
6
6
6
6
6
1
2
57
www.TechnoGearsMarbleMania.com
6 x2
1
6
6
Congratulations!
Now add some marbles and let’s play.
¡Felicitaciones!
Ahora coloca las canicas y vamosa jugar.
OUR WEBSITE
Please visit www.technogearsmarblemania.com to see more exciting
Marble Mania Twin Turbo Trax 2.0 construction plans.
NUESTRA PÁGINA WEB
Favor de visitar www.technogearsmarblemania.com para poder ver mayor
información relacionada a las instrucciones de construcción de excitantes diseños
con el Laberinto de la Diversión Twin Turbo Trax 2.0.
www.TechnoGearsMarbleMania.com
58