1
T WIN & 100 HEAD AMPLIFIERS
I M P O RTA N T S A F E T Y I N S T RU C T I O N S
ENGLISH - PAGES . . . . . . . . . . . 6-8
The lightning flash with arrowhead symbol within an equilateral triangle is intended to
alert the user to the presence of uninsulated “dangerous voltage” within the product’s
enclosure that may be of sufficient magnitude to constitute a risk of electric shock to
persons.
The exclamation point within an equilateral triangle is intended to alert the user to the
presence of important operating and maintenance (servicing) instructions in the
literature accompanying the product.
1)
ESPAÑOL - PAGINAS . . . . . . . . 9-11
FRANÇAIS - PAGES . . . . . . . . . . 12-14
Keep these instructions.
3)
Heed all warnings.
4)
Follow all instructions.
5)
Do not use this apparatus near water.
6)
Clean only with dry cloth.
7)
Do not block any ventilation openings. Install in accordance with the manufacturer’s instructions.
8)
Do not install near any heat sources such as radiators, heat registers, stoves, or other apparatus (including
amplifiers) that produce heat.
9)
Do not defeat the safety purpose of the polarized or grounding-type plug. A polarized plug has two blades
with one wider than the other. A grounding type plug has two blades and a third grounding prong. The
wide blade or the third prong are provided for your safety. If the provided plug does not fit into your outlet,
consult an electrician for replacement of the obsolete outlet.
10)
Protect the power cord from being walked on or pinched particularly at plugs, convenience receptacles and
the point where they exit from the apparatus.
11)
Only use attachments/accessories specified by the manufacturer.
12)
Use only with the cart, stand, tripod, bracket, or table specified by the manufacturer
or sold with the apparatus. When a cart is used, use caution when moving the cart/
apparatus combination to avoid injury from tip-over.
13)
Unplug this apparatus during lightning storms or when unused for long periods of time.
14)
Refer all servicing to qualified service personnel. Servicing is required when the apparatus has been
damaged in any way, such as power-supply cord or plug is damaged, liquid has been spilled or objects have
fallen into the apparatus, the apparatus has been exposed to rain or moisture, does not operate normally,
or has been dropped.
15)
To completely disconnect this apparatus from the AC mains, disconnect the power supply cord plug from
the AC receptacle.
ITALIANO - PAGINE . . . . . . . . . 15-17
DEUTSCH - SEITEN . . . . . . . . . . 18-20
PORTUGUÊS - PAGINA. . . . . . . 21-23
. . . . . . . . . . . . . 24-26
Read these instructions.
2)
16)
The mains plug of the power supply cord shall remain readily operable.
17)
WARNING – To reduce the risk of fire or electric shock, do not expose this apparatus to rain or moisture.
18)
Do not expose this equipment to dripping or splashing and ensure that no objects filled with liquids, such
as vases, are placed on the equipment.
19)
Maintain at least 6 inches (15.25 cm) of unobstructed air space behind the unit to allow for proper
ventilation and cooling of the unit.
20)
CAUTION – For rack mounted power amplifiers, keep all wiring and materials away from the sides of the
unit and allow the unit to cool down for 2 minutes before pulling from a rack enclosure.
21)
Amplifiers and loudspeaker systems, and ear/headphones (if equipped) are capable of producing very high
sound pressure levels which may cause temporary or permanent hearing damage. Use care when setting
and adjusting volume levels during use.
22)
FCC COMPLIANCE NOTICE: This equipment has been tested and found to comply with the limits for a Class
B digital device, pursuant to Part 15 of the FCC rules. These limits are designed to provide reasonable
protection against harmful interference in a residential installation. This equipment generates, uses and
can radiate radio frequency energy and if not used in accordance with the instructions, may cause harmful
interference to radio communications and there is no guarantee that interference will not occur in a
particular installation. If this equipment does cause harmful interference to radio or television reception,
which can be determined by turning the equipment off and on, the user is encouraged to try to correct
the interference by one or more of the following measures: reorient or relocate the receiving antenna,
increase the separation between the equipment and receiver, connect the equipment into an outlet on a
circuit different from that of the receiver. Consult the dealer or an experienced radio/TV technician if help is
needed with interference. NOTE: FMIC will not be responsible for unauthorized equipment modifications
that could violate FCC rules, and/ or void product safety certifications.
23)
WARNING – To maintain product safety, products with internal or external (battery pack) batteries:
•Batteries and/or the product in which they are installed, shall not be exposed to excessive heat such
as sunshine, fire or the like. •There may be a danger of explosion if the battery is incorrectly connected/
replaced. Replace only with the same or equivalent type battery specified in the instructions or on the
product.
24)
CAUTION – Unplug unit and allow it to cool before touching/ replacing vacuum tubes.
25)
WARNING – Provide an earthing connection before the mains plug is connected to the mains. And, when
disconnecting the earthing connection, be sure to disconnect after pulling out the mains plug from the
mains.
26)
Apparatus with CLASS I construction (grounded type with a three-prong plug) must be connected to a
MAINS socket outlet with a protective earthing connection.
I N S T RU CC I O N E S D E S E G U R I DA D I M P O RTA N T E S
CO N S I G N E S D E S É C U R I T É I M P O RTA N T E S
El relámpago con el símbolo de cabeza de flecha dentro de un triángulo equilátero tiene por objeto
alertar al usuario de la presencia de “voltaje peligroso” no aislado dentro del gabinete del
producto, que puede ser de magnitud suficiente como para constituir un riesgo de descarga
eléctrica para las personas.
Ce symbole avertit l'utilisateur de la présence d’une tension dangereuse non isolée dans
le boîtier du produit, qui peut être suffisamment importante pour constituer un risque
d'électrocution.
Le symbole du point d’exclamation dans un triangle équilatéral avertit l’utilisateur de la présence
d’instructions importantes relatives au fonctionnement et à l'entretien dans la documentation
qui accompagne le produit.
El signo de admiración dentro de un triángulo equilátero tiene por objeto alertar al usuario a la
presencia de importantes instrucciones de operación y mantenimiento (servicio) en los
documentos que acompañan al producto.
1)
2)
3)
4)
5)
6)
7)
8)
9)
10)
11)
12)
13)
14)
15)
16)
17)
18)
19)
20)
21)
22)
23)
24)
25)
26)
Lea estas instrucciones.
Conserve estas instrucciones.
Atienda todas las advertencias.
Siga todas las instrucciones.
No use este aparato cerca del agua.
Limpie sólo con un paño seco.
No bloquee ningún orificio de ventilación. Instale de acuerdo con las instrucciones del fabricante.
No lo instale cerca de ninguna fuente de calor, como radiadores, registros de calefacción, estufas u otros
aparatos (incluidos los amplificadores) que produzcan calor.
No elimine el objetivo de seguridad de la clavija polarizada o con conexión a tierra. Una clavija polarizada
tiene dos hojas, una de ellas más ancha que la otra. Una clavija con conexión a tierra tiene dos hojas y
una tercera pata de tierra. La hoja ancha o la tercera pata se suministran para su seguridad. Si la clavija
suministrada no encaja en su enchufe, consulte a un electricista para que reemplace el enchufe obsoleto.
Proteja el cable de alimentación para que no sea pisado o pellizcado, especialmente en las clavijas,
receptáculos de conveniencia y en el punto en el que salen del aparato.
Use únicamente aditamentos o accesorios especificados por el fabricante.
Úselo únicamente con el carrito, soporte, trípode, abrazadera o mesa especificados
por el fabricante o que se venden con el aparato. Cuando se use un carrito, sea
precavido al mover la combinación de carrito y aparato para evitar lesiones por
volcadura.
Desenchufe este aparato durante las tormentas eléctricas o cuando no se use durante períodos
prolongados de tiempo.
Refiera todo el servicio a personal cualificado. Se requiere servicio cuando el aparato se ha dañado de
cualquier forma, como si se dañan el cable de alimentación o la clavija, si se ha vertido un líquido o han
caído objetos al interior del aparato, si el aparato ha estado expuesto a la lluvia o la humedad, no funciona
normalmente o ha caído.
Para desconectar completamente este aparato de la red de CA, desconecte el cable de alimentación
eléctrica del receptáculo de CA.
La clavija eléctrica del cable de alimentación se mantendrá fácilmente operativa.
ADVERTENCIA – Para reducir el riesgo de incendio o descarga eléctrica, no exponga este aparato a la
lluvia o la humedad.
No exponga este equipo a escurrimientos o salpicaduras, y asegúrese de que no se coloquen objetos
llenos de líquido, como jarrones, sobre el equipo.
Mantenga al menos 6 pulgadas (15.25 cm) de espacio de ventilación sin obstrucciones detrás de la unidad
para permitir su ventilación y enfriamiento adecuados.
PRECAUCIÓN – En el caso de amplificadores de potencia montados en anaqueles, conserve todo el
cableado y materiales alejados de los lados de la unidad y permita que la unidad se enfríe durante 2
minutos antes de retirarla de un gabinete de anaquel.
Los amplificadores, sistemas de altavoces y auriculares (sea cual sea el dispositivo con el que esté
equipada la unidad) son capaces de producir niveles de presión sonora muy elevados que pueden llegar
a producir problemas de sordera tanto temporal como crónica. Tenga mucho cuidado a la hora de ajustar
los niveles de volumen al usar este aparato.
Certificación de cumplimiento de la sección 15 de las normas FCC (para dispositivos digitales, según sea
aplicable en cada caso) - Sección 15.21: Los cambios o modificaciones que no hayan sido autorizados
expresamente y por escrito por la empresa responsable del cumplimiento de estas normas pueden anular
la autorización del usuario para seguir utilizando este aparato. NOTA: El fabricante no será responsable de
ninguna interferencia en radio o TV que sea producida por modificaciones no autorizadas en este aparato.
Tal tipo de modificaciones pueden anular la autorización del usuario para seguir utilizando este aparato.
ADVERTENCIA – Para mantener la seguridad de los productos con baterías internas o externas
(paquete de baterías): •Las baterías y el producto en el que están instaladas no deberán exponerse a
calor excesivo, como la luz del sol, fuego y similares. •Puede haber peligro de explosión si la batería se
conecta o reemplaza de modo incorrecto. Reemplácelas sólo con baterías del mismo tipo o equivalente
especificadas en las instrucciones o en el producto.
PRECAUCIÓN – Desconecte esta unidad de la corriente y espere un rato hasta que se refrigere antes de
tocar / sustituir las válvulas.
PRECAUCION – Antes de conectar el cable de alimentación a la corriente eléctrica, consiga una conexión
a tierra. Además, a la hora de desconectar esta toma de tierra, asegúrese de hacerlo después de haber
extraído el cable de alimentación del chasis.
Los dispositivos de CLASE I (enchufe de tres bornes con toma de tierra) como este deben ser conectados
a una salida de corriente que disponga de una conexión de toma de tierra de seguridad.
1)
2)
3)
4)
5)
6)
7)
8)
9)
10)
11)
12)
13)
14)
15)
16)
17)
18)
19)
20)
21)
22)
23)
24)
25)
26)
Lisez ces instructions.
Conservez ces instructions.
Respectez toutes les mises en garde.
Suivez toutes les instructions.
N’utilisez pas cet appareil à proximité d’un point d’eau.
Nettoyez-le uniquement avec un chiffon sec.
Ne bloquez pas les ouvertures de ventilation. Installez l'appareil en suivant les instructions du fabricant.
Ne l’installez pas à proximité d’une source de chaleur, comme un radiateur, un four ou tout autre appareil
(incluant les amplificateurs) produisant de la chaleur.
Ne modifiez pas la fiche polarisée (Canada) ou la mise à la terre. Les fiches polarisées possèdent deux
lames, dont l’une est plus large que l’autre. Les fiches avec mise à la terre possèdent deux broches plus
une broche de terre. La lame plus large et la terre sont des éléments de sécurité. Si la fiche ne correspond
pas à votre prise secteur, contactez un électricien pour la faire remplacer.
Évitez de marcher sur le cordon secteur ou de le pincer, en particulier au niveau des fiches, des prises
secteur et de l'embase de l’appareil.
Utilisez uniquement les pièces/accessoires spécifiés par le fabricant.
Utilisez uniquement le chariot, le support, le trépied, la console ou la table spécifiés
par le fabricant ou vendus avec l’appareil. Lorsqu'un chariot est utilisé, prenez toutes
les précautions nécessaires pour éviter les chutes lors du déplacement de l’ensemble
chariot-appareil.
Déconnectez l’appareil pendant les orages ou les longues périodes d'inutilisation.
Confiez toutes les réparations à un technicien qualifié. Vous devez faire contrôler cet appareil s'il a
été endommagé de quelque façon que ce soit, comme lorsque le cordon secteur ou les fiches sont
endommagés, qu'un liquide ou des objets se sont infiltrés dans l’appareil, qu'il a été exposé à la pluie ou
l’humidité, qu'il a subi un choc ou qu'il ne fonctionne pas normalement.
Pour déconnecter entièrement l’appareil du secteur (phase, neutre et terre), déconnectez la fiche du
cordon secteur de la prise.
La fiche du cordon secteur doit demeurer accessible en tout temps.
MISE EN GARDE – Pour réduire les risques d’incendie ou d'électrocution, n’exposez pas cet appareil aux
intempéries ou à l'humidité.
N’exposez pas cet appareil à l’humidité ou aux projections liquides. Ne posez pas de récipient rempli de
liquide, tel qu'un vase, sur cet appareil.
Maintenez un espace d’au moins 15 cm (6 pouces) à l'arrière de l'appareil pour laisser circuler l’air et
permettre une ventilation et un refroidissement convenables.
ATTENTION – Pour les amplificateurs de puissance montés en Rack, ne placez pas de câbles et
matériaux à proximité des côtés de l’appareil. Laissez l'appareil refroidir pendant 2 minutes avant de le
retirer du Rack.
Les amplificateurs, les haut-parleurs, les enceintes, les casques et écouteurs (selon le cas) peuvent
produire des niveaux sonores très élevés qui peuvent causer des dommages auditifs temporaires ou
permanents. Réglez le volume avec modération.
Norme fédérale US FCC Part 15 (pour les produits numériques répondant aux descriptions) - alinéa
15.21 : Les changements ou modifications non approuvées officiellement par l'organisation ou la
société responsable de la conformation à la norme peuvent annuler le droit de l'utilisateur à se servir
du produit. REMARQUE : le fabricant n'est pas responsable des interférences radio ou TV causées par
les modifications non-autorisées apportées au matériel. Ces modifications peuvent annuler le droit de
l'utilisateur à se servir du produit.
MISE EN GARDE – Pour éviter d'endommager les produits munis de piles internes ou externes : •
Les piles et/ou le produit dans lequel elles sont installées ne doivent pas être exposés à une chaleur
excessive, comme les rayons du soleil, le feu, etc. • Il y a un risque d’explosion lorsque la pile n’est
pas correctement connectée/remplacée. Remplacez-la uniquement par une pile de type identique ou
équivalent, spécifié dans les instructions ou sur le produit.
ATTENTION – Déconnectez l'appareil du secteur et laissez-le refroidir avant de toucher ou de remplacer
les lampes.
ATTENTION – Veuillez vous assurer que l'appareil soit mis à la terre avant de connecter la fiche
au secteur. De la même façon, assurez-vous que la terre soit déconnectée en dernier lorsque vous
déconnectez la prise du secteur.
Les équipements de CLASSE I (mis à la terre avec une fiche secteur à trois broches) doivent être
impérativement connectés à une prise SECTEUR avec terre.
I M P O RTA N T I N O R M E D I S I C U R E Z Z A
1)
2)
3)
4)
5)
6)
7)
8)
9)
10)
11)
12)
13)
14)
15)
16)
17)
18)
19)
20)
21)
22)
23)
24)
25)
26)
WICHTIGE ANWEISUNGEN ZU IHRER SICHERHEIT
Il simbolo del fulmine con la punta a freccia, racchiuso in un triangolo equilatero, avverte
l’utente della presenza di tensione pericolosa non isolata all’interno del prodotto, sufficiente
a costituire un rischio di shock elettrico per le persone.
Das Symbol Blitz und Pfeil in einem gleichseitigen Dreieck soll den Benutzer vor dem Vorhandensein
nicht isolierter „gefährlicher Spannung“ im Gehäuse des Produkts warnen, die möglicherweise
hoch genug ist, um ein Stromschlagrisiko darzustellen.
Il punto esclamativo all’interno di un triangolo equilatero avvisa l’utente della presenza di
importanti istruzioni per il funzionamento e la manutenzione incluse nel materiale
informativo che accompagna il prodotto.
Das Ausrufezeichen in einem gleichseitigen Dreieck soll den Benutzer auf wichtige Bedienungsund Wartungsanweisungen (Serviceanweisungen) in den dem Produkt beiliegenden Broschüren
aufmerksam machen.
Leggere queste istruzioni.
Conservare queste istruzioni.
Rispettare tutte le avvertenze.
Seguire tutte le istruzioni.
Non usare questo apparecchio vicino all’acqua.
Pulire unicamente con un panno asciutto.
Non ostruire le prese di aerazione. Installare secondo le istruzioni fornite dal costruttore.
Non installare vicino a fonti di calore come caloriferi, diffusori di calore, stufe o altri dispositivi che
producono calore (inclusi gli amplificatori).
Non annullare la sicurezza garantita dalla spina polarizzata o con messa a terra. Le spine polarizzate
sono caratterizzate da due lamine, di cui una più grande dell’altra. Le spine con messa a terra
dispongono di due lame e di un terzo polo per la messa a terra. La lamina grande o il terzo polo sono
contemplati per garantire la sicurezza. Se la spina del cavo fornito in dotazione non si adatta alla
presa, consultare un elettricista per sostituire la presa obsoleta.
Proteggere il cavo di alimentazione perché non venga calpestato, tirato o piegato, in particolare
vicino alla presa e al punto in cui il cavo esce dal dispositivo.
Usare solo accessori/componenti specificati dal costruttore.
Usare solo carrelli, supporti, treppiedi, staffe o tavoli specificati dal costruttore o
venduti con l’apparecchio. Quando si usa un carrello, fare attenzione nello spostare la
combinazione carrello/apparecchio per evitare lesioni causate dal ribaltamento.
Scollegare il dispositivo durante i temporali con fulmini o in caso di lunghi periodi di inutilizzo.
Per l’assistenza tecnica rivolgersi sempre a personale qualificato. È necessaria l’assistenza quando
il dispositivo risulta danneggiato in qualunque modo (ad esempio: cavo di alimentazione o spina
danneggiati, liquido versato o oggetti caduti nel dispositivo, dispositivo esposto a pioggia o umidità,
funzionamento non normale o dispositivo caduto).
Per scollegare completamente l’apparecchio dalla presa di rete CA togliere la spina del cavo di
alimentazione dalla presa CA.
La spina di rete del cavo di alimentazione deve essere sempre facilmente accessibile e operabile.
AVVERTENZA - Per ridurre il rischio di incendio o di shock elettrico, non esporre questo apparecchio
alla pioggia o all’umidità.
Non esporre il dispositivo a sgocciolamenti o a spruzzi di alcun liquido ed assicurarsi che nessun
oggetto contenente liquidi, come vasi, venga collocato su di esso.
Lasciare almeno 15 cm di spazio libero dietro al dispositivo per consentire una corretta aerazione e il
raffreddamento dell'unità.
ATTENZIONE- Per gli amplificatori di potenza montati all'interno di un rack, mantenere tutti i cavi
e gli oggetti lontano dai fianchi laterali del dispositivo e, prima di estrarlo dal rack-case, lasciarlo
raffreddare per 2 minuti.
Gli amplificatori, i sistemi di altoparlanti e le cuffie/dispositivi in-ear (se presenti) possono
generare livelli audio con un'elevata pressione sonora, in grado di causare danni temporanei o
permanenti all'udito. Quindi, durante l'uso è opportuno prestare molta attenzione nell'impostazione
e regolazione dei livelli di volume.
Dichiarazione di Conformità FCC Parte 15 (per prodotti digitali, se applicabile) Parte 15.21: Le modifiche non espressamente approvate dalla parte responsabile alla conformità
può annullare l'autorità dell'utente di operare con il dispositivo. NOTA: Il costruttore non è da
ritenersi responsabile per qualsiasi interferenza radio o TV causata da modifiche non autorizzate
del dispositivo in oggetto. Tali modifiche possono annullare l'autorità dell'utente di operare con il
dispositivo.
AVVERTENZA – Per preservare la sicurezza dell'unità, prodotti con batterie interne o esterne
(battery-pack): • Le batterie e/o il prodotto in cui queste sono installate non devono essere esposti a
calore eccessivo, come luce solare, fuoco o simili. • Se la batteria viene collegata/sostituita in modo
non corretto può sussistere il rischio di esplosione. Sostituire solo con batterie dello stesso tipo o
equivalente, come specificato nelle istruzioni o sul prodotto.
CAUTELA - Prima di toccare/sostituire le valvole, disconnettere l'unità e lasciarla raffreddare.
ATTENZIONE – Prima di collegare la spina alla rete elettrica, assicurarsi che la presa disponga
di messa a terra. Inoltre, nel disconnettere la connessione con messa a terra, assicurarsi di aver
precedentemente scollegato la spina dalla rete elettrica.
Gli apparati in CLASSE I (con messa a terra mediante spina a tre-poli) devono essere collegati alla
presa di corrente elettrica tramite una connessione protettiva con messa a terra.
1)
2)
3)
4)
5)
6)
7)
8)
9)
10)
11)
12)
13)
14)
15)
16)
17)
18)
19)
20)
21)
22)
23)
24)
25)
26)
Lesen Sie diese Anweisungen.
Bewahren Sie diese Anweisungen auf.
Beachten Sie alle Warnhinweise.
Befolgen Sie alle Anweisungen.
Benutzen Sie die Vorrichtung nie in der Nähe von Wasser.
Nur mit trockenem Tuch reinigen.
Belüftungsöffnungen nicht blockieren. Den Anweisungen des Herstellers entsprechend installieren.
Installieren Sie die Vorrichtung nicht in der Nähe von Wärmequellen wie Radiatoren, Heizkörpern, Herden
oder anderen Geräten (insbesondere Verstärkern), die Wärme erzeugen.
Achten Sie darauf, den Sicherheitszweck des verpolungssicheren oder geerdeten Steckers nicht zu
umgehen. Ein verpolungssicherer Stecker ist mit zwei flachen Stiften ausgestattet, von denen einer breiter
ist als der andere. Ein geerdeter Stecker ist mit zwei Stiften und einer Erdbuchse ausgestattet. Der breitere
Stift oder die Erdbuchse dienen Ihrer Sicherheit. Sollte der mitgelieferter Stecker nicht in Ihre Steckdose
passen, wenden Sie sich zum Austausch der veralteten Steckdose an einen Elektriker.
Schützen Sie das Stromkabel davor, dass darauf getreten oder dass es besonders am Stecker, an
Steckerleisten oder an der Austrittsstelle aus dem Gerät geknickt wird.
Verwenden Sie nur vom Hersteller zugelassenes Zubehör.
Benutzen Sie das Gerät nur mit den vom Hersteller festgelegten oder gemeinsam mit
dem Gerät verkauften Wagen, Ständern, Stativen, Halterungen oder Tischen. Achten
Sie bei Benutzung eines Wagens darauf, dass das gemeinsam mit dem Wagen bewegte
Gerät nicht kippt und zu Verletzungen führt.
Ziehen Sie bei Gewittern oder bei längeren Stillstandzeiten den Netzstecker des Geräts.
Überlassen Sie alle Wartungsarbeiten qualifiziertem Personal. Ein Service wird erforderlich, wenn das
Gerät in irgendeiner Weise beschädigt wurde, beispielsweise bei Beschädigung des Netzsteckers oder des
Netzkabels, wenn Flüssigkeiten über das Gerät vergossen wurden oder Gegenstände in das Gerät gefallen
sind, das Gerät Regen oder Feuchtigkeit ausgesetzt war, nicht ordnungsgemäß funktioniert oder fallen
gelassen wurde,
Ziehen Sie den Netzstecker aus der Steckdose, um das Gerät vollständig vom Wechselstromnetz zu
trennen.
Der Netzstecker des Netzkabels muss jederzeit betriebsbereit sein.
WARNHINWEIS: Um die Gefahr vom Feuer oder Stromschlag zu vermeiden, darf das Gerät nicht Regen
oder Feuchtigkeit ausgesetzt werden.
Lassen Sie nicht zu, dass Flüssigkeiten auf das Gerät tropfen oder gespritzt werden können, und achten Sie
darauf, dass keine mit Wasser gefüllten Gegenstände wie Vasen auf das Gerät gestellt werden.
Achten Sie auf mindestens 15 cm Abstand hinter dem Gerät für die ungehinderte Luftzirkulation und
Kühlung des Geräts.
VORSICHT: Bei in Regalen (Racks) montierten Verstärkern ist die gesamte Verkabelung und sämtliches
Material von den Seiten des Gerätes fernzuhalten; lassen Sie das Gerät vor Entnahme aus dem Rack zwei
Minuten lang abkühlen.
Verstärker, Lautsprechersysteme und Ohr/Kopfhörer (falls getragen) können sehr hohe Schalldruckpegel
erzeugen und dadurch vorübergehende oder dauerhafte Hörschäden verursachen. Gehen Sie vorsichtig
vor, wenn Sie während des Betriebs die Lautstärkepegel einstellen oder nachregeln.
FCC Konformitätserklärung Teil 15 (für Digitalprodukte, nach Anwendbarkeit) - Teil 15.21: Änderungen
oder Modifikationen, die nicht ausdrücklich von der für die Konformität verantwortlichen Stelle genehmigt
wurden, können zu einem Betriebsverbot führen. HINWEIS: Der Hersteller ist nicht verantwortlich für
Radio- oder TV-Interferenzen, die durch unautorisierte Modifikationen an diesem Gerät verursacht
werden. Derartige Modifikationen können zu einem Betriebsverbot führen.
WARNHINWEIS: Zur Aufrechterhaltung der Sicherheit von mit internen oder externen Batterien
(Akkumulatoren) betriebenen Produkten ist folgendes zu beachten: • Die Batterien sowie das Produkt,
in dem sie installiert sind, dürfen keiner übermäßigen Hitze (durch Sonneneinstrahlung, Feuer usw.)
ausgesetzt werden. • Bei unsachgemäßem Anschluss/Austausch der Batterien besteht Explosionsgefahr.
Der Austausch darf nur mit Batterien des gleichen oder gleichwertigen Typs erfolgen, der in den
Anweisungen oder am Produkt angegeben ist.
VORSICHT – Ziehen Sie den Netzstecker und lassen Sie das Gerät abkühlen, bevor Sie die Vakuumröhren
berühren/ersetzen.
VORSICHT – Stellen Sie einen Erdungsanschluss her, bevor Sie den Netzstecker in die Netzsteckdose
stecken. Unterbrechen Sie den Erdungsanschluss erst, nachdem Sie den Netzstecker aus der Netzsteckdose
gezogen haben.
CLASS I Geräte (geerdet mit einem 3-Stift Stecker) müssen an eine Netzsteckdose mit Schutzerde
angeschlossen werden.
I N S T RU ÇÕ E S D E S E G U R A N Ç A I M P O RTA N T E S
1)
2)
3)
4)
5)
6)
7)
8)
9)
10)
11)
12)
13)
14)
15)
16)
17)
18)
19)
20)
21)
22)
23)
24)
25)
26)
安 全 にご 使 用 いた だくた め に
O relâmpago com símbolo de cabeça de flecha dentro de um triângulo equilátero destina-se a
alertar o utilizador para a presença de “tensão perigosa” dentro da estrutura do produto que
pode ter magnitude suficiente para representar um risco de choque eléctrico para as pessoas.
二等辺三角形の中の矢印のついた稲妻の閃光のシンボルは、人に電気ショ
ックを与えるに十分な、絶縁されていない「高電圧の危険」が製品のケース
内にあることを警告するものです。
O ponto de exclamação dentro do triângulo equilátero destina-se a alertar o utilizador para a
presença de instruções de funcionamento e manutenção (assistência técnica) na
documentação que acompanha o produto.
二等辺三角形の中の感嘆符合は、重要な操作方法およびメンテナンス方法
の記述が製品に付属の説明書にあることを示します。
Leia estas instruções.
Guarde estas instruções.
Cumpra todas as advertências.
Siga todas as instruções.
Não utilize este aparelho próximo de água.
Limpe apenas com um pano seco.
Não bloqueie quaisquer orifícios de ventilação. Instale de acordo com as instruções do fabricante.
Não instale próximo de fontes de calor, tais como radiadores, saídas de ar quente, fogões ou outros
aparelhos (incluindo amplificadores) que produzam calor.
Não anule a finalidade de segurança da ficha polarizada ou de ligação à terra. Uma ficha polarizada
possui duas lâminas, sendo uma delas mais larga do que a outra. Uma ficha de ligação à terra possui
duas lâminas e um terceira ponta de ligação à terra. A lâmina larga ou a terceira ponta são fornecidas
para sua segurança. Se a ficha fornecida não couber na sua tomada, consulte um electricista para
substituir a tomada obsoleta.
Proteja o cabo de alimentação eléctrica do aparelho para que não seja pisado ou dobrado
especialmente nas fichas, nos receptáculos ou no ponto onde o cabo sai do aparelho.
Utilize apenas acessórios/peças especificados pelo fabricante.
Utilize o aparelho apenas com o carrinho, suporte, tripé ou mesa especificados
pelo fabricante ou vendidos com o aparelho. Quando utilizar um carrinho, tenha
cuidado ao deslocar a combinação carrinho/aparelho para evitar ferimentos
provocados por uma possível queda.
Desligue este aparelho durante trovoadas ou quando não for utilizá-lo por um
longo período de tempo.
Solicite todas as reparações a pessoal de assistência qualificado. É necessária assistência técnica
quando o aparelhos se tiver danificado de alguma forma como, por exemplo, o cabo de alimentação
ou a ficha estão danificados, foram derramados líquidos ou caíram objectos para dentro do aparelho,
o aparelho esteve exposto a chuva ou humidade, o aparelho não funciona normalmente ou sofreu
uma queda.
Para desligar por completo este aparelho da corrente eléctrica de CA, desligue a ficha do cabo de
alimentação do receptáculo de CA.
A ficha eléctrica do cabo de alimentação irá permanecer pronta a funcionar.
ADVERTÊNCIA – Para reduzir o risco de incêndio ou choque eléctrico, não exponha este aparelho a
chuva ou humidade.
Não exponha este equipamento a gotejamento ou salpicos e certifique-se de que não são colocados
objectos com líquidos, tais como jarras, sobre o equipamento.
Mantenha desobstruído pelo menos 15,25 cm de espaço por trás da unidade para que a unidade
disponha de ventilação e arrefecimento adequados.
CUIDADO – Para amplificadores montados numa estante, mantenha todas as ligações eléctricas
e materiais afastados das partes laterais da unidade e deixe a unidade arrefecer durante 2 minutos
antes de retirar de uma estante.
Amplificadores, sistemas de alto-falantes, e fones de ouvido (se equipado) são capazes de
produzir níveis de pressão de som muito altos que podem causar lesões auditivas temporárias ou
permanentes. Seja cauteloso ao configurar e ajustar os níveis de volume durante o uso.
FCC parte 15 Indicação de Conformidade (para produtos digitais, como aplicável) – Parte 15.21:
Mudanças ou modificações não aprovadas por parte da responsável pela conformidade, poderia
causar que o usuário não tenha mais a autoridade de manusear o equipamento. NOTA: O fabricante
não está responsável por qualquer interferência de radio ou televisão causada por modificações
deste equipamento. Tais modificações pode fazer com que o usuário não tenha mais a autoridade de
manuseá-lo.
ADVERTÊNCIA – Para manter a segurança do produto, no caso de produtos com pilhas (conjunto
de pilhas) internas ou externas: • As pilhas e/ou o produto no qual estão instaladas, não devem ser
expostos a temperaturas excessivas, tal como a luz solar directa, fogo, ou temperaturas semelhantes.
• Pode existir um risco de explosão se a pilha estiver ligada/colocada de forma incorrecta. Substitua
apenas por pilhas de tipo equivalente ou idêntico ao especificado nas instruções ou no produto.
AVISO – Desconecte a unidade e permite-o de resfriar-se antes tocar ou trocar as válvulas de vácuo.
AVISO – Providencie uma conexão terra antes de ligar seu aparelho à tomada. E, quando estiver
desconectando o terra, certifique-se de ter desconectado antes de puxar o fio ligado à corrente
elétrica.
A aparelhagem com construção CLASS I (tipo terra com um plugue de 3 pinos) deve ser conectado a
uma tomada elétrica MAINS com uma conexão terra de proteção.
1)
2)
3)
4)
5)
6)
7)
8)
9)
10)
11)
12)
13)
14)
15)
16)
17)
18)
19)
20)
以下の説明をお読みください。
本説明書を保存してください。
警告にはすべて注意してください。
使用方法にはすべて従ってください。
本装置は水の近くでは使用しないでください。
清掃は、乾いた布でのみ行ってください。
通気孔はふさがないでください。製造元の手順書に従って設置してください。
ラジエーター、ヒート レジスター、調理用コンロ、音響用アンプリファイア等の、
熱を発する機器の近くには設置しないでください。
極性プラグや接地プラグの安全機能を妨げないようにしてください。極性プラグ
は二つのブレードの一方が他方より幅広くなっています。接地型プラグには、二つ
のブレードに加えて接地プロングがあります。幅の広いブレードまたは3番目のプ
ロングは、安全用です。プラグがコンセントに合わないときは、電気技師に相談し
て旧式のコンセントを付け替えてください。
電源コードが踏まれたり、特にプラグ、便利レセプタクル、または装置から出てくる
箇所でねじれないように保護してください。
メーカー指定の付属品/アクセサリーのみを使用してください。
カード、スタンド、三脚、ブラケット、テーブルは、メーカー指定の
もの、または装置と共に販売されているもののみを使用してくださ
い。カートをご使用の場合は、カートと装置を一緒に移動させると
き、転倒によって怪我をされないようご注意ください。
稲妻が光っている間、また長期間ご使用にならないときは、本装置の電源をプラ
グから抜いてください。
メンテナンスはすべて、資格のあるメンテナン スサービス要員に依頼してくださ
い。メンテナンスは装置が何らかの形で損傷した場合、例えば次のような場合に
必要となります: 電源コードまたはプラグが損傷した場合、装置の中に液体が
こぼれて入ったり、ものが落ちて入ったりした場合、装置が雨や湿気にさらされた
場合、装置が正常に動作しない場合、装置を落とした場合。
本装置をAC主電源から完全に切り離すには、電源コードのプラグをACコンセン
トから抜いてください。
電源コードの電源プラグは、常に操作可能な状態にしておいてください。
警告 − 火災や電気ショックの危険を減らすため、本装置を雨や湿気にさらさない
ようにしてください。
本装置を水のしずくや水はねにさらさないでください。また、花瓶などの水の入っ
たものは本装置の上には絶対に置かないようにしてください。
本装置ユニットの適切な通気および冷却のため、その背後に少なくとも 15.5 cm
のスペースを確保し、そこにはさえぎるようなものは置かないようにしてくださ
い。
注意 − ラックに搭載したパワー アンプリファイアの場合は、配線その他をユニッ
トの側面から離しておいてください。また、ラックのケースからユニットを取り出す
前にユニットを2分間冷却させてください。
21)
アンプリファイヤー、ラウドスピーカーシステムとイヤフォン/ヘッドフォン(必要な
場合)は、非常に大きな音圧レベルを生成し、一時的または恒久的な聴覚のダメ
ージの原因となる場合があります。使用中のボリューム•レベルの設定と調整には
注意が必要です。
22)
FCC Part 15 適合宣言(デジタル製品、規定の通り) ‒ Part 15.21: 順守の責任を持つ
団体によって明示的に許可されていない変更や改造は、ユーザーの機器を操作す
る権限を無効にする場合があります。注意: 製造者は機器に施された未認証の改
造によって引き起こされた、あらゆるラジオまたはテレビの障害については、責任
を有しません。この種の改造はユーザーの機器を操作する権限を無効にする場合
があります。
警告 − 安全確保のため、バッテリーを内臓した、または外部バッテリー(バッテリ
ーパック)を使用した製品をご使用の際は、次のことにご注意ください: * バ
ッテリーおよび/またはバッテリーが入った製品は、太陽光線、火、等の過度の熱
にはさらさないでください。* バッテリーの接続/交換方法を誤ると、爆発の危
険性があります。交換するときは、説明書または製品上に記載されたものと同じ
か、同等の種類のバッテリーのみを使用してください。
注意 ‒ 真空管に触る/交換する前に、製品をコンセントから抜き冷却させてくださ
い。
警告:電源に電源プラグを差し込む前に、接地されている接続を提供してくださ
い。また、接地されている接続を切断する場合は、 電源から電源プラグを抜いて
から接地を切断してください。
クラス I 構造の機器(3 本プロングのプラグを持つ接地型)は、保護用接
地接続を持つ電源コンセントに接続する必要があります。
23)
24)
25)
26)
Super-Sonic™ Twin / Super-Sonic™ 100 Head
Super Sonic amplifiers are designed for guitarists who want to create unmistakable Fender clean tones and expressive modern highgain tones…with one no-nonsense tube amp. The VINTAGE channel
delivers tones based on legendary Fender favorites, and the BURN
channel ignites musical inspiration with overdrive flavors from bluesy
to flame-throwing. The Super-Sonic amp is capable of modern highgain overdrive and sustain, but these characteristics can be fine tuned
without masking the tonal character of YOUR guitar. The Super-Sonic
Twin and 100 Head also contain impressive extras like Arena/Club
switch, Damping control, and all-new Fender Automatic Bias control.
• NOTCH TUNE lets you move the midrange notch for a variety of
American and British flavors
• Tube-driven Fender long-spring Reverb by Accutronics®
• Professional FX loop with level control; may also be used as a
footswitchable boost
• Choice of classic Black/Silver or iconic 1961 Blonde/Oxblood
cosmetic treatment
• Cover and 4-button pedalboard-friendly footswitch included
• 5-year limited transferable warranty (US and Canada; other
territories may vary)
Features include:
• Fender Automatic Bias (patent pending) lets you easily set your
output tubes to the recommended factory setting without meter
or tools. Bias may be set “hotter” or “cooler” if desired, and almost
any mix of 6L6 tubes will work.
• 100 Watts from four 6L6 output tubes
• ARENA/CLUB switch provides selectable 100 Watt or 25 Watt
output
• Seven 12AX7 preamp tubes & two 12AT7 tubes
• DAMPING control (on rear panel) lets you select Normal, Loose, or
Tight speaker response
• VINTAGE channel contains pre-gain tone controls and two
different switchable voices:
• Shimmering clean tone derived from vintage Fender Twin
Reverb® and Showman® amplifiers
• Fat, punchy tone reminiscent of 1960s Bassman® amplifiers
• Pre and Master Volume controls can be set for pure clean or
slightly overdriven tones
• Custom transformers by Schumacher
• Super-Sonic Twin contains two premium 12” Celestion® Vintage 30
speakers
• Super-Sonic 100 Head matches Super-Sonic 100 412 Straight and
Slant enclosures
• BURN channel allows tonal experimentation with post-gain EQ
and two-stage cascading preamp controls:
• GAIN 1 provides edgy breakup and distortion
• GAIN 2 adds compression, thickness, and sustain
The World's Most Popular Instrument Amplifiers...
Since 1946
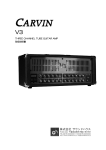
Front Panel
5
4
6
8
2
1
INPUT
10
GAIN
5
4
7
3
9
SHOWMAN/ BASSMAN 6
5
4
7
6
2
1
10
TREBLE
9
5
4
7
6
2
10
1
BASS
9
5
4
7
6
2
10
1
MID
9
8
2
1
10
5
4
7
8 3
8 3
8 3
3
VINTAGE / BURN
9
VOLUME
6
5
4
7
6
2
1
10
GAIN 1
9
5
4
6
2
1
10
GAIN 2
9
Plug your guitar in here.
B.
GAIN — Adjusts the input signal level of the VINTAGE channel. Use
together with VOLUME {E} to control the loudness of the VINTAGE
channel. Set to maximum for moderate overdrive.
2
1
10
TREBLE
♫
BASSMAN
The TWIN REVERB / SHOWMAN setting provides a Fender Blackface™
vintage amplifier voicing and the BASSMAN setting provides a Fender
Tweed vintage amplifier voicing.
D.
TREBLE / BASS / MID — Adjusts the tonal character of the VINTAGE
channel.
E.
VOLUME — Adjusts the overall loudness of the amplifier when the
VINTAGE channel is active. When set to maximum, the GAIN {B} control
acts as a single volume control, similar to those on vintage Fender
amplifiers.
6
9
5
4
7
6
2
1
10
9
6
10
1
MID
9
5
4
7
8 3
2
BASS
5
4
7
8 3
6
2
1
10
9
NOTCH TUNE
2
1
10
VOLUME
5
4
7
8 3
8
3
9
2
6
7
8
1
10
REVERB
9
FENDER MUSICAL INSTRUMENTS
VINTAGE / BURN — Selects the active channel as indicated by the
LEDs.
VINTAGE Channel
BURN Channel
G.
GAIN 1 / GAIN 2 — Primary and secondary adjustments for distortion
and sustain of the BURN channel. Use together with VOLUME {J} to
control the loudness of the BURN channel.
H.
TREBLE / BASS / MID — Adjusts the tonal character of the BURN channel.
I.
NOTCH TUNE — Use to move the midrange (MID) notch for a variety
of American and British tonal flavors.
TWIN REVERB® OR SHOWMAN® / BASSMAN® — Selects the amplifier
circuitry of the VINTAGE channel, as indicated by the LEDs.
TWIN REVERB / SHOWMAN
6
8 3
F.
INPUT —
5
4
7
8 3
A.
C.
7
8 3
3
FREQUENCY
Treble
Emphasis
Bass
Emphasis
J.
VOLUME — Adjusts the overall loudness of the amplifier when the
BURN channel is active.
K.
REVERB — Adjusts the Reverb level for both channels.
L.
POWER INDICATOR — Illuminates when the unit is ON.
fender.com
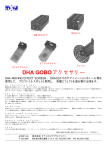
Rear Panel
TYPE: PR 903
ON
INPUT
POWER
V
Hz
325W
FUSE
4A L
250V
SERIAL NUMBER
NORMAL
ARENA
LOOSE
PARALLEL SPEAKER OUTPUTS
TIGHT
4Ω min TOTAL
100W
AUTOMATIC BIAS
WARM
ADJUST
NORMAL
OFF
SEND
POWER
M.
♫
N.
♫
O.
P.
STANDBY
CLUB
MIN
MAX
SEND LEVEL
RETURN
MIN
MAX
RETURN LEVEL
POWER — Switches the unit on-off.
!
POWER AMP
IN
DAMPING CONTROL
8Ω 16Ω
IMPEDANCE
MAIN
SPEAKER
EXTERNAL
SPEAKER
V.
POWER AMP IN — A direct input to the power amplifier. The preamp
circuit is automatically disconnected when a plug is inserted into this
jack.
STANDBY — In standby, the amplifier outputs are disabled while
power is supplied to the tube filaments only, keeping them warm and
ready to play.
W.
FOOTSWITCH — Connect the included 4-button footswitch to enable
remote selection of: Amp Voicing {C}, Channel {F}, Reverb and FX
Loop Bypass. NOTE: The front panel push buttons are disabled when the
footswitch is connected.
Use STANDBY instead of switching the power off during short breaks
to extend tube life span and to avoid the tube warm-up delay upon
returning to play the amp.
X.
AUTOMATIC BIAS — Select the desired tube bias temperature
(WARM/NORMAL/COOL) using the up and down arrows, after the
amplifier has warmed up (at least one minute). The amplifier will
remember your last setting the next time you switch the unit on.
NOTE: Press the up and down arrows simultaneously for one second to
restore factory automatic bias settings.
You can extend the life of the amplifier tubes by keeping the STANDBY
{N} switch down for 60 seconds when you first switch on the power.
IEC POWER INPUT SOCKET — Connect to a grounded outlet using the
supplied power cord in accordance with the voltage and frequency
specifications shown on the rear panel of your amplifier.
ARENA / CLUB — Select ARENA for maximum power output (100W)
when playing larger venues. Select CLUB for lower power output (25W)
when playing smaller venues or recording.
It is recommended that you change the position of the ARENA/CLUB
switch only when the amplifier is OFF or in STANDBY to reduce stress
on the tubes and to extend tube life span.
SEND LEVEL — Adjusts the output level of the SEND {S} jack. Use to
accommodate the input sensitivity of your external effects device.
S.
SEND / RETURN — These effects loop jacks have been tested and
found compatible with instrument-level stomp boxes and line-level
effects processors. Connect SEND to your effects device input and
RETURN to the effects output.
The OUTPUT TUBE STATUS indicator LEDs will display the following
information depending on the status of each tube:
LEDs scan left
to right:
The amplifier is warming up (takes approximately 1
minute).
LED is
green:
solid
The tube is OK and the bias matches the selected bias
temperature (WARM/NORMAL/COOL).
LED is blinking
green:
The tube bias does not match the selected bias temperature. This may happen for individual tubes from time
to time while the automatic bias system is adjusting the
bias. It usually will take less than 20 seconds to reach to
the target bias and for the LED to go back to solid green.
If the LED continues to blink after 5 minutes, its bias setting is beyond the range of the automatic bias and this
tube should be replaced.
LED is red:
The tube has failed or is missing.
LED is orange:
The tube has shutdown. A tube may shutdown when the
other tube in the pair (1A/1B) or (2A/2B) is bad or missing.
Y.
DAMPING CONTROL — Use to select a "looser" or "tighter" response
from the speakers. Damping is the interaction of the tube power amp
with the speakers.
Z.
IMPEDANCE SELECTOR — Select the speaker output impedance that
matches the total impedance load of the speaker configuration you
have chosen from the table below {AA}.
AA.
MAIN SPEAKER / EXTERNAL SPEAKER —
To set the Effect Loop "Unity Gain Level" (so the effects loop volume
level equals the volume with the effects loop disabled):
1. Start with the SEND LEVEL {R} at maximum and the RETURN LEVEL {T} at
minimum.
2. If any distortion is noted with the effects processor, reduce the SEND
LEVEL (and/or the processor's input level control) until the distortion is
no longer present).
3. Then increase the RETURN LEVEL (and/or the processor's output level
control) so the effects loop output is at unity gain (or to your preference).
T.
4Ω
OUTPUT TUBE STATUS
PATENT PENDING
FOOT SWITCH
PRE AMP OUT — An unbalanced, line-level output (includes Reverb).
R.
♫
COOL
U.
FUSE — Protects the amplifier from electrical faults. Only replace a
blown fuse with the type and rating specified on the rear panel of
your amplifier.
Q.
PRE AMP
OUT
2A 1A 1B 2B
The Effects Loop button on the footswitch can be configured as a
switchable lead volume boost without effects by simply connecting
SEND to RETURN with an instrument cable. The effects loop will
provide an additional 12dB gain when both SEND LEVEL {R} and
RETURN LEVEL {T} are set to maximum. Lower the RETURN LEVEL for
less boost if preferred.
RETURN LEVEL — Adjusts the RETURN {S} jack input level going into
the power amp. Use to match the volume level of the amp when
effects are off, or to set an alternate volume level selectable from the
footswitch.
!
A speaker must ALWAYS be connected to the MAIN SPEAKER jack
when the amplifier is ON or damage may occur to the unit. Switch the
amplifier OFF or to STANDBY while changing speaker connections or
impedance settings.
Connect speaker enclosures and set the IMPEDANCE SELECTOR {Z}
according to the table below.
MAIN
SPEAKER
16Ω
16Ω
8Ω
8Ω
4Ω
fender.com
+
+
+
+
+
EXTERNAL
SPEAKER
None
16Ω
None
8Ω
None
=
=
=
=
=
IMPEDANCE
SELECTOR
16Ω
8Ω
8Ω
4Ω
4Ω
7
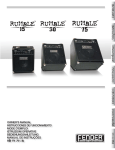
BURN Channel Suggested Settings
Big Rock
Strat Cat
Bronto-Sonic
Touch-Sensitive
Fat & Warm
Specifications
MODEL:
SUPER-SONIC 100 HEAD
SUPER-SONIC TWIN (COMBO)
TYPE:
PR 903
PR 903
PART NUMBERS:
2162100x00* (120V, 60Hz)
2162101x00* (110V, 60Hz) TW
2162103x00* (240V, 50Hz) AUS
2162104x00* (230V, 50Hz) UK
2162105x00* (220V, 50Hz) ARG
2162106x00* (230V, 50Hz) EUR
2162107x00* (100V, 50Hz) JPN
2162109x00* (220V, 60Hz) ROK
2162000x00* (120V, 60Hz)
2162001x00* (110V, 60Hz) TW
2162003x00* (240V, 50Hz) AUS
2162004x00* (230V, 50Hz) UK
2162005x00* (220V, 50Hz) ARG
2162006x00* (230V, 50Hz) EUR
2162007x00* (100V, 50Hz) JPN
2162009x00* (220V, 60Hz) ROK
POWER REQUIREMENT:
325W
325W
POWER AMP OUTPUT:
100W RMS @ 10% THD, 1kHz sine into 8Ω
100W RMS @ 10% THD, 1kHz sine into 8Ω
INPUT IMPEDANCE:
1MΩ
1MΩ
OUTPUT IMPEDANCE:
4Ω / 8Ω / 16Ω (selectable)
4Ω / 8Ω / 16Ω (selectable)
F 8A L, 250V
F 4A L, 250V
F 8A L, 250V
F 4A L, 250V
TUBES:
(4) 6L6GC; (7) 12AX7A; (2) 12AT7
(4) 6L6GC; (7) 12AX7A; (2) 12AT7
FOOTSWITCH (INCLUDED):
4-button, (078324)
1. Vintage/Burn, 2. Normal/Fat, 3. Reverb, 4. Effects
4-button, (078324)
1. Vintage/Burn, 2. Normal/Fat, 3. Reverb, 4. Effects
SPEAKERS:
Super-Sonic® 100 412 ST** (2162400x00)*
Super-Sonic® 100 412 SL** (2162450x00)*
Two 8Ω, 12" Celestion® Vintage 30 (047279)
10.5 in (26.7 cm)
26.25 in (66.7 cm)
10.53 in (26.7 cm)
20.25 in (51.4 cm)
26.26 in (66.7 cm)
11.31 in (28.7 cm)
53 lb (24.04 kg)
83 lb (37.65 kg)
FUSES
DIMENSIONS
WEIGHT:
100V-120V UNITS:
220V-240V UNITS:
HEIGHT:
WIDTH:
DEPTH:
*Super-Sonic amplifier and speaker cabinet exterior color code: Black "x"=0, Blonde "x"=4
**Recommended enclosures. Sold separately.
Product specifications are subject to change without notice.
8
◊ fender.com ◊
Super-Sonic™ Twin / Super-Sonic™ 100 Head
Los amplificadores Super Sonic han sido diseñados para los guitarristas
que quieran crear los inolvidables sonidos limpios Fender y sonidos de
alta ganancia modernos y expresivos…con un simple amplificador de
válvulas. El canal VINTAGE produce sonidos basados en los legendarios
favoritos de Fender, mientras que BURN inflama la inspiración musical
con saturaciones de todo tipo. El amplificador Super-Sonic es capaz de
producir saturación y sustain de alta ganancia modernos, pero puede
refinar aun más estas características sin enmascarar el carácter tonal
de SU guitarra. Los Super-Sonic Twin y 100 Head también le ofrecen
algunos extras increíbles como el interruptor Arena/Club, control
Damping y el innovador control bias automático de Fender.
• NOTCH TUNE le permite desplazar la muesca del rango medio
para conseguir una amplia gama de sonidos de tipo americano
y británico
• Reverb de muelles Fender con control de válvulas por Accutronics®
• Bucle de efectos profesional con control de nivel; también puede
usarlo como un realce controlable por pedal
• Disponible en acabados Negro/plata o nuestro famoso Dorado/
Oxido de 1961
• Incluye tapa y pedalera de 4 botones
• 5 años de garantía limitada transferible (en EE.UU. y Canadá; en el
resto de países puede ser distinto)
Estas son sus principales características:
• El bias automático de Fender (pendiente de patente) le permite ajustar
fácilmente sus válvulas de salida a la configuración recomendada de
fábrica sin la necesidad de medidores o herramientas. Puede ajustar
este bias más “caliente” o “frío” a voluntad, y funcionará con casi
cualquier combinación de válvulas 6L6.
• 100 watios desde sus cuatro válvulas de salida 6L6
• El interruptor ARENA/CLUB le ofrece una salida conmutable de
100 ó 25 watios
• Siete válvulas de previo 12AX7 y dos válvulas 12AT7
• Control DAMPING (en el panel trasero) que le permite elegir entre
Normal, Loose o Tight como respuesta del altavoz
• El canal VINTAGE contiene controles de tono pre-ganancia y dos
voces distintas conmutables:
• Un tono limpio y brillante derivado de los tradicionales
amplificadores Fender Twin Reverb® y Showman®
• Sonidos gruesos y con pegadas, reminiscencia de los
amplificadores Bassman® de los años 60
• Controles de volumen Pre y Master que puede ajustar para
conseguir sonidos totalmente limpios o ligeramente saturados
• Transformadores exclusivos Schumacher
• El Super-Sonic Twin incluye dos altavoces Vintage 30 de 12”
fabricados por Celestion®
• El Super-Sonic 100 Head admite los recintos acústicos Super-Sonic
100 412 Straight y Slant
• Canal BURN que le permite una total experimentación tonal con
EQ post-ganancia y dos fases de controles de previo en cascada:
• GAIN 1 le ofrece distorsión y un sonido cortante
• GAIN 2 añade compresión, grosor y sustain
Los amplificadores de instrumentos más famosos del
Mundo... desde 1946
Panel frontal
5
4
2
9
10
GAIN
5
4
7
8
1
INPUT
6
3
SHOWMAN/ BASSMAN 6
8 3
2
9
1
10
TREBLE
5
4
7
3
6
5
4
7
6
2
10
1
BASS
9
2
10
1
MID
5
4
7
8 3
6
8
2
9
9
1
10
5
4
7
8 3
VINTAGE / BURN
VOLUME
6
8 3
2
9
1
10
GAIN 1
5
4
7
3
6
2
1
10
GAIN 2
B.
GAIN—Ajusta el nivel de señal de entrada del canal VINTAGE. Uselo
junto con VOLUME {E} para controlar el volumen percibido del canal
VINTAGE. Ajústelo al máximo para una saturación media.
♫
6
9
Conecte aquí su guitarra.
TWIN REVERB® O SHOWMAN® / BASSMAN®—Elige la circuitería de
amplificación del canal VINTAGE, tal como le indicará el piloto.
BASSMAN
TREBLE / BASS / MID —Ajustan el carácter tonal del canal VINTAGE.
E.
VOLUME —Ajusta el volumen percibido global del amplificador
cuando está activo el canal VINTAGE. Cuando lo ajuste al máximo, el
control GAIN {B} actuará como un único control de volumen, similar al
de los clásicos amplificadores Fender.
6
2
1
10
TREBLE
9
5
4
7
6
2
1
10
BASS
9
5
4
7
8 3
8 3
6
2
10
1
MID
9
2
1
10
5
4
7
8 3
6
8
3
2
9
2
9
NOTCH TUNE
1
10
VOLUME
5
4
7
8 3
6
7
8
1
10
REVERB
9
FENDER MUSICAL INSTRUMENTS
VINTAGE / BURN —Elige el canal activo, tal como le indicará el piloto.
Canal VINTAGE
Canal BURN
G.
GAIN 1 / GAIN 2—Ajustes principal y secundario de la distorsión y
sustain del canal BURN. Uselos junto con VOLUME {J} para controlar el
volumen percibido del canal BURN.
H.
TREBLE / BASS / MID—Ajustan el carácter tonal del canal BURN.
I.
NOTCH TUNE—Uselo para desplazar la muesca de rango medio (MID)
para conseguir distintos sonidos de tipo americano o británico.
El ajuste TWIN REVERB / SHOWMAN ofrece un voicing de amplificador
tradicional Fender Blackface™, mientras que BASSMAN se le ofrece
del amplificador clásico Fender Tweed.
D.
5
4
7
F.
INPUT—
TWIN REVERB / SHOWMAN
5
4
8 3
A.
C.
7
FRECUENCIA
Enfasis de
agudos
Enfasis de
graves
J.
VOLUME —Ajusta el volumen percibido global del amplificador
cuando está activo el canal BURN.
K.
REVERB —Ajusta el nivel de reverb para ambos canales.
L.
PILOTO DE ENCENDIDO—Se ilumina cuando la unidad está
encendida.
◊ fender.com ◊
9
Panel trasero
TYPE: PR 903
ON
INPUT
POWER
V
Hz
325W
FUSE
4A L
250V
SERIAL NUMBER
NORMAL
ARENA
LOOSE
PARALLEL SPEAKER OUTPUTS
TIGHT
4Ω min TOTAL
100W
AUTOMATIC BIAS
WARM
ADJUST
NORMAL
OFF
SEND
POWER
M.
STANDBY
CLUB
MIN
MAX
SEND LEVEL
RETURN
MIN
MAX
RETURN LEVEL
POWER—Interruptor para encender y apagar la unidad.
DAMPING CONTROL
8Ω 16Ω
IMPEDANCE
MAIN
SPEAKER
EXTERNAL
SPEAKER
POWER AMP IN —Una entrada directa a la etapa de potencia. El
circuito de previo es desconectado automáticamente en cuanto
conecte una clavija en esta toma.
STANDBY— En este modo, la salida del amplificador queda anulada
durante el proceso de pasar corriente solo a los filamentos de las
válvulas, para permitir su precalentamiento y que queden listas.
W.
FOOTSWITCH— Conecte aquí la pedalera de 4 botones incluida para
el control remoto de: Voicing del amplificador {C}, Canal {F}, Reverb
y anulación de bucle de efectos. NOTA: Los botones del panel frontal
quedan desactivados cuando tenga esta pedalera conectada.
Use este STANDBY en lugar de apagar la unidad durante las pausas
para alargar la vida de las válvulas y evitar el retardo que se produce
durante su precalentamiento antes de volver a tocar.
X.
AUTOMATIC BIAS—Elija la temperatura de bias de válvula que quiera
(WARM/NORMAL/COOL) usando las flechas arriba/abajo, una vez
que el amplificador se haya precalentado (al menos un minuto).
El amplificador memorizará su último ajuste la próxima vez que lo
encienda. NOTA: Pulse a la vez las flechas arriba y abajo durante un
segundo para restaurar el valor de bis automático de fábrica.
FUSIBLE—Protege su amplificador contra cualquier avería eléctrica.
Sustitúyalo solo por otros que tenga las características que aparecen
indicadas en este panel trasero.
Q.
4Ω
OUTPUT TUBE STATUS
PATENT PENDING
FOOT SWITCH
V.
Para alargar la vida de las válvulas del amplificador deje pulsado el
interruptor STANDBY {N} durante 60 segundos al encender la unidad.
ENCHUFE IEC— Conéctelo a una salida de corriente con toma de tierra
del voltaje y amperaje indicado en este panel trasero usando el cable
de alimentación incluido.
P.
COOL
PRE AMP OUT—Salida no balanceada con nivel de línea (incluye Reverb).
♫
O.
POWER AMP
IN
U.
♫
N.
PRE AMP
OUT
2A 1A 1B 2B
ARENA / CLUB—Elija la opción ARENA para la máxima salida de
potencia (100W) cuando toque en grandes escenarios. Elija CLUB para
una menor salida (25W) cuando toque en estudio o en pequeñas salas.
Recomendamos que cambie la posición del interruptor ARENA/CLUB
solo con el amplificador apagado o en STANDBY para reducir la
carga sobre las válvulas y alargar su vida útil.
!
R.
SEND LEVEL—Ajusta el nivel de salida del conector SEND {S}. Uselo para
adaptarlo a la sensibilidad de entrada de su unidad de efectos externa.
S.
SEND / RETURN— Estos conectores de bucle de efectos han
demostrado ser compatibles con pedales de efectos de nivel
instrumento y procesadores de efectos con nivel de línea. Conecte
SEND a la entrada de su efecto y RETURN a la salida del mismo.
Los pilotos OUTPUT TUBE STATUS le mostrarán la información
siguiente, dependiendo del estado de cada válvula:
pilotos de
izquierda a
derecha:
Precalentamiento del amplificador (aproximadamente
un minuto).
iluminado en
verde:
Válvula OK y bias coincide con la temperatura de bias
elegida (WARM/NORMAL/COOL).
el piloto
parpadea en
verde:
El bias de válvula no coincide con la temperatura
elegida. Esto puede ocurrir de vez en cuando en
las válvulas individuales mientras el sistema de bias
automático ajusta el bias. En menos de 20 segundos
suele llegar al bias de destino y el piloto vuelve a quedar
fijo en verde. Si el piloto sigue parpadeando tras 5
minutos, el ajuste bias está fuera del rango del bias
automático y debería sustituir la válvula.
piloto rojo:
Válvula averiada o no está instalada.
piloto naranja:
Válvula apagada. Una válvula puede apagarse cuando la
otra del par (1A/1B) o (2A/2B) está averiada o falta.
Y.
CONTROL DAMPING —Uselo para elegir una respuesta más "suave"
o "compacta" de los altavoces. Este Damping o amortiguación es la
interacción de la etapa de potencia a válvulas con los altavoces.
2. Si detecta cualquier distorsión con el procesador de efectos, reduzca
SEND LEVEL (y/o el control de nivel de entrada del procesador, si es que
dispone de él) hasta que la distorsión desaparezca.
Z.
SELECTOR IMPEDANCE—Elige la impedancia de salida de altavoz que
mejor se adapte a la impedancia de carga total de la configuración de
altavoces que haya elegido de la tabla siguiente {AA}.
3. Suba después RETURN LEVEL (y/o el control de nivel de salida del
procesador, si es que dispone de él) hasta que la salida del bucle de
efectos esté a ganancia unitaria (o al nivel que quiera).
AA.
MAIN SPEAKER / EXTERNAL SPEAKER—
Ajuste del "nivel de ganancia unitaria" del bucle (para que el volumen
con el bucle sea igual a cuando tenga el bucle desactivado):
1. Comience con SEND LEVEL {R} al máximo y RETURN LEVEL {T} al mínimo.
♫
T.
El botón de bucle de efectos de la pedalera puede ser configurado
como un realce de volumen principal conmutable sin efectos
simplemente interconectando SEND a RETURN con un cable de
instrumento. El bucle de efectos le ofrecerá una ganancia adicional
de 12 dB cuando SEND LEVEL {R} y RETURN LEVEL {T} estén al máximo.
Reduzca RETURN LEVEL si quiere un realce menor.
RETURN LEVEL—Ajusta el nivel de entrada del conector RETURN {S}
que es enviado a la etapa de potencia. Uselo para adaptar el nivel
de volumen del amplificador cuando los efectos están desactivados,
o para ajustar un nivel de volumen alternativo conmutable desde la
pedalera.
10
!
Para evitar averías en la unidad, SIEMPRE debe haber un altavoz
conectado a la toma MAIN SPEAKER cuando el amplificador esté
encendido. Apague el amplificador o active el modo STANDBY
mientras cambie la configuración de altavoces o la impedancia.
Conecte unos recintos acústicos y ajuste el SELECTOR IMPEDANCE {Z}
de acuerdo a la siguiente tabla.
MAIN
SPEAKER
16 Ω
16 Ω
8Ω
8Ω
4Ω
fender.com
+
+
+
+
+
EXTERNAL
SPEAKER
Ninguno
16 Ω
Ninguno
8Ω
Ninguno
=
=
=
=
=
SELECTOR
IMPEDANCE
16 Ω
8Ω
8Ω
4Ω
4Ω
Ajustes sugeridos del canal BURN
Rock potente
Strat Cat
Bronto-sónico
Sensible al tacto
Sonido grueso
y cálido
Especificaciones técnicas
MODELO:
SUPER-SONIC 100 HEAD
SUPER-SONIC TWIN (COMBO)
TIPO:
PR 903
PR 903
REFERENCIAS:
2162100x00* (120 V, 60 Hz)
2162101x00* (110 V, 60 Hz) TW
2162103x00* (240 V, 50 Hz) AUS
2162104x00* (230 V, 50 Hz) UK
2162105x00* (220 V, 50 Hz) ARG
2162106x00* (230 V, 50 Hz) EUR
2162107x00* (100 V, 50 Hz) JPN
2162109x00* (220 V, 60 Hz) ROK
2162000x00* (120 V, 60 Hz)
2162001x00* (110 V, 60 Hz) TW
2162003x00* (240 V, 50 Hz) AUS
2162004x00* (230 V, 50 Hz) UK
2162005x00* (220 V, 50 Hz) ARG
2162006x00* (230 V, 50 Hz) EUR
2162007x00* (100 V, 50 Hz) JPN
2162009x00* (220 V, 60 Hz) ROK
CONSUMO:
325 W
325 W
SALIDA DE ETAPA DE POTENCIA:
100 W RMS @ 10% THD, 1 kHz sinusoidal a 8 Ω
100 W RMS @ 10% THD, 1 kHz sinusoidal a 8 Ω
IMPEDANCIA DE ENTRADA:
1 MΩ
1 MΩ
IMPEDANCIA DE SALIDA:
4 Ω / 8 Ω / 16 Ω (conmutable)
4 Ω / 8 Ω / 16 Ω (conmutable)
FUSIBLES
F 8A L, 250V
F 4A L, 250V
F 8A L, 250V
F 4A L, 250V
VALVULAS:
(4) 6L6GC; (7) 12AX7A; (2) 12AT7
(4) 6L6GC; (7) 12AX7A; (2) 12AT7
PEDALERA (INCLUIDA):
4 botones, (078324)
1. Vintage/Burn, 2. Normal/Fat, 3. Reverb, 4. Efectos
4 botones, (078324)
1. Vintage/Burn, 2. Normal/Fat, 3. Reverb, 4. Efectos
ALTAVOCES:
Super-Sonic® 100 412 ST** (2162400x00)*
Super-Sonic® 100 412 SL** (2162450x00)*
2x Vintage 30 de 8 Ω y 12" Celestion® (047279)
26.7 cm
66.7 cm
26.7 cm
51.4 cm
66.7 cm
28.7 cm
24 kg
37.65 kg
DIMENSIONES
PESO:
UNIDADES 100-120 V:
UNIDADES 220-240 V:
ALTURA:
ANCHURA:
PROFUNDIDAD:
*Código de colores del exterior del amplificador Super-Sonic y recinto acústico: Negro "x"=0, Dorado "x"=4
**Recintos acústicos recomendados. Se venden por separado.
Las especificaciones de este producto están sujetas a cambios sin previo aviso.
fender.com
11
Super-Sonic™ Twin / Super-Sonic™ 100 Head
Les amplificateurs Super Sonic ont été créés pour les guitaristes qui
souhaitent bénéficier du célèbre son clair Fender et des sons saturés
modernes… le tout dans un même ampli à lampe hyper fiable. Le
canal VINTAGE vous offre le son clair légendaire Fender, et le canal
BURN offre un son musical et créatif avec une saturation allant de
Bluesy à déchaînée. L'ampli Super-Sonic est capable de vous offrir une
Overdrive et un Sustain extrêmes, mais qui restent à tout moment
contrôlés par le musicien, avec une finesse totale, et sans jamais compromettre le caractère sonore de VOTRE guitare. Le Combo SuperSonic Twin et la tête 100 Head vous offrent également des fonctions
comme le sélecteur Arena/Club, le réglage de Damping, et la toute
nouvelle fonction de gestion automatique de la polarisation.
• Le GAIN 2 ajoute de la compression, du corps et du Sustain
• La fonction NOTCH TUNE creuse les médiums pour des sons à
l'accent anglais ou américain
• Réverbération à lampe Fender à long ressort par Accutronics®
• Boucle d'effets professionnelle avec réglage de niveau ; peut
servir de Boost commutable au pied
• Finition classique Black/Silver ou l'incontournable finition Blonde/
Oxblood de 1961
• Housse de protection et pédalier à 4 contacteurs fournis
• Garantie limitée de 5 ans transférable (US et Canada ; variable
selon les pays)
• Fonction Fender Automatic Bias (brevet déposé) vous permettant
de régler vos lampes de sortie sur les valeurs d'usine, sans outil ou
multimètre. La polarisation peut être plus ou moins poussée, et
quasiment tous les mélanges de 6L6 conviennent.
Caractéristiques générales :
• 100 Watts délivrés par quatre lampes de sortie 6L6
• Sélecteur ARENA/CLUB de puissance (100 Watt ou 25 Watts)
• Le réglage DAMPING (face arrière) détermine la réponse des hautparleurs : normale, lâche, ou serrée
• Sept lampes préamplificatrices 12AX7 et deux 12AT7
• Le canal VINTAGE offre des réglages de timbre pré-gain et deux
sonorités commutables par touche :
• Son hyper clair dérivé des amplis Vintage Fender Twin Reverb®
et Showman®
• Gros son avec du punch, rappelant la sonorité des amplis
Bassman® 1960
• Les réglages de timbre pré-gain et le Master Volume vous
permettent d'obtenir un son clair pur ou légèrement saturé
• Transformateurs spéciaux fabriqués par Schumacher
• Le Combo Super-Sonic Twin est équipé de deux superbes hautparleurs Celestion® Vintage 30 de 31 cm (12 pouces)
• La tête Super-Sonic 100 Head convient parfaitement aux enceintes
droites et à pan coupé Super-Sonic 100 412
• Le canal BURN vous offre une égalisation post-gain et deux étages
préamplificateurs configurés en série :
• Le GAIN 1 offre un son allant de "limite" saturé à "déchaîné"
Les amplificateurs les plus célèbres au monde...
Depuis 1946
Face avant
5
4
6
8
2
1
INPUT
10
9
GAIN
5
4
7
3
SHOWMAN/ BASSMAN 6
5
4
7
6
2
1
10
TREBLE
9
5
4
7
6
2
10
1
BASS
9
5
4
7
6
2
10
1
MID
9
8
2
1
10
5
4
7
8 3
8 3
8 3
3
VINTAGE / BURN
9
VOLUME
6
5
4
7
6
7
8 3
3
2
1
10
GAIN 1
9
5
4
6
2
1
10
GAIN 2
9
6
2
1
10
TREBLE
9
5
4
7
6
2
1
10
9
6
10
1
MID
9
5
4
7
8 3
2
BASS
5
4
7
8 3
8 3
F.
6
2
1
10
9
NOTCH TUNE
2
1
10
VOLUME
5
4
7
8 3
8
3
9
2
6
7
8
1
10
REVERB
9
FENDER MUSICAL INSTRUMENTS
VINTAGE/BURN — Sélectionne le canal, indiqué par les Leds.
A.
INPUT —
B.
GAIN — Détermine le niveau du signal en entrée du canal VINTAGE.
Utilisez ce réglage et le bouton de VOLUME {E} pour contrôler le
niveau du canal VINTAGE. Réglez au maximum pour obtenir une
Overdrive modérée.
G.
GAIN 1/GAIN 2 — Réglages primaire et secondaire de distorsion et
de Sustain du canal BURN. Utilisez en conjonction avec le VOLUME {J}
pour régler le niveau sonore général de l'ampli.
TWIN REVERB® OU SHOWMAN®/BASSMAN® — Sélectionne le circuit
d'amplification du canal VINTAGE, indiqué par les Leds.
H.
TREBLE/BASS/MID — Réglages de timbre du canal BURN.
I.
NOTCH TUNE —Déplace le creux dans les médiums (MID) pour vous
offrir les célèbres sons américains et anglais.
C.
Connectez votre guitare.
5
4
7
8 3
TWIN REVERB / SHOWMAN
♫
BASSMAN
Canal VINTAGE
FRÉQUENCE
Le réglage TWIN REVERB/SHOWMAN délivre un son d'ampli Fender
Blackface™ Vintage et la position BASSMAN donne un son d'ampli
Fender Tweed Vintage.
D.
TREBLE/BASS/MID — Réglages de timbre du canal VINTAGE.
E.
VOLUME — Détermine le volume général de l'amplificateur lorsque
le canal VINTAGE est actif. En position maximum, le bouton de
GAIN {B} agit comme un réglage de volume unique, identique à celui
des amplis Fender Vintage.
12
Canal BURN
Hautes
fréquences
accentuées
Basses
fréquences
accentuées
J.
VOLUME—Détermine le volume général de l'amplificateur lorsque le
canal BURN est actif.
K.
REVERB — Détermine le niveau de la réverbération pour les deux
canaux.
L.
TÉMOIN POWER—S'allume lorsque l'amplificateur est sous tension.
fender.com
Face arrière
TYPE: PR 903
ON
INPUT
POWER
V
Hz
325W
FUSE
4A L
250V
SERIAL NUMBER
NORMAL
ARENA
LOOSE
PARALLEL SPEAKER OUTPUTS
TIGHT
4Ω min TOTAL
100W
AUTOMATIC BIAS
WARM
ADJUST
NORMAL
OFF
SEND
POWER
M.
♫
N.
♫
O.
P.
STANDBY
CLUB
MIN
RETURN
MAX
MIN
SEND LEVEL
MAX
RETURN LEVEL
POWER — Place l'amplificateur sous/hors tension.
Vous augmentez l'espérance de vie de votre ampli en laissant le
STANDBY {N} en position basse lors des premières 60 secondes de la
mise sous tension.
STANDBY — En Standby, les sorties de l'amplificateur sont coupées, et
seuls les filaments des lampes sont alimentés, évitant toute perte de
temps de remise en chauffe.
!
POWER AMP
IN
EMBASE SECTEUR — Utilisez le cordon secteur fourni et utilisez uniquement une ligne secteur avec terre dont la tension et la fréquence
correspondent aux caractéristiques sérigraphiées en face arrière de
l'amplificateur.
ARENA/CLUB — Sélectionnez ARENA pour obtenir la puissance de
sortie maximum (100 W). Sélectionnez CLUB pour une puissance
réduite (25 W) convenant aux salles plus petites ou à l'enregistrement.
SEND LEVEL — Détermine le niveau de la sortie SEND {S}.
S.
SEND/RETURN — La boucle d'effet est compatible avec les pédales
d'effets ou les effets à niveau ligne. Connectez le départ SEND à l'entrée des effets externes et leur sortie au retour RETURN.
T.
Le contacteur Effects Loop du pédalier peut servir de fonction Boost
sans effets, en connectant le SEND au RETURN avec un mini câble
instrument. La boucle d'effets offre un gain de 12 dB en réglant les
boutons SEND LEVEL {R} et RETURN LEVEL {T} au maximum. Diminuez
le Boost avec le bouton RETURN LEVEL, si vous le souhaitez.
RETURN LEVEL — Détermine le niveau de retour de l'entrée RETURN
{S} en entrée de l'étage de puissance. Permet de régler le niveau des
effets externes ou le niveau de Boost.
8Ω 16Ω
IMPEDANCE
MAIN
SPEAKER
EXTERNAL
SPEAKER
V.
POWER AMP IN — Entrée directe de l'amplificateur de puissance. Le préampli est automatiquement déconnecté lorsque vous insérez une fiche.
W.
FOOTSWITCH — Connectez le pédalier à 4 contacteurs pour gérer :
le Voicing {C}, le canal {F}, Reverb et le Bypass de la boucle externe.
REMARQUE : Les touches de la face avant sont désactivées lorsque le
pédalier est connecté à l'amplificateur.
X.
AUTOMATIC BIAS — Sélectionnez la température de polarisation
(WARM/NORMAL/COOL) avec les flèches, une fois l'ampli chaud (au
moins une minute). L'ampli mémorise le réglage. REMARQUE : Appuyez
en même temps sur les deux flèches pendant une seconde pour revenir aux réglages de polarisation d'usine.
Les Leds OUTPUT TUBE STATUS vous renseignent comme suit :
Leds défilent
de gauche à
droite :
L'ampli est en chauffe (ce qui prend environ 1 minute).
Led verte allumée :
La lampe est bonne et la polarisation correspond à
la température sélectionnée (WARM/NORMAL/COOL).
Led verte clignotante :
La polarisation ne correspond pas à la température
sélectionnée. Ceci arrive de temps en temps pour les
lampes individuelles lorsque la polarisation automatique est en cours de réglage. Il faut en général moins
de 20 secondes pour atteindre la polarisation cible et
pour que la Led s'allume à nouveau en vert. Si la Led
continue à clignoter après 5 minutes, cela signifie que le
réglage est au-delà des valeurs de réglage automatique
et que la lampe doit être remplacée.
Led rouge :
La lampe est en panne ou n'est pas installée.
LED orange :
La lampe cesse de fonctionner temporairement, ce qui
arrive lorsque l'autre lampe de la paire (1A/1B) ou (2A/2B)
est mauvaise ou manquante.
Y.
DAMPING CONTROL — Utilisez le réglage pour sélectionner une
réponse plus "lâche" (Loose), normale ou plus "serrée" (Tighter) des
haut-parleurs. L'amortissement "Damping" correspond à l'interaction
entre les lampes de puissance et les haut-parleurs.
Z.
SÉLECTEUR D'IMPÉDANCE — Sélectionne la valeur d'impédance correspondant à l'impédance totale de charge de tous les haut-parleurs
connectés en sortie {AA}. Consultez le tableau ci-dessous.
AA.
MAIN SPEAKER/EXTERNAL SPEAKER —
2. Si vous entendez de la distorsion sur les effets, réduisez le SEND LEVEL
(et/ou si possible le niveau d'entrée du processeur externe).
3. Montez ensuite le niveau RETURN LEVEL (et/ou si possible le niveau
d'entrée du processeur externe) pour obtenir le même niveau (ou le
niveau que vous souhaitez utiliser).
DAMPING CONTROL
PRE AMP OUT — Sortie ligne asymétrique (avec la réverbération).
Pour régler la boucle d'effets sur le gain unitaire (pour que le niveau
soit identique avec ou sans les effets activés) :
1. Réglez le bouton SEND LEVEL {R} au maximum et le bouton RETURN
LEVEL {T} au minimum.
4Ω
OUTPUT TUBE STATUS
PATENT PENDING
FOOT SWITCH
Il est conseillé de ne modifier le réglage ARENA/CLUB que lorsque
l'amplificateur est hors tension ou en STANDBY pour réduire le stress
sur les lampes et allonger leur durée de vie.
R.
♫
COOL
U.
Utilisez le STANDBY plutôt que de placer l'ampli hors tension lors
des pauses, ce qui prolonge l'espérance de vie des lampes et évite les
délais de mise en chauffe lorsque vous recommencez à jouer.
FUSIBLE — Protège l'amplificateur des défaillances secteur. Remplacez
ce fusible par un autre exactement de même taille et de mêmes caractéristiques électriques (sérigraphiées en face arrière de l'amplificateur).
Q.
PRE AMP
OUT
2A 1A 1B 2B
!
Vous devez TOUJOURS avoir une enceinte connectée à la sortie
INTERNAL SPEAKER lors de la mise sous tension. L'inverse peut
endommager l'ampli. Placez l'ampli sur OFF ou en STANDBY lorsque
vous changez d'enceintes.
Connectez les enceintes et réglez le sélecteur d'IMPÉDANCE {Z} selon
ce tableau :
MAIN
SPEAKER
16 Ω
16 Ω
8Ω
8Ω
4Ω
fender.com
+
+
+
+
+
EXTERNAL
SPEAKER
Aucune
16 Ω
Aucune
8Ω
Aucune
=
=
=
=
=
SÉLECTEUR
IMPEDANCE
16 Ω
8Ω
8Ω
4Ω
4Ω
13
Canal BURN — Réglages conseillés
Big Rock
Strat Cat
Bronto-Sonic
Sensible au
toucher
Fat & Warm
Caractéristiques techniques
MODÈLE :
SUPER-SONIC 100 HEAD
SUPER-SONIC TWIN (COMBO)
TYPE :
PR 903
PR 903
RÉFÉRENCE :
2162100x00* (120V, 60Hz)
2162101x00* (110V, 60Hz) TW
2162103x00* (240V, 50Hz) AUS
2162104x00* (230V, 50Hz) UK
2162105x00* (220V, 50Hz) ARG
2162106x00* (230V, 50Hz) EUR
2162107x00* (100V, 50Hz) JPN
2162109x00* (220V, 60Hz) ROK
2162000x00* (120V, 60Hz)
2162001x00* (110V, 60Hz) TW
2162003x00* (240V, 50Hz) AUS
2162004x00* (230V, 50Hz) UK
2162005x00* (220V, 50Hz) ARG
2162006x00* (230V, 50Hz) EUR
2162007x00* (100V, 50Hz) JPN
2162009x00* (220V, 60Hz) ROK
CONSOMMATION ÉLECTRIQUE :
325W
325W
PUISSANCE DE SORTIE :
100W RMS @ 10% THD, 1kHz sine into 8Ω
100W RMS @ 10% THD, 1kHz sine into 8Ω
IMPÉDANCE D'ENTRÉE :
1MΩ
1MΩ
IMPÉDANCE DE SORTIE :
4Ω / 8Ω / 16Ω (selectable)
4Ω / 8Ω / 16Ω (selectable)
FUSIBLES
F 8A L, 250V
F 4A L, 250V
F 8A L, 250V
F 4A L, 250V
LAMPES:
(4) 6L6GC; (7) 12AX7A; (2) 12AT7
(4) 6L6GC; (7) 12AX7A; (2) 12AT7
PÉDALIER (FOURNI) :
4 contacteurs, (078324)
1. Vintage/Burn, 2. Normal/Fat, 3. Réverbe, 4. Effets
4 contacteurs, (078324)
1. Vintage/Burn, 2. Normal/Fat, 3. Réverbe, 4. Effets
HAUT-PARLEURS :
Super-Sonic® 100 412 ST** (2162400x00)*
Super-Sonic® 100 412 SL** (2162450x00)*
2 Celestion® Vintage 30 de 8 Ω, 12 pouces (047279)
26,7 cm
66,7 cm
26,7 cm
51.4 cm
66.7 cm
28.7 cm
24 kg
37,6 kg
DIMENSIONS
VERSION 100 V-120 V :
VERSION 220 V-240 V :
HAUTEUR :
LARGEUR :
PROFONDEUR :
HAUTEUR :
*Code de finition de l'amplificateur et de l'enceinte Super-Sonic : Black "x" = 0, Blonde "x" = 4
**Enceintes conseillées. Vendues séparément.
Caractéristiques sujettes à modifications sans préavis.
14
fender.com
Super-Sonic™ Twin / Super-Sonic™ 100 Head
Gli amplificatori Super Sonic sono progettati per i chitarristi che vogliono
sia l'inconfondibile suono Fender pulito sia il sound attuale e potente con
un unico amplificatore valvolare intelligente. Il canale VINTAGE produce
toni basati sul leggendario suono Fender, mentre il canale BURN è fonte di
ispirazione musicale grazie al suo timbro overdrive che va dal blues ad un
sound incendiario. L'amplificatore Super-Sonic può produrre suoni overdrive e sustain potenti e molto attuali, ma questi aspetti possono essere
definiti con precisione senza che intacchino le caratteristiche sonore
della TUA chitarra. Il Super-Sonic Twin e la testata 100 Head hanno inoltre
alcune incredibili caratteristiche aggiuntive, come l'interruttore Arena/
Club, il controllo del Damping e il nuovo Fender Automatic Bias control.
• NOTCH TUNE permette di spostare il notch sulle medie frequenze per
la crezione di suoni più tipicamente "American" piuttosto che "British"
• Riverbero valvolare Fender di tipo spring by Accutronics®.
• FX loop professionale con controllo del livello, può essere
utilizzato anche come boost con comando a pedale.
• Possibilità di scelta tra l'estetica classica Black/Silver o quella
caratteristica Blonde/Oxblood del 1961.
• Inclusi copertura e footswitch a quattro pulsanti.
• Garanzia di 5 anni trasferibile (valida per Stati Uniti e Canada, può
variare per gli altri Paesi).
• Fender Automatic Bias (brevettato) permette di impostare
le valvole in uscita sui valori raccomandati senza ulteriore
strumentazione o misurazioni. Eventualmente si può impostare
il bias su "più caldo" o "più freddo": quasi ogni combinazione di
valvole 6L6 funzionerà correttamente.
Caratteristiche principali
• 100 Watt derivanti da quattro valvole 6L6 in output.
• L'interruttore ARENA/CLUB seleziona tra un output da 100 oppure 25 Watt.
• Sette valvole preamp 12AX7 e due valvole 12AT7.
• Il controllo del DAMPING (sul pannello posteriore) permette di
scegliere il comportamento dell'altoparlante tra normale, morbido o
preciso.
• Il canale VINTAGE contiene i controlli per il suono pre-gain e due
diversi circuiti selezionabili:
• il sound brillante e pulito derivato dagli amplificatori vintage
Fender Twin Reverb® e Showman®
• il sound gonfio e potente che ricorda gli amplificatori Bassman®
degli anni '60
• i controlli del volume Pre e Master possono essere impostati per
suoni completamente puliti o leggermente saturi
• Trasformatori custom by Schumacher.
• Il Super-Sonic Twin contiene due prestigiosi altoparlanti Celestion®
Vintage 30 da 12".
• La testata Super-Sonic 100 Head si adatta alle casse Super-Sonic
100 412 Straight e Slant.
• Il canale BURN permette di sperimentare con i toni grazie a un
equalizzatore post-gain e ai due stadi (in sequenza) di controllo
della preamplificazione:
• GAIN 1 regola la definizione e la distorsione
• GAIN 2 aggiunge compressione, sustain e corpo
Gli amplificatori per strumenti più famosi al mondo...
Dal 1946
Pannello anteriore
5
4
6
8
2
1
INPUT
10
GAIN
5
4
7
3
9
SHOWMAN/ BASSMAN 6
5
4
7
6
2
1
10
TREBLE
9
5
4
7
6
2
10
1
BASS
9
5
4
7
6
2
10
1
MID
9
8
2
1
10
5
4
7
8 3
8 3
8 3
3
VINTAGE / BURN
9
VOLUME
6
5
4
7
6
7
8 3
3
2
1
10
GAIN 1
9
5
4
6
2
1
10
GAIN 2
9
6
2
1
10
TREBLE
9
5
4
7
6
2
1
10
9
5
4
7
8 3
8 3
F.
6
2
10
1
MID
BASS
9
5
4
7
8 3
6
2
1
10
9
NOTCH TUNE
2
1
10
VOLUME
5
4
7
8 3
8
3
9
2
6
7
8
1
10
REVERB
9
FENDER MUSICAL INSTRUMENTS
VINTAGE / BURN —Seleziona il canale attivo, come indicato dai LED.
A.
INPUT—
B.
GAIN—Regola il livello del segnale in ingresso del canale VINTAGE.
Usalo in combinazione con la manopola VOLUME {E} per regolare la
potenza del canale VINTAGE. Impostalo al massimo per una moderata
saturazione.
G.
GAIN 1 / GAIN 2— Controlli primario e secondario per la distorsione e
il sustain del canale BURN. Usati insieme al controllo VOLUME {J} regolano il volume del canale BURN.
TWIN REVERB® O SHOWMAN® / BASSMAN®—Seleziona il circuito del
canale VINTAGE dell'amplificatore, come indicato dai LED.
H.
TREBLE / BASS / MID—Regolano le caratteristiche del suono del
canale BURN.
I.
NOTCH TUNE—Sposta il notch delle frequenze medie (MID) per ottenere suoni più tipicamente "American" o "British".
C.
Collega qui la tua chitarra.
5
4
7
8 3
TWIN REVERB / SHOWMAN
♫
D.
E.
BASSMAN
Canale VINTAGE
L'impostazione TWIN REVERB / SHOWMAN produce il suono tipico degli
amplificatori vintage Fender Blackface™; l'impostazione BASSMAN
produce il suono tipico degli amplificatori vintage Fender Tweed.
FREQUENZA
TREBLE / BASS / MID —Regolano le caratteristiche del suono del
canale VINTAGE.
VOLUME— Regola il volume generale dell'amplificatore quando è
attivo il canale VINTAGE. Se impostato al massimo, il controllo GAIN
{B} funziona come un controllo singolo del volume, come quelli degli
amplificatori storici Fender.
Canale BURN
Enfasi
sugli alti
Enfasi
sui bassi
J.
VOLUME—Regola il volume complessivo dell'amplificatore quando è
attivo il canale BURN.
K.
REVERB —Regola il livello del riverbero per entrambi i canali.
L.
INDICATORE DI POTENZA—Si illumina quando l'unità è accesa.
fender.com
15
Pannello posteriore
TYPE: PR 903
ON
INPUT
POWER
V
Hz
325W
FUSE
4A L
250V
SERIAL NUMBER
NORMAL
ARENA
LOOSE
PARALLEL SPEAKER OUTPUTS
TIGHT
4Ω min TOTAL
100W
AUTOMATIC BIAS
WARM
ADJUST
NORMAL
OFF
SEND
POWER
M.
STANDBY
CLUB
MIN
MAX
SEND LEVEL
RETURN
MIN
MAX
RETURN LEVEL
POWER—Accende e spegne l'unità.
COOL
4Ω
OUTPUT TUBE STATUS
PATENT PENDING
FOOT SWITCH
DAMPING CONTROL
8Ω 16Ω
IMPEDANCE
MAIN
SPEAKER
EXTERNAL
SPEAKER
PRE AMP OUT—Uscita sbilanciata a livello di linea (include il riverbero).
V.
POWER AMP IN — Ingresso diretto all'amplificatore di potenza.
Quando un cavo viene inserito qui il circuito del preamplificatore è
disattivato automaticamente.
STANDBY— In modalità standby gli output dell'amplificatore sono
disabilitati: la corrente alimenta solamente i filamenti delle valvole,
mantendole calde e pronte all'uso.
W.
FOOTSWITCH— Collega qui il pedale a quattro pulsanti incluso, in
modo da abilitare la selezione a distanza di: Amp Voicing {C}, canale
{F} e il bypass del riverbero e del loop effetti. NOTA: quando il pedale è
collegato i pulsanti del pannello frontale vengono disattivati.
Utilizza la modalità STANDBY invece che spegnere l'unità durante
brevi pause: aumenterai la longevità delle valvole ed eliminerai i
tempi per il loro riscaldamento nel momento in cui torni a suonare.
X.
AUTOMATIC BIAS—Dopo che l'amplificatore si è scaldato (almeno
per un minuto), seleziona la temperatura del bias delle valvole (WARM/
NORMAL/COOL) tramite le frecce "su" e "giù". All'accensione successiva, l'amplificatore ricorderà le tue ultime impostazioni. NOTA: premi
contemporaneamente le frecce "su" e "giù" per un secondo per ripristinare le impostazioni iniziali automatiche del bias.
Puoi aumentare la longevità delle valvole dell'amplificatore lasciando in
basso l'interruttore STANDBY {N} per 60 secondi ogni volta che accendi.
♫
O.
POWER AMP
IN
U.
♫
N.
PRE AMP
OUT
2A 1A 1B 2B
PRESA DI CORRENTE— Connettere a una presa con messa a terra
tramite il cavo di alimentazione fornito, compatibilmente con le specifiche di voltaggio e frequenza indicate sul retro dell'amplificatore.
P.
FUSIBILE—Protegge l'amplificatore da sbalzi di corrente. Sostituire un fusibile bruciato solamente con il tipo specificato sul retro dell'amplificatore.
Q.
ARENA / CLUB—Seleziona ARENA per la potenza massima in uscita
(100W) quando suoni in ambienti grandi. Seleziona CLUB per una
potenza in uscita minore (25W) quando suoni in ambienti più piccoli o
in sessioni di registrazione.
Per evitare di sovraccaricare le valvole e per aumentarne la longevità,
si raccomanda di spostare l'interruttore ARENA/CLUB solamente
quando l'amplificatore è spento o in modalità STANDBY.
!
R.
SEND LEVEL—Regola il livello del jack SEND {S}. Usalo in abbinamento
alla sensibilità della tua unità effetti esterna.
S.
SEND / RETURN— Questi jack per loop effetti sono testati e compatibili
con effetti a pedale (instrument-level) e processori di effetti (line-level).
Collega SEND all'ingresso della tua unità effetti e RETURN alla sua uscita.
Per impostare un livello uniforme del loop effetti (in modo che il
volume del loop effetti equivalga al volume del segnale con il loop
effetti disabilitato):
A seconda delle condizioni di ogni valvola i LED dell'OUTPUT TUBE
STATUS indicheranno le seguenti informazioni.
I LED si spostano da sinistra
a destra
L'amplificatore si sta scaldando (richiede circa un
minuto).
Il LED è verde
fisso
La valvola è OK e il bias combacia con la temperatura
di bias selezionata (WARM/NORMAL/COOL).
Il LED lampeggia verde
Il bias della valvola non combacia con la temperatura di
bias selezionata. Può accadere di tanto in tanto per le
singole valvole intanto che il sistema automatico di regolazione del bias sta impostando il bias. Normalmente,
per raggiungere il bias desiderato e perché il LED ritorni
stabilmente verde, sono richiesti meno di 20 secondi. Se il
LED continua a lampeggiare dopo 5 minuti, le sue impostazioni relative al bias sono fuori dal range del sistema
automatico di bias e la valvola relativa va sostituita.
Il LED è rosso
La valvola manca o è danneggiata.
Il LED è arancione
Una valvola è spenta. Questo può verificarsi quando la valvola accoppiata (1A/1B) o (2A/2B) manca o è malfunzionante.
Y.
DAMPING CONTROL—Usalo per scegliere un comportamento più
"reattivo" o "morbido" da parte degli altoparlanti. Con "damping" si
intende l'interazione dell'amplificatore valvolare con gli altoparlanti.
2. Se noti distorsioni con il processore di effetti, riduci SEND LEVEL (e/o
il controllo del livello in ingresso del processore, se presente) fino alla
scomparsa della distorsione.
Z.
3. Aumenta quindi RETURN LEVEL (e/o il controllo del livello in uscita
del processore, se presente) fino a raggiungere il livello uniforme (o il
volume che preferisci).
SELETTORE DI IMPEDENZA—Seleziona l'impedenza in uscita
dell'altoparlante compatibile con il carico totale di impedenza della combinazione di altoparlanti scelta, riferendoti alla tabella di seguito {AA}.
AA.
MAIN SPEAKER / EXTERNAL SPEAKER—
1. Inizia con SEND LEVEL {R} al massimo e RETURN LEVEL {T} al minimo.
♫
T.
Il pulsante Effects Loop sul pedale può essere impostato come boost
del volume principale senza effetti collegando SEND a RETURN
con un cavo per strumenti. Con SEND LEVEL {R} e RETURN LEVEL
{T} impostati al massimo il loop effetti apporterà ulteriori 12dB di
guadagno al segnale. Puoi abbassare RETURN LEVEL per ottenere un
boost minore.
RETURN LEVEL—Regola il livello in ingresso all'amplificatore dal jack
RETURN {S}. Usalo per pareggiarlo al livello dell'amplificatore quando
gli effetti sono spenti, o per impostare un livello di volume alternativo
selezionabile dal pedale.
16
!
Per evitare danni all'unità, un altoparlante deve SEMPRE essere
collegato al jack MAIN SPEAKER quando l'amplificatore è ACCESO.
Quando cambi i collegamenti agli altoparlanti o le impostazioni di
impedenza SPEGNI o metti in STANDBY l'amplificatore.
Collega le casse e imposta il SELETTORE DI IMPEDENZA {Z} riferendoti
alla tabella sottostante.
MAIN
SPEAKER
16Ω
16Ω
8Ω
8Ω
4Ω
fender.com
+
+
+
+
+
EXTERNAL
SPEAKER
Nessuno
16Ω
Nessuno
8Ω
Nessuno
=
=
=
=
=
SELETTORE
DI IMPEDENZA
16Ω
8Ω
8Ω
4Ω
4Ω
Impostazioni suggerite per il canale BURN
Big Rock
Strat Cat
Bronto-Sonic
Touch-Sensitive
Fat & Warm
Specifiche tecniche
MODELLO:
SUPER-SONIC 100 HEAD
SUPER-SONIC TWIN (COMBO)
TIPO:
PR 903
PR 903
CODICI PRODOTTO:
2162100x00* (120V, 60Hz)
2162101x00* (110V, 60Hz) TW
2162103x00* (240V, 50Hz) AUS
2162104x00* (230V, 50Hz) UK
2162105x00* (220V, 50Hz) ARG
2162106x00* (230V, 50Hz) EUR
2162107x00* (100V, 50Hz) JPN
2162109x00* (220V, 60Hz) ROK
2162000x00* (120V, 60Hz)
2162001x00* (110V, 60Hz) TW
2162003x00* (240V, 50Hz) AUS
2162004x00* (230V, 50Hz) UK
2162005x00* (220V, 50Hz) ARG
2162006x00* (230V, 50Hz) EUR
2162007x00* (100V, 50Hz) JPN
2162009x00* (220V, 60Hz) ROK
REQUISITO ELETTRICO:
325W
325W
POTENZA IN USCITA:
100W RMS @ 10% THD, sine 1kHz in 8Ω
100W RMS @ 10% THD, sine 1kHz in 8Ω
IMPEDENZA IN INGRESSO:
1MΩ
1MΩ
IMPEDENZA IN USCITA:
4Ω / 8Ω / 16Ω (selezionabile)
4Ω / 8Ω / 16Ω (selezionabile)
F 8A L, 250V
F 4A L, 250V
F 8A L, 250V
F 4A L, 250V
VALVOLE:
(4) 6L6GC; (7) 12AX7A; (2) 12AT7
(4) 6L6GC; (7) 12AX7A; (2) 12AT7
PEDALE (INCLUSO):
4 pulsanti, (078324)
1. Vintage/Burn, 2. Normal/Fat, 3. Reverb, 4. Effects
4 pulsanti, (078324)
1. Vintage/Burn, 2. Normal/Fat, 3. Reverb, 4. Effects
ALTOPARLANTI:
Super-Sonic® 100 412 ST** (2162400x00)*
Super-Sonic® 100 412 SL** (2162450x00)*
2 x 8Ω, 12" Celestion® Vintage 30 (047279)
26,7 cm
66,7 cm
26,7 cm
51,4 cm
66,7 cm
28,7 cm
24 kg
37,6 kg
FUSIBILI
DIMENSIONI
PESO:
UNITÀ A 100V-120V:
UNITÀ A 220V-240V:
ALTEZZA:
LARGHEZZA:
PROFONDITÀ:
*Codici dei colori esterni degli amplificatori e casse Super-Sonic: Black "x"=0, Blonde "x"=4
**Casse consigliate. Vendute separatamente.
Le specifiche dei prodotti sono passibili di modifica senza preavviso.
fender.com
17
Super-Sonic™ Twin / Super-Sonic™ 100 Head
Super Sonic-Verstärker wurden für Gitarristen entwickelt, die sowohl
typisch saubere Fender-Sounds als auch expressive moderne Hi-GainSounds erzeugen möchten … mit nur einem schnörkellosen RöhrenAmp. Die Klangvarianten des VINTAGE-Kanals basieren auf legendären
und begehrten Fender-Modellen und der großartige BURN-Kanal
entfesselt mit seinen Overdrive-Varianten, von bluesy bis brandheiß,
frische musikalische Inspirationen. Das moderne Hi-Gain-Overdrive
und Sustain des Super-Sonic Amps lässt sich detailliert und nuanciert
einstellen, ohne den Klangcharakter IHRER Gitarre zu verfälschen. Der
Super-Sonic Twin und der 100 Head bieten zusätzlich beeindruckende
Extras, z. B. einen Arena/Club-Schalter, einen Damping-Regler sowie
eine brandneue Fender Automatic Bias-Steuerung.
• NOTCH TUNE verschiebt die Position der Mitten-Absenkung
und ermöglicht vielfältige amerikanische und britische Timbres
• Röhrenbetriebener Fender Reverb mit langer Hallfeder von
Accutronics®
• Professioneller FX Loop mit Pegelregler - auch als fußschaltbarer
Boost einsetzbar
• Wahlweise klassisches Black/Silver oder kultiges 1961er Blonde/
Oxblood Styling
• Schutzhülle und pedalboard-freundlicher 4-Tasten Fußschalter
inklusive
• 5 Jahre beschränkte übertragbare Garantie (in USA und Kanada in anderen Ländern gelten eventuell andere Garantien)
Haupt-Features:
• Fender Automatic Bias (zum Patent angemeldet) zum mühelosen
Einstellen der Endstufenröhren auf die empfohlene Werkseinstellung ohne Messgeräte oder Werkzeuge. Die Vorspannung ist
bei Bedarf “heißer” oder “dezenter” einstellbar, wobei fast jede
Mischung von 6L6 Röhren funktioniert.
• 100 Watt, erzeugt von vier 6L6 Endstufenröhren
• ARENA/CLUB-Schalter zum Wählen von 100 Watt oder 25 Watt
Ausgangsleistung
• Sieben 12AX7 Vorverstärkerröhren & zwei 12AT7 Röhren
• DAMPING-Regler (Rückseite) wählt drei unterschiedliche Lautsprecheransprachen: Normal, Loose oder Tight
• VINTAGE-Kanal mit pre-gain Klangreglern und zwei unterschiedlichen schaltbaren Stimmen:
• Schimmernd und sauber, basierend auf vintage Fender Twin
Reverb® und Showman® Verstärkern
• Fett und druckvoll, basierend auf 1960er Bassman® Verstärkern
• Pre- und Master Volume-Regler zum Einstellen von absolut sauberen oder leicht übersteuerten Klängen
• Spezialtransformatoren von Schumacher
• Super-Sonic Twin enthält zwei premium 12” Celestion® Vintage 30
Lautsprecher
• Super-Sonic 100 Head passt zu den Super-Sonic 100 412 Straight
und Slant Boxen
• BURN-Kanal ermöglicht Klangexperimente mit post-gain EQ und
zweistufigen kaskadierten Preamp-Reglern:
• GAIN 1 für kräftigen Crunch bis hin zur Distortion
• GAIN 2 für zusätzliche Kompression, Fülle und Sustain
Die weltweit beliebtesten Instrumentenverstärker...
seit 1946
Vorderseite
5
4
2
9
10
5
4
7
8
1
INPUT
6
3
GAIN
SHOWMAN/ BASSMAN 6
8 3
2
9
1
10
TREBLE
5
4
7
3
6
5
4
7
6
2
1
10
BASS
9
2
10
1
MID
5
4
7
8 3
6
8
2
9
9
1
10
5
4
7
8 3
VINTAGE / BURN
VOLUME
6
8 3
2
9
1
10
GAIN 1
5
4
7
3
6
2
1
10
GAIN 2
B.
GAIN — Regelt den Eingangssignalpegel des VINTAGE-Kanals und
bestimmt zusammen mit VOLUME {E} dessen Lautstärke. Bei Maximalpegel werden leichte Übersteuerungen erzeugt.
C.
TWIN REVERB® ODER SHOWMAN® / BASSMAN® — Wählt die Verstärkerschaltung des VINTAGE-Kanals, die von den LEDs angezeigt
wird.
D.
E.
6
9
Zum Anschließen der Gitarre.
6
2
1
10
TREBLE
9
5
4
7
6
2
1
10
9
6
10
1
MID
9
2
1
10
5
4
7
8 3
2
BASS
5
4
7
8 3
8 3
6
8
3
2
9
2
9
NOTCH TUNE
1
10
VOLUME
5
4
7
8 3
6
7
8
1
10
REVERB
9
FENDER MUSICAL INSTRUMENTS
VINTAGE / BURN — Wählt den aktiven Kanal, der von den LEDs angezeigt wird.
VINTAGE-Kanal
BURN-Kanal
G.
GAIN 1 / GAIN 2 — Erste und zweite Einstellung von Distortion und
Sustain des BURN-Kanals. Diese Regler bestimmen zusammen mit
VOLUME {J} die Lautstärke des BURN-Kanals.
H.
TREBLE / BASS / MID — Regelt den Klangcharakter des BURN-Kanals.
I.
NOTCH TUNE — Verschiebt die Position der Mitten-Absenkung (MID)
und ermöglicht die verschiedensten amerikanischen und britischen
Timbres.
BASSMAN
Die TWIN REVERB / SHOWMAN Einstellung liefert das Voicing eines
vintage Fender Blackface™ Verstärkers und die BASSMAN-Einstellung
liefert das Voicing eines vintage Fender Tweed Verstärkers.
FREQUENZ
TREBLE / BASS / MID — Regelt den Klangcharakter des VINTAGEKanals.
VOLUME — Regelt die Gesamtlautstärke des Amps bei aktiviertem
VINTAGE-Kanal. In der Maximalstellung fungiert GAIN {B} als einziger
Pegelregler, vergleichbar mit der Steuerung von vintage Fender Verstärkern.
18
5
4
7
F.
INPUT —
♫
5
4
8 3
A.
TWIN REVERB / SHOWMAN
7
Treble
Betonung
Bass
Betonung
J.
VOLUME — Regelt die Gesamtlautstärke des Amps bei aktiviertem
BURN-Kanal.
K.
REVERB — Regelt den Reverb-Pegel beider Kanäle.
L.
NETZANZEIGE — Leuchtet, wenn der Amp eingeschaltet ist.
fender.com
Rückseite
TYPE: PR 903
ON
INPUT
POWER
V
Hz
325W
FUSE
4A L
250V
SERIAL NUMBER
NORMAL
ARENA
LOOSE
TIGHT
PARALLEL SPEAKER OUTPUTS
4Ω min TOTAL
100W
AUTOMATIC BIAS
WARM
ADJUST
NORMAL
OFF
SEND
POWER
M.
♫
N.
♫
O.
P.
STANDBY
CLUB
MIN
MAX
SEND LEVEL
RETURN
MIN
MAX
RETURN LEVEL
POWER — Schaltet den Amp ein/aus.
!
COOL
4Ω
OUTPUT TUBE STATUS
PATENT PENDING
FOOT SWITCH
DAMPING CONTROL
8Ω 16Ω
IMPEDANCE
MAIN
SPEAKER
EXTERNAL
SPEAKER
Sie können die Lebensdauer der Verstärkerröhren verlängern, indem
Sie den STANDBY-Schalter {N} erst 60 Sekunden nach dem ersten
Einschalten des Geräts betätigen.
POWER AMP IN — Direkteingang zur Endstufe. Die Preamp-Schaltung
wird automatisch deaktiviert, wenn diese Buchse mit einem Stecker
belegt wird.
W.
STANDBY — Im Standby-Modus sind die Amp-Ausgänge deaktiviert,
während die Heizfäden der Röhren mit Spannung versorgt werden,
um sie warm und einsatzbereit zu halten.
FOOTSWITCH — Schließen Sie hier den mitgelieferten 4-Tasten
Fußschalter an, um eine Fernwahl von Amp Voicing {C}, Channel {F},
Reverb und FX Loop Bypass zu ermöglichen. Hinweis: Die vorderseitigen Drucktasten werden beim Anschluss eines Fußschalters deaktiviert.
X.
AUTOMATIC BIAS — Wählen Sie mit den Auf/Ab-Pfeilen die gewünschte Röhrenvorspannungs-Temperatur (WARM/NORMAL/COOL),
nachdem sich der Verstärker aufgewärmt hat (mindestens eine
Minute). Die vorgenommene Einstellung ist auch beim nächsten
Einschalten des Amps gültig. HINWEIS: Halten Sie die Auf/Ab-Pfeile
gleichzeitig eine Sekunde gedrückt, um die werkseitigen automatischen Bias-Einstellungen wiederherzustellen.
In kurzen Pausen sollten Sie den Amp nicht aus-, sondern auf
STANDBY schalten, um die Lebensdauer der Röhren zu verlängern
und eine Auf wärmverzögerung vor der Fortsetzung des aktiven
Betriebs zu vermeiden.
NETZEINGANG — Verbinden Sie den Eingang über das mitgelieferte
Netzkabel mit einer geerdeten Netzsteckdose, die den Spannungsund Frequenznennwerten auf der Amp-Rück seite entspricht.
ARENA / CLUB — Mit ARENA erhalten Sie die maximale Ausgangsleistung (100W) für große Veranstaltungsorte. Mit CLUB erhalten Sie
eine niedrigere Ausgangsleistung (25W) für kleinere Veranstaltungsorte
oder Aufnahmen.
Je nach Status der einzelnen Röhren zeigen die OUTPUT TUBE STATUS
LEDs folgende Informationen an:
LEDs von links nach
rechts laufend:
Der Amp wird aufgewärmt (dauert etwa 1 Minute).
LED leuchtet grün:
Die Röhre ist OK und die Vorspannung stimmt mit der
gewählten Bias-Temperatur (WARM/NORMAL/COOL)
überein.
LED blinkt grün:
Die Röhrenvorspannung stimmt nicht mit der gewählten Bias-Temperatur überein. Dies kann manchmal bei
einzelnen Röhren auftreten, während das automatische
Bias-System die Vorspannung einstellt. Es dauert normalerweise weniger als 20 Sekunden, bis die angestrebte Vorspannung erreicht ist und die LED wieder
konstant grün leuchtet. Wenn die LED nach fünf Minuten
immer noch blinkt, liegt die Vorspannung außerhalb des
automatischen Bias-Bereichs und die betreffende Röhre
sollte ersetzt werden.
Sie sollten die Stellung des ARENA/CLUB-Schalters nur im ausgeschalteten Zustand oder im STANDBY-Betrieb des Amps ändern,
um eine exzessive Belastung der Röhren zu vermeiden und deren
Lebensdauer zu verlängern.
R.
SEND LEVEL — Regelt den Ausgangspegel der SEND-Buchse {S} und
passt das Signal an die Eingangsempfindlichkeit Ihres externen Effektgeräts an.
S.
SEND / RETURN — Diese geprüften Effekt Loop-Buchsen sind kompatibel zu Bodeneffekten mit Instrumentenpegel und Effektprozessoren
mit Line-Pegel. Verbinden Sie SEND mit dem Effektgerät-Eingang und
RETURN mit dem Effektgerät-Ausgang.
"Unity Gain Pegel" für den Effekt-Loop einstellen (damit der Pegel
des aktivierten Effekt-Loops mit dem Pegel des deaktivierten EffektLoops übereinstimmt):
1. Stellen Sie anfänglich SEND LEVEL {R} auf Maximum und RETURN LEVEL
{T} auf Minimum ein.
2. Wenn Sie am Effektprozessor Verzerrungen feststellen, verringern Sie
SEND LEVEL (und/oder den Eingangspegel des Prozessors), bis die Verzerrungen verschwinden.
3. Erhöhen Sie dann RETURN LEVEL (und/oder den Ausgangspegel des
Prozessors), damit der Ausgang des Effekt-Loops auf Unity Gain (oder
wunschgemäß) eingestellt ist.
♫
POWER AMP
IN
V.
FUSE — Schützt den Amp vor elektrischen Fehlern. Ersetzen Sie
durchgebrannte Sicherungen nur durch Sicherungen des auf der
Amp-Rückseite angegebenen Typs und Nennwerts.
Q.
PRE AMP
OUT
2A 1A 1B 2B
Die Effekt-Loop-Taste des Fußschalters kann auch ohne eingeschleiften Effekt als Solo Boost-Schalter fungieren. Verbinden Sie
SEND einfach über ein Gitarrenkabel mit RETURN. Wenn SEND LEVEL
{R} und RETURN LEVEL {T} auf Maximum stehen, wird eine zusätzliche
Verstärkung von 12dB erzeugt. Drehen Sie RETURN LEVEL zurück,
wenn Sie weniger Boost wünschen.
T.
RETURN LEVEL — Regelt den Eingangspegel des über die RETURNBuchse {S} in die Endstufe eingespeisten Signals. Damit können Sie
den Pegel des Amps bei deaktivierten Effekten anpassen oder einen
alternativen, mit dem Fußschalter wählbaren Pegel einstellen.
U.
PRE AMP OUT — Asymmetrischer Line-Pegel-Ausgang (mit Reverb).
LED leuchtet rot:
Die Röhre ist ausgefallen oder fehlt.
LED leuchtet
orange:
Die Röhre hat sich ausgeschaltet. Dieser Fall kann eintreten, wenn die andere Röhre eines Paars (1A/1B) oder
(2A/2B) defekt ist oder fehlt.
Y.
DAMPING-REGLER — Wählt eine "offenere" oder "kompaktere" Ansprache der Lautsprecher. Die Dämpfung ist die Interaktion zwischen
Röhrenendstufe und Lautsprechern.
Z.
IMPEDANZ-WAHLSCHALTER — Wählen Sie die Lautsprecher-Ausgangsimpedanz, die der Gesamtimpedanzlast Ihrer gewählten Lautsprecherkonfiguration entspricht, aus der unteren Tabelle {AA}.
AA.
MAIN SPEAKER / EXTERNAL SPEAKER—
!
Die MAIN SPEAKER-Buchse muss bei eingeschaltetem Amp IMMER
mit einem Lautsprecheranschluss belegt sein, um Beschädigungen
zu vermeiden. Schalten Sie den Amp auf OFF oder STANDBY, wenn Sie
Lautsprecheranschlüsse oder Impedanz-Einstellungen ändern.
Schließen Sie Boxen an und stellen Sie den IMPEDANCE-WAHLSCHALTER {Z} entsprechend der folgenden Tabelle ein.
MAIN
SPEAKER
16Ω
16Ω
8Ω
8Ω
4Ω
fender.com
+
+
+
+
+
EXTERNAL
SPEAKER
keine
16Ω
keine
8Ω
keine
=
=
=
=
=
IMPEDANZWAHLSCHALTER
16Ω
8Ω
8Ω
4Ω
4Ω
19
BURN-Kanal Einstellungsvorschläge
Big Rock
Strat Cat
Bronto-Sonic
Touch-Sensitive
Fat & Warm
Technische Daten
MODELL:
SUPER-SONIC 100 HEAD
SUPER-SONIC TWIN (COMBO)
TYP:
PR 903
PR 903
ARTIKELNUMMERN:
2162100x00* (120V, 60Hz)
2162101x00* (110V, 60Hz) TW
2162103x00* (240V, 50Hz) AUS
2162104x00* (230V, 50Hz) GB
2162105x00* (220V, 50Hz) ARG
2162106x00* (230V, 50Hz) EUR
2162107x00* (100V, 50Hz) JPN
2162109x00* (220V, 60Hz) ROK
2162000x00* (120V, 60Hz)
2162001x00* (110V, 60Hz) TW
2162003x00* (240V, 50Hz) AUS
2162004x00* (230V, 50Hz) GB
2162005x00* (220V, 50Hz) ARG
2162006x00* (230V, 50Hz) EUR
2162007x00* (100V, 50Hz) JPN
2162009x00* (220V, 60Hz) ROK
LEISTUNGSAUFNAHME:
325W
325W
AUSGANGSLEISTUNG:
100W RMS @ 10% Klirrfaktor, 1kHz Sinus in 8Ω
100W RMS @ 10% Klirrfaktor, 1kHz Sinus in 8Ω
EINGANGSIMPEDANZ:
1MΩ
1MΩ
AUSGANGSIMPEDANZ:
4Ω / 8Ω / 16Ω (wählbar)
4Ω / 8Ω / 16Ω (wählbar)
F 8A L, 250V
F 4A L, 250V
F 8A L, 250V
F 4A L, 250V
RÖHREN:
(4) 6L6GC; (7) 12AX7A; (2) 12AT7
(4) 6L6GC; (7) 12AX7A; (2) 12AT7
FUSSSCHALTER (INKLUSIVE):
4 Tasten, (078324)
1. Vintage/Burn, 2. Normal/Fat, 3. Reverb, 4. Effects
4 Tasten, (078324)
1. Vintage/Burn, 2. Normal/Fat, 3. Reverb, 4. Effects
LAUTSPRECHER:
Super-Sonic® 100 412 ST** (2162400x00)*
Super-Sonic® 100 412 SL** (2162450x00)*
zwei 8Ω, 12" Celestion® Vintage 30 (047279)
26,7 cm
66,7 cm
26,7 cm
51,4 cm
66,7 cm
28,7 cm
24 kg
37,65 kg
SICHERUNGEN
ABMESSUNGEN
GEWICHT:
100V-120V GERÄTE:
220V-240V GERÄTE:
HÖHE:
BREITE:
TIEFE:
*Außenfarbcode für Super-Sonic Verstärker und Boxen: Black "x"=0, Blonde "x"=4
**Empfohlene Boxen. Separat erhältlich.
Technische Daten können unangekündigt geändert werden.
20
fender.com
Super-Sonic™ Twin / Super-Sonic™ 100 Head
Os amplificadores Super Sonic são concebidos para guitarristas que querem criar tons Fender únicos e límpidos e tons de alto ganho expressivos
e modernos... com um amplificador valvulado no-nonsense. O canal
VINTAGE proporciona tons baseados em favoritos lendários da Fender e o
canal BURN cria inspiração musical com sabores de overdrive que variam
do estilo blues até sons incendiários. O amp Super-Sonic é capacitado
para overdrive de alto ganho e sustentação, no entanto, estas características podem ser afinadas sem mascarar o caráter tonal da SUA guitarra. O
Twin Super-Sonic e o Head 100 também contêm extras impressionantes
tais como o disjuntor Arena/Club, o controle de Amortecimento, e todos
os novos controles de Bias Automáticos da Fender.
• O NOTCH TUNE permite-lhe mover o volume de alcance médio
para uma variedade de estilos americanos e britânicos
• Tube-driven Reverb de mola longa Fender por Accutronics®
• Loop FX profissional com controle de nível; pode também ser
utilizado como aumento alterável através de pedal
• Escolha de tratamento cosmético Preto/Prateado clássico ou icônico
Vermelho Sangue/Louro 1961
• Cobertura e interruptor de pé com pedal de 4 botões incluídos
• Garantia limitada transferível de 5 anos (EUA e Canadá; pode haver
variação em outros locais)
As características incluem:
• O Bias Automático Fender (patente pendente) permite-lhe configurar
facilmente suas válvulas de saída de acordo com a configuração de
fábrica recomendada, sem medição ou ferramentas. O Bias pode ser
configurado para "mais quente" ou "mais frio" conforme desejado,
e funcionará com praticamente todos os tipos de combinações de
válvulas 6L6.
• 100 Watts para quatro válvulas de saída 6L6
• O disjuntor ARENA/CLUB proporciona uma saída selecionável de 100
ou 25 Watts
• Sete válvulas de pré-amplificador 12AX7 & duas válvulas 12AT7
• O Controle de AMORTECIMENTO (no painel traseiro) permite-lhe
selecionar a resposta da coluna em Normal, Frouxa ou Apertada
• O canal VINTAGE contém controles tonais de pré-ganho e duas vozes
selecionáveis:
• Tom limpo e claro derivado dos amplificadores Fender Twin
Reverb® e vintage Showman®
• Tom vigoroso e incisivo reminiscente dos amplificadores Bassman®
dos anos 60
• Os controles de Volume Master e Pre podem ser configurados para
tons mais límpidos ou tons ligeiramente overdrive
• Transformadores personalizados da Schumacher
• O Super-Sonic Twin contém duas colunas premium Celestion®
Vintage 30 (12 polegadas, 31 cm)
• O Super-Sonic 100 Head se encaixa às Colunas Super-Sonic 100 412
Straight e Slant.
• O canal BURN possibilita uma experimentação tonal com EQ de pósganho e dois controles de pré-amplificador em cascata de dois níveis:
• O GAIN 1 fornece quebra aguda e distorção
• O GAIN 2 acrescenta compressão, espessura e sustentação
Os Amplificadores Musicais Mais Populares do Mundo...
Desde 1946
Painel Frontal
5
4
6
8
2
1
INPUT
10
GAIN
5
4
7
3
9
SHOWMAN/ BASSMAN 6
5
4
7
6
2
1
10
TREBLE
9
5
4
7
6
2
1
10
BASS
9
5
4
7
6
2
10
1
MID
9
8
2
1
10
5
4
7
8 3
8 3
8 3
3
VINTAGE / BURN
9
VOLUME
6
5
4
7
6
7
8 3
3
2
1
10
9
GAIN 1
2
1
10
GAIN 2
INPUT—
B.
GAIN—Ajusta o nível do sinal de entrada do canal VINTAGE. Utilize
juntamente com VOLUME {E} para controlar o volume do canal
VINTAGE. Configure para o máximo para obter overdrive moderado.
Ligue a sua guitarra aqui.
9
BASSMAN
A configuração TWIN REVERB/SHOWMAN fornece voz a um
amplificador vintage Fender Blackface™ e a configuração BASSMAN
fornece voz a um amplificador vintage Fender Tweed.
5
4
7
6
2
1
10
9
TREBLE
5
4
7
6
2
1
10
9
5
4
7
8 3
8 3
6
2
10
1
MID
BASS
9
5
4
7
8 3
6
2
1
10
9
NOTCH TUNE
2
1
10
VOLUME
5
4
7
8 3
8
3
9
2
6
7
8
1
10
REVERB
9
FENDER MUSICAL INSTRUMENTS
VINTAGE / BURN —Seleciona o canal ativo conforme indicado nos
LEDs.
Canal VINTAGE
Canal BURN
G.
GAIN 1 / GAIN 2—Ajustes principal e secundário para distorção e
sustentação do canal BURN. Utilize juntamente com VOLUME {J} para
controlar o volume do canal BURN.
H.
TREBLE / BASS / MID—Ajusta o caráter tonal do canal BURN.
I.
NOTCH TUNE—Utilizado para ajustar o volume de alcance médio
(MID) em uma variedade de estilos americanos e britânicos.
TWIN REVERB® OU SHOWMAN® / BASSMAN®—Seleccione o circuito
do amplificador do canal VINTAGE, tal como indicado pelos LEDs.
TWIN REVERB / SHOWMAN
♫
6
F.
A.
C.
5
4
8 3
FREQUÊNCIA
D.
TREBLE / BASS / MID —Ajusta o caráter tonal do canal VINTAGE.
E.
VOLUME—Ajusta o volume geral do amplificador quando o canal
VINTAGE está ativo. Quando configurado para o máximo, o controle
GAIN {B} age como um controle de volume único, semelhante aos dos
amplificadores Fender vintage.
Ênfase
Treble
Ênfase
Bass
J.
VOLUME—Ajusta o volume geral do amplificador quando o canal
BURN está ativo.
K.
REVERB —Ajusta o nível de Reverberação para ambos os canais.
L.
INDICADOR DE ENERGIA—Acende quando a unidade está ligada
(ON).
fender.com
21
Painel Traseiro
TYPE: PR 903
ON
INPUT
POWER
V
Hz
325W
FUSE
4A L
250V
SERIAL NUMBER
NORMAL
ARENA
LOOSE
PARALLEL SPEAKER OUTPUTS
TIGHT
4Ω min TOTAL
100W
AUTOMATIC BIAS
WARM
ADJUST
NORMAL
OFF
SEND
POWER
M.
STANDBY
CLUB
MIN
MAX
SEND LEVEL
RETURN
MIN
MAX
RETURN LEVEL
POWER—Liga e desliga a unidade.
DAMPING CONTROL
8Ω 16Ω
IMPEDANCE
MAIN
SPEAKER
EXTERNAL
SPEAKER
STANDBY— Em standby, as saídas do amplificador são desativadas
enquanto a energia é fornecida apenas aos filamentos da válvula,
mantendo-os quentes e prontos para tocar.
W.
FOOTSWITCH—Ligue o pedal interruptor de 4 botões já incluído para
ativar a seleção remota de: Voz Amplificador {C}, Canal {F}, Reverb e
Transferência de Loop FX. NOTA: Os botões de pressão do painel frontal são desativados quando o pedal interruptor é ligado.
Utilize STANDBY em vez de desligar a corrente durante intervalos
curtos para aumentar o ciclo de vida da válvula e para evitar o atraso
no aquecimento da válvula quando voltar a utilizar o amplificador.
X.
AUTOMATIC BIAS—Selecione a temperatura da bias de válvula desejada
(QUENTE/NORMAL/FRIO) utilizando as setas para cima e para baixo, assim
que o amplificador tiver aquecido (pelo menos um minuto). O amplificador
terá guardado em sua memória a sua última configuração da próxima vez
que a unidade for ligada. NOTA: Pressione as setas para cima e para baixo
simultaneamente, durante um segundo para restaurar as configurações
bias automáticas de fábrica.
P.
FUSE—Protege o amplificador de falhas elétricas. Substitua um fusível
queimado apenas pelo tipo de fusível especificado no painel traseiro
do seu amplificador.
ARENA / CLUB—Selecione ARENA para alimentação máxima de saída
do amplificador (100W) quando tocar em locais grandes. Selecione
CLUB para alimentação mínima de saída ao amplificador (25W) quando tocar em locais pequenos ou quando estiver gravando.
Recomenda-se alterar a posição do interruptor ARENA/CLUB apenas
quando o amplificador estiver DESLIGADO (OFF) ou em STANDBY
para reduzir o estresse nas válvulas e para estender o seu ciclo de vida.
!
SEND LEVEL—Ajusta o nível de saída da tomada SEND {S}. Utilize-o
para acomodar a sensibilidade de entrada do seu dispositivo de efeitos exteriores.
SEND / RETURN—Estas tomadas de efeitos loop foram testadas e
tidas como compatíveis com caixas de som de nível instrumental e
com processadores de efeitos ao nível da linha. Ligue SEND à entrada
do seu dispositivo de efeitos e RETURN à saída de efeitos.
Para configurar o "Nível de Ganho da Unidade" de Efeito Loop (para
que o nível de volume do efeito loop seja igual ao volume com os
efeitos loop desativados):
O LED indicador de OUTPUT TUBE STATUS irá exibir a seguinte informação dependendo do estado de cada válvula:
LEDs fazem uma
sondagem da
esquerda para a
direita:
O amplificador está aquecendo (demora aproximadamente 1 minuto).
LED verde sólido:
A válvula está OK e a bias coincide com a temperatura
bias selecionada (QUENTE/NORMAL/FRIO).
LED apresenta
uma luz verde
piscando:
O tubo bias não coincide com a temperatura bias selecionada. Isto pode acontecer periodicamente com tubos
individuais, enquanto o sistema bias automático ajusta
o bias. Demora, normalmente, menos de 20 segundos
para atingir o bias alvo e para o LED voltar a ficar com
uma cor verde sólida. Se o LED continuar a piscar após
5 minutos, a sua configuração bias está além do limite
do bias automático e esta válvula deverá ser substituída.
LED vermelho:
A válvula falhou ou está ausente.
LED laranja:
A válvula desligou. A válvula poderá desligar quando
outra válvula no par (1A/1B) ou (2A/2B) estiver danificada
ou ausente.
Y.
DAMPING CONTROL—Utilize-o para selecionar uma resposta "frouxa"
ou "apertada" das colunas. O Amortecimento é a interação do amplificador de energia da válvula com as colunas.
Z.
IMPEDANCE—Seleciona o impedimento de saída da coluna que casa
com a carga de impedimento total da configuração da coluna que foi
escolhida da tabela abaixo {AA}.
AA.
MAIN SPEAKER / EXTERNAL SPEAKER—
1. Comece com SEND LEVEL {R} no máximo e o RETURN LEVEL {T} no mínimo.
2. Se for notada qualquer distorção no processador de efeitos, reduza o SEND
LEVEL (e/ou controle de nível de entrada do processador, se existir) até que a
distorção desapareça).
3. Depois aumente o RETURN LEVEL (e/ou o controle de nível de saída do
processador, se existir) para que a saída efeito Loop esteja no ganho da
unidade (ou para sua preferência).
♫
T.
PATENT PENDING
POWER AMP IN —Uma entrada direta para o amplificador de energia.
O circuito do pré-amplificador é automaticamente desligado quando
uma tomada é inserida neste interruptor.
TOMADA DE ENTRADA ELÉTRICA IEC—Ligue a uma saída de terra
utilizando um cabo de alimentação fornecido, de acordo com as especificações de freqüência e de voltagem exibidas no painel traseiro do
seu amplificador.
S.
4Ω
OUTPUT TUBE STATUS
V.
O ciclo de vida das válvulas do amplificador pode ser estendido se
o interruptor STANDBY {N} for utilizado no nível baixo durante 60
segundos quando a corrente é ligada pela primeira vez.
O.
R.
COOL
FOOT SWITCH
PRE AMP OUT— Uma saída de nível de linha desequilibrada (inclui
Reverberação).
♫
Q.
POWER AMP
IN
U.
♫
N.
PRE AMP
OUT
2A 1A 1B 2B
O botão de Efeitos Loop no pedal interruptor pode ser configurado
como aumento de volume principal alterável sem efeitos, ao se
conectar SEND com RETURN e com um cabo de instrumento. Os efeitos
Loop irão fornecer um ganho adicional de 12dB quando o SEND LEVEL
{R} e o RETURN LEVEL {T} estiverem configurados para o máximo. Baixe
o RETURN LEVEL para menos aumento, se preferir.
RETURN LEVEL—Ajusta o nível da tomada de entrada RETURN {S} que se
conecta ao amplificador de energia. Utilize-o para casar o nível de volume
do amplificador quando os efeitos estão desligados, ou para configurar
um nível de volume alternativo selecionável a partir do pedal interruptor.
22
!
Uma coluna deverá SEMPRE ser ligada a uma tomada da COLUNA
PRINCIPAL quando o amplificador está ligado, se não, poderá
haver danos na unidade. DESLIGUE o amplificador ou coloque-o
em STANDBY enquanto substitui as ligações da coluna ou as
configurações de impedimento.
Ligue os anexos da coluna e configure o IMPEDANCE SELECTOR {Z} de
acordo com a tabela baixo.
COLUNA
PRINCIPAL
16Ω
16Ω
8Ω
8Ω
4Ω
fender.com
+
+
+
+
+
COLUNA
EXTERIOR
Nenhum
16Ω
Nenhum
8Ω
Nenhum
=
=
=
=
=
SELETOR DE
IMPEDIMENTO
16Ω
8Ω
8Ω
4Ω
4Ω
Configurações Sugeridas do canal BURN
Big Rock
Strat Cat
Bronto-Sonic
Touch-Sensitive
Fat & Warm
Especificações
MODELO:
SUPER-SONIC 100 HEAD
SUPER-SONIC TWIN (COMBO)
TYPO:
PR 903
PR 903
NÚMEROS DAS PEÇAS:
2162100x00* (120V, 60Hz)
2162101x00* (110V, 60Hz) TW
2162103x00* (240V, 50Hz) AUS
2162104x00* (230V, 50Hz) UK
2162105x00* (220V, 50Hz) ARG
2162106x00* (230V, 50Hz) EUR
2162107x00* (100V, 50Hz) JPN
2162109x00* (220V, 60Hz) ROK
2162000x00* (120V, 60Hz)
2162001x00* (110V, 60Hz) TW
2162003x00* (240V, 50Hz) AUS
2162004x00* (230V, 50Hz) UK
2162005x00* (220V, 50Hz) ARG
2162006x00* (230V, 50Hz) EUR
2162007x00* (100V, 50Hz) JPN
2162009x00* (220V, 60Hz) ROK
ALIMENTAÇÃO NECESSÁRIA:
325W
325W
SAÍDA DE AMP DE ENERGIA:
100W RMS @ 10% THD, 1kHz seno para 8Ω
100W RMS @ 10% THD, 1kHz seno para 8Ω
IMPEDIMENTO DE ENTRADA:
1MΩ
1MΩ
IMPEDIMENTO DE SAÍDA:
4Ω / 8Ω / 16Ω (selecionável)
4Ω / 8Ω / 16Ω (selecionável)
FUSÍVEIS
F 8A L, 250V
F 4A L, 250V
F 8A L, 250V
F 4A L, 250V
TUBOS:
(4) 6L6GC; (7) 12AX7A; (2) 12AT7
(4) 6L6GC; (7) 12AX7A; (2) 12AT7
PEDAL INTERRUPTOR (INCLUÍDO):
4-botões, (078324)
1. Vintage/Burn, 2. Normal/Fat, 3. Reverb, 4. Efeitos
4-botões, (078324)
1. Vintage/Burn, 2. Normal/Fat, 3. Reverb, 4. Efeitos
COLUNAS:
Super-Sonic® 100 412 ST** (2162400x00)*
Super-Sonic® 100 412 SL** (2162450x00)*
Duas 8Ω, 12" Celestion® Vintage 30 (047279)
26.7 cm
66.7 cm
26.7 cm
51.4 cm
66.7 cm
28.7 cm
24 kg
37.6 kg
DIMENSÕES
PESO:
UNIDADES 100V-120V:
UNIDADES 220V-240V:
ALTURA:
LARGURA:
PROFUNDIDADE:
*Código de cor exterior de móvel de coluna e amplificador Super-Sonic: Black "x"=0, Blonde "x"=4
**Colunas recomendadas. Vendidas em separado.
As especificações do produto estão sujeitas a alterações sem aviso prévio.
fender.com
23
Super-Sonic™ Twin / Super-Sonic™ 100 Head
Super Sonicシリーズは、紛うことなきFenderクリーントーンと、表情豊かでモダ
• 真空管による、Accutronics® Fenderロング・スプリング・リバーブ
ンなハイゲイン・トーンを、1つの実直なチューブアンプでクリエイトしたいギタリ
• レベルコントロール付きのプロフェッショナルFXループ; フットスイッチでコン
トロールできるブーストとしても利用可能
ストのために設計されました。VINTAGEチャンネルでは、Fenderの伝説的な人気
• クラシックなブラック/シルバーまたは、象徴的な1961 ブロンド/オックスブ
ラッドの外装を選択可能
のトーンをベースに、そしてBURNチャンネルでは、ブルージー∼フレイムスロウイ
ングなヘビートーンまで、幅広い音色で、インスピレーションを刺激します。Super-
• カバーと、エフェクトボードにも収納しやすい、4ボタンフットスイッチ付属
Sonicは、モダンなハイゲイン・オーバードライブとサステインにも秀でています
• 5年間限定保証は移譲も可能 (米国およびカナダ; それ以外の地域では条件が
異なる場合があります)
が、お使いのギターのキャラクターを損なうことなく、上記の特長を細かく調整で
きます。 Super-Sonic Twin および 100 Head は、Arena/Clubスイッチ、ダン
• Fenderオートマティック・バイアス (特許出願中) により、メーターや工具が
なくとも、簡単に出力真空管を、推奨の工場出荷状態に設定することができま
す。バイアスはより”ホット”に、またはより”クール”にセットすることもできま
す。また6L6真空管をほぼどのように組み合わせることも可能
ピング・コントロール、全く新しいFenderオートマティック・バイアスなどの、特筆
すべき機能を備えています。
特長:
• 4つの6L6真空管による100 ワット出力
• DAMPINGコントロール (リアパネル)でスピーカー・レスポンスをノーマル、
ルーズ、またはタイトの三段階に設定可能
• ARENA/CLUBスイッチで、100ワットと 25ワット出力を選択可能
• Schumacherのカスタム・コントロール
• 7つの12AX7プリアンプ真空管と、2つの12AT7真空管を搭載
• Super-Sonic Twinはプレミアム12” Celestion® Vintage 30スピーカー
2基搭載
• VINTAGEチャンネルは、プリゲイン・トーンコントロールと、2種類の音色の
切り替えが可能:
• ヴィンテージのFender Twin Reverb® と Showman® で、キラキラした
クリーントーンを実現
• 1960年代のBassman®の音色を彷彿とさせる、ファットでパンチのある
トーン
• プリおよびマスター・ボリューム・コントロールで、完全なクリーントーン、ま
たは微かにオーバードライブしたトーンを設定可能
• Super-Sonic 100 HeadはSuper-Sonic 100 412 ストレートおよびスラン
ト・エンクロージャーに対応
• BURNチャンネルでは、ポストゲインEQと2ステージ・カスケーディング・プリ
アンプコントロールで、多様なトーンを実験することが可能です。:
• GAIN 1はエッジーなブレイクアップとディストーションを提供
• GAIN 2ではコンプレッション、厚み、サステインを加えることが可能
• NOTCH TUNEでは、ミッドレンジ・ノッチを調節し、アメリカン∼ブリティ
ッシュの多彩なトーンを実現
1946年より続く、世界で最もポピュラーなアンプ
フロントパネル
5
4
6
8
2
1
INPUT
10
GAIN
5
4
7
3
9
SHOWMAN/ BASSMAN 6
5
4
7
6
2
1
10
TREBLE
9
5
4
7
6
2
1
10
9
6
10
1
MID
9
8
2
1
10
5
4
7
8 3
2
BASS
5
4
7
8 3
8 3
3
VINTAGE / BURN
9
VOLUME
6
5
4
7
6
2
1
10
GAIN 1
9
2
1
10
GAIN 2
B.
GAIN ̶ V IN TAGEチャンネル の入 力シグナル のレベルを調 節します。
VINTAGEチャンネルのラウドネスを調節するには、VOLUME {E}と併せて
使用します。モデレートなオーバードライブサウンドを作るには、最大に設
定します。
ここにギターを接続します。
TWIN REVERB® または SHOWMAN® / BASSMAN®̶ LEDライ
トの表示で確認しながら、VINTAGEチャンネルのアンプ回路を選びます。
♫
6
9
6
2
1
10
9
TREBLE
5
4
7
6
2
1
10
9
6
10
1
MID
9
5
4
7
8 3
2
BASS
5
4
7
8 3
8 3
6
2
1
10
9
2
NOTCH TUNE
1
10
VOLUME
5
4
7
8 3
8
3
9
2
6
7
8
1
10
REVERB
9
FENDER MUSICAL INSTRUMENTS
VINTAGE / BURN ̶アクティブにするチャンネルを選択します。LEDで
選択チャンネルを確認します。
VINTAGE チャンネル
BURN チャンネル
G.
GAIN 1 / GAIN 2 ̶ BURNチャンネルのディストーションおよびサステ
インを調節する、第一/第二のツマミです。 VOLUME {J} と併せて使用
し、BURNチャンネルのラウドネスを調節します。
H.
TREBLE / BASS / MID̶ BURNチャンネルのトーン・キャラクターを
調節します。
I.
NOTCH TUNE̶ 中音域 (MID) の周波数のノッチを移動し、アメリカン
からブリティッシュ系まで、多彩なトーン・フレーバーを表現します。
BASSMAN
TWIN REVERB / SHOWMANに設定すると、Fender Blackface™ ヴィンテ
ージアンプのボイシング、 BASSMAN に設定するとFender ツイードアンプの
ボイシングになります。
5
4
7
F.
INPUT̶
TWIN REVERB / SHOWMAN
5
4
8 3
A.
C.
7
8 3
3
周波数
D.
TREBLE / BASS / MID ̶VINTAGEチャンネルのトーン・キャラクター
を調節します。
E.
VOLUME ̶VINTAGEチャンネルがアクティブになっている時に、アンプ
全体のラウドネスを調節します。最大にすると、Fenderのヴィンテージアン
プと同様に、GAIN {B}コントロールが、シングル・ボリューム・コントロール
となります。
24
高音域強調
低音域強調
J.
VOLUME ̶ BURNチャンネルがアクティブになっている際の、アンプ全体
のボリュームを調節します。
K.
REVERB ̶ 両チャンネルのリバーブのレベルを調節します。
L.
パワー・インディケーター̶アンプ・ユニットの電源がオンの際に点灯しま
す。
fender.com
リアパネル
TYPE: PR 903
ON
INPUT
POWER
V
Hz
325W
FUSE
4A L
250V
SERIAL NUMBER
NORMAL
ARENA
LOOSE
TIGHT
PARALLEL SPEAKER OUTPUTS
4Ω min TOTAL
100W
AUTOMATIC BIAS
WARM
ADJUST
NORMAL
OFF
SEND
POWER
M.
STANDBY
CLUB
MIN
RETURN
MAX
MIN
SEND LEVEL
MAX
RETURN LEVEL
POWER̶アンプ・ユニットの電源のオン/オフを切り替えます。
♫
N.
最初にスイッチをオンにする際、STANDBY
{N}スイッチを下向きのままに
し、60秒間スタンバイ状態にしておいてからご使用いただくと、真空管の寿命を
延ばすことができます。
STANDBY̶スタンバイの状態では、真空管のフィラメントのみに電力が
供給され、アンプから出力はされない状態になっています。温度を保ち、演
奏可能な状態に準備します。
♫
PRE AMP
OUT
POWER AMP
IN
IEC POWER INPUT ソケット̶お使いのアンプのリアパネルの電圧/周
波数に従い、付属の電源コードを使用して、アース端子付きコンセントに接
続します。
P.
FUSE̶ 電気系統のトラブルからアンプを守ります。飛んでしまったヒュー
ズを交換する際には、必ずお使いのアンプのリアパネルに表示されている、
型式およびレーティングのヒューズをご使用ください。
Q.
ARENA / CLUB̶ 大きなサイズの会場で演奏する際など、最大の出力
(100W)に設定するにはARENAを選択します。小さめのサイズの会場や録
音で使用する際には、CLUBを選択すると、低出力(25W)となります。
S.
SEND / RETURN̶ これらのエフェクトループ・ジャックは、インストゥ
ルメント・レベルのコンパクト・エフェクターや、ライン・レベルのエフェク
ト・プロセッサーに対応することをテストで確認しています。SENDからお
使いのエフェクト機器のインプットに接続し、エフェクトのアウトプットと
RETURNを接続してください。
エフェクト・ループを "ユニティ・ゲイン・レベル"に設定するには (エフェクト・
ループ使用時のボリュームを、エフェクト・ループを使用していない時と同じにしま
す):
スタートします。
3. RETURN LEVELを徐々に上げ(エフェクト・プロセッサーに出力レベルコン
トロールがある場合は、そちらも併用できます)、エフェクト・ループ出力を、
エフェクト・ループ非使用時と揃えます(または、お好みのレベルに設定しま
す)。
♫
SENDをRETURNと通常の楽器用ケーブルで接続すると、フットスイッチのエフ
ェクト・ループ・ボタンを、ノン・エフェクトのリードボリュームとしても使用でき
ます。SEND LEVEL {R} および RETURN LEVEL {T}が最大に設定されてい
る場合で、エフェクト・ループで12dBのゲインを追加できます。ブースト量を減ら
したい場合は、RETURN LEVELを下げて調節します。
T.
EXTERNAL
SPEAKER
W.
FOOTSWITCH̶リモート操作をするために、付属の4ボタン・フットスイ
ッチを接続します : アンプ・ボイシング {C}、チャンネル {F}、リバーブおよ
び FXループ・バイパスをコントロールできます。 注意: フットスイッチ接続
時は、フロントパネル・ボタンでの操作が無効になります。
X.
AUTOMATIC BIAS̶アンプをウォーム・アップ(最低1分間)した後に、ア
ップ/ダウン・スイッチを使用して、お好みの真空管バイアス温度を選択しま
す(WARM/NORMAL/COOL)。設定をアンプが記憶し、次回電源をオンに
する際に、選択した温度になります。 注意: アップ/ダウンを同時に1秒間押
すと、工場出荷時のオートマティック・バイアス・セッティングに戻すことが
できます。
各真空管の状態が、OUTPUT TUBE STATUSインディケーターLEDで、
下記の通り表示されます:
L E D が 左 から 右
へ と 走 るように
点灯する:
アンプがウォームアップ中です (所要時間約1分)。
L E D が 緑 色に点
灯:
真空管が準備OKになり、バイアスが選択したバイアス温
度に合致しています (WARM/NORMAL/COOL)。
L E D が 緑 色に点
滅:
真空管のバイアスは、選択したバイアス温度に合致してい
ません。これは個々の真空管に対して、オートマティック・バ
イアスシステムが、バイアスを調整している際に度々起こり
ます。通常は20秒程で、設定したバイアスに達し、LEDの
点滅が終了し緑色に点灯します。5分を過ぎても点滅し続
けている場合、そのバイアスセッティングはオートマッティ
ック・バイアスの範囲を超えており、真空管の交換が必要と
なります。
L E D が 赤 色に 点
灯:
真空管が故障しているか、真空管がありません。
L E D が オレンジ
色に点灯:
真空管がシャットダウンしています。真空管のシャットダウ
ンは、ペアになっている真空管 (1A/1B) または (2A/2B)
の一方が良くない場合、または無い場合に起こります。
Y.
DAMPING CONTROL̶ "ルーズ" や "タイト" なスピーカー・レスポンス
を選択します。ダンピングとは、真空管パワーアンプとスピーカーの相互作用
です。
Z.
IMPEDANCE SELECTOR ̶下図{AA}より選択した、スピーカー構成の
トータル・インピーダンス負荷に合った、スピーカー出力インピーダンスを
選択します。
1. まずSEND LEVEL {R} を最大に、RETURN LEVEL {T} を最小の状態から
2. エフェクト・プ ロ セッ サ ー の 音 が 歪 む 場 合 、歪 み が なくな るま で S E N D
LEVELを下げます (エフェクト・プロセッサーに入力レベル・コントロールが
ある場合は、そちらも下げて調節します) 。
MAIN
SPEAKER
POWER AMP IN ̶パワーアンプへの直接入力です。このジャックにプラ
グが接続されると、自動的にプリアンプ回路は使用されなくなります。
切り替えることを推奨します。
SEND LEVEL̶ SEND {S} ジャックのアウトプット・レベルを調節しま
す。外部エフェクト機器の入力感度に合わせてご使用ください。
8Ω 16Ω
IMPEDANCE
V.
ている状態か、またはスタンバイになっている状態でARENA/CLUBスイッチを
R.
DAMPING CONTROL
PRE AMP OUT̶アンバランス、ライン・レベル出力 (Reverbを含む)。
真空管への負担を軽減し、真空管を長持ちさせるためには、アンプがオフになっ
!
4Ω
OUTPUT TUBE STATUS
PATENT PENDING
FOOT SWITCH
U.
短い間のオン/オフには、STANDBYスイッチをご使用ください。真空管の寿命
を延ばし、またプレイに復帰する際、真空管が温まるまで発音に要する時間を、短
縮できます。
O.
COOL
2A 1A 1B 2B
AA. MAIN SPEAKER / EXTERNAL SPEAKER̶
!
スピーカーはアンプがオンになっている時には、常に必ず、MAIN SPEAKERジ
ャックに接続されている必要があります。接続されていない場合、ユニットにダメ
ージが生じる場合があります。スピーカーの接続やインピーダンス設定を変更す
る際は、アンプの電源をオフにするか、スタンバイにしてください。
スピーカーエンクロージャーを接続し、インピーダンス・セレクター{Z}を下
図の通りに設定してください。
メイン・スピーカー
16Ω
+
16Ω
+
8Ω
+
8Ω
+
4Ω
+
外部スピーカー
無し
16Ω
無し
8Ω
無し
インピーダンス・セレクター
=
16Ω
=
8Ω
=
8Ω
=
4Ω
=
4Ω
RETURN LEVEL̶ RETURN {S} ジャックの、パワーアンプへ送る、イン
プット・レベルを調節します。エフェクトがオフになっている際のボリューム・
レベルのバランスを調節するのに使用したり、フットスイッチでボリュームを
切り替える際の、ボリューム・レベルを調節するのに使用します。
fender.com
25
BURN チャンネル 参考セッティング
ビッグ・ラック
ストラトキャッ
ト
ブロント・ソニック
タッチ・センシテ
ィブ
ファット&ウォ
ーム
仕様
型式:
SUPER-SONIC 100 HEAD
SUPER-SONIC TWIN (COMBO)
タイプ:
PR 903
PR 903
品番:
2162100x00* (120V, 60Hz)
2162101x00* (110V, 60Hz) 台湾
2162103x00* (240V, 50Hz) 豪州
2162104x00* (230V, 50Hz) 英国
2162105x00* (220V, 50Hz) アルゼンチン
2162106x00* (230V, 50Hz) 欧州
2162107x00* (100V, 50Hz) 日本
2162109x00* (220V, 60Hz) 韓国
2162000x00* (120V, 60Hz)
2162001x00* (110V, 60Hz) 台湾
2162003x00* (240V, 50Hz) 豪州
2162004x00* (230V, 50Hz) 英国
2162005x00* (220V, 50Hz) アルゼンチン
2162006x00* (230V, 50Hz) 欧州
2162007x00* (100V, 50Hz) 日本
2162009x00* (220V, 60Hz) 韓国
所要電力:
325W
325W
パワーアンプ出力:
100W RMS @ 10% THD, 1kHz 正弦波で8Ω
100W RMS @ 10% THD, 1kHz正弦波で8Ω
入力インピーダンス:
1MΩ
1MΩ
出力インピーダンス:
4Ω / 8Ω / 16Ω (選択可能)
4Ω / 8Ω / 16Ω (選択可能)
F 8A L, 250V
F 4A L, 250V
F 8A L, 250V
F 4A L, 250V
真空管:
(4) 6L6GC; (7) 12AX7A; (2) 12AT7
(4) 6L6GC; (7) 12AX7A; (2) 12AT7
フットスイッチ(付属):
4ボタン(078324)
1. Vintage/Burn, 2. Normal/Fat, 3. Reverb, 4. Effects
4ボタン (078324)
1. Vintage/Burn, 2. Normal/Fat, 3. Reverb, 4. Effects
スピーカー:
Super-Sonic® 100 412 ST** (2162400x00)*
Super-Sonic® 100 412 SL** (2162450x00)*
8Ω, 12インチ Celestion® Vintage 30x2基 (047279)
26.7 cm
66.7 cm
26.7 cm
51.4 cm
66.7 cm
28.7 cm
24 kg
37.65 kg
ヒューズ
サイズ
100V-120V ユニット:
220V-240V ユニット:
高さ:
幅:
奥行き:
重量:
*Super-Sonicアンプリファーおよびスピーカー・キャビネット外装カラーコード : ブラック "x"=0、ブロンド "x"=4
**エンクロージャー推奨。別売。
製品の仕様は予告無く変更になることがあります。
26
fender.com
䚼ӊ䚼ӊৡ⿄
(Part Name)
䚼ߚ⬉ᄤܗӊ
䚼ߚᴎ఼ࡴᎹ䞥ሲ䚼ӊ
䚼ߚ݊Ҫ䰘ሲ䚼ӊ
䪙
(PB)
x
x
x
᳝↦᳝ᆇ⠽䋼ܗ㋴
(Hazardous Substances’ Name)
∲
䬝
݁Ӌ䫀 ⒈㘨㣃
(Hg)
(Cd)
(Cr6+)
(PBB)
o
o
o
o
o
o
o
o
o
o
o
o
⒈Ѡ㣃䝮
(PBDE)
o
o
o
O: 㸼⼎䆹᳝↦᳝ᆇ⠽䋼䆹䚼ӊ᠔᳝ഛ䋼ᴤ᭭Ёⱘ䞣ഛ SJ/T 11363-2006 㾘ᅮⱘ⦄䞣㽕∖ҹϟ
X: 㸼⼎䆹᳝↦᳝ᆇ⠽䋼㟇ᇥ䆹䚼ӊⱘᶤϔഛ䋼ᴤ᭭Ёⱘ䞣䍙ߎ SJ/T 11363-2006 㾘ᅮⱘ⦄䞣㽕∖
This product is covered by one or more of the following patents:
US Patent Pending
AMPLIFICADOR DE AUDIO
IMPORTADO POR: Instrumentos Musicales Fender S.A. de C.V., Calle Huerta # 132, Col. Carlos Pacheco, C.P. 228890, Ensenada, Baja California, Mexico.
RFC: IMF870506R5A Hecho en E.E.U.U. Servicio de Cliente: 001-8665045875
A PRODUCT OF:
FENDER MUSICAL INSTRUMENTS CORPORATION
CORONA, CALIFORNIA, USA
Fender®, Super-Sonic™, Blackface®, Showman®, Twin Reverb® are trademarks of FMIC.
Other trademarks are property of their respective owners.
Copyright © 2010 FMIC. All rights reserved.
P/N 080561 REV A