1
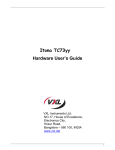
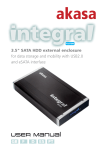
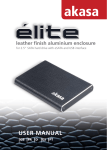
Ref
Itona LQ+ Series
Hardware Installation Guide
Guide d’Installation Hardware
Hardware-Installationsanweisungen
Instalación del hardware
Front View
Ref
This Class B digital apparatus complies with Canadian ICES-003.
Cet appareil numérique de classe B est conforme à la norme canadienne ICES-003.
Dieses digitale Class B-Gerät entspricht der Canandian ICES-003.
Este aparato digital de Clase B cumple la normativa canadiense ICES-003.
English
Français
Deutsch
Español
Components
Composants
Bauteile
Componentes
12
Two USB 2.0 Port
Deux ports
USB 2.0
Zwei ports USB
2.0
Dos ports USB 2.0
13
Two USB 3.0 Ports
Deux ports
USB 3.0
Zwei ports USB
3.0
Dos ports USB 3.0
14
HDMI Port
Port HDMI
HDMI-Anschluss
Puerto HDMI
15
Display Port (DP)
Port d’affichage
(DP)
Display-Anschluss (DP)
Puerto de pantalla
(DP)
16
Ethernet Port
Port ethernet
Ethernet-Anschluss
Puerto Ethernet
17
DC Power In
Alimentation
d’entrée DC
DC Stromeingang
Entrada CC
Rear View
English
Français
Deutsch
Español
Components
Composants
Bauteile
Componentes
1
Power Button
Bouton d’alimentation
Ein/Aus-Taste
Botón de encendido
2
Audio Out Port
Port sortie
audio
Audioausgang-Anschluss
Puerto de salida de
audio
3
Mic
Microphone
Mic
Micrófono
4
Two USB 2.0 Ports
Deux ports
USB 2.0
Zwei USB
2.0-Anschlüsse
Dos puertos USB
2.0
5
Mini PCIe WiFi
LED
LED de Mini
PCIe WiFi
Mini PCIe
WiFi-LED
LED Mini PCIe WiFi
6
HDD LED
LED disque dur
HDD-LED
LED HDD
7
Pedestal
Piédestal
Sockel
Pedestal
8
PCIe Slot Cover
Emplacement
PCIe couverture
PCIe-Slot-Abdeckung
Cubierta de la
ranura PCIe
9
VGA Port
Port VGA
VGA-Anschluss
Puerto VGA
10
Power Cord
Anchor
Fiche du
cordon d’alimentation
Netzkabelverankerung
Ancla del cable de
alimentación
11
Mini PCIe WiFi
(Optional)
Mini PCIe WiFi
(facultatif)
Mini PCIe WiFi
(Option)
Mini PCIe WiFi
(opcional)
© 2014 VXL Instruments Limited.
600 0110 547 77 A02
1
2
English
Français
Product Safety
Improper connection/mounting of this product could result in product
failure or damage. Please read this guide carefully before setting up
your Itona thin client.
Battery Disposal
Batteries and battery packs should not be disposed together with the
general household waste. In order to forward them to recycling or
proper disposal, please use the public collection system for
electronic waste in your country.
VXL Technical Support
To access VXL hardware and software documentation, visit:
http://www.vxl.net//Independent/product-manuals.aspx
Note: For more information about installing the
VESA Dock and Pedestal, refer to the
Itona LQ+ Series Hardware User Guide.
3. Connect the USB mouse and keyboard to the USB Ports.
4. Connect the network cable to the Ethernet Port.
5. Connect the monitor to the VGA Port, HDMI Port, Display Port or DVI Port (via HDMI to DVI converter
cable).
6. Connect the power cable to a grounded 3 pin electrical outlet.
For more details about Product Warranty, visit:
http://www.vxl.net/Support/Product-Warranty-Terms.aspx
Switching on the Itona LQ+ Series
Package Contents
The Itona LQ+ Series package contains the following items:
• Itona LQ+ Series Thin Client
• Power Adapter 65 W, 19 V DC
• Power Cord country specific (Optional)
• Mouse (Optional)
• HDMI to DVI converter cable
• Pedestal
• This Manual
Setting up the Itona LQ+ Series
Pour consulter la documentation logicielle et matériel de VXL,
rendez-vous sur:
http://www.vxl.net//Independent/product-manuals.aspx
Pour le soutien en ligne ou pour signaler un problème, rendez-vous sur:
http://vxlsupport.me/.
Guide d’Installation Hardware
3. Activate your account by following the instructions provided in the verification mail.
4. In the Login Tab, enter your Email Address and Password.
5. Click on Submit a Ticket and select VXL Thin Client Support.
Le paquet Itona Série LQ+ est composé des articles listés ci-dessous:
• Client léger Itona Série LQ+
• Adaptateur d’alimentation 65 W, 19 V DC
• Cordon d’alimentation pays spécifique (facultatif)
• Souris (facultative)
• HDMI à DVI câble convertisseur
• Piédestal
• Ce manuel
Instructions de sécurité
6. Click Next, fill in the requested information along with
the problem description, and click Submit.
Your problem will be registered and you will receive an email with a
ticket number.
Please mention the ticket number in future correspondence
regarding the issue.
1. Go to http://vxlsupport.me/ and login using your Email Address and Password.
2. Select the My Ticket option to view your ticket status.
3
Soutien technique VXL
Reporting a Problem
Checking the Status of Your Ticket
1. Unpack the unit from the carton. Take care not to drop the product when removing from the carton as it may damage the product.
Les piles et accumulateurs ne doivent pas être jetés avec les ordures
ménagères. Pour les recycler ou éliminer les piles sans risque pour
l’environnement, veuillez les déposer dans les centres de gestion
de déchets publics pour objets électroniques présents dans votre
région.
Pour de plus amples renseignements sur la garantie du produit,
rendez-vous sur :
http://www.vxl.net/Support/Product-Warranty-Terms.aspx
2. Click on Register. Provide the required details to complete registration.
Follow these precautions when installing Itona LQ+ Series:
• Use approved 3 Pin grounded power cord only. Ensure that you plug the power cord into a grounded 3 pin
electrical outlet.
• Allow approximately 4 Inches of space around the product for effective ventilation.
• Always place the client vertically for convection cooling.
• Do not operate this equipment in corrosive or explosive environment.
For more details about safety instructions, visit
http://vxl.net/Support/HardwareInstallationGuides.aspx
La connexion / le montage impropre du produit peut entraîner sa défaillance ou des dégâts. Veuillez lire attentivement ce mode d’emploi
avant d’installer votre client léger Itona.
Press the Power Button. You will hear a beep and subsequently the
operating system start-up screen appears.
1. Go to http://vxlsupport.me/.
Note: Skip to Step 4 if you are a registered user.
Safety Instructions
Sécurité produit
Elimination des piles
Note: For instructions to connect dual monitors,
refer to the Itona LQ/LQ+ Series Hardware User Guide.
For online support or reporting a problem, visit:
http://vxlsupport.me/
2. Snap fit the pedestal to place the thin client on a desk.
Or
Install the VESA Dock to mount the thin client on a wall, behind the monitor or under the counter.
4
Veuillez suivre ces précautions lorsque vous installez l’Itona série
LQ+:
• Utilisez un cordon d’alimentation homologué à 3 broches mis à la terre. Assurez-vous de brancher le cordon d’ali
mentation sur une prise électrique à 3 broches mise à la terre.
• Laissez une espace d’environ 10 cm autour du produit, pour assurer une ventilation efficace.
• Positionnez toujours le client verticalement, pour assurer un refroidissement par convection.
• N’utilisez pas cet équipement dans un environnement corrosif ou explosif.
Pour de plus amples consignes de sécurité, http://vxl.net/Support/
HardwareInstallationGuides.aspx
5
Deutsch
Installation de l’Itona Série LQ+
Vérification de l’état de votre ticket
1. Retirez l’unité du carton. Veillez à ne pas faire tomber le produit lorsque vous le retirez du carton : ceci pourrait endommager le produit.
2. Enclenchez le piédestal pour positionner le client léger sur un bureau, ou
Installez la station VESA pour monter le client léger sur un mur, derrière le moniteur ou sous un comptoir.
Produktsicherheit
Falscher Anschluss/Montage dieses Produkt kann zum Versagen
oder zur Beschädigung des Produkts führen. Lesen Sie diese Anweisungen bitte aufmerksam durch, bevor Sie Ihren Itona Thin Client
einrichten.
1. Visite http://vxlsupport.me/ et connectez-vous en utilisant votre adresse Email et le mot de passé
2. Sélectionnez l’option « My Ticket » pour afficher votre statut de ticket
Akku-Entsorgung
Akkus und Akku-Pakete dürfen nicht zusammen mit dem normalen
Haushaltsmüll entsorgt werden. Um sie zum Recycling oder zur
ordnungsgemäßen Entsorgung zu senden, benutzen Sie bitte das
öffentliche Sammelsystem für Elektronikmüll in Ihrem Land.
Note: Pour toutes informations complémentaires sur l’in stallation de la station VESA et du piédestal, veuillez vous reporter au Guide d’utilisation
hardware Itona Série LQ+.
3. Connectez la souris USB et un clavier aux ports USB.
4. Connectez le câble réseau au port ethernet.
5. Connectez le moniteur au port VGA, port HDMI, Display Port ou port DVI (via HDMI à câble convertisseur DVI).
Note: Pour obtenir des instructions pour connecter deux moniteurs, reportez-vous à la Itona LQ/
LQ+ Series Guide de l’utilisateur du matériel.
6. Connectez le cordon d’alimentation sur une prise élec
trique à 3 broches mise à la terre.
VXL Technischer Support
Für den Zugriff auf VXL Hardware- und SoftwareDokumentation besuchen Sie bitte:
http://www.vxl.net//Independent/product-manuals.aspx
Für Online-Support oder um ein Problem zu melden, besuchen
Sie bitte:
http://vxlsupport.me/
Für weitere Einzelheiten über die Produktgarantie besuchen Sie
bitte:
http://www.vxl.net/Support/Product-Warranty-Terms.aspx
Allumer l’Itona Série LQ+
Hardware-Installationsanweisungen
Appuyez sur le bouton d’alimentation. Vous entendrez un bip, et
l’écran de démarrage du système d’exploitation sera ensuite affiché.
Das Itona Paket der LQ+ Serie besteht aus den folgenden Posten:
• Itona LQ+ Serie Thin Client
• Netzgerät 65 W, 19 V DC
• Netzkabel (Option)
• HDMI zu DVI Konverterkabel
• Maus (Option)
• Sockel
• Diesem Handbuch
Signalez un problème
1. Visite: http://vxlsupport.me/
Note: Allez directement à l’étape 4, si vous êtes un
utilisateur enregistré.
2. Cliquez sur enregistrement ‘. Entrer les informations détaillées d’enregistrement.
3. Activer votre compte en suivant les instructions envoyées dans l’email de vérification.
4. Sur « Log-in », entrez votre adresse E-mail et le mot de passe.
5. Cliquez sur « Soumettre un Ticket » et sélectionnez « VXL Thin Client Support ».
6. Cliquez sur « Suivant », soumettre les informations demandées ainsi que la description du problème et puis cliquez sur « Soumettre ».
Sicherheitsanweisungen
Befolgen Sie diese Sicherheitsmaßnahmen bei der Installation von
Itona LQ+ Serie Geräten:
• Stets ein zugelassenes dreistiftiges, geerdetes Netzkabel benutzen. Das Netzkabel muss an eine geerdete, dreistif
tige Steckdose angeschlossen werden.
• Um das Produkt herum ca. 10 cm Freiraum lassen, um effektive Belüftung zu gewährleisten.
• Den Client zur Umluftkühlung stets vertikal aufstellen.
• Das Gerät darf nicht in einer korrosiven oder explosions
gefährdeten Umgebung betrieben werden.
Weitere Einzelheiten über Sicherheitsanweisungen finden Sie
unter http://vxl.net/Support/HardwareInstallationGuides.aspx
Votre problème sera enregistré sur la base de données et vous recevrez un courriel avec un numéro de référence du billet unique.
Veuillez utiliser le numéro de ticket unique dans toute future correspondance.
6
7
8
Español
Setup des Itona LQ+ Serie
1. Die Einheit aus dem Karton nehmen. Das Produkt vor
sichtig herausnehmen und nicht fallen lassen, da es
dadurch beschädigt werden könnte.
2. Den Sockel aufschnappen, um den Thin Client auf einem Schreibtisch aufzustellen
Oder
Das VESA Dock installieren, um den Thin Client an der Wand, hinter dem Monitor oder unter der Arbeitsplatte anzubringen.
Hinweis: Weitere Informationen zur Installation von VESA Dock und Sockel finden Sie in den Hardware-Benutzeran weisungen für die Itona LQ+ Serie.
Bitte erwähnen Sie die Ticketnummer in Zukunftige Korrespondenz
mit uns bezüglich das Problem
Kontrollen
Kontrollen Sie des Status Ihres Tickets
1. Gehen Sie zu http://vxlsupport.me/, melden Sie sich ein mit Ihre Email-addresse und Passwort ein.
2. Wählen Sie aus die Option „Mein Tickets“ um die Status Ihre Ticket zu sehen.
El montaje o la conexión de manera incorrecta de este producto podrían estropearlo u ocasionar daños personales. Lea detenidamente
esta guía antes de instalar su cliente ligero Itona.
Eliminación de las baterías
Las pilas y baterías no deben eliminarse junto con la basura
doméstica. Para reciclarlos o eliminarlos correctamente, utilice el
sistema público de recogida de residuos electrónicos vigente en su
país.
Asistencia técnica de VXL
Para acceder a documentación sobre hardware y software VXL,
visite:
http://www.vxl.net//Independent/product-manuals.aspx
3. USB-Tastatur und -Maus benutzen, schließen Sie diese an die USB-An.
Para obtener asistencia online o notificar un problema, visite:
http://vxlsupport.me/
4. Netzwerkkabel an den Ethernet-Anschluss anschließe
5. Schließen Sie den Monitor an den VGA-Port, HDMI-Port, Display Port oder DVI-Anschluss
(über HDMI-auf-DVI-Konverter-Kabel).
Seguridad del producto
Para más información sobre la garantía del producto, visite:
http://www.vxl.net/Support/Product-Warranty-Terms.aspx
Instalación del hardware
Hinweis: Für Anweisungen, um zwei Monitore an
schließen, auf die Itona LQ/LQ+ Serie Hard
ware-Benutzer handbuch.
El paquete Itona Serie LQ+ consta de los siguientes componentes:
• Cliente ligero Itona Serie LQ+
• Adaptador de alimentación de 65 W, 19 V CC
• Cable de alimentación (opcional)
• Ratón (opcional)
• HDMI al cable convertidor de DVI
• Pedestal
• Este manual
6. Netzkabel an eine geerdete, dreistiftige Steckdose an
schließen.
Einschalten des Itona der LQ+ Serie
Den Ein/Aus-Schalter drücken. Sie hören einen Piepton, dann erscheint die Startanzeige des Betriebssystems.
Instrucciones de seguridad
Problem Meldung
Siga estas precauciones durante la instalación del Itona Serie LQ+:
• Use exclusivamente un cable de alimentación de 3 polos con toma de tierra homologado. Enchufe el cable de alimentación a una toma de corriente de 3 polos con toma de tierra.
• Deje unos 10 cm de espacio alrededor del producto para que esté correctamente ventilado.
• Coloque siempre el cliente en posición vertical para que se refrigere por convección.
• No utilice este aparato en entornos corrosivos o explo
sivos.
Para más información sobre instrucciones de seguridad, visite,
http://vxl.net/Support/HardwareInstallationGuides.aspx
1. Gehen Sie zu http://vxlsupport.me/
Hinweis: ueberspringen zur Abschnitt 4 wenn Sie schon ein registierte Benutzer sind.
2. Klicken Sie auf Anmeldung, Geben Sie erforderlichen Angaben ein um die Registrierung abzuschliessen.
3. Folgen Sie die Anweisungen in der Bestätigungs-E-Mail
um Ihre Accounts zu aktivieren
4. In Registerkarte Anmelden, geben Sie Ihre Email-adresse
u. Passwort ein.
5. Klicken Sie auf Ticket einreichen und „VXL Thin Client Support“ auswählen.
6. Auf „Weiter“ Klicken, füllen Sie die erforderlichen Informationen und die Problembeschreibung ein und auf „Senden“ Klicken.
Beschreibene Problem wird registriert, und Sie werden eine E-Mail
mit einer Ticket-Nummer erhalten.
9
10
11
Configuración del Itona Serie LQ+
Verificar el estado de tu boleto
1. Desembale la unidad. Procure que no se le caiga el pro
ducto al sacarlo de la caja, porque podría estropearse.
2. Encaje el pedestal para colocar el cliente ligero sobre un escritorio.
O bien
Instale el adaptador VESA de montaje mural para el cli
ente ligero, detrás del monitor o debajo del mostrador.
Nota: Para más información sobre cómo montar el
adaptador VESA, consulte la guía del usuario del hardware Itona Serie LQ+.
3. Conecte el ratón USB y un teclado a los puertos USB.
4. Conecte el cable de red al puerto Ethernet.
5. Conecte el monitor al puerto VGA, puerto HDMI, Display Port o Puerto DVI (a través de un cable HDMI a DVI con
vertidor).
Nota: Para obtener instrucciones para conectar dos monitores, consulte la Guía del usuario del hard
ware Itona LQ/LQ+ Series.
6. Enchufe el cable de alimentación a una toma de corriente de 3 polos con toma de tierra.
Encendido del Itona Serie LQ+
Pulse el botón de encendido. Oirá un pitido y, a continuación, aparecerá la pantalla de inicio del sistema operativo.
Informar de un problema
1. visite http://vxlsupport.me/. Nota: Ir a 4. abajo si ya eres un usuario registrado.
2. Haga clic en ‘Registrarse’. Rellene los datos necesarios para completar el registro.
3. activar tu cuenta siguiendo las instrucciones
proporcionadas en el correo de verificación.
4. en el ‘Login’, introduzca su dirección de correo electrónico y contraseña.
5. Haga clic en ‘Enviar un Ticket’ y seleccione ‘VXL Thin Client Support’.
6. Haga clic en ‘Siguiente’ y luego complete la información solicitada junto con una descripción del problema y luego haga clic en ‘Enviar’.
Su consulta será registrada en la base de datos y usted recibirá un
correo electrónico con un número de referencia único boleto.
Por favor use el número del boleto correspondencia futura.
12
1. visite http://vxlsupport.me/ y ‘Login’ utilizando su dirección de correo electrónico y contraseña..
2. Seleccione la opción ‘Mi Ticket’ para ver el estado de tu boleto.