1
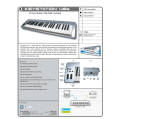
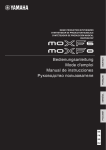
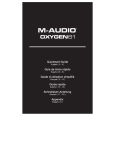
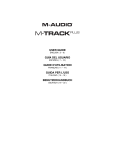
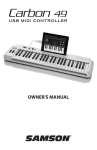
Quickstart Guide
English
English (( 22 –– 44 ))
Guía de inicio rápido
Español
Español (( 55 –– 77 ))
Guide d'utilisation rapide
Français
Français (( 88 –– 10
10 ))
Guida rapida
Italiano
Italiano (( 11
11 –– 13
13 ))
Kurzanleitung
Deutsch
Deutsch (( 14
14 –– 16
16 ))
Appendix
English
English (( 17
17 –– 18
18 ))
Quickstart Guide (English)
Introduction
Congratulations on purchasing the M-Audio Keystation 49es keyboard. The 49 key velocity-sensitive USB
keyboard is designed to easily integrate with your PC or Macintosh computer. Keystation 49es offers semiweighted keys that give you the feel of a piano in a compact MIDI controller. Ideal for a multitude of music
creation and education applications, Keystation 49es offers a pitch bend wheel, directional and transport
buttons for software control, plus an assignable modulation wheel and a slider for hands-on control. Though
Keystation 49es is class compliant and features true plug-and-play operation under Windows Vista, Windows
7, Windows 8, and Mac OS X, we recommend that you spend a few minutes reviewing this manual to learn
about proper operation, advanced functionality, and programmability.
Box Contents
Keystation 49es, USB Cable, Ableton Live Lite Software Download Card, Quickstart Guide, Safety &
Warranty Manual
Support
For the latest information about this product (system requirements, compatibility information, etc.) and
product registration, visit m-audio.com/keystation49esii.
For additional product support, visit m-audio.com/support.
To learn more about Keystation 49es's advanced functions, please see the full User Guide, available at
m-audio.com/keystation49esii.
Quick Start
Connecting Your Keyboard
Keystation 49es is powered through a USB connection to a computer. It is recommended that you connect
Keystation 49es to a computer’s onboard USB port or to a powered USB hub. The single USB cable not only
powers the keyboard but also sends MIDI data to and from your computer system.
You can also use Keystation 49es with your iPad to control supported music creation apps.
Connecting your Keystation 49es to an iPad requires the iPad Camera Connection Kit, which is available
from the Apple Store.
Connection Diagram
COMPUTER*
ON/OFF
POWER
SUSTAIN
PEDAL*
2
*SOLD
SEPARATELY
Recommended Installation
Ableton Live Lite: We've included Ableton Live Lite with your Keystation 49es so you can get started
making music with professional software right out of the box. Follow the instructions on the included software
download card for installing Ableton Live Lite.
Getting Started
Follow the instructions on the included software download card for installing Ableton Live Lite. Once you
have finished installation, you will need to configure your MIDI software to use the Keystation 49es. Please
note that when you press a key on the keyboard, you will not hear any sound. This is because pressing a key
causes the keyboard to send out MIDI data. MIDI data gives instructions on how a sound should play, but in
order to actually hear that sound you need to configure your music software to read the MIDI data being sent
from the Keystation 49es and play the sound back accordingly. This setup will more than likely entail going
into an Options or Device Set-Up menu in your music software application and selecting the appropriate
device. The Keystation 49es should appear under the name “Keystation 49es” for Windows Vista, Windows
7, Windows 8, and Mac OS X. Please consult the manual that came with your software for the proper setup
procedure.
Features
Top Panel
Keyboard
Most of the white keys and black keys on the Keystation 49es are labeled with names. When in the
Advanced menu, pressing any of the labeled keys will allow for special operations such as adjusting the MIDI
channel, transposing, and sending program change messages.
Octave Buttons
If you press the octave “+” button once, the LED above the octave “-” button will turn off, indicating the
keyboard’s octave is now shifted up. If you press the octave “+” key again, you will shift one more octave up,
and so on. It is possible to shift the keyboard up 3 octaves or down 3 octaves from 0 octave shift.
To shift the octave down, press the octave “-” button and notice that the LED above the octave “+” turns off. If
only the LED above the octave “-” key is lit, the octave is shifted down and, if only the LED above the octave
“+” key is lit, the octave is shifted up. The octave “+” and octave “-” LEDs will change color when moving up
or down more than one octave.
To return the octave shift to 0, press both the octave “+” and “-” keys together. Both LEDs will light, indicating
that the octave shift has returned to 0.
Volume Slider
The Volume Slider sends a MIDI message that controls the volume of the notes you are playing. The Volume
Slider can also be assigned to different effects such as pan (balance), attack, reverb, chorus and many more.
To learn more about Keystation 49es's advanced functions, please see the full User Guide, available at
m-audio.com/keystation49esii.
Pitch Bend Wheel
As the name indicates, the pitch bend wheel is primarily used to bend the notes played on the keyboard up or
down. This allows you to play phrases not normally associated with keyboard playing, such as guitar-style
riffs. Your sound source determines how far you can bend the note. The usual setting is two semitones, but it
can be up to two octaves up or down.
Modulation Wheel
The modulation wheel is typically used for modulation of the sound you are playing. This type of real-time
controller was originally introduced on electronic keyboard instruments to give the performer options such as
adding vibrato, just like players of acoustic instruments do. The modulation wheel is fully MIDI-assignable.
3
Advanced Functions Button
The Advanced Functions button is used to access all the advanced functions of the keyboard.
When the Advanced Functions button is pressed, the keyboard goes into “Edit Mode.” In Edit Mode, the keys
on the keyboard are used for selecting functions and entering data.
The LED above the Advanced Functions button indicates whether or not Edit Mode is engaged. In Edit Mode,
the black keys on the keyboard are used for selecting functions, while the white keys are used for data entry
and channel selection.
Your keyboard will slip out of Edit Mode as soon as a function is selected, or the Advanced button, CANCEL
or ENTER key is pressed (the LED above the Advanced Functions button will turn off). The keyboard can
then be used to play notes again.
To learn more about Keystation 49es's advanced functions, please see the full User Guide, available at
m-audio.com/keystation49esii.
Directional Buttons
These buttons can use the Mackie Control® or HUI® protocols to control certain functions in software that
support them. To learn more about Keystation 49es's advanced functions, please see the full User Guide,
available at m-audio.com/keystation49esii.
Transport Buttons
These buttons can use the Mackie Control or HUI protocols to control certain functions in software that
support them. To learn more about Keystation 49es's advanced functions, please see the full User Guide,
available at m-audio.com/keystation49esii.
Rear Panel
1.
2.
USB Port: The USB port delivers power to the keyboard
and transmits MIDI data when connected to a computer
to trigger a software synth or MIDI sequencer.
Sustain Pedal Input: This socket accepts a
momentary-contact foot pedal (sold separately). When
pressed, this pedal will sustain the sound you are
playing without having to keep your fingers pressing
down the keys.
1
2
3
ON/OFF
POWER
NOTE: The polarity of the sustain pedal is determined by the keyboard upon startup. When Keystation
49es is powering up, the sustain pedal is assumed to be in the "up" (Off) position. It is important that the
sustain pedal is not pressed during startup, otherwise the pedal will reverse its operation, and notes will
sustain when the pedal is not pressed.
NOTE: A foot pedal can be used for sustaining the sound that you are playing, without having to keep
your hands on the keyboard (just like the sustain pedal on a piano).
You can plug a foot pedal of any polarity, sold separately, into the foot pedal input on your M-Audio
keyboard. The keyboard will automatically detect the correct polarity when powering up. If you want to
reverse the polarity, simply depress the pedal when you switch on your keyboard.
3.
On/Off Switch: Use this switch to power the device on or off.
4
Guía de inicio rápido (Español)
Introducción
Felicitaciones por la compra de su teclado M-Audio Keystation 49es. Este teclado USB sensible a la
velocidad de 49 teclas está diseñado para integrarse fácilmente con su PC o computadora Macintosh. El
Keystation 49es ofrece teclas semicontrapesadas que le dan la sensación de un piano en un controlador
MIDI compacto. Ideal para una multitud de aplicaciones de creación de música y educación, el Keystation
49es ofrece una rueda de inflexión de pitch, botones direccionales y de transporte para control de software,
más una rueda de modulación asignable y un deslizador para control manual. A pesar de que el Keystation
49es cumple especificaciones de clase y ofrece una operación plug and play con Windows Vista, Windows
7, Windows 8 y Mac OS X, le recomendamos que se tome unos minutos para leer este manual y aprender
acerca del funcionamiento correcto, la funcionalidad avanzada y programabilidad.
Contenido de la caja
Keystation 49es, Cable USB, Ableton Live Lite Tarjeta de descarga de software, Guía de inicio rápido,
Manual sobre la seguridad y garantía
Soporte
Para obtener la información más completa acerca de este product (los requisitos del sistema, compatibilidad,
etc) y registro del producto, visite m-audio.com/keystation49esii.
Para soporte adicional del producto, visite m-audio.com/support.
Para aprender más acerca las funciones avanzadas del Keystation 49es, consulte la Guía del usuario
completa, disponible en m-audio.com/keystation49esii.
Inicio rápido
Conexión del teclado
El Keystation 49es se alimenta a través de una conexión USB a una computadora. Se recomienda que
conecte el Keystation 49es al puerto USB incorporado de una computadora o a un concentrador USB
alimentado. El único cable USB no solo alimenta al teclado sino que también envía datos MIDI desde y hacia
su computadora.
También puede utilizar el Keystation 49es con su iPad para controlar las aplicaciones de creación de música
compatibles.
La conexión del Keystation 49es con un iPad requiere el iPad Camera Connection Kit, que está disponible
en Apple Store.
Diagrama de conexión
COMPUTADORA*
ON/OFF
POWER
* Se vende por separado
PEDAL DE
SOSTENIDO*
5
Instalación recomendada
Ableton Live Lite: Hemos incluido Ableton Live Lite con su Keystation 49es de modo que puede comenzar
a hacer música con software profesional en cuanto lo saca de la caja. Siga las instrucciones de la tarjeta de
descarga de software incluida para instalar Ableton Live Lite.
Guía de inicio rápido
Siga las instrucciones de la tarjeta de descarga de software incluida para instalar Ableton Live Lite. Una vez
concluida la instalación deberá configurar su software MIDI para poder utilizar el Keystation 49es. Recuerde
que de momento el teclado no producirá ninguna clase de sonido cuando pulse una tecla. Esto se debe a
que, al pulsar una tecla, el teclado se limita a enviar datos MIDI. Los datos MIDI son información acerca de
cómo debe reproducirse un sonido, pero para poder oírlo necesita configurar su software musical para que
lea los datos MIDI que Keystation 49es le envía y los reproduzca de manera adecuada. Muy probablemente,
esta configuración implicará la selección del dispositivo adecuado en algún menú “Opciones” o
“Configuración de dispositivos” de su software musical. El teclado Keystation 49es aparecerá en sus
programas como “Keystation 49es” (en Windows Vista, Windows 7, Windows 8, y Mac OS X). Por favor,
consulte el manual suministrado con su software para realizar una configuración correcta.
Características
Panel superior
Teclado
La mayoría de las teclas blancas y negras del Keystation 49es tienen rótulos con nombres. Dentro del menú
Advanced (Funciones avanzadas), presionar las teclas rotuladas permitirá realizar operaciones especiales
tales como ajustar el canal MIDI, transponer enviar mensajes de cambio de programa.
Octave Buttons
Si oprime el botón OCT (octava) “+” una vez, el LED que está arriba del botón de octava “-” se apagará,
indicando que la octava del teclado está desplazada hacia arriba. Si pulsa de nuevo el botón de octava “+”,
el rango del teclado aumentará en dos octavas, y así sucesivamente. Puede modificar el rango del teclado
hasta 3 octavas hacia arriba o hacia abajo partiendo de la posición predeterminada.
Para desplazar la octava hacia abajo, oprima el botón OCT “-” y note que el LED que está arriba del botón
de octava “+” se apaga. Si sólo permanece iluminada la tecla de octava “-”, el rango de octavas está
desplazado hacia abajo; Si sólo permanence iluminada la tecla de octava “+”, el rango de octavas está
desplazado hacia arriba. Los LED de octava “+” y octava “-” cambiarán de color cuando se desplace hacia
arriba o hacia abajo más de una octava.
Para regresar al rango normal 0, pulse ambas teclas de octava (“+” y “-”) al mismo tiempo. Ambos LEDs se
iluminarán para indicar que el rango de octava se encuentra de nuevo en “0”.
Deslizador volumen
El deslizador de volumen envía un mensaje MIDI que controla el volumen de las notas que está tocando.
También puede asignarlo a diferentes efectos, como por ejemplo el panorama (balance), ataque,
reverberación o chorus, entre otros. Para aprender más acerca las funciones avanzadas del Keystation
49es, consulte la Guía del usuario completa, disponible en m-audio.com/keystation49esii.
Rueda de pitch bend
La rueda de pitch bend se usa generalmente para alterar el tono de las notas tocadas en el teclado hacia
arriba o hacia abajo, lo cual le permite tocar frases que no se asocian normalmente con un instrumento de
teclado, por ejemplo un fraseo de guitarra.
Su fuente de sonido determina el rango en que la rueda de pitch bend altera el tono. El ajuste más común es
dos semitonos, aunque puede ser de hasta dos octavas hacia arriba o hacia abajo.
6
Rueda de modulación
La rueda de modulación se usa normalmente para modular el sonido que está tocando. Este tipo de
controlador en tiempo real se incorporó originalmente en los teclados electrónicos para ofrecer al
instrumentista opciones como las de agregar vibrato, tal como lo hace un músico al tocar un instrumento
acústico. La rueda de modulación es totalmente asignable vía MIDI.
Advanced Functions botón
El botón Advanced Functions permite acceder a las funciones avanzadas del teclado.
Al pulsar este botón, el teclado entra en modo de programación. Mientras se encuentre en este modo, las
teclas del teclado permiten seleccionar funciones e introducir datos.
El LED situado sobre el botón Advanced Functions indica si el teclado está o no en modo de programación.
Cuando está en modo de programación, las teclas negras permiten seleccionar funciones, mientras que las
blancas se usan para introducir datos y seleccionar canales.
Su teclado saldrá del modo Edit (Edición) cuando se seleccione una función o se pulse el botón Advanced,
las teclas CANCEL (Cancelar) o ENTER (se encenderá el LED que está arriba del botón Advanced
Functions [Funciones avanzadas]). Entonces podrá volver a utilizar el teclado para tocar notas.
Para aprender más acerca las funciones avanzadas del Keystation 49es, consulte la Guía del usuario
completa, disponible en m-audio.com/keystation49esii.
Botones direccionales
Estos botones pueden usar los protocolos Mackie Control® o HUI® para controlar ciertas funciones del
software que los soporta. Para aprender más acerca las funciones avanzadas del Keystation 49es, consulte
la Guía del usuario completa, disponible en m-audio.com/keystation49esii.
Botones de transporte
Estos botones pueden usar los protocolos Mackie Control o HUI para controlar ciertas funciones del software
que los soporta. Para aprender más acerca las funciones avanzadas del Keystation 49es, consulte la Guía
del usuario completa, disponible en m-audio.com/keystation49esii.
Panel trasero
1.
2.
Puerto USB: El puerto USB suministra alimentación al
teclado y transmite datos MIDI cuando se conecta a una
computadora para disparar un secuenciador MIDI o
sintetizador de software.
1
Entrada para pedal de sustain: Esta toma permite
conectar un pedal (se vende por separado). El pedal se
usa normalmente para sostener el sonido con el pie en
lugar de mantener las manos sobre el teclado.
2
3
ON/OFF
POWER
ATENCIÓN: El teclado detecta la polaridad del pedal de sustain en el momento de su puesta en
marcha. Al poner en marcha un teclado Keystation 49es, se asume que el pedal de sustain está en
posición "inactiva" (Off). Es importante no pulsar el pedal de sustain durante el arranque de la unidad;
de lo contrario, el pedal invertirá su funcionamiento y las notas se reproducirán en sostenido cuando
no se pulse el pedal.
ATENCIÓN: El pedal se usa normalmente para sostener el sonido sin necesidad de mantener las
manos sobre el teclado, tal como sucede con un piano acústico. Puede conectar un pedal (no
suministrado) de cualquier polaridad en la entrada para pedal del teclado. Al ponerse en
funcionamiento, el teclado detectará automáticamente la polaridad del pedal conectado. Si desea
invertir la polaridad, mantenga el pedal pulsado al poner el teclado en funcionamiento.
3.
Conmutador On/Off: Este conmutador enciende y apaga la unidad.
7
Guide d'utilisation rapide (Français)
Présentation
Nous vous félicitons d’avoir fait l'acquisition du clavier Keystation 49es de M-Audio, un clavier USB
dynamique de 49 touches conçu pour une intégration facile avec votre ordinateur PC ou Macintosh.
Keystation 49es offre des touches semi-lourdes qui vous donnent la sensation d'un piano dans un contrôleur
MIDI compact. Idéal pour de très nombreuses applications de création musicales et éducatives, le Keystation
49es propose une molette de modulation tonale, des touches de déplacement et de lecture pour la
commande logiciel, plus une molette de modulation et un curseur assignables pour un contrôle à portée de
main. Bien que le Keystation 49ese soit nativement compatible et offre un fonctionnement réellement prêt à
l’utilisation sous Windows Vista, Windows 7, Windows 8 et Mac OS X, nous vous recommandons de
consacrer quelques minutes à l’examen de ce guide pour apprendre comment utiliser correctement le
clavier, ses fonctions évoluées, et sa programmation.
Contenu de la boîte
Keystation 49es, Câble USB, Ableton Live Lite Téléchargement du logiciel carte, Guide d'utilisation rapide,
Consignes de sécurité et informations concernant la garantie
Assistance
Pour les dernières informations concernant ce produit (la configuration système minimale requise, la
compatibilité, etc) et l’enregistrement du produit, veuillez visiter m-audio.com/keystation49esii.
Pour toute assistance supplémentaire, veuillez visiter m-audio.com/support.
Afin d’en savoir plus sur le fonctions évoluées du Keystation 49es, veuillez consulter le Guide d’utilisation
complet disponible sur m-audio.com/keystation49esii.
Utilisation rapide
Connexion de votre clavier
Le Keystation 49es est alimenté via une connexion USB à un ordinateur. Il est recommandé de brancher le
Keystation 49es à un port USB intégré de l'ordinateur ou à un concentrateur USB alimenté. Le câble USB
permet non seulement d’alimenter le clavier, mais également de transmettre et de recevoir des données
MIDI depuis et vers un ordinateur.
Vous pouvez également utiliser le Keystation 49es avec votre iPad pour commander les applications de
création musicale supportées.
Afin d'utiliser le Keystation 49es avec votre iPad, vous devez vous procurer le Kit de connexion d'appareil
photo iPad offerte à la boutique Apple Store.
Schéma de connexion
ORDINATEUR*
ON/OFF
POWER
PÉDALE DE SUSTAIN*
8
*VENDU SÉPARÉMENT
Installation recommandée
Ableton Live Lite : Nous avons inclus l’application Ableton Live Lite avec le Keystation 49es afin que vous
puissiez commencer à créer de la musique avec un DAW logiciel de qualité professionnelle aussitôt que
vous le sortez de la boîte. Veuillez suivre les instructions sur la carte de téléchargement de logiciel afin
d’installer le logiciel Ableton Live Lite.
Démarrage
Veuillez suivre les instructions sur la carte de téléchargement de logiciel afin d’installer le logiciel Ableton
Live Lite. Une fois l’installation terminée, vous devrez configurer votre logiciel pour utiliser Keystation 49es.
Veuillez remarquer que si vous appuyez sur une touche du clavier, vous n’entendrez aucun son. En effet,
quand vous appuyez sur une touche, le clavier envoie les données MIDI vers l’extérieur. Les données MIDI
donnent des instructions sur la façon dont les sons doivent être joués, mais, pour entendre les sons, vous
devez configurer votre logiciel de musique pour la lecture des données MIDI envoyées par le Keystation
49es et pour la diffusion des sons correspondants. Cette configuration vous entraînera certainement vers un
menu Options ou Configurations périphériques (Device Set-Up) dans votre logiciel de musique afin d’y
sélectionner le périphérique approprié. Le Keystation 49es devrait apparaître dans la section reserve aux
périphériques MIDI de votre logiciel sous le nom « Keystation 49es » pour Windows Vista, Windows 7,
Windows 8, et Mac OS X. Veuillez consulter le manuel fourni avec votre logiciel pour une configuration
appropriée.
Caractéristiques
Panneau supérieur
Clavier
La plupart des touches blanches et noires du Keystation 49es sont étiquetées avec des noms. À partir du
menu Advanced, les touches étiquetées permettent d’effectuer des opérations spéciales telles que le réglage
du canal MIDI, la transposition, et la transmission de messages de changement de programme.
Octave Boutons
Si vous appuyez une fois sur la touche de décalage d’octave « + », la DEL au-dessus de la touche de
décalage d’octave « - » s'éteindra, indiquant que l’octave du clavier joue maintenant une octave plus haut. Si
vous appuyez encore sur le bouton d’octaves « + », vous monterez encore d’une octave, et ainsi de suite. Il
est possible de faire monter ou descendre le clavier de 3 octaves à partir de l’octave de départ 0.
Pour décaler l'octave vers le bas, appuyez sur la touche de décalage d’octave « - » et notez que la DEL audessus de l'octave « + » s'éteindra. Si seule la DEL située au-dessus du bouton d’octaves « - » est allumée,
cela signifie que l’octave est décalée vers le bas. Au contraire, si seule la DEL située au-dessus du bouton
d’octaves « + » est allumée, cela signifie que l’octave est décalée vers le haut. Les DEL des touches de
décalage d’octave « + » et « - » changent de couleur lorsque le clavier est décalé de plus d'une octave vers
le haut ou vers le bas.
Pour retourner à l’octave 0, appuyez en même temps sur les deux boutons d’octaves « + » et « - ». Les deux
témoins lumineux s’allumeront, ce qui indique que l’octave est revenue à 0.
Curseur de volume
Le curseur de volume envoie un message MIDI qui contrôle le volume des notes que vous jouez. Le curseur
de volume peut aussi être assigné à la création de divers effets tels que le panoramique (balance), l’attaque,
la reverb, le chorus et bien d’autres. Afin d’en savoir plus sur le fonctions évoluées du Keystation 49es,
veuillez consulter le Guide d’utilisation complet disponible sur m-audio.com/keystation49esii.
Molette de pitch-bend
Comme son nom l’indique, la molette de pitch-bend est principalement utilisée pour modifier la hauteur
tonale des notes jouées sur le clavier. Ceci vous permet de jouer des phrases musicales qui ne sont pas
normalement associées au son d’un clavier; par exemple, des riffs de guitare. C’est votre source sonore qui
détermine jusqu’à quel point vous pouvez modifier la hauteur tonale de la note. Le réglage habituel est de
deux demi-tons, mais il peut aller jusqu’à deux octaves monter ou descendre.
9
Molette de modulation
La molette de modulation est généralement utilisée pour moduler le son que vous jouez. Ce type de
contrôleur en temps réel a d’abord été implanté sur les claviers électroniques pour offrir au musicien des
options telles que l’ajout de vibrato, qui permet d’imiter le travail effectué avec des instruments acoustiques.
La molette de modulation est entièrement programmable par MIDI.
Fonctions avancées bouton
Le bouton « Advanced Functions » (fonctions avancées) est utilisé pour l’accès à toutes les fonctions
avancées du clavier.
Quand vous appuyez sur le bouton « Advanced Functions », le clavier se met en mode de programmation.
Dans ce mode, les touches sont utilisées pour sélectionner des fonctions et entrer des données.
Le témoin situé au-dessus du bouton « Advanced Functions » indique si le clavier se trouve en mode de
programmation. Dans le mode de programmation, les touches noires du clavier sont utilisées pour la
sélection de fonctions et les touches blanches pour l’entrée de données et le choix des canaux.
Le clavier quitte le mode Edit aussitôt qu'une fonction est sélectionnée, ou que la touche Advanced,
CANCEL ou ENTER est enfoncée (la DEL au-dessus de la touche Advanced Functions s'éteindra).
Le clavier peut donc être à nouveau utilisé pour produire des notes.
Afin d’en savoir plus sur le fonctions évoluées du Keystation 49es, veuillez consulter le Guide d’utilisation
complet disponible sur m-audio.com/keystation49esii.
Touches de déplacement
Ces touches peuvent utiliser les protocoles Mackie Control® ou HUI® afin de commander certaines fonctions
des logiciels audionumériques. Afin d’en savoir plus sur le fonctions évoluées du Keystation 49es, veuillez
consulter le Guide d’utilisation complet disponible sur m-audio.com/keystation49esii.
Touches de lecture
Ces touches peuvent utiliser les protocoles Mackie Control ou HUI afin de commander certaines fonctions
des logiciels audionumériques. Afin d’en savoir plus sur le fonctions évoluées du Keystation 49es, veuillez
consulter le Guide d’utilisation complet disponible sur m-audio.com/keystation49esii.
Panneau arrière
1.
2.
Port USB : Le port USB permet d’alimenter le clavier et de
transmettre des données MIDI lorsqu’il est branché à un ordinateur
pour déclencher un synthétiseur ou séquenceur MIDI logiciel.
1
Entrée pour pédale sustain : Cette prise accepte une pédale
momentanée (vendu séparément). La pédale est normalement
utilisée pour le soutien du son que vous jouez sans avoir à garder
les mains sur le clavier.
2
3
ON/OFF
POWER
REMARQUE : La polarité de la pédale de sustain est calculée par le clavier quand il est allumé. Quand
vous allumez le clavier, celui-ci fait l'hypothèse que la pédale est en position « inactive ». Il est
important que la pédale de sustain ne soit pas pressée lors du démarrage, pour éviter que son
fonctionnement soit inversé et que les notes soient soutenues lorsqu'elle n'est pas pressée.
REMARQUE : Vous pouvez utiliser une pédale pour prolonger le son que vous jouez sans avoir à
garder les mains sur le clavier (exactement comme la pédale forte (sustain) d’un piano). Vous pouvez
brancher une pédale (vendue séparément) de n’importe quelle polarité dans l’entrée pour pédale de
votre clavier M-Audio. Le clavier détectera automatiquement la polarité correcte lors de la mise en
marche. Si vous voulez inverser la polarité, appuyez simplement sur la pédale lorsque vous allumez
votre clavier.
3.
Interrupteur on/off : Utilisez cet interrupteur pour allumer ou éteindre le dispositif.
10
Guida rapida (Italiano)
Introduzione
Congratulazioni per aver acquistato la tastiera Keystation 49es di M-Audio. Questa tastiera USB a 49 tasti
sensibili alla velocità è stata concepita per integrarsi facilmente con il vostro PC o Macintosh. Il Keystation
49es presenta tasti semi-pesati che offrono la sensazione di un pianoforte in un controller MIDI compatto.
Ideale per tutta una serie di creazioni musicali e applicazioni educative, il Keystation 49es offre una rotella di
bend del pitch, tasti direzionali e di trasporto per il controllo del software, nonché una rotella di modulazione
assegnabile ed un cursore per il controllo diretto. Sebbene il Keystation 49es sia compatibile e sia dotato di
funzionalità plug-and-play in Windows Vista, Windows 7, Windows 8, e Mac OS X, si consiglia di dedicare
alcuni minuti ad analizzare il presente manuale per saperne di più in merito a un utilizzo adeguato, alle
funzioni avanzate e alla possibilità di programmazione.
Contenuti della confezione
Keystation 49es, Cavo USB, Ableton Live Lite Carta di download del software, Guida rapide, Istruzioni di
sicurezza e garanzia
Assistenza
Per conoscere le ultime informazioni in merito a questo prodotto (i requisiti di sistema complete,
compatibilità, ecc) e per la registrazione del prodotto, recarsi alla pagina m-audio.com/keystation49esii.
Per ulteriore assistenza, recarsi alla pagina m-audio.com/support.
Per saperne di più sulla sulle funzioni avanzate della Keystation 49es, si veda la guida per l'uso completa,
disponibile alla pagina m-audio.com/keystation49esii.
Inizio rapido
Collegamento della tastiera
Il Keystation 49es è alimentato tramite un collegamento USB al computer. Si consiglia di collegare il
Keystation 49es alla porta USB del computer o a un hub USB alimentato. Il singolo cavo USB non solo
alimenta la tastiera, ma invia dati MIDI da e verso il computer.
Si può inoltre utilizzare la Keystation 49es con l'iPad per controllare le app di creazione musicale supportate.
Per collegare la Keystation 49es a un iPad occorre l'iPad Camera Connection Kit, disponibile presso l'Apple
Store.
Schema dei collegamenti
COMPUTER*
ON/OFF
POWER
PEDALE
SUSTAIN*
11
*VENDUTO
SEPARATAMENTE
Installazione consigliata
Ableton Live Lite: abbiamo incluso l'Ableton Live Lite con l'Keystation 49es in modo che possiate iniziare
immediatamente a fare musica con software professionale. Seguire le istruzioni presenti nella scheda di
download del software in dotazione per installare il Ableton Live Lite.
Guida introduttiva
Seguire le istruzioni presenti nella scheda di download del software in dotazione per installare il Ableton Live
Lite. Una volta terminata l’installazione, è necessario configurare l’applicazione per poter utilizzare
Keystation 49es. Infatti, se si preme qualsiasi tasto della tastiera, non si udirà alcun suono. Ciò è dovuto al
fatto che la pressione del tasto determina l’invio da parte della tastiera di dati MIDI. Questi forniscono le
istruzioni su come riprodurre il suono, ma per udire effettivamente tale suono, occorre configurare il
programma musicale per la lettura dei dati MIDI inviati dalla Keystation 49es e per la relative riproduzione.
Per effettuare questa impostazione, è sufficiente accedere al menu Opzioni o Impostazione periferica
dell’applicazione e selezionare la periferica adeguata. La Keystation 49es dovrebbe apparire come
“Keystation 49es” in Windows Vista, Windows 7, Windows 8, e Mac OS X. Per la corretta procedura di
impostazione, consultare il manuale in dotazione al programma.
Caratteristiche
Pannello superiore
Tastiera
La maggior parte dei tasti bianchi e neri del Keystation 49es è contrassegnata da nomi. Quando ci si trova
nel menù Advanced (Avanzate), premendo uno qualsiasi dei tasti contrassegnati sarà possibile effettuare
operazioni speciali quali regolare il canale MIDI, trasporre e inviare messaggi di modifica di programma.
Pulsanti delle ottave
Se si preme una volta il tasto ottava “+”, il LED al di sopra del tasto ottava “-” si spegne, indicando che le
ottave della tastiera sono ora salite. Se si preme nuovamente il pulsante di ottava “+”, la tastiera verrà
spostata di 2 ottave più in alto. È possibile spostare la tastiera in su o in giù di 3 ottave partendo dallo
spostamento di ottava 0.
Per far scendere l'ottava, premere il tasto ottava “-”: il LED al di sopra dell'ottava “+” si spegne. Se solo il LED
soprastante il tasto di ottava “-” è illuminato, la ottava è spostata in giù; se solo il LED soprastante il tasto di
ottava “+” è illuminato, la ottava è spostata in su. I LED ottava “+” e ottava “-” cambieranno colore quando ci
si muove, verso l'alto o verso il basso, di più di un'ottava.
Per tornare allo spostamento di ottava 0, premere insieme i pulsanti “+” e “-”. Entrambi i LED si illuminano, a
indicare che lo spostamento di ottava è tornato a 0.
Slider Volume
Lo slider Volume invia un messaggio MIDI che controlla il volume delle note in esecuzione. Tale slider può
anche essere assegnato a effetti diversi, quali pan (bilanciamento), attack, reverb, chorus e molti altri.
Per saperne di più sulla sulle funzioni avanzate della Keystation 49es, si veda la guida per l'uso completa,
disponibile alla pagina m-audio.com/keystation49esii.
Ruota Pitch Bend
Come indicato dal nome, questa ruota viene generalmente utilizzata per modificare il tono delle note
riprodotte dalla tastiera verso l’alto o verso il basso. Ciò consente di suonare fraseggi normalmente non
associati alla tastiera, tra cui i riff di chitarra. La sorgente del suono determina l’entità dell’estensione del tono
della nota. L’impostazione normale è di due semitoni ma può essere spinta fino a due ottave in su o in giù di.
Ruota Modulation
Questa ruota viene generalmente utilizzata per la modulazione del suono in esecuzione. Questo tipo di
controller in tempo reale è stato originariamente introdotto sugli strumenti a tastiera elettronici per offrire al
musicista l’effetto vibrato, tipicamente disponibile con gli strumenti acustici. La ruota modulation è
completamente assegnabile via MIDI.
12
Il pulsante Advanced Functions
Il pulsante Advanced Functions viene utilizzato per accedere a tutte le funzioni avanzate della tastiera.
Una volta premuto, la tastiera passa in “modalità di programmazione”. Durante questa modalità, i tasti
possono essere utilizzati per selezionare funzioni e immettere dati.
La LED soprastante il pulsante Advanced Functions indica se la tastiera si trova o meno nella modalità di
programmazione. In modalità di programmazione, i tasti neri vengono utilizzati per la selezione delle funzioni,
mentre quelli bianchi per l’immissione dei dati e la selezione dei canali.
La tastiera scivola fuori dalla modalità Edit non appena una funzione viene selezionata o il tasto Advanced
(avanzata), CANCEL (annulla) o ENTER (invio) viene premuto (il LED presente sopra il tasto Advanced
Functions - funzioni avanzate - si spegne). La tastiera può essere nuovamente utilizzata per suonare.
Per saperne di più sulla sulle funzioni avanzate della Keystation 49es, si veda la guida per l'uso completa,
disponibile alla pagina m-audio.com/keystation49esii.
Tasti direzionali
Questi tasti possono impiegare i protocolli Mackie Control® o HUI® per controllare determinate funzioni del
software che li supportano. Per saperne di più sulla sulle funzioni avanzate della Keystation 49es, si veda la
guida per l'uso completa, disponibile alla pagina m-audio.com/keystation49esii.
Tasti di trasporto
Questi tasti possono impiegare i protocolli Mackie Control o HUI per controllare determinate funzioni del
software che li supportano. Per saperne di più sulla sulle funzioni avanzate della Keystation 49es, si veda la
guida per l'uso completa, disponibile alla pagina m-audio.com/keystation49esii.
Pannello posteriore
1.
2.
Porta USB: la porta USB fornisce alimentazione alla
tastiera e trasmette dati MIDI quando è collegata a un
computer per attivare un sintetizzatore software o un
sequenziatore MIDI.
Ingresso per pedale sustain: Questa presa accetta
un pedale a contatto momentaneo (venduto
separatamente). Quando premuto, il pedale sostiene il
suono in esecuzione senza dover tenere le mani sulla
tastiera.
1
2
3
ON/OFF
POWER
NOTA: La polarità del pedale sustain viene determinata dalla tastiera al momento dell'accensione.
Quando la tastiera Keystation 49es viene alimentata, il pedale sustain viene ritenuto in posizione
“sollevata” (ossia, disattivato). È importante che il pedale sustain non sia premuto durante l'avvio,
altrimenti viene invertito il funzionamento del pedale e le note verranno sostenute quando esso non è
premuto.
NOTA: Il pedale viene normalmente usato per sostenere il suono in esecuzione senza dover tenere le
mani sulla tastiera, esattamente come accade con il pianoforte. È possibile collegare un pedale (non
incluso) con qualsiasi polarità nell’ingresso “foot switch” della tastiera M-Audio. La tastiera sarà in
grado di rilevare la corretta polarità al momento dell’accensione. Se si desidera invertire la polarità, è
sufficiente tenere premuto il pedale al momento dell’accensione della tastiera.
3.
Interruttore di accensione/spegnimento: Utilizzare questo interruttore per alimentare o spegnere il
dispositivo.
13
Kurzanleitung (Deutsch)
Einleitung
Herzlichen Glückwunsch zum Kauf des M-Audio Keystation 49es Keyboard. Dieses USB-Keyboard mit 49
anschlagdynamischen Tasten wurde designt, um eine möglichst einfache Integration mit Ihrem PC oder
Macintosh-Computer zu ermöglichen. Keystation 49es ist mit halbgewichteten Tasten ausgestattet, die Ihnen
das Spielgefühl eines Klaviers verleihen - alles in einem kompakten MIDI-Controller. Die Keystation 49es
eignet sich ideal für verschiedenste Musikproduktionen, pädagogische Anwendungen und bietet darüber
hinaus eine Pitch-Bend-Rad, Richtungs- und Transport-Tasten zur Steuerung von Softwares sowie ein
zuweisbares Modulationsrad und einen Schieberegler für die praktische Steuerung. Obwohl die Keystation
49es klassenkompatibel ist und über einen tatsächlichen Plug-and-Play-Betrieb unter Windows Vista,
Windows 7, Windows 8 und Mac OS X verfügt, empfehlen wir, dass Sie sich ein paar Minuten Zeit nehmen
und dieses Handbuch lesen, um mehr über die richtige Bedienung, erweiterte Funktionalität und
Programmierbarkeit zu erfahren.
Lieferumfang
Keystation
49es,
USB-Kabel,
Ableton
Sicherheitshinweise und Garantieinformationen
Live
Lite
Software-Download-Karte,
Kurzanleitung,
Kundendienst
Die neuesten Informationen zu diesem Produkt (Systemanforderungen, Kompatibilitätsinformationen usw.)
und die Registrierung Ihres Produkts finden Sie auf: m-audio.com/keystation49esii.
Für zusätzlichen Produkt-Support besuchen Sie m-audio.com/support.
Um mehr über den die erweiterten Funktionen der Keystation 49es zu erfahren, lesen Sie bitte das
vollständige Handbuch unter m-audio.com/keystation49esii.
Schnellstart
Anschluss des Keyboards
Keystation 49es wird über eine USB-Verbindung zum Computer mit Strom versorgt. Es wird empfohlen, dass
Sie die Keystation 49es mit einem integrierten USB-Anschluss Ihres Computers oder mit einem USB-Hub
verbinden. Das USB-Kabel versorgt das Keyboard nicht nur mit Strom, sondern überträgt auch MIDI-Daten
vom und zum Computersystem.
Sie können die Keystation 49es auch mit Ihrem iPad verwenden, um unterstützte Musikproduktions-Apps zu
steuern.
Um Ihre Keystation 49es mit einem iPad zu verbinden, ist ein iPad Camera Connection Kit erforderlich, das
im Apple Store verfügbar ist.
Anschlussübersicht
COMPUTER*
ON/OFF
POWER
SUSTAINPEDAL*
14
*SEPARAT
ERHÄLTLICH
Empfohlene Installation
Ableton Live Lite: Wir liefern Keystation 49es mit Ableton Live Lite aus, damit Sie Ihre Musikproduktion
gleich mit professioneller Software beginnen können. Folgen Sie den Anweisungen auf der mitgelieferten
Software-Download-Karte für die Installation von Ableton Live Lite.
Erste Schritte
Folgen Sie den Anweisungen auf der mitgelieferten Software-Download-Karte für die Installation von Ableton
Live Lite. Nach der Installation der Gerätetreiber müssen Sie Ihre MIDI-Software für Keystation 49es
konfigurieren. Bitte beachten Sie, dass Sie nach der Treiberinstallation bei Tastendruck noch keinen Sound
hören werden, da über Keystation 49es lediglich MIDI-Daten übertragen werden. MIDI-Daten beinhalten
Informationen zur Art und Weise der Wiedergabe. Für die tatsächliche Soundwiedergabe müssen Sie Ihre
Audiosoftware entsprechend konfigurieren. Im folgenden Abschnitt geben wir Ihnen ausführliche Hinweise zu
den Konfigurationsoptionen, die Sie in Ihrer Audiosoftware vornehmen müssen. Im Abschnitt “MIDI-Geräte”
Ihrer Audioanwendung sollte Keystation 49es unter der Bezeichnung “Keystation 49es” (Windows Vista,
Windows 7, Windows 8, und Mac OS X) bzw. unter der Bezeichnung “Keystation 49es” (sonstige
Betriebssysteme) ausgewiesen sein. Genauere Hinweise zur Konfiguration entnehmen Sie bitte dem
Benutzerhandbuch Ihrer Audioanwendung.
Funktionen
Oberseite
Keyboard
Die meisten weißen und schwarzen Tasten auf der Keystation 49es sind beschriftet. Wenn Sie sich im Menü
Erweitert befinden, können Sie durch Drücken einer der beschrifteten Tasten Sonderfunktionen aktivieren
und so den MIDI-Kanal einstellen, transponieren und Programmwechsel senden.
Oktavtasten
Wenn Sie die Oktaventaste "+" einmal drücken, erlischt die LED oberhalb der Oktaventaste "-", was anzeigt,
dass die Oktave der Tastatur nun nach oben verschoben wurde. Bei erneutem Drücken der Octave Up-Taste
(“+”) werden die Noten zwei Oktaven höher gesetzt, usw. Mit den Octave Up & Down-Tasten können Sie das
Keyboard insgesamt 3 Oktaven nach oben oder unten transponieren.
Um die Oktave nach unten zu verschieben, drücken Sie die Oktaventaste "-". Sie werden feststellen, dass
die LED oberhalb der Oktave "+" erlischt. Wenn nur die LED über der Octave Down-Taste (“-”) leuchtet,
werden alle Noten eine Oktave niedriger wiedergegeben. Wenn nur die LED über der Octave Up-Taste (“+”)
leuchtet, werden alle Noten eine Oktave höher wiedergegeben. Die LEDs der Oktaventasten "+" und "-"
ändern die Farbe, wenn Sie mehr als eine Oktave nach oben oder nach unten springen.
Über gleichzeitiges Drücken der Octave Up & Down-Tasten setzen Sie das Keyboard auf die urprüngliche
Oktavlage zurück. In diesem Falle leuchten beide LEDs.
Lautstärke-Slider
Über den Lautstärke-Slider werden normalerweise MIDI-Befehle zur Regelung der Tonlautstärke gesendet.
Sie können dem Slider allerdings auch für andere Kontrollfunktionen wie Pan (Balance), Attack, Reverb,
Chorus, uvm. programmieren. Um mehr über den die erweiterten Funktionen der Keystation 49es zu
erfahren, lesen Sie bitte das vollständige Handbuch unter m-audio.com/keystation49esii.
Pitchrad
Mit dem Pitchrad können Sie die Tonhöhe einzelner Noten während des Spielens verändern. So können Sie
Sounds erzeugen, die normalerweise nicht mit Keyboard-Klängen assoziiert werden — zum Beispiel
Gitarrenriffs. In welchem Umfang Sie die Tonhöhe verändern können, hängt von Ihrer Soundquelle ab.
Normalerweise wird der Bereich von zwei Halbtönen beansprucht; potentiell sind jedoch Tonerweiterungen
bis zu zwei Oktaven höher oder niedriger möglich.
15
Modulationsrad
Mit dem Modulationsrad können Sie den Klang während des Spielens in Echtzeit modulieren. Diese Funktion
wurde ursprünglich für elektronische Keyboardinstrumente entwickelt, um den Performern die Möglichkeit der
Einführung von akustischen Effekten wie zum Beispiel Vibratos zu geben. Das Modulationsrad ist absolut
MIDI-fähig.
Funktionstaste
Über die Funktionstaste erhalten Sie Zugriff auf die erweiterten Funktionen Ihres Keystation 49es-Keyboards.
Durch Drücken der Taste setzen Sie das Keyboard in den Edit-Modus. Danach können Sie die gewünschten
Funktionen auswählen und die entsprechenden Daten eingeben.
Die LED über dem Taster zeigt an, ob der Edit-Modus aktiviert oder deaktiviert ist. Im Edit-Modus werden die
Funktionen über die schwarzen Tasten des Keyboards ausgewählt. Über die weißen Tasten geben Sie die
Daten ein und wählen die Kanäle aus.
Die Tastatur wird den Modus Bearbeiten verlassen, sobald eine Funktion ausgewählt oder wenn die Taste
Erweitert, ABBRECHEN oder ENTER gedrückt wird (die LED oberhalb der Funktionstaste erlischt). Nach
Verlassen des Edit-Modus steht die Tastatur wieder für die Tonerzeugung zur Verfügung.
Um mehr über den die erweiterten Funktionen der Keystation 49es zu erfahren, lesen Sie bitte das
vollständige Handbuch unter m-audio.com/keystation49esii.
Richtungstasten
Diese Tasten können die Protokolle von Mackie Control® oder HUI® verwenden, um bestimmte Funktionen in
Softwares zu steuern, die diese unterstützen. Um mehr über den die erweiterten Funktionen der Keystation
49es zu erfahren, lesen Sie bitte das vollständige Handbuch unter m-audio.com/keystation49esii.
Transport-Tasten
Diese Tasten können die Protokolle von Mackie Control oder HUI verwenden, um bestimmte Funktionen in
Softwares zu steuern, die diese unterstützen. Um mehr über den die erweiterten Funktionen der Keystation
49es zu erfahren, lesen Sie bitte das vollständige Handbuch unter m-audio.com/keystation49esii.
Rückseite
1.
Ein-/Ausschalter: Der USB-Anschluss versorgt das
Keyboard mit Strom und übermittelt MIDI-Daten, wenn
es mit einem Computer verbunden ist, um einen
Software-Synthesizer
oder
MIDI-Sequenzer
zu
triggern.
1
2
3
ON/OFF
POWER
2.
Anschluss für Sustain-Pedal: Dieser Anschluss ist
für ein Sustain-Pedal vorgesehen (separat erhältlich).
Mit einem Sustain-Pedal können Sie Töne halten,
ohne dass Sie dazu die Tasten gedrückt halten
müssen.
HINWEIS: Die Polarität des Sustain-Pedals wird automatisch ermittelt, sobald Keystation 49es
eingeschaltet wird. Standardmäßig wird davon ausgegangen, dass das Sustain-Pedal auf "AUS" (nicht
gedrückt) steht. Deshalb sollten Sie das Pedal beim Einschalten des Keyboards nicht betätigen, denn
andernfalls wird es verkehrt betrieben, was zur Folge hat, dass die Noten gehalten werden, wenn das
Pedal nicht gedrückt wird.
HINWEIS: Mit der Pedalfunktion können Sie, wie beim Klavier, die Länge des gespielten Tons
verändern, ohne dass Ihre Hände zum Einsatz kommen. Wenn Sie mit einem Fußpedal (nicht im
Lieferumfang enthalten) arbeiten möchten, können Sie dieses an den für Fußpedale vorgesehenen
Anschluss anstecken. Pedalfunktion und Polarität werden automatisch beim Einschalten des
Keyboards erkannt. Wenn Sie Polarität und Funktion verändern wollen, halten Sie das Pedal beim
Einschalten des Keyboards einfach in der gewünschten Funktion (mit oder ohne aufgesetztem Fuß).
3.
Netzschalter - Schaltet Keystation 49es ein oder aus.
16
Appendix (English)
Wheel and Fader User Assignments
00 Bank Select
01 Modulation
02 Breath Control
03 Controller 3
04 Foot Control
05 Porta Time
06 Data Entry
07 Channel Volume
08 Balance
09 Controller 9
10 Pan
11 Expression
12 Effects Controller 1
13 Effects Controller 2
14 Controller 14
15 Controller 15
16 Gen Purpose 1
17 Gen Purpose 2
18 Gen Purpose 3
19 Gen Purpose 4
20 Controller 20
21 Controller 21
22 Controller 22
23 Controller 23
24 Controller 24
25 Controller 25
26 Controller 26
27 Controller 27
28 Controller 28
29 Controller 29
30 Controller 30
31 Controller 31
32 Bank Select LSB
33 Modulation LSB
34 Breath Control LSB
35 Controller 35
36 Foot Control LSB
37 Porta Time LSB
38 Data Entry LSB
39 Channel Volume LSB
40 Balance LSB
41 Controller 41
42 Pan LSB
38 Data Entry LSB
39 Channel Volume LSB
40 Balance LSB
41 Controller 41
42 Pan LSB
43 Expression LSB
44 Controller 44
45 Controller 45
46 Controller 46
47 Controller 47
48 Gen Purpose 1 LSB
49 Gen Purpose 2 LSB
50 Gen Purpose 3 LSB
51 Gen Purpose 4 LSB
52 Controller 52
53 Controller 53
54 Controller 54
55 Controller 55
56 Controller 56
57 Controller 57
58 Controller 58
59 Controller 59
60 Controller 60
61 Controller 61
62 Controller 62
63 Controller 63
64 Sustain Pedal
65 Portamento
66 Sostenuto
67 Soft Pedal
68 Legato Pedal
69 Hold 2
70 Sound Variation
71 Resonance
72 Release Time
73 Attack Time
74 Cut- off Frequency
75 Controller 75
76 Controller 76
77 Controller 77
78 Controller 78
79 Controller 79
80 Gen Purpose 5
17
112 Controller 112
113 Controller 113
114 Controller 114
115 Controller 115
116 Controller 116
117 Controller 117
118 Controller 118
119 Controller 119
Channel Mode Messages:
120 All Sound off
121 Reset all Controllers
122 Local Control
123 All Notes Off
124 Omni Off
125 Omni On
126 Mono On (Poly Off)
127 Poly On (Mono Off)
Extra RPN Messages:
128 Pitch Bend sensitivity
129 Fine Tune
130 Coarse Tune
131 Channel Pressure
Technical Specifications
Power
USB-bus-powered
Size (width x depth x height)
7.7" x 3" x 31.9"
195 mm x 75 mm x 810 mm
Weight
4.6 lbs.
2.1 kg
Specifications are subject to change without notice.
Trademarks and Licenses
M-Audio is a trademark of inMusic Brands, Inc., registered in the U.S. and other countries.
Mackie Control and HUI are trademarks or registered trademarks of LOUD Technologies Inc.
iPad, Mac, and OS X are trademarks or service marks of Apple Inc., registered in the U.S. and
other countries.
Windows is a registered trademark of Microsoft Corporation in the United States and other
countries.
All other product or company names are trademarks or registered trademarks of their
respective owners.
18
m-audio.com
Manual Version 1.0