1
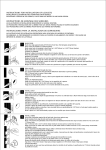
locating the accessories and user guide
installing the riving knife or blade guard
INSTALACIÓN DEL DIVISOR
LOCALIZACIÓN DE LOS ACCERSORIOS Y GUÍA DEL USUARIO
2
1
Remove the table insert by pulling the
latch forward and then lifting the insert
up and forward.
Retire el inserto de la mesa tirando del pestillo
hacia adelante y luego levantando el inserto arriba
y hacia adelante.
4
3
Open the clamp by reaching into the
opening and flipping the red handle up.
Abrir la pinza al alcanzar en el abertura y dar la
vuelta a la manija roja.
1
2
3
Slide the riving knife or blade guard out
of the clamp.
Deslizar el divisor o protección de la hoja de la
abrazadera.
5
Flip the table extension handle up.
Voltear la extension de la mesa.
Place the riving knife or blade guard into
the clamp.
Slide the table extension to its furthest
open position. Slide out the storage drawer.
Lift the lid to locate the saw accessories
and user guide.
Deslice la Extensión de la mesa a su posición más
abierta. Deslice el cajón de almacenamiento.
Levantar la tapa para localizer los accesorios de
sierra y su guía de usuario.
Flip the red handle down to close the clamp.
Voltear la manija roja hacia abajo para cerrar la pinza.
locating and installing the rip fence
Colocar el divisor o protector de la hoja en la
abrazadera.
6
LOCALIZAR E INSTALAR LA GUÍA DE CORTE
7
1
With the rear of the table insert tilting
downward, slide the table insert into the
table opening so that the screws on the
bottom of the table insert slide beneath
the screws in the table.
Press the front of the table insert down
to lock.
Presione la parte delantera del inserto de la mesa
hacia bajo para trabar.
Con la parte posterior de la insercíon de la mesa
basculante hacia abajo, Deslice el insert de la mesa
en la abertura de la mesa para que los tornillos de
la parte inferior de la inserción se junte debajo de
los tornillos de la mesa.
The rip fence is stored in a holster on the right
side of the saw, beneath the table extension wing.
Lift the grey latch to remove the fence.
La guiá de corte se guarda en una funda en el lado derecho de
la sierra,debajo de la extension de ala. Levante el pestillo gris
para quitar el guía de corte.
turning the saw on and off
2
PRENDIENDO Y APAGANDO LA SIERRA
3
turning on
PRENDIENDO
1
2
SOLID
4
BLINKING
A solid green light and a blinking red
light will appear.
Aparacerá una luz verder sólido y una luz roja
parpadente.
3
SOLID
Slide the fence out of the holster and lay it on
the table. Make sure the red lever is unlocked.
OFF
Deslice la guía de la funda y lo ponder sobre la mesa.
Asegúrese de que la palanca roja esta desbloqueado.
Once the red light stops blinking and is
off, the saw is ready to use. If the red
light stays on, refer to the user guide.
With the paddle pushed in,
flip the power switch to the
on position.
Halar la paleta para hacer gira la
cuchilla.
using the mobile cart
turning off
USANDO EL CARRO MÓVIL
APAGANDO
1
Asignar la guía en el riel frontal y deslícelo a la posición de
corte deseada. Presione la palanca roja para ajustar la
guia en su lugar.
Pull the paddle out to spin
the blade.
Una vez que la luz roja deje de parpadear y no
esta encendida, la sierra está lista para usar.
Mueve el interruptor en la
poscicion “prendido”.
Align the fence on the front rail and slide it to
the desired cutting position. Press the red
lever to lock the fence in place.
2
BLINKING
4
1
2
3
OFF
The green light will blink until the
blade comes to a stop.
La luz verde parpadea hasta que la hoja se
detenga.
3
SOLID
OFF
Push the paddle in to turn
the motor off.
Empuje la paleta para apagar el
motor.
When the green light is solid, the saw
is ready to shut off.
Cuando la luz verde es sólido, La sierra está
lista para apagar.
Grasp the handles and step on the locking lever.
After you finish all your cuts,
flip the power switch to the
off position.
Da le vuelta al interruptor a la
posción de apagado.
Agarra las asas y pisar la palanca.
Pull the handles downward. The cart will
lock in place once the saw is in the full
upright position.
To collapse the cart, step on the locking
lever and raise the handles. Press the
wheels forward until they lock in place.
Halar las manijas hacia abajo. El carro se encaje en
su lugar una vez que la sierra está en la posición
vertical.
Para derumbar el carro, Pisar la palanca de bloqueo
y leventar las manijas. Presione las ruedas hacia
adelante hasta que encajen en su lugar.