1
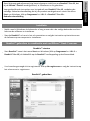
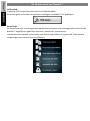
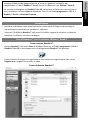
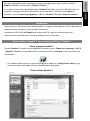
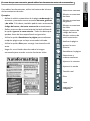
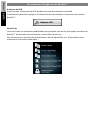
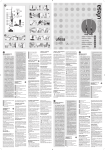
Software Quick Start Guide for Windows® This Quick Start Guide provides general guidelines for installing and using Readiris™ Pro 12 provided with your IRIScan™ Book 2. For detailed instructions on Readiris™ Pro 12 refer to the complete User Guide provided with your product: from the Windows Start menu, click All Programs > I.R.I.S. > Readiris™ Pro 12 > User Guide. Installation • Log on to Windows as administrator or make sure you have the necessary administration rights to install the software. • Insert the Readiris™ CD‐ROM in the CD‐ROM drive and follow the on‐screen instructions to install the software on your computer. Using Readiris™ with your IRIScan™ Book 2 scanner How to run Readiris™ • Start Readiris™ from the Windows Start menu (Click All Programs > I.R.I.S. > Readiris™ Pro 12) or double‐click the Readiris™ shortcut on your desktop. • You will be prompted to register. Click Register now and follow the on‐screen instructions to register. How to use Readiris™ English Step 1: Use the left toolbar to load and process your documents Readiris™ can process all kinds of documents containing text, graphics, tables, complex columns, etc. Even dot matrix and degraded texts. 1. Click Options to activate the possible processing options: Page Analysis (default option): it splits up your documents in recognition zones. Page Deskewing: it straightens documents that were scanned at an angle. Rotation options: they rotate your documents in the required direction. 2. Power on your IRIScan™ Book and connect it to your computer. A window will open prompting you to load your IRIScan™ Book images. Select the images you want to open and click Open. Note: to open images at a later time, click the Open button on the main toolbar and manually search for the images you want to open. Step 2: Recognize and save your documents 1 Click the globe icon to select the language of your docu‐ ments. Tip: You can favor recognition speed over accuracy and vice versa by moving the slider. 2. Click Format to select the target application (Word, OpenOffice, Excel, etc.) or output format (DOCX, ODT, PDF, PDF‐iHQC™, PDF/A, XPS, XPS‐ iHQC™, etc.) of your documents, then select the required options. iHQC™ Use the iHQC™ technology to highly compress your PDF and XPS documents. 3. Click Recognize + Save to execute the recognition and save your documents. If needed, you can edit your documents before recognizing them To edit your documents, use the right toolbar buttons. Examples: • Refine the automatic page analysis by sorting the zones and by drawing new text, graphic, table, barcode and handprinting windows. Also manually create barcode and handprint windows if needed. • Define a limited recognition zone using Ignore exterior zone. All data outside the zone will be discarded. • Use Deskew page to straighten the document page. • Use Rotate to set the correct text orientation. • Right‐click on the scanned image to access useful functions. Select window Draw text window Draw graphic window Draw table window Draw barcode window Draw handprinting window Analyze page Ignore exterior zone Deskew page Select sort windows Fit to window Fit to width Actual size Rotate Magnifying glass Print images Readiris™ smart tools OCR Wizard You can access the OCR Wizard from the left toolbar. The wizard smoothly guides you through the settings required to operate Readiris™. SmartTasks The SmartTasks are predefined commands that allow you to launch the main Readiris™ functions at a time (scan, recognition, conversion). Your documents are directly transferred to Word, OpenOffice, etc. (Many other applications and formats are available.) Ce Guide de démarrage rapide propose des consignes générales relatives à l'installation et à l'utilisation de Readiris™ Pro 12 livré avec IRIScan™ Book 2. Pour des instructions détaillées sur Readiris™ Pro 12 reportez-vous au Guide de l’utilisateur complet fourni avec le produit : à partir du menu Démarrer de Windows, cliquez sur Tous les programmes > I.R.I.S. > Readiris™ Pro 12 > Guide Utilisateur Installation Connectez-vous à Windows en tant qu'administrateur ou assurez-vous de posséder les droits d'administration requis pour installer le logiciel. Insérez le CD-ROM Readiris™ dans le lecteur de CD-ROM et suivez les instructions qui s'affichent à l'écran pour installer le logiciel. Utilisation de Readiris™ avec votre scanner IRIScan™ Book 2 Exécution de Readiris™ Lancez Readiris™ à partir du menu Démarrer de Windows (cliquez sur Tous les programmes > I.R.I.S. > Readiris™ Pro 12) ou double-cliquez sur le raccourci Readiris™ sur votre bureau. Vous êtes invité à enregistrer le logiciel. Cliquez sur Enregistrer maintenant et suivez les instructions qui s'affichent à l'écran pour enregistrer le produit. Utilisation de Readiris™ Etape 1: La barre d'outils de gauche contient les options nécessaires à l'ouverture et au traitement des documents. Readiris™ peut traiter tous les documents contenant du texte, des images, des tableaux, des colonnes complexes, et même des symboles matriciels ou des textes altérés. 1. Cliquez sur Options pour activer les options de traitement possibles : Analyse de page (option par défaut): fractionne les documents en fenêtres de reconnaissance. Redressement des pages : corrige le désalignement des documents numérisées et décalées d'un certain angle. Rotation : fait pivoter vos document dans la direction nécessaire. 2. Allumez votre scanner IRIScan™ Book et connectez-le à votre votre ordinateur. Une fenêtre s'affiche, vous demandant de charger les images du scanner IRIScan™ Book. Sélectionnez les images que vous voulez ouvrir et cliquez sur Ouvrir. Remarque : pour ouvrir les images plus tard, cliquez sur le bouton Ouvrir dans la barre d'outils principale et chercher manuellement les images que vous voulez ouvrir. Etape 2: Reconnaissance et enregistrement des documents 1. Cliquez sur l'icône représentant un globe pour sélectionner la langue de vos documents. Vous pouvez privilégier la vitesse de reconnaissance par rapport à la précision, et inversement, en déplaçant le curseur. 2. Cliquez sur Format pour sélectionner l'application cible (Word, OpenOffice, Excel, etc.) ou le format de sortie (DOCX, ODT, PDF, PDF-iHQC™, PDF/A, XPS, XPS-iHQC™, etc.) de vos documents, puis sélectionnez les options requises. iHQC™ Utilisez la technologie iHQC™ pour l'hypercompression de vos documents PDF et XPS. 3. Cliquez sur Reconnaître + Enregistrer pour exécuter la reconnaissance des documents et les enregistrer. En cas de besoin, vous pouvez éditer vos documents avant de les reconnaître. Pour éditer vos documents, utilisez les boutons de la barre d'outils sur la droite. Sélectionner une fenêtre Exemples : Dessiner une fenêtre texte Affinez l'analyse de page automatique en triant les fenêtres et en dessinant de nouvelles fenêtres comportant du texte, des images et des tableaux. Vous pouvez également créer manuellement des fenêtres de codes à barres et de texte manuscrit, si besoin est. Définissez une zone de reconnaissance limitée à l'aide de l'option Ignorer la zone extérieure. Les données à l'extérieur de cette zone ne seront pas prises en compte. Utilisez l'option Redresser la page pour corriger l'angle de la page de document. A l'aide de l'option Tourner la page, définissez l'orientation de texte correcte. Cliquez avec le bouton droit sur l'image numérisée pour accéder à des options utiles. Dessiner une fenêtre graphique Dessiner une fenêtre tableau Dessiner une fenêtre de codes à barres Dessiner une fenêtre de texte manuscrit Analyser la page Ignorer la zone extérieure Redresser la page Sélectionner et trier les fenêtres Pleine page Pleine largeur Taille réelle Rotation Loupe Imprimer les images Outils intelligents de Readiris™ Assistant OCR Vous pouvez accéder à l'assistant OCR à partir de la barre d'outils de gauche. L'assistant vous guide facilement dans les différents écrans de configuration des options nécessaires au bon fonctionnement de Readiris™. SmartTasks Les SmartTasks sont des commandes prédéfinies qui permettent d'exécuter directement les principales fonctions de Readiris™ (analyse, reconnaissance, conversion). Vos documents sont directement transférés dans Word, OpenOffice, etc. (de nombreux autres formats et applications sont disponibles.) Diese Kurzanleitung enthält allgemeine Hinweise für die Installation und Benutzung von Readiris™ Pro 12 für IRIScan™ Book 2. Weitere Informationen zu Readiris™ Pro 12 finden Sie im Benutzerhandbuch: Klicken Sie in Windows auf Start und dann auf Alle Programme > I.R.I.S. > Readiris™ Pro 12 > Benutzerhandbuch Installation Melden Sie sich bei Windows als Administrator an und stellen Sie sicher, dass Sie über die erforderlichen Administratorrechte zum Installieren der Software verfügen. Legen Sie die CD-ROM Readiris™ in das CD-ROM-Laufwerk ein und befolgen Sie die Bildschirmanweisungen, um Readiris™ zu installieren. So verwenden Sie Readiris™ mit Ihrem IRIScan™ Book 2 Scanner Readiris™ ausführen Starten Sie Readiris™ über das Menü Start in Windows (klicken Sie auf Alle Programme > I.R.I.S. > Readiris™ Pro 12) oder doppelklicken Sie auf dem Desktop auf die Verknüpfung Readiris™. Sie werden zur Registrierung aufgefordert. Klicken Sie auf Jetzt registrieren und befolgen Sie die Bildschirmanweisungen. Readiris™ verwenden Schritt 1: Verwenden Sie die linke Funktionsleiste, um Ihre Dokumente zu öffnen und zu verarbeiten Readiris™ kann verschiedene Dokumente mit Texten, Grafiken, Tabellen, komplexen Spalten usw. verarbeiten. Selbst Nadeldrucktexte und Texte minderer Qualität können verarbeitet werden. 1. Klicken Sie auf Optionen, um die in Frage kommenden Verarbeitungsoptionen zu aktivieren: Seitenanalyse (Standardoption): die Dokumente werden in Erkennungsfenster aufgeteilt. Seitenschräglage korrigieren: die Dokumente, die schräg eingescannt wurden, werden gerade ausgerichtet. Optionen Drehung: das Dokument wird in der gewünschten Richtung gedreht. 2. Schalten Sie Ihren IRIScan™ Book ein und schließen ihn an Ihren Computer an. Sie werden aufgefordert, Ihre IRIScan™ Book Bilder zu laden. Wählen Sie die Bilder aus, die Sie öffnen möchten, und klicken Sie auf Öffnen. Hinweis: Wenn Sie Bilder später öffnen möchten, klicken Sie in der Hauptfunktionsleiste auf Öffnen, um manuell nach den Bildern zu suchen, die Sie öffnen möchten. Schritt 2: Dokumente erkennen und speichern 1. Klicken Sie auf die Schaltfläche Globus, um die Sprache für das Dokument auszuwählen. Sie können für die Erkennung die Geschwindigkeit gegenüber der Genauigkeit bevorzugen und umgekehrt, indem Sie den Schieberegler bewegen. 2. Klicken Sie auf Format, um die Zielanwendung (Word, OpenOffice, Excel usw.) oder das Ausgabeformat (DOCX, ODT, PDF, PDF-iHQC™, PDF/A, XPS, XPS- iHQC™ usw.) für Ihre Dokumente auszuwählen. Wählen Sie dann die erforderlichen Optionen aus. iHQC™ Mit der Technologie iHQC™ können Sie Ihre PDF- und XPS-Dokumente stark komprimieren. 3. Klicken Sie auf Erkennen + Speichern, um die Erkennung auszuführen und die Dokumente zu speichern. Sie können Ihre Dokumente vor dem Scannen bearbeiten Verwenden Sie zum Bearbeiten der Dokumente die Schaltflächen in der rechten Funktionsleiste. Fenster auswählen Beispiele: Textfenster zeichnen Grenzen Sie die automatische Seitenanalyse ein, indem Sie die Fenster Sortieren und neue Fenster für Texte, Grafiken und Tabellen zeichnen. Erstellen Sie auch Fenster für Strichcodes und handschriftliche Texte, falls erforderlich. Definieren Sie über Außenbereich ignorieren einen begrenzten Erkennungsbereich. Alle Daten außerhalb des Bereichs werden verworfen. Verwenden Sie Seitenschräglage korrigieren, um die Dokumentseite gerade zu richten. Verwenden Sie Drehen, um die richtige Textausrichtung festzulegen. Klicken Sie mit der rechten Maustaste auf des eingescannte Bild, um auf nützliche Funktionen zugreifen zu können. Grafikfenster zeichnen Tabellenfenster zeichnen Strichcodefenster zeichnen Handschriftfenster zeichnen Seite analysieren Außenbereich ignorieren Seitenschräglage korrigieren Fenster auswählen und sortieren An Fenster anpassen An Breite anpassen Tatsächliche Größe Drehung Lupe Bilder drucken Intelligente Tools von Readiris™ OCR Assistent Sie können den OCR-Assistenten über die linke Funktionsleiste aufrufen. Der Assistent führt Sie bequem durch die für Readiris™ erforderlichen Einstellungen. SmartTasks Die SmartTasks sind vordefinierte Befehle, mit denen Sie alle Hauptfunktionen von Readiris™ gleichzeitig aufrufen können (Scannen, Erkennen, Konvertieren). Ihre Dokumente werden direkt an Word, OpenOffice usw. weitergeleitet (es sind viele weitere Anwendungen und Formate verfügbar.) Deze Beknopte gebruiksaanwijzing bevat algemene richtlijnen om Readiris™ Pro 12, dat bij de IRIScan™ Book 2 wordt geleverd, te installeren en te gebruiken. Voor gedetailleerde instructies over het gebruik van Readiris™ Pro 12, raadpleeg de volledige Gebruikershandleiding die bij uw product wordt geleverd: vanuit het menu Start van Windows, klik op Programma's > I.R.I.S. > Readiris™ Pro 12 > Gebruikershandleiding Installatie Meld u aan bij Windows als beheerder of zorg ervoor dat u de nodige beheerdersrechten hebt om de software te installeren. Stop de Readiris™ cd-rom in het cd-romstation en volg de instructies op het scherm om de software op uw computer te installeren. Readiris™ gebruiken in combinatie met uw IRIScan™ Book 2 scanner Readiris™ starten Start Readiris™ vanuit het menu Start van Windows (Klik op Programma's > I.R.I.S. > Readiris™ Pro 12) of dubbelklik op de Readiris™ snelkoppeling op het Bureaublad. U zal worden gevraagd zich te registreren. Klik op Nu registreren en volg de instructies op het scherm om te registreren. Readiris™ gebruiken Stap 1: Gebruik de linkerwerkbalk om uw documenten te openen en te verwerken Readiris™ kan allerlei soorten documenten verwerken die tekst, figuren, tabellen, complexe kolommen, enz. bevatten. Zelfs dotmatrix en vervormde tekst. 1. Klik op Opties om de mogelijke verwerkingsopties te activeren: Pagina-analyse (standaard ingeschakeld): verdeelt uw documenten in herkenningsvensters. Pagina's rechtzetten: zet documenten recht die schuin werden gescand. Rotatie-opties: draaien uw documenten in de vereiste richting. 2. Schakel uw IRIScan™ Book 2 scanner in en sluit hem aan op uw computer. Een venster zal worden geopend waarin u wordt gevraagd of u uw IRIScan™ Book afbeeldingen wil laden. Selecteer de afbeeldingen die u wil openen en klik op Open. Opmerking: om afbeeldingen op een later tijdstip te openen, klik op Openen in de hoofdwerkbalk en zoek handmatig naar de afbeeldingen die u wil openen. Stap 2: Herken uw documenten en sla ze op 1. Klik op de wereldbol om de taal van uw documenten te selecteren. Geef de voorkeur aan snelheid of aan precisie door de glijder te bewegen. 2. Klik op Formaat om de doeltoepassing (Word, OpenOffice, Excel, enz.) of het uitvoerformaat (DOCX, ODT, PDF, PDF-iHQC™, PDF/A, XPS, XPS- iHQC™, enz.) van uw documenten te selecteren. Selecteer vervolgens de vereiste opties. iHQC™ Gebruik de iHQC™-technologie om uw PDF- en XPS-documenten maximaal te comprimeren. 3. Klik op Herkennen + Opslaan om de herkenning uit te voeren en uw documenten op te slaan. Indien nodig kunt u uw documenten bewerken voor de herkenning Om uw documenten te bewerken, gebruik de knoppen op de rechterwerkbalk. Venster selecteren Voorbeelden: Tekstvensters tekenen Verfijn de resultaten van de automatische paginaanalyse door de vensters te sorteren en nieuwe tekst, afbeeldings- en tabelvensters te tekenen. U kunt ook handmatig streepjescode- en handschriftvensters tekenen. Beperk de herkenningszones d.m.v. Buitenkant van zone negeren. Alle gegevens buiten die zone worden genegeerd. Afbeeldingsvensters tekenen Tabelvensters tekenen Streepjescodevensters tekenen Handschriftvensters tekenen Gebruik Bladzijde rechtzetten om het document recht te trekken. Pagina analyseren Gebruik Rotatie om de juiste paginastand in te stellen. Buitenkant van zone negeren Klik rechts op de gescande afbeelding voor handige functies. Bladzijde rechtzetten Vensters selecteren en sorteren Volle bladzijde Volle breedte Ware grootte Draaien Vergrootglas Beelden afdrukken De slimme tools van Readiris™ OCR wizard U kunt de OCR wizard bereiken vanuit de linkerwerkbalk. De wizard gidst u vlot door de vereiste instellingen om Readiris™ te gebruiken. SmartTasks De SmartTasks zijn vooraf ingestelde opdrachten waarmee u de meestgebruikte functies van Readiris™ tegelijk kunt gebruiken (scannen, herkennen, converteren). Uw documenten worden rechtstreeks naar Word, OpenOffice, enz. gestuurd. (Vele andere toepassingen en formaten zijn beschikbaar.) In questa Guida rapida vengono fornite le istruzioni generali necessarie per l'installazione e l'uso di Readiris™ Pro 12 fornito in dotazione con IRIScan™ Book 2. Per istruzioni dettagliate su Readiris™ Pro 12, consultare la Guida per l'utente fornita con il prodotto: Dal menu Start di Windows, fare clic su Tutti i programmi > I.R.I.S. > Readiris™ Pro 12 > Guida per l'utente Installazione Accedere a Windows come amministratore o assicurarsi di disporre dei privilegi di amministratore necessari per installare il software. Inserire il CD-ROM di Readiris™ nell'unità CD-ROM e seguire le istruzioni a video per installare il software sul vostro computer. Uso di Readiris™ con lo scanner IRIScan™ Book 2 Come avviare Readiris™ Avviare Readiris™ dal menu Start di Windows (fare clic su Tutti i programmi > I.R.I.S.> Readiris™ Pro 12) o fare doppio clic sul collegamento Readiris™ sul desktop. Verrà richiesto di eseguire la registrazione. Per eseguire la registrazione, fare clic su Registra ora e seguire le istruzioni a video. Come utilizzare Readiris™ Fase 1: Uso della barra degli strumenti sulla sinistra per elaborare i documenti Readiris™ può elaborare documenti di tutti i tipi, contenenti testo, elementi grafici, tabelle, colonne complesse, ecc. È in grado di riconoscere anche testi stampati a matrice di punti e di bassa qualità. 1. Fare clic su Opzioni per attivare le opzioni di elaborazione disponibili: Analisi pagina (opzione predefinita): suddivide il documento in finestre di riconoscimento. Allineamento pagine: corregge l'allineamento delle pagine acquisite con un'inclinazione errata. Opzioni di Rotazione: consentono di ruotare il documento nel senso desiderato. 2. Accendere IRIScan™ Book e collegarlo al computer. Verrà visualizzata una finestra che richiede all'utente di caricare le immagini acquisite con lo scanner IRIScan™ Book. Selezionare le immagini che si vuole aprire e fare clic su Apri. Nota: per aprire le immagini successivamente, fare clic sul pulsante Apri nella barra degli strumenti principale, quindi cercare manualmente le immagini che si desidera aprire. Fase 2: Riconoscimento e salvataggio dei documenti 1. Fare clic sull'icona a forma di mappamondo per selezionare la lingua del documento. È possibile aumentare la velocità di riconoscimento rispetto alla precisione e viceversa spostando il cursore. 2. Fare clic su Formato per selezionare l'applicazione di destinazione (Word, OpenOffice, Excel, ecc.) o il formato di output(DOCX, ODT, PDF, PDF-iHQC™, PDF/A, XPS, XPS- iHQC™, ecc.) dei documenti, quindi selezionare le opzioni desiderate. iHQC™ La tecnologia iHQC™ permette di applicare un elevato livello di compressione ai documenti PDF e XPS. 3. Fare clic su Riconoscere + Salvare per eseguire il riconoscimento e salvare i documenti. Se necessario, è possibile modificare i documenti prima di procedere al riconoscimento Per modificare i documenti, utilizzare i pulsanti nella barra degli strumenti sulla destra. Seleziona finestra Esempi: Disegna una finestra di testo Ottimizzare l'analisi automatica della pagina ordinando le finestre e tracciando nuove finestre di testo, grafica e tabelle. Se necessario, è anche possibile creare manualmente finestre codice a barre e stampatello. Definire una zona di riconoscimento limitata utilizzando l'opzione Ignora zona esterna. Tutti i dati all'esterno della zona verranno scartati. Utilizzare l'opzione Allinea pagina per allineare la pagina del documento. Disegna una finestra grafica Disegna una finestra di tabella Disegna una finestra di codice a barre Traccia finestra con testo in stampatello Analisi pagina Utilizzare l'opzione Ruota per selezionare l'orientamento corretto del testo. Ignora zona esterna Fare doppio clic sull'immagine acquisita per accedere a funzioni utili. Allinea pagina Seleziona e ordina finestre Adatta a finestra Adatta a larghezza Dimensione reale Ruota Lente d'ingrandimento Stampa immagini Strumenti intelligenti Readiris™ Procedura guidata OCR È possibile aprire la procedura utilizzando la barra degli strumenti sulla sinistra. La procedura guidata consente di configurare facilmente le impostazioni necessarie per l'uso di Readiris™. SmartTask Gli SmartTask sono comandi predefiniti che consentono di attivare alcune delle funzioni principali di Readiris™ contemporaneamente (scansione, riconoscimento, conversione). I documenti vengono direttamente trasferiti a Word, OpenOffice, ecc. (sono disponibili molte altre applicazioni e formati.) Este Manual de Iniciação Rápida fornece directrizes gerais para instalar e utilizar o Readiris™ Pro 12 fornecido com o IRIScan™ Book 2. Para obter instruções detalhadas sobre o Readiris™ Pro 12, consulte o Manual do Utilizador completo fornecido com o produto: a partir do menu Iniciar do Windows, clique em Todos os programas > I.R.I.S. > Readiris™ Pro 12> Manual do Utilizador. Instalação • Inicie sessão no Windows como administrador ou certifique‐se de que tem os direitos de administrador necessários para instalar o software. • Introduza o CD‐ROM do Readiris™ na unidade de CD‐ROM e siga as instruções no ecrã para instalar o software no computador. Utilizar o Readiris™ com o scanner IRIScan™ Book 2 Como executar o Readiris™ • Inicie o Readiris™ a partir do menu Iniciar do Windows (clique em Todos os programas> I.R.I.S. > Readiris™ Pro 12) ou clique duas vezes no atalho do Readiris™ no ambiente de trabalho. • Ser‐lhe‐á solicitado que efectue o registo. Clique em Registar agora e siga as instruções no ecrã para efectuar o registo. Como utilizar o Readiris™ Inglês Fase 1: Utilize a barra de ferramentas esquerda para carregar e processar os seus documentos O Readiris™ pode processar todos os tipos de documentos que contenham texto, gráficos, tabelas, colunas complexas, etc., até mesmo matrizes de pontos e textos degradados. 1. Clique em Opções para activar as opções de processamento possíveis: Análise de páginas (opção predefinida): divide os seus documentos em zonas de reconhecimento. Remoção da inclinação da página: endireita os documentos digitalizados em ângulo. Opções de rotação: permitem rodar os documentos na direcção pretendida. 2. Active o IRIScan™ Book e ligue‐o ao computador. Abre‐se uma janela solicitando que carregue as imagens do IRIScan™ Book. Seleccione as imagens que pretende abrir e clique em Abrir. Nota: para abrir imagens posteriormente, clique em Abrir na barra de ferramentas Fase 2: Reconheça e guarde os seus documentos principal e procure manualmente as imagens que pretende abrir. 1 Clique no ícone do globo para seleccionar o idioma dos seus documentos. Conselho: Pode favorecer a velocidade de reconhecimento sobre a precisão e vice versa deslocando o cursor. 2. Clique em Formato para seleccionar a aplicação pretendida (Word, OpenOffice, Excel, etc.) ou o formato de exportação (DOCX, ODT, PDF, PDF‐iHQC™, PDF/A, XPS, XPS‐ iHQC™, etc.) dos documentos e seleccione as opções pretendidas. iHQC™ Utilize a tecnologia iHQC™ para comprimir os seus documentos PDF e XPS. 3. Clique em Reconhecer + Guardar para executar o reconhecimento e guardar os documentos. Caso seja necessário, pode editar os documentos antes de os reconhecer Para editar os documentos, utilize os botões da barra de ferramentas direita. Exemplos: • Melhore a análise de página automática ao ordenar as zonas e ao desenhar novas janelas de texto, gráficos, tabela, código de barras e texto manuscrito. Crie também manualmente janelas de código de barras e de texto manuscrito, se necessário. • Defina uma zona de reconhecimento limitado utilizando Ignorar zona exterior. Todos os dados fora da zona serão eliminados. • Utilize Retirar inclinação da página para alinhar a página do documento. • Utilize Rodar para definir a orientação correcta do texto. • Clique com o botão direito na imagem digitalizada para aceder a funções úteis. Seleccionar janela Desenhar uma janela de texto Desenhar uma janela de gráfico Desenhar uma janela de tabela Desenhar uma janela de código de barras Desenhar uma janela de texto manuscrito Analisar página Ignorar zona exterior Retirar inclinação da página Seleccionar e ordenar janelas Ajustar à janela Ajustar à largura Tamanho real Rodar Lupa Imprimir imagens Ferramentas inteligentes do Readiris™ Assistente de OCR Pode aceder ao Assistente de OCR a partir da barra de ferramentas esquerda. O assistente guia‐o suavemente pelas definições necessárias para utilizar o Readiris™. SmartTasks As SmartTasks são comandos predefinidos que permitem lançar as funções principais do Readiris™ de uma vez só (digitalização, reconhecimento, conversão). Os seus documentos são transferidos directamente para Word, OpenOffice, etc. (Estão disponíveis muitas outras aplicações e formatos.) В этом руководстве по быстрой установке представлены общие рекомендации по установке и использованию ПО Readiris™ Pro 12, которое поставляется в комплекте с IRIScan™ Book 2. См. подробные инструкции по использованию Readiris™ Pro 12 в полном руководстве пользователя: В меню Пуск ОС Windows выберите Все программы > I.R.I.S. > Readiris™ Pro 12 > User Guide.pdf. Установка • Войдите в Windows как администратор или убедитесь, что у вас есть необходимые права администратора для устаноки ПО. • Вставьте компакт‐диск Readiris™ в дисковод для компакт‐дисков и следуйте инструкциям по установке ПО. Использование Readiris™ со сканером IRIScan™ Book 2 Запуск Readiris™ • Запустите Readiris™ из меню «Пуск» Windows (нажмите Все программы > I.R.I.S. > Readiris™ Pro 12) или дважды щелкните значок Readiris™ на рабочем столе. • Система предложит зарегистрироваться. Нажмите кнопку Регистрация и следуйте инструкциям на экране, чтобы зарегистрироваться. Использование Readiris™ Русский Шаг 1. Используйте левую панель инструментов для загрузки и обработки документов Readiris™ может обрабатывать все типы документов, включающих текст, графику, таблицы, сложные колонки и др. Даже материалы, напечатанные на матричном принтере, и текст низкого качества. 1. Выберите пункт Параметры, чтобы активировать доступные параметры обработки: Анализ страницы (параметр по умолчанию): документы будут разделяться на зоны распознавания. Выравнивание страницы: выравнивание документов, отсканированных под углом. Параметры поворота: поворот документов в нужном направлении. 2. Включите сканер IRIScan™ Book и подключите его к компьютеру. Откроется окно с предложением загрузить изображения IRIScan™ Book. Выберите изображения, которые нужно открыть, и нажмите кнопку Открыть. Примечание. Чтобы открыть изображения позднее, нажмите кнопку Открыть на главной панели инструментов и вручную найдите изображения, которые Шаг 2. Распознайте и сохраните документы. необходимо открыть. 1 Для выбора языка документов щелкните значок глобуса. Совет. Можно увеличить скорость распознавания за счет точности и наоборот, передвигая бегунок. 2. Нажмите кнопку Формат, чтобы выбрать целевое приложение (Word, OpenOffice, Excel и др.) или формат вывода (DOCX, ODT, PDF, PDF‐iHQC™, PDF/A, XPS, XPS‐ iHQC™ и др.) для документов, а затем выберите нужные параметры. iHQC™ Технология iHQC™ используется для сильного сжатия PDF‐ и XPS‐документов. 3. Нажмите Распознать и сохранить, чтобы распознать и сохранить документы. При необходимости документы можно изменить перед преобразованием Для редактирования документов используйте кнопки на правой панели инструментов. Примеры: • Уточнение автоматического анализа страницы путем сортировки зон и создания новых зон с текстом, графикой, штрихкодами и таблицами, а также зон печати печатными буквами. Кроме того, при необходимости можно вручную создать зоны со штрихкодами и письмом печатными буквами. • Задание ограниченной области распознавания с помощью параметра Игнорировать внешнюю область. Все данные за пределами области будут отброшены. • Использование параметра Выравнивание страницы для выравнивания страницы документа. • Использование параметра Поворот для задания правильной ориентации текста. • Щелкните изображение правой кнопкой мыши для доступа к полезным функциям. Выбор окна Создание окна с текстом Создание окна с графикой Создание окна с таблицей Создание окна со штрихкодом Создание окна с письмом печатными буквами Анализ страницы Игнорировать внешнюю область Выравнивание страницы Выбор и сортировка окон По размеру окна По ширине Фактический размер Поворот Увеличительное стекло Печать изображений Интеллектуальные инструменты Readiris™ Мастер OCR Мастер OCR можно запустить с помощью левой панели инструментов. Мастер помогает настроить параметры, необходимые для работы с Readiris™. SmartTask SmartTask — это предварительно заданные команды, которые позволяют запускать несколько основных функций функии Readiris™ одновременно (сканирование, распознавание, преобразование). Документы будут переданы непосредственно в Word, OpenOffice и др. (Доступно множество других приложений и формато.) Esta Guía rápida del usuario proporciona directrices generales para instalar y utilizar Readiris™ Pro 12 incluido con su IRIScan™ Book 2. Si necesita instrucciones detalladas sobre Readiris™ Pro 12, consulte la Guía del usuario completa, incluida en formato electrónico con el producto: Desde el menú Inicio de Windows, vaya a Todos los programas > I.R.I.S. > Readiris™ Pro 12 > Guía del usuario. Instalación Inicie sesión en Windows como administrador o asegúrese de disponer de los derechos de administración necesarios para instalar el software. Introduzca el CD-ROM de Readiris en el lector de CD y siga las instrucciones que aparecerán en pantalla para instalar el software en el ordenador. Cómo utilizar Readiris™ con el escáner IRIScan™ Book 2 Cómo ejecutar Readiris™ Ejecute Readiris™ desde el menú Inicio de Windows (vaya a Todos los programas > I.R.I.S. > Readiris™ Pro 12) o haga doble clic en el acceso directo a Readiris™ que encontrará en el escritorio. Se le pedirá que registre su copia del programa. Haga clic en Registrarse ahora y siga las instrucciones que aparecerán en pantalla para registrarla. Cómo utilizar Readiris™ Paso 1: Utilice la barra de herramientas izquierda para abrir y procesar sus documentos Readiris™ puede procesar todo tipo de documentos con texto, gráficos, tablas, columnas complejas... e incluso impresiones matriciales y textos degradados. 1. Haga clic en Opciones para activar todas las opciones de procesamiento posibles: Análisis de página (opción predeterminada): divide los documentos en ventanas de reconocimiento. Restablecimiento de páginas: endereza los documentos que se escanearon inclinados. Opciones de rotación: giran los documentos en la dirección que desee. 2. Encienda su IRIScan™ Book y conéctelo al ordenador. Se abrirá una ventana en la que se le pedirá si desea cargar las imágenes de su IRIScan™ Book. Seleccione las imágenes que desee abrir y haga clic en Abrir. Nota: para abrir las imágenes más adelante, haga clic en el botón Abrir de la barra de herramientas principal y busque manualmente las imágenes que desee abrir. Paso 2: Reconozca y guarde los documentos 1. Haga clic en el icono del globo terráqueo para seleccionar el idioma de los documentos. Podrá dar preferencia a la velocidad por encima de la precisión y viceversa moviendo el control deslizante. 2. Haga clic en Formato para seleccionar la aplicación de destino (Word, OpenOffice, Excel, etc.) o el formato de salida (DOCX, ODT, PDF, PDF-iHQC™, PDF/A, XPS, XPS-iHQC™, etc.) de los documentos y, a continuación, seleccione las opciones pertinentes. iHQC™ Utilice la tecnología iHQC™ para comprimir al máximo los documentos PDF y XPS. 3. Haga clic en Reconocer + Guardar para ejecutar el reconocimiento y guardar los documentos. En caso de que sea necesario, puede editar los documentos antes de reconocerlos. Para editar los documentos, utilice los botones de la barra de herramientas derecha. Seleccionar ventana Ejemplos: Dibujar una ventana de texto Refine el análisis automático de la página ordenando las ventanas y trazando nuevas ventanas de texto, gráficas y de tabla. Si lo desea, también podrá crear ventanas de código de barras y de texto manuscrito manualmente. Defina una zona de reconocimiento limitada utilizando la opción Ignorar la zona exterior. Todos los datos que queden fuera del área especificada se ignorarán. Utilice la opción Restablecer la página para enderezar cualquier página que se haya escaneado inclinada. Utilice la opción Girar para corregir la orientación del texto. Haga clic con el botón derecho sobre la imagen escaneada para acceder a varias funciones útiles. Dibujar una ventana de gráfico Dibujar una ventana de tabla Dibujar ventana de código de barras Dibujar ventana de texto manuscrito Analizar la página Ignorar la zona exterior Restablecer la página Seleccionar y ordenar ventanas Ajustar a la ventana Ajustar a lo ancho Tamaño real Girar Lupa Imprimir las imágenes Herramientas inteligentes de Readiris™ Asistente de OCR Podrá acceder al Asistente de OCR desde la barra de herramientas izquierda. El asistente le permitirá configurar fácilmente todos los parámetros necesarios para utilizar Readiris™. SmartTasks Las SmartTasks son comandos predefinidos que permiten ejecutar las principales funciones de Readiris™ (escaneado, reconocimiento y conversión) de una vez. Sus documentos se transferirán directamente a Word, OpenOffice, etc. (Hay muchas otras aplicaciones y formatos disponibles.) يوفر دليل البدء السريع هذا توجيهات عامة حول تنصيب واستخدام Readiris™ Pro 12 وهو مزود مع IRIScan™ Book 2الخاص بك. للتعرف على التعليمات المفصلة حول Readiris™ Pro 12راجع دليل المستخدم الكامل الوارد مع منتجك :من قائمة ( Startابدأ) في نظام ،Windowsانقر فوق ( All Programsكل البرامج) > ( User Guide > Readiris™ Pro 12 > I.R.I.S.دليل المستخدم). التنصيب •قم بتسجيل الدخول إلى Windowsكمسئول ،أو تأكد من حصولك على حقوق اإلدارة الالزمة لتنصيب البرنامج. أدخل القرص المضغوط الخاص بـ ™ Readirisفي محرك األقراص المضغوطة ،واتبع اإلرشادات • ِ التي تظهر على الشاشة لتنصيب البرنامج على الكمبيوتر لديك. استخدام ™ Readirisمع الماسح الضوئي IRIScan™ Book 2 كيفية تشغيل ™Readiris •قم ببدء تشغيل ™ Readirisمن قائمة ( Startابدأ) في نظام ،Windows (انقر فوق ( All Programsكل البرامج) > )Readiris™ Pro 12 > I.R.I.S. مزدوجا فوق اختصار ™ Readirisالموجود على سطح المكتب لديك. نقرا أو انقر ً ً •ستتم مطالبتك بالتسجيل .انقر فوق تسجيل اآلن واتبع التعليمات الموضحة على الشاشة للتسجيل. كيفية استخدام ™Readiris العربية | ®WINDOWS الصفحة 1 الخطوة :1استخدم شريط األدوات األيسر لتحميل مستنداتك ومعالجتها يتمكن ™ Readirisمن معالجة كافة أنواع المستندات التي تشتمل على نصوص ورسوم وجداول وأعمدة معقدة وغيرها ،وحتى المصفوفة النقطية والنصوص ذات الجودة المنخفضة. 1.1انقر فوق خيارات لتنشيط خيارات المعالجة الممكنة: تحليل الصفحة (الخيار االفتراضي) :يقوم بتقسيم المستندات الخاصة بك في مناطق تعرف. تصحيح وضع الصفحة :لتعديل المستندات التي تم مسحها ضوئيًا بزاوية. خيارات التدوير :لتدوير مستنداتك إلى االتجاه المطلوب. 2.2قم بتشغيل IRIScan™ Bookوتوصيله بالكمبيوتر ستفتح نافذة تطالبك بتحميل صور IRIScan™ Bookالخاصة بك. حدد الصور التي تريد فتحها وانقر فوق فتح. مالحظة :لفتح الصور ً الحقا ،انقر فوق فتح على شريط األدوات الرئيسي وابحث يدويًا عن الصور التي تريد فتحها. الخطوة :2التعرف على المستندات وحفظها 1.1انقر فوق رمز الكرة األرضية لتحديد لغة مستنداتك. تلميح :يمكنك تفضيل سرعة التعرف عن الدقة والعكس من خالل تحريك شريط التمرير. 2.2انقر فوق تنسيق لتحديد التطبيق المستهدف ( WordوOpenOffice و Excelوما شابه) أو تنسيق الناتج ( DOCXو ODTوPDF و™ PDF-iHQCو PDF/Aو XPSو™ XPS- iHQCوما شابه) لمستنداتك ،ثم حدد الخيارات المطلوبة. ™iHQC استخدم تقنية ™ iHQCلضغط مستندات PDFو XPSالخاصة بك بدرجة عالية. 3.3نقر فوق تعرف +حفظ لتنفيذ التعرف وحفظ مستنداتك. الصفحة 2 العربية | ®WINDOWS إذا لزم األمر ،يمكنك تحرير مستنداتك قبل التعرف عليها لتحرير مستنداتك ،استخدم أزرار شريط األدوات الصحيحة. أمثلة: •قم بتصفية تحليل الصفحة التلقائي من خالل تصنيف المناطق ورسم نوافذ نص ورسومات وجداول وأشرطة رموز وكتابة يدوية جديدة .قم ً أيضا يدويًا بإنشاء نوافذ شريط الرموز والكتابة اليدوية إذا لزم األمر. •قم بتحديد منطقة تعرف محددة باستخدام تجاهل المنطقة الخارجية .سيتم تجاهل أي بيانات تقع خارج المنطقة. •استخدم تصحيح الصفحة لتعديل صفحة المستند. •استخدم تدوير لضبط اتجاه النص الصحيح. •انقر بزر الماوس األيمن فوق الصورة الممسوحة ضوئيًا للوصول إلى الوظائف المفيدة. تحديد النافذة رسم نافذة نصوص رسم نافذة رسومات رسم نافذة جداول رسم نافذة أشرطة الرموز رسم نافذة الكتابة اليدوية تحليل الصفحة تجاهل المنطقة الخارجية تصحيح وضع الصفحة تحديد تصنيف النوافذ مالئمة للنافذة مالئمة للعرض الحجم الفعلي تدوير عدسة تكبير طباعة الصور العربية | ®WINDOWS الصفحة 3 أدوات ™ Readirisالذكية معالج التعرف الضوئي على الحروف يمكنك الوصول إلى معالج OCRمن شريط األدوات األيسر. يقوم المعالج بتوجيهك عبر اإلعدادات الالزمة لتشغيل ™.Readiris SmartTasks تمثل SmartTasksأوامر محددة ً كل على حدة مسبقا تتيح لك تشغيل وظائف ™ Readirisالرئيسية ٍ (المسح الضوئي والتعرف والتحويل). يتم تحويل مستنداتك مباشرة إلى Wordأو OpenOfficeأو ما شابه (تتوافر العديد من التطبيقات والتنسيقات األخرى). الصفحة 4 العربية | ®WINDOWS


![LM 4.0_QuickStart_EURO [7] Languages.fm](http://vs1.manualzilla.com/store/data/006170771_1-f471c6a60f770fa9f17213cbf88d66dd-150x150.png)