1
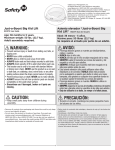
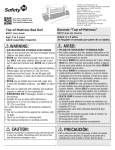
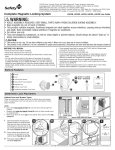
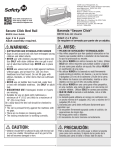
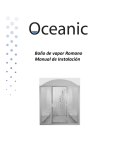
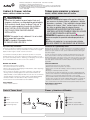
©2013 Cosco Management, Inc. All Rights Reserved. Todos derechos reservados.
www.djgusa.com (800) 544-1108 www.safety1st.com
Made in CHINA. Hecho en CHINA. Styles and colors may vary. Los estilos y los colores pueden variar.
Distributed by (distribuido por) Dorel Juvenile Group, Inc., 2525 State St., Columbus, IN 47201-7494
Dorel Distribution Canada, 873 Hodge, St. Laurent, QC H4N 2B1
10/21/13 4358-6224A
Cabinet & Drawer Latches
Trabas para armarios y cajones
WARNING:
AVISO:
48444, 48390, HS204 User Guide
48444, 48390, HS204 Guía del Usuario
• No utilice este producto para evitar que los niños tengan acceso a sustancias tóxicas y peligrosas u objetos
punzantes y cortantes. Tales materiales siempre deben
colocarse en lugares “altos” u otros lugares a los que
los niños no puedan llegar de ninguna manera.
• REQUIERE INSTALACIÓN POR PARTE DE UN ADULTO.
MANTENGA LAS PIEZAS PEQUEÑAS FUERA DEL ALCANCE
DE LOS NIÑOS DURANTE LA INSTALACIÓN.
PRECAUCIÓN: Este producto es sólo un elemento disuasivo. El
mismo no reemplaza la supervisión adecuada por parte de un
adulto.
NO utilice este producto si se encuentra roto o dañado.
PARA USO DOMÉSTICO ÚNICAMENTE EN INTERIORES.
• Do not use this product to guard against toxic and
dangerous substances, or sharp-edged or pointed objects.
Such materials should always be placed “high up” or
otherwise made completely inaccessible to children.
• ADULT INSTALLATION REQUIRED. KEEP SMALL
PARTS AWAY FROM CHILDREN DURING
INSTALLATION.
CAUTION: This product is only a deterrent. It is not a substitute for proper adult supervision.
DO NOT use product if damaged or broken.
FOR INDOOR HOME USE ONLY.
Información de seguridad importante
Important Safety Information
Check for security after installation by tugging firmly on the door or drawer. If the latch does not securely hold the door or drawer when tugged,
adjust the latch height to obtain a secure connection.
Después de su colocación, verifique que funcione correctamente tirando
firmemente de la puerta o el cajón. Si el pestillo no sujeta firmemente la
puerta o el cajón al tirar de estos, ajuste la altura del pestillo para lograr
una unión segura.
Your child will eventually be able to defeat this product. To keep this
product effective for as long as possible, avoid letting children see how
you operate child safety devices. Watching you disengage a lock, latch or
cover could enable them to learn sooner how to defeat it.
Un niño sin supervisión puede ser capaz de inutilizar la protección que
ofrece este producto. Para que este producto funcione efectivamente
durante más tiempo, evite que los niños vean como se opera. Si los niños
ven cómo usted libera una traba, un pestillo o una cubierta, podrían aprender más rápido la manera de inutilizar cualquier tipo de dispositivo de
seguridad.
BEFORE YOU BEGIN:
ANTES DE COMENZAR:
• Lea todas las instrucciones antes de instalar.
• Guarde estas instrucciones para su uso futuro.
•R
etire todo el contenido del embalaje y deseche la caja y/o las bolsas de
polietileno.
• Despliegue e identifique todas las piezas.
•N
o devuelva este producto al lugar donde lo compró. Si falta alguna pieza,
envíe un correo electrónico a [email protected], llame al Departamento de
Relaciones con el Consumidor al (800) 544-1108, o envíe un fax al
(800) 207-8182. También puede visitar nuestro sitio web en www.safety1st.com.
Tenga a mano el número de modelo (48444, 48390, HS204) y el código de
fecha (fecha de fabricación), que se encuentran indicados en el paquete.
•N
o se recomienda el uso de herramientas eléctricas para la instalación de tornillos.
• Read all instructions before installing.
• Keep these instructions for future use.
• Remove all contents from packaging and discard box, and/or poly bags.
• Lay out and identify all parts.
• Do not return this product to the place of purchase. If any parts are
missing, email [email protected], call Consumer Relations at
(800) 544-1108, or fax at (800) 207-8182. You can also visit our website
at www.safety1st.com. Have the model number ready (48444, 48390,
HS204) and date code (manufacture date) located on package.
• Power tools are not recommended for screw installation.
TOOLS NEEDED:
• Phillips head screwdriver
HERRAMIENTAS NECESARIAS:
• Destornillador Phillips
Parts & Terms Used
A
B
C
Catch
D
Positioning Tape
Latch
Screws (4 per lock)
Piezas y términos utilizados
C
A
B
D
1
A
B
C
Enganche
D
Ruban de positionnement
Pestillo
Tornillos (4 por traba)
Drawer
Latches
To Install
1 Attach enclosed positioning tape to mounting
surface of the catch and latch pieces.
d positioning
tape to mounting
DO NOT remove second tape backing yet.
eces. DO NOT remove second
t.
Para instalar
1"
2 Position
catch
1” fromof
inside
edge of
˝ from
inside
edge
cabinet
cabinet frame. Mark catch position. Remove
ch position.
Remove
positioning
tape backingpositioning
and stick in position.
d stick in position.
osed double-sided tape is for
. You• must
secure catch and latch
Enclosed double-sided tape is for positiondrawers
with
ing only.
Youenclosed
must securescrews.
catch and latch
2
o it engages
screws. catch when door is
5˝. Mark latch position. Remove
e backing
stick in position.
3 Positionand
latch so it engages catch when door
t of catch
and
latch
prior
to
is opened
about
1.5”. Mark
latch position.
Remove positioning tape backing and stick in
crews.position.
After checking alignment,
ch and latch tightly with screws.
3
CAUTION:
1
1
2 Sitúe la traba a 2.5 cm (1 pulgada) del borde interior
del armario. Marque la posición de la traba. Quite el
respaldo de la cinta adhesiva y pegue la traba en su
sitio.
PRECAUCIÓN:
• La cinta adhesiva de doble cara sólo sirve para
fijar la posición. Debe atornillar la traba y el pestillo (pasador) a los armarios y gavetas con los
tornillos incluidos.
to cabinets and drawers with enclosed
Pegue la cinta adhesiva (incluida) a las superficies de
montaje de todos los componentes.
NO QUITE TODAVÍA la tira de respaldo.
3 Sitúe el pestillo de modo que se enganche con la
traba cuando la puerta se abra aproximadamente 3.8 cm (1.5 pulgadas). Marque la posición del
pestillo. Quite el respaldo de la cinta adhesiva y
pegue el pestillo en su sitio.
Check alignment of catch and latch prior
to attaching with screws. After checking
alignment, secure both catch and latch tightly
with screws.
ened 1.5˝ the latch will engage
NOTE:
An alternative
to mount these
on latch
with
finger method
to open.
cabinet latches is to mount the catch on the
side of the cabinet and then mount the latch
sideways on the edge of the cabinet door or
drawer.
ve method to mount these cabinet latches is to
the side of the cabinet and then mount the latch
ge of the cabinet door or drawer.
Compruebe la correcta alineación de la traba
y el pestillo antes de atornillarlos. Después de
comprobar la alineación, atornille firmemente la
traba y el pestillo.
NOTA: Otra forma alternativa de montar este
sistema de seguridad consiste en poner el pestillo
en un costado del armario y después poner de
lado la traba en el borde de la puerta o gaveta del
armario.
duct is only a deterrent. It is not a substitute for
vision. Discontinue use when child becomes old
Toxic and dangerous substances, as well as
nted objects, should always be placed “high up”
To Use
Para Usar
inaccessible to small children.
4 El pestillo se enganchará con la traba cuando la puerta o gaveta
4 When drawer is opened 1.5” the latch will engage catch. Press
abra 3.8 cm (1.5 pulgadas). Para abrir la puerta o gaveta,
down
on
latch
with
finger
to
open.
e difficult to access if used on a top drawer that se
empuje el pestillo hacia abajo con un dedo.
with a 1"
overhang.
latch
is difficult
access,
NOTE:
Latch may beIf
difficult
to access
if used on to
a top
NOTA: Puede ser difícil acceder al pestillo si lo utiliza en un
drawer
that
has
a
counter
top
with
a
1”
overhang.
If
latch
is
ject todifficult
depress
latch.
cajón superior que tiene un mostrador con un saliente de 1 pulg.
to access, insert a rounded object to depress latch.
Si es difícil acceder al pestillo, inserte un objeto redondo para
presionarlo.
To Clean
Wipe clean. Keep lock dry.
Para limpiar
Limpie con un paño. Mantenga la traba seca.
2