1
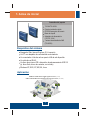
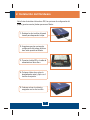
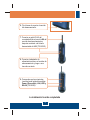
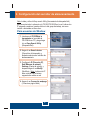
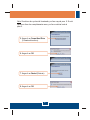
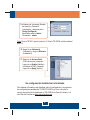
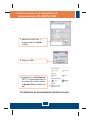
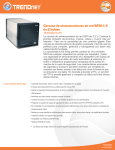
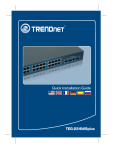
Quick Installation Guide
TS-I300
TS-I300W
Table ofofContents
Table
Contents
Español .....................................................................................................
1. Antes de iniciar ..................................................................................
2. Instalación del Hardware ...................................................................
3. Configuración del servidor de almacenamiento ................................
4. Cómo acceder a los dispositivos de almacenamiento
TS-I300/TS-I300W ............................................................................
1
1
2
4
7
Troubleshooting ........................................................................................ 8
Version 07.06.2006
1. Antes de iniciar
Contenidos del paquete
TS-I300/TS-I300W
Guía de instalación rápida
CD-ROM para guía del usuario
Base de soporte
Adaptador de alimentación
(12V DC, 3.0A)
1 antena desmontable de 2dBi
(TS-I300W)
Requisitos del sistema
Navegador Web: Internet Explorer (5.0 ó superior)
Un PC con adaptador de red instalado correctamente.
Un conmutador o Hub de red con puerto LAN de red disponible.
Un cable de red RJ-45.
Un disco duro interno IDE o dispositivo de almacenamiento USB 2.0
(ej. disco flash, disco duro externo; no incluido)
Windows XP, 2000, NT, ME, 98, Linux
Aplicación
USB 2.0 & IDE Network Storage Enclosure (TS-I300)
Or
USB 2.0 & IDE Wireless Network Storage Enclosure (TS-I300W)
DATA
HD
1
Español
2. Instalación del Hardware
Nota: Antes de instalar el disco duro IDE, las opciones de configuración del
jumper (puente conector) deben ponerse en Master.
1. Extraiga los dos tornillos del panel
trasero para desprender la tapa.
2. Asegúrese que las opciones de
configuración del jumper del disco
duro estén puestas en Master.
3. Conecte el cable IDE y el cable de
alimentación al disco duro.
4. Coloque el disco duro sobre la
abrazadera de metal y fíjelo con 4
tornillos de sujeción.
5. Vuelva a colocar la cubierta y
asegúrela con los dos tornillos.
2
Español
6. Fije la base de soporte al servidor
de almacenamiento.
7. Conecte un cable RJ-45 del
conmutador/Hub al puerto LAN del
servidor de almacenamiento y
después conéctelo a la Antena
desmontable de 2dBi (TS-I300W).
8. Conecte el adaptador de
alimentación externo al servidor de
almacenamiento y luego a una
toma de corriente.
9. Compruebe que las siguientes
luces del panel están encendidas:
Power (Encendido), LAN, HDD y
WLAN (TS-I300W).
La instalación ha sido completada
3
Español
3. Configuración del servidor de almacenamiento
Nota: Instale y utilice la Easy search Utility (Herramienta de búsqueda fácil)
para encontrar todo lo referente a la TS-I300/TS-I300W en la red, la dirección
IP asignada, cambiar el nombre del host o del grupo de trabajo, así como
instalar o desinstalar el disco duro.
Para usuarios de Window
1. Introduzca el CD-ROM de la
herramienta en la unidad de
CD-ROM de su PC y luego haga
clic en Easy Search Utility
(Búsqueda fácil).
2. Haga clic en Search device
(Dispositivo de búsqueda), y
después seleccione el servidor de
almacenamiento.
3. Configure la IP (Dirección IP),
Red (Máscara de subred),
Gateway (Puerta de enlace), y
después haga clic en Modify
(Modificar). Nota: La dirección IP
debe coincidir con el mismo
segmento de red de su red.
4. Haga clic en Connect to webpage
(Conectar a página Web).
4
Español
Nota: Si su disco duro ya ha sido formateado, por favor vaya al paso 9. Si está
fijando un disco duro completamente nuevo, por favor continúe hasta el
paso 5.
5. Haga clic en Format Hard Drive
(Formatear disco duro).
6. Haga clic en OK.
7. Haga clic en Restart (Reiniciar).
8. Haga clic en OK.
5
Español
9. Introduzca el Username (Nombre
de Usuario) y Password
(contraseña), y después pulse
Config (Configurar).
Nombre de usuario: admin
Contraseña: admin
Nota: Para la TS-I300 vaya a la sección 4. Para la TS-I300W continúe hasta el
paso 10.
10. Haga clic en Advanced
(Avanzado) y luego en Wireless
(Inalámbrico).
11. Haga clic en Access Point
(Punto de acceso) y después
haga clic en Enable (Habilitar).
Introduzca el SSID y después
haga clic en Apply (Aplicar).
Su configuración inalámbrica ha finalizado.
Para obtener información más detallada sobre la configuración y las opciones
de configuración avanzadas de TS-I300/TS-I300W, por favor consulte la
sección de resolución de problemas, el CD-ROM de la Guía del Usuario, o el
sitio Web de Trendnet en http://www.trendnet.com.
6
Español
4. Cómo acceder a los dispositivos de
almacenamiento TS-I300/TS-I300W
1. Seleccione el disco duro, y
después haga clic en Mount
(Instalar).
2. Haga clic en OK.
3. Haga doble clic en My Computer
(Mi PC). Después haga doble clic
en cualquier disco duro instalado
en Network Drives (Unidades de
red).
Su dispositivo de almacenamiento está listo para usar
7
Español
Troubleshooting
Q1: Can I connect or disconnect the USB storage device while the TS-I300/TS-I300W is on?
A1: Yes, you can connect or disconnect any external USB device while the computer is on,
because the USB interfaces are Plug-and-Play and hot-pluggable. Just press on the
Unmount button on the unit or open the utility program and press unmount for the USB
device.
Q2: I specified the IP address http://192.168.1.2 in my Internet Browser's Address Bar, but
an error message says “The page cannot be displayed.” How can I get into the TS-I300/TSI300W's web configuration page?
A2: First, check your hardware settings again by following the instructions in section 2.
Second, make sure the LAN and WLAN (TS-I300W) lights are lit. Third, make sure the
TS-I300/TS-I300W is assigned an IP Address in the same subnet as your network. You may
need to adjust the TCP/IP settings on your computer to match the storage server. Please
see the steps below:
1. Go into the Control Panel and double-click
the Network Connections icon, right-click
the Local Area Connection icon and then
click Properties.
2. Click Internet Protocol (TCP/IP) and then
click Properties. Then click on Use the
following IP address, and make sure you
assign your network adapter an IP address
in the subnet of 192.168.1.x.
Q3: I am unable to mount or access the IDE hard drive. What should I do?
A3: First, verify that the IDE hard drive has been properly installed (see section 2). Second,
disable any software firewall programs (e.g. Norton Internet Security, McAfee). If you are
running Windows XP, disable the built-in XP firewall. Third, make sure the
TS-I300/TS-I300W is assigned an IP Address in the same subnet as your network.
8
Q4: All the settings are correct, but I can not make a wireless connection to the TS-I300W.
A4: First, double check that the WLAN light on the storage device is lit. Second, power cycle
the Access Point. Unplug the power to the TS-I300W. Wait 15 seconds, then plug the power
back in. Third, contact the manufacturer of your wireless network adapter. Make sure the
wireless network adapter is configured with the proper SSID. The default SSID of the Access
Point is TRENDnet.
If you still encounter problems or have any questions regarding the TS-I300/TS-I300W, please
contact TRENDnet's Technical Support Department.
Certifications
This equipment has been tested and found to comply with FCC and CE Rules.
Operation is subject to the following two conditions:
(1) This device may not cause harmful interference.
(2) This device must accept any interference received. Including interference that may cause
undesired operation.
Waste electrical and electronic products must not
be disposed of with household waste. Please
recycle where facilities exist. Check with you Local
Authority or Retailer for recycling advice.
NOTE: THE MANUFACTURER IS NOT RESPONSIBLE FOR ANY RADIO OR TV INTERFERENCE
CAUSED BY UNAUTHORIZED MODIFICATIONS TO THIS EQUIPMENT. SUCH MODIFICATIONS
COULD VOID THE USER’S AUTHORITY TO OPERATE THE EQUIPMENT.
9
TRENDnet Technical Support
US . Canada
Toll Free Telephone: 1(866) 845-3673
24/7 Tech Support
Europe (Germany . France . Italy . Spain . Switzerland . UK)
Toll Free Telephone: +00800 60 76 76 67
English/Espanol - 24/7
Francais/Deutsch - 11am-8pm, Monday - Friday MET
Worldwide
Telephone: +(31) (0) 20 504 05 35
English/Espanol - 24/7
Francais/Deutsch - 11am-8pm, Monday - Friday MET
Product Warranty Registration
Please take a moment to register your product online.
Go to TRENDnet’s website at http://www.trendnet.com
3135 Kashiwa Street
Torrance, CA 90505
USA
Copyright ©2006. All Rights Reserved. TRENDnet.