1
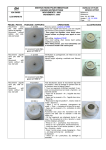
7135 Tél. + 41 32 933 60 00 Fax + 41 32 933 60 01 www.bergeon.ch [email protected] D e p u i s 1 7 9 1 Outil SElTZ de précision Zapfenrichtgerät SEITZ à redresser les pivots des axes de balanciers SEITZ precision tool for straightening balance staff pivots Util SElTZ de precisión para enderezar los pivotes de los ejes de volantes Permet de redresser les pivots sans les casser grâce à une réglette de contrôle, ainsi qu’une vis avec butée d’appui. Erlaubt das Richten von Zapfen ohne diese zu brechen dank einer Stützschraube und eines Richtanschlages. Allows the pivots to be straightened without breaking due to a control device as well as a screw fitted with a stop. Permite enderezar los pivotes sin romperlos gracias a una regleta de control y un tornillo con un tope de apoyo. 41 trous empierrés ∅ 0.07 - 0.15 mm. Progression 0.025 mm. Un mode d’emploi détaillé est livré avec chaque outil. 41 Lagersteinlöcher ∅ 0.07 - 0.15 mm. Progression 0.025 mm. Eine ausführliche Gebrauchs anweisung wird mit jedem Gerät geliefert. 41 jewelled holes ∅ 0.07 - 0.15 mm. Progression 0.025 mm. Detailed operating instructions delivered with each tool. 41 agujeros empedrados ∅ 0.07 - 0.15 mm. Progresión 0.025 mm. Un modo de empleo detallado se entrega con cada útil. Outil complet Vollständiges Werkzeug Complete tool Util completo No 30350-D-02 97 gr. Pce Fr. Réglette et vis d’appui seules. S’adaptent sur les anciens outils. Richtanschlag und Stützschraube alleine. Passend auf die alten Werkzeuge. Control and stop screw only. Can be adapted to old model. Regleta y tornillo de apoyo solos. Se adaptan a los útiles antiguos. 2082008 No 30350-D-1 1 gr. Pce Fr. Mode d’emploi Gebrauchsanweisung Instructions for use Modo de empleo 1. Placer le pivot à redresser dans le trou de pierre plus grand de 0.01 mm que le diamètre du pivot. 2. Régler la réglette (1) en tour nant la vis centrale moletée (2) de manière qu’en tournant le balancier, le point le plus haut de la serge touche la réglette. Pour faire tourner le balancier, utiliser un pinceau à poils souples. 3. Tourner la couronne (3) jusqu’à ce que la butée d’appui (4) touche presque la plaque de base (6). 4. Dévisser la butée d’appui (4) de 1/2 ou 3/4 de tour, pour cela, utiliser le repaire (5) sur la couronne (3). 5. Noter sur la serge du balancier le point de contact avec la réglette. Presser sur la cou ronne (3) jusqu’à ce que la butée d’appui (4) touche la plaque (6). 1. Den zu richtenden Zapfen in die Steinbohrung um 0.01 mm grösser als den Durchmesser des Zapfens legen. 2. Höhe des Richtanschlages ( 1) durch Drehen der mittleren Rändelmutter so einstellen, dass er die höchste Stelle des Taumelschlages am Unruhreif eben berührt. (Zum Drehen der Unruh einen feinen Maler pinsel verwenden). 3. Einstellkrone (3) drehen, bis die Stützschraube (4) fast die Grundplatte (6) berührt. 1. Place the pivot to be straigh tened in the jewelled hole 0.01 mm bigger than the diameter of the pivot. 2. Set the control device (1) by turning the center screw (2) in the same way as the balance wheel the highest point of the wheel touching the control device. To spin the balance wheel use a brush with soft hair. 3. Turn the crown (3) with the screw (4) until the screw almost touches the base (6). 1. Colocar el pivote por endere zar en el agujero empedrado mayor de 0.01 mm que el diámetro del pivote. 2. Regular la regleta (1) girando el tornillo central moleteado (2) en tal forma que, al hacer girar el volante, el punto más alto del aro esté en contacto con la regleta. Para hacer girar el volante, utilizar un pincel de pelos suaves. 3. Hacer girar la corona (3) hasta que el tope de apoyo (4) toque casi la placa de base (6). 4. Stützschraube (3/4) um eine halbe Umdrehung heraus schrauben. Hierbei auf den Markierungsstrich (5) achten. 5. Krone (3) nach unten drücken, bis die Stützschraube (4) auf der Grundplatte (6) aufsetzt. Berührungspunkt des Anschlages (1) auf dem Unruhreif merken. 4. Unscrew (4) 1/2 or 3/4 of a turn, using the mark (5) on crown (3). 4. Destornillar el tope de apoyo (4) de 1/2 o 3/4 de vuelta. Para esto, utilizar el punto de refe rencia (5) ubicado en la corona (3). 5. Anotar en el aro del volante el punto de contacto con la regleta. Presionar la corona (3) hasta que el tope de apoyo toque la placa (6). 5. Mark on the balance wheel the point of contact with the control device. Press on the crown (3) until the stop (4) touches the plate (6). 7136 www.bergeon.ch [email protected] 6. Faire tourner le balancier à l’aide d’un pinceau. Observer le jour entre la réglette et la serge du balancier. Placer à nouveau le point le plus haut de la serge sous la réglette. Cela devrait être le même point noté sur la serge qu’avant la première correction. 7. Dévisser la butée d’appui (4) de 3/4 de tour. 8. Presser sur la couronne (3) jusqu’à ce que la burée d’appui (4) touche la plaque de base (6). 9. Faire tourner le balancier, observer le “mal plat”. 10. Répéter les opérations 7 -8-9 jusqu’à ce que le pivot soit complètement redressé. Vous constaterez que le jour entre la réglette et la serge du balancier devient toujours plus grand et que “mal plat” devient toujours plus faible. 11. Diminuer à chaque correction l’angle du “mal plat” par ex. 60°,45°,30°, 15°. 12. Le pivot est considéré redressé seulement lorsqu’il n’appa raîtra plus de “mal plat”. Important Le point de contact de la réglette avec le point le plus haut de la serge doit toujours se trouver à la même place si tout à coup ce point se trouve être déplacé de 180°, c’est que la correction était trop importante. Quelques conseils Il faut contrôler l’axe du balancier attentivement lorsque l’on con trôle le “mal plat” qui ne provient pas nécessairement d’un pivot plié. Le jeu de pivot dans la pierre peut gêner lors du contrôle; il faut le supprimer en utilisant le plus petit trou possible et en faisant l’observation d’une manière parallèle à la plaque de base 6 en inclinant l’outil. Par la force de gravitation (centrifuge) le pivot s’appuie sur 2 points dans le trou du pivot. Si l’on fait tourner le balancier avec un pinceau latéralement et de haut en bas, alors il ne peut pas se manifester d’ébat de pivot. D e p u i s 1 7 9 1 6. Unruh mit Hilfe des Malerpin sels drehen. Anhand der Breite des Lichtspaltes zwischen An schlag (1) und Reif, die Richt wirkung beurteilen. Den höchsten Punkt des Taumel schlages wieder unter den Anschlag (1) stellen. Es sollte der gleiche Punkt auf der Ober fläche des Reifs sein, an dem vorher der Anschlag (1) zum dem Richten angesetzt wurde. 7. Stützschraube (4) 3/4 um eine Vierteldrehung herausschrauben. 8. Krone (3) niederdrücken bis Stützschraube (4) aufsetzt. 6. Turn the balance wheel with the brush. Observe the play between the control and the wheel. Place the new point of contact, the highest of the wheel on the control. This should be the same as the first correction. 6. Hacer girar el volante con el pi ncel. Observar el espacio entre la regleta y el aro del volante. Colocar nuevamente el punto más alto del aro debajo de la regleta. Este deberá coi’ncidir con el punto anotado sobre el aro antes de la primera corrección. 7. Unscrew contact point (4) 3/4 of turn. 8. Press on the crown (3) until the control point (4) touches the plate (6). 7. Destornillar el tope de apoyo (4) de 3/4 de vuelta. 9. Unruh drehen; Richtwirkung beobachten. 10. Die unter den Punkten 7 bis 9 beschriebenen Arbeiten solange wiederholen, bis die Richtwir kung einsetzt. Erkennbar daran, dass der Lichtspalt zwischen Anschlag (1) und dem Berührungspunkt auf dem Unruhreif grösser und der Taumelschleg kleiner wird. 11. Drehwinkel , um den die Krone (3) herausgeschraubt wird, bei jedem weiteren Richtversuch verkleinern. (z.B. 60°,45°, 30°,15°.) 12. Der Zapfen darf erst dann als gerade gerichtet gelten, wenn weder Unruhreif noch Welle einen Taumelschlag zeigen. 9. Turn the balance and observe the u neveness. 10. Repeat operations 7 -8-9 until the pivot is straight. You will notice that the play between the control and the wheel becomes larger and that the uneveness is smaller. Wichtig Der Berührungspunkt des Anschla ges ( 1) an der höchsten Stelle des Unruhreifs muss bei allen Richt vorgängen der gleiche bleiben. Wechselt er plötzlich um 180°, wur de der V erstellwi nkel zu gross ge wählt und der Zapfen überdehnt. Einige Ratschläge Bei der Beobachtung des Taumel schlages soll man der Welle den grösseren Wert zumessen, da ein unflach laufender, schi agender Reif von sich aus Fehlanzeigen einbringt, die nicht von einem krummen Zapfen herrühren. Das Zapfenspiel in dem Lochstein kann sich bei der Kontrolle störend bemerkbar machen. Man beseitigt es, indem man die kleinstmöglichste Bohrung nimmt und die Platte parallel zur Blickrichtung geneigt hält. I nfolge der Schwerkraft legt sich der Zapfen an zwei Stellen der Lochwandung an. Dreht man die Unruh mit dem Pinsel seitlich von oben nach unten, so kann sich kein Zapfenspiel zeigen. 8. Presionar la corona (3) hasta que el tope de apoyo (4) toque la placa de base (6). 9. Hacer girar el volante obser vando el “malplano”. 10. Repetir las operaciones 7.-89 hasta que el pivote quede completamente enderezado. Se podrá notar que el espacio entre la regleta y el aro del volante se vuelve siempre más grande y el “mal plano” siempre menor. 11. Decrease at each correction the angle of the uneveness, ex. 60°, 45°, 30°,15°. 11. En cada corrección, disminuir el ángulo del “mal plano”, por ejemplo 60”,45°, 30”, 15°. 12. The pivot is to be considered as straightened as soon as there is no uneveness. 12. Es solamente cuando no aparecerá “mal plano” alguno que el pivote podrá considerarse enderezado. Important The point of contact with the con trol point (1) and the highest point of the balance wheel should always be at the same point; if suddenly this point is at 180°, the correction went too far. Importante El punto de contacto de la regleta debe siempre coi’ncidir con el punto más alto del aro. El hecho que ese punto se encuentre des plazado de 180°, significa que la corrección ha sido demasiado grande. Algunos consejos Debe controlarse el eje de volante con mucha atención cuando se controla el “mal plano” que no es debido necesariamente a un pivote doblado. El juego del pivote en la piedra puede engañar durante el control: debe suprimirse escogiendo el agujero el más pequeño posible y haciendo la observación en una posición paralela a la placa de base 6, inclinando el útil. Por la fuerza de gravitación (centrífuga) el pivote se apoya en 2 puntos en el agujero del pivote. Haciendo girar el volante con un pincel late ralmente y de arriba hacia abajo, no puede manifestarse juego del pivote. Practical tips Check carefully the balance staff while checking the uneveness which does not necessarilly come from a bent pivot. The play of the pivot in the jewel could confuse while checking; it should be elimi nated by using the smallest hole and inclining the base of the tool. By gravitation the pivot touches two points in its hole. If you turn the balance wheel with the brush laterally and up and down there will not be any shake. 9091998 Tél. + 41 32 933 60 00 Fax + 41 32 933 60 01