1
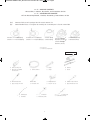
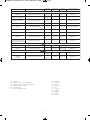
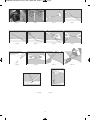
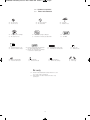
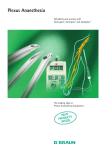
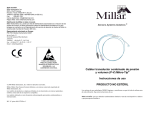
A1806ed02 DEBUT.QXD_Brochure A1677 Ed04-GB 13/01/14 13:51 Page1 ENGLISH Celsite® Implantable Access Port System Sistema Implantable de Acceso Instructions for Use Instrucciones de uso ESPAÑOL P 5-8 PP 9-12 11-18 A1806ed02 DEBUT.QXD_Brochure A1677 Ed04-GB 13/01/14 13:51 Page2 A1806ed02 DEBUT.QXD_Brochure A1677 Ed04-GB 13/01/14 13:51 Page3 en (English): INSTRUCTIONS FOR USE Celsite® IMPLANTABLE ACCESS PORT SYSTEM PLEASE READ CAREFULLY TABLE OF CONTENTS I II III IV V VI - DESCRIPTION OF THE DEVICE PACKAGE CONTENTS INDICATIONS CONTRAINDICATIONS POTENTIAL COMPLICATIONS (Immediate and delayed) GENERAL WARNINGS & PRECAUTIONS VI-1 HANDLING AND STORAGE VI-2 PATIENT VI-3 CATHETER POSITION VI-4 DRUG INCOMPATIBILITIES VI-5 NEEDLES VI-6 IMPLANTATION TECHNIQUES VI-7 OCCLUSION VI-8 INFECTION VII - CENTRAL VENOUS IMPLANTATION TECHNIQUES VII-1 Venous catheters VII-2 Percutaneous Technique VII-3 Surgical Cut-down Technique VII-4 References requiring modifications to the above techniques VII-4-1 Brachial Implantation Technique VII-4-2 Braunule Technique VII-4-3 Valved Catheter VII-4-4 Pre-connected catheter and port VIII - USE OF THE PORT AND CATHETER VENOUS PORTS IX - MAINTENANCE OF THE PORT AND CATHETER IX-1 RINSING AND HEPARINIZATION VENOUS PORTS IX-2 NEEDLE WITHDRAWAL X - DURATION OF IMPLANTATION AND REMOVAL OF THE PORT X-1 DURATION OF IMPLANTATION OF THE SYSTEM X-2 REMOVAL OF THE SYSTEM X-3 SPECIAL ATTENTION: BABYPORT®, BABYPORT® S AND SMALL PORTS PRODUCT LIST FIGURES SYMBOLS GLOSSARY Page 2 Page 4 Page 5 Page 5 Page 5 Page 5 Page 6 Page 7 Page 7 Page 8 Page 13 Page 14 Page 15 es (Spanish) : INSTRUCCIONES DE USO SISTEMA DE VÍA DE ACCESO IMPLANTABLE Celsite® POR FAVOR LEA CUIDADOSAMENTE ÍNDICE I II III IV V VI - DESCRIPCIÓN DEL DISPOSITIVO CONTENIDO DEL PAQUETE INDICACIONES CONTRAINDICACIONES COMPLICACIONES POTENCIALES (INMEDIATAS Y RETARDADAS) ADVERTENCIAS GENERALES Y PRECAUCIONES VI-1 MANEJO Y ALMACENAMIENTO VI-2 PACIENTE VI-3 POSICIÓN DEL CATÉTER VI-4 INCOMPATIBILIDAD CON MEDICAMENTOS VI-5 AGUJAS VI-6 TÉCNICAS DE IMPLANTES VI-7 OCLUSIÓN VI-8 INFECCIÓN VII - TÉCNICAS DE IMPLANTE CENTRAL INTRAVENOSO VII-1 CATÉTER INTRAVENOSO VII-2 TÉCNICA PERCUTÁNEA VII-3 TÉCNICA DE DISECCIÓN VENOSA (SURGICAL - CUT-DOWN) VII-4 REFERENCIAS DE LAS TÉCNICAS ANTERIORES QUE REQUIEREN MODIFICACIONES VII-4-1 TÉCNICA DE IMPLANTACIÓN BRAQUIAL VII-4-2 TÉCNICA BRAUNULA VII-4-3 CATÉTER VALVULADO VII-4-4 CATÉTER Y VÍA DE ACCESO IMPLANTADA PRE-CONECTADOS VIII - USO DEL CATÉTER Y DE LA VÍA DE ACCESO IMPLANTADA VÍAS DE ACCESO IMPLANTADAS INTRAVENOSAS IX - MANTENIMIENTO DEL CATÉTER Y DE LA VÍA DE ACCESO IMPLANTADA IX-1 ENJUAGUE Y HEPARINIZACIÓN VÍAS DE ACCESO IMPLANTADAS INTRAVENOSAS IX-2 RETIRADA DE LA AGUJA X - DURACIÓN DEL IMPLANTE Y EXTRACCIÓN DE LA VÍA DE ACCESO MPLANTA X-1 DURACIÓN DEL IMPLANTE DEL SISTEMA X-2 EXTRACCIÓN DEL SISTEMA X-3 ATENCIÓN ESPECIAL BABYPORT®, BABYPORT®S Y VÍAS DE ACCESO IMPLANTADAS PEQUEÑAS LISTA DEL PRODUCTO FIGURAS INDICE DE SIMBOLOS 1 Página 2 Página 4 Página 9 Página 9 Página 9 Página 9 Página 10 Página 11 Página 11 Página 12 Página 13 Página 14 Página 15 A1806ed02 DEBUT.QXD_Brochure A1677 Ed04-GB 13/01/14 13:51 Page4 en (English) : I - DESCRIPTION OF THE DEVICE es (Spanish) : I - DESCRIPCION DEL DISPOSITIVO en : Caution: Federal (USA) law restricts this device to sale by or on the order of a physician es : Este producto sólo debe venderse a médicos o bajo presciptión facultativa en: The Celsite® Access Port Systems are implantable port and catheter systems that allow safe, repeated access to the patient’s bloodstream. The port chamber and catheter design (See Figure A) can be used for the administration of medications and fluids. The Celsite® port systems consist of an access port with a silicone septum, which is connected to a catheter using a connection ring, and implantation accessories. The triangular shaped port has a low-profile nose, finger stops on the side of the housing, and a round base. Celsite® Access Ports have suture holes or suture zones to secure placement during implantation. The system is provided sterile and intended for single use only. Celsite® ports are offered in “standard” or “small” sizes. (A “standard” size has 0.50 or 0.25 mL dead volume of port; a “small” size has 0.15 mL dead volume of port.) The Celsite® access port family includes the below product lines. Refer to page 13 of this IFU for a complete list of Celsite® reference numbers and information regarding port/catheter materials, volume, implantation route, and implantation techniques. • Celsite® Access Ports (Venous) are standard sized ports manufactured with a low-profile design with titanium/polysulphone/silicone or titanium/epoxy/silicone materials. Catheters are available in either polyurethane or silicone materials (REF: 05430425, 05432460, 05433823, 05433750, 05433556, 05436946, 05430095). Some Celsite® ports are available with pre-connected catheters (REF: 05436709, 05436717, 05436725). The Celsite® Dual Venous, Celsite® Brachial, and pediatric Celsite® Babyport® and Celsite® Babyport® S are included in the product line. • Celsite® Access Ports (Dual Venous) are standard sized double access ports manufactured with titanium/epoxy/silicone materials that allow direct connection to a two-lumen silicone catheter. One catheter connection attaches both lumens of the catheter to the port (REF: 05430100, 05430101). • Celsite® Access Ports (Brachial Venous) are small sized ports manufactured with titanium/epoxy/silicone materials and a polyurethane catheter. Celsite® brachial ports are for peripheral implantation in the arm of the patient (REF: 05433734). • Celsite® Discreet TM Access Ports (Venous) are standard sized ports manufactured with a low-profile design with a left or right off-set exit cannula that permits a vertical incision and a 90 degree port/exit cannula. Celsite® Discreet TM ports are manufactured with titanium/epoxy/silicone materials. Catheters are available in either polyurethane or silicone materials (REF: 05430144, 05430145, 05430146). • Celsite® ConceptTM Access Ports (Venous) are standard sized ports manufactured with a low-profile, light weight design and have three silicone suture areas, which provide the physician with flexibility in suturing. Celsite® ConceptTM ports are manufactured with titanium/polysulphone/silicone materials. Catheters are available in either polyurethane or silicone materials (REF: 05437025, 05437026, 05437028). • Celsite® Babyport® and Babyport® S (Pediatric Venous) are small sized ports manufactured with titanium/epoxy/silicone materials. The Babyport® has a 4.5Fr polyurethane catheter; the Babyport® S has a 6Fr silicone catheter (REF: 05433742, 05433842). es : Los Sistemas de Acceso Implantables Celsite®, son sistemas de acceso implantables y catéteres que permiten el repetido acceso, sin riesgo, al torrente sanguíneo de los pacientes (vea figura A). El diseño de la cámara de acceso y el catéter permite utilizarlos en la administración de medicamentos y líquidos. Las vías de acceso implantadas Celsite® consiste en una vía de acceso implantada con un tabique de silicona, que esta conectada al catéter usando un anillo de conexión y accesorios de implante. La vía de acceso implantada de forma triangular tiene una nariz disimulada, soportes en la parte dorsal de la cubierta, y alrededor de la base. Las vías de acceso implantadas Celsite® tiene orificios suturados o zonas suturadas para asegurar la colocación durante el implante. El sistema se provee estéril y con la intensión de uso único. Las vías de acceso implantadas Celsite® se ofrecen el tamaño “regular” o “pequeño” (El “regular” tienen una vía de acceso implantada de un volumen residual de 0.50 o 0.25mL de vía de acceso el “pequeño” tiene tienen una vía de acceso implantada con un volumen residual de 0.15 ml de vía de acceso). La familia de los Sistemas de Acceso Implantables Celsite® incluye las líneas de productos mostradas más abajo. Refiérase a la página 13 de este folleto de información para una lista completa de los números de referencia Celsite® e información relacionada con los materiales de la vía de acceso implantada/catéter, volumen, ruta de implante y técnicas de implante. 2 A1806ed02 DEBUT.QXD_Brochure A1677 Ed04-GB 13/01/14 13:51 Page5 • Celsite® Access Ports (Venous) (Intravenoso) son vías de acceso implantadas de tamaño regular con un diseño sencillo con materiales de titanio/polisulfona/silicona o titanio/époxy/silicona. Los catéteres están disponibles en poliuretano o silicona (REF: 05430425, 05432460, 05433823, 05433750, 05433556, 05436946, 05430095). Algunas Vías de Acceso Implantadas Celsite® están disponibles con catéteres pre-conectados (REF: 05436709, 05436717, 05436725). Los Celsite® Dual Venous (Doble Lumen), Celsite® Brachial (Braquial), y Celsite® Babyport® pediátrico y Celsite® Babyport® están incluidos en la línea de productos. • Celsite® Access Ports Dual Venous (Doble Lumen) son vías de doble acceso implantadas, de tamaño regular manufacturadas con materiales de titanio/époxy/silicona que permiten la conexión directa a un catéter doble lumen de silicona. Una conexión del catéter une ambos lúmenes del catéter de la vía de conexión (REF: 05430100, 05430101). • Celsite® Access Ports (Brachial Venous) (Braquial Intravenosa) son vías de acceso implantadas pequeñas manufacturadas con materiales de titanio/époxy/silicona y un catéter de poliuretano. Las Vías de Acceso Implantadas Braquial Celsite® son para implantes periféricos en el brazo del paciente (REF: 05433734). • Celsite® Discreet TM Access Ports (Venous) (Intravenosasas) son vías de acceso implantadas de tamaño regular manufacturadas con un diseño sencillo que tiene una cánula de salida que le sobresale por el dorso izquierdo o derecho que permite una incisión vertical y una vía de acceso implantada/cánula de salida, de 90 grados. Las vías de acceso, Celsite® Discreet TM están manufacturadas con materiales de titanio/époxy/silicona. Los catéteres están disponibles en materiales de poliuretano o silicona (REF: 05430144, 05430145, 05430146). • Celsite® ConceptTM Access Ports (Venous) (Intravenosas) estas vías de acceso Implantadas, de tamaño regular están manufacturadas con un diseño sencillo, de peso ligero y tienen tres áreas de sutura de silicona, que le provee al médico flexibilidad al suturar. • Celsite® ConceptTM estas vías de acceso Implantadas están manufacturadas con materiales de titanio/polisulfona/ silicona. Los catéteres están disponibles en materiales de poliuretano o silicona (REF: 05437025, 05437026, 05437028). • Celsite® Babyport® and Babyport® S (Pediatric Venous) (Pediátrico Intravenosas) son vías de acceso implantadas, pequeñas, manufacturadas con materiales de titanio/époxy/silicona. El Babyport® tiene un catéter de poliuretano de 4.5Fr; el Babyport® S tiene un catéter de silicona de 6Fr (REF: 05433742, 05433842). en: Celsite® Access Port and Catheter es: Via de Acceso Implantada Celsite® y Catéter en: Epoxy or Polysulphone (PSU) housing (A) en: Silicone Septum (B) en: Silicone or polyurethane catheter (D) en: Exit cannula (C) en: Connection ring with anti-kink device (F) en: Titanium Chamber (E) en: Figure A es: Figura A (B) es: Membrana de Silicona (Septum) (A) es: Epoxy o Polysulphone (PSU) cubierta (C) es: Cánula de salida (D) es: Catéter de Silicona o poliuretano (E) 3 es: Cámara de titanio (F) es: Anillo de conexión con dispositivo antiacodamiento A1806ed02 DEBUT.QXD_Brochure A1677 Ed04-GB 13/01/14 13:51 Page6 en : II - PACKAGE CONTENTS 1 Access Port, 1 Catheter, Accessories, and Instructions for Use es : II - CONTENIDO DEL PAQUETE 1 Vía de Acceso Implantada, 1 Catéter, Accesorios, y Instrucciones de Uso (en) (es) Contents: Refer to unit package label for actual content list. Contenido: Refiérase a la etiqueta del embalaje de la unidad para la lista de contenidos. en: Celsite® Discreet TM (Right) (Epoxy) es: Celsite® Discreet TM (Derecha) (Epoxy) en: Celsite® Discreet TM (Left) (Epoxy) es: Celsite® Discreet TM (Izquierda) (Epoxy) en: Celsite® (Epoxy) es: Celsite® (Epoxy) en: Celsite® ConceptTM (Polysulphone and silicone) es: Celsite® ConceptTM (Polisulfona y silicona) en: Celsite® (Polysulphone) es: Celsite® (Polisulfona) en Access port es Vía de Acceso Implantada 1 F = 0.33 mm en Connection rings (x2) es Dispositivo de seguridad del catéter (x2) en J guidewire es Guia de alambre J en Syringe es Jeringa en Catheter es Catéter en Thin wall needle 18G es Aguja de cuerpo fino 18G en Vein lifter es Elevador de vena en Winged Surecan® es Surecan® con alas en Surecan® needle 22G (x2) es Agujas 22G Surecan® (x2) en Tunnelling rod es Tunelizador en Peelable introducer es Introductor pelable 4 en Introcan® i.v. cannula 20G es Cánula Introcan® 20G A1806ed02 GB.QXD_Brochure A1677 Ed04-GB 08/01/14 11:45 Page1 III - INDICATIONS Celsite® Access Ports are indicated for patient therapies requiring repeated access to the vascular system. • Celsite®/Celsite® ConceptTM Access Ports are indicated for intra-venous administration of drugs for chemotherapy, antibiotics and anti-viral drugs, and for parenteral nutrition, blood sampling or transfusions. • Celsite® Discreet TM / Celsite® Dual Venous / Celsite® Brachial / Celsite® Babyport® / Celsite® Babyport® S Ports are recommended for use whenever patient therapy requires repeated I.V. Access for injection, drug therapy and/or blood sampling. IV – CONTRAINDICATIONS The following are contraindications to port placement: • Known infection, bacteraemia or septicemia. • Known allergy to any of the materials contained in the access port or catheter. • If the medications to be used in the access port are incompatible with any of the materials contained in the access port or catheter. • If the patient’s anatomy does not allow the insertion of the catheter into the chosen access site. • Blood clotting disorder. V – POTENTIAL COMPLICATIONS (Immediate and delayed) Air embolism Brachial plexus injury Cardiac arrhythmia, tamponade, puncture Catheter disconnection or fragmentation Catheter occlusion Catheter rupture Embolism Explantation of the port secondary to inflammatory reaction Fibrin sheath formation Hematoma Hemothorax Hemorrhage Infection/Sepsis Pneumothorax Port/Catheter migration Thromboembolism/Thrombophlebitis Thrombosis Fever, chills, or other flu-like symptoms Swelling, pain, pus, redness or burning sensation around the port incision Shortness of breath or dizziness Chest pain Pain or swelling of neck, face, or arm on side of body where the implantable port is inserted Before implantation of the access port system these, and other, well documented potential complications should be considered. VI - GENERAL WARNINGS AND PRECAUTIONS VI-1 HANDLING AND STORAGE Precautions: • This product should be implanted or accessed only by personnel experienced in the technical and clinical aspects of access ports. • During storage avoid freezing or excessively high temperatures, storage at room temperature is recommended. • Celsite® Access Ports are for single use only, do not re-sterilize the product, or any of the components, and destroy after use. The product is sterilized using Ethylene Oxide and is sterile and non-pyrogenic in unopened, undamaged, individual packages. Do not use if package is damaged. • Check the expiration date before use and never implant a device past the expiration date. VI-2 PATIENT Precautions: • Ensure that use of the access port is indicated taking into consideration the patients’ anatomy, needs and proposed use of the port. • Check the condition of the skin over the proposed implantation and puncture sites. • For venous catheter placement, place the patient slightly inclined head down. • Check hemostasis: Partial thrombin, Partial thrombin time, Bleeding time, Platelet count. VI-3 CATHETER POSITION Precaution: To ensure that the system works correctly, there should be no kinking of the catheter. It is recommended that the catheter is tunnelled sub-cutaneously to the port. VI-4 DRUG INCOMPATIBILITIES Precaution: Do not use drugs or solvents which are incompatible with the raw material of the catheter. Never use incompatible drugs together or in sequence: the port should be rinsed of all residues with 10-20 mL sterile sodium chloride (NaCl) 0.9% between each medication. VI-5 NEEDLES Precautions: Always use special bevelled needles which are adapted for use with implantable access port systems. Normal hypodermic needles will damage the septum and may cause leakage of the system or blockage due to small silicone particles. Care must be taken to avoid needle sticks in accordance with local Infection Control standards (and avoid the risk of exposure to contaminated blood). 5 A1806ed02 GB.QXD_Brochure A1677 Ed04-GB 08/01/14 11:45 Page2 VI-6 IMPLANTATION TECHNIQUES Precautions: • To prevent shearing of the guidewire never withdraw the J guidewire through the Seldinger needle. • Remove the guidewire and the dilator together. Do not remove the guidewire through the dilator as this may result in the guidewire unravelling. • It is recommended that sterile NaCl 0.9% (with or without heparin according to local protocols) be used to flush the port and catheter during implantation (Fig. 3, page 14) to reduce the risk of thrombosis. • During implantation ensure that the catheter is not damaged by unguarded forceps, suture needle or other sharp instruments. • If using the Celsite® ConceptTM Access Ports (with silicone inserts) it is recommended that the suture be placed within the square indicated on the silicone to reduce the risk of port flip. VI-7 OCCLUSION Precaution: Always use a syringe equal to or greater than 10 mL volume when rinsing the port to avoid generating excessive pressures in case of occlusion of the system. Warning: In case of obstruction of the system never try to clear the blockage using a fluid under high pressure which carries the risk of catheter fracture and migration. • According to local protocols, and under medical supervision, 70% alcohol may be used to aid the unblocking of silicone catheters when the blockage is due to lipid deposits. The use of alcohol with Polyurethane (PUR) catheters is not recommended. • According to local protocols, and under medical supervision, Hydrochloric acid (HCl) 0.1 mol/L may be used to aid the unblocking of both silicone and PUR catheters when the blockage is due to mineral deposits. VI-8 INFECTION Warning: In case of infection, if appropriate, treat with antibiotic drugs. If this fails, or is not appropriate, the catheter and port should be removed. VII CENTRAL VENOUS IMPLANTATION TECHNIQUES VII-1 Venous catheters a) Precaution: The catheter tip should always be positioned in the Superior Vena Cava at the entrance to the right atrium (see Fig. 1, page 14). A radiograph should be taken to verify catheter position and exclude hemothorax or pneumothorax. b) Warning: Particular attention should be paid when the catheter is to be implanted via the subclavian route. It is recommended that the catheter be inserted outside the costoclavicular space (see Fig. 2, page 14). Catheter ruptures have been observed with the subclavian route, the associated risk of extravasation of the infused drugs and embolisation of the distal extremity may have serious consequences. This is due to rupture of the catheter secondary to the catheter being pinched in the costoclavicular space (Pinch-Off syndrome). It is necessary to pay particular attention to catheters used for long periods or for ambulatory patients rather than short term catheters. Catheter rupture can occur with silicone and polyurethane catheters. The following clinical signs may suggest catheter pinching: • The patient needs to lift the arm to permit infusion. • Intermittent malfunction of the catheter, such as difficulty with aspiration or infusion. • Subclavicular pain or swelling during infusion. • Palpitations or chest discomfort may indicate catheter fracture. Remove any subclavian catheter which presents any of the signs of catheter Pinch-Off. A radiograph with contrast injection may be useful to detect catheter abnormalities at the costoclavicular level. VII-2 Percutaneous Technique a) Insert the Seldinger needle into the chosen vein; verify the position by observing blood reflux (Fig. 4, page 14). b) Insert the J guidewire into the vein, when the correct position is reached, withdraw the needle (Fig. 5, page 14). c) Thread the assembled dilator and peelable sheath over the guidewire using a twisting motion to pass through the skin planes (Fig. 6, page 14). d) Remove the dilator and guidewire from the vein and insert the catheter through the peelable sheath (Fig. 7, page 14) to the desired position at the junction of the Superior Vena Cava and the right atrium (Fig. 1, page 14). Check catheter tip position using fluoroscopy. e) Prepare the port pocket at the chosen site, the port should lie approximately 1/2 - 1 cm below the skin surface away from the injection site. Cut the luer connector from the catheter and attach to the tunnelling rod (Fig. 8, page 14). f) Tunnel the catheter from the puncture point to the port pocket (Fig. 9, page 14); ensure there is no kinking of the catheter. Cut the excess catheter (at right-angles) prior to connecting to the port. g) Catheter port/connection: Slide the connection ring over the catheter, firmly push the catheter onto the exit cannula ensuring the catheter covers the length of the exit cannula, slide the connection ring over the catheter and exit cannula. The connection ring should be in contact with the port (Fig. 10, page 14). h) Confirm catheter connection by gently pulling on the catheter. i) Insert the port into the port pocket, paying attention not to kink the catheter. j) Confirm catheter patency (by ensuring that both aspiration and injection are possible), taking care that the skin incision is not at the injection site. k) It is possible to fix the access port to the fascia with sutures. 6 A1806ed02 GB.QXD_Brochure A1677 Ed04-GB 08/01/14 11:45 Page3 VII-3 Surgical Cut-down Technique a) The skin is incised and the tissue dissected (Fig. 11, page 14). b) The selected vessel is identified and tapes passed under it. The vessel is incised with a scalpel or with scissors (Fig. 12, page 14). c) The previously flushed catheter is inserted into the vessel, using either a small vessel dilator or vein lifter (Fig. 13, page 14). d) Follow from point e) - k) of the preceding paragraph: “Percutaneous Technique”. VII-4 References requiring modifications to the above techniques VII-4-1 Brachial Implantation Technique Brachial ports and catheters can be placed using either the Percutaneous or Surgical Cut-down Technique, see above. Select the appropriate vein on the anterior aspect of the elbow, normally the Basilic or Cephalic vein. The catheter length should be measured before insertion of the catheter into the vein. Ensure that the access port is not placed over the mid-line of the selected vein. The port and catheter should be positioned above the elbow on the internal surface of the arm. VII-4-2 Braunule Technique a) Puncture the vein with a needle percutaneously or through a skin incision. b) Flush the catheter with sterile sodium chloride (NaCl) 0.9 %. Remove the stilette from the cannula, and insert the catheter through the cannula to the desired position at the junction of the Superior Vena Cava and the right atrium. c) Gently withdraw the cannula over the catheter. d) Follow from point e) - k) above: “Percutaneous Technique”. VII-4-3 Valved catheter Do not place the catheter over the guidewire, as this may cause damage to the valve. The catheter must be tunnelled from the puncture point to the port pocket; the tunnelling rod must not be placed through the valve. VII-4-4 Pre-connected catheter and port The catheter should be measured and trimmed to the correct length before insertion in the vein. The catheter must be tunnelled from the port pocket to the puncture point. VIII - USE OF THE PORT AND CATHETER VENOUS PORTS Always verify that the port and catheter are functional by aspirating a few mL of blood into a syringe and injecting a few mL of sterile sodium chloride (NaCl) 0.9% before attempting to start an infusion. If aspiration of blood is not possible, attempt to inject a few mL of sterile sodium chloride (NaCl) 0.9% into the port. Caution: If resistance to injection is noted, or if swelling occurs around the port or along the catheter, device malfunction should be suspected. In this case, device integrity should be verified using X-ray and contrast media studies. IX - MAINTENANCE OF THE PORT AND CATHETER General recommendations: • If sterile heparinized sodium chloride (NaCl) 0.9% is used the system should be rinsed first with sterile sodium chloride (NaCl) 0.9% alone, as some drugs may react with heparin and result in blockage of the port/catheter due to the formation of precipitates. • Always rinse the system between administration of different drugs. Special care should be taken with drugs which have a higher risk of precipitation, with anti-coagulation agents, after blood sampling or after transfusion to reduce the risk of catheter occlusion. • Failure to maintain the system may result in occlusion of the catheter. IX-1 RINSING AND HEPARINIZATION VENOUS PORTS Rinsing of the access port is essential. Rinse the port with 10-20 mL of sterile sodium chloride (NaCl) 0.9% after each use and every 4-6 weeks when no treatment is being given. IX-2 NEEDLE WITHDRAWAL To avoid blood reflux into the catheter, always maintain positive pressure on the syringe during needle withdrawal (see Fig. 14, page 14). 7 A1806ed02 GB.QXD_Brochure A1677 Ed04-GB 08/01/14 11:45 Page4 X – DURATION OF IMPLANTATION AND REMOVAL OF THE PORT X–1 DURATION OF IMPLANTATION OF THE SYSTEM The port and catheter system should be removed at the end of treatment. The duration of the system is mostly dependant on the catheter. Fracture is the most common complication of aging. Risk of fracture may increase over time depending on the material of the catheter, the pathway, and the entry point of the catheter into the vessel. X–2 REMOVAL OF THE SYSTEM Precaution : When removing the system, care must be taken not to fracture the catheter. If the catheter is sutured into the vessel, the sutures should first be removed. Control the catheter while removing the system from the port pocket. Be vigilant if there is excessive resistance to the removal of the catheter. Catheters may become encapsulated and attached to the vein wall. Should this occur and it is not possible to remove the catheter without risking catheter fracture, or if the catheter is fractured, the advice of an Interventional Radiologist, Surgeon or other Physician with endo-luminal experience should be sought. X–3 SPECIAL ATTENTION: BABYPORT® (pediatric), BABYPORT® S (pediatric) AND SMALL PORTS Following implantation of a port in a child particular attention should be given to the position of the catheter tip. Over time, as the child grows, the position of the catheter tip will change and move higher in the Superior Vena Cava (SVC). As for any catheter, a high tip position in the SVC predisposes the catheter to fibrin sheath formation and other mechanical difficulties. The position of the catheter tip should be checked radiographically a minimum of every 12 months or more frequently if the child is growing quickly. The catheter should be changed when the tip reaches the level of T4. Always ensure that the catheter is functioning correctly before beginning infusions. 8 A1806ed02 ES.QXD_Brochure A1677 Ed04-GB 13/01/14 13:51 Page9 III - INDICACIONES Las Vías de Acceso Implantadas Celsite® son indicadas a pacientes sometidos a terapias que requieren de repetido acceso al sistema vascular. • Las Vías de Acceso Implantadas Intravenosas Celsite®/Celsite® ConceptTM son indicadas para la administración intravenosa de medicamentos para quimioterapia, antibióticos y medicamentos antivirales y para nutrición parenteral, tomas de muestras de sangre o transfusiones. • Las Vías de Acceso Implantadas Arteriales Celsite® Discreet TM / Celsite® Dual Venous / Celsite® Brachial / Celsite® Babyport® / Celsite® Babyport® S son indicadas para usarse cuantas veces el paciente requiera acceso repetitivo intravenoso por inyección, medicamento de terapia y/o muestras de sangre. IV – CONTRAINDICACIONES Las siguientes son contraindicaciones al implante de la Vía de Acceso Implantada: • Infecciones conocidas, bacteriemia o septicemia. • Alergias conocidas a cualquiera de los materiales contenidos en la vía de acceso implantada o en el catéter. • Si los medicamentos a utilizar en la vía de acceso son incompatibles con cualquiera de los materiales que contienen la vía de acceso implantada o el catéter. • Si la anatomía del paciente no permite la inserción del catéter dentro de la zona de acceso escogida. • Trastorno de coagulación. V – COMPLICACIONES POTENCIALES (Inmediatas y reacción retardada) Infecciones/ Sepsias Neumotórax Migración de la Vía de acceso Trombo embolismo/trombo flebitis Trombosis Fiebre, escalofríos y otros síntomas gripales Infamación, dolor, pus, enrojecimiento o sensación de quemazón alrededor de la incisión de la vía de acceso implantada Espasmos respiratorios o mareos Dolor en el pecho Dolor o inflamación en el cuello, la cara o el brazo del lado del cuerpo en donde se le insertó la vía de acceso implantada Embolismo aéreo Angiospasmo Arritmia, taponamiento, punción cardíaca Desconexión o fragmentación del catéter Oclusión del catéter Ruptura del catéter Embolismo Explantación de la vía de acceso implantada después de una reacción inflamatoria Formación de una vaina de fibrina Hematoma Hemotórax Hemorragia Antes del implante del sistema de acceso de vía implantada, se deben considerar estas y otras complicaciones potenciales ya documentadas. VI - ADVERTENCIAS GENERALES Y PRECAUCIONES VI-1 MANEJO Y ALMACENAMIENTO Precauciones: • Este producto solo debe ser implantado o utilizado por personal experimentado en los aspectos técnicos y clínicos de las vías de acceso. • Durante el almacenamiento evite congelación o excesivas altas temperaturas, se recomienda que se mantenga a temperatura ambiente. • Las Vías de Acceso Implantadas Celsite® son para uso único, no re-esterilice el producto, o ninguno de sus componentes, y destrúyalo después de su uso. El producto ha sido esterilizado usando Oxido de Etileno y empaquetado en paquetes individuales estériles, no pirogénicos, cerrados e intactos. No use si el empaque esta malogrado. • Verifique la fecha de expiración antes de usarse. Nunca implante un dispositivo después de la fecha de caducidad. VI-2 PACIENTE Precauciones: • Asegúrese de que el uso de la vía de acceso implantada haya sido indicado, tomando en consideración la anatomía del paciente, sus necesidades y el uso propuesto de la vía de acceso implantada. • Revise las condiciones de la piel sobre el área propuesta para el implante y la incisión. • Para el implante del catéter intravenoso, coloque al paciente ligeramente inclinado con la cabeza hacia abajo. • Revise hemostasia: Trombosis parcial, tiempo de trombosis parcial, tiempo de sangrado, conteo de plaquetas. VI-3 POSICIÓN DEL CATÉTER Precaución: Para asegurarse de que el sistema funciona correctamente, no debe haber ningún pliegue en el catéter. Se recomienda tunelizar (insertar) el catéter vía subcutánea hasta la vía de acceso implantada. VI-4 INCOMPATIBILIDAD CON MEDICAMENTOS Precaución: No utilice medicamentos ni diluyentes que sean incompatibles con la materia prima del catéter. Nunca utilice medicamentos incompatibles en forma simultánea o consecutiva: la vía de acceso implantada ser debe enjuagar de todo residuo con 10-20 mL de cloruro de sodio estéril (NaCI) 0.9% entre un medicamento y otro. VI-5 AGUJAS Precauciones: Siempre utilice agujas biseladas, adaptadas para el uso de sistemas de vías de acceso implantables. Agujas hipodérmicas normales dañarán la membrana de septum y pueden ocasionar filtración del sistema u obstruirlo a causa de las partículas pequeñas de silicona. Deben tomarse precauciones para evitar pinchazos accidentales conforme con las normas del Control de Infecciones locales (y evitar el riesgo de exposición a sangre contaminada). 9 A1806ed02 ES.QXD_Brochure A1677 Ed04-GB 13/01/14 13:51 Page10 VI-6 TÉCNICAS DE IMPLANTES Precauciones: • Para evitar el deterioro del alambre-guía, nunca retire el alambre-guía “J” por la aguja Seldinger. • Retire el alambre-guía y el dilatador simultáneamente. No retire el alambre –guía a través del dilatador ya que esto puede resultar en el desenlace del alambre-guía. • Se recomienda utilizar NaCI 0.9%(con o sin heparina de acuerdo a los protocolos locales) para enjuagar, y asegurar la vía de acceso implantada y el catéter durante el implante (Fig. 3 pág, 14) para reducir el riesgo de trombosis. • Durante el implante, asegúrese de que el catéter no esté deteriorado por pinzas desprotegidas, agujas de suturar u otros instrumentos cortantes. • Si está utilizando la vía de acceso implantada Celsite® ConceptTM (con inserciones de silicona) es recomendable suturar en el cuadrado marcado en la silicona para reducir el riesgo de que la vía de acceso se voltee. VI-7 OCLUSIÓN Precaución: Siempre utilice una jeringa de un volumen igual o mayor a 10 ML al enjuagar la vía de acceso implantada, para evitar presiones excesivas en caso de oclusión del sistema. Aviso: En caso de obstrucción del sistema, nunca intente eliminar la obstrucción utilizando un líquido a alta presión que pudiera implicare riesgo de fractura y migración al catéter. • Según los protocolos locales, y bajo supervisión médica, puede utilizarse alcohol al 70% para ayudar a desbloquear los catéteres de silicona cuando la obstrucción es causada por depósitos lípidos. El uso de alcohol en catéteres de PUR no es recomendado. • De acuerdo a los protocolos locales, y bajo supervisión médica, Acido hidroclórico (HCI) 0.1 mol/L puede utilizarse para ayudar a desbloquear tanto a los catéteres de silicona como a los catéteres de PUR cuando el obstrucción es causada por depósitos minerales. VI-8 INFECCIÓN Aviso: En caso de infección, si corresponde, trátese con antibióticos. Si esto falla, o si no corresponde, deben extraerse el catéter y la vía de acceso implantada. VII TÉCNICA DE IMPLANTE INTRAVENOSO CENTRAL VII-1 Catéteres intravenosos a) Precaución: La punta del catéter siempre deberá ser posicionada en la Vena Cava Superior en la entrada de la aurícula derecha (ver Fig. 1, pág. 14). Deberá tomarse una radiografía para verificar la posición y excluir Hemotórax o neumotórax. b) Aviso: Se debe prestar atención particularmente cuando el implante del catéter se va a efectuar por la vía subclavia. Se recomienda que el catéter se inserte fuera de la línea costo clavicular (ver Fig.2, Pág.14). Se han observado rupturas de catéteres con la vía de la subclavia, el riesgo asociado con la extravasación del medicamento administrado y embolización de la extremidad distal puede tener serias consecuencias. Esto se debe a la ruptura del catéter secundario al catéter que esta pinzado en el espacio costo-vascular (signo del pinzamiento). Es necesario prestar más atención particularmente a catéteres usados por largos periodos de tiempo o a los en pacientes ambulatorios que a catéteres de cortos periodos de uso. La ruptura de catéter puede ocurrir con catéteres de silicona o poliuretano. Los siguientes síntomas clínicos pueden sugerir pinzamiento del catéter: • El paciente necesita levantar la mano para permitir infusión. • Fallos intermitentes del catéter, como dificultad con aspiración o infusión. • Dolor o inflamación sub-clavicular durante la perfusión. • Palpitaciones o incomodidad en el pecho pueden indicar ruptura de catéter. Retire todo catéter subclavio que presente cualquiera de los síntomas de signo de pinzamiento. Una radiografía con inyección de contraste puede ser útil para detectar anormalidades al nivel costo clavicular. VII-2 Técnicas Percutáneas a) Inserte la aguja Seldinger en la vena escogida; verifique la posición observando el reflujo de sangre (Fig. 4 pág. 14). b) Inserte el alambre-guía “J” en de la vena, cuando alcance la posición correcta, retire la aguja (Fig. 5, pág. 14). c) Introduzca el dilatador y su cubierta pelable juntos sobre el alambre-guía retorciéndolos para pasarlos a través de los planos de la piel (Fig. 6, Pág. 14) d) Retire el dilatador y el alambre-guía de la vena e inserte el catéter a través de la cubierta pelable (Fig. 7, pág. 14) hasta la posición deseada en la unión de la Vena Cava Superior y la aurícula derecha (Fig. 1, pág. 14). Compruebe la posición de la punta del catéter mediante fluoroscopia. e) Prepare la cavidad de la vía de acceso implantada en el sitio escogido: la vía de acceso implantada debe reposar aproximadamente a ½-1cm por de bajo la superficie de la piel y lejos del sitio de la inyección. Corte el conector “Luer” del catéter y conéctelo a la vaina del tunelizador (Fig. 8, pág. 14). f) Tunelice el catéter desde el punto de punción hasta la cavidad de la vía de acceso implantada. (Fig. 9, pág. 14); asegúrese de que el catéter no tenga ningún pliegue. Corte el exceso de catéter (en ángulo recto) antes de conectarlo a la vía de acceso implantada. g) Conexión de catéter/vía de acceso implantada: Deslice el anillo de conexión por el catéter y empuje firmemente en la cánula de salida asegurándose de que el catéter cubra toda la longitud de la cánula de salida. Deslice el anillo de conexión sobre el catéter y la cánula de salida. El anillo de conexión debe estar en contacto con la vía de acceso implantada (Fig. 10, pág. 14). h) Confirme la conexión del catéter, tirando ligeramente el catéter. i) Inserte la vía de acceso implantada dentro del bolsillo de la vía de acceso implantada, prestando atención para no acodar el catéter. j) Confirme la permeabilidad del catéter (asegurándose de que tanto la aspiración como la inyección sean posibles), cuidando que la incisión cutánea no esté en el punto de inyección. k) Es posible fijar la vía de acceso implantada a la fascia mediante suturas. 10 A1806ed02 ES.QXD_Brochure A1677 Ed04-GB 13/01/14 13:51 Page11 VII-3 Técnica de Disección Venosa (Cut-Down) a) La piel se corta y el tejido se disecciona. (Fig.11 pág. 14). b) El vaso sanguíneo seleccionado es identificado y se le pasan cintas retractoras por debajo del mismo. Se realiza una incisión en el vaso sanguíneo con bisturí o con tijeras (Fig. 12, pág. 14). c) Se inserta, el catéter previamente lavado, en el vaso sanguíneo, utilizando un dilatador pequeño o un levantador de venas (Fig.13 pág. 14). d) Siga los pasos del punto e) – k) del párrafo anterior: “Técnica Percutánea”. VII-4 Referencias que requieren modificaciones a las técnicas anteriores VII-4-1 Técnica de Implante Braquial Las vías de acceso implantadas y los catéteres braquiales pueden ser implantados utilizando la técnica OTW (Over-the Wire), percutánea o quirúrgica Cut-Down; véase más arriba. Seleccione la vena apropiada en la parte anterior del codo, normalmente la vena basílica o la Cefálica. La longitud del catéter debe medirse antes de la inserción del catéter en la vena. Asegúrese de que la vía de acceso implantada no se encuentre sobre la línea media de la vena seleccionada. La vía de acceso implantada y el catéter deben colocarse por encima del codo en la superficie interna del brazo. VII-4-2 Técnica Braunula a) Punce la vena con la aguja percutáneamente o a través de una incisión en la piel. b) Enjuague el catéter con cloruro de sodio (NaCI) 0,9%. Retire el estilete de la cánula e inserte el catéter a través de la cánula hasta llegar a la posición deseada, en la unión de la Vena Cava Superior con la aurícula derecha. c) Retire cuidadosamente la cánula sobre el catéter. d) Siga los pasos del punto e) - k) arriba: “Técnica percutánea”. VII-4-3 Catéter Valvulado No coloque el catéter sobre el alambre - guía ya que podría causar daños a la válvula. El catéter debe ser tunelizado desde la cavidad de la vía de acceso implantada hasta el lugar de punción; la vaina del tunelizador no debe colocarse a través de la válvula. VII-4-4 Catéteres y reservorios pre-conectados El catéter debe ser medido y recortado a la longitud correcta antes de la inserción en la vena. El catéter debe ser tunelizado desde el bolsillo de la vía de acceso implantada hasta el lugar de punción. VIII - USO DE LA VÍA DE ACCESO IMPLANTADA Y DEL CATÉTER VÍA DE ACCESO IMPLANTADA INTRAVENOSA Siempre verifique que la vía de acceso implantada y el catéter funcionan correctamente aspirando algunos mL de sangre en una jeringa e inyectando algunos mL de cloruro de sodio (NaCl) 0,9%, antes de comenzar una infusión. Si no se puede aspirar sangre, intente inyectar algunos mL de cloruro de sodio (NaCI) 0,9% en la vía de acceso implantada. Aviso: Si se observa resistencia a la inyección o si aparece un edema alrededor de la vía de acceso implantada o a lo largo del catéter, debe sospecharse un problema de funcionamiento del dispositivo. En este caso, la integridad del dispositivo debe verificarse por medio de rayos -x y estudios de medios de contraste. IX - MANTENIMIENTO DE LA VÍA DE ACCESO IMPLANTADA Y DEL CATÉTER Recomendaciones generales: • Si se utiliza cloruro de sodio (NaCI) 0,9% heparinizado, el sistema debe ser enjuagado previamente con cloruro de sodio (NaCl) 0,9% solo, dado que algunos medicamentos pueden reaccionar con la heparina y producir el bloqueo de la vía de acceso implantada /catéter debido a la formación de precipitados. • Siempre enjuague el sistema entre una y otra administración de diferentes medicamentos. Para reducir el riesgo de obstrucción del catéter, debe prestarse atención particularmente en el caso de fármacos que tienen mayor riesgo de precipitar, de agentes anti-coagulatorios, después de una toma de muestra de sangre o después de una transfusión. • Falta de mantenimiento adecuado al sistema, puede resulta en obstrucción del catéter. IX-1 ENJUAGUE Y HEPARINIZACIÓN VÍA DE ACCESO IMPLANTADA INTRAVENOSA Es esencial enjuagar la vía de acceso implantada. Enjuague la vía de acceso implantada con 10-20 mL de cloruro de sodio (NaCI) 0.9% después de cada tratamiento, y cada 4-6 semanas en caso de que no se hubiera administrado ningún tratamiento. IX-2 RETIRADA DE LA AGUJA Para evitar un reflujo de sangre en el catéter, mantenga siempre una presión positiva en la jeringa al retirar la aguja (ver Fig. 14, pág. 14). 11 A1806ed02 ES.QXD_Brochure A1677 Ed04-GB 13/01/14 13:51 Page12 X – DURACIÓN DEL IMPLANTE Y RETIRADA DE LA VÍA DE ACCESO IMPLANTADA X–1 DURACIÓN DEL IMPLANTE DEL SISTEMA El sistema de vía de acceso y catéter debe ser retirado al terminar el tratamiento. La durabilidad del sistema depende mayormente del catéter. La ruptura es la complicación de envejecimiento más frecuente. El riesgo de ruptura puede variar con el tiempo en función del material del catéter, la vía del trayecto y del punto de entrada del catéter en el vaso sanguíneo. X–2 RETIRADA DEL SISTEMA Precaución: Al retirar el sistema se debe tener mucho cuidado de no romper el catéter. Si el catéter está suturado al vaso sanguíneo, las suturas se deben retirar primero. Controle el catéter durante la retirada del sistema desde la cavidad de la vía de acceso implantada. Vigile si hay resistencia excesiva al retirar el catéter. Los catéteres pueden encapsularse y fijarse en la pared de la vena. En este caso, y si no es posible retirar el catéter sin riesgo de ruptura del mismo, o si el catéter está roto, se debe consultar a un radiólogo intervencionista, cirujano u otro médico con experiencia endoluminal. X–3 ATENCIÓN ESPECIAL: BABYPORT®, (PEDIATRICO) BABYPORT® S,(PEDIATRICOS) Y VÍAS DE ACCESO IMPLANTADA PEQUEÑAS Después del implante de una vía de acceso implantada en un niño, se debe prestar atención particularmente a la posición de la punta del catéter. Con el tiempo, a medida que el niño crece, la posición de la punta del catéter cambiará y se moverá más arriba en la Vena Cava Superior. Como para cualquier catéter, una posición alta de la punta del catéter en la Vena Cava Superior predispone el catéter a la formación de una vaina de fibrina y a otras dificultades mecánicas. La posición de la punta del catéter debe verificarse radiológicamente cada 12 meses como mínimo o con mayor frecuencia si el niño crece rápidamente. Se debe cambiar el catéter cuando la punta de este alcanza el nivel de T4. Siempre asegúrese de que el catéter funcione correctamente, antes de iniciar las perfusiones. 12 A1806ed02 FIN.QXD_Brochure A1677 Ed04-GB 10/01/14 12:42 Page1 Dead volume of port (C) Dead volume of catheter/cm (D) Implantation routes (E) Possible implantation techniques (F) Polysulphone (2)/Silicone (3) 0.25 mL 0.018 mL Venous (6) Seldinger (7) Dual Venous (1) 05430100 Dual Venous (1) 05430101 Epoxy Resin (4)/Silicone (3) 0.50 mL x 2 0.25 mL x 2 0.013 mL Venous (6) Seldinger (7) 05436717 05433750, 05436725 Polysulphone (2)/Silicone (3) Polysulphone (2)/Silicone (3) 0.50 mL 0.25 mL 0.008 mL Venous (6) Seldinger (7) Surgical (8), Seldinger (7) 05433823 Polysulphone (2)/Silicone (3) 0.50 mL 0.02 mL Venous (6) Seldinger (7) 05432460 05433556 Polysulphone (2)/PUR (5) Polysulphone (2)/PUR (5) 0.50 mL 0.25 mL 0.02 mL Venous (6) Surgical (8), Seldinger (7) 05430425, 05436709 Polysulphone (2)/Silicone (3) 0.50 mL 0.01 mL Venous (6) Surgical (8), Seldinger (7) Brachial (9) 05433734 Epoxy Resin (4)/PUR (5) 0.15 mL 0.01 mL Venous (6) Seldinger (7) 05436946 Polysulphone (2)/PUR (5) 0.25 mL 0.015 mL Venous (6) Seldinger (7) Babyport® (pediatric) (10) 05433742 Babyport® S (pediatric)(10) 05433842 Epoxy Resin (4)/PUR (5) Epoxy Resin (4)/Silicone (3) 0.15 mL 0.005 mL 0.011 mL Venous (6) Seldinger (7) Reference number (A) Port/catheter material (B) Celsite® 05430095 Celsite® Discreet ™ 05430144, 05430145 05430146 Epoxy Resin (4)/Silicone (3) 0.50 mL 0.01 mL Venous (6) Seldinger (7) Epoxy Resin (4)/Silicone (3) 0.25 mL 0.008 mL Venous (6) Seldinger (7) Celsite® (A) (B) (C) (D) (E) (F) 05437025 Polysulphone (2) + Silicone (3)/Silicone (3) 0.50 mL 0.02 mL Venous (6) Seldinger (7) 05437026 05437028 Polysulphone (2) + Silicone (3)/PUR (5) 0.50 mL 0.25 mL 0.02 mL Venous (6) Seldinger (7) (1) (2) (3) (4) (5) (6) (7) (8) (9) (10) es: Referencia es: Material vía de acceso implantada/catéter es: Volumen residual de la vía de acceso implantada es: Volumen residual del catéter cm es: Vías de implante es: Técnicas de implante posibles 13 es: Doble lumen es: Polisulfona es: Silicona es: Resina époxy es: PUR es: Intravenoso es: Seldinger es: Quirúrgico es: Braquial es: Pediatrico A1806ed02 FIN.QXD_Brochure A1677 Ed04-GB 10/01/14 12:42 Page2 Fig. 1 Fig. 2 Fig. 3 Fig. 4 Fig. 5 Fig. 6 Fig. 7 Fig. 8 Fig. 9 Fig. 10 Fig. 11 Fig. 12 Fig. 13 Fig. 14 en: Fig. es: Fig. 14 A1806ed02 FIN.QXD_Brochure A1677 Ed04-GB 10/01/14 12:42 Page3 en : SYMBOLS GLOSSARY es : ÍNDICE DE SÍMBOLOS 2 STERILIZE en - Do not re-use es - De un solo uso en - Keep away from sunlight es - No exponer al sol en - Do not re-sterilize es - No reesterilizar en - Do not use if package is damaged. es - No utilizar si el embalaje está deteriorado. i en - Consult instructions for use es - Consulte el modo de empleo en - Keep dry es - Guarde al seco en - DEHP free es - Sin DEHP STERILE EO en - Latex free. Components and packaging do not contain natural rubber latex es - Sin látex . Los componentes y el embalaje no contienen el natural de goma en - Sterilized using ethylene oxide es - Esterilizado por óxido de etileno LOT en - Batch code es - Número de lote REF en - Date of manufacture es - Fecha de fabricación en - Use by date es - Utilícese antes de en - Catalog number es - Número de catálogo Rx only en - Caution: Federal (USA) law restricts this device to sale - by or on the order of a physician es - Este producto sólo debe venderse a médicos o bajo - prescripción 15 en - Open here es - Abrir aquí A1806ed02 FIN.QXD_Brochure A1677 Ed04-GB 10/01/14 12:42 Page4 A1806ed02 FIN.QXD_Brochure A1677 Ed04-GB 10/01/14 12:42 Page5 A1806ed02 FIN.QXD_Brochure A1677 Ed04-GB 10/01/14 12:42 Page6 en: Manufactured for: es: Fabricado para : B. Braun Interventional Systems Inc. 824 Twelfth Avenue Bethlehem, PA 18018 www.bisusa.org en: Customer Service, ordering: es: Servicio al cliente, órdenes: Tel : (877) 836-2228 en: Technical Support: es: Apoyo Técnico: Tel : (800) 443-8362 en: Manufactured by : B. BRAUN MEDICAL SAS es: Fabricado por : 204 avenue du Maréchal Juin F - 92100 Boulogne Billancourt, FRANCE A1806 Ed02 (11/2013) Information/Información : Fax : 33 5 49 52 88 77