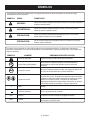
1
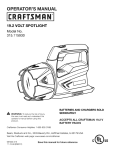
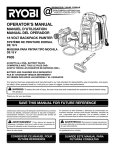
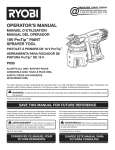
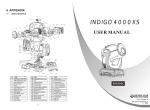
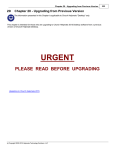
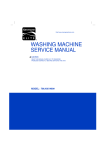
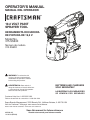
OPERATOR’S MANUAL MANUAL DEL OPERADOR 19.2 VOLT paint SPRAYER tool hERRAMIENTA ROCIADORA DE PINTURA DE 19,2 V Model No. 315.SS630 Número de modelo 315.SS630 WARNING: To reduce the risk of injury, the user must read and understand the operator’s manual before using this product. advertencia: Para reducir el riesgo de lesiones, el usuario debe leer y comprender el manual del operador antes de usar este producto. BATTERIES AND CHARGERS SOLD SEPARATELY las baterías y los cargadores se venden por separado Customer Help Line: 1-800-932-3188 Teléfono de atención al consumidor: 1-800-932-3188 Sears Brands Management, 3333 Beverly Rd., Hoffman Estates, IL 60179 USA Visit the Craftsman® web page: www.sears.com/craftsman Visite el sitio web de Craftsman®: www.sears.com/craftsman Save this manual for future reference 987000-915 12-04-09 (REV:03) Guarde este manual para futuras consulta TABLE OF CONTENTS / ÍNDICE DE CONTENIDO Warranty........................................................................ 2 Garantía......................................................................... 2 Introduction................................................................... 2 Introducción................................................................... 2 Important Safety Instructions........................................ 3 Instrucciones de seguridad importantes....................... 3 Specific Safety Rules..................................................4-5 Reglas de seguridad específicas................................ 4-5 Symbols......................................................................... 6 Símbolos........................................................................ 6 Features......................................................................... 7 Características............................................................... 7 Assembly....................................................................... 7 Armado.......................................................................... 7 Operation....................................................................8-9 Funcionamiento.......................................................... 8-9 Maintenance................................................................ 10 Mantenimiento............................................................. 10 Troubleshooting........................................................... 11 Corrección de problemas............................................ 11 Illustrated Parts List..................................................... 12 Figura numeras (ilustraciones)......................................i-ii Figure Numbers (Illustrations)...................................... i-ii Pedidos de piezas / Servicio..................... pág. posterior Parts Ordering/Service...................................Back Page WARRANTY / GARANTÍA If this Craftsman® product fails to provide complete satisfaction within one year from date of purchase, Return it o any Sears store or other Craftsman® outlet in the United States for free replacement. This warranty does not cover lamps, alkaline batteries, bits or blades, which are expendable parts. This warranty applies for only 90 days from the date of purchase if this product is ever used for commercial or rental purposes. This warranty gives you specific legal rights, and you may also have other rights which vary from state to state. Sears, Roebuck and Co., Hoffman Estates, IL 60179 *** Si este producto de Craftsman® no lo satisface por completo durante el primer año posterior a la fecha de compra, devuélvalo a cualquier tienda Sears u otro punto de venta de productos Craftsman® de los Estados Unidos para cambiarlo por otro sin cargo. Esta garantía no incluye lámparas, baterías, brocas o cuchillas, que son piezas que no pueden volver a utilizarse. Esta garantía se aplica solamente durante los 90 días posteriores a la fecha de compra si este producto se utiliza al menos una vez para propósitos comerciales o de alquiler. Esta garantía le otorga derechos legales específicos y también puede gozar de otros derechos que varían según el estado. Sears, Roebuck and Co., Hoffman Estates, IL 60179 INTRODUCTION / INTRODUCCIÓN This product has many features for making its use more pleasant and enjoyable. Safety, performance, and d ependability have been given top priority in the design of this product making it easy to maintain and operate. *** Esta producto ofrece numerosas características para hacer más agradable y placentero su uso. En el diseño de este producto se ha conferido prioridad a la seguridad, el desempeño y la fiabilidad, por lo cual se facilita su manejo y mantenimiento. 2 IMPORTANT SAFETY INSTRUCTIONS WARNING: To reduce the risk of skin injection: WARNING: SAVE THESE INSTRUCTIONS. To reduce the risks of fire or explosion, electric shock, and the injury to persons, read and understand all instructions included in this manual. Be familiar with the controls and the proper usage of the equipment. READ ALL INSTRUCTIONS KNOW YOUR POWER TOOL. Read the operator’s manual carefully. Learn the machine’s applications and limitations as well as the specific potential hazards related to this tool. WARNING: To reduce the risk of fire or explosion: Do not spray flammable or combustible materials near an open flame or sources of ignition such as cigarettes, motors, and electrical equipment. For units intended for use with only water-based or mineral spirit-type materials with a minimum flash point of 140°F (60°C), do not spray or clean with liquids having a flash point less than 140°F (60°C). Paint or solvent flowing through the equipment is able to result in static electricity. Static electricity creates a risk of fire or explosion in the presence of paint or solvent fumes. Do not use a paint or a solvent containing halogenated hydrocarbons. Keep spray area well ventilated. Keep a good supply of fresh air moving through the area. Keep pump assembly in a well-ventilated area. Do not smoke in the spray area. Do not operate light switches, engines, or similar spark-producing products in the spray area. Keep area clean and free of paint or solvent containers, rags, and other flammable materials. Know the contents of the paints and solvents being sprayed. Read all Material Safety Data Sheets (MSDS) and container labels provided with the paints and solvents. Follow the paint and solvent manufacturer’s safety instructions. Fire extinguisher equipment shall be present and working. Do not aim the nozzle at, or spray any person or animal. Keep hands and other body parts away from the discharge. For example, do not try to stop leaks with any part of the body. Always use the spray tip. Do not spray without spray tip in place. Only use a spray tip specified by the manufacturer. Use caution when cleaning and changing spray tips. In the case where the spray tip clogs while spraying, follow the manufacturer’s instructions for turning off the unit before removing the spray tip to clean. Do not leave the unit energized while unattended. When the unit is not in use, turn off the unit in accordance with the manufacturer’s instructions. High pressure spray is able to inject toxins into the body and cause serious bodily injury. In the event that injection occurs, seek medical attention immediately. Check parts for signs of damage. Replace any damaged parts. This system is capable of producing 2500 psi. Only use replacement parts or accessories that are specified by the manufacturer and that are rated a minimum of 2500 psi. Know how to stop the unit quickly. Be thoroughly familiar with the controls. Verify that all connections are secure before operating this unit. For household use only. WARNING: To reduce the risk of injury: Do not operate or spray near children. Keep children away from equipment at all times. Do not overreach or stand on an unstable support. Keep effective footing and balance at all times. Stay alert and watch what you are doing. Do not operate the unit when fatigued or under the influence of drugs or alcohol. 3 - English SPECIFIC SAFETY RULES Keep guards in place and in working order. Never operate the tool with any guard or cover removed. Make sure all guards are operating properly before each use. To reduce the risk of injury, keep children and visitors away. All visitors should wear safety glasses and be kept a safe distance from work area. Keep the area of operation clear of all persons, particularly small children, and pets. Use right tool. Don’t force tool or attachment to do a job it was not designed for. Don’t use it for a purpose not intended. Do not operate the equipment while barefoot or when wearing sandals or similar lightweight footwear. Wear protective footwear that will protect your feet and improve your footing on slippery surfaces. Exercise caution to avoid slipping or falling. Always wear safety glasses with side shields. Everyday eyeglasses have only impact-resistant lenses; they are not safety glasses. Use only recommended accessories. The use of improper accessories may cause risk of injury. Avoid dangerous environment. Don’t use in damp or wet locations or expose to rain. Keep work area well lit. Never direct a paint stream toward people or pets, or any electrical device. Never start the machine if ice has formed in any part of the equipment. WARNING: High pressure spray can be dangerous if subject to misuse. The spray must not be directed at persons, animals, electrical devices, or the machine itself. Keep away from hot parts. Check bolts and nuts for looseness before each use. A loose bolt or nut may cause serious motor problems. Before storing, allow the product to cool. Store in a cool, well-ventilated area, safely away from spark and/or flame-producing equipment. When servicing use only identical replacement parts. Use of any other parts may create a hazard or cause product damage. Never use the sprayer without a spray tip installed. Follow the maintenance instructions specified in this manual. Check damaged parts. Before further use of the tool, a guard or other part that is damaged should be carefully checked to determine that it will operate properly and perform its intended function. Check for alignment of moving parts, binding of moving parts, breakage of parts, mounting, and any other conditions that may affect its operation. A guard or other part that is damaged must be properly repaired or replaced by an authorized service center to avoid risk of personal injury. Never leave tool running unattended. Turn power off. Don’t leave tool until it comes to a complete stop. Be thoroughly familiar with controls. Know how to stop the product and bleed pressure quickly. Keep tool dry, clean, and free from oil and grease. Always use a clean cloth when cleaning. Never use brake fluids, gasoline, petroleum-based products, or any solvents to clean tool. Do not use tool if switch does not turn it off. Have defective switches replaced by an authorized service center. Before cleaning, repairing, or inspecting, shut off the motor and make certain all moving parts have stopped. An injection injury can lead to possible amputation. See a physician immediately. Never put your hand in front of the spray tip when in use. Gloves will not always provide protection against an injection injury. Wear clothing to keep paint off skin and hair, along with a mask or respirator during use. Paints, solvents, and other materials can be harmful if inhaled or if they come into contact with the body. Always shut the unit off, remove the battery pack, and release pressure before servicing, cleaning the tip or guard, changing the tip, or leaving unattended. Plastic can cause sparks. Never hang plastic to enclose a spray area. Do not use plastic drop cloths when spraying flammable materials. Do not spray outdoors on windy days. Do not attempt to clean or unclog the spray tip with your finger. A battery operated tool with integral batteries or a separate battery pack must be recharged only with the specified charger for the battery. A charger that may be suitable for one type of battery may create a risk of fire when used with another battery. 4 - English SPECIFIC SAFETY RULES Use battery operated tool only with specifically designated battery pack. Use of any other batteries may create a risk of fire. Use battery only with charger listed. MODEL 315.SS630 BATTERY PACK (Li-ion) CHARGER 315.113740 (130285003, 130285006) 315.113710 (130156001) (Multi-Chemistry) 315.259260 (140351001) CH2000 CH2010 (140136001) BATTERY PACK (Ni-Cd) 315. 259260 (140351001) 1425301 (911041) 315.115730 (140301006) 315.115720 (140301007) CH2000 CH2010 (140136001) 130279003, 130279005 (Item No. 911375) Disconnect battery pack from tool before making any adjustments, changing accessories, or storing the tool. Such preventive safety measures reduce the risk of starting the tool accidentally. When battery pack is not in use, keep it away from other metal objects like: paper clips, coins, keys, nails, screws, or other small metal objects that can make a connection from one terminal to another. Shorting the battery terminals together may cause sparks, burns, or a fire. Battery tools do not have to be plugged into an electrical outlet; therefore, they are always in operating condition. Be aware of possible hazards when not using your battery tool or when changing accessories. Following this rule will reduce the risk of electric shock, fire, or serious personal injury. Do not place battery tools or their batteries near fire or heat. This will reduce the risk of explosion and possibly injury. Do not crush, drop or damage battery pack. Do not use a battery pack or charger that has been dropped or received a sharp blow. A damaged battery is subject to explosion. Properly dispose of a dropped or damaged battery immediately. Batteries can explode in the presence of a source of ignition, such as a pilot light. To reduce the risk of serious personal injury, never use any cordless product in the presence of open flame. An exploded battery can propel debris and chemicals. If exposed, flush with water immediately. Do not charge battery tool in a damp or wet location. Following this rule will reduce the risk of electric shock. For best results, your battery tool should be charged in a location where the temperature is more than 50°F but less than 100°F. Do not store outside or in vehicles. Under extreme usage or temperature conditions, battery leakage may occur. If liquid comes in contact with your skin, wash immediately with soap and water. If liquid gets into your eyes, flush them with clean water for at least 10 minutes, then seek immediate medical attention. Following this rule will reduce the risk of serious personal injury. Never leave a tool unattended with the battery installed. Save these instructions. Refer to them frequently and use them to instruct other users. If you loan someone this tool, loan them these instructions also. 5 - English SYMBOLS The following signal words and meanings are intended to explain the levels of risk associated with this product. SYMBOL SIGNAL MEANING DANGER: Indicates an imminently hazardous situation, which, if not avoided, will result in death or serious injury. WARNING: Indicates a potentially hazardous situation, which, if not avoided, could result in death or serious injury. CAUTION: Indicates a potentially hazardous situation, which, if not avoided, may result in minor or moderate injury. CAUTION: (Without Safety Alert Symbol) Indicates a situation that may result in property damage. Some of the following symbols may be used on this product. Please study them and learn their meaning. Proper interpretation of these symbols will allow you to operate the product better and safer. SYMBOL NAME DESIGNATION/EXPLANATION Safety Alert Indicates a potential personal injury hazard. Read Operator’s Manual To reduce the risk of injury, user must read and understand operator’s manual before using this product. Eye Protection Always use eye protection with side shields marked to comply with ANSI Z87.1. Recycle Symbols This product uses nickel-cadmium (Ni-Cd) and lithium-ion (Li-ion) batteries. Local, state, or federal laws may prohibit disposal of batteries in ordinary trash. Consult your local waste authority for information r egarding available recycling and/or disposal options. Volts Voltage Direct Current Type or a characteristic of current PSI Pressure Pressure is measured in pounds per square inch GPH Flow Rate Flow rate is measured in maximum gallons of paint sprayed per hour Li - Ion V 6 - English FEATURES PRODUCT SPECIFICATIONS Container Size....................................................................................................................................................................1 qt. Motor.....................................................................................................................................................................19.2 Volt DC KNOW YOUR paint sprayer See Figure 1, page i. The safe use of this product requires an understanding of the information on the product and in this operator’s manual as well as a knowledge of the project you are attempting. Before use of this product, familiarize yourself with all operating features and safety rules. C3 ENERGY INDICATOR WINDOW The C3 energy indicator window located on the side of the handle will light when a Craftsman19.2 V compact lithiumion battery pack (315.113710) is installed and has charge. innovative motor design The innovative motor design means less vibration and noise when using your sprayer. quick-lock container The quick-lock feature allows easy installation and removal of the paint container. spray tips The two spray tips provided allow you to choose between different spray patterns − vertical, horizontal, and round. NOTE: Feature will not light with Craftsman 19.2 V nickelcadmium battery packs. ASSEMBLY UNPACKING WARNING: If any parts are damaged or missing do This product has been shipped completely assembled. n Carefully remove the product and any accessories from the box. Make sure that all items listed in the packing list are included. not operate this product until the parts are replaced. Use of this product with damaged or missing parts could result in serious personal injury. WARNING: Do not attempt to modify this product WARNING: Do not use this product if it is not completely assembled or if any parts appear to be missing or damaged. Use of a product that is not properly and completely assembled could result in serious personal injury. n Inspect the product carefully to make sure no breakage or damage occurred during shipping. n Do not discard the packing material until you have carefully inspected and satisfactorily operated the product. n If any parts are damaged or missing, please call 1-800-932-3188 for assistance. PACKING LIST Paint Sprayer with Quick-Lock Container and 1 in. round tip Replacement Atomizer Valve Brush Cleaner Lubricant 12 in. Fan Tip Operator’s Manual 7 - English or create accessories not recommended for use with this product. Any such alteration or modification is misuse and could result in a hazardous condition leading to possible serious personal injury. WARNING: To prevent accidental starting that could cause serious personal injury, always remove the battery pack from the tool when assembling parts. OPERATION WARNING: Do not allow familiarity with products to make you careless. Remember that a careless fraction of a second is sufficient to inflict serious injury. To remove: Depress the latches on both sides of the battery pack to release the battery pack and remove it from the tool. WARNING: Battery tools are always in operating condition. Therefore, switch should always be locked when not in use or carrying at your side. WARNING: Always wear eye protection with side shields marked to comply with ANSI Z87.1. Failure to do so could result in fluids entering your eyes resulting in possible serious injury. WARNING: Do not use any attachments or accessories not recommended by the manufacturer of this product. The use of attachments or accessories not recommended can result in serious personal injury. APPLICATIONS You may use this product for the purposes listed below: Interior and exterior painting and staining of decks, outdoor furniture, fences, and walls This product will accept Craftsman® 19.2 V lithium-ion battery packs and Craftsman® 19.2 V nickel-cadmium battery packs. For complete charging instructions, refer to the Operator’s Manual for the battery packs and chargers listed in the Specific Safety Instructions. BATTERY pROTECTION FEATURES Craftsman® 19.2 V lithium-ion battery packs are designed with features that protect the lithium-ion cells and maximize battery life. WARNING: Risk of fire or explosion. Spray area must be well-ventilated and away from sparks or flames. filling sprayer with paint/stain See Figure 3 - 4, page i. Remove and discard any skin that has formed on top of the paint or stain, then thoroughly mix the material in its original container before beginning. NOTE: Older containers of stain and paint may need to be strained before use. Remove the battery pack from the sprayer. Remove the quick-lock container by twisting counterclockwise so that the arrow on the container lines up with the “unlock” symbol on the lid. Fill the container with paint or stain as desired. Do not fill above the max fill mark on the container. Reinstall the container on the sprayer and twist clockwise so that the arrow on the container lines up with the “lock” symbol on the lid. selecting the proper spray tip See Figure 5, page ii. Use the round tip for latex paints, oil-based paints, and stains. This tip sprays in a round pattern. If the tool stops during use, release the trigger to reset and resume operation. If the tool still does not work, the battery needs to be recharged. Use the 12 in. fan tip for latex paints. This tip sprays in a wide pattern that can be adjusted from horizontal to vertical. TO INSTALL / Remove BATTERY PACK See Figure 2, page i. WARNING: Always remove battery pack from your tool when you are assembling parts, making adjustments, cleaning, or when not in use. Removing battery pack will prevent accidental starting that could cause serious personal injury. To install: Place the battery pack in the tool. Align the raised rib on the battery pack with groove in the battery port. Make sure the latches on each side of the battery pack snap in place and that the battery pack is secured in the tool before beginning operation. To switch tips: Remove the battery pack from the sprayer. Remove the installed tip by turning it counter-clockwise. Install the desired tip and rotate clockwise to tighten securely. NOTE: The tip should be tightened securely by hand. A too loose or overtightened tip may cause the sprayer to leak or be damaged. To change direction of fan tip: Slightly loosen the fan tip by rotating counter-clockwise 1/4 turn. Rotate the adjusting arm 1/4 turn in the direction needed to switch the direction of the tip spray. 8 - English OPERATION While holding the adjusting arm in position, rotate the wide fan tip clockwise until securely tightened. WARNING: To reduce the risk of injection, do not point sprayer at any part of the body or person. In case of skin injection, seek medical attention immediately. Do not use without spray tip in place. Operating the sprayer See Figures 6 - 9, page ii. Place a line of lubricant on the piston. To gain access to the piston, follow the instructions in Cleaning the Sprayer for Storage in the Maintenance section of this manual. Ensure surface to be painted is free of dust, dirt, and grease. Mask or cover any areas not intended to be painted or stained. Be aware of wind that may cause your paint or stain to spray into areas not desired. Always use drop cloths or other cover to protect areas that are not intended to be painted or stained. Fill the quick-lock container with no more than 1 quart of desired paint or stain. NOTE: After every 4 refills of the quick-lock container, add a line of lubricant to the piston. See Cleaning the Sprayer for Storage for instructions on disassembling the sprayer to gain access to the piston. Select the proper spray tip for desired spray pattern. Install the battery pack in the sprayer. Pull the switch trigger to spray paint. Release the switch trigger to stop paint spray. Practice spraying on a piece of scrap material to test your spray pattern and to prime the pump before beginning. If you do not get a preferred spray pattern with an even amount of paint or stain throughout, paint may be thinned as desired. Refer to the Troubleshooting section later in this manual. NOTE: The pump must be primed after every paint change and at first use after storing. Spray paint at a scrap surface for at least 20 seconds to prime. To create an even coating over the entire surface: • Move your arm at a steady rate of speed and make sure to move your entire arm, not just your wrist. • Keep the sprayer an even distance from the area being sprayed, which should be between 18 to 20 inches from the tip of the sprayer to the surface being sprayed. • Depress the trigger to begin the spray off the material you want to paint. Operate the sprayer in straight horizontal or vertical strokes across the surface being painted, then release the trigger off the material to end the stroke. NOTE: For spray quality consistency when using thinner paints, it may be necessary to keep the trigger depressed between strokes. When finished, remove the battery pack, return any unused paint or stain to its original container, and thoroughly clean the sprayer. CAUTION: It is important to thoroughly clean the sprayer after each use or when changing colors. Allowing paint or stain to remain in an idle tool for an extended period can cause its moving pieces to seize up. WARNING: Do not clean with any flammable liquids such as paint stripper, paint remover, brush cleaner, mineral spirits, lacquer thinner, turpentine, acetone, gasoline, kerosene, etc. cleaning the sprayer after use The solution used to clean the sprayer is determined by the type of material that has been sprayed. For anything other than latex material, follow the material manufacturer’s directions for appropriate clean-up. To clean the sprayer for short term storage: Remove the battery pack from the sprayer. If you haven’t already done so, remove the paint container and return any unused paint or stain to its original container. Fill the paint container with lukewarm water (following the use of latex products) or any non-flammable paint thinner (following the use of oil-based products). Reinstall the paint container. Install the battery pack in the sprayer. Spray the solution onto a piece of cardboard or other scrap material. Continue spraying until all the solution is used. Remove the battery pack from the sprayer. Place a line of lubricant on the piston. To gain access to the piston, follow the instructions in Cleaning the Sprayer for Storage in the Maintenance section of this manual. Use a damp cloth to wipe the exterior of the sprayer. The unit is now ready to put away. 9 - English MAINTENANCE WARNING: When servicing, use only identical replacement parts. Use of any other parts may create a hazard or cause product damage. WARNING: Always wear eye protection with side shields marked to comply with ANSI Z87.1. Failure to do so could result in fluids entering your eyes resulting in possible serious injury. MAINTENANCE procedures NOTE: Always remove the battery pack from the unit before attempting a service operation. Avoid using solvents when cleaning plastic parts. Most plastics are susceptible to damage from various types of commercial solvents and may be damaged by their use. Use clean cloths to remove dirt, dust, oil, grease, etc. WARNING: Do not at any time let brake fluids, gasoline, penetrating oils, etc., come in contact with plastic parts. Chemicals can damage, weaken, or destroy plastic which may result in serious personal injury. cleaning the sprayer for storage Using the cleaning brush provided and the solution determined by the last type of paint or stain sprayed, clean all of the above parts thoroughly. NOTE: Make sure to scrub thoroughly inside the pump housing opening so that no paint or stain material is left behind. Clean the vent hole in the pump housing using a straightened paper clip. To reassemble: Place a line of lubricant on the piston. Slide the spring back onto the piston. Insert the piston and spring assembly inside the back of the pump housing. Replace the pump housing assembly/container lid onto the sprayer. Replace the locking nut on the motor housing by pushing in while rotating clockwise to secure. Insert the atomizer valve assembly into the pump housing front opening. Replace the spray tip and rotate clockwise to secure. Reinstall the suction tube and filter. Reinstall the paint container. The sprayer is now ready to be stored. replacing atomizer valve assembly See Figure 8, page ii. When you’ve finished your project and are ready to store the sprayer, a thorough cleaning and lubrication is recommended. Remove the battery pack from the sprayer. Remove the paint container. If you haven’t already done so, return any unused paint or stain to its original container. Fill the paint container with lukewarm water (following the use of latex products) or any non-flammable paint thinner (following the use of oil-based products). Reinstall the paint container. Install the battery pack in the sprayer. Spray the solution onto a piece of cardboard or other scrap material. Continue spraying until all the solution is used. Remove the battery pack from the sprayer. Remove the paint container. Remove the suction tube and filter. Remove the installed spray tip by turning it counterclockwise. Remove the atomizer valve assembly. Remove the locking nut by turning it counterclockwise. Slide the pump housing assembly/container lid forward off the sprayer. Pull the piston and spring off the pump housing. See Figure 10, page ii. The atomizer valve causes the paint or stain material to spin as it comes out of the sprayer. After 7 to 10 gallons of paint or stain, the atomizer valve may no longer produce a good spray pattern and may need to be replaced. To replace: Remove the battery pack from the sprayer. Rotate the spray tip counterclockwise and remove. Install the new atomizer valve assembly Replace the spray tip and rotate clockwise to secure. BATTERY PACK REMOVAL AND PREPARATION FOR RECYCLING 10 - English WARNING: Upon removal, cover the battery pack’s terminals with heavy-duty adhesive tape. Do not attempt to destroy or disassemble battery pack or remove any of its components. Lithium-ion and nickel-cadmium batteries must be recycled or disposed of properly. Also, never touch both terminals with metal objects and/or body parts as short circuit may result. Keep away from children. Failure to comply with these warnings could result in fire and/or serious injury. troubleshooting Problem Cause Possible Solution Motor does not run. Battery is not charged. Charge battery. Motor overheats. Piston has seized up. Thoroughly clean the sprayer using longterm storage cleaning instructions in the Maintenance section of this manual. Continuous spray operation. Release trigger at the end of each pass to allow the motor to cool. Motor has a low hum but does not spray. Piston has seized up. Thoroughly clean the sprayer using longterm storage cleaning instructions in the Maintenance section of this manual. Motor seems to be running properly but doesn’t spray. Suction tube and filter are loose or damaged. Reinstall or replace suction tube and filter as needed. Atomizer valve is clogged or worn out. Clean or replace atomizer valve. Material being sprayed is too thick. Follow material manufacturer’s directions and thin material as needed. Plugged spray tip or intake filter; worn piston. Thoroughly clean the sprayer and, if necessary, replace piston*, using storage cleaning instructions in the Maintenance section of this manual. Sprayed material is spitting, globbing Paint container volume is getting low. up or unable to get a preferred spray Material being sprayed is too thick. pattern with an even amount of paint or stain Suction tube is loose. Refill paint container. Follow material manufacturer’s directions to thin material as needed. Reinstall suction tube securely. Atomizer valve is clogged or worn out. Clean or replace atomizer valve. Worn spray tip or piston. Clean or replace spray tip or piston*. Paint/stain spray overspray is excessive. Spray tip is too far from the surface being sprayed. Hold sprayer closer to the surface being sprayed. Paint/stain runs or sags on the work surface. Proper paint methods not being observed. Refer to Operating the Sprayer earlier in this manual. Paint/stain is leaking behind the spray tip. Spray tip is loose. Tighten spray tip. Atomizer valve is worn or not positioned properly. Replace or reposition atomizer valve as needed. * Although unlikely, a worn piston is possible. A replacement piston can be purchased by calling customer service at 1-800-932-3188. Follow the instructions in Cleaning the Sprayer for Storage to access the piston for replacement. 11 - English CRAFTSMAN PAINT SPRAYER – MODEL NUMBER 315.SS630 The model number will be found on a label attached to the motor housing. Always mention the model number in all correspondence regarding your paint sprayer or when ordering repair parts. SEE BACK PAGE FOR PARTS ORDERING INSTRUCTIONS 2 10 1 3 4 9 6 8 5 7 12 11 PARTS LIST Key Part No.Number DescriptionQty. 1 2 3 4 5 6 7 8 9 10 11 12 940114264 940207025 303233002 692331001 303221001 519459001 303265001 303262002 303260002 303263001 303836001 521206001 987000915 Logo Label.......................................................................................................1 Data Label........................................................................................................1 Piston Assembly...............................................................................................1 Spring...............................................................................................................1 Pump Housing Assembly.................................................................................1 Locking Nut......................................................................................................1 Atomizer Valve Assembly.................................................................................1 Round Tip.........................................................................................................1 12 in. Fan Tip....................................................................................................1 Cleaning Brush.................................................................................................1 Suction Tube and Filter....................................................................................1 Quick-Lock Container......................................................................................1 Operator’s Manual (960931508) 12 - English Fig. 2 Fig. 1 d c B b A B f A-Battery pack (paquete de baterías) B-Depress latches to release battery pack (para soltar, el paquete de baterías oprima los pestillos) e Fig. 3 A g A A-1 qt. quick-lock container [contenedor de aseguramiento rápido de 0,9464 l (1 cto.)] B-12 in. wide fan tip [punta ancha en abanico de 304,8 mm (12 pulg.)] C-1 in. round fan tip [punta redonda en abanico de 25,4 mm (1 pulg.)] D-Lubricant bottle (botella de lubricante) E-Switch trigger (gatillo del interruptor) F-Cleaning brush (cepillo para limpiar) G-Replacement atomizer valve assembly (reemplazo del conjunto de la válvula atomizadora) B A-Lock (asegurar) B-Unlock (desasegurar) Fig. 4 A B A-Max fill line (línea de llenado máximo) B-1/2 quart fill line (línea de llenado de 1/2 cuarto) i Fig. 5 Fig. 6 Fig. 7 CORRECT SPRAY TECHNIQUE (TÉCNICA DE ROCIADO CORRECTA) A INCORRECT SPRAY TECHNIQUE (TÉCNICA DE ROCIADO INCORRECTA) Fig. 8 G A-Rotate spray tip counterclockwise to loosen (gire la punta de rociado a la izquierda para aflojarla) e d c A f b b I H B-Rotate adjusting arm 1/4 turn to change direction of paint spray from horizontal to vertical (gire el brazo de ajuste 1/4 de vuelta para cambiar la dirección de rociado de la pintura de horizontal a vertical) C A-Spray tip (punta de rociado) B-Atomizer valve assembly (conjunto de válvula atomizadora) C-Locking nut (tuerca de seguridad) D-Pump housing assembly/container lid (conjunto de alojamiento de la bomba/tapa del contenedor) E-Spring (resorte) F-Piston (pistón) G-Sprayer housing (alojamiento del rociador) H-Quick-lock container (contenedor de aseguramiento rápido) I -Suction tube and filter (tubo de succión y filtro) Fig. 9 Fig. 10 A b D C-Vertical spray direction (dirección de rociado vertical) D-Horizontal spray direction (dirección de rociado horizontal) PLACE LINE OF LUBRICANT ON PISTON SHAFT (PLACER UNE PELLICULE DE LUBRIFIANT SUR L’ARBRE DE PISTON, PLACER UNE PELLICULE DE LUBRIFIANT SUR L’ARBRE DE PISTON) ii A-Atomizer valve is good (la válvula atomizadora está en buen estado) B-Atomizer valve is bad and needs to be replaced (la válvula atomizadora está en mal estado y necesita ser reemplazada) Instrucciones de seguridad importantes ADVERTENCIA: Para reducir el riesgo de inyección: ADVERTENCIA: Guarde estas instrucciones. Para reducir el riesgo de incendio o explosión, descanga eléctrica, y la lesiones a personas, lea y comprenda todas instrucciones incluidas en este manual. Familiarícese con todos los controles y la forma correcta de utilizar la equipo. Lea todas las instrucciones Familiarícese con su herramienta eléctrica. Lea cuidadosamente el manual del operador. Aprenda sus usos y limitaciones, así como los posibles peligros específicos de esta herramienta. ADVERTENCIA: Para reducir el riesgo de estallido o explosión: No rocíe materiales inflamables ni combustibles cerca de llamas abiertas o fuentes de ignición, como cigarrillos, motores y equipos eléctricos. No rocíe ni limpie con líquidos que tengan un punto de inflamación menor a 60 °C (140 °F) las unidades diseñadas para ser utilizadas sólo con materiales a base de agua o de un tipo de alcohol mineral con un punto de inflamación mínimo de 60 °C (140°F). La pintura o el solvente que fluyen a través del equipo pueden generar electricidad estática. La electricidad estática produce un riesgo de incendio o explosión en presencia de emanaciones de pintura o de solvente. No use una pintura o un solvente que contenga hidrocarburos halogenados. Mantenga el área de rociado bien ventilada. Mantenga una buena circulación de aire fresco en el área. Mantenga el conjunto de la bomba en un área bien ventilada. No fume en el área donde se área de rociado. No utilice interruptores de luz, motores o productos similares que produzcan chispas en el área donde se área de rociado. Mantenga el área limpia y sin contenedores de pintura o solvente, trapos y otros materiales inflamables. Conozca el contenido de las pinturas y los solventes que se rocían. Lea todas las hojas de datos sobre la seguridad de materiales (MSDS) y las etiquetas de los contendores que se proveen con las pinturas y los solventes. Siga las instrucciones de seguridad del fabricante de la pintura y el solvente. Tenga a mano un extinguidor de incendios que funcione. No apunte la boquilla ni rocíe en dirección a personas ni animales. Mantenga las manos y demás partes del cuerpo lejos de la descarga. Por ejemplo, no intente detener fugas con ninguna parte del cuerpo. Utilice siempre la punta de rociado. No rocíe sin la punta de rociado en su lugar. Utilice únicamente una punta de rociado especificada por el fabricante. Tenga precaución al limpiar y cambiar las puntas de rociado. En el caso en que la punta de rociado se obstruya durante el rociado, siga las instrucciones del fabricante para apagar la unidad y aliviar la presión antes de retirar la punta de rociado para limpiarla. No deje la unidad sin supervisión cuando está activada. Cuando la unidad no está en funcionamiento, apáguela según las instrucciones del fabricante. El rociado a alta presión puede inyectar toxinas en el cuerpo y provocar lesiones corporales graves. En el caso en que se produzca la inyección, busque atención médica de inmediato. Inspeccione que las mangueras y las piezas no muestren señales de daño. Reemplace cualquier manguera o pieza dañada. Este sistema es capaz de producir 17 236,89 kPa (2 500 psi). Utilice solamente piezas o accesorios de repuesto especificados por el fabricante y que tengan una capacidad nominal de 17 236,89 kPa (2 500 psi), como mínimo. Sepa cómo detener la unidad rápidamente. Familiarícese completamente con los controles. Antes de hacer funcionar la unidad, verifique que todas las conexiones sean seguras. Para uso doméstico únicamente. ADVERTENCIA: Para reducir el riesgo de lesiones: No utilice la unidad ni rocíe cerca de los niños. Mantenga alejados a los niños del equipo en todo momento. No se estire demasiado ni se pare sobre un soporte inestable. Mantenga los pies bien asentados y el equilibrio en todo momento. Permanezca alerta y preste atención a lo que esté haciendo. No use la unidad si está cansado o se encuentra bajo los efectos de alguna droga o del alcohol. 3 - Español REGLAS DE SEGURIDAD ESPECÍFICAS Mantenga las protecciones en su lugar y en buenas condiciones de trabajo. Nunca utilice la herramienta con ninguna de las protecciones o cubiertas quitadas. Asegúrese de que todas las protecciones estén funcionando de forma correcta antes de utilizar la unidad. Para reducir el riesgo de lesiones, mantenga a alejados a niños y demás circunstantes. Todos los presentes deben llevar puestos anteojos de seguridad y permanecer a una distancia segura del área de trabajo. Mantenga alejadas del área de trabajo a todas las personas, particularmente a los niños de corta edad, y también a las mascotas. Use la herramienta adecuada a la tarea. No fuerce la herramienta ni ningún accesorio a efectuar tareas para las que no están hechos. No la use para propósitos no indicados en las instrucciones. No accione el equipo cuando esté descalzo o al llevar puestas sandalias o calzado liviano similar. Use calzado de seguridad que le proteja sus pies y mejore su postura en superficies resbaladizas. Tenga suma precaución para evitar resbalarse o caer. Siempre use gafas de seguridad con protección lateral.Los anteojos de uso diario tienen lentes resistentes a golpes únicamente; no son anteojos de seguridad. Utilice sólo accesorios recomendados. El empleo de accesorios inadecuados puede presentar riesgos de lesiones. Siga las instrucciones de la mantenimiento especificadas en este manual. Inspeccione las piezas dañadas. Antes de seguir utilizando la herramienta, es necesario inspeccionar cuidadosamente toda protección o pieza dañada para determinar si funcionará correctamente y desempeñará la función a la que está destinada. Verifique la alineación de las partes móviles, que no haya atoramiento de las mismas, que no haya piezas rotas, el montaje de las piezas y cualquier otra condición que pudiera afectar su funcionamiento. Toda protección o pieza que esté dañada debe repararse apropiadamente o reemplazarse en un centro de servicio autorizado. Nunca deje desatendida ninguna herramienta en funcionamiento. Apague la herramienta. No se aleje de la herramienta hasta no verla completamente detenida. Familiarícese completamente con los controles. Aprenda a detener la máquina y a liberar rápidamente la presión. Mantenga la herramienta seca, limpia y libre de aceite y grasa. Siempre utilice un paño limpio para la limpieza de la unidad. Nunca utilice fluidos para frenos, gasolina, productos a base de petróleo ni solventes para limpiar la herramienta. No utilice la herramienta si el interruptor no apaga. Lleve todo interruptor defectuoso a un centro de servicio autorizado para que lo reparen. Antes de limpiar, reparar o inspeccionar la máquina, apague el motor y cerciórese de que se hayan detenido todas las partes en movimiento. Evite tener un entorno de trabajo peligroso. No utilice herramientas eléctricas en lugares húmedos o mojados ni las exponga a la lluvia. Mantenga bien iluminada el área de trabajo. Nunca dirija un chorro de agua en dirección de personas o animales, ni hacia dispositivos eléctricos. Nunca ponga en marcha la máquina si se ha formado hielo en cualquier parte del equipo. ADVERTENCIA: Los chorros de alta presión pueden ser peligrosos si se utilizan indebidamente. Nunca dirija el chorro a personas, animales, dispositivos eléctricos ni a la máquina misma. Evite el contacto con las partes calientes de la unidad. Antes de cada uso, inspeccione los pernos y las tuercas para verificar que están apretados. Una tuerca o perno sueltos pueden causar problemas graves en el motor. Antes de guardar deje que se enfríe el producto. Guarde la unidad en un lugar frío y bien ventilado, a una distancia segura de todo equipo generador de chispas o llamas. Al dar servicio a la unidad, sólo utilice piezas de repuesto idénticas. El empleo de piezas diferentes puede causar un peligro o dañar el producto. Nunca utilice el rociador sin la punta de rociado instalada. Una lesión por inyección puede ocasionar una posible amputación. Consulte a un médico de inmediato. Nunca coloque la mano delante de la punta de rociado cuando use la unidad. Los guantes no siempre brindan protección contra lesiones por inyección. Cuando utilice la unidad, use ropa que no permita que la pintura entre en contacto con la piel ni el cabello, junto con una máscara o un respirador. Las pinturas, los solventes y otros materiales pueden ser dañinos si se inhalan o si entran en contacto con el cuerpo. Siempre apague la unidad, quite el paquete de baterías, y libere presión antes de dar servicio a la unidad, limpiar la punta o la protección, cambiar la punta o dejar desatendida la unidad. 4 - Español REGLAS DE SEGURIDAD ESPECÍFICAS El plástico puede provocar chispas. Nunca utilice plástico para cercar un área de rociado. No use protecciones de plástico al rociar materiales inflamables. No rocíe en exteriores en días ventosos. No intente limpiar ni destapar la punta de rociado con el dedo. Toda herramienta de baterías, ya sea de baterías integradas o de paquete de baterías separado, debe recargarse únicamente con el cargador especificado para las baterías. Un cargador que puede ser adecuado para un tipo de baterías puede significar un riesgo de incendio si se emplea con otro tipo de baterías. Utilice las herramientas de baterías sólo con el paquete de baterías específicamente indicado. El empleo de baterías diferentes puede presentar un riesgo de incendio. Cargue las pilas solamente con el cargador indicado. MODELO 315.SS630 PA Q UETE DE BateríaS (Li-ion) CARGADOR 315.113740 (130285003, 130285006) 315.113710 (130156001) (Química dual) 315.259260 (140351001) CH2000 CH2010 (140136001) PAQUETE DE BateríaS (Ni-Cd) 315. 259260 (140351001) 1425301 (911041) 315.115730 (140301006) 315.115720 (140301007) CH2000 CH2010 (140136001) 130279003, 130279005 (Item No. 911375) Desconecte el paquete de baterías de la herramienta o ponga el interruptor en la posición de aseguramiento o apagado antes de efectuar ajustes, de cambiar accesorios o de guardar la herramienta. Con tales medidas preventivas de seguridad se reduce el riesgo de poner en marcha accidentalmente la herramienta. Cuando no esté usando el paquete de baterías, manténgalo alejado de todo objeto metálico como: clips, monedas, llaves, clavos, tornillos y otros objetos metálicos pequeños que puedan establecer conexión entre ambas terminales. Establecer una conexión directa entre las dos terminales puede causar chispas, quemaduras o incendios. Las herramientas de baterías no se necesitan conectar a una toma de corriente; por lo tanto, siempre están en condiciones de funcionamiento. Esté consciente de los posibles peligros cuando no esté usando la herramienta de baterías o cuando esté cambiando los accesorios de la misma. Con el cumplimiento de esta regla se reduce el riesgo de una descarga eléctrica, incendio o lesión corporal seria. No coloque herramientas de baterías ni las baterías mismas cerca del fuego o del calor. De esta manera se reduce el riesgo de explosiones y de lesiones. No aplaste, deje caer o dañe la batería. Nunca utilice una batería o cargador que se ha caído, aplastado, recibido un golpe contundente o ha sido dañado(a) de alguna manera. Las baterías dañadas pueden sufrir explosiones. Deseche de inmediato toda batería que haya sufrido una caída o cualquier daño. Las baterías pueden explotar en presencia de una fuente de inflamación, como una luz guía. Para reducir el riesgo de lesiones corporales serias, nunca use un producto inalámbrico en presencia de llamas expuestas. La explosión de una batería puede lanzar fragmentos y compuestos químicos. Si ha quedado expuesto a la explosión de una batería, lávese de inmediato con agua. No cargue herramientas de baterías en lugares mojados o húmedos. Con el cumplimiento de esta regla se reduce el riesgo de una descarga eléctrica. Para obtener resultados óptimos, debe cargar la herramienta de baterías en un lugar donde la temperatura esté entre 50°F y 100°F. No guarde la herramienta a la intemperie ni en el interior de vehículos. En condiciones extremas de uso o temperatura las baterías pueden emanar líquido. Si el líquido llega a tocarle la piel, lávese de inmediato con agua y jabón. Si le entra líquido en los ojos, láveselos con agua limpia por lo menos 10 minutos, y después busque de inmediato atención médica. Con el cumplimiento de esta regla se reduce el riesgo de lesiones corporales serias. Nunca deje desatendida ninguna herramienta con la batería instalada. Guarde estas instrucciones. Consúltelas frecuentemente y utilícelas para instruir a otros usuarios. Si presta a alguien esta herramienta, facilítele también las instrucciones. 5 - Español SÍMBOLOS Las siguientes palabras de señalización y sus significados tienen el objeto de explicar los niveles de riesgo relacionados con este producto. SÍMBOLO SEÑAL SIGNIFICADO PELIGRO: Indica una situación peligrosa inminente, la cual, si no se evita, causará la muerte o lesiones serias. ADVERTENCIA: Indica una situación peligrosa posible, la cual, si no se evita, podría causar la muerte o lesiones serias. PRECAUCIÓN: Indica una situación potencialmente peligrosa la cual, si no se evita, puede causar lesiones leves o moderadas. PRECAUCIÓN: (Sin el símbolo de alerta de seguridad) Indica una situación que puede producir daños materiales. Es posible que se empleen en este producto algunos de los siguientes símbolos. Le suplicamos estudiarlos y aprender su significado. Una correcta interpretación de estos símbolos le permitirá utilizar mejor y de manera más segura el producto. SÍMBOLO NOMBRE DENOMINACIÓN/EXPLICACIÓN Alerta de seguridad Indica un peligro posible de lesiones personales. Lea el manual del operador Para reducir el riesgo de lesiones, el usuario debe leer y comprender el manual del operador antes de usar este producto. Protección ocular Siempre póngase protección ocular con protección lateral con la marca de cumplimiento de la norma ANSI Z87.1. Symboles reciclar Este producto contiene baterías de níquel-cadmio (Ni-Cd) o iones de litio (Li-ion). Es posible que algunas leyes municipales, estatales o federales prohíban desechar las baterías de níquelcadmio en la basura normal. Consulte a las autoridades reguladoras de desechos para obtener información en relación con las alternativas de reciclado y desecho disponibles. Volts Voltaje Corriente continua Tipo o característica de corriente PSI Presión La presión se mide en libras por pulgada cuadrada GPH Caudal El caudal se mide según la cantidad máxima de galones de pintura que se rocía por hora Li - Ion V 6 - Español CARACTERÍSTICAS ESPECIFICACIONES DEL PRODUCTO Tamaño del contenedor................................................................................................................................... 0,9464 l (1 cto.) Motor..............................................................................................................................................................19,2 V, corr. cont CONOZCA SU ROCIADOR DE PINTURA Vea la figura 1, page i. Para usar este producto con la debida seguridad se debe comprender la información indicada en la herramienta misma y en este manual, y se debe comprender también el trabajo que intenta realizar. Antes de usar este producto, familiarícese con todas las características de funcionamiento y normas de seguridad del mismo. VISOR DEL INDICADOR DE ENERGÍA C3 El visor del indicador de energía C3 ubicado al costado del mango se enciende luego de instalar y cargar un compacto paquete de batería Craftsman de iones de litio de 19,2 V (315.113710). NOVEDOSO DISEÑO DEL MOTOR El novedoso diseño del motor implica menos vibración y ruido al usar su rociador. CONTENEDOR DE ASEGURAMIENTO RÁPIDO La característica de aseguramiento rápido permite instalar y eliminar fácilmente el contenedor de pintura. PUNTAS DE ROCIADO Las dos puntas de rociado suministradas le permiten elegir entre patrones de rociado diferentes: vertical, horizontal, y circular NOTA: Esta lámpara no se encenderá con paquetes de baterías de níquel-cadmio Craftsman de 19,2 V. ARMADO DESEMPAQUETADO ADVERTENCIA: Si falta o está dañada Embarcamos este producto completamente armado. n Extraiga cuidadosamente de la caja la producto y los accesorios. Asegúrese de que estén presentes todos los artículos enumerados en la lista de empaquetado. ADVERTENCIA: No use este producto si no está totalmente ensamblado o si alguna pieza falta o está dañada. Si utiliza un producto que no se encuentra ensamblado de forma correcta y completa, puede sufrir lesiones graves. n Inspeccione cuidadosamente la producto para asegurarse de que no haya sufrido ninguna rotura o daño durante el transporte. n No deseche el material de empaquetado hasta que haya inspeccionado cuidadosamente la producto y la haya utilizado satisfactoriamente. n Si hay piezas dañadas o faltantes, le suplicamos llamar a 1-800-932-3188, donde le brindaremos asistencia. LISTA DE EMPAQUETADO Rociador de pintura con contenedor de aseguramiento rápido y punta redonda de 25,4 mm (1 pulg.) Válvula atomizadora de repuesto Limpiador para brochas Lubricante Punta ancha en abanico de 304,8 mm (12 pulg.) Manual del operador 7 - Español alguna pieza, no utilice este producto sin haber reemplazado la pieza. Usar este producto con partes dañadas o faltantes puede causar lesiones serias al operador. ADVERTENCIA: No intente modificar este producto ni hacer accesorios no recomendados para la misma. Cualquier alteración o modificación constituye maltrato el cual puede causar una condición peligrosa, y como consecuencia posibles lesiones corporales serias. ADVERTENCIA: Para evitar un arranque accidental que podría causar lesiones corporales serias, siempre desmonte de la herramienta el paquete de baterías al montarle piezas a aquélla. FUNCIONAMIENTO ADVERTENCIA: No permita que su familarización con ADVERTENCIA: Las herramientas de baterías siempre este producto le vuelva descuidado. Tenga presente que un descuido de un instante es suficiente para causar una lesión grave. están en condiciones de funcionamiento. Por lo tanto, siempre debe estar asegurado el interruptor cuando no esté usándose o el operador lo lleve por un lado. ADVERTENCIA: Siempre póngase protección ocular ADVERTENCIA: Riesgo de incendio o explosión. El área con protección lateral con la marca de cumplimiento de la norma ANSI Z87.1. La inobservancia de esta advertencia podría ocasionar la entrada de fluidos en sus ojos y provocar lesiones graves. ADVERTENCIA: No utilice ningún aditamento o accesorio no recomendado por el fabricante de esta herramienta. El empleo de aditamentos o accesorios no recomendados podría causar lesiones serias. USOS Este producto puede emplearse para el fines enumerado abajo: Pinturas y barnices para interiores y exteriores para terrazas, muebles de exteriores, cercas y paredes Este producto acepta baterías de iones de litio Craftsman® de 19,2 V y de níquel-cadmio de 19,2 V. Para ver las instrucciones de carga completas, consulte el manual del operador de los paquetes de baterías y cargadores enumerados en las Reglas de Seguridad Específicas. de rociado debe estar bien ventilada y lejos de chispas o llamas. LLENADO DEL ROCIADOR CON PINTURA/TINTE Vea la figuras 3 y 4, page i. Retire y deseche cualquier capa que se haya formado en la superficie de la pintura o del tinte, luego mezcle bien el material en su contenedor original antes de comenzar a pintar. NOTA: Es posible que se deba filtrar los contenedores de tinte y pintura más antiguos antes de usar el rociador. Quite el paquete de baterías del rociador. Retire el contenedor de aseguramiento rápido girándolo a la izquierda de tal manera que la flecha del contenedor se alinee con el símbolo “desasegurar” de la tapa. Llene el contenedor con pintura o tinte según se desee. No llene por encima de la marca de llenado máximo del contenedor. Vuelva a instalar el contenedor en el rociador y gírela a la derecha de tal manera que la flecha del contenedor se alinee con el símbolo “asegurar” en la tapa. SELECCIÓN DE LA PUNTA DE ROCIADO ADECUADA CARACTERÍSTICAS DE PROTECCIÓN DE LAS BATERÍAS Vea la figura 5, page ii. Las baterías de iones de litio Craftsman® 19,2 V están diseñadas con características que protegen las celdas de iones de litio y maximizan la duración de las baterías. Si la herramienta se detiene durante el uso, suelte el gatillo para reiniciarla y reanude el funcionamiento. Si aun así no funciona, se debe recargar la batería. Utilice una punta de ventilador redonda de 25,4 mm (1 pulg.) para materiales como pinturas látex y como pinturas y manchas al aceite. Esta redonda tiene un patrón de rociado redondo. Utilice una punta de ventilador de 304,8 mm (12 pulg.) de ancho para materiales como pinturas látex. Esta redonda ancha en abanico tiene un patrón de rociado ancho que puede ajustarse de horizontal a vertical. PARA DESMONTAR Y MONTAR EL PAQUETE DE baterías Vea la figura 2, page i. ADVERTENCIA: Retire siempre el paquete de baterías de la herramienta antes de instalar las piezas, realizar ajustes. limpiarla o cuando no la utilice. Retirar el paquete de baterías evitará que la unidad se accione accidentalmente y provoque lesiones graves. Para conectar: Coloque el paquete de baterías en la producto, alineando la costilla realzada del paquete de baterías con el receptáculo para baterías de la herramienta. Asegúrese de que los pestillos situados en ambos lados del paquete de baterías entren completamente en su lugar con un chasquido y de que el paquete quede bien fijo en la herramienta antes de empezar a utilizar la herramienta. Para el desmontaje: Oprima los pestillos a ambos lados para soltar y extraer el paquete de baterías. Para cambiar las puntas: Quite el paquete de baterías del rociador. Retire la punta instalada girándola a la izquierda. Instale la punta deseada, gírela a la derecha y apriétela firmemente. NOTA: La punta debe apretarse firmemente con la mano. Una punta demasiado floja o demasiado apretada puede provocar que el rociador presente fugas o daños. Para cambiar la dirección de la punta ancha en abanico: Afloje ligeramente la punta ancha en abanico girándola a la izquierda 1/4 de vuelta. Gire el brazo de ajuste 1/4 de vuelta hacia la dirección necesaria para cambiar la dirección del rociado de la punta. Al sostener el brazo de ajuste en su posición, gire la punta ancha en abanico a la derecha hasta que quede firmemente apretada. 8 - Español FUNCIONAMIENTO ADVERTENCIA: Para reducir el riesgo de inyección, no apunte el rociador a ninguna parte del cuerpo ni a otra persona. En el caso de inyección en la piel, busque atención médica de inmediato. No utilice la unidad sin la punta de rociado en su lugar. FUNCIONAMIENTO DEL ROCIADOR Vea la figuras 6 a 9, page ii. Coloque una línea de lubricante en el pistón. Para tener acceso al pistón, siga las instrucciones en Cómo limpiar el rociador para almacenamiento de la sección Mantenimiento de este manual. Asegúrese de que la superficie que se pintará no tenga polvo, suciedad ni grasa. Tape o cubra cualquier área que no deba ser pintada o teñida. Esté atento al viento que pueda provocar que la pintura o el tinte se rocíen en áreas no deseadas. Utilice siempre protecciones u otras cubiertas para proteger las áreas que no deban pintarse o teñirse. Llene el contenedor de aseguramiento rápido con no más de 1 cuarto de la pintura o el tinte deseados. NOTA: Después de volver a llenar el contenedor de aseguramiento rápido 4 veces, agregue una línea de lubricante al pistón. Vea la sección Limpieza del rociador para guardarlo para obtener instrucciones sobre cómo desarmar el rociador para tener acceso al pistón. Seleccione la punta de rociado adecuada para el patrón de rociado deseado. Instale el paquete de baterías del rociador. Tire del gatillo del interruptor para rociar pintura. Suelte el gatillo del interruptor para detener el rociado de pintura. Practique rociando sobre un pedazo de material de desecho para probar su patrón de rociado y para cebar la bomba antes de comenzar. Si no logra un patrón de rociado de su preferencia con una cantidad uniforme de pintura o tintura en toda la aplicación, se puede diluir la pintura según se desee. Consulte la sección Corrección de problemas que aparece más adelante, en este manual. NOTA: La bomba debe cebarse después de cada cambio de pintura y la primera vez que la utilice después de haber estado guardada. Rocíe pintura en una superficie de desecho durante, al menos, 20 segundos para cebar la bomba. Para producir una capa pareja sobre toda la superficie: • Mueva el brazo a una velocidad constante y asegúrese de mover todo el brazo, no solo la muñeca. • Mantenga el rociador a una misma distancia del área que se está rociando, que debe ser de entre 457,2 mm (18 pulg.) y 508 mm (20 pulg.) desde la punta del rociador hasta la superficie que se está rociando. • Oprima el gatillo para comenzar a rociar el material que desea pintar Utilice el rociador en recorridos rectos horizontales o verticales sobre la superficie que se está pintando, luego, suelte el gatillo para detener la pulverización. NOTA: Para obtener una calidad consistente de pulverización cuando se trabaja con pinturas decapantes, puede ser necesario mantener el gatillo oprimido entre cada recorrido. Cuando termine, quite el paquete de baterías, vuelva a colocar la pintura o el tinte que no haya utilizado en su contenedor original, y limpie bien el rociador. PRECAUCIÓN: Es importante limpiar bien el rociador después de cada uso o al cambiar de color. Dejar que la pintura o el tinte permanezcan en una herramienta sin uso durante un período prolongado puede provocar que sus piezas móviles se agarroten. ADVERTENCIA: No limpie con líquidos inflamables como decapante para pinturas, quitapinturas, limpiador para brochas, destilados de petróleo, diluyente de laca, trementina, acetona, gasolina, querosene, etc. LIMPIEZA DEL ROCIADOR DESPUÉS DE UTILIZARLO La solución que se utiliza para limpiar el rociador se determina según el tipo de material que se ha rociado. Para cualquier otro material que no sea látex, siga las instrucciones del fabricante del material para una limpieza adecuada. Para limpiar el rociador a fin de guardarlo durante un breve período: Quite el paquete de baterías del rociador. Si aún no lo ha hecho, retire el contenedor de pintura y vuelva a colocar toda la pintura o el tinte que no haya utilizado en su contenedor original. Llene el contenedor de pintura con agua jabonosa templada (después de usar productos de látex) o cualquier diluyente de pintura no inflamable (siguiendo las instrucciones de los productos al aceite). Vuelva a colocar el contenedor de pintura. Instale el paquete de baterías del rociador. Rocíe la solución sobre un pedazo de cartón u otro material de desecho. Siga rociando hasta que se haya utilizado toda la solución. Quite el paquete de baterías del rociador. Coloque una línea de lubricante en el pistón. Para tener acceso al pistón, siga las instrucciones en Cómo Limpiar El Rociador Para Almacenamiento de la sección Mantenimiento de este manual. Utilice un paño húmedo para limpiar la parte exterior del rociador. Ahora, la unidad está lista para guardar. 9 - Español MANTENIMIENTO ADVERTENCIA: Al dar servicio a la unidad, sólo utilice piezas de repuesto idénticas. El empleo de piezas diferentes puede causar un peligro o dañar el producto. ADVERTENCIA: Siempre póngase protección ocular con protección lateral con la marca de cumplimiento de la norma ANSI Z87.1. La inobservancia de esta advertencia podría ocasionar la entrada de fluidos en sus ojos y provocar lesiones graves. PROCEDIMIENTOS DE MANTENIMIENTO notA: Siempre quite el paquete de baterías de la unidad antes de realizar el servicio de la unidad. Evite el empleo de solventes al limpiar piezas de plástico. La mayoría de los plásticos son susceptibles a diferentes tipos de solventes comerciales y pueden resultar dañados. Utilice paños limpios para eliminar la suciedad, el polvo, el aceite, la grasa, etc. ADVERTENCIA: No permita en ningún momento que fluidos para frenos, gasolina, aceites penetrantes, etc., lleguen a tocar las piezas de plástico. Las sustancias químicas pueden dañar, debilitar o destruir el plástico, lo cual a su vez puede producir lesiones corporales serias. Cómo Limpiar El Rociador Para Almacenamiento Vea la figura 8, page ii. Una vez que haya terminado su proyecto y esté listo para guardar el rociador, se recomienda realizarle una buena limpieza y lubricación. Quite el paquete de baterías del rociador. Retire el contenedor de pintura. Si aún no lo ha hecho, vuelva a colocar toda la pintura o el tinte que no haya utilizado en su contenedor original. Llene el contenedor de pintura con agua jabonosa templada (después de usar productos de látex) o cualquier diluyente de pintura no inflamable (siguiendo las instrucciones de los productos al aceite). Vuelva a colocar el contenedor de pintura. Enchufe el rociador. Rocíe la solución sobre un pedazo de cartón u otro material de desecho. Siga rociando hasta que se haya utilizado toda la solución. Quite el paquete de baterías del rociador. Retire el contenedor de pintura. Retire el tubo de succión y el filtro y deposítelos a un lado. Retire la punta de rociado instalada girándola a la izquierda y deposítela a un lado. Retire el conjunto de la válvula atomizadora y deposítela a un lado. Retire la tuerca de seguridad girándola a la izquierda. Deslice el conjunto de alojamiento de la bomba/la tapa del contenedor fuera del rociador. Tire del pistón y desprenda el alojamiento de la bomba. Con el cepillo para limpiar suministrado y una solución acorde con el último tipo de pintura o tinte que roció, limpie profundamente todas las piezas mencionadas arriba. NOTA: Asegúrese de restregar bien dentro de la abertura del alojamiento de la bomba de tal manera que no queden restos de materiales de pintura o tinte. Limpie el orificio de ventilación del alojamiento de la bomba con un clip para papel enderezado. Para volver a armar la unidad: Coloque una línea de lubricante en el pistón. Deslice el resorte hacia atrás sobre el pistón. Introduzca el pistón y el conjunto del resorte en la parte posterior del alojamiento de la bomba. Vuelva a colocar el conjunto del alojamiento de la bomba/la tapa del contenedor dentro del rociador. Vuelva a colocar la tuerca de seguridad en el alojamiento del motor empujándola hacia adentro mientras la gira a la derecha para asegurarla. Introduzca el conjunto de la válvula atomizadora en la abertura delantera del alojamiento de la bomba. Vuelva a colocar la punta de rociado y gire a la derecha para asegurarla. Vuelva a colocar el tubo de succión y el filtro. Vuelva a colocar el contenedor de pintura. Ahora, el rociador está listo para guardar. replacing atomizer valve assembly Vea la figura 10, page ii. La válvula atomizadora provoca que el material de pintura o tinte gire cuando sale del rociador. Después de entre 26,5 (7 gal.) y 37,85 l (10 gal.) de pintura o tinte, es posible que la válvula atomizadora deje de realizar un buen patrón de rociado y sea necesario reemplazarla. Para reemplazar el conjunto: Quite el paquete de baterías del rociador. Gire la punta de rociado a la izquierda y retírela. Instale el conjunto de válvula atomizadora nuevo. Vuelva a colocar la punta de rociado y gire a la derecha para asegurarla. REMOCIÓN Y PREPARACIÓN DEL Paquete de baterías PARA EL RECICLADO 10 - Español ADVERTENCIA: Al retirar el paquete de baterías, cubra las terminales del mismo con cinta adhesiva reforzada. No intente destruir o desarmar el paquete de baterías, ni de desmontar ninguno de sus componentes. Las baterías deben reciclarse o desecharse debidamente. Asimismo, nunca toque ambas terminales con objetos metálicos y partes del cuerpo, ya que puede producirse un corto circuito. Manténgase fuera del alcance de los niños. La inobservancia de estas advertencias puede causar incendios y lesiones corporales serias. Corrección de problemas PROBLEMA CAUSA POSIBLE SOLUCIÓN El motor no funciona. La batería no está cargada. Cargue la batería. El motor se recalienta. El pistón está agarrotado. Limpie bien el rociador según las instrucciones de limpieza para guardarlo durante un largo período que figuran en la sección Mantenimiento de este manual. Operación de rociado continua. Suelte el gatillo al terminar cada pasada para dejar que el motor se enfríe. El motor tiene un zumbido bajo, pero no rocía. El pistón está agarrotado. Limpie bien el rociador según las instrucciones de limpieza para guardarlo durante un largo período que figuran en la sección Mantenimiento de este manual. El motor parece estar funcionando adecuadamente pero no rocía. El tubo de succión y el filtro están flojos o dañados. Vuelva a instalar o reemplace el tubo de succión y el filtro, según sea necesario. La válvula atomizadora está obstruida o desgastada. Limpie o reemplace la válvula atomizadora. El material que se está rociando es demasiado espeso. Siga las instrucciones del fabricante del material para diluir el material, según sea necesario. La punta de rociado o el filtro de entrada están tapados; pistón desgastado. Limpie bien el rociador y, de ser necesario, reemplace el pistón*, siguiendo las instrucciones de limpieza para guardar la unidad que figuran en la sección Mantenimiento de este manual. El volumen del contenedor de pintura está bajando. Vuelva a llenar el contenedor de pintura. El material que se está rociando es demasiado espeso. Siga las instrucciones del fabricante del material para diluir el material, según sea necesario. El tubo de succión está flojo. Vuelva a instalar el tubo de succión firmemente. La válvula atomizadora está obstruida o desgastada. Limpie o reemplace la válvula atomizadora. La punta de rociado o el pistón están desgastados. Limpie o reemplace la punta de rociado o el pistón*. El sobrerociado de pintura/tinte es excesivo. La punta de rociado está demasiado lejos de la superficie que se está rociando. Sostenga el rociador más cerca de la superficie que está rociando. La pintura/el tinte se corre o se desprende de la superficie de trabajo. No se están siguiendo los métodos de pintura adecuados. Consulte la sección Funcionamiento del rociador que figura anteriormente en este manual. Hay fugas de pintura/tinte detrás de la punta de rociado. La punta de rociado está floja. Apriete la punta de rociado. La válvula atomizadora está desgastada o no está colocada adecuadamente. Vuelva a colocar o a ubicar la válvula atomizadora, según sea necesario. El material rociado salpica, forma globos o no se puede lograr un patrón de rociado de su preferencia con una cantidad uniforme de pintura o tintura. * Aunque sea poco probable, puede tratarse de un pistón desgastado. Se puede comprar un pistón de repuesto llamando al servicio al cliente al 1-800-932-3188. Siga las instrucciones de la sección Cómo Limpiar El Rociador Para Almacenamiento para tener acceso al pistón y reemplazarlo. 11 - Español Get it fixed, at your home or ours! Your Home For expert troubleshooting and home solutions advice: www.managemyhome.com For repair – in your home – of all major brand appliances, lawn and garden equipment, or heating and cooling systems, no matter who made it, no matter who sold it! For the replacement parts, accessories and owner’s manuals that you need to do-it-yourself. For Sears professional installation of home appliances and items like garage door openers and water heaters. 1-800-4-MY-HOME® (1-800-469-4663) Call anytime, day or night (U.S.A. and Canada) www.sears.com www.sears.ca Our Home For repair of carry-in items like vacuums, lawn equipment, and electronics, call anytime for the location of your nearest Sears Parts & Repair Service Center 1-800-488-1222 (U.S.A.) www.sears.com 1-800-469-4663 (Canada) www.sears.ca To purchase a protection agreement on a product serviced by Sears: 1-800-827-6655 (U.S.A.) 1-800-361-6665 (Canada) Para pedir servicio de reparación a domicilio, y para ordenar piezas: Au Canada pour service en français: 1-888-SU-HOGAR® 1-800-LE-FOYER MC (1-888-784-6427) ® Registered Trademark / TM Trademark / SM Service Mark of Sears Brands, LLC ® Marca Registrada / TM Marca de Fábrica / SM Marca de Servicio de Sears Brands, LLC MC Marque de commerce / MD Marque déposée de Sears Brands, LLC (1-800-533-6937) www.sears.ca © Sears Brands, LLC