1
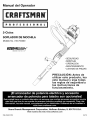
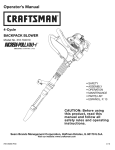
Operator's
Manual
R
_ P R 8
F E S S ! 8
N A IL
2-Cycle
BACKPACK BLOWER
Model No. 316.794000
INCREDI.PULL "
UNBELIEVABLE
STARTING
EA
SE
TM
• SAFETY
• ASSEMBLY
• OPERATION
• MAINTENANCE
• PARTS LIST
• ESPANOL, P. 13
CAUTION:
Before using
this product, read this
manual and follow all
safety rules and operating
instructions.
Sears Brands Management
Corporation,
Visit our website:
769-05932 P00
Hoffman
Estates, IL 60179 U.S.A.
www.craftsman.com
05/10
TABLE OF CONTENTS
Rules for Safe Operation
................................................
Warranty .............................................................
Know Your Unit .......................................................
2
4
4
Assembly Instructions
..................................................
Oil and Fuel Information .................................................
5
6
Starting/Stopping
Instructions ............................................
Operating Instructions
..................................................
Maintenance and Repair Instructions
......................................
Cleaning and Storage
..................................................
Troubleshooting
......................................................
Specifications
.......................................................
Parts List ...........................................................
Service Information ............................................
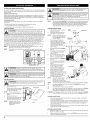
SPARK ARRESTOR
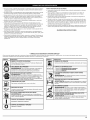
The purpose of safety symbols is to attract your attention to possible dangers. The safety I
symbols, and their explanations, deserve your careful attention and understanding. The I
safety warnings do not by themselves eliminate any danger. The instructions or warnings
they g ve are not subst tutes for proper acc dent prevent on measures.
SYMBOL
6
7
8
9
1O
11
25
Back Cover
NOTE
NOTE: For users on U.S. Forest Land and in the states of California, Maine, Oregon
and Washington.
All U.S. Forest Land and the state of California (Public Resources Codes
4442 and 4443), Oregon and Washington require, by law that certain internal combustion
engines operated on forest brush and/or grass-covered areas be equipped with a spark
arrestor, maintained in effective working order, or the engine be constructed, equipped and
maintained for the prevention of fire. Check with your state or local authorities
for
regulations pertaining to these requirements. Failure to follow these requirements could
subject you to liability or a fine. This unit is factory equipped with a spark arrestor. If it
requires replacement,
ask your Sears or other qualified service dealer to install the
Accessory
Part #753-06418 Muffler Assembly
,_
NOTE:
MEANING
required in order
to avoid
seriousdanger,
personal
injury. or
May
be used
in conjunction
SAFETY
ALERT:
Indicates
warning
caution.
Attention
is
with other symbols or pictographs.
Advises of information
of the equipment.
or instructions
vital to the operation or maintenance
I _IIL
yourself or to others. Always follow the safety precautions to reduce the risk
I of
DANG
ER: Failure
a safety
warning will result in serious injury to
fire, electric
shock to
andobey
personal
injury.
I _hb,
yourself and others. Always follow the safety precautions to reduce the risk
I WARNING:
Failureand
to obey
a safety
warning can result in injury to
of fire, electric shock
personal
injury.
I _L,
damage or personal injury to yourself or to others. Always follow the safety
I CAUTION:
warningshock
may and
resultpersonal
in property
precautions to Failure
reduce to
theobey
risk aofsafety
fire, electric
injury.
NOTE:
CALIFORNIA
PROPOSITION
This Unit Can Use a Plug-In Power Start or Power Bit Start Optional
Accessory!
Please refer to the Plug-in Power Start or Power Bit Start operator's manual for
proper use of these features. (Items Sold Separately! Please refer to page 9 of
this manual for more information about purchasing these accessories.)
Read the Operator's Manual and follow all warnings and safety instructions.
Failure
to do so can result in serious injury to the operator
and/or bystanders.
FOR
QUESTIONS, CALL 1-8OO-4-MY-HOME®
65 WARNING
THE ENGINE EXHAUST FROM THIS PRODUCT CONTAINS CHEMICALS KNOWN TO
THE STATE OF CALIFORNIA TO CAUSE CANCER, BIRTH DEFECTS OR OTHER
REPRODUCTIVE HARM.
" IMPORTANT
READ ALL INSTRUCTIONS
SAFETY INSTRUCTIONS
BEFORE OPERATING
read these instructions before operating the unit in order to ensure the safety of
must these
follow instructions
the safety rules.
Please
keep
for later
use.
I WARNING:
using the unit,
you
the operator andWhen
any bystanders.
Please
•
•
Read the instructions carefully. Be familiar with the controls and proper use of the unit.
Read this operating instruction manual carefully. Be thoroughly familiar with the
controls and the proper use of the equipment. Know how to stop the unit and
disengage the controls quickly.
•
Do net operate this unit when tired, ill, or under the influence of alcohol,
medication.
•
Never allow children to operate the equipment. Never allow adults unfamiliar with the
instructions to use the unit. Never allow adults to operate the equipment without
proper instruction.
•
All blower tubes must be installed properly
SAFETY WARNINGS
I ,_
"
WHILE OPERATING
I
I_,
All information, illustrations,
and specifications
in this manual are based on the latest
product information available at the time of printing. We reserve the right to make changes
at any time without notice.
I
I
• To avoid static electricity shock, do not wear rubber gloves or any other insulated
gloves while operating this unit.
• Use the unit only in daylight or good artificial light.
drugs, or
•
before operating the unit.
and its vap°rs can expl°de
if
• To reduce the risk of hearing loss associated with sound level(s), always wear
ear/hearing protection when operating this unit.
• Wear hea W long pants, boots, gloves, and a long sleeve shirt. Do not wear loose
clothing, jewelry, short pants, sandals or go barefoot. Secure hair above shoulder level.
FOR GAS UNITS
ignited. Take the following precautions:
I WARNING:
Gas°line is highly flammable,
• Wear safety glasses or goggles that are marked as meeting ANSI Z87.1-198g standards
and are marked as such. Wear ear/hearing protection when operating this unit.
• Never run the unit without the proper equipment attached.
I
Keep outside surfaces free from oil and fuel.
• Avoid accidental starting. Be in the starting position whenever pulling the starter
rope. The operator and unit must be in a stable position while starting. Refer to
Starting/Stopping
Instructions.
• Do not set unit on any surface except a clean, hard area while engine is running.
Debris such as gravel, sand, dust, grass, etc. could be picked up by the air intake
and thrown out by the discharge opening, damaging unit, property, or causing
serious injury to bystanders or operator.
• Use the right tool. Only use this tool for its intended purpose.
•
•
Store fuel only in containers
such materials.
•
Always stop the engine and allow it to cool before filling the fuel tank. Never remove
the fuel tank cap or add fuel when the engine is hot. Always loosen the fuel tank cap
slowly to relieve any pressure in the tank before fueling. Do net smoke.
Always mix and add fuel in a clean, well-ventilated outdoor area where there are no
sparks or flames. De not smoke.
Never operate the unit without the fuel cap securely in place.
•
•
specifically
designed
and approved
for the storage of
•
Avoid creating a source of ignition for spilled fuel. Wipe up any spilled fuel from the
unit immediately before starting the engine. Move the unit at least 30 feet (9.1 m)
from the fueling source and site before starting the engine. Do net smoke.
•
Never start or run the unit inside a closed room or building. Breathing
can kill. Only operate this unit in a well-ventilated outdoor area.
exhaust fumes
Do not force unit. It will do the job better and with less likelihood of injury at a rate for
which it was designed.
• Do not overreach or use from unstable surfaces such as ladders, trees, steep slopes,
rooftops, etc. Always keep proper footing and balance.
• Always hold the unit with a firm grip when operating.
•
Keep hands, face, and feet away from all moving parts. Do not touch or try to stop
the impeller when it is rotating. Do not operate without guards in place.
• Do not put any object into openings. Do not use with any opening blocked; keep free
of dirt, debris, and anything that may reduce the air flow.
•
Do not touch the engine or muffler. These parts get extremely
even after the unit is turned off.
•
Do not operate the engine faster than the speed needed to do the job. Do not run
the engine at high speed when not in use.
• Always stop the engine when operation
to another.
hot from operation,
is delayed or when walking from one location
• Stop the engine for maintenance, repair, to install or remove the blower tubes. The
unit must be stopped and the impeller no longer turning to avoid contact with the
rotating blades.
2
•
If you strike or come into contact with a foreign object, stop the engine immediately
and check for damage. Do not operate before repairing damage. Do not operate the
unit with loose or damaged parts.
•
Use only replacement parts or accessories recommended for this tool that are
distributed by Sears or a Craftsman outlet. Use of any replacement parts purchased
elsewhere may be hazardous, and will also void your warranty.
•
Never use this unit for spreading
may contain toxic materials.
chemicals,
fertilizers
or other substances
which
• To reduce fire hazard, replace faulty muffler and spark arrestor. Keep the engine and
muffler free from grass, leaves, excessive grease or carbon build up.
• Turn the engine off and disconnect
•
the spark plug for maintenance
or repair.
Never point the blower or blowing debris in the direction of people, animals, or in
the direction of windows. Always direct the blowing debris away from people,
animals, and windows. Use extra caution when blowing debris near solid objects
such as trees, automobiles, walls, etc.
OTHER
SAFETY WARNINGS
• Always disconnect the spark plug before performing maintenance or accessing
movable parts. See Replacing the Spark Plug.
• Never store the unit, with fuel in the tank, inside a building where fumes may reach
an open flame (pilot lights, etc.) or sparks (switches, electrical motors, etc.).
• Allow the engine to cool before storing or transporting. Be sure to secure the unit
while transporting.
• Store the unit in a dry place, secured, or at a height to prevent unauthorized
damage. Keep out of the reach of children.
use or
•
Never douse or squirt the unit with water or any other liquid. Keep handles dry, clean,
and free from debris. Clean after each use, see Cleaning and Storage instructions.
•
Keep these instructions. Refer to them often and use them to instruct other users. If
you loan this unit to others, also loan these instructions to them.
SAVE THESE INSTRUCTIONS
,, SAFETY
This operator's manual describes safety and international
operating, maintenance," and repair information.
SYMBOL
AND
INTERNATIONAL
symbols and pictographs
SYMBOLS
that may appear on this product.
MEANING
SYMBOL
"
Read the operator's
manual for complete
safety, assembly,
MEANING
• PRIMERBULB
Indicates
danger,
warning
with other symbols
or caution.
May be used
in conjunction
i¸
or pictographe.
ill
WARNING:
Read the operator's manual(s) and follow all warnings
and safety instructions. Failure to do so can result in serious in ury to
• READ OPERATOR'S MANUAL
the operator and/or bystanders.
O
1
ii_ i _
2
3
Push primer bulb; fully and Slowly, i 0 times.
• CHOKE CONTROL
1. ' FULL choke position
2, * PARTIAL choke position
3. • RUN choke position
H N
• THROWN
L
__j
OBJECTS CAN CAUSE SEVERE INJURY
Small Objects can be propelled at high Speed,
injury,
WARNING:
WARNING:
Thrown objects and loud noise can cause severe eye
injury and hearing loss. Wear eye protection meeting ANSI Z87.1-1989
m • standards
WEAR EYE
and
AND
ear protection
HEARING when
PROTECTION
operating this unit. Use a full face
IF " shield when needed.
Causing
. .i oiti;5<•
KEEP BYSTANDERS
WARN ING:
-•
UNLEADED
children and pets, at
FUEL
_
• OIL
Refer to operator's
WARNING:
Do not touch a hot engine. These parts get extremely
hot from operation and may cause severe burns. When the unit is
turned °ff the engine will remain h°t f°r a sh°rt time"
manual for the proper type of oil.
• DO NOT USE E85 FUEL IN TH S UNIT
WARN ING:
• HOTSURFACE
._._
"_,,.
,_
AWAY
Keep all bystanders, especially
least 50 feet (!5 m) from the Operating area.
Always use clean, fresh unleaded fuel
_1_ _L_
...........................
It has been proven that fuel containing
f
I
greater than
SEVERE INJURY
15% ethanol will likely damage
I
I • ON
/ START/RUN
ON/OFF
STOP CONTROL
this engine and void the warranty.
• WARNING:
BLOWERS -
Stop the engine
and allow
the impeller
to Stop before
ROTATING
IMPELLER
BLADES
CAN CAUSE
opening the vacuum door, installing Or changing tubes or bag, or
before cleaning or performing any maintenance.
CRAFTSMAN
PROFESSIONAL
FOR 3 YEARS from the date of purchase, this product
repair is unavailable.
is warranted
3 YEAR FULL WARRANTY
against any defects in material or workmanship.
Defective product
will receive free repair or free replacement
For warranty coverage details to obtain repair or replacement,
visit the web site: www.craftsman.com
This warranty covers ONLY defects in material and workmanship.
Warranty coverage does NOT include:
•
Expendable
•
•
Product damage resulting from user attempts at product modification or repair or caused by product accessories.
Repairs necessary because of accident or failure to operate or maintain the product according to all supplied instructions.
items that can wear out from normal use within the warranty period, such as filters or spark plugs.
•
Preventive
maintenance,
or repairs necessary
This warranty gives you specific
due to improper
fuel mixture, contaminated
or stale fuel.
legal rights, and you may also have other rights which vary from state to state.
Sears Brands Management Corporation, Hoffman Estates, IL 60179
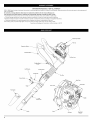
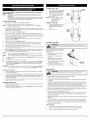
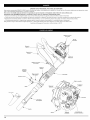
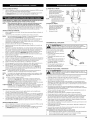
Starter
Rope
Handle
Fuel Cap
Suspension
System
Shoulder
Support
Air
Filter
Cover
Shoulder
Su
Buckle
On/Off
Switch
Throttle
Throttle
Cables
Grip
Flex
Cruise
Tube
Control
Spark Plug
Primer
Trigger
Flare
Choke
Nozzle
Muffler
Lower
Blower Tube
Nozzle
Stand
Fuel Tank
4
Bulb
Lever
Power Start
Feature
if
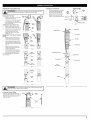
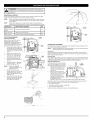
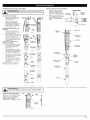
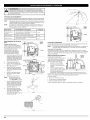
ASSEMBLING
THE BLOWER TUBE
Adjusting
the Throttle
-i
Grip
iA iw.°...O; oavoi ,e,iou
I
e,sona,,n,u n
1.
shut the unit off before removing
or installing the blower tubes.
2.
Installing the Flex Tube
1.
2.
2.
2.
3.
4.
Using a T-20 Torx ®screwdriver,
tighten the two screws at the
bottom of the throttle grip (Fig. 6).
T-20 Torx ®Screw
Fig, 6
Tube
Place a hose clamp over the
other end of the flex tube (Fig. 2).
Slide the end of the hose with the
clamp on it over the top end of
the upper blower tube and
tighten the screw on the hose
clamp (Fig. 2).
Installing
Nozzle
1.
Throttle
Grip
Upper
Blower
Tube
Place a hose clamp over the end
of the flex tube (Fig. 1).
Slide the end of the flex tube with
the clamp on it over the elbow
tube and tighten the screw on the
hose clamp (Fig. 1).
Installing the Upper Blower
1.
Move the throttle grip to a location
on the upper blower tube that
provides the best grip (Fig. 6).
the Lower
Blower
Throttle
Cables
Fig, 1
Tube and
Flex
Insert the bump on the upper
blower tube into the bump slot
on the lower blower tube (Fig. 3).
While holding the upper blower
tube, twist the lower blower tube
clockwise until it locks into place
(Fig. 3).
Insert the bump on the lower
blower tube into the bump slot
on the nozzle (Fig. 4).
While holding the lower blower
tube, twist the nozzle clockwise
until it locks into place (Fig. 4).
(_
L
ower
Flex
Tube
_
Fig, 2
_/,
Upper
The completed blower tube should
look like Figure 7.
Blower
Upper
Blower
Tube.
On/Off
Tube
Throttle
Blower
Grip
Lower
Blower
Tube
Tube
Fig, 3
I1_
BI ....
Tube
Nozzle
Lower
_
Nozzle
Fig, 4
Fig,
tubes are locked in place or firmly installed.
Secure the Throttle
Tube
Cables
Cables
_/_...--_
Elbow
Place a zip tie around the elbow tube
and the throttle cables, as shown (Fig. 5).
Tighten the zip tie, making sure not to
crimp the cables.
Zip
Fig, 5
Tie
7
Switch
OIL AND FUEL MIXING
INSTRUCTIONS
WARNING:
Operate this unit only in a well- ventilated outdoor area.
Carbon monoxide exhaust fumes can be lethal in a confined area.
Old and/or improperly mixed fuel are the main reasons for the unit not running properly.
Be sure to use fresh, clean unleaded fuel. Follow the instructions carefully for the proper
fuel/oil mixture.
Definition
of Blended Fuels
WARNING:
Today's fuels are often a blend of gasoline and oxygenates such as ethanol, methanol, or
MTBE (ether). Alcohol-blended
fuel absorbs water. As little as 1% water in the fuel can
make fuel and oil separate. It forms acids when stored. When using alcohol-blended fuel,
use fresh fuel (less than 30 days old).
position
operator
To avoid
place or
Using Blended Fuels
If you choose to use a blended fuel, or its use is unavoidable, follow recommended
precautions:
• Always use the fresh fuel mix explained in your operator's manual
•
NOTE:
Always agitate the fuel mix before fueling the unit
• Drain the tank and run the engine dry before storing the unit
Using Fuel Additives
I _I1_
I
I
strict attention to the oil and fuel mixing instructions on the 2-cycle oil
container. UsingForimproperly
CAUTION:
proper engine
mixedoperation
fuel can severely
and maximum
damagereliability,
the engine.
pay
I
I
The bottle of 2-cycle oil that came with your unit contains a fuel additive which will help
inhibit corrosion and minimize the formation of gum deposits. It is recommended that
you use our 2-cycle oil with this unit. If unavailable, use a good 2-cycle oil designed for
air-cooled engines along with a fuel additive, such as STA-BIL® Gas Stabilizer or an
equivalent. Add 0.8 oz. (23 ml.) of fuel additive per gallon of fuel according to the
instructions on the container. NEVER add fuel additives directly to the unit's fuel tank.
Thoroughly mix the proper ratio of 2-cycle engine oil with unleaded gasoline in a
separate fuel can. Use a 40:1 fuel/oil ratio. Do not mix them directly in the engine fuel
tank. See the table below for specific gas and oil mixing ratios.
NOTE:
One gallon (3.8 liters) of unleaded gasoline mixed with one 3.2 oz. (95 ml)
bottle of 2-cycle oil makes a 40:1 fuel/oil ratio.
NOTE:
Dispose of the old fuel/oil mix in accordance
regulations.
4.
5.
GAS
2-CYCLE
OIL
1 GALLON US
(3.8 LITERS)
3.2 FL. OZ.
(95 ml)
1 LITER
25 ml
i i
explode. Always stop the engine and allow it to cool before filling the fuel
tank. Do not smoke while filling the tank. Keep sparks and open flames at a
distance from the area.
I
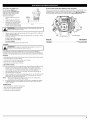
Crouch in the starting position
(Fig. 11). Pull the starter rope 5
times in a controlled motion.
7.
Move the choke lever to Position 2
(Fig. 10).
Pull the starter rope 3-5 times in
a controlled motion to start the
engine.
9.
While continuing to keep the
throttle trigger in the FAST
position, allow the engine to
warm up for 30 to 60 seconds.
10.
While continuing to keep the
throttle trigger in the FAST
position, move the choke lever to
Position 3 and continue warming
the unit for an additional 60
seconds (Fig. 10). The unit may
be used during this time.
spilled fuel immediately. Avoid creating a source of ignition for spilt fuel. Do
I WARNING:
Add fuel
a clean,
ventilated outdoor area. Wipe uP any I
not start the engine
until in
fuel
vapors well
dissipate.
I _
NOTE:
FUELING THE UNIT
I
Never operate the unit without the fuel cap securely in place.
Remove fuel cap slowly to avoid injury from fuel spray.
I_
I WARNING:
1.
2.
Remove the fuel cap.
Place the gas container's spout
into the fill hole on the fuel tank
(Fig. 8) and fill the tank.
NOTE:
Do not overfill the tank.
3.
4.
5.
Gas
Can
Spout
Wipe up any fuel that may have
spilled.
Reinstall the fuel cap.
Move the unit at least 30 ft. (9.1
m) from the fueling source and
site before starting the engine.
NOTE:
Dispose of any old fuel
mixture in accordance to
federal, state and local
regulations.
I
_
Fig,9
Fig,
The cruise control may be
released and the throttle
control used normally once
the engine has been properly warmed.
10
Fig, 1t
NOTE:
The unit is properly warmed up when the engine accelerates without hesitation.
IF...
the engine hesitates, return the choke lever to Position
continue the warm-up.
IF...
IF...
the engine
the engine
3 (Fig. 10)
controlled
IF WARM,..
If the engine is already warm, start the unit with the choke lever in Position
2 (Fig. 10). After the unit starts, move the choke lever to Position 3 (Fig. 10).
Using the Cruise
2 (Fig. 10) and
does not start, go back to step 3.
fails to start after two attempts, move the choke lever to Position
and press down the cruise control. Pull the starter rope in a
motion 3-8 times. The engine should start. If not, repeat.
Control
1.
Once the engine has started and warmed
the unit as needed (Fig. 9).
2.
For longer periods of operation and to eliminate possible finger fatigue, move the
cruise control toward the FAST position to incrementally increase or maintain the
unit's engine speed (Fig. 9). When the cruise control is pressed, the trigger will
recede into the handle.
3.
To decrease engine speed, move the cruise control to the SLOW position and the
trigger will return to idle position (Fig. 9).
FuelTank
Fig.8
STOPPING
1.
2.
6
On/OffSwitch
Move the choke lever to Position 1
(Fig. 10).
Press down the cruise control to
lock the trigger into the FAST
position (Fig. 9).
6.
8.
MIXING RATIO - 40:1
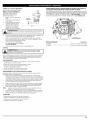
The unit uses the Incredi-Pull TM starting system, which significantly reduces the
effort required to start the engine. You must pull the starter rope out far enough
to hear the engine attempt to start. There is no need to pull the rope briskly-there is no harsh resistance when pulling. Be aware that this starting method is
vastly different from (and much easier than) what you may be used to.
STARTING INSTRUCTIONS
Cruise
1.
Mix fuel with oil. See Oil and Fuel
Control °_W
Mixing Instructions.
2.
Fill the fuel tank with fresh fuel
mix. Refer to Fueling the Unit.
NOTE:
There is no need to turn the
unit on. The On/Off Control
is in the ON ( I ) position at
Trigger
in the_!_
all times (Fig. 9).
3.
Slowly press and release the
primer bulb 10 times. Some
rul_
amount of fuel should be visible
in the primer bulb (Fig. 10). If fuel
cannot be seen in the bulb,
press and release the bulb until J I
fuel is visible.
to federal, state and local
UNLEADED
Avoid accidental starting. Make sure you are in the starting
when pulling the starter rope (Fig. 11). To avoid serious injury, the
and unit must be in a stable position while starting.
serious personal injury, make sure that the blower tube is locked in
firmly installed.
up, squeeze
the trigger to accelerate
INSTRUCTIONS
Release the trigger or move the cruise control to the SLOW position and allow the
engine to cool down by idling.
Press and hold the On/Off Control switch in the OFF (O) position until the engine
comes to a complete stop (Fig. 9).
PUTTING ON THE UNIT
1.
HOW TO START THE UNIT USING THE PLUG-IN
START ACCESSORY
NOTE-
2.
This unit can use a Plug-In Power Start or Power Bit Start optional
accessory!
Please refer to the Plug-in Power Start or Power Bit Start operator's manual
for proper use of this feature. (Items Sold Separately? Please refer to page 9
of this manual about purchasing these accessories.)
STARTING
1.
2.
POWER START OR POWER BIT
INSTRUCTIONS
Mix fuel with oil. See Oil and Fuel Mixing Instructions.
Fill the fuel tank with fresh fuel mix. Refer to Fueling the Unit.
Pull the shoulder support straps
down to tighten the shoulder
supports (Fig. 12).
NOTE:
The unit must be started
prior to putting it on. See
Starting/Stopping
Instructions.
1.
There is no need to turn the unit on. The On/Off Control is in the ON ( I )
position at all times (Fig. 9).
Slowly press and release the primer bulb 10 times. Some amount of fuel should
be visible in the primer bulb (Fig. 10). If fuel can not be seen in the bulb, press and
release the bulb until fuel is visible.
4.
Move the choke lever to Position 1 (Fig. 10).
5.
6.
Press down the cruise control to lock the trigger into the FAST position (Fig. 9).
Crouch in the starting position (Fig. 11). Place the Plug-In Power Start or Power Bit
Start into the back of the unit. Refer to the Operation section of the Plug-In Power
Start or Power Bit Start operator's manual.
7.
Press and hold the ON (I) button of the Plug-in
equipped drill for 2 seconds.
8.
Move the choke lever to Position 2 (Fig. 10).
9.
Press and hold the ON (I) button of the Plug-in Power Start or Power Bit Start
equipped drill in intervals no longer than 2 seconds each until the unit starts.
10.
Remove the Plug-In Power Start or drill from the unit.
11.
While continuing to keep the throttle trigger in the FAST position,
to warm up for 30 to 60 seconds.
12.
While continuing to keep the throttle trigger in the FAST position, move the choke
lever to Position 3 and continue warming the unit for an additional 60 seconds
(Fig. 10). The unit may be used during this time.
NOTE:
2.
Pull up on the bottom tabs of the
shoulder support buckles to
loosen the shoulder supports
(Fig. 13).
Remove the unit.
HOLDING
allow the engine
control used normally
the engine fails to start after two attempts, move the choke lever to Position 3
(Fig. 10) and press down the cruise control. Then press and hold the Plug-in
Power Start or drill ON (I) button in intervals no longer than 2 seconds each
until the unit starts.
If the engine is already warm, start the unit with the choke lever in Position
(Fig. 10). After the unit starts, move the choke lever to Position 3 (Fig. 10).
12
Fig,
13
I_
I
protection
To decrease engine speed, move the cruise control to the SLOW position
trigger will return to idle position (Fig. 9).
and the
INSTRUCTIONS
1.
Release the trigger or move the cruise control to the SLOW position
engine to cool down by idling.
2.
Press and hold the On/Off Control switch in the OFF (O) position
comes to a complete stop (Fig. 9).
and allow the
until the engine
at all times when operating this unit. Wear a dust mask in dusty
To avoid serious personal injury, wear eye and hearing
I WARNING:
locations.
Before operating the unit, stand in the
operating position (Fig. 14). Check for
• The operator is wearing eye and
hearing protection.
• The operator is wearing proper
clothing.
• If the conditions are dusty, the
the operator
following: is wearing a dust mask.
• The unit is secure and comfortable
on the operator's back.
L.
I
• The right arm is bent and the right
hand is gripping the throttle grip.
Fig. 14
2
For longer periods of operation and to eliminate possible finger fatigue, move the
cruise control toward the FAST position to incrementally increase or maintain the
unit's engine speed (Fig. 9). When the cruise control is pressed, the trigger will
recede into the handle.
STOPPING
Fig,
Shoulder
THE BLOWER
OPERATING
3.
Straps
Support
Using the Cruise Control
1.
Once the engine has started and warmed up, squeeze the trigger to accelerate
the unit as needed (Fig. 9).
2.
Support
Power Start or Power Bit Start
The cruise control may be released and the throttle
once the engine has been properly warmed.
IF WARM...
Shoulder
Buckles
NOTE:
The unit is properly warmed up when the engine accelerates without hesitation.
IF...
the engine hesitates, return the choke lever to Position 2 (Fig. 10) and continue
the warm-up.
IF...
the engine does not start, go back to step 3.
IF...
Supports
TAKING OFF THE UNIT
NOTE:
3.
Shoulder
Place the shoulder supports over
the shoulders so that the engine
rests on the operator's back.
I_
•
TIPS
I
make sure the blower tubes are in place before operating the unit.
To prevent serious personal injury or damage to the unit,
I WARNING:
Never direct the unit at anyone while the unit is in operation.
• Always hold the unit securely when operating.
• To reduce the risk of hearing loss associated
is required.
with sound level(s), hearing protection
• Operate power equipment only at reasonable hours-- not early in the morning or late
at night when people might be disturbed. Comply with times listed in local ordinances.
Usual recommendations
are 9:00 am to 5:00 pm, Monday through Saturday.
• To reduce noise levels, operate power blowers at the lowest possible speed to de the
job and limit the total number of pieces of power equipment used at any one time.
• Check your equipment before operation, especially the muffler, air intakes and air filters.
• Use rakes and brooms to loosen debris before blowing.
•
In dusty conditions,
slightly dampen
surfaces.
• Conserve water by using power blowers instead of hoses for many lawn and garden
applications, including cleaning debris from areas such as screens, patios, grills,
porches, and gardens.
• Watch out for children, pets, open windows or freshly washed cars, and blow debris
safely away.
• Use the full blower nozzle extension so the air stream can work closer to the ground.
• Clean up after using blowers
•
and other equipment.
Dispose of debris appropriately.
Use the cruise control (Fig. 9) to keep the trigger depressed
continuous operation easier.
while operating to make
APPLICATIONS
1
Use the blower for trees, shrubs, flower beds and hard-to-clean
2.
Use the unit around buildings
3.
Use the blower around walls, overhangs,
areas.
and for other normal cleaning procedures.
fences and screens.
WARNING:
To prevent serious injury, never perform maintenance or
repairs with unit running. Always service and repair a cool unit. Disconnect
the spark plug wire to ensure that the unit cannot start. See Replacing the
Spark Plug.
MAINTENANCE
I
SCHEDULE
Perform these required maintenance procedures at the frequency
These procedures should also be a part of any seasonal tune-up.
stated in the table.
NOTE:
Some maintenance procedures
unsure about these procedures,
service dealer.
NOTE:
Maintenance, replacement, or repair of the emission control devices and
system should only be performed by a Sears or other qualified service dealer.
FREQUENCY
Before starting
engine
I
MAINTENANCE
the
may require special tools or skills. If you are
take your unit to a Sears or other qualified
REQUIRED
Clean and re-oil the air filter
Every 25 hours
Check the spark plug condition
19
SEE
Fill the fuel tank with fresh fuel
Every 10 hours
Fig,
Air Filter
Cover
p 6
p 8
and gap
p 9
Tab
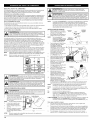
AIR FILTER MAINTENANCE
Air Filter
Cleaning the Air Filter
_-_
Clean and re-oil the air filter per the
Maintenance Schedule. ]t is an
important item to maintain. Failure to
maintain your air filter properly can
result in poor performance or can cause
permanent damage to your engine.
1.
To open the air filter cover, push __
2.
3.
4.
5.
the locking tab on the right side
of the cover inward, then pull the
air filter cover out and to the left
(Fg. 15).
Remove the air filter (Fig. 16).
Locking
Apply enough clean SAE 30
motor oil to lightly coat the filter
(Fig. 18).
CARBURETOR
ADJUSTMENT
The idle speed of the engine is adjustable. An idle adjustment
filter cover and the engine cover (Fig. 21).
NOTE:
Tab
Check
Fig, 15
Wash the filter in detergent and
water (Fig. 17). Rinse the filter
thoroughly and allow it to dry.
Locking
Tab
Tabs
Careless adjustments can seriously damage your unit. An authorized
dealer should make carburetor adjustments.
Fuel
Idle Speed Screw
///I//
_-_
16
2.
1.
Swing the cover to the right until
the tab on the air filter back plate
snaps into place in the slot on
the air filter cover (Fig. 20).
service
The condition of the air filter is important to the operation of the unit. A dirty air filter will restrict
air flow. This is often mistaken for an out of adjustment carburetor. Check the condition of the
air filter before adjusting the idle speed screw. Refer to Air Filter Maintenance.
If, after checking the fuel and cleaning
the air filter, the engine still will not idle,
adjust the idle speed screw as follows:
Fig,
screw is between the air
Old and/or improperly mixed fuel is usually the reason for improper unit performance.
Drain and refill the tank with fresh, properly-mixed
fuel prior to making any adjustments.
Refer to Oil and Fuel Information.
Clean Air Filter
Adjust
Squeeze the filter to spread and
remove excess oil
(Fig. 19).
6.
Replace the filter (Fig. 16).
NOTE:
If the unit is operated
without the air filter, you will
VOID the warranty.
7.
Reinstall the air filter cover.
Position the slots on the left side
of the air filter cover onto the
tabs on the right side of the back
plate (Figs. 16).
8.
Fig, 20
Cover
_
Adjulsleent
Screw
high idle for a minute to warm
up. Refer to Starting/Stopping
Instructions.
Move the cruise control to the
SLOW position and let the engine
Start
idle. Ifthe
the engine
engine and
stops,
let insert
it run at
a a_
small Phillips screwdriver in
between the air filter cover and
the engine cover (Fig. 21). Turn
Fig, 2t
the idle speed screw in,
clockwise, 1/8 of a turn at a time (as needed) until the engine idles smoothly.
Checking the fuel mixture, cleaning the air filter, and adjusting the idle speed should
solve most engine problems. If not and all of the following are true:
• the engine will not idle
• the engine hesitates or stalls on acceleration
• there is a loss of engine power
Fig, 17
Fig, 18
8
Have the carburetor
adjusted
by a Sears or other qualified dealer.
REPLACING
PLUG-IN
THE SPARK PLUG
1.
Stop the engine and allow it to
cool.
2.
Grasp the plug wire firmly and
pull the cap from the spark plug.
3.
Clean dirt from around the spark
plug. Remove the spark plug
from the cylinder head by turning
a 5/8 in. socket counterclockwise.
J_
0,025
(0,635
in.
Fig. 22
Grit in the
Replace cracked, fouled or dirty spark plug. Set the air gap at 0.025 in. (0.635 mm)
using a feeler gauge (Fig. 22).
Install a correctly-gapped
spark plug in the cylinder head. Turn the 5/8 in. socket
clockwise until snug.
5.
If using a torque wrench torque to:
110-120 in.,Ib. (12.3-13.5 N,m}
Item No.
Do not overtighten.
6.
Reconnect
316.85951
316.85952
the spark plug wire and engine cover.
CLEANING
and allow it to cool before you clean or service it.
I WARNING:
To avoid serious personal injury, always turn your unit off
I _b
Use a small brush to clean off the outside of the unit. Do not use strong detergents.
Household cleaners that contain aromatic oils such as pine and lemon, and solvents such
as kerosene, can damage plastic housing or handle. Wipe off any moisture with a soft cloth.
STORAGE
•
Never store the unit with fuel in the tank where fumes may reach an open flame or spark.
• Allow the engine to cool before storing.
• Lock up the unit to prevent unauthorized
•
•
use or damage.
Store the unit in a dry, well-ventilated area.
Store the unit out of the reach of children.
LONG TERM STORAGE
If you plan on storing the unit for an extended
1.
2.
time, use the following
storage procedure:
Drain all fuel from the fuel tank into a container with the same 2-cycle fuel
mixture. Do not use fuel that has been stored for more than 30 days. Dispose of
the old fuel/oil mix in accordance to federal, state and local regulations.
Start the engine and allow it to run until it stalls. This ensures that all fuel has
been drained from the carburetor.
3.
Allow the engine to cool. Remove the spark plug and put 1 oz. (30 ml) of any high
quality motor oil or 2-cycle oil into the cylinder. Pull the starter rope slowly to
distribute the oiL Reinstall the spark plug.
NOTE:
Remove the spark plug and drain all of the oil from the cylinder before
attempting to start the blower after storage.
4.
Thoroughly clean the unit and inspect it for any loose or damaged parts. Repair
or replace damaged parts and tighten loose screws, nuts or bolts. The unit is
ready for storage.
TRANSPORTING
• Allow the engine to cool before transporting
• Drain fuel from unit before transporting
• Tighten fuel cap before transporting
•
BIT START FEATURES
mm.)
J WARNING:
Jenginecould damage
Do not the
sand
cylinder.
blast, scrape or clean electrodes.
4.
POWER START AND POWER
This unit can be started with an optional Plug-In Power Start or Power Bit Start (items
sold separately). If choosing to start the unit using one of these features or have
questions, please contact your local Craftsman retailer or call 1-800-4-MY-HOME®
for
more information and purchasing. You may also go to www.craftsman.com.
Use a Champion #RDJ7J or a
replacement part #753-06193 spark
plug. The correct air gap is 0.025 in.
(0.635 mm). Remove the plug and
check its condition per the
Maintenance Schedule.
Secure the unit while transporting
I
Description
.....................................
........................................
Plug-In Power Start
Power Bit Start
PROBLEM
SOLUTION
Empty fuel tank
Old or improperly
Fill fuel tank with properly mixed fuel
mixed fuel
Plugged spark arrestor
Drain fuel tank and add fresh fuel mixture
Take to a Sears or other qualified service dealer
I=1_[_ I _I ::iv,_vA
IIIIIIII_[O]ilal
IIm]all::l
Air filter is plugged
Clean or replace the air filter
Improper carburetor
adjustment
Adjust according to the CarburetorAdjuetment
qualified service dealer for an adjustment
I=1_[_ I _I ::iv,_vA
IIIIIIII_[O]il
dF_,T_e,]
::1li!::1
;T_,_I
d::1
Old or improperly
mixed fuel
Drain fuel tank and add fresh fuel mixture
Plugged spark arrestor
Take to a Sears or other qualified service dealer
Old or improperly
Drain fuel tank and add fresh fuel mixture
mixed fuel
Plugged spark arrestor
NEED MORE HELP
10
Take to a Sears or other qualified service dealer
section or take to a Sears or other
Engine Type ......................................................................................................................
Displacement
................................................................................................................................
Air-Cooled,
2-Cycle
27 cc
Idle Speed RPM .....................................................................................................................
3,200-4,400
Operating RPM ......................................................................................................................
MPH ................................................................................................................................
7,000-7,800 rpm
up to 150
CFM ................................................................................................................................
up to 500
Ignition Type .............................................................................................................................
Ignition Switch ........................................................................................................................
Electronic
Rocker Switch
Spark Plug Gap ..................................................................................................................
Lubrication ..........................................................................................................................
0.025 in. (0.635 mm)
Fuel/Oil Mixture
Fuel/Oil Ratio ................................................................................................................................
40:1
Carburetor ....................................................................................................................
Starter ............................................................................................................
Muffler ...........................................................................................................................
Diaphragm, All-Position
Spring Assist Starting TM Auto Rewind
Baffled with Guard
Throttle ........................................................................................................................
Fuel Tank Capacity
All specifications
Manual Spring Return
.....................................................................................................................
are based on the latest product information
available
20 oz. (591 ml)
at the time of printing. We reserve the right to make changes at any time without notice.
REPAIR PROTECTION
AGREEMENTS
Congratulations on making a smart purchase. Your new Craftsman® product is designed and manufactured for years of dependable
repair from time to time. That's when having a Repair Protection Agreement can save you money and aggravation.
Here's what the Repair Protection
Agreement*
Expert service by our 10,000 professional
Unlimited
service
and no charge
rpm
operation.
But like all products,
it may require
includes:
repair specialists
for parts and labor on all covered repairs
Product replacement
up to $1500 if your covered product can't be fixed
Discount of 10% from regular price of service and related installed parts not covered by the agreement;
also, 10% off regular price of preventive
maintenance
check
Fast help by phone - we call it Rapid Resolution - phone support from a Sears representative. Think of us as a "talking owner's manual."
Once you purchase the Repair Protection Agreement, a simple phone call is all that it takes for you to schedule service. You can call anytime day or night, or schedule a service
appointment online.
The Repair Protection Agreement is a risk-free purchase. If you cancel for any reason during the product warranty period, we will provide a full refund. Or a prorated refund anytime
after the product warranty period expires. Purchase your Repair Protection Agreement today!
Some limitations
*Coverage
and exclusions
apply. For prices
in Canada varies on some
and additional
items. For full details,
information
call Sears Canada
in the U.S.A., call 1-800-827-6655.
at 1-800-361-6665.
Sears Installation
Service
For Sears professional installation of home appliances, garage door openers, water heaters and other major home items, in the U.S.A. or Canada, call 1-800-4-MY-HOME®,
11
12
Manual
del Operador
R
_ P R 8
F E S S | 8
N A IL
2-Ciclos
SOPLADOR
DE MOCHILA
Modelo No. 316.794000
INCREDI.PULL "
UNBELIEVABLE
STARTING
EA
SE
TM
•
•
•
•
•
SEGURIDAD
MONTAJE
OPERACION
MANTENIMIENTO
LISTADO DE PIEZAS
PRECAUCION:
Antes de
utilizar este producto,
lea
este manual y siga todas
las reglas de seguridad y
las instrucciones
de
funcionamiento.
Sears Brands Management
Corporation,
Visite nuestro
769-05932 P00
Hoffman
Estates, IL 60179 U.S.A.
sitio web: www.craftsman.com
05/10
INDICE DE CONTENIDOS
Normas para una operaci6n segura
......................................
Garantfa ............................................................
Conozca su unidad ...................................................
Los simbolos de seguridad se utilizan para Ilamar su atenci6n sobre posibles peligros. Los
simbolos de seguridad y sus explicaciones merecen toda su atenci6n y comprensi6n. Los
simbolos de seguridad no eliminan ningQn peligro per si mismos. Las instrucciones o
14
16
16
Instrucciones de montaje ...............................................
Informaci6n del aceite y del combustible
..................................
Instrucciones de arranque y apagado .....................................
Instrucciones de operaci6n .............................................
Instrucciones de mantenimiento y reparaci6n ...............................
Limpieza y almacenamiento
............................................
Resoluci6n de problemas
..............................................
Especificaciones
.....................................................
Lista de piezas .......................................................
Llamadas a apoyo al cliente ...................................
advertenc as que ofrecen no subst tuyen as med das adecuadas de prevenc 6n de acc dentes.
17
18
18
19
20
21
22
23
25
Contraportada
SIMBOLO
SlGNIFICADO
Debe prestar DE
atencion
para evitar sufrirIndica
graves
lesiones
personales.
Puede ser
ALERTA
SEGURIDAD:
peligro,
advertencia
o precauci6n.
utilizado junto con otros s[mbolos o figuras.
NOTA:
Le ofrece informaci6n o instrucciones
o mantenimiento del equipo.
que son esenciales para la operaci6n
I
PELIGRO:
El no obedecer una advertencia de seguridad puede conducir
a que usted u otras personas sufran graves lesiones. Siga siempre las
precauciones de seguridad para reducir el riesgo de incendio, descarga
PARACHISPAS
NOTA: Para los usuarios en tierras forestales de los EE.UU. y en los estados de California,
Maine, Oregon y Washington. Todos los terrenos forestales de los EE.UU. y el estado de
California (C6digos de Recursos Pt_blicos 4442 y 4443), Oregon y Washington, requieren per
decreto, que ciertos motores de combusti6n interna que se hagan funcionar en zonas boscosas
y/o zonas cubiertas per pastizales, esten equipados con un parachispas, que sean mantenidos
en buen estado de funcionamiento o que el motor sea construido, este equipado y sea
mantenido para evitar incendios. Consulte los reglamentos pertinentes a esos requisites con las
autoridades estatales o locales. El incumplimiento de esos requisites puede responsabilizarle o
someterle a la imposici6n de una multa. Esta unidad fue equipada en la f_brica con un
parachispas. Si requiere sustituci6n, hay una Silenciador disponible, Pieza #753-06418 al
contactar el Sears o a otro proveedor de servicio calificado.
e 6ctr ca yes
I
ones persona es.
ADVERTENCIA:
El no seguir una advertencia de seguridad puede
conducir a que usted u otras personas sufran lesiones. Siga siempre las
precauciones de seguridad para reducir el riesgo de incendio, descarga
el6ctrica y lesiones personales.
I
I
PRECAUCION:
El no seguir una advertencia de seguridad puede
I
conducir a dare patrimonial o a que usted u otras personas sufran lesiones
personales. Siga siempre las precauciones de seguridad para reducir el
r esgo de ncend o, descarga e 6ctr ca y es ones persona es.
PROPOSICION
65 DE CALIFORNIA
NOTA:
LAS EMISIONES DEL MOTOR DE ESTE PRODUCTO CONTIENEN SUBSTANCIAS
QUlMICAS QUE EL ESTADO DE CALIFORNIA CONOCE COMO CAUSANTES
DECANCER, DEFECTOS DE NACIMIENTO U OTROS DAI_IOS REPRODUCTIVOS.
iEsta unidad puede utilizar un arrancador de potencia electrico o el
accesorio opcional accesorio arrancador de potencia para taladro!
Para informarse sobre el use adecuado de estos sistemas, consulte el manual del
operador del arrancador de potencia electrico odel accesorio opcional accesorio
arrancador de petencia para taladro, i(Articulos vendidos per separado)! Vea en la
pAgina 21 de este manual m_.s informaci6n sobre estes accesorios).
Lea el manual del operador y siga todas las advertencias e instrucciones de seguridad.
De no hacerlo, el operador y/o los espectadores pueden sufrir graves lesiones.
SI TIENE PREGUNTAS, LLAME AL 1-80O-4-MY-HOME®
Toda la informaci6n, las ilustraciones y las especificaciones contenidas en este manual se
basan en la informaci6n mas reciente disponible en el memento de impresi6n del manual. Nos
reservamos el derecho de hacer cambios en cualquier memento sin aviso previo.
" IMPORTANTE
LEA TODAS
LAS INSTRUCCIONES
INFORMACION
ANTES DE LA OPERACION
•
DE SEGURIDAD
"
Evite crear una fuente de ignici6n para el combustible derramado. Limpie de la
unidad inmediatamente
cualquier combustible derramado antes de arrancar el
ADVERTENCIA:
Se debe seguir las siguientes reglas de seguridad
cuando use la unidad. Per favor lea estas instrucciones para su propia
seguridad y las de los espectaderes, antes de hacer funcionar la unidad. Per
I
favor mantenga estas instruccienes en un lugar segure para use future.
•
Lea todas las instrucciones
correcto de la unidad.
•
Lea este manual de instrucciones de funcionamiento
completamente con los controles y el use apropiado
la unidad y desactivar los controles con rapidez.
•
No opere esta unidad si estA cansado,
drogas o medicamentos.
•
Nunca permita que los niRos manejen el equipo. Nunca permita que los adultos usen
la unidad cuande no est6n familiarizados con las instruccienes. Nunca permita que las
personas adultas manejen el equipo si no cuentan con las instrucciones apropiadas.
•
Se debe instalar adecuadamente
funcionar la unidad.
AVISOS DE SEGURIDAD
con cuidado.
Conozca
enfermo,
bien los contreles y el use
o bajo los efectos del alcohol,
PARA LAS UNIDADES
QUE FUNCIONAN
antes de hacer
antes de arrancar el motor. No fume.
Nunca
arranquesiempre
ni use la
la unida
unidada dentro
una
o edificio
cerrado.y sitio de
motor. Mueva
30 pies de
(9.1
m)habitaci6n
come minimo
de la fuente
Respirar los vapores de escape puede causarle la muerte. Opere esta unidad s61o
en un Area exterior bien ventilada.
DURANTE
detenidamente. Familiarfcese
del equipo. Sepa c6mo apagar
todos los tubes de la sopladora
combustible
•
LA OPERACION
•
Use lentes o gafas de protecci6n que cumplan con las normas ANSI Z87.1-1989, y
protecci6n para sus oidos/audici6n
mientras opere esta unidad. Use siempre una
mascara facial o para protegerse contra el polvo si la operaci6n levanta polvo.
•
Use pantalones largos y gruesos, betas, guantes y camisa de manga larga. No use
ropa holgada, alhajas, pantalones cortes, sandalias ni est6 descalzo. Sostenga el
cabello sobre el nivel de los hombres.
•
La protecci6n accesoria de corte debe estar siempre colocada en su lugar mientras
opere la unidad. No opere la unidad con las dos I[neas de corte extendidas, y la linea
correcta instalada. No extienda la I[nea de corte m_.s all_. de la Iongitud de la protecci6n.
•
Esta unidad cuenta con un embrague. El accesorio de certe permanece estacionario
cuando el motor estA en marcha lenta. Si no Io hace, haga ajustar la unidad per un
t6cnico de servicio autorizado.
CON GASOLINA
• Ajuste la manija a su tamaRo de mode que le brinde el mejor agarre.
I _i1_
explotar si se encienden. Tome las siguientes precauciones:
I ADVERTENCIA:
La gas°lina es muy inflamable Y sus gases pueden
I
• Aseg0rese de que el accesorio de corte no est,. en contacto con ningOn objeto
antes de arrancar la unidad.
• Use la unidad 0nicamente con la luz del d[a o con buena luz artificial.
Almacene el combustible solamente en recipientes dise_ados y aprobados
especfficamente
para el almacenamiento
de dichos materiales.
Pare siempre el motor y deje que se enfrie antes de Ilenar el tanque de combustible.
Nunca quite la tapa del tanque de combustible, ni agregue combustible, cuando el
motor est6 caliente. Siempre afloje la tapa del tanque de combustible lentamente para
aliviar cualquier presi6n que haya en el tanque antes de cargar combustible. No fume.
•
Evite arrancar la unidad accidentalmente.
Col6quese en posici6n de inicio siempre
que tire de la cuerda de arranque. El operador y la unidad deben estar en una
posici6n estable al comenzar. Lea las instrucciones de Arranque yApagado.
•
Use la herramienta
ha side diseRada.
•
No se estire demasiado.
•
Siempre mezcle y agregue el combustible
no haya chispas ni llamas. No fume.
• Sestenga
Sestenga
•
Nunca opere la unidad sin la tapa de combustible
•
•
14
en un Area exterior bien ventilada,
bien colocada
en su lugar.
donde
•
adecuada.
No use esta unidad para ninguna tarea para la cual no
Mantenga
siempre una posici6n y equilibrio
adecuados.
siempre la unidad con ambas manes mientras est6 en funcionamiente.
con firmeza tante el mango come la manija auxiliar.
Mantenga las manes, la cara y los pies lejos de todas las partes m6viles. No intente
tocar ni detener el accesorio de corte mientras gira.
•
No toque el motor, el bastidor del engranaje ni el silenciadon Estas partes se calientan
mucho con la operaci6n. Luego de apagar la unidad, permanecen calientes durante
un tiempo breve.
OTRAS ADVERTENCIAS
DE SEGURIDAD
No opere el motor a una velocidad mayor que la necesaria para cortar, recortar o recortar
los bordes. No haga funcionar el motor a alta velocidad mientras no est,. cortando.
• Apague siempre el motor cuando demore el corte o mientras camina entre zonas de corte.
Desconecte la bujia en todo momento antes de hacerle mantenimiento o alcanzar
las piezas movibles.
• Nunca guarde la unidad con combustible en el tanque dentro de un edificio en
donde los gases puedan alcanzar una llama expuesta (pilotos, etc) o chispas
(interruptores, motores elActricos, etc.)
•
•
•
Si golpea o se enreda con algOn objeto extrafio, apague el motor de inmediato y
verifique si hay dafios. Repare todos los dafios antes de volver a intentar operar la
unidad. No opere la unidad si tiene piezas flojas o dafiadas.
• Apague el motor para realizar todo el mantenimiento,
accesorio de corte u otros accesorios.
•
•
•
•
reparaciones
o cambio del
Utilice solamente piezas o accesorios de reemplazo recomendados
para esta
herramienta que sean distribuidos pot Sears o por un establecimiento
comercial de
Craftsman. Puede obtenerlos en su proveedor de servicio autorizado. El uso de
piezas y accesorios que no son equipo origina; puede causar graves lesiones al
operador o el dafio de su unidad, y la cancelaciAn de su garant[a.
Mantenga la unidad libre de vegetaciAn y otros materiales. Pueden alojarse entre el
accesorio de corte y la protecci6n.
Para reducir el riesgo de incendio, cambie los silenciadores y amortiguadores
de
chispas defectuosos, mantenga el motor y el silenciador libre de pasto, hojas, grasa
excesiva o acumulaciones de carbono.
•
Permita que el motor se enfrie antes de guardarla o transportarla. AsegOrese de
sujetar la unidad mientras la transporta.
• Guarde la unidad en un lugar seco, bien sea bajo Ilave o suficientemente
alto para
que evite el uso no autorizado o dafios. MantAngala fuera del alcance de los nifios.
• Nunca remoje o chorree la unidad con agua o cualquier otro I[quido. Mantenga los
mangos secos, limpios y libres de escombros. L[mpiela despuAs de cada uso, vea
las Instrucciones de Limpieza y Almacenamiento.
• Conserve estas instrucciones. ConsOltelas con frecuencia y Oselas para instruir a otros
usuarios. Sile presta esta unidad a otras personas, tambiAn incluya las instrucciones.
GUARDE ESTAS INSTRUCCIONES
Nunca apunte la sopladora hacia a la gente, mascotas o ventanas. Dirija siempre el
soplado de desechos lejos de la gente, animales y ventanas. Tenga mucho cuidado
cuando sople desechos cerca de objetos s61idos como Arboles, autom6viles,
paredes, etc.
" SIMBOLOS
DE SEGURIDAD
E INTERNACIONALES
"
Este manual del operador describe los sfmbolos y figuras de seguridad e internacionales
que pueden aparecer en este producto.
informaci6n completa acerca de la seguridad, ensamble, operaci6n y mantenimiento y reparaci6n.
SIMBOLO
SIGNIFICADO
• SIMBOLO
SIMBOLO
• LEA EL MANUAL
• BOMBILI_
Puede ser utilizado junto
• CONTROL
Lea el manual deI operador y siga todas
advertencias e instrucciones de seguridad. De no hacerlo, el
operador y/o los espectadores pueden sufrir graves lesiones.
• USE PROTECCION
OCULAR
as
DEL CEBADOR
Oprima la bombilla
DEL OPERADOR
ADVERTENCIA"
1
para obtener
SIGNIFICADO
DE ALERTA DE SEGURIDAD
Indica peligro, advertencia o precauci6n,
con otros simbolos o figuras.
Lea el manual del operador
2
3
H I',1
del cebador
€0mpleta
y lentamente,
de 10 veces.
DE ESTRANGULACION
1. PoSici6n de ESTRANGULACION
2, Posici6n de ESTRANGULACION
3. PosiciAn de MARCHA
COMPLETA
PARCIAL
Y AUDITIVA
ADVERTENCIA:
Los objetos arrojados por la unidad y el ruido
fuerte pueden causar graves lesiones oculares y perdida auditiva. Utilice
protecci6n ocular que cumpla con las normas ANSI Z87.1-1989 y
protecci6n auditiva cuando opere esta unidad. Use una pantalla que le
cubra el rostro por completo cuando sea necesario.
Use siempre combustible
imp o, nuevo y sin plomo.
COMBUSTIBLE
SIN PLOMO
I"
• INDIOADOR
• NO UTILICE COMBUSTIBLE
contiene
_
_[,_
||
|_|
calientan
mucho Con el funcionamiento
y puede causar quemaduras
ADVI=RTI=NOIA"
NO toque Un moto[ Calientel Estas partes se
graves. Cuando la unidad esta apagada, e! m0t0r Se mantendrA
caliente durante un corto tiempo.
acerca
E85 EN ESTA UNIDAD
Se ha demostrado que el combustible
mAs de115% de etanol probablemente ocasionara
que
daAos al
PUEDEN CAUSAR
i
_l_
!
" MANTENGAALEJADOSALOSESPECTADORES
ADVERT ENCIA: Mantenga a iod0s los espectad0resl en eSP_ial
a n 5os y animales d0mAstic0s a pot !0 men0s 50 pies (! 5 m) del Area
de corte,
°ESUPERRC,ECAL,ENTE
ADVERTENCIA"
_
_'
DE ACEITE
Consulte el manual del operador para obtener informaci6n
del tipo correcto de aceite.
_
MJn 50ft(iSm}
motor y anulara la garantia.
LESlONES
GRAVES
ADVERTENCIA: Pare
el motor y permita que el rotor se detenga
• LAS SOPLADORASCUOHILLAS GIRATORIAS DEL ROTOR
antes de instalar o cambiar tubes o !a bolsa, o antes de limpiar o
hacerle cualquier mantenimiento,
I" ENOcNETNRDI
L oD/EAENCENu'ED/_vIYRAcP_G
A DO
15
GARANT|A
TOTAL PROFESIONAL
POR 3 AI_IOS, DE CRAFTSMAN
Este producto se garantiza DURANTE 3 ANOS a partir de la fecha de compra, contra defectos
costo o ser& remplazado gratuitamente si no puede ser reparado.
Para conocer
Esta garantia
en el material o en la mano de obra. El producto
defectuoso
ser& reparado sin ningOn
los detalles sobre la cobertura
de la garantia para que sea reparado o reemplazado,
visite el sitio web: www.craftsman.com
cubre SOLAMENTE defectos en el material o mane de obra. La cobertura
de la garantia NO incluye:
•
Artfculos consumibles
•
•
Da5os que ocurran al producto como resultado de intentos de modificaci6n o reparaci6n pot parte del usuario, o que sean causados por accesorios del producto.
Reparaciones necesarias debidas a accidente o falla en el funcionamiento,
o por no mantener el producto de acuerdo con todas las instrucciones provistas.
•
El mantenimiento
Esta garantia
que se desgasten
preventivo,
debido al uso normal dentro del periodo de la garantia, tales como filtros o bujias de encendido.
o reparaciones
le otorga a usted derechos
necesarias debido a mezcla incorrecta
de combustible,
o a combustible
viejo o contaminado.
legales especificos, y usted puede adem&s poseer otros derechos, los cuales varian de un estado a otro.
Sears Brands Management Corporation, Hoffman Estates, IL 60179
Manija
de la cuerda
de arranque
Tapa del
combustible
Sistema
de
soporte
Soporte de los
hombros
Cubierta
de
filtro de aire
Hebilla
de los soporte
de la hombro
Cables
del
regulador
Control
de
encendido
apagado
y
Mango
de control
del regulador
Control
de
Tubo
flexible
crucero
Bujia
Palanca
Gatillo
de encendido
Bombilla
cebador
del
del
obturador
Tubo inferior
de la sopladora
Boquilla
Tanque
de
combustible
16
Caracteristica
arrancador
de
de potencia
ENSAMBLAJE
DEL TUBO DE LA SOPLADORA
Ajuste
1.
lAB
unidad, apague la unidad antes de quitar o instalar los tubos de la sopladora.
,,
I
2.
Instalacibn
1.
2.
del tubo flexible
Coloque una abrazadera de
manguera sobre el extremo del
tubo flexible (Fig. 1).
Deslice el extremo del tubo
flexible con la abrazadera
colocada sobre la boquilla de la
caja de impelente y apriete el
tornil]o situado en la abrazadera
de la manguera. (Fig. 1).
Instalaci6n
sopladora
3.
4.
Mango
control
de
del
regulador
\
Torx
®"1"-20 tornillo
6
del tubo superior de la
ubo
Coloque una abrazadera de
manguera sobre el otto extremo
del tubo flexible (Fig. 2).
2.
Deslice el extremo de la manguera
con la abrazadera colocada sobre
el extremo superior del tubo
superior de la sopladora y apriete
el tornillo de la abrazadera de la
manguera (Fig. 2).
Instalacibn
del tubo inferior del
soplador y la boquilla
2.
del regulador
Fig.
1.
1.
del mango de control
Mueva el mango de control del
regulador a un lugar en el tubo
superior de la sopladora que
proporciona el mejor agarre (Fig. 6). Tubosuperior
Uti]izando un destornillador Torx _ de la sopladora
T-20, apriete los dos torni]los que
estan en la parte inferior del
mango de control del regulador
(Fig. 6).
Cables
lexible
del
regulador
Fig,1
de
_i
la manguera
Tub° (_"
':x:Ls
Inserte el tope del tubo superior
de la sopladora en la ranura de
tope de la tubo inferior de la
sopladora (Fig. 3).
manguera
Abrazadera
_
de
la manguera
o superior
_,_ ,_
la sopladora
Mientras sujeta el tubo superior
del soplador, gire a la derecha el
tubo inferior del soplador hasta
que encaje en su lugar (Fig. 3).
(1
?_
Fig, 2
Tubo
Inserte el tope del tubo inferior de
la sopladora en la ranura de tope
de la boquilla (Fig. 4).
Tubo superior
la sopladora
superior
de
Control
de
de la sopladora
apagado
Mientras sujeta el tubo inferior
del soplador, gire a la derecha el
boquilla hasta que encaje en su
lugar (Fig. 4).
Tope
Mango
de control
del regulador
Ranura
El tubo terminado de la sopladora
debe parecer como en la Figura 7.
"_"
A
Tubo
inferior
de
Tubo inferior
la sopladora
la sopladora
de
Fig, 3
Tubo
_/la
inferior
de
It
II
sopladora
Tope
,_
Ranura
de
_
tope
Boquilla
Fig,4
Fig,
ADVERTENCIA:
Para evitar lesiones personales graves, asegOrese de
i que os tubos de sop ado estAn f adas en su ugar o f rmemente nsta adas.
Asegure
los cables
del regulador
Cables
_.._
Tubo
7
I
i
del
Coloque un cincho de pl_tstico alrededor
del tubo del codo y los cables del
regulador, como se muestra (Fig. 5).
Apdete la cincho de plastico,
asegur_mdose de no engarzar los cables.
__4[:-----
codo
Fig.
5
17
MEZCLAR
EL ACEITE Y EL COMBUSTIBLE
ADVERTENCIA:
Use esta unidad s61o en un Area exterior bien
ventilada. Los gases de escape de mon6xido de carbono pueden ser
letales en un Area cerrada.
El combustible viejo o mal mezclado son los motives principales del mal funcionamiento
de la unidad. AsegQrese de usar combustible nuevo, limpio y sin plomo. Siga las
instrucciones en detalle para mezclar correctamente el aceite y el combustible.
Definici6n de los combustibles
de mezcla
ADVERTENClA:
Evite los arranques accidentales. Col6quese en posici6n
de inicio cuando tire de la cuerda de arranque (Fig. 11). El operador y la unidad
deben estar en una posici6n estable al arrancar la unidad para evitar graves
lesiones personales. Para evitar lesiones personales graves, asegOrese de que
los tubes de la sopladora est6n colocados antes de hacer funcionar la unidad.
Los combustibles actuales con frecuencia son una mezcla de gasolina y oxigenantes come
per ejemplo etanol, metanol o MTBE (6ter). El combustible mezclado con alcohol absorbe
agua. Una cantidad tan pequefia come el 1% de agua en el combustible puede causar la
separaci6n del combustible y el aceite. Forma Acidos cuando estA almacenado. Cuando
use combustible mezclado con alcohol, use combustible nuevo (de menos de 30 dias).
Ueo de combustibles de mezcla
NOTA:
Si usted opta per usar un combustible de mezcla o si su use es inevitable, tome las
precauciones recomendadas.
• Use siempre una mezcla fresca de combustible segQn Io indica su manual del operador.
•
Agite siempre la mezcla de combustible
• Drene el tanque y haga funcionar
Ueo de aditivoe en el combustible
antes de cargarlo en la unidad.
el motor en seco antes de guardar
la unidad.
ADVERTENClA:
Para que el motor funcione correctamente y con la
mayor fiabilidad, preste mucha atenci6n a las instrucciones de mezcla de
aceite y combustible del envase de aceite de 2 ciclos. El use de combustible
mezclado en forma incorrecta puede dafiar seriamente el motor.
INSTRUCClONES
I
Mezcle la gasolina con el aceite.
Vea las Instrucciones para Mezclar
el Aceite y el Combustible.
2.
Uene el tanque de combustible con
gasolina nueva, limpia y sin plomo.
NOTA:
3.
Mezcle bien la proporci6n correcta de aceite para motor de 2 ciclos y gasolina sin plomo
en una lata de combustible per separado. Use una proporci6n de 40:1 de combustible y
aceite. No los mezcle directamente en el tanque de combustible de la unidad. Consulte
las proporciones especfficas de mezcla de gasolina y aceite en la tabla siguiente.
NOTA:
3,8 litros (un galen) de gasolina sin plomo mezclada con una botella de 95 mL (3,2
onzas) de aceite de 2 ciclos es una proporci6n de 40:1 de combustible y aceite.
NOTA:
Elimine la mezcla vieja de aceite y combustible de acuerdo con los
reglamentos federales, estatales y locales.
4.
5.
6.
7.
ACEITE DE 2
ClCLOS
8.
3,8 LITROS
95 ML
(1 GALEN DE EE.UU.) (3,20NZAS FLUIDAS)
1 LITRO
25 ML
PROPORClON
ADVERTENCIA:
DE LA MEZCLA
La gasolina es muy inflamable. Los gases pueden explotar
ADVERTENClA:
Cargue el combustible en un Area exterior limpia y bien
ventilada. Limpie de inmediato tode combustible que se haya derramade.
Evite crear una fuente de encendido con el combustible derramado. No
arranque el motor hasta que se hayan evaporado los gases del combustible.
CARGA DE COMBUSTIBLE
1.
EN LA UNIDAD
Saque la tapa de la gasolina.
inyector
2.
Coloque el pico del recipiente de
gasolina en el orificio de Ilenado
del tanque de gasolina (Fig. 8) y
Ilene el tanque.
NOTA:
No Ilene el tanque demasiado. -=
del envase
del gasolina
/
I
de
de
encendido
fuii_ ucerO
LENT0
Optima lentamente y libere la pera
del cebador 10 veces. DeberA
verse alguna cantidad de
combustible en la pera del
cebador (Fig. 10). Si no puede vet
combustible en la pera, optima y
suelte la pera tantas veces come
sea necesario hasta que yea
combustible en la misma.
y
apagado
Fig. 9
Coloque la palanca del obturador
en la Posici6n 1 (Fig. 10).
Optima el control de crucero hacia
abajo para trabar el gatillo en la
posici6n de RAPIDO (Fig. 9).
AgAchese en la posici6n de
salida (Fig. 11). Tire de la cuerda
de] arrancador 5 veces en un
movimiento controlado.
Coloque la palanca del obturador
en la Posici6n 2 (Fig. 10).
Tire de la cuerda de arranque 3 a
5 veces en un movimiento
controlado para arrancar el motor.
Fig, 10
Cuerda
de
Mientras que continQa
manteniendo el disparador de la
vAIvula reguladora en la posici6n
RAPIDA, permita que el motor
caliente per 30 a 80 segundos.
10.
Mientras que continQa
manteniendo el disparador de ]a
vAJvula reguladora la posici6n
Fig, 1t
RAPIDA, coloque la palanca de
la estrangulaci6n en la Posici6n 3 y continQe calentando la unidad para los 60
segundos adicionales (Fig. 10). Se puede usar la unidad durante este tiempo.
NOTA:
NOTA:
SI...
lesionarse con el rociado del combustible. No opere nunca la unidad sin la
J ADVERTENCIA:
Saque la tapa
del combustible
lentamente para evitar
tapa del combustible firmemente
colocada
en su lugar.
J _lb
I
I
No hay necesidad de
encender la unidad. El Control
de Encendido y Apagado estA
en la posici6n Encendido (I),
en todo memento (Fig. 9).
Control
Control
9.
= 40:1
si tanque
se encienden.
Apague siempre
motor y espere
se enfrfe
antes de
el
de combustible.
No fumeel mientras
Ilena el que
tanque.
Mantenga
las cargar
chispas y las llamas lejos del Area.
DE ARRANQUE
1.
I
La botella de aceite de 2 ciclos que vine con su unidad contiene un aditivo en el
combustible que ayudarA a inhibir la corrosi6n y a reducir la formaci6n de dep6sitos de
goma. Se recomienda que use s61o el aceite de 2 ciclos con esta unidad. Si es
inevitable, use un buen aceite de 2 ciclos elaborado para motores enfriados per aire
junto con un aditivo para el combustible come per ejemplo el estabilizador de gasolina
STA-BIL® o similar. Agregue 23 mL (0,8 onzas) de aditivo de combustible per gal6n de
combustible de acuerdo con las instrucciones del envase. NUNCA agregue aditivos
directamente en el tanque de combustible de la unidad.
GASOLINA SIN
PLOMO
La unidad usa Incredi-Pull TM, Io cual reduce considerablemente
el esfuerzo
requerido para arrancar el motor. Debe halar el cordon de arranque Io
suficiente para oir que el motor trata de arrancar. No es necesario halar el
cord6n con energia: no hay fuerte resistencia al halar. Tenga en cuenta que
este m6todo de arranque es muy diferente (y mucho mAs fAcil) del que
usted pudiera estar acostumbrado a usar.
A temperaturas mAs frias, es posible que el motor tarde mAs tiempo en
calentarse y alcanzar la velocidad de funcionamiento
maxima.
La unidad se ha calentado debidamente cuando el motor acelera sin fallar.
el motor funciona con fallas, vuelva a colocar la palanca del obturador
Posici6n 2 (Fig. 10) y continQe calentando el motor.
en la
SI...
SI...
el motor no arranca, regrese al paso 2.
el motor no arranca despu6s de dos intentos, coloque la palanca del
obturador en la Posici6n 3 (Fig. 10) y optima el control de crucero hacia
abajo. Tire de la cuerda de arranque fuertemente de 3 a 8 veces. El motor
debe arrancar. Si no Io hace, repita el procedimiento.
Sl ESTA CALIENTE... Si el motor es ya caliente, comience la unidad con la palanca de
la estrangulaci6n en la Posici6n 2 (Fig. 10). Despu6s de que la unidad
comience, mueva la palanca de la estrangulaci6n para Posici6n 3 (Fig. 10).
C6mo usar el control
de crucero
3.
Limpie toda la gasolina que
pueda haberse derramado.
1.
Una vez que el motor haya arrancado y est6 caliente, oprima el gatillo para
acelerar la unidad segQn sea necesario (Fig. 9).
4.
Vuelva a instalar la tapa de la
gasolina.
2.
5.
Mueva la unidad per Io menos
9,1 m (30 pies) de la fuente y
sitio de carga antes de arrancar
el motor.
Para periodos de funcionamiento
mAs prolongados y para eliminar la,posibilidad
de fatiga en el dedo, mueva el control de crucero hacia la posici6n RAPIDO para
aumentar poco a poco o mantener la velocidad del motor de la unidad (Fig. 9).
Cuando se oprima el control de crucero, el gatillo retrocederA hacia la manija.
Para disminuir la velocidad del motor, mueva el control de crucero hacia la
posici6n LENTO y el gatillo regresarA a la posici6n de marcha en vacio (Fig. 9).
NOTA:
18
Elimine la mezcla del combustible
federales, estatales y locales.
Fig.
vieja de acuerdo
8
a los reglamentos
3.
INSTRUCCIONES
EL PONER EN LA UNIDAD
DE PARADA
1.
Lance el disparador o mueva el control de travesla a la posici6n LENTA y permita
que el motor se refresque abajo estando desocupado.
2.
Oprima y mantenga oprimido el control de encendido y apagado en la posici6n
de APAGADO (O) hasta que el motor se detenga por completo (Fig. 9).
COMO ARRANCA
O EL ACCESORIO
NOTA:
ELECTRICO
iEsta unidad puede utilizar un accesorio opcional enchufable del del
cornienzo de la energia o del cornienzo del pedacito de energia!
Refiera por favor al manual enchufable del operador del comienzo de la
energla o del comienzo del pedacito de energla para el uso apropiado de
esta caracterlstica. (Se vende por separado) En la p_tgina 21 de este manual
encontrar_ la informaci6n necesaria para comprar estos accesorios).
INSTRUCCIONES
1.
LA UNIDAD CON EL ARRANCADOR
DE POTENCIA
ARRANCADOR
DE POTENCIA PARA TALADRO
DE ARRANQUE
Coloque la palanca del obturador
5.
Oprima el control de crucero hacia abajo para trabar el gatillo en la posici6n de
RAPIDO (Fig. 9).
AgAchese en la posici6n de salida (Fig. 11). Coloque el arrancador de potencia
electrico o el accesorio arrancador de potencia para taladro en la parte posterior
de la unidad. Consulte la secci6n de Operacidn del arrancador de potencia
electrico o accesorio arrancador de potencia para taladro del operador manual.
8.
9.
10.
11.
1.
en la Posici6n
SOSTENIMIENTO
Apriete y mantenga apretado el ENCENDIDO (I) bot6n del arrancador de
potencia electrico o el taladro equipado accesorio arrancador de potencia
taladro durante 2 segundos.
Coloque la palanca del obturador en la Posici6n 2 (Fig. 10).
para
Apriete y mantenga apretado el ENCENDIDO (I) bot6n del arrancador de potencia
electrico o el taladro equipado accesorio arrancador de potencia para taladro en
intervalos de no mas de 2 segundos cada hasta que la unidad arranque.
Quitar el arrancador de potencia electrico o el taladro de la unidad.
Mientras que continOa manteniendo el disparador de la vAIvula reguladora
posici6n RAPIDA, permita que el motor caliente por 30 a 60 segundos.
en la
I_
el motor funciona con fallas, vuelva a colocar la palanca del obturador
Posici6n 2 (Fig. 10) y continQe calentando el motor.
el motor no arranca, regrese al paso 2.
el motor no arranca despu6s de dos intentos, coloque la palanca del
obturador en la Posici6n 3 (Fig. 10) y oprima el control de crucero hacia
abajo. A continuaci6n, apriete y mantenga apretado el bot6n de
ENCENDIDO (I) del arrancador de potencia electrico o taladro en intervalos
de no m_.s de 2 segundos cada hasta que la unidad arranque.
Sl ESTA CALIENTE... Si el motor es ya caliente, comience la unidad con la palanca de
la estrangulaci6n en la Posici6n 2 (Fig. 10). Despu6s de que la unidad
comience, mueva la palanca de la estrangulaci6n para Posici6n 3 (Fig. 10).
C6rno usar el control de crucero
1.
Una vez que el motor haya arrancado y est6 caliente, oprima el gatillo para
acelerar la unidad segOn sea necesario (Fig. 9).
2.
Para perfodos de funcionamiento
m_ts prolongados y para eliminar la posibilidad
de fatiga en el dedo, mueva el control de crucero hacia la posici6n RAPIDO para
aumentar poco a poco o mantener la velocidad del motor de la unidad (Fig. 9).
Cuando se oprima el control de crucero, el gatillo retrocederA hacia la manija.
Para disminuir la velocidad del motor, mueva el control de crucero hacia la
posici6n LENTO y el gatillo regresar_ a la posici6n de marcha en vac[o (Fig. 9).
INSTRUCCIONES
1.
2.
Hebillas
de los
soportes
de la
hombros
Fig.
DE LA SOPLADORA
DE PARADA
Lance el disparador o mueva el control de travesia a la posici6n LENTA y permita
que el motor se refresque abajo estando desocupado.
Oprima y mantenga oprimido el control de encendido y apagado en la posici6n
de APAGADO (O) hasta que el motor se detenga por completo (Fig. 9).
I
13
protecci6n
ocular y auditiva en todo momento cuando maneje esta unidad.
Para
graves, p6ngase
para evitar
polvo lesiones
en sitios personales
que sean polvorientos.
I ADVERTENCIA:
P6ngase una mascara
•
El operador ester vestido protecci6n
ocular y auditiva.
•
El operador
apropiada.
,.,_/_
ester vestido con la ropa
• Si las condiciones son polvorientas, el
operador Ileva puesta una mascara.
• La unidad es segura y c6moda en la
espalda del operador.
El brazo derecho estA doblado y la
mano derecha ester agarrando el
mango de control del regulador.
CONSEJOS
Fig.14
UTILES SOBRE LA OPERACION
I
asegOrese de que los tubos de la sopladora
I unidad,
ADVERTENCIA:
Para evitar lesiones personales
de
hacer funcionar la unidad.
en la
SI...
3.
Fig. 12
Antes de operar esta unidad, p_rese
en la posici6n de operaci6n. Verifique
Io siguiente (Fig. 14):
•
Mientras que continQa manteniendo el disparador de la vAIvula reguladora la
posici6n RAPIDA, coloque la palanca de la estrangulaci6n en la Posici6n 3 y
contint_e calentando la unidad para los 60 segundos adicionales (Fig. 10). Se
puede usar la unidad durante este tiempo.
NOTA:
A temperaturas m&s frlas, es posible que el motor tarde m_.s tiempo en
calentarse y alcanzar la velocidad de funcionamiento
maxima.
NOTA:
La unidad se ha calentado debidamente cuando el motor acelera sin fallar.
SI...
hombros
de los
soportes
de la
hombros
1 (Fig. 10).
12.
SI...
Tirar hacia arriba las lengiJetas
inferiores de la hebillas de los
soportes de la hombros para
aflojar los soportes de los
hombros (Fig. 13).
Extraiga la unidad.
Soportes
Correas
de los
para Mezclar el Aceite y el
4.
7.
Coloque el soportes de los
hombro sobre los hombros para
que el motor se basa en la
espalda del operador.
2.
Tire de las correas de hombros
hacia abajo para ajustar los
soportes de los hombros (Fig. 12).
NOTA:
La unidad debe ser iniciado
antes de ponerlo en. Vea las
Instrucciones de arranque y
apagado.
QUlTARSE LA UNIDAD
2.
Mezcle la gasolina con el aceite. Vea las Instrucciones
Combustible.
2.
Llene el tanque de combustible con gasolina nueva, limpia y sin plomo.
NOTA:
No hay necesidad de encender la unidad. El Control de Encendido y Apagado
esta en la posici6n Encendido (I), en todo momento (Fig. 9).
3.
Oprima lentamente y libere la pera del cebador 10 veces. DeberA verse alguna
cantidad de combustible en la pera del cebador (Fig. 10). Si no puede vet
combustible en la pera, oprima y suelte la pera tantas veces como sea necesario
hasta que vea combustible en la misma.
6.
1.
est6n colocados antes
graves o daho a la
• No apunte nunca la unidad en la direcci6n de nadie durante la operaci6n.
• Sostenga siempre la unidad de forma segura durante la operaci6n.
• Se requiere el uso de protecci6n auditiva para reducir el riesgo de p_rdida auditiva
asociada con los niveles de sonido.
• Opere el equipo solamente durante horas razonables--no
muy temprano en las
mahanas ni muy tarde en las noches, cuando la gente se pueda molestar. Acate las
horas detalladas en las ordenanzas locales. La recomendaci6n usual es de 9:00 am
a 5:00 pm, de lunes a s_.bado.
• Para reducir los niveles de ruido, opere las sopladoras motorizadas a la menor
velocidad posible para hacer el trabajo y limite el nOmero total de piezas de equipos
motorizadas que se usen simultAneamente.
• Verifique el estado del equipo antes del funcionamiento,
especialmente
el tubo de
escape, tomas de aire y filtros de aire.
• Use rastrillos y escobas para esparcir los desechos antes de soplarlos.
•
Remoje ligeramente
las superficies
cuando
bajo condiciones
polvorientas.
• Conserve agua mediante el uso de sopladoras motorizadas en vez de usar mangueras
para muchas de las aplicaciones de prados y ajardinado, incluyendo la limpieza de
desechos en _.reas tales como canales, mallas, patios, pardllas, p6rticos y jardines.
• Tenga cuidado con los ni6os, animales dom6sticos, ventanas abiertas y autom6viles
reci6n lavados, y sople los desechos en forma segura.
• Use la extensi6n completa de la boquilla sopladora de manera que el chorro de aire
salga se m_.s cerca del suelo.
•
Limpie despu_s de usar las sopladoras
recipientes para la basura.
•
Use el control de crucero (Fig. 9) para mantener el gatillo oprimido
trabajando para facilitar el funcionamiento
continuo.
PROCEDIMIENTO
DE OPERACION
y otros equipos.
Deposite
los desechos
en
mientras est_
PARA LA SOPLADORA
1
2.
Use la sopladora para _trboles, arbustos, macizos de flores y zonas de limpieza dificil.
Use la unidad alrededor de edificios y para otras limpiezas normales.
3.
Use la sopladora
para paredes, salientes,
cercas y mallas.
19
ADVERTENClA:
Para evitar lesiones
personales graves, nunca realice
manteni-miento ni reparaciones con la unidad funcionando. Realice siempre el
mantenimiento y las reparaciones con la unidad fria. Desconecte el cable de la
bujia de encendido para cerciorarse de que la unidad no arrancarA. Lea Cambio
de la Bujfa de Encendido.
PROGRAMA
DE MANTENIMIENTO
Lleve a cabo estos procedimientos de mantenimiento requeridos con la frecuencia indicada
en la tabla. Estos procedimientos tambi6n deben formar parte de cualquier puesta a punto.
NOTA:
Es posible que algunos procedimientos de mantenimiento requieran herramientas
o habilidades especiales. Si no estA seguro sobre estos procedimientos, Heve la
unidad a un Sears o a otto proveedor de servicio calificado.
NOTA:
Los trabajos de mantenimiento, reemplazo o reparaciSn del sistema y los
dispositivos de control de emisiones debe set realizados por un Sears u
otto proveedor de servicio calificado.
FRECUENClA
MANTENIMIENTO
REQUERIDO
Llene el tanque de combustible con la mezcla
correcta de aceite y combustible
p18
Cada 10 horas
Limpie y vuelva a aceitar el filtro de aire
p 20
Cada 25 horas
Inspeccione la condicion
la bujia de encendido
y la separacion
de
p 21
rrta
3.
Lave el filtro con detergente y
agua (Fig. 17). Enjuague bien el
filtro y dejelo secar.
4.
Aplique suficiente cantidad de
aceite de motor SAE 30 limpio
para revestir ligeramente el filtro
(Fig. 18).
Optima el filtro para esparcir y
eliminar el exceso de aceite
(Fig. 19).
6.
Reemplace el filtro (Fig. 16).
NOTA:
Si se hace funcionar la
unidad sin el filtro de aire,
usted ANUI_AR/_ la garantia.
NOTA:
de ale
Orejeta
Fig,
1
Bastidor
del filtro
15
de aire
Orejeta
Filtro
de aire -//
Fig, 16
t/tt!1 Torni,,o0°
Ajuste del Tornillo de Velocidad Minima
Si despu6s de inspeccionar el
combustible y limpiar el filtro de aire el
motor aQn no funciona en minima,
ajuste el tornillo de velocidad minima
segQn se indica a continuacion.
I!I1//
ajustede
1.
Arranque el motor y d6jelo
funcionar a una minima alta
durante un minuto para que se
caliente.
2.
Mueva el control de crucero
hacia la posici6n LENTO y dejar
que el motor marcha en vacio. Si
Fig, 21
el motor se para, inserte un
destornillador Phillips peque6o en el orificio de la cubierta del motor (Fig. 21).
L
El control de la mezcla de combustible, la limpieza del filtro de aire y el ajuste del tornillo de
marcha en vacio deben resolver la mayoria de los problemas del motor.
en minima
•
El motor fluctOa o se ahoga al acelerarlo
•
Existe una p6rdida de fuerza motriz
Lleve el carburador a ajustar a un Sears o un proveedor de servicio autorizado.
Fig, 17
Fig, 18
20
Los ajustes descuidados pueden daflar su motor seriamente. Los ajustes del
carburador deben set realizados pot un proveedor de servicio autorizado.
Si esto no sucede, y:
• El motor no funciona
Vuelva a instalar la tapa del filtro
de aire. Coloque las ranuras en
el lado izquierdo de la tapa del
filtro de aire sobre las leng0etas
en el lado derecho de la placa
posterior (Figuras 16).
Gire la tapa hacia la derecha
hasta que la leng0eta que esta
en la placa posterior del filtro de
aire caiga en su lugar en la
ranura que esta sobre la tapa del
filtro de aire (Fig. 20).
Fig, 20
DEL CARBURADOR
Inspecci6n del Combustible
Una mezcla incorrecta o vieja de combustible es en general el motivo pot el cual la
unidad no funciona adecuadamente.
Drene y vuelva a Ilenar el tanque con combustible
nuevo y bien mezclado antes de hacer ningQn ajuste. Consulte la Informacidn sobre
Aceite y Combustible.
Ranuras
5.
8.
AJUSTE
Orejeta
La velocidad minima del motor puede ser ajustada. Un tornillo de ajuste de minima esta
entre la cubierta del filtro del aire y la cubierta del motor (Fig. 21).
del fUtro de aire
Limpie y vuelva a aceitar el filtro de
aire per Programa de mantenimiento.
Es importante darle mantenimiento a
este componente. El no dar
mantenimiento al filtro de aire
correctamente puede hacer que
funcione mal o puede da5ar de
i
manera permanente a su motor.
I
1.
Para abra la tapa del filtro de aire,
empuje la lengOeta de cierre en el '
lado derecho de la cubierta hacia
el interior, a continuacion, tire del
tapa del filtro de aire hacia fuera y
hacia la izquierda (Fig. 15).
2.
Quite el filtro de aire (Fig. 16).
7.
_
DEL FILTRO DE
_CeUll:_ilet
AIRE
Limpieza
19
CONSULTE
Antes de arrancar
el motor
MANTENIMIENTO
Fig,
CAMBIO
DE LA BUJIA DE ENCENDIDO
Use una buj[a de encendido Champion
RDJ7J o reemplazo 753-06193. La
separaci6n correcta es de 0,635 mm
(0,025 pulg). Retire la bujfa per
Programa de mantenimiento e
inspeccione su estado.
1.
Apague el motor y espere que se
enfrie.
2.
Desconecte el cable de la bujia
de encendido.
3.
Limpie alrededor de la bujia de
encendido. Saque la bujfa de
encendido de la cabeza del
cilindro girando una Ilave de
casquillo de 16 mm (5/8 de
pulgada) en sentido antihorario.
5.
mm
Fig. 22
I
Vuelva a conectar
Caracteristica
arrancador
ajuste a:
110-120 pulg.olibrae (12,3-13,5
No ajuete demasiado.
6.
0,635
(0.025pulg)
Cambie las bujias que est&n rajadas, sucias o deterioradas. Fije la separaci6n de
aire a 0,635 mm (0,025 pulg.) utilizando un calibrador (Fig. 22).
Instale una bujfa de encendido con la separaci6n correcta en la cabeza del
cilindro. Ajuste girando la Ilave de casquillo 16 mm (5/8 de pulgada) en sentido
horario hasta que est& ajustada sin huelgo.
Si usa una Ilave de torsi6n,
Y
Esta unidad puede arrancarse con un opcional arrancador de potencia electrico o accesorio
arrancador de potencia para taladro (artfculos vendidos per separado). Si decide arrancar la
unidad utilizando uno de estos sistemas de arranque o tiene alguna pregunt_ comunfquese
con el distribuidor Craftsman de su Iocalidad o Ilame al 1-800-4-MY-HOME _-' para m_ts
informaci6n, as[ como la forma de comprarlo. Tambi6n puede ir a www.craftsman.com.
electrodes. El motor podria da_arse si penetran peque_as partfculas en el
I ABVERTENClA:
No limpie con chorro de arena, ni raspe ni limpie los
cilindro.
I ,d_
4.
CARACTERI'STICAS
DEL ARRANCADOR
DE POTENCIA
ELECTRICO
ACCESORIO
ARRANCADOR
DE POTENCIA
PARA TALADRO
Nt_mero
Nora)
del articulo
316.85951 ..................................................................
316.85952 ...................................................................
de
de potencia
Descripci6n
Comienzo enchufable de la energia
Comienzo del pedacito de energia
el cable de la bujia y la cubierta del motor.
LIMPIEZA
ADVERTENCIA: Para evitar graves lesiones personales, apague
I siempre su unidad y espere que se enfrie antes de limpiarlo o realizar
I cuaqu ert po de manten m ento.
I
Use un cepillo pequeRo para limpiar la parte exterior de la unidad. No use detergentes
fuertes. Los limpiadores dom6sticos que contienen aceites aromAticos come pino y
lim6n, y con solventes como el queroseno pueden da_ar el bastidor de plAstico y la
manija. Seque toda la humedad con un paso suave.
ALMACENAMIENTO
•
°
No guarde nunca la unidad con combustible en el tanque donde los vapores
puedan Ilegar a una llama o chispa.
Espere que el motor se enfrie antes de guardar la unidad.
•
Guarde la unidad bajo Ilave para prevenir el use per
personas no autorizadas y su da5o.
°
•
Guarde la unidad en un _trea seca y bien ventilada.
Guarde la unidad fuera del alcance de los niRos.
ALMACENAMIENTO
POR LARGOS PERIODOS
DE TIEMPO
Si planea guardar la unidad durante un largo per[odo de tiempo, siga el siguiente
procedimiento
para su almacenamiento.
1.
Drene todo el combustible del tanque de combustible en un recipiente que
contenga la misma mezcla de combustible de 2 ciclos. No use combustible que
haya permanecido guardado durante m_ts de 30 dfas. Deseche la mezcla vieja de
combustible y aceite de acuerdo alas regulaciones federales, estatales y locales.
2.
Arranque el motor y dejelo funcionar hasta que se ahogue. Esto asegura que
todo el combustible ha sido drenado del carburador.
3.
Espere que el motor se enfr[e. Retire la bujfa de encendido y coloque alrededor
de 30 ml (1 onza) de cualquier aceite para motor de 2 ciclos de buena calidad
dentro del cilindro. Tire de la cuerda de arranque lentamente para esparcir el
aceite. Vuelva a instalar la bujia de encendido.
NOTA:
4.
Saque la bujia de encendido y drene todo el aceite del cilindro antes de
intentar usar el soplador luego de haber estado guardado.
Limpie bien la unidad e inspeccione para ver si existen partes flojas o da_adas.
Repare o cambie las partes daRadas y ajuste los tornillos, tuercas o pernos que
puedan estar flojos. La unidad estA ahora lista para ser guardada.
TRANSPORTE
•
Espere que el motor se enfrie antes de su transporte.
°
Drene el combustible
°
°
Ajuste la tapa del combustible antes del transporte.
Asegure la unidad durante su transporte.
de la unidad antes de transportar
21
CAUSA
El tanque de combustible
El combustible
Parachispas
ACCION
est_ vacio
es viejo o estA mal mezclado
Llene el tanque con combustible
Drene el tanque de combustible
bien mezclado
y agregue la mezcla de combustible
Tomar a un Sears o otto comerciante
obstruido
nuevo
de servicio cualificado
I:lq _vA[e]ll[e]_.!
_[e_I_LIJ_[_][e]_r:l:l_ hVAIl_lhVAp':l
El filtro de aire estgt obstruido
El carburador
no estgl ajustado
Limpie o cambie el filtro de aire
en forma correcta
Ajuste segOn las instrucciones o Ileve la unidad a un Sears o otro proveedor
autoriza para hacer un ajuste de carburador
I:lq _vA[e]ll[e]_.!
_[e_V:Te]:II:I_._:I
El combustible
Parachispas
es viejo o estgl mal mezclado
obstruido
El combustible
Parachispas
es viejo o estA mal mezclado
obstruido
Drene el tanque de combustible
Tomar a un Sears o otto comerciante
Drene el tanque de combustible
nuevo
de servicio cualificado
y agregue la mezcla de combustible
Tomar a un Sears o otto comerciante
NECESITA MAS AYUDA
22
y agregue la mezcla de combustible
de servicio cualificado
nuevo
de servicio
Tipo de motor
................................................................................................................
Enfriado per aire, 2 ciclos
Desplazamiento
..............................................................................................................................
R.RM. de velocidad minima ......................................................................................................
hasta 3.200-4.400
R.RM. de operaci6n ............................................................................................................
MPH ................................................................................................................................
hasta 7.000-7.800 r.p.m.
hasta 150
Pies cQbicos per minuto .....................................................................................................................
hasta 500
Tipo de encendido ........................................................................................................................
Interrupter de encendido ............................................................................................................
Separaci6n
de la bujia de encendido
Lubricacion
.............................................................................................................
Electr6nico
Interruptor oscilante
................................................................................................
0,635 mm (0,025 pulg)
Mezcla de combustible
Proporci6n de combustible - aceite ................................................................................................................
Carburador .................................................................................................................
Arranque
Diafragma,
...................................................................................................
Spring Assist Starting
Silenciador
Regulador
................................................................................................................
.................................................................................................................
Capacidad
del tanque de combustible
27 cc
r.p.m.
TM
y aceite
40:1
multiposicional
Bobinado
autom_ttico
Amortiguado con protecci6n
Retorno manual del resorte
...................................................................................................
Toda las especificaciones
contenidas en este manual se basan en la informaci6n
hacer cambios en cualquier momento sin aviso previo.
CONVENIO
591 ml (20 onzas)
mAs reciente disponible
DE PROTECCION
en el momento de impresi6n
del manual. Nos reservamos
el derecho de
DE REPARACION
Felicidades per haber realizado una compra inteligente. Su nuevo producto Craftsman@ est_ disefiado y fabricado para ofrecerle aries de funcionamiento
confiable. Pero como
todos los productos, es posible que sea necesario repararlo de vez en cuando. Ah[ es cuando tenet un Convenio de Protecci6n de Reparaci6n puede ahorrarle dinero y problemas.
Esto ee Io que incluye el Convenio de Protecci6n
de Reparaci6n*:
Servicio experto de nuestros 10,000 especialistas
Servicio
ilimitado
y sin costo
alguno
profesionales
en reparaciones
per piezas y mano de obra en todas las reparaciones
cubiertas
Reemplazo del producto
per un valor de hasta $1500 si el producto cubierto no se puede reparar
Deecuento de110% en el precio regular del servicio, as[ como de las piezas instaladas, que el convenio no cubra; igualmente, 10% de descuento en el precio regular de
comprobaci6n
de mantenimiento preventive
Ayuda rapida por tel_fono - la Ilamamos Soluci6n RApida - asistencia t6cnica per tel6fono de un representante de Sears. Piense en nosotros como si fu6ramos un "manual
del usuario que habla".
Una vez que adquiera el Convenio de Protecci6n de Reparaci6n, todo Io que necesita es hacer una simple Ilamada para programar el servicio de reparaci6n. Puede Ilamar a
cualquier hora del dia o de la noche, o hacer una cita de servicio per Internet.
El Convenio de Protecci6n de Reparaci6n es una compra libre de riesgo. Si usted cancela pot cualquier motivo durante el periodo de garantia del producto, proporcionaremos
reembolso complete. O, un reembolso prorrateado en cualquier momento despu6s de que venza el periodo de garantia del producto, iAdquiera hoy mismo su Convenio de
Protecci6n de Reparaci6n!
un
Aplican algunas limitaciones y exclusiones. Para obtener precios e informaci6n adicional en los Estados Unidos, Ilarne al 1-800-827-6655.
*La cobertura en Canad& varia en algunos articulos. Para obtener todos los detallee, Ilarne a Sears en Canad& al 1-800-361-6665.
Servicio de Instalaci6n
Para la instalaci6n de electrodom6sticos,
Canad_t, Ilame al 1-800-4-MY-HOME®.
abridores
de puertas de garaje, calentadores
Sears
de agua, y otros productos
para el hogar pot profesionales
de Sears, en los Estados
Unidos o
23
24
REPLACEMENT
PARTS - MODEL 316.794000
2-CYCLE GAS BACKPACK BLOWER
Item
Item
Part No.
753-06418
753-06419
Description
Muffler Assembly
Muffler Gasket
753-06441
753-06193
Shortblock Assembly
Spark Plug
7
753-06184
753-06189
753-06253
Insulator O-Ring
Insulator Assembly
Carburetor Gasket
8
9
753-06442
791-181757
Carburetor
Air Filter
1
2
3
4
5
6
(includes 2)
(includes 4 & 11-17)
(includes 5)
Assembly
(includes 7)
Part No.
10
753-05725
Description
Aircleaner Assembly
11
12
753-06443
753-05703
Module Assembly
Screw
13
753-06440
Cylinder Gasket
14
15
753-05705
753-05706
Flywheel Adapter
Washer
16
753-05707
Bushing
17
18
753-06246
753-06091
Flywheel Assembly
Pawl Assembly
19
753-06104
Electric Start Adapter
(includes 9)
25
REPLACEMENT
PARTS - MODEL 316.794000
2-CYCLE GAS BACKPACK BLOWER
Item
1
Part No.
753-06000
Description
Nozzle
2
753-05971
Lower Blower Tube
3
4
753-05975
753-05991
Throttle Grip Assembly
Upper Blower Tube
5
6
753-05640
753-05641
Clamp
Flex Tube
7
753-05990
8
9
753-05645
753-05643
10
11
12
13
26
Item
Part No.
14
753-05649
Description
Intake Cover
15
16
791-181345
791-180050
Screw
Nut
17
791-181862
Screw
18
19
753-06448
791-182414
Impeller Housing Assembly (includes
Bolt
Elbow
20
753-04482
Impeller Hardware (includes 19)
Harness
Lead Wire
21
22
753-05651
753-05654
Impeller (includes 19 & 20)
Fuel Tank Assembly (includes 23)
753-06434
Throttle Cable
23
791-182529
Fuel Cap
753-05647
791-182678
Nut
Washer
24
25
753-06455
753-06344
753-05648
Insulator Mount
26
27
753-06001
753-06436
Housing Assembly
Grip
Flare Nozzle
Starter Assembly
(includes 15)
(includes 17)
13-17)
27
Your Home
product manuals and expert advice:
For troubleshooting,
managemylife
www.managemylife.com
For repair - in your home - of all major brand appliances,
lawn and garden equipment, or heating and cooling systems,
no matter who made it, no matter who sold it!
For the replacement parts, accessories and
owner's manuals that you need to do-it-yourself.
For Sears professional installation of home appliances
and items like garage door openers and water heaters.
1-800-4-MY-HOME
Call anytime,
®
(1-800-469-4663)
day or night (U.S.A. and Canada)
www.sears.com
www.sears.ca
Our Home
For repair of carry-in items like vacuums, lawn equipment,
and electronics, call anytime for the location of your nearest
Sears Parts & Repair Service
1-800-488-1222
(U.S.A.)
www.sears.oom
To purchase
a protection
1-800-827-6655
agreement
(U.S.A.)
Para pedir servicio de reparaci6n
a domicilio, y para ordenar piezas:
1-888-SU-HOGAR
(1-888-784-6427)
www.sears.com
®
Center
1-800-469-4663
(Canada)
www.sears.oa
on a product serviced
by Sears:
1-800-361-6665
(Canada)
Au Canada pour service
en fran(_ais:
1-800-LE-FOYER
(1-800-533-6937
www.sears.ca
® Registered Trademark / TMTrademark of KCD liD,LLC in the United States, or Sears Brands, LLC in other countries
® Marca Registrada / TMMarca de F_brica de KCD IP, LLC en Estados Unidos, o Sears Brands, LLC in otros paises
MO
Marque de commerce / MD Marque depos6e de Sears Brands, LLC
M°