1
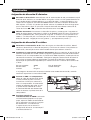
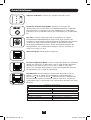
Digital Load Meter
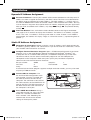
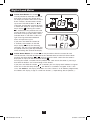
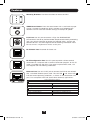
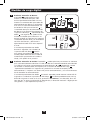
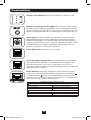
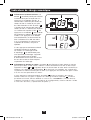
1 Select Bank Button: This button A
can be pressed to show total current for
each bank. Pressing this button once
will display the total current for all of the
Bank 1 outlets, located nearest to the
input cord. The LED for Bank 1 D will
illuminate and the total current for Bank
1 outlets will display in amps in the LED
Amps display C . Pressing this button A a second time will produce the same
results for Bank 2. Pressing the button a
third time will display total PDU current
and both Bank 1 and Bank 2 LEDs will
light. Pressing the button additional
times will repeat the cycle.
C
D
E
B
A
UP
If you press and hold this button for
4 seconds, the numbers in the LED
Amps display C will flip for mounting
versatility. The unit can be mounted with
the power cord facing the top or bottom
while still being able to read the display.
DOWN
2 Select Outlet Button: This button B can be pressed to show the current for each
individual outlet. The LED located next to the selected outlet and the LED for the Bank
to which the outlet belongs ( D or E ) will flash when the total current for that outlet is
displayed (in amps) on the Load Meter Display C .
Pressing this button a second time will produce the same results for outlet 2, pressing a
third time for outlet 3 and so on through all the outlets.
If you press and hold this button B for 4 seconds you can display the IP Address assigned
to the unit in the LED Amps display C . The default is no address assigned. If this is the
case, “no address” will display, one letter at a time. If there is an IP Address programmed,
the address will display 1 digit at a time with dashes (-) representing dots or periods (.).
8
201207109-93-3161.indb 8
8/14/2012 2:03:49 PM