1
< :
?.~~:
.-.
,,
;,..,>.
”
L
L.,.
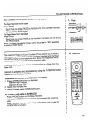
CORDLESS/CORDED
TELEPHONE SYSTEM
WITH 10 CHANNEL AU ‘OSCA V,
10 NUMBER MEMORY
PAGE, and INTERCOM
MODEL 2=9638
-*
-
-
-
-
-
-
-
—
—
—
—
——
—
—
——
-—
—
—
-
—
——
~—
——
—9
—*
-
—
.
—
—
-
.
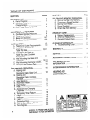
TABLE
OF CONTENTS
PAGE
SECTION
D. Pause Function ...........................
E. Chain Dial from Memory .............
21
21
22
22
22
22
5
5
5
6-7
8-9
PRODUCT CARE .........*........................
A. Batte~ Replacement...................
8. Antenna Replacement.................
C. General Product Care .................
23
23
24
24
10
IN CASE OF DIFFICULT .....................
A. Troubleshooting Chart .................
2
2
WARRAN~ .........................................
2
SERVICE ..............................................
2
ACCESSORY ORDER FORM .............
27-2
FCC REG1STRATION
1NFORMATION. ...................................
2
INTERFERENCE 1NFORMATION.......
2
HEARING AID
COMPATIBILIW .................................*
2
3
3
INTRODUCTION ...................................
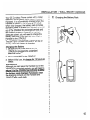
A. Parts Checklist ............................
B. Cordless Telephone
Characteristics .............................
C. Anti-Piracy Security System ........
4
4
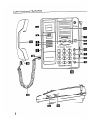
CONTROLS and FEATURES ...............
A. Cordless Handset Features.........
B. Telephone Features.....................
C. Base Unit Controls .......................
D. Cordless Handset Controls .........
.lNSTALUTIQN .....................................
A. Telephone Outlet Requirements..
1u
B. Installation for Desk or
Table Top Use .............................. 10-11
c. Installation for Desk or
Table Top Use (Cordless
11
Telephone).........................*.........
D. Wall Mounting the Base Unit
3n4n
(optional) ...................................*. lz-la
14
E. Wall Mounting Recharge Cradle..
15
F. Charging the ‘Battery Pack ..........
TELEPHONE
OPERATION
Iu
...................
A. Makinq and
Recei~ng Calls: Base Unit ..........
Making
and
B.
Receiving Calls: Cordless
Handset ...................................*”.”
Auto
Stand-by ...**...*.....................
c
D Automatic Redial .........................
E Fast Redial ..................................
F. Hold ..............*....**.............**.*...*.*”
G Autoscan and Changing
Channels ......**..*.............$..*....**””
H. Temporary Tone Feature .............
1. Page ......*.*..........................-””. -..*
J. Intercom .....................................”
...*..*”
K. Flash ......*..........................0.=
.
..........................
L. Distinctive Ring
M. HOW to Save Batte~ Power.........
N. Tone Signals .........*... .....*............
●
●
●
●
2
PAG
SECTION
16
TELEPHONE MEMORY OPERATION..
A. Store a Number into Memory ......
B. Changing a Stored Number .........
C. Storing from Redial .....................
16
17
17
17
17
18
18
19
19
20
20
20
20
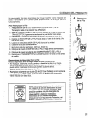
WARNING: TO PREVN
HRE OR ELECTRICAL SHOCK H~RD,
00 NOT =pOSE
~lS PROOU~ TO RAIN OR MOl~RE
A
UGHTNING
THE
-H
AND ARROW”
Hmg WmlN THE
TRIANGLE IS
~
SIGN
WARNING
A~NG
YOU of
■oANGEROU$
INSIDE
VOLTAG~
WE PROOU~.
—
A
p&q
CAUTION: TO REDUCE THE
RISK OF ELECTRIC SHOCK,
DO NOT REMOVE COVER
(OR BACK). NO USERSERVICEABLE PARTS lNSIDE. REFER SERVICING
TO OUALIFIED SERVICE
PERSONNEL.
THE EXCLAMA
POINT WITHIN
I
TRIANGLE
WARNING
ALERTING you
IMPORTANT
INSTRUCTION
ACCOMPANYI
THE
—PRODUC
1
SEEMARKINGON BO~OM/ BACK OF PfiOOUCT
INTRODUCTION
Thank you for purchasing a GE Communications Product. Your new telephone is a carefu[lY
high-quality, durable product with natural sound quality, modern features and
styling. It is designed to give YOU the quali~ and COflVemenC~ YOU expect in a telephone.
engineered,
To familiarize yourself with all the features Of YOUr telePhoflet
instructions carefully. Retain this Guide for future reference.
elegant
please read the followina
FCC NUMBER IS LOCATED ON THE BO~OM OF THE BASE
REN NUMBER IS LOCATED ON THE BOnOM OF BASE
OTHER IMPORTANT INFORMATION ON PAGE 29 OF THIS GUIDE
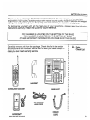
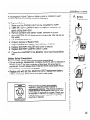
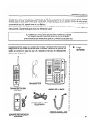
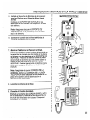
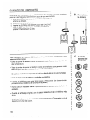
Carefully remove unit from the package. Check this list to be certain
all components are included. Remember to save your sales receipt in
case you ever need warranty semice.
lb
●
Check List
●
E
-
—C*
HANDSET
CORDLESS HANDSET
1
II
BASE UNIT
,
TELEPHONE
LINE CORD
ANYROOMm
RECHARGE CRADLE
COILED
CORD
3
INTRODUCTION
●
s
●
B.
●
●
●
●
Cordless
Telephone
Character-
istics
●
●
●
in vour home.
s
●
●
“Full Power means that your telephone is designed to operate at
the maimum power allowed by the Federal Communications
Commission (FCC).
●
The range at which you can use the cordless Handset away from
the Base is dependent upon many factors. The telephone Base is
like a radio transmitter in that it transmits telephone line signals via
radio waves to the Handset. Therefore, the location of the Base is
important in order to obtain maximum Handset range for the power
allowed.
●
●
●
●
●
●
●
●
●
●
●
●
●
c
●
●
●
In some areas, installing the Base on the second floor will provide
greater range than a ground floor installation. Reception can be
adversely affected by such things as aluminum siding, appliances
(refrigerators, stove, etc. ) insulation foii batting, heating ducts and
other metal construction which acts to shield radio signals.
●
●
●
●
●
●
●
●
●
●
Atmosphere conditions also play an irnpotiant role in the
performance of your cordless telephone.
●
●
●
●
●
Alwavs keep the Base antenna raised.
●
●
9
Above all, keep within the ranae of the Base.
Whenever you place the cordless handset on the Anyroomm recharge
cradle, the unit automatically seleds a securiu code. This code helps
to avoid unauthorized use of your telephone line by another cordless
telephone in your area.
Note: Whenever a power outage occurs, or batteries are replaced,
the HANDSH
may have to be returned to the recharge cradle to
reset Security code.
●
●
~
.
●
Anti-Pirac
Security
System
●
●
●
●
●
●
●
●
●
●
●
●
●
●
●
●
●
●
●
●
●
●
●
●
4
C.
CONTROLS
FEATURES
and
●
C~stal Clear Soundm - With compandor extends the effective
range of your cordless telephone and virtually eliminates static and
interference.
10 Channel Scan- Automatically selects a channel that is likely to
be clear.
g
●
●
●
●
●
●
2-Way Page and Intercom: Use your telephone as an intercom or
paging system.
Digitai Security System-Prevents unauthorized communication
from other cordless telephones.
●
●
●
●
●
●
Answer
Tempora~ Tone-Allows pulse (rotary) service users to easily
access tone services.
Fast Redial - Just push redial while on-line to redial a number.
Ringer OtiOff - Ringer Off is also a battery save switch.
Distinctive Ring
Display Lights - For phone, intercom and charge.
Flash to Activate Custom calling services.
High Performance Flexible Handset Antenna
Memory Log
Hearing Aid Compatible
Consumer Replaceable Battery and Antenna
Cordless
Handset
Features
●
●
Convenient Push Button Channel Advance
10 Number Memory - For frequently called numbers.
Auto
A.
●
●
●
●
●
●
●
●
●
●
●
●
●
s
●
●
●
●
●
●
●
10 Number Memory for frequently called numbers.
2-Way Page and Intercom: Use your telephone as an intercom or
paging system.
s
●
●
B.
.
Telephone
Features
High Petiormance Base Antenna
True Electronic Hold
ToneWulse Switch for use with touch tone or pulse diaiing semices.
Temporary Tone allows pulse (rotary) service users to easily
access tone services.
FIash to activate custom calling semices.
Electronic Memory Back-Up - Saves stored memory numbers
duting power interruptions without batteries.
Ringer HiLo/Off
Fast Redial - just push redial while on-line to redia[ a number.
Display Lights for Line-in-use, Intercom, Hold
Memory Log
Desk or Wall Mount
FCC Registered
UL Listed
On*Year
Limited Warranty
5
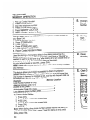
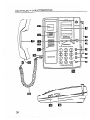
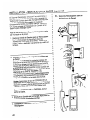
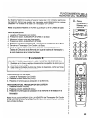
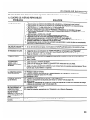
CONTROLS and FEATURES
■
m
\
\7
-\
.
m
A
6
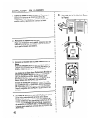
CONTROLS
1. HANDSET HOOK S WITCH
C.
2. HANDSET HOOK- Adjustable hook holds Handset to the Base
unit when wall mounted.
3. LINE-IN-USE LIGHT4. INTERCOM LIGHT-
and FEATURES
8ase Unit
Controls
Lights when the telephone line is in use.
When lit, Intercom is “ON”.
5* SPEAKER
6. MEMORY LOG - Listing space for names/number in phone
Memory.
7. HIGH PERFORMANCE BASE ANTENNA
8. PAGWFIND BUTON
9. STORE BU~ON
- Pages handset.
- Stores phone number in a memo~ location.
Used when dialing a number stored in a
10. D/AL BU~ONmemory location.
11. FLASH BU~ON - Activates custom calling sewices of your
local telephone company such as call transferor call waiting.
12. REDIAL BU~ON-
Redials the last number called. Use for
normal or fast redial.
13. HOLD BU~ON-
Puts calling party on “HOLD”.
14. LIGHT f~r HOLD FUNCTION
SWITCH- Sets the dialing mode for either Tone
or Pulse (for rotary sewice).
15. PULS~ONE
16. RINGER HKOIOFF
SWITCH-Adjusts
the volume of the Ringer
(Hi, LO, or OFF).
17. HANDSET-
Contains transmitter and receiver for phone
conversation.
18. BASE JACK-
Jack for Coiled Cord.
19. HANDSET JACK- Jack for Coiled Cord.
20. COILED CORD
7
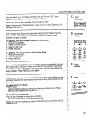
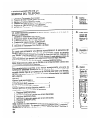
CONTROLS and FEATURES
I
8
CONTROLS and FEATURES
●
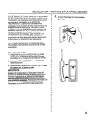
21. PHONE ON/OFF BUnON
J
D.
Cordless
●
22. CHANNEL SELECT BU~ON
- Selects Channel of operation for
Handset and Base unit.
●
●
●
Handset
Controls
23. FLASH BU~ON
24. RINGER ON/OFF S W!TCH - (Batte~ Save)
Used when dialing a number stored in a
25. DIAL BU~ON-
Merno~ Location.
- Redials the last number called. Use for
normal or fast Redial.
26. REDIAL BU~ON
27. PHONWINTERCOM
LIGHT
28. INTERCOM BU~ON
29. PAGE BU~ON
- Pages Base
30. HIGH PERFORMANCE HANDSET ANTENNA
31 MEMORY LOG
●
32. BA~ERY
CHARGE LIGHT
33. BA~ERY
COMPARTMENT
34. CHARGING CONTACTS
35. HANDSET HOOK
●
36. AC LINE CORD - Plugs into AC outlet.
●
37. ANYROOW
●
Recharge Cradle.
●
●
●
●
●
●
●
●
●
●
●
●
●
●
●
●
●
●
●
●
●
●
●
●
●
●
●
●
●
●
●
9
INSTALLATION – DESK Or TABLE TOP
A modular (Universal Service Order Code)
USOC:
RJI 1C outlet jack (illustrated)
is
required.
Installation of this telephone in locations with 4prong jacks or with hard-wired outlets will
require additional Converters (not included).
The dealer from whom you purchased your
phone or a telephone supply store can advise
you regarding the proper Converter.
1. Plug TELEPHONE STRAIGHT CORD into
Modular (RJI 1C) wall jack, and into bottom
of unit.
A.
:
Telephone Outje
Requiremc ---
●
●
●
s
●
●
●
●
t
●
●
c
““’---v
●
●
y
A
8
B.
:
Installation
for Desk or Table
Top Use
:
●
●
●
●
Note: Mounting bracket must be removed
from the back of the telephone base to
correctly route the telephone line cord.
(See page 12 for instructions on how to
remove the mounting bracket.)
●
●
●
s
●
●
●
●
●
●
●
2. Plug the POWER SUPPLY into an electrical outlet
which cannot be switched off. Do not use an
outlet that can be turned on and off by a wall
switch.
s●
●
●
lo-
●
●
n
●
●
●
3. Raise ANTENNA on BASE.
●
●
●
●
●
●
●
●
●
10
INSTALLATION
- DESK or TABLE TOP
●
4. Set TONHPULSE Switch on the Base to the
position compatible with your telephone
semice. (If you’re not sure, check with your
local telephone company.)
s
●
●
●
●
●
●
a
5. Set the RINGER Switch:
HI= Sound will be loudest
LO= Sound will be lower
OFF= Telephone will not ring
●
●
●
●
●
●
6. Co flnect the Coiled Cord.
Plug one end of the coiled cord to the
handset and plug the other into the handset
jack. Place the handset into the base.
●
●
●
s
●
●
●
●
●
●
●
●
●
●
●
●
●
●
1.
PIUQthe AC POWER CORD into a standard
;
Instillation for Desk or Table
Top Use (Cordless Telephone)
n
2. Place HANDS=in
recharge Cradle.
Note: Before initial use, let charge for 12
hours or more.
●
●
●
I
.
●
●
●
●
c
●
●
●
●
●
●
●
●
●
11
INSTALLATION - WALL MOUNT (optional)
●
●
1. Reverse the Handset Hook
Firmly slide the HANDSET HOOK out of the
BASE. Rotate it one-half turn and slide it
back into the BASE.
D.
●
b
●
●
●
●
●
●
2. Remove the Mounting Bracket
For wall mount installations, press in the WO
tabs and Pull the MOUNTiNG BRACKET
from the back of the telephone.
3. Connect the Telephone Line Cord to Base
Plug either end of the TELEPHONE LINE
CORD into the pHON~ LINE JACK on the
bottom of the telephone.
The Base unit has a Cord Wrap for storage
of excess straight line telephone cord and
AC POWER CORD. This Cord Wrap is
located on the bottom of the Base under the
MOUNTING BRACKET.
●
s
●
●
●
●
‘
●
●
●
●
●
●
J
●
●
:
c
4
●
●
Wrap excess telephone and AC POWER
CORD around pegs as shown in illustration.
Leave 3 inches of TELEPHONE CORD
unwrapped.
:
●
●
●
●
●
●
●
●
4. Reverse the MOUNTING BRACKfl
so the
deepest part is at the bottom of the Base. Place
modular plug and the 3 inches of the straight
telephone line cord through the opening in the
center of the MOUNTING 8RACKH Be sure
to feed the AC POWER CORD through the slot
on the bottom of the MOUNTING BRACKET
:
●
:
●
:
●
●
●
●
●
.
12
●
Wall Mounting the Base Unit
INSTALLATION
- WALL MOUNT (optional)
5. install the Mounting Bracket so that the
Wall Mount Arrows Face U~ward
Snap the MOUNTING BRACKET into the
lower set of tab openings in the base of the
telephone.
●
●
●
●
Note: Make sure MOUNTING BRACKET is
positioned as shown to the right.
●
6. Connect the telephone line cord to
telephone wall jack
7. Mount the Telephone to the Wall Plate
Position the telephone against the wall jack
plate so that pins of the plate align with key
hole slots on the MOUNTING BRACKET.
Press the telephone against the jack plate so
that pins pass through key hole slots in the
MOUNTING BRACK~. Gently guide the
telephone downward to secure the telephone
to the jack plate.
s
.
●
:
●
●
●
s
●
●
●
Note: Be certain that the AC POWER CORD
and the TELEPHONE LINE CORD stay clear
of the pins of the wall plate and the keyhole
slots on the MOUNTING BRACK~
:
●
●
●
●
●
●
●
●
8. Raise the Base Antenna.
●
●
●
9* Cdnnect the Called Card.
Plug one end of the COILED CORD to the
han~set and plug the other into the handset
jack. Place the handset into the base.
●
●
●
m
U*
●
●
●
●
●
●
●
.
●
●
●
●
13
INSTALLATION - WALL MOUNT (optional)
●
E.
The AnyroomT” Recharge Cradle provides you
with maximum flexibility in using and recharging
your GE Cordless Phone. All you need to do is
to plug the Recharge Cradle into any AC outlet.
Then, You can place the Cordless Handset into
it to recharge the battery.
:
For convenience, the Recharge Cradle can be
mounted on a wall.
:
:
.
:
.
c
●
●
●
●
●
●
1. Reverse the Handset Hook
Firmly slide the HANDS= HOOK out of the
cradle. Rotate it one-half turn and slide it
back into the cradle.
●
●
●
●
●
●
●
●
●
●
●
●
●
●
2. Mount the Recharge Cradle to the Waii
Plate
Position the CRADLE against the wall jack
plate so that pins of the plate align with key
hole slots on the BACK OF CRADLE. Press
the CRADLE against the jack plate so that
the pins pass through key hole slots in the
BACK OF CRADLE. Gently guide the
CRADLE downward to secure the telephone
to the jack plate.
●
●
●
●
●
●
●
Q
●
●
●
●
●
●
●
●
●
Notes: Be certain that the AC POWEH
●
CORD stays clear of the pins on the wall
plate and the keyhole slots on the BACK OF
●
CRADLE.
●
●
●
●
●
●
Route AC POWER CORD as illustrated.
●
●
●
●
●
●
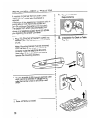
3. Plug the AC Power Cord into a standard
ho;sehold outfet.
●
●
●
●
●
4. Place HANDSET in Recharge Cradle.
●
●
●
●
●
●
●
14
Wa[[ Mounting Recharge
INSTALLATION
- WALL
MOUNT
(optional)
F. Charging the Battery pack
Your GE Cordless Phone comes with a nickel
cadmium rechargeable battery pack (located in
Handset). It is automatically charged when the
Handset is placed in the charging CRADLE.
When fully charged, the battery pack provides
sufficient power to enable the Handset to be left
. out of the CRADLE for prolonged periods and
still function properly. However, to maintain
adequate power, you will need to charge the
battery pack every few days by returning the
Handset to the CRADLE.
The 8A~ERY CONDITION LIGHT will be on
steady when the battery is charging.
1.
B;su;e
the AC LINE CORD on the
CRADLE is plugged into a standard
electrical outlet.
2. Place HANDSflin
the CRADLE.
3. Before initial use, let charae for 12 hours or
more.
IMPORTANT:
Although you can leave the Handset out of the
CRADLEfor etiended periods, you will need to
return it to the CRADLE neriodicallv to keep
~
the
atte
perjodicai[y clean
the charging contacts on the Handset and
CRADLE with a soti cloth.
●
15
TELEPHONE
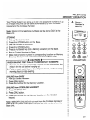
OPERATION
●
To Make a Cali at Base Unit
1. Pick-up HANDSET
(Line-in-Use Indicator Lights)
2. ~aii for DiAL TONE.
3. DIAL phone number.
4. When finished, Hang-up.
s
A.
Makinq a
Receifing
Calls: Bas
Unit
B,
Making an
Receiving
Calls:
●
●
●
●
●
●
●
●
●
●
●
To Receive a Call at Base Unit
1. Pick-up HANDSET
(Line-in-Use Indicator Lights)
2. When finished, Hang-up.
●
●
●
●
●
●
●
●
When the HANDSET
is in the CRADLE
To Receive a Call
—
1. When phone rings, lift the HANDSET. The phone in use light will
be “ON” and you can talk (AUTO ANSWER FEATURE)
2. If vou Dress the PHONE bution by accident within 2-3 seconds of
Iifing ~heHANDSETout of the cradle, the phone will ignore your
command.
3. If the call is first answered on an extension phone and you wait 10
seconds after the last ring to lift the cordless HANDSET, you will
have to press the PHONE button to talk.
●
●
●
●
●
a
●
●
●
●
●
●
●
●
To Make a Call
1. Pick-up HANDSET
2. Press PHONE button. (phone light will be “ON”)
3. Wait for dial tone.
4. Dial telephone number.
When finished, press PHONE button to Hang-up.
●
●
●
●
●
●
●
●
●
●
●
●
When the HANDSET is out of the CRADLE
To Receive a Call
1. Pick-uo HANDSET
2. Press ‘PHONE button. (phone light will be “ON”)
3, When finished, press PHONE button to Hang-up.
To Make a Call
1. Pick-up HANDSET
2. Press PHONE button. (phone light will be “ON”)
3. Wait for dial tone.
4. Dial telephone number.
5. When finished, press PHONE button to Hang-up.
16
Cordless
Handset
*
*
[0
●
●
●*O
TELEPHONE
You can leave your Cordless Handset with the Phone “ON”, then
place it in the Base. It will automatically Hang-up.
z
OPERATION
C.
Auto
●
Stand-by
●
●
When You
pick up the Handset, the unit will be “ON”.
.
Note: Pressing the PHONE button, when unit is in Auto Stand-by will
Hang-up the phone.
●
IN-
~
~m
m
-
~
Automatic
s
●
●
-41
“~
I
●
The Handset and Base have separate Last Number Redial memory.
The number will remain in each phone’s RED/AL memo~ untii
another number is diaied.
D.
Redial
●
●
●
●
To REDIAL the last number tailed at the Handset
1. Pick-up HANDS~
2. Press PHONE button.
3. Wait for dial tone.
4. Press RED/AL.
●
●
●
●
●
●
●
●
●
To REDIAL the last number called at the Base
1. Pick-up HANDS~
2. Wait for dial tone.
3. Press REDIAL.
●
●
●
●
●
●
●
●
If you want to keep dialing a busy number in rapid succession you can
do so with FAST REDIAL. When you hear the busy signal, just press
the REDIAL button. The phone wili go off iine, on iine, then redial the
busy number. Press REDIAL to try again.
Enables you to interrupt a conversation temporarily at the Base phone
and iater resume the conversation from this or any other phone on the
same line.
To place paw on HOLD
Press HOLD.
HOLD indicator lights to remind you that your phone is on HOLD
and IN USE indicator will remain on.
To continue conversation
Pick up any Handset on same iine and taik.
The HOLD indicator on the Base will go off.
Note: You cannot receive any calls on this phone line whiie the HOLD
indicator is iit.
:
E.
Fast
Redial
s
F.
Hold
s
●
:
.-.
-s.
ma
●
:
●
●
@
@
6=
rAL cmRm
&Cordlos8
mus +
TOlevhOn~
●
:~
●
●
●
●
●
●
17
TELEPHONE
OPERATION
●
4
G
●
Your Cordless Phone System will automatically scan the 10 channels
and select the channel most likely to be clear. This is done every time
you use your phone, though sometimes intederence may persist on
the chosen channel. If this should happen, you have the option of
manually selecting a channel.
■
●
●
●
●
Autoscan a
Changing
Channels
●
●
●
●
●
Your Cordless Phone allows you to change channels during a
conversation should you experience static and/or noise.
To change channels
Press and Release CHANNEL button on Cordless Handset.
Unit will advance to next Channel.
Note: Phone must be “ON” to change the channels.
c
II
-
●
●
●
●
●
●
●
●
●
●
●
●
●
●
if you have PULSE (rotary) service, you can still access those special
services (such as electronic banking, calling cards, telephone
answering equipment, etc.) which require tone signals for operation.
zm
●
●
●
●
●
●
●
●
●
●
●
When finished, hang-up. The phone will automatically return to
PULSE (rotary) service.
●
●
●
●
●
Note: The TEMPORARY TONE feature is only for use by those who
have PULSE (rota~) service. If you have Touch-Tone se~ice, you do
not need to use the TEMPORARY TONE feature.
●
●
●
●
●
●
●
●
●
●
●
●
●
●
●
●
●
●
●
●
●
●
●
●
18
●
Temporaw
Feature
●
●
Dial the local access number in the normal way. Then, press the “*”
key on either the Base or Handset to activate TEMPORARY TONE.
Your phone will then generate the required tone signals as you dial
the numbers or symbols needed to complete your call.
H.
Tone
●
TELEPHONE
OPERATION
●
●
●
Your Cordless Phone System allows No-way paging.
1.
●
●
Page
●
To Page Handset from Base
Press PAGE
Each time you press PAGE at the Base unit, the Cordless Handset
will sound the PAGE signal.
To Page Base from Handset
Press PAGE
Each time you press PAGE at the Handset, the Base unit will sound
the PAGE signal.
Note: Cordless Handse~s Ringer switch must be in “ON” position
to receive PAGE signal.
●
m
:
●
I
●
●
●
●
s
●
●
●
●
●
●
●
●
●
●
●
J.
●
The Intercom Feature of your Cordless Phone allows you to have a
two-way conversation between the Cordless Handset and the Base
Unit without wing up the teieohone iine. Since the teiephone iine is
not being used, you can Stiii ;eceive incoming tails.
●
intercom
●
●
●
●
—
●
●
●
This feature is handy as a means of responding to a Page from the
Base unit.
●
●
●
●
●
Intercom is activated and deactivated by using the INTERCOM button
located on the Cordless Handset.
●
●
●
●
●
To activate lNTERCOM at CORDLESS HANDSET
1. Press INTERCOM bution on Handset.
Intercom light flashes.
Intercom is now “ON:
2. Speak into Handset Mic.
3* When finished press INTERCOM button.
10 answer a call while in INTERCOM
Press PHONE button on Cordless Handset.
This ends INTERCOM conversation and answers the incoming
tails.
Note: Handset must be within range of the Base unit in order for
INTERCOM to function.
●
●
●
@
●
●
●
●
●
●
●
●
\
“a”
19
TELEPHONE
OPERATION
●
This button is used to activate customer calling semices available
through your local phone company, such as Call Transfer and Call
Waiting, etc. These services generally require an extra monthly fee. If
you subscribe to any of these services, please refer to the phone
company’s instructions on how to use Flash.
z
●
K.
Flash
L.
Distinctive
Ring”
●
●
●
●
●
●
●
Notes: Do not use the PHONE button to try to access calling services
because you will hang-up the phone.
Do not use the FLASH button to hang-up phone.
●
●
●
●
●
b
The Base Unit and the Cordless Handset are capable of receiving the
distinctive ringing patterns generated through your local telephone
company as a special sewice. This custom calling service is available
only through your local telephone company.
The Cordless Handset has the ability to save battery power when in
or out of the Base Unit.
g
●
:
●
●
●
M.
:
●
●
●
To reduce battery usage, slide the RINGER switch to the “OFF
position. However, the Handset will not ring when there is an incoming
call. This battery saving feature is most convenient when another
efiension phone is within hearing distance.
~OW~O
Save
Batiey
Power
●
●
;
:
\
;~:
●
9
N.
:
CORDLESS HANDSET
A long warbling tone with RINGER
‘ON”:
-Signals an incoming call.
3 short beeps with RINGER ‘ON”:
-A PAGE signal.
●
●
●
●
●
●
●
BASE
3 warbling tones:
–A PAGE signal
●
“e
●
●
✎☛
●
●
●
●
●
●
●
●
●
●
●
20
Tone
Signals
TELEPHONE
MEMORY OPERATION
●
●
Your Phone System can store up to ten (10) telephone numbers of up
to 24 digits long that can be dialed automatically by both the Base
Keypad and the Cordless Handset.
●
●
A.
Store a
Number in
Memov
●
●
●
●
Note: Storing of the telephone numbers can be done ONLY at the
Base unit.
●
●
●
●
●
STORING
1. Pick up Corded Handset.
2. Press the STORE button on the Base.
3. Dial the number to be stored.
4. Press the STORE button.
5. Press a numbered key (0-9... Memory Location) on the Base.
6. Return Corded Handset to Base.
7. Make note of stored number in corresponding location on Memory
Directory Card (on back of handset and front of Base Unit).
●
●
●
●
NUMBER
MEMORY
●
●
●
●
●
●
●
●
●
●
●
●
●
—>
CAUTION ~
WHEN MAKING TEST CALLS TO EMERGENCY NUMBERS:
1. Remain on the line and briefly explain to the dispatcher the
reason for the call before hanging up.
2. Perform such activities in the off-peak hours, such as early
morning hours or late evening.
10
●
●
CRYWAL C~Rm
CatdmdiCardtoss
PLUS +
Te!ephano
●
●
●
●
●
●
●
●
●
●
●
DIALING from BASE
1. Pickup Corded Handset.
2. Press DIAL button.
3. Press the number for the Memory Location.
9
●
●
●
●
●
●
●
●
DIALING from CORDLESS HANDSET
1. Press PHONE button.
2. Press DIAL button.
3. Press the number for the Memory Location on the Handset
keypad.
●
●
●
●
●
●
●
●
●
●
Note: MEMORY
DIALING will not work from the Cordless Handset if
there is an AC power interruption, but you can dial numbers from the
Base Unit.
“a”
●
●
●
●
●
●
●
●
.
●
●
●
●
●
21
TELEPHONE
MEMORY
OPERATION
●
B.
1
1. Pick up Corded Handset.
2. Press STORE button.
3. Dial new telephone number.
4. Press STORE button again.
5. Press MEMORY LOCATION.
6. Return Corded Handset to Base.
●
Stored
Number
●
●
●
●
●
●
●
You can easily store into MEMORY the last phone number dialed on
your Base Unit.
1. Pick up Corded Handset.
2. Press STORE button.
3. Press REDIAL.
4. Press STORE button again.
5. Press MEMORY LOCATION.
6. Return Corded Handset to Base.
Used for storing a momentary delay in the dialing sequence of a
stored telephone number. This is generally used when a “PAUSE” is
needed to wait for a dial tone (e.g. after dialing 9 for an outside line) or
a computer tone (e.g. for some long distance sewices).
At point where pause is required... press DIAL.
Note: Pause can only be used at the Base Unit when storingnumbers
into memory.
:
●
This feature allows you to dial in succession a chain of numbers in
different memo~ locations. This is useful when you must dial more than
one number in memory to complete a call, such as with frequent calls via
an independent sewice (e.g. MCI or Sprint).
Memov Location
Example:
Local Access Number of Long
distance com,pany,and 2 or 3
7
pauses at end, press.......**..................**......-......**.*.*...
8
Authorization Code (ID), press..,..,*...,.........................
.....................*.... 9
Long distance phone number, press
To initiate Chain Dialing
1. Press DIAL.
2. Press 7, then wait for the access tone.
3. Press D/AL.
4. Press 8, then wait for the access tone.
5. Press DIAL
6. Press 9.
Note: When dialing other phone numbers please wait for the dialing to
end. For example, press DIAL, press 7 (wait for dialing to end) press
DIAL, press 8 etc.
C.
Storing
from
Redial
D.
pause
Function
E.
Chain Di
from
Memoq
●
●
●
●
●
●
●
●
●
●
●
t
●
●
:
●
●
●
:
●
●
●
●
.
Changing
●
●
●
●
●
●
●
●
●
22
●
●
●
●
●
@
B
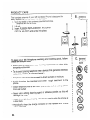
PRODUCT CARE
●
●
A rechargeable Nickel Cadmium battery pack is installed in each
Cordless Handset to provide power for operation.
To Replace Batie~
1. Make sure the PHONE LIGHT on the HANDSET is “OF7.
2. Open BA~ERY COMPARTMENT on back of HANDSET by
gently sliding down door.
3. Remove SCREW from battery holder. Remove HOLDER.
4. Slide BA~ERY PLUG down and out of plug clip. (Do not pull on
the wires.)
5. Lift BA~ERY PACK out.
6. Properly dispose of Battery Pack.
7. Plug in replacement Batte~ Pack (GE Cat. #5-2313).
8. Replace BA~ERY HOLDER and screw to secure.
9. Replace BA~ERY COMPARTMENT Cover.
10* Charge the HANDSETin the BASE for 12 or more hours before
use.
●
●
●
A.
~atiery
Replacement
●
●
●
●
●
●
●
●
●
●
●
●
●
●
●
●
●
●
Batte~ Safe@ Precautions
For your safety, please follow these simple precautions:
c Do not recharge, disassemble, mutilate, puncture, wet or dispose of
Batiery in fire. Like other batteries of this type, if it is burned or
punctured, it could release toxic material which could cause injury.
Keep Battery out of reach of children.
Replace only with GE Cat. #5-2313 or AT&T replacement battery
#4051. Accessory Order Form included in this guide.
●
●
.
f
3
-~~
%9
Ni-Cd
m~~m
~ff~
Note: Numerous states have enacted
legislation regarding proper disposal of
rechargeable batteries. This product contains a
nickel-cadmium rechargeable battery and must
be recycled or disposed of properly. Check your
Federal, State or Local regulations regarding
recycling or disposal.
23
PRODUCT
CARE
●
B.
:
The handset antenna of your GE Cordless Phone is designed for
easv replacement in the event it is damaged.
1. ‘Turn the BASE of the antenna counterclockwise.
Antenna will come loose.
2. Liti out.
3. Insert RUBBER REPtiCEMENT ANTENNA
(GE Cat. #5-2327) and screw into place.
●
Antenna
Replaceme
R
**
*
aa-*.**
●
●
●.0
●
●
●
●
●
●
To keep your GE Telephone
these few simple rules:
working
and looking good, follow
C.
●
●
●
●
Avoid putting telephone near heating appliances or other high
temperature sources.
●
●
●
●
●
●
TV to avoid placing telephone near devices that generate electrical
noise. (i.e., motors, fluorescent lamps.)
●
●
●
●
●
●
Telephone should not be exposed to direct sunlight or moisture.
●
●
●
●
Avoid dropping the Handset and other
phone.
●
rough treatment to the
●
●
●
●
Clean telephone with a soft cloth (Remember to first unplug phone
from wall outlet)
●
●
●
●
●
Never use a strong cleaning agent or abrasive powder, as this will
damage the finish.
●
●
●
●
Retain the original packaging , should you need to ship the phone at
a later date.
●
●
●
●
●
●
Periodically clean the charge contacts on the Handset and Cradle
with a soft cloth.
●
●
●
●
●
●
●
24
General
Product
Care
IN CASE OF DIFFICULTY
In
case of difficul~, check the following before seeking serv[ce.
A. TROUBLESHOOTING CHART
PROBLEM
NO
Dial Tone
Dial Tone but can’t dial
out
Handset does not ring
Base does not ring
SOLUTION
I
1. Check Installation
Is 8ASE POWER CORD connected to a working out!et?
IS RECHARGE CRADLE POWER CORD connected to a working outlet?
IS CHARGING LIGHT lit on HANOS~
Do not use an outiet that can be turned ON and OFF by a wall switch.
IS TELEPHONE L/NE CORD connected firmly to the base unit and phone outlet?
Is BASE ANTENNA raised?
2. Is CORDLESS HANDS= out of range of the base?
3. Make sure SA~ERIES are property charged (12 Hours).
4. Is the BA~ERY PACKinstalled correctiy (see page 23)?
no dial tone,
5. Disconnect COHDLESS PHONE and connect another phone to the same jack. If
then the problem may be in your wiring or local sewice.
be returned to
6. Whenever a power outageoccurs,or battedes are replaced, the HANDSHmust
the BASE. “
7, If you have pulse service on your line, your TONHPULSE Switch on the Base must be set on
Pulse.
8. Make sure RINGER Switch on Handset is “ON”.
9. DO you have too many extension phones on your telephone line? Try unplugging some other
phones.
10. Perform checks 1,2,3,4,5 and 6 above.
11. Make sure RINGER Switch on Base is on high or low (NOT OF~.
12. See #9 above.
13. See #10 above.
You experience static,
noise, or fading in and
out
14. Is BASE ANTENNA raised?
15. IS HANDSHout of range from the SASH Move cioser to BASE.
16. Does the BASE need to be relocatd?
BASE plugged into an outlet with household appliances? If so, move the appliance
17. IS COHDED
or telephone.
18. Check installation per #1 above.
Unit beeps
19.
20.
21.
22.
Memory Oia[ing
23. Did you programthe memo~ correctly (see Page21)?
24. Did you foilow proper dialing sequence(see Page 21)?
Problems
Charge BA~ERY for 12 hours.
Clean charging canta~ on HANDS=
Check installation per #l above.
Replace SA~ERY.
and CRADLE with a soft cloth.
25. See #7 above.
26. Did you reprogram numbers into memo~ after power
outage or replacing
Low Batte~ indicator
flashes and unit beeps
after a few te!ephone
calls even though
battery has been
charged for 12 hours
27. Charge battery for 12 hours.
28. Replace Batteq.
29. Clean charging contacts on Handset and Recharge Cradle.
Page does not work
30. Check for power outage (or #3 above).
8atte~? (See Page 21)
.
25
ONE YEAR
LIMITED WARRANTY
●
●
What
does
your
warranty cover?
●
Any defect in material or workmanship.
For how long after the original purchase?
● One year.
● The warranty for rental units begins with the first rentai.
What will we do?
● Provide you with a new, or at our option, a refurbished
unit.
. The exchange unit is warranted for the remainder of your product’s original one-year
●
warranty period.
●
●
●
●
●
●
●
●
●
●
How do you make a warran~ claim?
which were originally provided with
● Properly pack your unit. Include any cables, etc.,
the product. We recommend using the original carton and packing materials.
● Include in the package a copy of the sales receipt or other evidence of date of original
purchase. If the unit was a gift, provide a statement
specifying the date received. AlSO
print your name and address and a description of the defect.
c Ship the unit standard UPS or equivalent to:
Thomson Consumer Electron=, Inc.
Product Exchange Center
32 Spur Drive
El Paso, Texas 79906
. Pay any charges billed to you by the Exchange Center for semice not covered by the
warranty.
● A new or refurbished
unit will be shipped to you prepaid freight.
What does your warranty not cover?
● Customer instruction.
Your Ownets Manual provides information regarding operating
instructions and user controls. For additional information, ask your dealer.
● Installation
and set-up service adjustments.
● Batteries.
. Damage from misuse or neglect.
● Products which have been modified or incorporated
into other products.
● Product aurchased or serviced outside the USA.
How does state law relate to this warranty?
cThis warrantygives you specific legal rights,and you may also have other rights which
va~ from state to state.
what if you purchased your product outside the United States?
● This warran~ does not apply.See your dealer for details.
Thomson Consumer Electronics, Inc.
●
●
●
●
●
●
●
●
●
●
●
●
●
●
●
●
●
●
●
●
●
●
●
●
●
●
●
●
s*
●
●
●
●
●
●
●
.
SERVICE
●
FCC requires this product be serviced only by the manufacturer or its authorized
service agents. In accordance with FCC requirements, changes or modifications
not expressly approved by Thomson Consumer Electronics could vo!d the user’s
authority to operate this product. For instructions on how to obtain service, refer to
the warranty included in this Guide or call consumer service, telephone number:
800-448-0329.
●
●
Attach your sales receipt to the booklet for future reference or jot down the date this
product was purchased or received as a gift. This information will be valuable if service
should be required during the warranty period.
.
Purchase date
:
,
●
.
●
.
s
●
●
●
●
●
Name of store
●
26
..
ACCESSORY
ORDER FORM
To fulfill your communicating
needs and enhance your lifes~vle,
“
a wide range of GE extension phones, main phones, cordless
phones and answering systems is available.
Just stop by your nearest retailer and ask to see the wide range
of GE telephone products.
All are carefilly en~”neered to offer you high quality and
dependability, modern .easy-to-use features, and elegant styling
at an affordable pn”ce.
Should you wish to purchase, insist on the GE brand for all
your communicating needs.
27
ACCESSORY
2-9638
ORDER FORM
.
CATALOGNUM8ER
5-2313
“PRICE EACH
OESCRIPTION
NICKEL CADMIUM 8A~ERY
~
QUANTl~
TOTAL
$14.95
PACK
D
5-2327
S10.95
HANDSET ANTENNA
f,
II3
1Ill
I
h
For credit card purchases
Your complete charge card number, its expiration
date and your signature arenecessary to process
all charge card orders.
Copy your complete account number from your
VISA card.
mml~m
My card expires:
Copy your complete account number from
MasterCard
mmlmm
Copy the number above
name on the MasteKard
your
My card expires:
Authorized Signature
your
*Prices are subject to change without notice.
Total Merchandise .............................. $
SaJes T= ........................................... $
We are required by law to colle~ the
appropriate
sales
tax for each
individual state, county, and locality
to which the merchandise is being
sent
Shipping, Handling, and
!nsurance ........................................... $
Total Amount Enclosed ...................... $
or MasterCard
Use VISA
preferably. Money order or check
must be in U.S. currency only. No
COO or CASH.
All accessories
are subject
availability. Where applicable,
wiii ship a superseding model.
5.00
to
we
●Prices are subject to change without notice. M
order form and money order or check (in U.S
currency) made payable to Thomson Consume
Electron=, Inc.to:
Consumer Electronics
Mail Order Department
P.o. Box 8419
Ranks, PA 17573-84119
This is your return label. Please print clearly.
To:
Apt.,_
Address
City
State
ZIP ~
Please make sure that this form has been filled o
completely.
CUSTOMER : CUT ALONG DO~ED LINE.
*
2
FCC REGISTRATION
INFORMATION
\/our GE telephone equipment is feglstefed with the Federai
and 68. FCC Rules and Regulations.
1. Notification to the focal Teiephone Company
COmmunlCatiOnS
Commission
and is in compliance
with parts ~5J
On the bottom of this e~UIPmentIs a la~el l~diCatif19amof19other informatlo~~ the .FCC ~e9iStratiQn number and Ringer
Equivalence Number (REN) for the equ!pment. You must, upon request, provide this information to your telephone company.
me REN is useful to determine the number of devices You maY connect ‘o Your telephone,line and sti~lhave all these devices
ring when your ~e~ePhone number Js ~ajled. In mast (but not ,all) areas? the sum of the R~~.s of all devices Connected to one
iine shouldnotexceed5. TObe certainOftie numberOfdevicesYoumaYconnecttoYourlIfleas determinedbythe REN, YOU
should contact your local telephone company.
~OTES:
nis
equipment
may not be used On coin semice provided
by the telephone
company.
party lines are subject tO state tafiffs! and therefore? YOUmaY not be able tO USe YOUrOWn telephone
party line. Check with your local telephone company.
equipment
if you are on a
Notice m~t be given to the te~ePhofle company upon permanent disconnection OfYOUrtelephone from your line.
Z. Rights of the Telephone Company.
should your equipme~t
cause trouble on your.line which may harm the telephone
network, the telephone
company shalJ,
where practicable, notjfy YOUthat tempo.~v dlscofltlnuance of service may be req~lre~. Where Pfior notice is not practicable
d~sc~ntjnueservice i~mediately.In case
and the circumstances warrant such actloflt the teiePhone camPanY maY temPOm.~lY
of such te~poraw djscqfl~inuancetthe tel~ph?neCOmPaqY
must (1) PrOMPtjYnot~fyYOUOf SUChtempora~ discontinuance, (2)
affordYOUthe opportunity to corre~ the Sltuatlon and (3) Inform YOUof your right tO bring a complaint to the Commission
pursuant to proceduresset forthin Subpart E of pati 68, FCC Rules and Regulations.
The telephone company maY Take changes in its commgnicati?ns facii~tiestequipment oPemtiOfiSof procedures where such
adon is requ~rtiin theOperationaf ltsbusinessand notlncafls~~tent
With FCC Rules and Regulations. If tiese changes are
adequate
expected to affe~ the use or pe~ormance Of your telephone equjpmentt the telephone company mustgiveYOU
notice, in writing, to allow you to maintain unintempted service.
INTERFERENCE
INFORMATION
This device complies with Pafl 15 of ~e FCC Ruies. Operation is-subject to the fol!owing two conditions: (I) This device may not
cause harmml inte~erencet and (2) ~IS device must ac~ePt any Intefierence recelvedt including intetierence that may cause
undesired operation.
This equipment has been tested and found to comply with the limits for a ClaSS B digit~ device, pursuant to part 15 of the FCC
Rules. These limits are designed to provide reasonable prote~ion against harmful inte~erence in a residential installation.
This equipment generates, uses and can radiate radio frequen~ efler9Y and, if not ins=! led and used in aaordance with the
instru~ons, may cause harmful interference to radio communications. However, there is no guarantee that interference will not
owr in a pafiicular installation.
If this equipment does cause harmful intederence to radio or television ~=eption, which ~ be determined by turning the
equipment off and on, the user is encouragedtotryto COrr~ the intederence by one or more of the follow.ngmeasures:
s Reorient or relwate the receiving—antenna (that is, the antenna for radio or television that is ‘receiving- the interference).
. Reorient or relocate and increase the separation between the telecommunications equipment and receiving antenna for radio or
television that is “receivin@ the interference).
the telecommunications equipment into an outiet on a circuit different from that to which the receiving antenna is
. Conna
connected.
.
s Consult the dealer or an experienced radi~
technician for help.
[f these measures do not eliminate the interference, please cansultyour dealer or an experienced radid/television technician for
additional suggestions. Also, the Federal Communi=tions Commission has prepared a helpful book!et, “How.To Identify and
~esoive Hadifl
interference Problems”.This booklet is avaiiabie from the U.S. Government
when ordering copies.
D.C.20402. Please specify stock number 004400403454
HEARING AID COMPATIBILl~
This teiephone system meets FCC standards for Hearing Aid Compatibility.
Printing Ofice,
Washington,
DE MATER!AS
TABLA
SECCION
jNTR~DucclUN
.....................................................
.............................................
A.
8.
C.
Lists de Partes
Caracteristicas del Telefono ......................
Sin Cordon .............................
Sistema de Seguridad
.................................
Contra Pirateria ,...<....+
..........................
Ca~T~O~~S
Y CARACTERIS~CAS
--Caracteristicas
del
A.
Transceptor Sin Cordon ..............................
B. CaraCteristic~ del Te14fono.......................
Contro{es de la Unidad de Base ................
c.
D. Controles de{ Transceptor
Sin Cordon ............................................”.” ..-.
jNSTALAclON
...........................................................
Requisites
. . de la Toma
TelefonIca .....................................................
B. [nstalacion pam el Uso
sobre Esctitorioo Mesa ..............................
Instalacion para el Uso
c.
sobre Esctitodo o Mesa
(El Telefono Sin Cordon) .............................
D. Montaje de la Unidad
de la Base en la Pared (optional) ..............
E. Montaje del Sopotie
..............................
Recargador en la Pared
F. Para Recargar el Acumulador
A
de la
Pila............................................
PAGINA
SECCION
pAGl~A
FUNC!ONAMIENTO
DE LA MEMORIA QEL
TELEFONO
A Como Almacenar un Numero Te{efenico
31
31
B.
32
c.
33
D.
E.
37
38
OtraVez.......................................................
Funcionde la Pausa ....................................
50
50
Como Marcar una Serie de Numeros
Usando la Memotia .....................................
50
CUIDADO DEL PROUUCTO ...................................
A. Reempl=o de la Pila ..................................
6. Reempl~o de la Antena .............................
C, Cuidado General del Producto ...................
51
52
52
EN CASO DE DIFICULTAD .....................................
5
5
A.
38
38-39
50
50
en la Memoria ..............................................
Como Cambiar un Numero Almacenado.,.
Como Almacenar delModode Marcar
32
33
33
35
49
Cuadro
GARAN~A
de Averias
41
Reparable..................
5
...................................*.... ......................
SERVICIO DE REPARAC!ONES
5
...........................
39
INFORMAC!ON
DEL REGISTRO
5
EN LA FCC. ...
40-41
lNFOR~AC\QN DE iNTERFERENCIAS
5
..............
42
COMPAnBILIDAQ
DE APARA~O
DE SORDERA .........................................................
43
...” . . . . . .
.........................”
FUNCIONAMIENTODEL TEUFONO
Para Hater y Recibir una
A
LLamada: La Unidad de la Base ................
B. Para Hater y Recibir una
LLamada:. El Transceptor
sin Cordon .............................................”....s
Autarnatica
..................
Position de ESpera
c.
Para Marmr Otra Vez
0.
Autom5tiamente .....................................”.”.
E. Para Mar=r Otra Vez
Rapidamente .........................................”.””..
F. Retenedor ..................................................”.
G. 8usqueda Automatim y Pam
Cambiar el Canal ...........................”.............
H. Caraderistia del Tono
Provisional ..............................................”....
1. Boton Avisor .................................................
...................
J. Sistema de lntercomunicacidn
...........................
K. Boton de Luz Instantanea
L. Timbre Distintivo .......................................””.
M. Como Ahormr Energia de
!a Plea...,........................................................
N. Sefiales de Tono ........................................”.
44
44
u
45
45
45
45
.
46
46
47
47
48
4a
~A “w’[m
●
48
4a
+m~mWwA
A
~ SIG~ DE =
R~MpAGO y U CUIDAOO:PARA RE~uc~R
~~@N
‘-0
PUNTA OE FLECnA EL R!ESGo.oE u~A sAcuNo o~ mM~GULO
ELECTRICA,
OIDA
Um StiAL DE
OENTROOELnyw
CUBIERTA
LA
GULOES UNAs~A L QUITE
(O PARTE pos=RloR~
‘0
OE A<OVmN~
::shTo~~c~
A
USE
PARTES
OE REPUESO
OE QU~
ALERTANDoLE
~
Y TO OENTRO. CONsULTE A ;;oou~,
ALGUHA PERSONA CAUFlP=
‘:OLf:EauE
w
E
‘~f~;~Es
Om O CAOA OEL SERV~CIO D
GROSO*
REPARAC1ONES.
oEL PROOU~.
lMPOm-
30
INTRODUCTION
Gracias porhaber comprado un Producto de la GE Communications. Su nuevo telefono es Un producto
durable que ha sido cuidadosamente construido incorporando en @i Un SOnidO naturaj de aita’calidad,
caracteristicas modernas y un estilo elegante. Ha sido disefiado para brindarle a Ud. la calidad y la
conveniencia que Ud. espera tener en un telefono.
Para famiiiarizarse con todas Ias caracteristicas de su telefono, favor de leer cuidadosamente Ias siguientes
instrucciones. Guarde esta guia para una referencia futura.
EL NUMERO DE LA FCC ESTA U81CAO0 EN EL FONDO DE U BASE
EL NUhlERO REN ESTAUBICAOOEN EL FONDO DE M BASE
OTRA INFORMATION IMPORTANTE ESTA EN LA PAGINA55 DE ESTA GUIA
Cuidadosamente saque la unidad del envase. Chequee esta Iista para
asegurarse de que todas Ias partes estan incluidas. Recuerde de guardar su
recibo de compra en caso de que Ud. necesite el servicio de reparaciones
cubiefio por la ‘garantia.
de Pafles
●
●
●
●
●
●
●
●
●
●
●
●
●
●
●
●
●
●
●
●
●
●
c
——M*
——
TRANSCEPTOR
●
●
●
●
●
TRANSCEPTOR SIN
CORDON
●
UNIDAD DEW BASE
●
●
●
●
.
●
●
●
●
T
●
e—
●
●
CORDON DE U LINA
TELEFONICA
●
●
●
●
●
●
●
CORDON ENROLLADO
SOPORTE RECARGADOR
ANYROOMm
INTRODUCTION
●
●
●
●
Un telefono Sin cordbn Ie ofrece conveniencia, facilidad y moviiidad durante
Ias comunicaciones telefbnicas. Sin embargo, su uso depende en la
disponibilidad de la energia AC/CA (Corriente Alterna). Cualquier
interruption de la ene{gia e!ectrica en su Iocalidad impedira su habiiidad de
hater o recibir una Ilamada. Por esa, un telefona sin cordon no debe ser
instalado corno el unico telefono en su hoqa.
:
●
o
●
●
8
B.
Caracte
ticas d
Telefono
Cord6n
“Energia Totaln quiere decir que su telefono ha sido disefiado para
funcionar al nivel de energia mtiima permissible por la Camisi6fl Federal de
Comunicaciones (FCC).
El alcance al cual Ud. puede usar e! Transceptor Sin Cordon fuera de la
base depende en muchos factores. La Base del telefono es como un
transmisor de radio en que transmite Ias seflales en la lines telefonica por
medio de ondas de radio al Transceptor. For eso, la ubicacidn de la 8ase
es importance para obtener un alcance m%imo del Transceptor con la
energia permissible.
En algunas areas, una instaiaci6n de la Base en el segundo piso
proporcionar~ un alcance mas grande que una instalacion en el primer
piso. La recepcidn puede ser afectada contrariamente por tales cosas
como forraduras de aluminio, aparatos electrodomesticos (refrigeradores,
estufas etc.) , forro aislante-metalico, conductos de caiefaccidn, y otra
construccibn metalica que funciona para resguardar Ias sefiales de radio.
●
Tambien, Ias condiciones atmosfericas juegan un papel importance en la
funcion de su telefono sin cordon.
●
Siem~re mantenga la antena de la Base en una posicjdn levantada.
●
Sobre todo, mantenaa el Telefono en ~ ro~orcion al aicance de la Base.
●
●
●
‘Cuandoquiera que Ud. ponga el transceptor sin cordon en el soporte
recargador Anyroomh, la unidad seleccionara automaticamente un codigo de
seguridad. Este codigo ayuda a evitar el uso no autorizado de su Iinea
telefonica por otro te{efono sin cordon en su area.
Nota: Cuandoquiera que ocurra una interruption electrica, o cuando se
reernplacenIas pilas, puede que el TRANSCEPTOR necesite volver al
saporte recargador para establecer nuevamente el cddigo de seguridad.
.s
●
.
●
●
●
●
●
●
●
●
●
●
●
●
●
●
●
●
●
●
●
●
●
●
●
●
32
C. Sistem
Segurida
~ontraPiraterfa
CONTROLES
Y CARACTERISTICAS
●
●
●
●
●
●
●
●
●
●
●
●
●
●
●
●
●
●
Sanido CWstal ClearTM- Con compandotm, extiende el alcance efectivo de
su telefono sin cordon y elimina practicamente el estatico y la intederencia.
8dsqueda de 10 Canales- Selecciona automaticamente el canal que este
probablemente disponib[e.
Baton de Contacto Convenience para Avanzar el Canal
Memoria de 10 Nurneros Telef6nicos - Para numeros Iiamados
frecuentemente.
Sisterna Para Avisar y Aparato de Intercomunicacion de 2 Vias: Use su
telefono como un aparato de intercomunicacion o un sistema para avisos.
Sistema de Seguridad Digital-Sistema de Seguridad Digital
Contestaci6n Autom4tica
Tono Provisional-Permite a Ios usuarios del sewicio de pulso (rotario) de
ganar acceso facilmente a Ios servicios de tono.
- Simplemente presione el
Boton para Marcar Otra Vez ~apidamente
boton para marcar otra vez mientras este en la Iinea para marcar un
numero otra vez.
El Timbre Prendido/Apagado - El conmutador del ~mbre Apagado
tambien ahorra la pila.
El Timbre Distintivo
Lutes Indicadoras - Para el telefono, el aparato de intercomunicacion y el
recargador.
Boton de Luz lnstantanea - Para activar un servicio especial.
Antena del Transceptor flexible de altas caracter~sticas
Lista de la Memoria
Compatible con Aparato de Sordera
Pila y Antena Reemplazables por el Usuario
:
A.
●
Caracter~s-
ticas de!
Transceptor
Sin Cordon
●
●
●
●
●
●
●
●
●
●
●
●
●
●
●
●
●
●
●
●
●
●
●
●
●
●
●
●
●
●
●
●
●
●
●
●
Memoria de 10 Ntimeros Telefonicos - para ntimeros Ilamados
frecuentemente.
Sistema para Avisar y Aparato de Intercomunicacion
de 2 Vias: Use su
telefono como un aparato de intercomunicacion o un sistema para avisos.
Antena de Base de Altas Caracteristicas
Verdadera Retention Electr6nica
Conmutador de Tono/Pulso para el uso con Ios semicios de marcacion
con tono o con pulse.
Tono Provisional - Permite a Ios usuarios de! servicio de pulso (rotario) de
ganar acceso facilmente a Ios semicios de tono.
Boton de Luz Instantanea - Para activar un servicio especial.
Sistema EJectr6nico de Apoyo a la Memoria - Guarda [OSntimeros
telefonicos cuando la energia sea interrumpida sin el uso de pilas.
El Timbre Alto/Bajo/Apagado
Boton Dara Marcar Otra Vez Rapidamente - Simplemente presione el
boton para marcar otra vez mient~as este en la Iinea para marcar un
numero otra vez.
Lutes Indicadoras Para el telefono, el aparato de intercomunicacion y el
recargador
Lists de la Memoria
Montaje sobre un Escritorio o una Mesa
Registrado con la FCC
Anotado en UL (Los Laboratorios de Asesoramientos)
Garantia Limitada de Un Afro
●
●
●
●
●
B.
Caracterjs-
ticas del
Telefono
●
●
●
●
c
●
●
●
●
●
●
●
●
●
●
●
●
●
●
●
●
●
●
●
●
●
●
●
●
33
Y CARACTERISTICAS
CONTROLES
I Ii
II
mae
1
m
A
34
. ‘...
.
. .. .
.. .
.
.
..-.
.
.
.-
. . .. ..
CONTROLES Y CARACTERISTICAS
1. INTERRUPTOR
DEL TRANSCEPTOR
:
●
2. GANCHO PARA EL TRANSCEPTOR
- Gancho ajustable mantiefle el
Transceptor en la unidad de la base cuando este montado sobre la
●
●
●
C.
Contro!es de
la Unidad de la
Base
pared.
3. LUZ INDICADURA DE LA LINEA EN USQ - Se enciende cuando la
Iinea telefonica sea usada.
4. LUZ DEL APARATO DE INTERCUMUNICAC/ON
- Cuando se
encienda, indica que el aparato de intercomunicacion esta PRENDIDO.
5. PARLANTE
6. LJSTA DE LA MEMORIA - Espacio para anotar Ios nombre~ntimeros
en la memoria del telefono.
7. ANTENA DE U BASE DE ALTAS CARACTER!STICAS
8. BOTON PARA AVISAMENCONTRAR
- LLama el transceptor.
9. BOTON ALMACENAR - Almacena el ntimero telefonico en una
ubicacibn en la memoria.
10. BOTON MARCAR - Es usado cuando se marca un ntimero
aimacenado en una ubicacion en la memoria..
11. BOTON DE LUZ lNSTANTANEA - Activa un servicio especial (de su
compafiia telef6nica local) como 61de la transferencia de una Ilamada o
la IIamada de espera.
12. BOTON MARCAR OTRA VEZ -
Marca otra vez el tiltimo ntimero
Ilamado. Se usa para marcar normalmente o tipidamente.
13. BOTON RETENEDOR - Retiene la Ilamada de entrante.
14. LUZ PARA LA FUNC\ON DEL RETENDEDOR
15. CONMUTADOR DE TONOPULSO - Estabiece el modo para marcar
con Tono o Pulso (para el servicio rotario).
16. CONMUTADOR DEL ~MBRE ALTO~AJO/APAGADO
volumen del ~mbre (ALTO, BAJO o APAGADO)
17. TRANSCEPTOR - contiene
el trammisor
- Ajusta el
y e! feceptor para una
conversation telefonica.
18. ENCHUFE DE U
BASE-
El enchufe para el Cordon Enrollado
19. ENCHUFE DEL TRANSCEPTOR - El enchufe para el Cordon
Enrollado.
20.
CORDON ENROLLADO
35
CONTROLES
Y CARACTERISTICAS
m
A
\
II11
36
CONTROLES
Y CARACTERISTICAS
●
21. INTERRUPTOR
DEL TELEFONO PRENDIDO/APAGADO
s
●
EL CANAL - Selecciona el Canal de
operation para el Transceptor y la unidad de la Base
22. BOTON PARA SELECCIONAR
23. BOTON DE LUZ INSTANTANEA
●
●
●
D. Controles para
el Transceptor
Sin Cordon
c
.
●
●
24. INTERRUPTOR
DEL TIMBRE PRENDiDO/APAGADO
- (Ahorra la pila.)
●
●
25. BOTON PARA MARCAR - Es usado cuando se marca un numero
●
●
almacenado en una ubicacion en la Memoria.
●
●
26. BOTON PARA MARCAR OTRA V=-
Marca otra vez el ultimo ntimero
Ilamado. Es usado para marcar normalmente o rapidamente.
●
●
●
●
27. LUZ INDICADORA DEL TELEFONU/APARATO DE
●
INTERCOMUNICACION
●
●
●
28. BOTON PARA EL APARATO DE lNTERCOMUNICACION
●
●
29. BOTON PARA AVISAR - Llama la Base
●
●
30. ANTENA DEL TRANSCEPTOR DE ALTAS CARACTERISTICAS
●
●
31
●
●
LISTA DE LA MEMORIA
●
●
32. LUZ INDICADORA DEL RECARGADOR DE LA P!LA
●
●
33. COMPARTIM!ENTO DE LA PILA
●
●
34. CONTACTOS RECARGADORES
35. GANCHO
●
●
●
PARA EL TRANSCEPTOR
●
●
DE LA LINEA AC/CA (CORRIENTE
al tomacorriente AC/CA.
36. CORDON
37. Soporte Recargador ANYROOMW
ALTERNA)
- Se enchufa
●
●
●
●
●
●
●
●
●
●
●
c
●
●
●
●
●
●
●
●
●
●
●
●
●
●
●
●
●
●
●
●
●
●
37
INSTALLACTION
- SOBRE ESCRITORIO O MESA
s
Se requiere un enchufe modular USOC (Universal
Service Order Code) RJ11 C (e~emplo ilustrado). Una
instalacion de este telefono en ubicaciones con
enchufe con 4-patas o con conectadores donde el
telefono este alambrado permanentemente requerira
convertidores
adicionales
“ Requisites
1
●
●
s●
~
(no incluidos). El
distribuidor de quien Ud. ha comprado su telefono o
un almac~n suministrador de telefonos puede sugerir
el concertidor
de la
Toma Telefonica
A
apropiado.
:
.
●
●
b
●
●
1. Enchufe el CORDON LiSO DEL TELEFONO en
el Enchufe Modular (RJ11C) en la pared y al
fondo de la unidad.
B. instalacion para ei uso so~re
s
●
Escritorio o Mesa
●
●
●
●
●
Nota: El soporte para e{ montaje debe ser
removido de la parte trasera de la base del
telefono para sacar correctamente el cordon de la
lines telefonica. (Vea p~gina 12 para las
instrucciones en como remover el sopotie de
montaje.)
●
●
s
●
●
o
●
9
o
o
%
●
●
2. Enchufe el CORDON DE M ENERGIA en un
tomacorriente electrico que no pueda ser
apagado. No use un tomacorriente que pueda ser
prendido y apagado por medio de un conmutador
en la pared.
●
●
:
.●
●
●
●
●
●
●
●
●
●
●
●
●
●
3. Levante la ANTENA de la BASE.
●
●
●
●
●
●
●
●
●
38
INSTALLACTION
- SOBRE
ESCRITORIO
O MESA
●
ubicado
en la Base, en la position que sea compatible con
su sewicio telefonico. (Si Udl no esta seguro,
chequee con su compafiia telefonica IOC{I.)
4, ?onga el Conmutador
s
de TONO/PULSOt
●
●
m
4
●
●
9
●
5. Ajuste el Cunmutadar dei TIMBRE:
AfTO = El sonido sera 10mas alto.
EAJO = El sonido sera 10mas bajo.
APAGADO = El telefono no sonara.
●
●
●
●
●
●
●
●
●
●
●
●
●
6. Conecte el Cordon Enroilado.
Enchufe un etiremo del cordon enrollado en el
transceptor y el otro etiremo en el enchufe del
transceptor en la base. Ponga ei transceptor en la
base.
.
●
●
●
tr
L
s
●
●
●
●
●
●
●
●
●
●
●
●
1. Enchufe el CORDON DE U ENERGiA AC/CA
(Corriente Alterna) en una tomacorriente
domestico normal.
.
C. Instaiacion para e[ uso sobre
●
Escritorio o Mesa ~elefono
Sin Corddn)
●
●
●
2. Coloque el TRANSCEPTOR
en el Soporte
Recargador.
Nota: Antes del uso initial cargue la unidad por
12 haras o mas.
●
.
●
:
●
●
●
●
●
●
.
●
●
●
●
●
●
●
39
INSTALACION
- EN LA PARED
●
1. Vuelva al reves el Gancho para el Transceptor
Deslice firmemente el GANCHO PARA EL
TRANSCEPTOR fuera de la BASE. Girelo una
media vuelta y deslicelo de vuelta a la base.
D.
:●
●
●
●
n
●
●
Q
●
la—
●
●
●
●
●
●
●
.
●
2. Remueve el Soputie de Montaje
Para una instalaci6n en la pared, presione Ias dos
trabillas y tire el SOPORTE DE MONTAJE fuera
de la parte trasera del te!efono.
●
:
●
●
●
●
●
●
3. Conecte
Base
ei Corddn de la L;nea Telefdnica a la
●
●
●
Enchufe cualquier extremo del CORDON DE U
LINEA TELEFON/CA en el ENCHUFE PARA U
LINEA TELEFONICA al fondo del teldfono.
●
●
●
●
La unidad de la Base tiene Postes para Enroliar el
exceso del cordon telefonico Iiso y el CORDON
DE U ENERGIA AC/CA. Estos Postes para
Enrollar el Cordon estan ubicados al fondo de la
Base debajo del SOPORTE DE MONTAJE.
:
Enrolle el exceso del CORDON TELEF~N~CO Y
del CORDON DE LA ENERGIA AC/CA alrededor
:
●
●
●
●
●
●
.
●
de Ios postescomo se muestra en la ilustracion.
Deje 3 pulgadas del CORDON TELEFONICO sin
enroilar.
:●
●
●
●
4. De vuelta al SOPORTE DE MONTAJE para que la
parte mas profunda este al fondo de la Base.
Ensarte el enchufe modular y Ias 3 pulgadas del
cordon telefonico Iiso atraves de la abetiura en el
centro del SOPORTE DE MONTAJE. Asegtirese
de ensafiar el CORDON DE LA ENERGiA AC/CA
a traves de la abertum al fondo del SOPORTE DE
MoNTAJE.
●
●
●
●
●
●
●
●
●
●
●
●
●
●
●
40
,.
Montaje de la Unidad de Base
la Pared
INSTALACION
- MONTAJE
EN LA PARED
(OpCiO~a[)
●
●
5. Instale el Soporte de Monta~e de tal manera
●
que Ias Flechas en el Sopurte Miren Hacia
Arriba
Coloque e! SOPORTE DE blONTAJE en Ias
●
9
●
●
●
abefluras de Ias trabiilas mas abajas en la base
del telefono.
Nata: Asegurese de que el SUPORTE DE
MONTAJE este en la position que se muestra
aqui a la derecha.
6. Cunecte el cordhn de la i~nea telefonica ai
enchufe telefbnico en la pared.
●
●
●
●
●
●
●
c
●
●
●
●
●
●
●
7. Monte ei Telefono a la Placa en la Pared.
Coloque el telefono contra la p[aca del enchufe en
la pared de tal manera que IOSpostes en la placa
se alineen con Ias aberturas en el SOPORTE DE
MONTAJE. Presione e{ telefono contra la piaca
del enchufe de tal forma que Ios postes pasen a
traves de Ias aberturas en el SOPORTE DE
MONTAJE. Des[ice Iigeramente el telefono hacia
abajo para asegurar ei telefono en la placa de[
enchufe.
Nota: Asegtirese de que el CORDON DE LA
ENERGIA AC/CA y el CORDON DE U L!NH
TELEFONICA esten alejados de Ios pastes en la
placa en la pared y de Ias aberturas en el
SOPORTE
DE MONTAJE.
I
8. Levante la Antena de la Base.
●
●
●
9. Conecte e! Cord6n Enroilado.
Enchufe un etiremo del CORDON ENROLMDO
en el transceptor y enchufe el otro etiremo en el
enchufe del transceptor en la base. Coloque el
transceptor en la base.
*
/
●
II
●
:
●
●
●
●
●
●
●
●
●
●
●
●
●
●
41
INSTALLATION
- MONTAJE EN LA PARED (optional)
El Soporte Recargador Anyroom’m Ie proporc]ona a
Ud. una flexibilidad mtiima para usar y recargar su
Telefono Sin Cordon de la GE. Simplemente hay que
enchufar el Sopohe Recargador en cualquier
tomacorriente AC/CA (Corriente Alterna). Despues,
Ud. Duede colocar el Transceptor
..
Sin Cordon en el
Saporte para recargar la pila.
E. Sopotie Recargador para el
z
Montaie en la Pared
Para su conveniencia, el Soporte Recargador puede
ser montado en la pared.
1. Vueiva ai reves el Gancho para el Transceptor
Deslice firmemente el GANCHO PARA EL
TRANSCEPTOR fuera de la BASE. Girelo una
media vuelta y deslicelo nuevamente de vueita en
la base.
●
●
●
●
●
~~
6
2. Coloque ei Sopotie Recargador a la Placa en
la pared
Coloque el SOPORTE de enfrente la placa del
enchufe en la pared de manera que Ios postes en
la placa se alineen con Ias abetiuras en la pa~e
trasera del SOPORTE RECARGADOR. Presione
e{ SOPORTE RECARGADOR contra la placa del
enchufe para que Ios pastes pasen a traves de Ias
abetiuras en la PARTE TRASERA DEL
SOPORTE RECARGADOR. Deslice Iigeramente
el SOPORTE RECARGADOR hacia abajo para
asegurar el telefono en la placa del enchufe.
●
●
●
●
●
●
●
●
●
●
●
●
●
●
●
●
●
●
●
Notas: Asegdrese de que el CORDONDE U
ENERGIA AC/CA este alejado de Ios postes en la
piaca en la pared y de Ias abefluras en la PARTE
TRASERA DEL SOPORTE RECARGADOR
Saque el CORDON DE M ENERGIA AC/CA
cotio se iiustra.
●
s●
●
●
i
●
w
3. Enchufe el Cordon de la Energfa ACICA en Un
tomacurriente domestico normal.
z●
●
●
●
●
●
4. Coioque el TRANSCEPTOR
Recargador.
—
en el Soputie
●
●
●
●
●
●
42
INSTALLATION
- MONTAJE EN LA PARED (apcional)
●
Su GE Telefono Sin Cordon viene con un acumulador
de pilas recargables de niquel cadmio (ubicado en el
Transceptor). Se recargara automaticamente cuando
se coloque el Transceptor en el SOPORTE
RECARGAOOR. Cuandosea completamente
recargado,e! acumuladorde pilas proporcionarauna
efiergia suficiente para que et Transceptorpueda
quedarse fuera del SOPORTE durante periodos de
tiempo prolongados y continuara a funcioflar
correctamente. Sin embargo, para mantener una
energia adecuada, Ud. necesitar~ recargar el
acumulador de pilas cada cieflo tiempo devolviendo
el Transceptor al SOPORTE RECARGADOR.
La LUZ INDICADORA
DE LA CONDCION DE U
PIU brillara continuamente cuando la pila se esta
recargando.
Camo Re=rgar
1.
la Piia
Asegtirese de que e! CORDON DE U LINU
AC/CA en el SOPORTE RECARGADOR este
enchufado en un tomacorriente e[ectrico normal.
2. Coloque el TRANSCEPTOR en el SOPORTE
RECARGADUR.
.
3. Antes de usar inicialmentela unidad, permits aue
se caraue nor 12 horas o mas.
IMPORTANTE:
Aunque Ud. pueda dejar el Transceptor fuera del
SOPORTE durante perfodos de tiempo efiendidos,
necesitara devolverlo al SOPORTE RECARGAneriddicamente Dara mantener Ias Dilas en
una candici6n caruadas. Periodicamente Iimpie con
un trapo suave IOScontados cargadores en el
Tmnsceptor y en el SOPORTE RECARGADOR.
s
●
●
F. coma Recargar el Acumulador
de Piias
FUNCIONAMIENTO
DEL TELEFONO
●
I
Para Hater
una LLamada
de la Unidad de la Base
1. Levante el TRANSCEPTOR.
(La Luz Indicadora de la Lines en Uso se Prendera.)
2. Espere por la sefial de Iinea
3. WIAROUE el numero telefonico.
4, Cuando termine, Cuelgue.
Para Recibir una LLamada a la Unidad de la Base
1. Levante el TRANSCEPTOR.
(La Luz Indicadora de la Lines en Uso se Prender~.)
2. Cuando termine, Cuelgue.
~.
●
Como Hater y
Recibir
Llamadas:
●
●
●
Unidad de la
Base
●
c
●
●
●
●
●
●
●
●
Cuando ei Transceptor Esta @ ei Sopotie Para Recibir una LLamada
●
Cuando el telefono suene, Ievante el TRANSCEPTOR. La Iuz indicadora
del telefono en uso “SE PRENDERA” y Ud. podra hablar.
(CARACTERISTICA
DE LA CONTESTAC1ON AUTOMATICA)
2. Si Ud. presiona accidentalemente el boton denominado PHONE dentro de
2-3 segundos despues de que haya Ievantado el THANSCEPTOR del
sapotie, el telefono no hara caso de su mando.
3. Si se contestara la Ilamada primeramente en un telefono anexo y si Ud.
esperara 10 segundos despues del ultimo timbrazo antes de levantar el
TRANSc~pTOH
SIN CORDON, Ud. necesitara presionar el boton
de;orn;nado PHONE para hablar.
●
1.
B.
●
Como Hater
Recibir
Llamadas: E
Transceptor
sin Cordon
●
●
●
●
●
●
●
●
●
●
●
●
☛☛
●
Para Hater una LLamada
1.
2.
3.
4.
5.
Levante el TRANSCEPTOR.
Presione el boton TELEFONO (PHONE). (La Iuz indicadora del telefono
en uso se prendera.)
Espere por la sefial de Iinea.
Marque el ntimero telefonico.
Cuando termine, presione el boton TELEFONO para colgar.
I@
@
Cuando el Transceptor Esta Fuera del Supotie
1. Levante el TRANSCEPTOR.
2. Presione el boton denominado PHONE. (La Iuz indicadora del telefono en
uso se prendera.)
3. Cuando termine, presione el boton PHONE para colgar.
Para Hater una LLamada
1. Levante el TRANSCEPTOR.
2. Presione el boton denominado PHONE. (La Iuz indicadora del telefono en
uso se prender~.)
3. Espere por la sefial de Iinea.
4. Marque el ntimero telefonico.
5. Cuando termine, presione el boton PHONE para colgar.
●
●
●
●
●
●
44
FUNCIONAhllENTO
DEL TELEFONO
●
ud. puede dejar e! Transceptor
Sin Cordon con el boton denominado
PHONE
C.
:
en la position de “’PREND/DO”y, despues, caloquelo en la Base. Se colgara
●
autom~ticamente.
Cuando Ievante et Transceptor,la unidadya estara “PRENDIDA”.
Nota: Oprimiendo el boton PHONE cuando la unidad este en el modo de
Espera automaticamente hara coigar el Telefono.
●
Espera
~=1
Automatic
●
●
mmmn
Pm
●
●
●
●
●
●
El Transceptor y la Base tiene cada uno una memoria separada para Marcar
Otra Vez el Ultimo Numero. El numero se quedar~ en la memoria para
MARCAR OTRA VEZ de cada telefono hasta que se marque otro ntimero.
Para MARCAR
OTRA VEZ e! tiitimo ndmero Ilamado
del transceptor
1. Levante el TRANSCEPTOR.
2. Presione el boton TELEFONO (PHONE).
3. Espere por la seflal de Iinea.
4. Presione MARCAR OTRA V= (REDIAL).
Para MARCAR OTRA VEZ ei tiltimo ndmero l[amado de la base
1. Levante el TRANSCEPTOR.
2. Espere la sefial de Iinea.
3. Presione MARCAR OTRA V= (REDIAL)
.
s
D.
●
●
●
Como ~arcar
Otra Vez
Automatica-
mente
●
●
●
G
~
II
●
●
II
●
9
II
*6-
11
----
●
Si Ud. quiere continuar marcando un numero ocupado rapidamente, puede
hacerlo con e] boton de MARCAR OTRA VEZ RAPIDAMENTE (FAST
REDIAL). Cuando oiga el tono indicando que el telefono .esta ocupado,
simplemente hay que presionar el boton REDIAL. El telefono colgara, se
activara, y despues marcara otra vez el numero ocupado. Pres~one RED/AL
para probar nuevamente.
E. Como Marcar
:
.
Otra Vez
Rapidamente
:
●
:
●
a
●
Le permite a Ud. interrumpir una conversation temporalemente a la Unidad
de Base y despues reasumir la conversation desde este o cualquier otro
telefono efl la misma Iinea.
Para retener la llamada entrante
Presione HOLD.
La Iuz indicadora del modo RETENEDOR se prendera para recordable a
Ud. que la Ilamada esta aguardando y la Iuz indicadora del TELEFONO
EN USO quedara prendida.
Para continuar
la cunversacitin.
Levante cualquier Transceptor en la misma Iinea y hable.
La Iuz indicadora del modo RETENEDOR en la Base se apagara.
Nota: Ud. no podra recibir Ilamadas en esta Iinea telefonica mientras que el
indicador de RETENEDOR este prendido.
z
F.
Retenedor
:
●
:
&
@@@
●
●
rAL CL~Rw
dlcordloss
PLUS +
Tslzphone
:~
●
●
●
●
●
●
●
●
●
●
●
●
●
45
FUNC1ONAMIENTO
DEL TELEFONO
●
●
Su Sistema Te[efonico Sin CardOn explorara automaticameflte Ios 10 canales
y seleccionara el canal que est# mas probablemente disponible. Esto se har~
cada vez que Ud. utiliza su telefono aunque, de, vez en cuando, una
interferiencia pueda persistir en el canal escogido. Si esto ocurre, Ud. tiene la
option de seleccionar un canal manua!mente.
●
G.
~usqueda
Automatic
y Como
Cambiar de
Canal
H.
La Caracter
●
●
●
●
c
●
●
●
Su Telefono Sin Cordon Ie permite a Ud. cambiar canales durante una
conversation si experiments estatica y/o ruido.
●
Para cambiar canales
●
Presione y Sueite e{ boton CANAL (CHANNEL) en et Transceptor Sin
Cordon.
La unidad avanzara al proximo canal.
Nota: El telefono debe estar “PREND/DO” para cambiar canales.
9
●
●
●
●
●
●
●
●
●
●
●
~
●
*
●
Si Ud. tiene ei servicio telefbnico de PULSO (rotario), todavia puede ganar
acceso a aquellos semicios especiales (como la banca electronics, tafietas
de credito telefonicas, y equipos telefdnicos de respuesta,etc.) que requieren
sefiales de tono para su funcionamiento.
●
●
●
●
●
●
●
Marque e{ ndmero de acceso local de la manera normal. Despues, presione
ia tec!a “y” en la Base o el Transceptor para activar el TONU PROV1S1ONAL.
Su telefono generara [as sefiales de tono requeridas mientras Ud. marca Ios
numeros o simbolos necesarios para compietar su Ilamada.
b
●
●
●
●
●
●
Cuando termine, cuelgue. El telefono volvera autom~ticamente dl servicio de
PULSO (rotario).
●
●
●
●
●
Nota: La caracteristica del TONO PROVISIONAL es solamente para Ios que
tengan e} servicio de PULSO (rotario). Si Ud. tiene el servicio de Toque de
TONO PROVISIONAL
Tono, no necesitara usar la caracter~stica del
●
●
●
●
9
●
●
46
FUNCIONAMIENTO
DEL TELEFONO
Su Sistema Telefdnico Sin cordon permite aviso de doble via.
[.
Baton Avisor
J.
Aparato de
lntercomlfnicacion
Para Avisar el Transceptor de la Base
?resione PAGE
Cada vez que Ud. presione PAGE en la unidad de la 8ase, el Transceptor
Sin Corddn sonara la sefial de aviso.
Para Avisar la Base del Transceptur
Presione PAGE
Cada vez que Ud. presione PAGE en el Transceptor, la Base sonara la
sefial de aviso.
Nota: El conmutador dei timbre del Transceptor Sin Cordon debe estar en la
position
de “PRENO/DO”
para recibir la sefial de aviso.
●
●
La caracteristica del Aparato de Intercomunicacion de su Telefono Sin
Cordon Ie permite a Ud. tener una conversation de doble via entre el
Transceptor Sin Cordon y la Base sin ocupar la Iinea telefonica. Puesto que
la lines telefonica no sea usada, Ud. puede todavia recibir Ilarnadas
entrantes.
●
●
●
●
●
●
—
●
●
r
●
Esta caracteristica es utii como medio de responder al aviso de la Base.
●
●
.**
●
●
El aparato de intercominucacion se adiva y desactiva usando el boton
INTERCOM, ubicado en el Transceptor Sin Cordon.
●**
●
*
●
●
0
●
●
Para activar el APARATO DE INTERCOMUNICAC!UN
TRANSCEPTOR SIN CORDON
en el
1. Presione et boton INTERCOM en el Transceptor.
La IUZindicadora del aparato de intercomunicacion parpadeara.
Ahora el aparato de intercomunicacion esta ‘PRENDiDO”.
2. Hable en el Microfono del Transceptor.
3. Cuando termine, presione el boton INTERCOM.
●
●
●
●
●
●
●
●
●
●
●
●
Para contestar una IIamada mientras estd usando el aparato de
intercumunicaciOn
Presione el boton PHONE en el Transceptor Sin Cordon.
Esto termina la conversation en e! APARATO DE lNTERCOMUNiCACION
y contests Ias Ilamadas entrantes.
Nota: El Transceptor debe estar al alcance de la Unidad de Base para
poder hater funcionarel APARATO DE lNTERCOMUN/CACION.
●
●
●
●
●
●
●
●
●
●
●
●
●
●
●
●
●
●
47
FUNCIONAMIENTO
DEL TELEFONO
●
Este baton es usado para act]var un servicio especial de su compafiia
telefdnica local. como la Transferencia de una LLamada y una LLamada de
Espera, etc. Estos servicios requieren un abono extra mensual. Si Ud. se
abona a cuaiqulerade estos servic!os, favor de referirse a Ias instrucciones
de la compafiia telefonica en como usar e! BOTON DE LUZ INSTANTANEA
(FUSH).
Notas: No use el boton PHONE para tratar de entrar en Ios servicios
especials porque el telefono colgar~.
No use el boton ~~SH para colgar el telefono.
K.
J
●
Boton de L
—
I
Instantanea
●
●
●
—
●
●
~
●
●
●
“6”
1
●
●
●
●
●
m
●
La Unidad de Base y el Transceptor Sin Cordon son capaces de recibir
distintos timbrazos generados por la compafiia telefdflica local como un
servicio especial. Este servicio especial es disponible solamente por su
compafiia telefOnica local.
L.
;
Timbre
~istintivo
.
●
●
●
●
●
.
●
El Transceptor Sin Cordon tiene la habilidad de ahorrar la energia en la pila
s
cuando este colocado en la Base o cuando este fuera de la Unidad de Base.
●
●
M. Como
Ahorrar la
Energia de
la Pila
●
●
Para reducir el uso de la piia, deslice el conmutador Tl~~R~ (RINGER) a la
position de “APAGADO” (OFF). Sin embargo, el Transceptor no sonara
cuando haya una IIamada entrante. Esta caracteristica de ahorrar la pilas es
muy convenience cuando otros telefonos anexos se encuentren fuera del
alcance auditivo.
●
●
:
\
:~;,
/
●
●
Un sonido melodioso con el TIMBRE
(RINGER) “PRENDIDO” (ON):
N.
I
EL TRANSCEPTOR SIN CORDON
●
●
-Signals an incoming call.
●
●
●
●
3 sonidos cotios intermitentes can el
TIMBRE (RINGER) ‘PRENDIDO (ON):
-Sefiala una Ilamada entrante.
●
●
●
●
U BASE
3 sonidos melodiosos:
-Una sefial de AVISO.
●
●
●
●
●
●
●
●
●
●
●
●
●
●
●
●
●
48
Se fiales de
Tono
FUNCIONAMIENTO DE LA
MEMORIA DEL TELEFONO
●
●
Su Sistema Telefonico puede almacenar hasta diez (1 O) ntimeros telefonicos
de hasta 24 digitos que pueden ser marcados automaticamente por ambas
unidades - el Teclado en la Base y el Transceptor
●
●
A.
Sin Cordon.
●
Ntimero en la
Memoria
●
Nota: Se puede almacenar
un numero SOUMENTE
●
en la Unidad de Base.
Como
Almacenar un
●
●
●
PARA ALMACENAR
1. Levante el Transceptor con Cordon.
2. Presione el baton ALMACENAR (STORE) en la Base.
●
●
●
●
●
●
3. Marque e[ numero para ser aimacenado.
4. Presione el baton ALMACENAR (STORE).
●
lo
NUM8ER
MEMORY
●
●
5. Presione una tecla numerada (0-9... Ubicacion en la Memoria) en la Base.
6. Devuelva el Transceptor Con Cordon a la Base.
7. Anote el numero almacenado en la ubicacidn correspondiente en la
●
●
●
●
●
Ta~eta del Directorio de la Memoria (en la parte trasera del transceptor y
la parte delantera de la Unidad de Base).
CUIDAD04
~
●
C~AL
UR”
Carded/Cardloss
PLUS +
T~lophan~
●
CUANDO PRUEBA LLAMADAS A LOS NUMEROS DE EMERGENCIA:
1. Quedese en la Iinea y explique brevemente al expedidor la razon por la
Ilamada antes de colgar.
2. Haga tales adividades
durante Ias horas de descanso, como Ias horas
de la madrugada o tarde en la noche.
●
—
●
●
●
●
●
●
●
●
PARA MARCAR
DE LA BASE
1. Levante el Transceptor Con Cordon.
2. Presione el botdn MARCAR (DIAL).
3. Presione el ndmero para la Ubicacion en la Memoria.
PARA MARCAR
DEL TRANSCEPTOR
SIN CORDON
7. Presione el boton PHONE.
2. Presione el boton MARCAR (DIAL).
3. Presione el numero para la Ubicacion en la Memoria en el teclado en el
transceptor.
Nota: Nose podra MARCAR CON M MEMORIA
del Transceptor Sin Cordon
si hay una interrumpcidn de energia AC/CA; pero, Ud. podra marcar numeros
de la Unidad de Base.
“m”
FUNCIONAMIENTO DE LA
MEMORIA DEL TELEFONO
1.
2.
3.
4.
5.
Levante e! Transceptor Con Cordon.
Presione ei baton ALMACENAR (STORE).
Marque un numero telefonico nuevo.
Presione de nuevo e] boton ALMACENAR (STORE).
Presione la UBICACION EN LA MEMORIA.
6. Devue[va el Transceptar Con Cordon a la Base.
Ud. puede facilmente almacenar el ultimo numero marcado de la Unidad de
Base en la MEMORIA.
1. Levante el Transceptor Con Cordon.
2. Presione el boton ALMACENAR (STORE).
3. Presione MARCAB OTRA VEZ (REDIAL).
4. Presione de nuevo el bcton ALMACENAH.
5. Presione la UBICACION EN LA MEMORIA.
6. Devuelva el Transceptor Con Cordon ala Base.
●
B.
:
●
Como
Cambiar u
●
●
Nfimero
Almacenad
●
●
●
●
●
C.
;
●
Para
Alma
del
Modo de
Marcar Ot
Vez
cenar
●
●
●
●
●
●
●
●
●
●
●
Es usada para almacenar una demora moment~nea en la secuencia del
ntimerotelefonicoalmacenado. Se usa generalmente cuando se necesita
Una “PAUSA” mientras espera por la sefial de Iinea (per ejemplo, despues de
haber marcado el 9 para obtener una Iinea exterior) o para obtener el tono de
una computadora
(par ejemplo, para algunos servicios de Iarga distancia).
D.
:●
la Pausa
s
:
●
●
Al memento donde se requiera la pausa...presione MARCAR (DIAL).
●
Nota: Solamente se puede usar la PAUSA
en la Unidadde Basecuando esta
.
.
●
almacenando numeros en la memorla.
I
●
Esta caracterfstica Ie permite a Ud. marcar sucesivamente una serie de
numeros en diferentes ubicaciones en la memoria. Esto es util cuando Ud.
necesite marcar mas de un numero en la memoria para hater una Ilamada,
tal como Ilamadas frecuentes usando un servicio independiente (per ejemplo
MCI o Sprint).
●
Ejemplo:
Ubicacibn en la Memofia
Nfimero Local para Acceso a
la Compafiia de Larga Distancia,
7
y 203 pausa al final, presione...................................
Codigo de Autorizacion (ID), presione ........................8
Ntimero telefonico de Iarga distancia, presione..........9
Para lniciar marcando una Serie de Ntimeros
1. Presione MARCAR (DIAL).
2. Presione 7; despues, espere por el tono de acceso.
3. Presione MARCAR (DIAL).
4. Presione 8; despues, espere por el tono de acceso.
5. Presione MARCAH (DIAL)
6. Presione 9.
Nota: Cuando Ud. este marcando otros numeros telefdnicos, favor de esperar
al final de la marcacion. Por ejemplo, presione MARCAR (DIAL), presione 7
(espere por el final de la marcacion), presione MARCAR (DIAL), presione 8,
etc.
50
Funcion d
E.
●
Como
un
Serie de
Marcar
●
●
●
NOmeros~
Usando la
Memoria
●
●
●
●
Q
●
●
●
●
●
●
●
●
●
●
●
●
●
●
●
●
●
●
●
●
●
●
●
CUIDADO DEL PROD UCTO
●
●
Un acumulador de pilas recargables de Niquel Cadmio viene instalado en
cada Transceptor”
Sin Cordon para proporcionar
la energfa
para el
●
funcionamiento.
●
●
●
A.
~eemplazo
de la Pi!a
●
●
Para Reemplazar
1.
2.
3.
4.
5.
6.
7.
8.
9.
10.
la Piia
●
Asegurese de que la LUZ TELEFONICA (PHONE LIGH~ en el
Transceptor este en la position de APAGADO.
Abra el COMPARTIMIENTO DE LA P/M, ubicado en la parte trasera del
TRANSCEPTOR, ligeramente des!izando la puefiecilla hacia abajo.
Remueva el TORNILLO del sasten de la pila. Remueva el SOSTEN.
Deslice el ENCHUFE DE M PILA hacia abajo y fuera de la clavija. (No
tire de Ios hilos.)
Levante ei (ACUMULADOR DE PIUS) fuera de la unidad.
Deseche de la pila cotrectamente.
Enchufe la pila de reemplazo. (GE Cat. #5-2313).
Coloque de nuevo el SOSTEN DE U P/M. Haga entrar atornillando[o.
Coloque de nuevo la cubierta del COMPARTiM/ENTO DE LA P/U.
Recargue el TRANSCEPTOR en la BASE durante 12 horas o rnas antes
de usarlo.
●
●
●
●
●
●
●
●
●
u
+
w
●
●
●
●
●
●
●
●
●
●
●
●
.
●
●
●
s
de Seguridad Con la Pi/a
Para su se~uridad, favor de seguir estas simples precauciones:
●
No recar~ue, desmonte, mutfie, perfore, o deseche la pila en un fuego.
Coma otras pilas de este tipo, si la pila se quema o si esta perforada,
pu~e soltar materials toxicos que podrfan causar[e dafios.
●
Guarde la pila fuera del alcance de nifios.
Precauciones
●
Reemolace solamente con lapilaGE#5-2313
de{ Cat~logo o con la pila de
reemplazo de la AT&T #405 1.“El Formulario de Pedidos de Accesorios
Viene inciuido con esta Guia.
●
●
●
●
●
●
●
●
●
●
●
c
●
●
●
●
●
●
●
●
Nota: Numerosos estados han formulado Ieyes
con respecto al ado de deshacerse de pilas
recargables de una manera apropiada. Este
producto contiene una pila re=rgable de
niquel-cadmio y debe ser rocesada o
desechada de una manera apropiada.
Chequee con sus regulaciones Federales, del
Estado o Locales como procesar o desechar.
●
●
●
●
●
●
●
●
●
●
●
9
●
●
●
●
●
●
●
●
●
51
CUIDADO DEL PRODUCTO
●
La antenadel transceptorde
su GE Telefono Sin Cordon hasido
Para ser reemplazada facilmente en caso de que sea dafiada.
1. Gire la BASE de la antena de derecha a izquierda. La
antena se aflojara.
disefiada
2. Levante la antefia de la base.
3. lnserte la ANTENA DE REEIVIPUZO DE CAUCHO
... .
(GE #5-2327 del Catalogo). Atornille para fijar la
antena firmemente en su sitio.
z
4
B.
Reemplazo
la Antena
e
n
..
*
.*
R
a
+
.0.
●
●**
●
●
●
●
Para mantener su Telefono GE funcionando
estas sencillas reglas:
y
Evite de poner el telefono cerca de aparat~s
alta temperature.
●
en buenas condiciones, siga
C.
●
●
●
●
calorificos u otras fuentes de
.0
●
●
●
●
artefactos que generan ruido
Trate de evitar de poner el telefono cerca de
electrico (per ejemplo. motores, Iamparas fluorescences).
●
●
●
●
●
●
El telefono no debe ser expuesto ni a la Iuz directs de[ sol ni ala humedad.
●
●
●
●
●
Evite de dejar caer el telefono o maltralar su telefono
●
●
●
●
Limpie el telefono
con una tela suave. (Recuerde
primeramente el telefono de la toma en la pared.)
de desenchufar
●
●
●
●
●
Nunca use un Iimpiador fuerte o polvos abrasvios porque estos dafiaran el
acabado.
●
●
●
●
●
●
Guarde el embalaje original, por si acaso necesite enviar el telefono mas
●
●
tarde.
●
●
●
Limpie periodicamente
Ios contactos recargadores en el Transceptor y en el
Soporte con una tela suave.
●
●
●
●
●
●
●
●
●
●
52
Cuidado
General del
Producto
EN CASO DE DIFICULTAD
En CaSOde dificultad, cbequee Ios cases siguientes
antes de buscar un semicio de reparaciones.
A. CUADRO DE AVERIAS REPARABLE
SOLUCION
PR06LEMA
No hay sefial de
tono
1. Chequee la instalacian
- ~Esta ccnectado ei CORDON DE ENERGiA OE U BASE con un tomacorriente que Iunciana?
- ~ Esta co~ectado e{ COHDON DE ENERGtADEL SOPOHTERECARGADORa un tomacorriente que
funciona?
- ~Esta encendida la LUZ RECARGADORAen el TRANSCEPTOH
- LNOuse un tomacorriente que pueda ser PRENOIDOOAPAG~RO por uc iflterruptor en la pared.
- ~Esta conectado firmemente a la unidad de base y af tomacornente telefon[co el CORDON DE M LINEA
TELEFONICA?
- L EstaIevantada la ANTENA DE U BASE
2. ~Esti fuera~el alcancede la base el TRANSCEPTORSIN COROOM
(12 horas).
3. Asegurese de queIas PIMS estenremrgadasapmpia~amente.
4. ~Esti colocado corr~tamente el ACUMUMDOR qE PIUS
(Vea la pdgina 51 )
5. Disconecteei telefonosin cordony cofl=te Otroteie~o~o~ mismoenchufe.Si nohaysefialde Iinea,el
problems puede estar en su aiambraje o con el servic!o Iocai.
de la ei~ricidad,o cuandoIaspiias son reemplzadas,
6. Cuandoquiem ue ocurra un torte e~ el suministro
debe volver ei 7 RANSCEPTORa la BASE.
Hay Sefiai de tines pero n{
puede hater una Ilarnada
7. Si Ud. tiene ei servicio de puiso, ei conmutador de TONOiPULSOdebe estar en la position de PUiSO.
El Transceptorno suena
8. Asegurese de que ei conmutador dei TlM8~E (~~NGE~)en ei Transceptoreste “PRENDiOO”.
9. ~ene Ud. demasiado teiefonos anexos en su i~nea telefdni=? pwebe desenchufandoaigunos teiefonos.
10. ~aua ios cheaueos 1, 2, 3, 4, 5, Y 6 arnba.
b 8ase
no
suena
11. Asegurese de que ei ~nmutador dei TfMSREen la Base esta en la ~osidon de ALTOo BAJO (NO APAGAUO).
12. Vea # 9 arnba.
13. Vea # 10 arnba.
Ud. experiments
estatica, ruido, o
disminuciOn o aumento
del sonido
14. ~ Esta levantada la ANTENA DE 8AS=
15. ~Esta fuera dei aicance de la BASE ei TRANSCEPTOm Ac4quese mas a la BASE.
16.Naesita mudar la BASE a un nuevo sitio?
17. ~Esta enchufada la BASE CON CORDON en una tomacarriente con aparatos eiedrodomdsticos?
fuera ei USO, mude ei teiefono o ei aparato.
18. Chequee la instaiacion como en ei #l arriba.
& unidad hate sonidos
cortos intermitentes.
19.
20.
21.
22.
Probiernas Marcando
mn la Memoria
23. Programo Ud. corrmamente la rnernofla?(Vea la pagina49.)
24. Sigid Ud. correctamente la secuencia pam mar=r un ntimefo? (Vea la pagina 49.)
25. Vea #7 atiba.
26. Programo Ud. nuevamente Ios numeros en ia memofla despues de un torte en ei suministro de energia
o desoues de reemufazar ia Piia? (Vea la pagina 49).
b Iuz indicadora dei nivel
de la pila parpadea y la
unidad hate midos
intermitentes despuds de
algunas Ilamadas
telefdnicas, aunque la pila
ha sido re~rgada por 12
horas
27. R-rgue
la pila por 12 horas.
28. Reemplace la Piia.
29. Umpie ios contactos r-rgadores
El control de aviso no
funciona.
30. Chequee para ver si la energia tie intemmpida
Recargue la pila por 12 horas.
timpie ios contados r=rgadores
en ei 7HANsCE~TOR
Chequee ia instaiacion como en ei #1 arriba.
Reempiace la P/U.
en ei TMsceptof
y en la BASE con una
Si eso
teia suave.
y en el Soporte Re~rgador.
(O vea #3 arriba.)
53
GARANTIA
LIMITADA
DE UN ANO
●
●
●
~Que Ie cubre la garantia?
Cualquier defecto de mano de obra o material.
●
●
●
~Por
cuanto
tiempo
despues
de
la comra
●
original?
●
Un afio.
●
●
La garantia para unidades rentadas empieza con la primers rents.
~Que vamos a hater nosotros?
a nuestro criterio, una unidad reacondicionada.
. Proveerle a Ud. con una nueva o,
La unidad cambiada estara garantizada por el tiempo restante del afio de garantia de la
unidad original que Ud. compro.
de la garantia?
que haya sido
LC6mo hater un raciamo
●
●
. Empaquete
●
la unidada
correctarnente,
Incluya cualquier
●
●
●
●
●
●
●
cabie, etc.,
originalmehte proveidos el producto. Nosotros recomendamos usar Ias cajas originates y
materiaies de empaquetar.
lncluya en el paquete una copia de] recibo de compra o otra evidencia con al fecha de
compra. Si la unidad fue un regale, proves un documento especificando la fecha recibida.
Tambien escriba su nombre y direccion y una desripcion de! defecto,
● Envie la unidad por UPS (United Parcel Sewice) o su equivalence a:
Thomson Consumer Electronics, Inc.
Product Exchange Center
32 Spur Drive
E! Paso, Texas 79906
Pague cualquier recibo enviado por la Exchange Center por sewicios no cubieflos por la
garantia.
● Una unidad nueva o reacandicionada [e sera enviada a Ud. con el envio pagado por la
compafiia.
LQue no Ie cubre la garantia?
● Instrucciones de consumidor. El Manual del Propietario Ie provee a Ud. con information
adicional, consulte con su concesionario.
● Instalaciones y adustes de la unidad.
● Pilas.
Desperfectos por mal uso o negligencia.
● Productos que hayan sido modificados o incorpomdos dentro de otros products.
● Productos comprados o repamdos fuera de Ios Estados Unidos.
a esta Ud
garantia?
~Como Ias leyes del estado estan relacionadas
tal vez tenga otros derechos, Ios
c ~sta garantia
Ie da a Ud. derechos Iegales especificos.
cuales varian
de estado a estado.
LSi este prOdudo ha sido adquirido fuera de Ios Estdos Unidos?
. Esta garant ia no vale. Consulte al distribuidor para cudquier information necesafla.
●
●
●
●
●
●
●
●
●
●
●
●
●
●
●
●
●
●
●
●
●
●
●
●
●
●
●
●
●
●
●
●
●
●
●
●
●
●
Thomson
Consumer El~troni~,
●
Inc.
●
●
●
SERVICIO DE RAPARACIONES
●
FCC La FCC requiere que este producto sea reparado solamente por el fabricate
o sus
agentes de servicio autoizados De acuerdo con las reguiaciones de la FCC cambios o
modificaciones no aprobados expresamente por el Thomson Consumer Electronics
podrian anular la autoridad del usuario de
usar este
~nstrucciofles
en o
a laproducto.
garantia Para
Inclulda
en esta Gula
refierase
de reparaciones,
conlo obtener sewicio
Ilame
al “Customer
Sewice”,
ntimero
telefdnico:
54
●
J●
●
800-448-0329
Adjunte el recibo de venta a este manual para unaEsta
referencia
futurasera
o apunte
la fecha
information
muy Util
si e!
en que fue comprado o recibido como un regale.
servicio de de reparaciones
fuera requerido durante el plazo de la garantia.
~i
Fecha de Compra
Nombre de la Tienda ~“
.●
:●
●
INFORMATION
DE LA REGISTRAC1ON DE LA FCC
Su equlpo [elefonlco de la GE ha s}do regls;rado
con la Comlslon
federal ae Comunrcaclofles LFCC) y esta en acuerdo con ]as par~es 15
y 68 de Ias Regulac!ones y Reglas de la FCC.
1. Notificacitin a la Compafiia Teiefonica Local
Al fondo de este equlpo Ud. hallar~ Un rdtulo tn~icando, entre otra lflfOrmaC!On, el fltimero de la
Reglstraclon con la FCC y el Numero de{ Equivalence Tmbre (RE~) para este equlco. Ud. debera. a pet[clon, proveer esta lnformac]on
a su compafiia telefonica.
El R~N es util Para determlnar el nurnero total de artefactos que u!. Puede conec~~r a su Iinea te~eftinica. todavia asegurando que
todos estos artefactos sonaran cuando se Ilame su numero teiefdnlco. En la maYor~ade Ias areas (Pero no en todas)t el total de IOS
ntimeros REN de todos Ios artefactos conectados a una lines no debe exceder 5. para estar se9ur0 del ntimero totalde artefactos que
2,
Ud. pueda conectar a su Iinea (determinado pore! RE~), Ud. debera Poflerse en contacto cofl su compafiiatelefonica local.
NOTAS: No se puede usar este equipo con un teiefono de previo pago proveido Por la compafiia telefonica.
Las Iineas compartidas son sujetas a Ias tarifas de{ estado, y por eso, es gos~ble que Ud. no pueda USar su propio equipo teiefonico si
Ud. estuviera compartiendo la misma linea telefdnica con otros abonados.
Se debe notiffcar la cornpafiia telefonica cuando se desonecte permanentemente su te~efono de la iinea.
Derechos de la Compafiia Telefdnica.
su equipo causase algun probiema en su lines que pudiera dafiar la red telef~nl~~. la compafi~a telefonica siempre que sea posibie
le avisara de la posible interruption temporal de su servcio. En =s0 que la com~aflla no Pudlera avisade de antemano y hubiero
Si
En caso de tal interruption
necesidad de tomar tal accion, la compafiia !elefonica podra interrumpir su s@mciOjflm~iatemeflte.
telefdnica temporal la compafiia debe: (1) dade aviso ai memento de tal ifltermPclofl temPorai de se~icio, (2) concederie a Ud. la
ooortunidad de correQfir la situacibn, (3) informarie a Ud. de sus derec~os de Presentar una ques~a a la Comisionde acuerdo con Ios
procedimientos dictados en la Subpafie E de la Parte 68 de Ias Regularciones y Reglas de la FCC
La compafiia telefonica puede hater Ios cambios en sus instalacio~es de comunicaci~nt en ~uipos, en sus funcionamientoso
procedimientos que digne necesarios para ei manejo de sus negocios y que no scan incompatibles con Ias Reglas y Regulaciones de
de SuequiPo te~ef~nico, la Compafiia telefonica debeti darle
la FCC. Si estos cam bions pudieran alterrar e! uso o e{ funcionamiento
aviso ad=uado
en escrito para
lNFORMACION
que Ud. goco de un servicio ininterrupido.
DE INTERFERENCIAS
Este artefacto cumpie con la Parte 15 de Ias Regias de la FCC. SU fncionamieflto es sujeto a Ias dos condiciones siquientes: (1) Este
artefacto no puede causar intederencia dafiosa, y (2) Es~eatiefacto debe acepta~ cuaiquier intederencia recibida, incluyendo interfrencia
que guedo causar un funcionamiento no deseado.
Este equipo ha sido probado y cumple con Ios Iimites para un afiefacto digitai de la Clase 6, de confomidad con la Parte 15 de Ias Reglas
de la FCC. Estos Iimites han sido diseflados para proporcionar una protmcidn =onable contm una interferencia dtiosa que pueda
existiren una instalacion domestics.
Este equipo genera, usa y puede radiar la energfa de frecuencia de una mdio y. si no fuem instaiado y usado de acuerdo con Ias
instrucciones, puede causar interferencia dafiosa a las transmisiones radiates. Sin embargo, no hay garantia que la interferencia no
wurrira
en una instalacion
en particular.
Si este equipo causa en efecto una interferencia
dafiosa a la recepcidnde la ~djo o de la televjsdn,to cual puede ser determinado
apagando y prendiendo el equipo, Ie animamos a Ud. de tratar de conegir la intetierencia por medio de una (o mas) de Ias sugerencias
siguientes:
Cambie la position o la ubicacidn de la antena (quiere decir la antena de la mdio o de la television que esta r~ibiendo la interferencia),
Cambie la position o cambie la ubicacion y aumente la distancia entre ei equipo de telecomunicatciones
y la antena receptors
de la
radio o de la television
que esta recibiendo la interferencia.
Cone@e el equipo de tei~ommuniaciones
a una toma en un circuito diferente dei circuito al cual la antena receptors este conectada.
Consulte al comerciante o a un tenico de radio/telesion experto para ayuda.
Siestas medidas no eliminan la intederencia, favor de consultar a su distflbuidoro a un tknico de radio/television experto por otras
sugerencias. Tambien, la Comision Federal de Comunicaciones (FCC) ha preparado un folleto muy util, “How To Identify and Resolve
de Raditielevison”).
Este folletose puede
Radio~
Interference Problems” (“como Identificar y Resolver Problemas de Interferencia
obtefler del U.S. Government Printing Office, Washington, D.C. 2040Z. Favor de especifi=r el numero 004-000 -00345-4 cuando haga su
pedido.
●
●
●
●
COMPATIBILIDAD
DE APARATITO DE SORDERA
Este telefono cumple con Ias reg!as de la FCC para ser compatible con Ios Aparatitos de Sordera.
55
Model 2-9638
349A 13644001
~OMSON
(Rev.
94-18
Printed in Malaysia
@ 1994
O, Ws)
CONSUMER
ELECTRO~lCS INC.
600 N. Sherman Otive, P.O.80X 1976
Indianapolis, IN 46206-1976