1
3
Assembly & Set-Up
Contents of Carton
•
One Tiller
•
One Handlebar Assembly
•
One Shift Rod
•
One Depth Stake
•
One Operator’s Manual
•
One Engine Operator’s Manual
NOTE: This Operator’s Manual covers several models. Garden
tiller features may vary by model. Not all features in this manual
are applicable to all garden tiller models and the garden tiller
depicted may differ from yours.
NOTE: Reference to the right or left side of the tiller is
determined from the operator’s position behind the machine. All
exceptions will be noted.
Warning! To prevent personal injury or property
damage, do not start the engine until all assembly
steps are complete and you have read and
understand the Safe Operation Practices Section
and the Operating Section in this manual.
Depth Stake
WARNING! Disconnect the spark plug wire and
ground it against the engine to prevent unintended
starting.
1.
Tip the tiller forward so that it rests on the front
counterweight.
2.
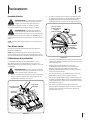
Un-thread the T-knob from the top of the depth stake and
remove the flat washer and hex bolt. Remove the hairpin
clip from the clevis pin. See Fig. 3-1.
Assembly
T-Knob Flat Washer
Unpacking Instructions
1.
Remove the staples, break the glue on the top flaps, or cut
the tape at the end of the carton and peel along the top
flap to open carton.
2.
Remove the loose parts included with the tiller (i.e.,
Operator’s Manual, etc.).
3.
Cut the corners and lay the carton down flat.
4.
Remove the packing materials.
5.
Roll or slide the tiller out of the carton. Check the carton
thoroughly for loose parts.
6.
Extend the control cable and lay it on the floor. Be careful
not to bend or kink the control cable.
NOTE: This tiller is shipped without gasoline or oil in the engine.
Be certain to service engine with gasoline and oil as instructed
in the separate Engine Operator’s Manual before operating your
machine.
Clevis
Pin
Hex Bolt
Hairpin Clip
Depth
Stake
Figure 3-1
3.
Raise the tine shield hinge flap assembly and insert the
depth stake assembly into the slot — under the tine shield
— and up through the tine shield assembly.
4.
Insert the clevis pin through the tine shield and depth stake
assemblies. Secure it with the hairpin clip.
5.
Insert a hex bolt into the top hole of the depth stake
assembly. Place the flat washer on the hex bolt and thread
the T-knob onto the hex bolt. Tighten securely. See Fig. 3-1.
6.
Tip the tiller back down so that it rests on the tines.
7