1
6200 Grand Pointe Dr., Grand Blanc, MI 48439
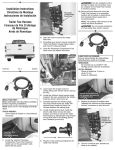
5. Raise hitch into position and align holes of the hitch with the
weld nuts in the vehicle frame rails where bolts were previously removed. The DS hitch bracket has to slide underneath
the compressor bracket.
6. (PS), place exhaust hanger bracket into original position on
top of hitch bracket (rod end through hitch bracket opening for
AWD vehicles) and secure hanger and hitch bracket to frame
rail using the (2) M10 bolts and lock washers. (DS), using
(1) M10 bolt and lock washer secure compressor and hitch
bracket to frame rail. Using 15mm socket, tighten to hold in
place. Use Thread Locker on bolts before installing. (Recommended: GM #12345493).
7. Bend handle nuts as shown below.
8. Install handle nuts into slot on the inside DS frame rail. Apply
Thread Locker to M12 bolts and insert bolt through vertical
portion of hitch bracket and rail into the handle nut. Using
18mm socket, tighten. Repeat for PS.
9. Torque M10 bolts to 72 lbs ± 3NM.
10. Torque M12 bolts to 100 lbs ± 5NM.
11. Reinstall the tail pipe's rubber grommet to the end of the
hanger rod. (AWD Vehicles Only)
12. Raise spare tire.
Trailer Hitch
ALL INFORMATION WITHIN
ABOVE BORDER TO BE PRINTED
EXACTLY AS SHOWN ON 8.5 x 11
WHITE 16 POUND NON-BOND
RECYCLABLE PAPER.
PRINT ON BOTH SIDES, EXCLUDING TEMPLATES.
TO BE UNITIZED IN ACCORDANCE
WITH GM SPECIFICATIONS.
IR 18FE11
DATE
REVISION
AUTH
DR
TITLE
PART NO.
PART NO.
19258988
SHEET
INSTALLATION INSTRUCTIONS
Trailer Hitch
19258988
SHEET
2
2
OF
OF
6
6