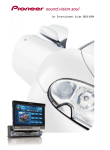
1
Multi-CD control High power
CD player with RDS/DAB tuner
ENGLISH
Reproductor de CD de alta potencia con control de
múltiples CD con sintonizador RDS/DAB
ESPAÑOL
FRANÇAIS
DEH-P90DAB
DEUTSCH
Operation Manual
Manual de Operación
ITALIANO
NEDERLANDS
Contents
Key Finder .................................................... 3
Head Unit
- Steering Remote Controller
-
Before Using This Product ...................... 5
About This Product .......................................... 5
About This Manual ............................................ 5
About DAB Tuner ............................................ 5
Resetting the Microprocessor ............................ 6
About the Demo Mode ...................................... 7
- Reverse Demo
- Feature Demo
Precaution .......................................................... 8
In Case of Trouble ............................................ 8
Remote Controller and Care .................... 9
Using the Steering Remote Controller .............. 9
- Battery
Basic Operation ...................................... 11
To Listen to Music .......................................... 11
Basic Operation of Tuner ................................ 12
- Manual and Seek Tuning
- Preset Tuning
- Band
Basic Operation of Built-in CD Player .......... 13
- Eject
- Changing the Display
(only for CD TEXT Discs)
- Track Search and Fast Forward/Reverse
- CD Loading Slot
- Open
Basic Operation of Multi-CD Player .............. 15
- Track Search and Fast Forward/Reverse
- Disc Search
- Changing the Display
(When playing a CD TEXT disc on a CD
TEXT compatible Multi-CD Player)
- Disc Number Search
(for 6-Disc, 12-Disc types)
- Disc Number Rough Search
(for 50-Disc type only)
Basic Operation of DAB ................................ 17
- Changing the Display
- Preset Tuning
- DAB indicator
- Selecting the Ensemble or Service
- Band
1
Corresponding Display Indications and
Buttons ...................................................... 19
Entering the Function Menu ............................ 19
Function Menu Functions ................................ 20
Entering the Detailed Setting Menu ................ 22
Detailed Setting Menu Functions .................... 23
Tuner Operation ...................................... 24
-
Local Seek Tuning (LOCAL)
Best Stations Memory
(Best Stations Memory)
Using the RDS Functions ........................ 25
What is RDS? .................................................. 25
Program Service Name Display ...................... 25
AF Function (AlternativeFrequency) .............. 26
- Activating/Deactivating the AF Function
PI Seek Function ............................................ 27
- PI Seek
- Auto PI Seek (for preset station)
Regional Function (Regional) ........................ 27
- Activating/Deactivating
the Regional Function
Traffic Announcement Standby Function
(Traffic Announcement) .......................... 28
- Activating/Deactivating the TA Function
- Canceling Traffic Announcements
- Adjusting the TA Volume
- TP Alarm Function
PTY Function .................................................. 30
- Searching the PTY
- News Program Interruption Setting (News)
- PTY Alarm
- Canceling Announcements
- PTY List
Radio Text ...................................................... 33
- Radio Text Display
- Storing Radio Text in Memory
- Recalling Preset Radio Text
Using the DAB Functions ........................ 35
What is DAB? ................................................ 35
- Outline
Announcement Support Function .................... 36
- Announcement operated by the TA button
- TP Alarm Function
- Operating Announcement with the
Function Menu
- Switching Interrupting Announcement
Repeat Play (Play Mode)
Random Play (RandomPlay)
- Pause (Pause)
- Disc Title Input (Title Input ABC)
-
-
Audio Adjustment .................................... 52
Other Functions ........................................ 68
Switching the Entertainment Display .............. 68
Using the AUX Source .................................... 69
- Selecting the AUX Source
- AUX Title Input
Cellular Telephone Muting .............................. 69
CD Player and Care .................................. 70
ITALIANO
Precaution ........................................................ 70
Built-in CD Player’s Error Message .............. 71
Specifications .......................................... 72
NEDERLANDS
Selecting the Equalizer Curve ........................ 52
Entering the Audio Menu ................................ 52
Audio Menu Functions .................................... 53
- Balance Adjustment (FAD/BAL)
- Equalizer Curve Adjustment (EqualizEr)
- Equalizer Curve Fine Adjustment (EqualizEr)
- Loudness Adjustment (LoudnEss)
- Subwoofer Output (Sub W-1)
- Subwoofer Setting Adjustment (Sub W-2)
- Non Fading Output (Non FadE-1)
- Non Fading Output Level Adjustment
(Non FadE-2)
- High Pass Filter (High Pass)
- Front Image Enhancer Function (FIE)
- Source Level Adjustment (SLA) Function
- Automatic Sound Levelizer (ASL) Function
Entering the Initial Setting Menu .................... 62
Initial Setting Menu Functions ........................ 63
- Changing the FM Tuning Step
(FM Tuning Step)
- Setting the DAB Priority Function
(DAB Priority)
- Switching the Auto PI Seek (Auto PI Seek)
- Setting the Warning Tone (Warning Tone)
- Switching the AUX Mode (AUX)
- Setting the Dimmer (Dimmer)
- Selecting the Illumination Color
(Illumination Color)
- Switching the Rear Speaker Output
(Rear Speaker Out)
- Setting the Subwoofer Control
(Sub woofer control)
- Flap auto open (FLAP AUTO)
- Selecting the Wall Paper (Wall Paper)
- Selecting the Brightness (Brightness)
FRANÇAIS
Repeat Play (Play Mode)
Random Play (RandomPlay)
- Pause (Pause)
Compression and DBE (Compression) .......... 48
- Comp./DBE ON/OFF Switching
Disc Title ........................................................ 49
- Disc Title Input (Title Input ABC)
- Selecting Discs by Disc Title List
(Disc List)
-
Initial Setting ............................................ 62
DEUTSCH
Using Multi-CD Players .......................... 47
Theft Protection .............................................. 60
- Detaching the Front Panel
- Replacing the Front Panel
- Warning Tone
ESPAÑOL
Using the Built-in CD Player .................. 45
Detaching and Replacing
the Front Panel .................................. 60
ENGLISH
Service Follow Function ................................ 39
- Service Follow Function (FM)
Service Component Function .......................... 40
Available Service List Function ...................... 40
Preset Service List Function ............................ 41
Available PTY Function .................................. 42
- Searching the PTY
- Cancelling the PTY Search Setting mode
Dynamic Label Function ................................ 43
- Dynamic Label Display
- Storing Dynamic Label in Memory
- Recalling Preset Dynamic Label
2
Key Finder
Head Unit
DISPLAY button
RESET button FUNCTION button
ENTERTAINMENT button
EJECT button
5/∞/2/3 buttons
EQ selector
+/– button
Buttons 1–6
TEXT button
SOURCE/OFF button
3
BAND button
PTY button
TA button
AUDIO button
Steering Remote Controller
ENGLISH
A steering remote controller that enables remote operation of the head unit is supplied.
Operation is the same as when using buttons on the head unit.
BAND button
5/∞ buttons
SOURCE/OFF button
2/3 buttons
AUDIO button
+/– button
Raise or
lower the
volume.
DEUTSCH
FUNCTION button
ESPAÑOL
ATT button
This lets you quickly
lower volume level
(by about 90%). Press
once more to return to
the original volume
level.
FRANÇAIS
ITALIANO
NEDERLANDS
4
Before Using This Product
About This Product
• This product complies with the EMC Directives (89/336/EEC, 92/31/EEC) and CE Marking
Directive (93/68/EEC).
The tuner frequencies on this product are allocated for use in Western Europe, Asia, the
Middle East, Africa and Oceania. Use in other areas may result in improper reception. The
RDS function operates only in areas with FM stations broadcasting RDS signals.
About This Manual
This product features a number of sophisticated functions ensuring superior reception and
operation. All are designed for the easiest possible use, but many are not self-explanatory.
This operation manual is intended to help you benefit fully from their potential and to
maximize your listening enjoyment.
We recommend that you familiarize yourself with the functions and their operation by
reading through the manual before you begin using this product. It is especially important
that you read and observe the “Precaution” on page 8 and in other sections.
This manual explains head unit operation. You can perform the same operations with the
steering remote controller.
About DAB Tuner
Since this product is equipped with a DAB tuner, never connect an external DAB tuner. If
you do, it may cause malfunction.
5
Resetting the Microprocessor
ENGLISH
The microprocessor must be reset under the following conditions:
When using this product for the first time after installation.
When the machine fails to operate properly.
When strange (incorrect) messages appear on the display.
• To reset the microprocessor, press the RESET button on the head unit with a
pen tip or other pointed instrument.
ESPAÑOL
DEUTSCH
FRANÇAIS
ITALIANO
NEDERLANDS
6
Before Using This Product
About the Demo Mode
This product features two demonstration modes. One is the Reverse Demo mode, the other
is the Feature Demo mode.
Reverse Demo
If you do not perform an operation within about 30 seconds, screen indications start to
reverse, and then continue reversing every 10 seconds. Pressing button 5 when power to
this product is switched OFF while the ignition switch is set to ACC or ON cancels the
Reverse Demo mode. Pressing button 5 again to start the Reverse Mode.
Feature Demo
The Feature Demo automatically starts when power to this product is switched OFF while
the ignition switch is set to ACC or ON. Pressing button 6 during Feature Demo operation
cancels the Feature Demo mode. Pressing button 6 again to start the Feature Mode.
Remember that if the Feature Demo continues operating when the car engine is switched
OFF, it may drain battery power.
Note:
• You cannot cancel a Demo mode when the front panel is open.
• The red lead (ACC) of this product should be connected to a terminal coupled with ignition switch
ON/OFF operations. If this is not done, the vehicle battery may be drained.
7
Precaution
ENGLISH
• A “CLASS 1 LASER PRODUCT” label is affixed to the bottom of the player.
CLASS 1
LASER PRODUCT
ESPAÑOL
•
•
•
•
•
The Pioneer CarStereo-Pass is for use only in Germany.
Keep this manual handy as a reference for operating procedures and precautions.
Always keep the volume low enough for outside sounds to be audible.
Protect the product from moisture.
If the battery is disconnected, the preset memory will be erased and must be reprogrammed.
DEUTSCH
In Case of Trouble
Should this product fail to operate properly, contact your dealer or nearest authorized
Pioneer Service Station.
FRANÇAIS
ITALIANO
NEDERLANDS
8
Remote Controller and Care
Using the Steering Remote Controller
Precaution:
• Do not operate this unit while manipulating the steering wheel as it might result in a traffic accident.
• If you have to operate this unit unavoidably when driving, look ahead carefully to avoid the risk of
being involved in a traffic accident.
• If any of the following troubles occur, immediately stop using this unit and consult with the dealer
from whom you purchased it:
– the unit is smoking.
– the unit is emitting abnormal odor.
– a foreign object has entered the unit.
– liquid has been spilled on or into the unit.
If you continue to use this unit without finding a remedy, the unit may be damaged badly, resulting
in a serious accident or fire.
• Do not leave this unit free (unattached) inside the car. When the car stops or turns a curve, the unit
might drop on the floor. If the unit rolls under the brake pedal, it might prevent the driver from
braking well, causing serious trouble. Be sure to fix this unit to the steering wheel.
• Do not disassemble or modify this unit. To do so may cause a fault.
Battery
7 Install the Lithium Battery
• Remove the cover on the back of the steering remote controller and insert
the battery with the (+) and (–) poles pointing in the proper direction.
9
ENGLISH
7 Replacing the Lithium Battery
• Remove the lithium battery.
ESPAÑOL
Precaution:
DEUTSCH
• Replace the battery with a CR2032 lithium battery.
• Replace the battery in the unit using a non metallic tapered instrument.
WARNING:
• Keep the lithium battery out of reach of children. Should the battery be swallowed,
immediately consult a doctor.
FRANÇAIS
CAUTION:
•
•
•
•
•
ITALIANO
Do not recharge, disassemble, heat or dispose of battery in a fire.
Use a CR2032 (3 V) lithium battery only. Never use other types of battery with this unit.
Do not handle the battery with metallic tools.
Do not store the lithium battery with metallic materials.
When disposing of used batteries, please comply with governmental regulations or
environmental public institution’s rules that apply in your country/area.
• Always check carefully that you are loading the battery with its (+) and (–) poles facing
in the proper directions.
NEDERLANDS
10
Basic Operation
To Listen to Music
The following explains the initial of operations required before you can listen to music.
Note:
• Loading a disc in this product. (Refer to page 14.)
1. Select the desired source (e.g. Tuner).
Each press changes the Source ...
Each press of the SOURCE/OFF button selects the desired source in the following order:
Built-in CD player (Compact Disc) = TV = Tuner = DAB (Digital Audio Broadcasting)
Tuner = Multi-CD player = External Unit 1 = External Unit 2 = AUX
Note:
• External Unit refers to a Pioneer product (such as one available in the future) that, although incompatible as a source, enables control of basic functions by this product. Two External Units can be
controlled by this product, although “External” is displayed whether you select External Unit 1 or
External Unit 2. When two External Units are connected, the allocation of them to External Unit 1
or External Unit 2 is automatically set by this product.
• In the following cases, the sound source will not change:
* When a product corresponding to each source is not connected to this product.
* No disc is set in this product.
* No magazine is set in the Multi-CD player.
* AUX (external input) is set to OFF. (Refer to page 64.)
• When this product’s blue/white lead is connected to the car’s Auto-antenna relay control terminal,
the car’s Auto-antenna extends when this product’s source is switched ON. To retract the antenna,
switch the source OFF.
2. Raise or lower the volume.
3. Turn the source OFF.
Hold for 1 second
11
ENGLISH
Basic Operation of Tuner
This product’s AF function can be switched ON and OFF. AF should be switched OFF for
normal tuning operations. (Refer to page 26.)
Manual and Seek Tuning
Manual Tuning (step by step)
0.5 seconds or less
Seek Tuning
0.5 seconds or more
ESPAÑOL
• You can select the tuning method by changing the length of time
you press the 2/3 button.
Note:
DEUTSCH
• If you continue pressing the button for longer than 0.5 seconds, you can skip
broadcast stations. Seek Tuning starts as soon as you release the button.
• Stereo indicator “
” lights when a stereo station is selected.
Preset Number Indicator
Band Indicator
Frequency Indicator
FRANÇAIS
ITALIANO
Preset Tuning
Band
• You can memorize broadcast stations in buttons
1 through 6 for easy, one-touch station recall.
2 seconds or less
Broadcast station preset memory
2 seconds or more
NEDERLANDS
Preset station recall
FM-1 = FM-2 = FM-3
= MW/LW
Note:
• Up to 18 FM stations (6 in FM-1, FM-2 and FM-3) and 6
MW/LW stations can be stored in memory.
• You can also use the 5 or ∞ buttons to recall broadcast
stations memorized in buttons 1 through 6.
12
Basic Operation
Basic Operation of Built-in CD Player
Eject
Press the EJECT button one
time, the front panel opens
and then the disc is ejected.
In case of opening the
front panel, you can just
eject a CD.
Note:
Play Time Indicator
Track Number Indicator
• The CD function can be turned
ON/OFF with the disc remaining in this product. (Refer to
page 11.)
• A disc left partially inserted
after ejection may incur damage or fall out.
Changing the Display (only for CD TEXT Discs)
Each press of the DISPLAY button changes the display in the following order:
Disc Title
Play Time
Disc Title
Disc Artist
Disc Title
Track Title
Disc Title
Track Artist
You can scroll to see the rest of the text by pressing the DISPLAY button for 2 seconds.
Note:
• A CD TEXT disc is a CD featuring recorded text information such as Disc Title, Artist Name
and Track Title.
• If certain text information is not recorded on a CD TEXT disc, “No ~” (e.g. “No Title”) is
displayed.
13
ENGLISH
Track Search and Fast Forward/Reverse
• You can select between Track Search or Fast Forward/Reverse by
pressing the 2/3 button for a different length of time.
0.5 seconds or less
Fast Forward/Reverse
Continue pressing
ESPAÑOL
Track Search
DEUTSCH
CD Loading Slot
FRANÇAIS
If a CD is inserted, the front panel is closed automatically.
The Built-in CD player plays one standard 12 cm or 8 cm
(single) CD at a time. Do not use an adapter when playing 8 cm CD.
Note:
• If a disc cannot be inserted fully or playback fails, make sure the
recorded side is down. Push the EJECT button and check the disc for
damage before reinserting it.
• If the Built-in CD player cannot operate properly, an error message
(such as “ERROR-14”) appears on the display. Refer to “Built-in CD
Player’s Error Message” on page 71.
• Do not insert anything other than a CD into the CD Loading Slot.
ITALIANO
Open
Press the EJECT button and hold momentarily, and the front
panel opens without ejecting a CD.
In case of opening the front panel, you can close it.
NEDERLANDS
Note:
• When opening the front panel, the 1 to 6 buttons are not available.
WARNING:
• Do not use with the front panel left open. If you do leave it open,
it may result in injury in the event of an accident.
14
Basic Operation
Basic Operation of Multi-CD Player
This product can control a Multi-CD player (sold separately).
Track Search and Fast Forward/Reverse
• You can select between Track Search or
Fast Forward/Reverse by pressing the 2/3
button for a different length of time.
Track Search
0.5 seconds or less
Fast Forward/Reverse
Continue pressing
Track Number Indicator
Disc Number Indicator
Play Time Indicator
Disc Search
Changing the Display (When playing a CD TEXT disc on a CD TEXT compatible
Multi-CD Player)
Each press of the DISPLAY button changes the display in the following order:
Disc Title
Play Time
Disc Title
Disc Artist
Disc Title
Track Title
Disc Title
Track Artist
You can scroll to see the rest of the text by pressing the DISPLAY button for 2 seconds.
Note:
• A CD TEXT disc is a CD featuring recorded text information such as Disc Title, Artist Name
and Track Title.
• If certain text information is not recorded on a CD TEXT disc, “No ~” (e.g. “No Title”) is
displayed.
• You cannot switch to the Disc Title Input mode in the Detailed Setting Menu.
15
ENGLISH
Disc Number Search (for 6-Disc, 12-Disc types)
• You can select discs directly with the 1 to 6 buttons. Just press the number
corresponding to the disc you want to listen to.
Note:
• When a 12-Disc Multi-CD Player is connected and you want to select disc 7 to 12, press the 1 to 6
buttons for 2 seconds.
ESPAÑOL
Disc Number Rough Search (for 50-Disc type only)
This handy function lets you select discs loaded in a 50-Disc Multi-CD Player using the 1
to 5 buttons. The 50 discs are divided into five blocks, with each of the 1 to 5 buttons
assigned to a block.
• Select the desired block with the 1 to 5 buttons.
Note:
DEUTSCH
• After completing a rough search, use the 5 and ∞ buttons to select a desired disc.
Note:
FRANÇAIS
• The Multi-CD player may perform a preparatory operation, such as verifying the presence of a disc
or reading disc information, when the power is turned ON or a new disc is selected for playback.
“READY” is displayed.
• When a magazine is loaded into a 50-Disc type Multi-CD Player, information on all the discs in
the magazine is read.
If you start playing a disc on a 50-Disc type Multi-CD Player before reading of information on all
discs has been completed, reading of information stops part way through. This will prevent you
from using the ITS function. (If you try and use this function, “Not Ready” is displayed.)
If this happens, reading of information begins again when you switch to a component other than
the 50-Disc Type Multi-CD Player.
• If the Multi-CD player cannot operate properly, an error message such as “ERROR-14” is displayed. Refer to the Multi-CD Player Owner’s Manual.
• If there are no discs in the Multi-CD player magazine, “No Disc” is displayed.
• “LOADING” will be displayed in the following cases:
* If the disc in the extra tray is selected.
* If the disc is moved from the extra tray to the magazine.
(Refer to the 50-Disc Type Multi-CD Player Owner’s Manual.)
• You cannot use the “Ejecting a Single Disc”, “Frequency Play”, “Music Group Play” or “ABC
Disc Title Search” functions with this product.
ITALIANO
NEDERLANDS
16
Basic Operation
Basic Operation of DAB
Changing the Display
Each press of the DISPLAY button changes the display in the following order:
Service Label
PTY Label
Service Label
Service Component Label
Service Label
Ensemble Label
Dynamic Label
Note:
• With a Service Component that has no Service Component Label or Dynamic Label, switching to
Service Component Label and Dynamic Label is not possible.
• With displays other than PTY Label, if you do not perform an operation within 8 seconds or press
a button other than the DISPLAY button, the display returns to PTY Label indications.
• The information is correlated with the list in the section “PTY List” on page 32.
Band Indicator
Service Label
Preset Tuning
PTY Label
• You can memorize Services in buttons 1 through
6 for easy, one-touch station recall.
Preset station recall
2 seconds or less
Broadcast station preset memory
2 seconds or more
Note:
• Up to 18 Service Components can be stored in memory.
• You can also use the 5 or ∞ buttons to recall Service
Components memorized in buttons 1 through 6.
17
ENGLISH
DAB indicator
There’s a “DAB” indicator in the display. This indicates DAB
reception is possible.
Note:
• If there’s no sound even when “DAB” is lit, switch Services. The Service you were
listening to may have ended.
7 When listening to DAB
ESPAÑOL
Lights during Ensemble reception.
7 When listening to a non-DAB source
Lights when in an area where DAB reception is possible.
Selecting the Ensemble or Service
Select a desired Service
0.5 seconds or less
Tune to a high or low frequency (Ensemble)
0.5 seconds or more*
DEUTSCH
When you first switch to DAB, Auto Seek is performed to find a DAB
Ensemble.
(Auto Seek is also performed in the same way each time you switch bands.)
Once Ensemble is received, Auto Seek ends.
FRANÇAIS
* By pressing the same button, search stops and the unit switches to standby for reception of that Ensemble frequency.
ITALIANO
Band
DAB1 = DAB2 = DAB3
To enable this unit to memorize more Services, frequencies are stored in three
bands, 1, 2 and 3. (Frequencies (Ensemble) that can be received are the same for
1, 2 and 3.)
NEDERLANDS
Note:
• When first switching to each of the bands, Auto Seek is performed for receivable
Ensembles. (The starting frequency for Auto Seek in each band differs. For this reason,
when multiple frequencies are receivable, a different frequency is automatically received
in each band.)
18
Basic Operation
Corresponding Display Indications and Buttons
This product’s display features Key Guidance Indicators. These light to indicate which of
the 5/∞/2/3 buttons you can use. When you’re in the Function Menu (refer to next section), Detailed Setting Menu (refer to page 22), Initial Setting Menu (refer to page 62) or
Audio Menu (refer to page 52), they also make it easy to see which 5/∞/2/3 buttons you
can use to switch functions ON/OFF, switch repeat selections and perform other operations.
Indicator and corresponding buttons are shown below.
7 Head Unit
7 Steering Remote
Controller
7 Display
z
z
1
When 1 is lit in the display, perform appropriate operations with the z buttons.
Entering the Function Menu
The Function Menu lets you operate simple functions for each source.
Note:
• After entering the Function Menu, if you do not perform an operation within about 30 seconds, the
Function Menu is automatically canceled.
1. Select the desired mode in the Function Menu. (Refer to next section,
“Function Menu Functions”.)
Each press changes the Mode ...
19
2. Operate a mode. (e.g. Random Play)
ENGLISH
ESPAÑOL
The button used and the operation it performs are
indicated by the key guidance indicator. Press the
5 button to switch the key guidance indicator ON,
and the ∞ button to switch it OFF.
3. Cancel the Function Menu.
DEUTSCH
Function Menu Functions
The following chart shows functions for each source in the Function Menu.
The chart also shows indications for each function, operations and buttons used to perform
operations. For more details, or when you want to know about an operation, refer to the
page number indicated in the chart.
FRANÇAIS
7 Tuner
Page
5: ON
∞: OFF
24
Regional Function (Regional)
5: ON
∞: OFF
27
Local Seek Tuning (LOCAL)
1 5: ON
3 ∞: OFF
2 2 or 3: Select (Sensitivity)
24
TA Function (Traffic Announcement)
5: ON
∞: OFF
28
AF Function (AlternativeFrequency)
5: ON
∞: OFF
26
News Program Interruption Setting
(News)
5: ON
∞: OFF
31
NEDERLANDS
Button: Operation
Best Stations Memory
(Best Stations Memory)
ITALIANO
Function name (Display)
20
Basic Operation
7 DAB Tuner
Function name (Display)
Button: Operation
Page
Announcement Support
(Announcement Support)
1 5: ON
2 ∞: OFF
2 2 or 3: Select (Mode)
36
Service Follow (Service Follow)
5: ON
∞: OFF
39
Service Component (Primary/Secondary)
2 or 3: Select
40
Available Service List
(Service List)
1 2 or 3: Select (Service)
2 5: Play
40
Preset Service List
(SRVC. List)
1 2 or 3: Select (Service)
2 5: Play
41
7 Built-in CD Player
Function name (Display)
Button: Operation
Page
Repeat Play (Play Mode)
5: ON
∞: OFF
45
Random Play (RandomPlay)
5: ON
∞: OFF
45
Pause (Pause)
5: ON
∞: OFF
46
Button: Operation
Page
Repeat Play (Play Mode)
2 or 3: Select (Play Range)
47
Selecting Discs by Disc Title List
(Disc List)
1 2 or 3: Select (Disc Title)
2 5: Play
51
Random Play (RandomPlay)
5: ON
∞: OFF
47
Pause (Pause)
5: ON
∞: OFF
48
Compression and DBE (Compression)
5 or ∞: Select
(Sound Quality Function)
48
7 Multi-CD Player
Function name (Display)
21
Entering the Detailed Setting Menu
ENGLISH
In the Detailed Setting Menu, you can operate convenient, complex functions for each
source.
1. Enter the Detailed Setting Menu.
ESPAÑOL
Hold for 2 seconds
2. Operate a mode.
3. Cancel the Detailed Setting Menu.
DEUTSCH
Note:
• You can cancel the Detailed Setting Menu by pressing the FUNCTION button again for 2 seconds.
FRANÇAIS
ITALIANO
NEDERLANDS
22
Basic Operation
Detailed Setting Menu Functions
The following chart shows functions for each source in the Detailed Setting Menu.
The chart also shows indications for each function, operations and buttons used to perform
operations. For more details, or when you want to know about an operation, refer to the
page number indicated in the chart.
7 Built-in CD Player
Function name (Display)
Button: Operation
Page
Disc Title Input (Title Input ABC)
1 5 or ∞: Select (Character)
2 2 or 3: Select (Position)
3 3: Memory
46
7 Multi-CD Player
23
Function name (Display)
Button: Operation
Page
Disc Title Input (Title Input ABC)
1 5 or ∞: Select (Character)
2 2 or 3: Select (Position)
3 3: Memory
49
Tuner Operation
Local Seek Tuning (LOCAL)
ENGLISH
When Local mode is ON (“LOC” indicator lights), you can only select broadcast stations
providing strong reception.
1. Press the FUNCTION button and select the Local mode (LOCAL) in the
Function Menu.
ESPAÑOL
2. Switch the Local ON/OFF with
the 5/∞ buttons.
3. Select the desired Local Seek
sensitivity with the 2/3 buttons.
DEUTSCH
FM
: LEVEL 1 Ô LEVEL 2 Ô LEVEL 3 Ô LEVEL 4
MW/LW : LEVEL 1 Ô LEVEL 2
Note:
• The LEVEL 4 setting allows reception of only the strongest stations, while lower settings let you
receive progressively weaker stations.
FRANÇAIS
Best Stations Memory (Best Stations Memory)
The BSM (Best Stations Memory) function stores stations in memory automatically.
1. Press the FUNCTION button and select the BSM mode (Best Stations
Memory) in the Function Menu.
2. Switch the BSM ON with the
5 button.
ITALIANO
The stations with the strongest signals will be stored under buttons 1–6
and in order of their signal strength.
NEDERLANDS
• To cancel the process, press the
∞ button in the Function
Menu before memorization is
complete.
24
Using the RDS Functions
What is RDS?
RDS (Radio Data System) is a system for transmitting data along with FM programs. This
data, which is inaudible, provides a variety of features such as: program service name, program type display, traffic announcement standby, automatic tuning and program type tuning, intended to aid radio listeners in tuning to a desired station.
Note:
• RDS service may not be provided by all stations.
• RDS functions, like AF (Alternative Frequencies search) and TA (Traffic Announcement standby),
are only active when your radio is tuned to RDS stations.
Program Service Name Display
With this function, the names of networks/stations providing RDS services replace the frequency on the display a few seconds after they are tuned in.
• When you want to know the frequency of the current station, change
the display.
Each press changes the Display ...
Each press of the DISPLAY button selects the display in the following order:
Program Service Name
PTY Information
Frequency
PTY Information
Note:
• After switching displays, if you do not perform an operation within 8 seconds, the Program Service
Name is automatically displayed.
7 PTY Information
PTY (Program Type ID code) information for the currently tuned station appears on the
display. The information is correlated with the list in the section “PTY List” on page 32.
Note:
• If a PTY code of zero is received from a station, “None” will be displayed. This indicates that the
station has not defined its program contents.
7 Frequency
The frequency of the current station appears on the display.
25
AF Function (AlternativeFrequency)
ENGLISH
The AF (Alternative Frequencies search) function is used to search for other frequencies in
the same network as the currently tuned station. It automatically retunes the receiver to
another frequency in the network which is broadcasting a stronger signal when there are
problems with reception of the currently tuned station or better reception is possible on
a different frequency.
Note:
ESPAÑOL
• AF tunes the receiver only to RDS stations when you use Seek tuning or BSM Auto Memory with
the “AF” indicator ON.
• When you recall a preset station, the tuner may update the preset station with a new frequency from
the station’s AF list. (This is only available when using presets on the FM-1 and FM-2 bands.) No
preset number appears on the display if the RDS data for the station received differs from that for
the originally stored station.
• Sound may be temporarily interrupted by another program during an AF frequency search.
• When the tuner is tuned to a non-RDS station, the “AF” indicator flashes.
• AF can be switched ON or OFF independently for each FM band.
DEUTSCH
Activating/Deactivating the AF Function
AF is set to ON by default.
1. Press the FUNCTION button and select the AF mode
(AlternativeFrequency) in the Function Menu.
2. Activate or deactivate AF while in an FM band.
FRANÇAIS
ITALIANO
NEDERLANDS
26
Using the RDS Functions
PI Seek Function
The tuner searches for another frequency broadcasting the same programming. “PI Seek”
appears on the display and the radio volume is muted during a PI Seek. The muting is discontinued after completion of the PI Seek, whether or not the PI seek has succeeded. If the
PI Seek is unsuccessful, the tuner returns to the previous frequency.
PI Seek
If the tuner fails to locate a suitable alternative frequency or if the broadcasting signal is
too weak for proper reception, the PI Seek will automatically start.
Auto PI Seek (for preset station)
When preset stations cannot be recalled, as when traveling long distances, the product can
be set to perform PI Seek also during preset recall.
The default setting for Auto PI Seek is OFF.
Note:
• Refer to “Initial Setting” for details on how to switch Auto PI Seek ON/OFF.
Regional Function (Regional)
When AF is used to retune the tuner automatically, the Regional function limits the selection to stations broadcasting regional programs.
Note:
• Regional programming and regional networks are organized differently depending on the country
(i.e., they may change according to the hour, state or broadcast area).
• The preset number may disappear on the display if the tuner tunes in a regional station which differs from the originally set station.
• Regional can be switched ON or OFF independently for each FM band.
• “REG” is displayed if you activate the Regional function when the Function Menu is canceled.
Activating/Deactivating the Regional Function
The Regional function is set to ON by default.
1. Press the FUNCTION button and select the Regional mode (Regional) in the
Function Menu.
2. Activate or deactivate Regional while in an FM band.
“REG”
27
Traffic Announcement Standby Function (Traffic Announcement)
ENGLISH
The TA (Traffic Announcement standby) function lets you receive traffic announcements
automatically, no matter what source you are listening to. The TA function can be activated for either a TP station (a station that broadcasts traffic information) or an enhanced
other network’s TP station (a station carrying information which cross-references TP stations).
Activating/Deactivating the TA Function
ESPAÑOL
1. Tune in a TP or enhanced other network’s TP station.
The TP indicator (“TRFC”) lights when the tuner is tuned to a TP station or an enhanced
other network’s TP station.
2. Activate the TA function.
DEUTSCH
“TRFC2”
The “TRFC2” indicator lights, indicating that the tuner is waiting for traffic announcements.
FRANÇAIS
Note:
• If you switched TA Function ON when you are tuned in to neither a TP nor enhanced other network’s TP station, only “T” in “TRFC” indicator is displayed.
Repeat the preceding operation when no traffic announcement is being received to deactivate the TA function.
Note:
ITALIANO
• You can also switch the TA function ON/OFF in the Function Menu.
• The system switches back to the original source following traffic announcement reception.
• The TA function can be activated from sources other than tuner if the tuner was last set to the FM
band but not if it was last set to the MW/LW band.
• If the tuner was last set to FM, turning on the TA function lets you operate other tuning functions
while listening to sources other than tuner.
• Only TP or enhanced other network’s TP stations are tuned in during the Seek Tuning mode when
the “TRFC2” or “T” indicator is ON.
• Only TP or enhanced other network’s TP stations are stored by BSM when the “TRFC2” or “T”
indicator is ON.
• When listening to DAB, turning ON/OFF the DAB TA function will simultaneously turn ON/OFF
the RDS Traffic Announcement.
NEDERLANDS
28
Using the RDS Functions
Canceling Traffic Announcements
• Press the TA button while a traffic announcement is being received to cancel
the announcement and return to the original source.
The announcement is canceled but the tuner remains in the TA mode until the TA button is
pressed again.
Adjusting the TA Volume
When a traffic announcement begins, the volume adjusts automatically to a preset level to
enable you to hear the announcement clearly.
• Set the volume by adjusting it during reception of a traffic announcement.
The newly set volume is stored in memory and recalled for subsequent traffic announcements.
TP Alarm Function
About 30 seconds after the “TRFC2” indicator turns to “T” due to a weak signal, a 5 second beep sounds to remind you to select another TP or enhanced other network’s TP station.
• When DAB’s Service Follow Function is ON.
• When this unit (during DAB reception) cannot clearly receive a Service Component
supporting Road Traffic Flash and Transport Flash.
• When this unit RDS cannot receive a TP or enhanced other network’s TP station broadcast.
• If you are listening to the tuner, tune in another TP station or enhanced
other network’s TP station.
In sources other than tuner, the tuner automatically seeks out the TP station with the
strongest signal in the current area 10 (or 30)* seconds after the “TRFC2” indicator
turns to “T”.
* Time taken before Seek begins.
29
TA function ON
10 seconds
TA, AF functions ON
30 seconds
PTY Function
ENGLISH
With Wide and Narrow classification of program type, the PTY function provides two
ways to select stations by the type of program being broadcast (PTY Search). It also provides automatic tuning to emergency broadcasts (PTY Alarm).
Note:
• There’s no need to perform PTY Search settings again if they have previously been set. After
switching to the PTY Search Setting mode in Step 1, just perform PTY Search in Step 4.
ESPAÑOL
Searching the PTY
1. Select the PTY Search Setting mode.
DEUTSCH
2. Select the PTY Search method (Wide, Narrow).
FRANÇAIS
3. Select one from among the PTY.
4. Start PTY Search.
ITALIANO
The tuner searches for a station broadcasting the desired PTY.
To cancel the PTY Search Setting mode, hold down the PTY button for 2 seconds.
NEDERLANDS
Note:
• The program of some stations may differ from that indicated by the transmitted PTY.
• If no station broadcasting the selected programming type is found, “NOT FOUND” is displayed for
about 2 seconds, and the tuner returns to the original station.
30
Using the RDS Functions
News Program Interruption Setting (News)
You can switch automatic reception of PTY code news programs ON/OFF. When a
received news program ends, reception of the previous program resumes.
• Set interruption to ON or OFF.
Hold for 2 seconds
“NEWS”
Note:
• You can also switch the News Program Interruption Setting ON/OFF in the Function Menu.
• When “N” in “NEWS” indicator is displayed, it indicates that you have set interruption ON.
• When “2” is displayed on the right side of indicator, it indicates that the news program is received.
PTY Alarm
PTY Alarm is a special PTY code for announcements regarding emergencies such as natural disasters. When the tuner receives the radio alarm code, “ALARM” appears on the
display and the volume adjusts to the TA volume. When the station stops broadcasting the
emergency announcement, the system returns to the previous source.
Canceling Announcements
• Press the TA button during announcement reception to cancel the announcement and return to the previous source.
31
PTY List
Narrow
Details
News&Inf
News
News.
Affairs
Current affairs.
Weather
Weather reports/Meteorological information.
Finance
Stock market reports, commerce, trading, etc.
Pop Mus
Popular music.
Rock Mus
Contemporary modern music.
Easy Mus
Easy listening music.
Oth Mus
Other types of music, which can’t be
categorized.
Jazz
Jazz music based programs.
Country
Country music based programs.
Nat Mus
National music based programs.
Oldies
Oldies music, ‘Golden age’ based programs.
Folk Mus
Folk music based programs.
L. Class
Light classical music.
Classic
Serious classical music.
Educate
Educational programs.
Drama
All radio plays and serials.
Culture
Programs concerned with any aspect of national
or regional culture.
Programs about nature, science and technology.
Varied
Light entertainment programs.
Children
Children’s programs.
Social affairs programs.
Religion
Religion affairs programs or services.
Phone In
Phone in based programs.
Touring
Travel programs, not for announcements about
traffic problem.
Leisure
Programs about hobbies and recreational
activities.
Document
Documentary programs.
NEDERLANDS
Social
ITALIANO
Science
FRANÇAIS
Others
Sports programs.
DEUTSCH
Classics
General information and advice.
Sport
ESPAÑOL
Popular
Info
ENGLISH
Wide
32
Using the RDS Functions
Radio Text
This tuner can display Radio Text data transmitted by RDS stations, such as station information, the name of the currently broadcast song and the name of the artist.
Note:
• When Radio Text is received, the “RT” indicator lights.
• The tuner automatically memorizes the three latest Radio Text broadcasts received, replacing text
from the least recent reception with new text when it is received.
• You can store data from up to six Radio Text transmissions in buttons 1–6.
• If you do not perform an operation within 8 seconds, the Radio Text mode is canceled.
Radio Text Display
1. Switch to the Radio Text mode.
Hold for 2 seconds
“RT”
Note:
• Press the TEXT button once more, and the Radio Text mode is canceled.
• When no Radio Text is currently being received, “NO TEXT” is displayed, and the Radio Text
mode is canceled after 8 seconds.
2. Recalling the three latest Radio Text broadcasts from the tuner’s memory.
Pressing the button switches between the four Radio Text data displays.
Note:
• If there is no Radio Text data stored in the tuner, this button does not operate.
33
Storing Radio Text in Memory
ENGLISH
1. Perform “Radio Text Display” steps 1 and 2, and then select the Radio Text
you want to store in memory.
2. Press one of buttons 1–6 for 2 seconds to store the desired Radio Text.
(e.g. Press button 4 for 2 seconds.)
ESPAÑOL
Hold for 2 seconds
The Radio Text is stored in memory under the selected button.
DEUTSCH
Recalling Preset Radio Text
1. Switch to the Radio Text mode.
Hold for 2 seconds
FRANÇAIS
2. Press one of buttons 1–6 to recall a Radio Text preset under that button.
(e.g. Press button 4.)
ITALIANO
Note:
• You can also use the 5 or ∞ buttons to recall Radio Text memorized in buttons 1 through 6.
NEDERLANDS
34
Using the DAB Functions
What is DAB?
DAB stands for Digital Audio Broadcasting. The benefits of DAB are as follows:
• High sound quality (near CD quality is normal, although this may be reduced on some
services, in order to allow more services to be broadcast).
• Interference free reception.
Note:
• Test broadcasts may be performed by some broadcast stations.
Outline
The way services are transmitted with DAB is very different to that used on MW/LW or
FM. With DAB, services are bundled into groups, normally called Ensembles or
Multiplexes. An ensemble would typically contain about 6 services, though this may vary
from 1 up to 10 or more services at any one time. Several different ensembles may be
available in any area.
Some Individual services on an ensemble may be further subdivided into service components. The main service is called the primary service component, and the subsidiary services are called secondary service components. This unique feature of DAB has many possible applications. A typical one would be for a sports service called SPORT RADIO for
example, to add several secondary service components for Saturday afternoon, with each
service component offering coverage of a different football match or sports event. In this
way SPORT RADIO could offer the listener the choice of several events simultaneously
rather than being forced to select one event only.
Ensemble
Service
Primary Service Component
Service
Primary Service Component
Secondary Service Component
Secondary Service Component
7 About Service Components
Service Components include Audio and Data. Data Service reception is not possible with
this unit. (In this Manual, Service refers to the regular Audio Service.)
35
Announcement Support Function
ENGLISH
Even when listening to non-DAB sources, the Announcement Support Function lets you
automatically listen to set Announcement Support. When the interrupting announcement
ends, play returns to the original source.
When listening to a DAB broadcast, you can switch setting for announcement interruption
ON/OFF, except for Alarm announcements. Switching between Announcements is as follows:
Announcement that is always ON:
• Alarm (Alarm)
ESPAÑOL
Announcements operated by the TA button:
• Road Traffic Flash (“TRFC” indicator)
• Transport Flash (“TRFC” indicator)
Announcements operated with the Function Menu:
News Flash (News)
Weather Flash (Weather)
Warning/Service (Warning)
Event Announcement (Event)
Special Event (Special Event)
Finance (Finance)
Sports (Sports)
Information (Information)
DEUTSCH
•
•
•
•
•
•
•
•
Announcements operated by the TA button
FRANÇAIS
7 Switching the Road Traffic Flash and Transport Flash ON/OFF
• Switch Road Traffic Flash and Transport Flash ON/OFF.
“TRFC”
“2”
ITALIANO
Each time you press the TA button, the announcement is switched ON/OFF.
Note:
NEDERLANDS
• When the Service Component supporting Road Traffic Flash and Transport Flash is selected,
“TRFC2” lights.
• When the Service Component doesn’t support Road Traffic Flash and Transport Flash, only
“T” in “TRFC” lights.
• When listening to FM, turning ON/OFF the RDS TA function will simultaneously turn ON/OFF
the DAB Road Traffic Flash and Transport Flash.
Continued overleaf.
36
Using the DAB Functions
7 Canceling Road Traffic Flash and Transport Flash interruptions part way through
• To cancel a Road Traffic Flash or Transport Flash interruption and return to
the original source, press the TA button during an Announcement interruption.
Note:
• You can also switch in order between interrupting Announcements. (Refer to “Switching
Interrupting Announcements” on the next page.)
TP Alarm Function
When the following conditions arise, the “TRFC2” indicator turns to “T”, and after 30
seconds, the TP Alarm beeps for 10 seconds, reminding you to select a Service Component
supporting Road Traffic Flash and Transport Flash.
• When Road Traffic Flash and Transport Flash interruption setting is ON.
• When the Service Follow Function is ON.
• When this unit (during DAB reception) cannot clearly receive a Service Component
supporting Road Traffic Flash and Transport Flash.
• When this unit RDS cannot receive a TP or enhanced other network’s TP station broadcast.
• When listening to a DAB broadcast, after hearing the TP Alarm, you should
re-tune to a Service that supports Road Traffic Flash and Transport Flash if
you want to continue the possibility to receive them.
When listening to any other sources, 30 seconds after the “TRFC2” indicator turns to “T”,
search automatically starts for a Service Component in that area that supports Road Traffic
Flash and Transport Flash.
37
Operating Announcements with the Function Menu
ENGLISH
7 Switch Announcements ON/OFF
1. Select the Announcement Support mode (Announcement Support) in the
Function Menu.
2. Select the desired Announcement Support in the following order:
ESPAÑOL
News Flash (News) Ô Weather Flash (Weather) Ô Announce (Announce)
3. Switch the selected Announcement Support ON/OFF.
DEUTSCH
Note:
FRANÇAIS
• When “NEWS”, “WTHR” or “ANNC” is displayed, it indicates that Announcement Support is provided by the current Service Component.
• When the initial of each Announcement indicator is displayed, it indicates that you have selected
the Announcement Support. (e.g. “N” in “NEWS”.)
• When “2” is displayed on the right side of indicator, it indicates that Announcement corresponding
to the Announcement Support you have selected is supported by the current Service Component.
• When “Announce” is ON, “Warning/Service”, “Event Announcement”, “Special Event”,
“Finance”, “Sports” and “Information” are also switched ON.
ITALIANO
Switching Interrupting Announcements
When there are multiple Announcements in standby waiting to interrupt, and you are
listening to an Announcement, you can switch between them in order.
• Switch to the next Announcement.
NEDERLANDS
Each press changes the Announcement ...
Each time you press the SOURCE/OFF button, you move to the next Announcement.
When there are no more Announcements, you return to the original one.
38
Using the DAB Functions
Service Follow Function
If reception of the selected Service worsens, this automatically searches for other
Ensemble supporting the same Service. Depending on conditions, an Ensemble supporting
Alarm and Road Traffic Flash is received.
1. Select the Service Follow mode (Service Follow) in the Function Menu.
2. Switch Service Follow ON/OFF.
Service Follow Function (FM)
When an Ensemble that supports the same Service can’t be found, or when reception
conditions are poor, the Service Follow Function switches to an identical FM broadcast.
However, switching is not possible if reception of a station broadcasting an identical FM
transmission is poor, doesn’t exist or is not cross-referenced by the DAB station.
During FM reception, if DAB finds a Service identical to the original Service, and
reception is better, DAB reception resumes. Selection is then performed in line with the
Service Component selected with the first Service.
Note:
• Switch the Service Follow Function ON, and the Service Follow Function (FM) is automatically
switched ON.
• The Service Follow Function (FM) is a DAB function. If the initial source you listen to is RDS
(FM), there’s no switching to DAB.
• Even if you switch to an FM broadcast, the button only functions during DAB operation.
7 When the “NET” indicator flashes
When the selected Service does not have broadcast station information for an identical FM
broadcast, if reception conditions for that Service worsen, the “NET” indicator flashes to
indicate the Service Follow Function (FM) cannot operate.
39
Service Component Function
ENGLISH
If the currently received Service has a Secondary Service Component (“EXTRA” lights),
Service Component switching is possible.
1. Select the Service Component Switching mode (Primary/Secondary) in the
Function Menu.
2. Select the desired Service Component.
ESPAÑOL
Available Service List Function
DEUTSCH
If the currently received Ensemble has multiple services, lists of every 6 services are
displayed. You can select the desired service from the service list.
1. Select the Available Service List mode (Service List) in the Function Menu.
2. Select the desired Service from the service list.
FRANÇAIS
3. Play the selected Service with the 5 button.
ITALIANO
NEDERLANDS
40
Using the DAB Functions
Preset Service List Function
If you have stored Services in memory, a preset service list is displayed and you can select
the desired service from the list.
1. Select the Preset Service List mode (SRVC. List) in the Function Menu.
2. Select the desired Service from the service list.
3. Recall the selected Service.
Note:
• You cannot operate this mode if you didn’t store services in memory.
• To store the service, refer to the page 17 “Preset Tuning”.
41
Available PTY Function
ENGLISH
Lists of every 6 PTY that is in the Current Ensemble can be displayed by pressing the
PTY button. You can select the desired PTY from the list.
DAB PTY functions are slightly different from RDS PTY functions. Do not confuse DAB
PTY functions and RDS PTY functions.
Searching the PTY
ESPAÑOL
1. Enter the PTY Search Setting mode.
DEUTSCH
2. Select one from among the PTY.
3. Start PTY Search.
FRANÇAIS
DAB receives the desired PTY Service.
Note:
ITALIANO
• The PTY method displayed is Narrow. The Wide method cannot be selected when using DAB as
source. (Refer to page 32.)
• The selected PTY is displayed in a different color depth than the other non selected PTY’s.
Canceling the PTY Search Setting mode
• To cancel the PTY Search Setting mode part way through, press the PTY
button for 2 seconds.
NEDERLANDS
Hold for 2 seconds
42
Using the DAB Functions
Dynamic Label Function
Dynamic Label provides character information concerning the Service Component you’re
currently listening to. You can scroll the displayed information.
Note:
• When Dynamic Label is received, the “TEXT” indicator lights.
• The tuner automatically memorizes the three latest Dynamic Label received, replacing text from the
least recent reception with new text when it is received.
• You can store data from up to six Dynamic Label transmissions in buttons 1–6.
Dynamic Label Display
1. Enter the Dynamic Label mode.
“TEXT”
Note:
• Press the TEXT button once more, and the Dynamic Label mode is canceled.
• When no Dynamic Label is currently being received, “NO TEXT” is displayed.
2. Recalling the three latest Dynamic Label broadcasts from the tuner’s
memory.
Pressing the button switches between the four Dynamic Label data displays.
Note:
• If there is no Dynamic Label data stored in the tuner, this button does not operate.
3. Scroll the Dynamic Label with the the ∞ button.
Note:
• When viewing Dynamic Label, do not operate until you have parked your car safely.
• If you press the 5 button, you return to the first line.
• If you select the Dynamic Label mode again after having canceled it, the information may switch to
the latest available.
• You can also view the Dynamic Label by pressing the ENTERTAINMENT button. In this case, the
data that is currently displayed is always updated. For more details, refer to “Switching the
Entertainment Display” on page 68.
43
Storing Dynamic Label in Memory
ENGLISH
1. Perform “Dynamic Label Display” steps 1 and 2, and then select the
Dynamic Label you want to store in memory.
2. Press one of buttons 1–6 for 2 seconds to store the desired Dynamic Label.
(e.g. Press button 4 for 2 seconds.)
ESPAÑOL
Hold for 2 seconds
Recalling Preset Dynamic Label
DEUTSCH
1. Switch to the Dynamic Label mode.
FRANÇAIS
2. Press one of buttons 1–6 to recall a Dynamic Label preset under that button.
(e.g. Press button 4.)
ITALIANO
NEDERLANDS
44
Using the Built-in CD Player
Repeat Play (Play Mode)
Repeat Play plays the same track repeatedly.
1. Press the FUNCTION button and select the Repeat mode (Play Mode) in
the Function Menu.
2. Switch the Repeat Play
ON/OFF with the 5/∞
buttons.
Note:
• If you perform Track Search or Fast Forward/Reverse, Repeat Play is automatically canceled.
Random Play (RandomPlay)
Random Play plays the tracks on a CD in random order for variety.
1. Press the FUNCTION button and select the Random mode (RandomPlay)
in the Function Menu.
2. Switch the Random Play
ON/OFF with the 5/∞
buttons.
45
Pause (Pause)
ENGLISH
Pause pauses the currently playing track.
1. Press the FUNCTION button and select the Pause mode (Pause) in the
Function Menu.
2. Switch the Pause ON/OFF with
the 5/∞ buttons.
ESPAÑOL
Disc Title Input (Title Input ABC)
You can input up to 48 disc titles for CDs in the Built-in CD player. (Refer to “Disc Title
Input” on page 49 under “Using Multi-CD Players”.)
DEUTSCH
Note:
• After the title for 48 discs have been entered, data for a new disc will overwrite the oldest one.
• If you connect a Multi-CD player, you can input disc titles for up to 100 discs.
• When playing a CD TEXT disc on this product, you cannot switch to this mode.
FRANÇAIS
ITALIANO
NEDERLANDS
46
Using Multi-CD Players
Repeat Play (Play Mode)
There are three repeat play ranges: One-track Repeat, Disc Repeat and Multi-CD player
Repeat. Default repeat play range is Multi-CD player Repeat.
1. Press the FUNCTION button and select the Repeat selecting mode (Play
Mode) in the Function Menu.
2. Select the desired repeat play
range with the 2/3 buttons.
Multi-CD player Repeat = One-track
Repeat = Disc Repeat
Play range
Display
Indicator
Multi-CD player Repeat
Magazine Repeat
---------------
One-track Repeat
Track Repeat
Disc Repeat
Disc Repeat
Note:
• If you select other discs during the repeat play, the repeat play range changes to Multi-CD player
Repeat.
• If you perform Track Search or Fast Forward/Reverse during One-track Repeat, the repeat play
range changes to Disc Repeat.
Random Play (RandomPlay)
Tracks are played at random within the selected repeat play range as explained in “Repeat
Play” above.
1. Press the FUNCTION button and select the Random mode (RandomPlay)
in the Function Menu.
2. Switch the Random Play
ON/OFF with the 5/∞
buttons.
After selecting the desired repeat
play range from those referred to in
“Repeat Play” above, switch MultiCD Player Random Play ON.
Note:
• One-track Repeat changes to the Disc Repeat when you switch the Random Play ON.
47
Pause (Pause)
ENGLISH
Pause pauses the currently playing track.
1. Press the FUNCTION button and select the Pause mode (Pause) in the
Function Menu.
2. Switch the Pause ON/OFF with
the 5/∞ buttons.
ESPAÑOL
Compression and DBE (Compression)
Using the Comp. (Compression) and DBE (Dynamic Bass Emphasis) functions enables
Multi-CD player sound quality adjustment. Each of the functions enables two-step adjustment.
The Comp. (Compression) function
adjusts imbalances between loud and
subdued sounds at higher volumes.
7 DBE
DEUTSCH
7 Comp.
DBE (Dynamic Bass Emphasis) boosts
bass levels to give a fuller sound.
Comp./DBE ON/OFF Switching
FRANÇAIS
1. Press the FUNCTION button and select the Comp./DBE Switching mode
(Compression) in the Function Menu.
2. Select the desired mode with
the 5/∞ buttons.
Comp. OFF = Comp. 1 = Comp. 2
= Comp. OFF = DBE 1 = DBE 2
ITALIANO
Note:
• You can use these functions with a Multi-CD player that has them. If the player does not feature the
Comp./DBE functions, “No Comp.” is displayed if you try to use them.
NEDERLANDS
48
Using Multi-CD Players
Disc Title
Disc Title Input (Title Input ABC)
You can input Titles up to 10 letters long for up to 100 discs. Using this function lets you
easily search for and select a desired disc for play.
1. Play the disc you wish to input the disc title.
2. Enter the Disc Title Input mode (Title Input ABC) in the Detailed Setting
Menu. (Refer to page 22.)
Note:
• When playing a CD TEXT disc on a CD TEXT compatible Multi-CD player, you cannot switch to
this mode.
• A CD TEXT disc is a CD featuring recorded text information such as Disc Title, Artist Name and
Track Title.
3. Switch the desired Character
type with button 1.
Each press of button 1 changes the
Character type in the following
order:
Alphabet (Upper case), Numbers
and Symbols = Alphabet (Lower
case) = European letters, such as
those with accents (e.g. á, à, ä, ç)
Note:
• You can select to input Numbers and Symbols by pressing button 2.
4. Select letters, numbers and
symbols with the 5/∞ buttons.
To insert a space, select the flashing
cursor “_”.
49
ENGLISH
5. Move the box left and right
with the 2/3 buttons.
ESPAÑOL
6. When you have completed title
input, make the 10th letter
flash, then memorize by pressing the 3 button.
Note:
• Titles remain in memory, even after the disc has been removed from the magazine, and are recalled
when the disc is reinserted.
• After the titles for 100 discs have been entered, data for a new disc will overwrite the data for the
disc that has not been played back for the longest time.
• You can display the disc title of the disc currently playing.
DEUTSCH
FRANÇAIS
ITALIANO
NEDERLANDS
50
Using Multi-CD Players
Selecting Discs by Disc Title List (Disc List)
Every 6 discs are displayed. You can scroll the display.
Follow the procedures below to play a disc for which you have input the title in a MultiCD player or a CD TEXT disc on a CD TEXT compatible Multi-CD player.
1. Press the FUNCTION button and select the Disc Title List mode
(Disc List) in the Function Menu.
2. Select the desired disc title
with the 2/3 buttons.
“No Disc Title” is displayed for disc
whose titles have not been input.
“No Disc” is displayed next to the
disc number when no disc is set in
the magazine.
Note:
• You can also select and play the desired disc title directly with the 1 to 6 buttons.
3. Play the selected disc with the
5 button.
51
Audio Adjustment
Selecting the Equalizer Curve
ENGLISH
You can switch between Equalizer curves.
• Rotate the EQ selector up or down to select the desired Equalizer curve.
ESPAÑOL
“CUSTOM”
SUPER BASS (super bass) +
= POWERFUL (powerful) +
= NATURAL (natural)
+
= VOCAL (vocal) +
= CUSTOM (custom) +
= FLAT (flat)
Note:
DEUTSCH
• “CUSTOM” stores an equalizer curve you have made adjustments to. (Refer to “Equalizer Curve
Adjustment” on page 53 and “Equalizer Curve Fine Adjustment” on page 54.)
• You can create different “CUSTOM” curves for different sources. (The Built-in CD player and
Multi-CD player are set to the same Equalizer Curve Adjustment setting automatically.)
• When “CUSTOM” is selected, the displayed curve and name switches to that selected before
adjustments were made (refer to pages 53 to 54) and “CUSTOM” is also displayed.
Initially, “FLAT” and “CUSTOM” appear on the display.
Entering the Audio Menu
With this menu, you can adjust the sound quality.
FRANÇAIS
Note:
• After entering the Audio Menu, if you do not perform an operation within about 30 seconds, the
Audio Menu is automatically canceled.
• Audio Menu functions change depending on the Rear Speaker Output and Subwoofer Controller
setting in the Initial Setting Menu. (Refer to “Switching the Rear Speaker Output” and “Setting the
Subwoofer Control” on page 65 to 66.)
1. Select the desired mode in the Audio Menu.
ITALIANO
Each press changes the Mode ...
NEDERLANDS
2. Operate a mode.
3. Cancel the Audio Menu.
52
Audio Adjustment
Audio Menu Functions
The Audio Menu features the following functions.
Balance Adjustment (FAD/BAL)
This function allows you to select a Fader/Balance setting that provides ideal listening conditions in all occupied seats.
1. Press the AUDIO button and select the Fader/Balance mode (FAD/BAL) in
the Audio Menu.
2. Adjust front/rear speaker balance with the 5/∞ buttons.
“Fader Front:15” – “Fader Rear:15”
is displayed as it moves from front to
rear.
3. Adjust left/right speaker balance with the 2/3 buttons.
“Balance Left:9” – “Balance
Right:9” is displayed as it moves
from left to right.
Note:
• When the Rear Speaker Output setting is “Sub woofer output”, you cannot adjust front/rear speaker
balance. (Refer to page 65.)
• “Fader F/R:0 0” is the proper setting when 2 speakers are in use.
Equalizer Curve Adjustment (EqualizEr)
You can adjust the currently selected equalizer curve settings as desired. Adjusted
equalizer curve settings are memorized in “CUSTOM”.
1. Press the AUDIO button and select the Equalizer mode (EqualizEr) in the
Audio Menu.
2. Select the band you want to
adjust with the 2/3 buttons.
LOW (low) BAND +
= MID (mid)
BAND +
= HIGH (high) BAND
3. Boost or attenuate the selected
band with the 5/∞ buttons.
The display shows “+6” – “–6”.
Note:
• If you make adjustments when a curve other than “CUSTOM” is selected, the newly adjusted curve
will replace the previous adjusted curve. And new curve and name with “CUSTOM” appear on the
display while selecting the equalizer curve. (Refer to page 52.)
53
Equalizer Curve Fine Adjustment (EqualizEr)
ENGLISH
You can adjust the center frequency and the Q factor (curve characteristics) of each currently selected curve band (LOW BAND/MID BAND/HIGH BAND). Adjusted equalizer
curve settings are memorized in “CUSTOM”.
Level (dB)
Center frequency
ESPAÑOL
Q=2N
Q=2W
Frequency (Hz)
1. Press the AUDIO button for 2 seconds to select Equalizer Curve Fine
Adjustment.
DEUTSCH
2. Press the AUDIO button to
select the desired band for
adjustment.
FRANÇAIS
3. Select the desired frequency for
each band with the 2/3 buttons.
LOW (low) BAND: 40 Ô 80 Ô 100
+
= 160 (Hz)
MID (mid) BAND: 200 Ô 500 Ô 1 k
Ô 2 k (Hz)
HIGH (high) BAND: 3.15 k Ô 8 k Ô 10 k
Ô 12.5 k (Hz)
ITALIANO
4. Select the desired Q factor with
the 5/∞ buttons.
2N +
= 1N +
= 1W +
= 2W
Note:
NEDERLANDS
• If you make adjustments when a curve other than “CUSTOM” is selected, the newly adjusted curve
will replace the previous adjusted curve. And new curve and name with “CUSTOM” appear on the
display while selecting the equalizer curve. (Refer to page 52.)
54
Audio Adjustment
Loudness Adjustment (LoudnEss)
The Loudness function compensates for deficiencies in the low and high sound ranges at
low volume. You can select a desired Loudness level.
1. Press the AUDIO button and select the Loudness mode (LoudnEss) in the
Audio Menu.
2. Switch the Loudness function
ON/OFF with the 5/∞ buttons.
3. Select the desired level with the
2/3 buttons.
Low (low) +
= Mid (mid)
+
= High (high)
Subwoofer Output (Sub W-1)
When a Subwoofer is connected, switch Subwoofer output ON.
Initially, Subwoofer output is OFF.
The Subwoofer output phase can be switched between normal, or 0˚ (“Phase:NOR”), and
reverse, or 180˚(“Phase:REV”). 0˚ is the default phase.
Note:
• When the Subwoofer Controller setting is “Sub woofer control External”, you cannot switch the
Subwoofer ON/OFF mode. In this case, this setting is not necessary. (Refer to page 66.)
• Select the OFF setting when you do not want the Subwoofer to operate.
1. Press the AUDIO button and select the Subwoofer ON/OFF mode
(Sub W-1) in the Audio Menu.
2. Switch the Subwoofer output
ON/OFF with the 5/∞ buttons.
3. Change the phase of
Subwoofer output with the
2/3 buttons.
55
Subwoofer Setting Adjustment (Sub W-2)
ENGLISH
When the Subwoofer output is ON, you can adjust the cut-off frequency and the output
level of Subwoofer.
1. Press the AUDIO button and select the Subwoofer setting mode
(Sub W-2) in the Audio Menu.
ESPAÑOL
2. Select the frequency to 50 Hz,
80 Hz or 125 Hz with the 2/3
buttons.
3. Increase or decrease the output
level with the 5/∞ buttons.
The display shows “+6” – “–6”.
DEUTSCH
Note:
• You can select the Subwoofer setting mode only when Subwoofer output is switched ON in the
Subwoofer ON/OFF mode.
Non-Fading Output (Non FadE-1)
When the Non-Fading Output setting is ON, the audio signal does not pass through this
unit’s low pass filter (for the Subwoofer), but is output through the RCA output.
FRANÇAIS
Note:
• When the Subwoofer Controller setting is only “Sub woofer control External”, you can switch the
Non-Fading Output ON/OFF mode. (Refer to page 66.)
1. Press the AUDIO button and select the Non-Fading Output ON/OFF
mode (Non FadE-1) in the Audio Menu.
ITALIANO
2. Switch the Non-Fading output
ON/OFF with the 5/∞ buttons.
NEDERLANDS
56
Audio Adjustment
Non-Fading Output Level Adjustment (Non FadE-2)
When the Non-Fading output is ON, you can adjust the level of Non-Fading output.
1. Press the AUDIO button and select the Non-Fading Output setting mode
(Non FadE-2) in the Audio Menu.
2. Increase or decrease the output
level with the 5/∞ buttons.
The display shows “0” – “–15”.
Note:
• You can select the Non-Fading Output setting mode only when Non-Fading output is switched ON
in the Non-Fading Output ON/OFF mode.
High Pass Filter (High Pass)
When you do not want sound in the Subwoofer output frequency range output from the
front or rear speakers, switch the High Pass Filter ON. Only higher frequencies than those
in the selected range are output from the front and rear speakers.
Precaution:
• You can’t switch F.I.E. function and High Pass Filter function ON at the same time.
1. Press the AUDIO button and select the High Pass Filter mode (High Pass) in
the Audio Menu.
2. Switch the High Pass Filter
function ON/OFF with the 5/∞
buttons.
3. Select the desired frequency
with the 2/3 buttons.
50 +
= 80 +
= 125 (Hz)
57
Front Image Enhancer Function (FIE)
ENGLISH
The F.I.E. (Front Image Enhancer) function is a simple method of enhancing front imaging
by cutting mid- and high-range frequency output from the rear speakers, limiting their output to low-range frequencies. You can select the frequency you want to cut.
Precaution:
• You can’t switch F.I.E. function and High Pass Filter function ON at the same time.
• When the F.I.E. function is deactivated, the rear speakers output sound of all frequencies, not just
bass sounds. Reduce the volume before disengaging F.I.E. to prevent a sudden increase in volume.
ESPAÑOL
1. Press the AUDIO button and select the F.I.E. mode (FIE) in the Audio
Menu.
2. Switch the F.I.E. function
ON/OFF with the 5/∞ buttons.
DEUTSCH
3. Select the desired frequency
with the 2/3 buttons.
100 +
= 160 +
= 250 (Hz)
Note:
FRANÇAIS
• After switching the F.I.E. function ON, select the Fader/Balance mode in the Audio Menu, and
adjust front and rear speaker volume levels until they are balanced.
• When the Rear Speaker Output setting is “Sub woofer output” , you cannot switch the F.I.E. mode.
(Refer to page 65.)
• Switch the F.I.E. function OFF when using a 2-speaker system.
ITALIANO
NEDERLANDS
58
Audio Adjustment
Source Level Adjustment (SLA) Function
The SLA (Source Level Adjustment) function prevents radical leaps in volume level when
switching between sources. Settings are based on the FM volume level, which remains
unchanged.
1. Compare the FM volume with the volume of the other source.
(e.g. Built-in CD player)
2. Press the AUDIO button and select the SLA mode (SLA) in the Audio Menu.
3. Increase or decrease the level
with the 5/∞ buttons.
The display shows “+4” – “–4”.
Note:
• Since the FM volume is the control, SLA is not possible in the FM modes.
• The MW/LW volume level, which is different from the FM base setting volume level, can also be
adjusted similar to sources other than tuner.
• The Built-in CD player and Multi-CD player are set to the same volume adjustment setting automatically.
• External Unit 1 and External Unit 2 are set to the same volume adjustment setting automatically.
Automatic Sound Levelizer (ASL) Function
During driving, noise in the car changes according to the driving speed and road conditions. The automatic sound levelizer (ASL) monitors such varying noise and automatically
increases the volume level, if this noise becomes greater. The sensitivity (variation of volume level to noise level) of ASL can be set to one of five levels.
1. Press the AUDIO button and select the Auto Sound Levelizer mode (ASL) in
the Audio Menu.
2. Switch the Auto Sound
Levelizer ON/OFF with the
5/∞ buttons.
3. Select the desired level in the
following order with the 2/3
buttons:
Low (low) Ô Mid-Low (mid-low) Ô Mid (mid)
Ô Mid-High (mid-high) Ô High (high)
59
Detaching and Replacing the Front Panel
Theft Protection
ENGLISH
The front panel of the head unit is detachable to discourage theft.
Precaution:
• Never use force or grip the display tightly when removing or replacing the front panel.
• Avoid subjecting the front panel to excessive shocks.
• Keep the front panel out of direct sunlight and high temperatures.
Detaching the Front Panel
ESPAÑOL
1. Open the front panel.
Precaution:
DEUTSCH
• A few seconds after turning the ignition switch to ON/OFF, the front panel automatically moves.
When this happens, your fingers may become jammed in the panel, so keep your hands away from
it.
2. Slide and remove the front
panel toward you.
Take care not to grip the front
panel tightly or drop it.
FRANÇAIS
Release Section
Precaution:
• When removing the front panel, be sure to press the corrugated release section on the rear of the
front panel while pulling.
ITALIANO
3. Use the protective case provided to store/carry the
detached front panel.
NEDERLANDS
60
Detaching and Replacing the Front Panel
Replacing the Front Panel
1. Make sure the inner cover is closed.
2. Replace the front panel by
clipping it into place.
Warning Tone
If the front panel is not detached within 5 seconds after the ignition is turned off, a warning
tone will sound.
Note:
• You can cancel the warning tone function. (Refer to page 64.)
61
Initial Setting
Entering the Initial Setting Menu
ENGLISH
With this menu, you can perform initial settings for the product.
1. Switch the sources OFF.
2. Enter the Initial Setting Menu.
ESPAÑOL
Hold for 2 seconds
3. Select the desired mode.
DEUTSCH
Each press changes the Mode ...
4. Operate a mode.
5. Cancel the Initial Setting Menu.
FRANÇAIS
Note:
• Holding down the FUNCTION button for 2 seconds also cancels the Initial Setting Menu.
ITALIANO
NEDERLANDS
62
Initial Setting
Initial Setting Menu Functions
The Initial Setting Menu features the following functions.
Changing the FM Tuning Step (FM Tuning Step)
Normally set at 50 kHz during Seek tuning in the FM mode, the tuning step changes to
100 kHz when the AF or TA mode is activated.
It may be preferable to set tuning step to 50 kHz in the AF mode.
1. Press the FUNCTION button and select the FM Tuning Step mode (FM
tuning step) in the Initial Setting Menu.
2. Select the desired tuning step
with the 2/3 buttons.
Note:
• The tuning step remains set at 50 kHz during Manual tuning.
• The tuning step returns to 100 kHz if the battery is temporarily disconnected.
Setting the DAB Priority Function (DAB Priority)
You can set the product in this mode so that interruption of traffic information from DAB
takes precedence over RDS Traffic Announcement (TA) function.
7 When it is ON
During DAB reception, when the selected Service Component supports Road Traffic
Flashes and Transport Flashes, reception is not interrupted by RDS Traffic Announcement
(TA).
7 When it is OFF
Interruption is by the first received news flash from among RDS and DAB traffic
information broadcasts.
1. Press the FUNCTION button and select the DAB Priority Setting mode
(DAB Priority) in the Initial Setting Menu.
2. Switch the DAB Priority
Setting ON/OFF with the 5/∞
buttons.
63
Switching the Auto PI Seek (Auto PI Seek)
ENGLISH
During Preset Station PI Seek operation, you can switch the Auto PI Seek function
ON/OFF. (Refer to “PI Seek Function” on page 27.)
1. Press the FUNCTION button and select the Auto PI Seek mode (Auto PI
Seek) in the Initial Setting Menu.
ESPAÑOL
2. Switch the Auto PI Seek
ON/OFF with the 5/∞ buttons.
Setting the Warning Tone (Warning Tone)
You can switch the Warning Tone function ON/OFF. (Refer to “Warning Tone” on
page 61.)
DEUTSCH
1. Press the FUNCTION button and select the Warning Tone mode
(Warning Tone) in the Initial Setting Menu.
2. Switch the Warning Tone
ON/OFF with the 5/∞ buttons.
FRANÇAIS
Switching the AUX Mode (AUX)
It is possible to use auxiliary (AUX) equipment with this product.
Activate the AUX mode when using external equipment with this product.
ITALIANO
1. Press the FUNCTION button and select the AUX Setting mode (AUX) in
the Initial Setting Menu.
2. Switch the AUX ON/OFF with
the 5/∞ buttons.
NEDERLANDS
64
Initial Setting
Setting the Dimmer (Dimmer)
To enable this product’s display from being too bright at night, when the vehicle’s head
lights are turned ON the display is dimmed.
You can switch this function ON/OFF.
1. Press the FUNCTION button and select the Dimmer mode (Dimmer) in the
Initial Setting Menu.
2. Switch the Dimmer ON/OFF
with the 5/∞ buttons.
Selecting the Illumination Color (Illumination Color)
This product is equipped with two illumination colors, green and red.
You can select the desired illumination color.
1. Press the FUNCTION button and select the Illumination Color mode
(Illumination Color) in the Initial Setting Menu.
2. Select the desired illumination
color with the 2/3 buttons.
Switching the Rear Speaker Output (Rear Speaker Out)
This product’s rear speaker leads can be used for full-range speaker (“Full Range output”)
or Subwoofer (“Sub woofer output”) connection. If you switch Rear Speaker Lead setting
to the “Sub woofer output”, you can connect a rear speaker lead directly to a Subwoofer
without using an auxiliary amp.
1. Press the FUNCTION button and select the Rear Speaker Output mode
(Rear Speaker Out) in the Initial Setting Menu.
2. Select the desired Rear
Speaker Out with the 5/∞ buttons.
Note:
• When no Subwoofer is connected to the rear speaker lead, select “Full Range output”.
• Even if you change to “Sub woofer output”, there is no output unless you switch the Subwoofer
Output (refer to page 55) in the Audio Menu ON.
65
Setting the Subwoofer Control (Sub woofer control)
ENGLISH
When rear speaker leads are connected to full range speakers (when “Full Range output” is
selected), you can connect the RCA Subwoofer output to a Subwoofer. In this case, you
can select whether to use the Subwoofer controller’s (Low Pass Filter, Phase) built-in
“Internal” or the auxiliary “External”.
1. Press the FUNCTION button and select the Subwoofer Control mode
(Sub woofer control) in the Initial Setting Menu.
ESPAÑOL
2. Change the Subwoofer
Controller with the 2/3 buttons.
Note:
DEUTSCH
• When the Rear Speaker Output is “Sub woofer output”, you cannot change the Subwoofer
Controller.
• If you change the Subwoofer Controller, Subwoofer output and Non-Fading output in the Audio
Menu return to the factory settings.
• Even if you change this setting, there is no output unless you switch the Non-Fading Output (refer
to page 56) or Subwoofer Output (refer to page 55) in the Audio Menu ON.
Flap auto open (FLAP AUTO)
FRANÇAIS
For theft protection, the front panel opens automatically and easily detaches.
Initially, this function is ON.
1. Press the FUNCTION button and select the Flap Auto Open mode (FLAP
AUTO) in the Initial Setting Menu.
2. Switch the Flap Auto Open
ON/OFF with the 5/∞ buttons.
ITALIANO
NEDERLANDS
66
Initial Setting
Selecting the Wall Paper (Wall Paper)
This product is equipped with four types of wall paper.
1. Press the FUNCTION button and select the Wall Paper mode (Wall Paper)
in the Initial Setting Menu.
2. Select the desired Wall Paper
with the 2/3 buttons.
Selecting the Brightness (Brightness)
You can select the display brightness. The display shows “0” – “31”.
1. Press the FUNCTION button and select the Brightness mode (Brightness)
in the Initial Setting Menu.
2. Select the desired Brightness
with the 2/3 buttons.
67
Other Functions
Switching the Entertainment Display
ENGLISH
You can change the display to the movie screens, etc. while listening to each source.
(e.g. MOVIE SCREEN MODE)
• Select the desired Entertainment Display.
ESPAÑOL
Each press changes the Display ...
7 When listening to non-DAB sources
Each press of the ENTERTAINMENT button changes the display in the following order:
MOVIE SCREEN MODE = Display before entering the Entertainment Display
DEUTSCH
7 When listening to a DAB source
Each press of the ENTERTAINMENT button changes the display in the following order:
DLS MODE = MOVIE SCREEN MODE = Display before entering the Entertainment
Display
Note:
FRANÇAIS
• When viewing the Dynamic Label (DLS) by pressing the ENTERTAINMENT button, the data that
is currently displayed is always updated.
ITALIANO
NEDERLANDS
68
Other Functions
Using the AUX Source
An IP-BUS-RCA-Interconnector such as CD-RB20 or CD-RB10 (sold separately) enables
you to connect this product to auxiliary equipment featuring an RCA output.
For more details, refer to the IP-BUS-RCA Interconnector’s Owner’s Manual.
Selecting the AUX Source
• Select AUX. (Refer to page 11.)
Each press changes the Source ...
AUX Title Input
The display title for AUX Source can be changed.
1. Select the AUX Title Input mode (Title Input ABC) in the Detailed Setting
Menu.
Hold for 2 seconds
2. Input the AUX Title.
Refer to “Disc Title Input” on page 49, and perform procedures 3 to 6 in the same way.
Cellular Telephone Muting
Sound from this system is muted automatically when a call is made or received using a
cellular telephone connected to this product.
• The sound is turned off, “MUTE” is displayed and no audio adjustment is possible.
Operation returns to normal when the phone connection is ended.
69
CD Player and Care
Precaution
ENGLISH
• Play only CDs bearing the Compact Disc Digital
Audio mark. (If a CD features the top right mark on
its disc title side, that disc is a CD TEXT disc. There
are also some CD TEXT discs that do not feature the
top right mark.)
COMPACT
DIGITAL AUDIO
ESPAÑOL
• This product is designed for use with conventional,
fully circular CDs only. Use of shaped CDs are not
recommended for this product.
DEUTSCH
• Check all CDs before playing and discard cracked, scratched or warped discs.
• Normal playback of CD-R discs other than those recorded with a music CD recorder
may not be possible.
• Playback of music CD-R discs, even those recorded with a music CD recorder, may not
be possible with this product due to disc characteristics or scratches or dirt on the disc.
Dirt or condensation on the lens inside this product may also prevent playback.
• Titles and other text information recorded on a CD-R disc may not be displayed by this
product.
• This product conforms to the track skip function of the CD-R disc. The tracks containing
the track skip information are skipped over automatically.
• Read the precautions with the CD-R discs before using.
FRANÇAIS
• Wipe dirty or damp discs outward from the center with a soft cloth.
ITALIANO
• Avoid touching the recorded (iridescent) surface when
handling discs.
• Store discs in their cases when not in use.
• Keep discs out of direct sunlight and high temperatures.
• Do not affix labels or apply chemicals to discs.
• Condensation may collect inside the player when using the heater in cold weather, interfering with playback. Turn it off for an hour or so and wipe damp discs with a soft cloth.
• Road shocks may interrupt CD playback.
NEDERLANDS
70
CD Player and Care
Built-in CD Player’s Error Message
When problems occur with CD playback, an error message appears on the display. Refer
to the table below to identify the problem, then take the suggested corrective action. If the
error persists, contact your dealer or your nearest PIONEER Service Center.
71
Message
Possible cause
Recommended action
ERROR- 11, 12, 17, 30
Dirty disc.
Clean the disc.
ERROR- 11, 12, 17, 30
Scratched disc.
Replace the disc.
ERROR- 14
Unrecorded CD.
Check the disc.
ERROR- 10, 11, 12, 14,
17, 30, A0
Electrical or mechanical
problem.
Turn the ignition ON and OFF, or
switch to a different source, then back
to the CD player.
ERROR- 44
All tracks are setting track skip.
Replace the disc.
HEAT
CD player overheating.
Discontinue play until the machine
temperature drops.
A Title (English)
Specifications
CD player
Power source .......... 14.4 V DC (10.8 – 15.1 V allowable)
Grounding system ........................................ Negative type
Max. current consumption ...................................... 11.5 A
Dimensions
(mounting size) .. 180 (W) × 50 (H) × 155.6 (D) mm
(front face) .......... 170 (W) × 45 (H) × 23.8 (D) mm
Weight .................................................................... 1.85 kg
System .................................... Compact disc audio system
Usable discs .................................................. Compact disc
Signal format .................... Sampling frequency: 44.1 kHz
Number of quantization bits: 16; linear
Frequency characteristics .............. 5 – 20,000 Hz (±1 dB)
Signal-to-noise ratio ...... 96 dB (1 kHz) (IEC-A network)
Dynamic range ............................................ 94 dB (1 kHz)
Number of channels ............................................ 2 (stereo)
ENGLISH
General
DAB tuner
Frequency range
(Band III) .......... 174.928 – 239.200 MHz (5A – 13F)
(L Band) .... 1,452.960 – 1,490.624 MHz (L1 – L23)
Usable sensitivity
(Band III) .................................................. –97.5 dBm
(L Band) .................................................... –100 dBm
Mode ................................................................ I, II, III, IV
DEUTSCH
FM tuner
Frequency range ...................... 87.5 – 108 MHz (50 kHz)
Usable sensitivity .................................................... 11 dBf
(1.0 µV/75 Ω, mono, S/N: 30 dB)
50 dB quieting sensitivity ........................................ 16 dBf
(1.7 µV/75 Ω, mono)
Signal-to-noise ratio ...................... 70 dB (IEC-A network)
Distortion .......................... 0.3% (at 65 dBf, 1 kHz, stereo)
Frequency response ...................... 30 – 15,000 Hz (±3 dB)
Stereo separation .......................... 40 dB (at 65 dBf, 1 kHz)
FRANÇAIS
MW tuner
Frequency range ........................ 531 – 1,602 kHz (9 kHz)
Usable sensitivity .............................. 18 µV (S/N: 20 dB)
Selectivity .................................................. 50 dB (±9 kHz)
LW tuner
ITALIANO
Maximum power output ...................................... 50 W × 4
50 W × 2 ch/4 Ω + 70 W × 1 ch/2 Ω (for Subwoofer)
Continuous power output .................................... 22 W × 4
(DIN45324, +B = 14.4 V)
Load impedance ........ 4 Ω (4 – 8 Ω [2 Ω for 1 ch] allowable)
Preout maximum output
level/output impedance .......................... 4.6 V/100 Ω
Equalizer (3-Band Parametric Equalizer)
(Low) .......................... Frequency: 40/80/100/160 Hz
Q Factor: 0.35/0.59/0.95/1.15
(+6 dB when boosted)
Gain: ±12 dB
(Mid) .......................... Frequency: 200/500/1k/2k Hz
Q Factor: 0.35/0.59/0.95/1.15
(+6 dB when boosted)
Gain: ±12 dB
(High) ................ Frequency: 3.15k/8k/10k/12.5k Hz
Q Factor: 0.35/0.59/0.95/1.15
(+6 dB when boosted)
Gain: ±12 dB
Loudness contour
(Low) .................. +3.5 dB (100 Hz), +3 dB (10 kHz)
(Mid) ................ +10 dB (100 Hz), +6.5 dB (10 kHz)
(High) ................ +11 dB (100 Hz), +11 dB (10 kHz)
(volume: –30 dB)
HPF
Frequency ............................................ 50/80/125 Hz
Slope ........................................................ –12 dB/oct.
Subwoofer
Frequency ............................................ 50/80/125 Hz
Slope ........................................................ –18 dB/oct.
Gain ................................................................ ±12 dB
Phase ................................................ Normal/Reverse
ESPAÑOL
Audio
Frequency range ........................................ 153 – 281 kHz
Usable sensitivity .............................. 30 µV (S/N: 20 dB)
Selectivity .................................................. 50 dB (±9 kHz)
NEDERLANDS
Note:
• Specifications and the design are subject to possible modification without notice due to improvements.
72
Contenido
Guía de botones ........................................ 3
Unidad principal
- Controlador remoto de volante
-
Antes de usar este producto .................... 5
Sobre este producto .......................................... 5
Sobre este manual .............................................. 5
Acerca del sintonizador DAB .......................... 5
Reposición del microprocesador ...................... 6
Acerca del modo de demostración .................... 7
- Demostración de retroceso
- Demostración de característica
Precaución ........................................................ 8
En caso de problema ........................................ 8
Controlador remoto y cuidado ................ 9
Uso del controlador remoto de volante ............ 9
- Pila
Operación básica .................................... 11
Para escuchar música ...................................... 11
Operación básica del sintonizador .................. 12
- Sintonización de búsqueda y manual
- Sintonización de emisoras preajustadas
- Banda
Operación básica del reproductor
de CD incorporado .................................. 13
- Expulsión
- Cambio de visualización
(solamente para los discos CD TEXT)
- Búsqueda de pista y avance
rápido/retroceso
- Ranura de carga de CD
- Abierto
Operación básica del reproductor
de Multi-CD ............................................ 15
- Búsqueda de pista y avance
rápido/retroceso
- Búsqueda de disco
- Cambio de visualización
(Al reproducir un disco CD TEXT en
un reproductor de Multi-CD compatible
con CD TEXT)
- Búsqueda de número de CD
(para tipos de 6 discos, 12 discos)
- Búsqueda aproximada de número de disco
(solamente para el tipo de 50 discos)
Operación básica de DAB .............................. 17
- Cambio de visualización
- Sintonización de emisoras preajustadas
- Indicador DAB
- Selección de conjunto o servicio
- Banda
Visualizaciones y botones correspondientes .... 19
Selección del menú de funciones .................... 19
1
Funciones del menú de funciones .................. 20
Selección del menú de ajustes detallados ........ 22
Funciones del menú de ajustes detallados ...... 23
Operación del sintonizador .................... 24
Sintonización de búsqueda local
(LOCAL)
- Memoria de las mejores emisoras
(Best Stations Memory)
-
Uso de las funciones RDS ...................... 25
¿Qué es RDS? .................................................. 25
Visualización del nombre de servicio
de programa .............................................. 25
Función AF (AlternativeFrequency) .............. 26
- Activación/desactivación
de la función AF
Función de búsqueda PI .................................. 27
- Búsqueda PI
- Búsqueda PI automática
(para la emisora preajustada)
Función regional (Regional) ............................ 27
- Activación/desactivación de la función
regional
Función de espera de anuncio de tráfico
(Traffic Announcement) .......................... 28
- Activación/desactivación
de la función TA
- Cancelación de anuncios de tráfico
- Ajuste del volumen de la función TA
- Función de alarma TP
Función PTY .................................................. 30
- Búsqueda PTY
- Ajuste de interrupción de programa
de noticias (News)
- Alarma PTY
- Cancelación de anuncios
- Lista de PTY
Texto de radio .................................................. 33
- Visualización de texto de radio
- Almacenamiento de texto de radio en la
memoria
- Llamada de texto de radio preajustado
Uso de las funciones DAB ...................... 35
¿Qué es DAB? ................................................ 35
- Principios generales
Función de soporte de anuncio ........................ 36
- Anuncios operados por el botón TA
- Función de alarma TP
- Operación de los anuncios con el menú de
funciones
- Cambio de los anuncios por interrupción
Función de seguimiento de servicio ................ 39
- Función de seguimiento de servicio (FM)
-
Uso de reproductores de Multi-CD ...... 47
-
Ajuste de audio ........................................ 52
Ajustes iniciales ...................................... 62
Selección del menú de ajustes iniciales .......... 62
Funciones del menú de ajustes iniciales .......... 63
- Cambio del paso de sintonía de FM
(FM Tuning Step)
- Ajuste de la función de prioridad DAB
(DAB Priority)
- Cambio de la búsqueda PI automática
(Auto PI Seek)
- Ajuste del sonido de advertencia
(Warning Tone)
- Conmutación del modo AUX (AUX)
- Ajuste del reductor de luz (Dimmer)
- Selección del color de iluminación
(Illumination Color)
- Cambio de la salida del altavoz trasero
(Rear Speaker Out)
- Ajuste del control del altavoz de graves
(Sub woofer control)
- Abertura automática (FLAP AUTO)
- Selección del papel de pared (Wall Paper)
- Selección del brillo (Brightness)
Otras funciones ........................................ 68
Cambio a la visualización de
entretenimiento ........................................ 68
Uso de la fuente AUX .................................... 69
- Selección de la fuente AUX
- Ingreso de título para la fuente AUX
Enmudecimiento de teléfono celular .............. 69
ITALIANO
Reproductor de CD y cuidado ................ 70
Precaución ...................................................... 70
Mensajes de error del reproductor de
CD incorporado ........................................ 71
Especificaciones .................................... 72
NEDERLANDS
Selección de la curva del ecualizador ............ 52
Ingreso al menú de audio ................................ 52
Funciones del menú de audio .......................... 53
- Ajuste del equilibrio (FAD/BAL)
- Ajuste de la curva del ecualizador
(EqualizEr)
- Ajuste fino de la curva del ecualizador
(EqualizEr)
- Ajuste de sonoridad (LoudnEss)
- Salida de altavoz de graves secundario
(Sub W-1)
- Fijación de los ajustes de altavoz de graves
secundario (Sub W-2)
- Salida sin extinción (Non FadE-1)
- Ajuste del nivel de salida sin extinción
(Non FadE-2)
- Filtro de paso alto (High Pass)
- Función de mejorador de imagen delantera
(FIE)
- Función de ajuste de nivel de fuente
(SLA)
Protección contra robo .................................... 60
- Extracción del panel delantero
- Colocación del panel delantero
- Sonido de advertencia
FRANÇAIS
Reproducción con repetición (Play Mode)
Reproducción aleatoria (RandomPlay)
- Pausa (Pause)
Compresión y DBE (Compression) ................ 48
- Conmutación Comp./DBE ON/OFF
Título de disco ................................................ 49
- Ingreso de título de disco (Title Input ABC)
- Selección de discos mediante la lista
de títulos de disco (Disc List)
-
Extracción y colocación del panel
delantero ............................................ 60
DEUTSCH
Reproducción con repetición (Play Mode)
Reproducción aleatoria (RandomPlay)
- Pausa (Pause)
- Ingreso de título de disco
(Title Input ABC)
-
Función de nivelador de sonido automático
(ASL)
ESPAÑOL
Uso del reproductor de
CD incorporado .................................. 45
-
ENGLISH
Función de componente de servicio ................ 40
Función de lista de servicios disponibles ........ 40
Función de lista de servicios preajustados ...... 41
Función PTY disponible .................................. 42
- Búsqueda PTY
- Cancelación del modo de ajuste de búsqueda
PTY
Función de etiqueta dinámica .......................... 43
- Visualización de etiqueta dinámica
- Almacenamiento de etiquetas dinámicas en la
memoria
- Llamada de una etiqueta dinámica
preajustada
2
Guía de botones
Unidad principal
Botón DISPLAY
Botón RESET Botón FUNCTION
Botón ENTERTAINMENT
Botón EJECT
Botones 5/∞/2/3
Selector EQ
Botón +/–
Botones 1–6
Botón TEXT
Botón SOURCE/OFF
3
Botón BAND
Botón PTY
Botón TA
Botón AUDIO
Controlador remoto de volante
ENGLISH
Se suministra un controlador remoto de volante que permite la operación a distancia de la
unidad principal. La operación es la misma que cuando se usan los botones en la unidad
principal.
Botón BAND
Botón FUNCTION
Botón SOURCE/OFF
Botones 2/3
Botón AUDIO
DEUTSCH
Botones 5/∞
ESPAÑOL
Botón ATT
Este botón le permite bajar el
nivel del volumen rápidamente
(aproximadamente 90%).
Presionélo un vez más para
volver al nivel de volumen
original.
Botón +/–
Suba o
baje el
volumen.
FRANÇAIS
ITALIANO
NEDERLANDS
4
Antes de usar este producto
Sobre este producto
• Este producto cumple con las Directivas EMC (89/336/CEE, 92/31/CEE) y Directiva de
Marcación CE (93/68/CEE).
Las frecuencias del sintonizador en este producto se han dispuesto para usar en Europa
Occidental, Asia, Oriente Medio, Africa y Oceanía. El uso en otras áreas puede resultar en
una recepción inapropiada. Las funciones RDS operan solamente en áreas con señales
RDS de emisoras FM.
Sobre este manual
Este producto viene con diversas funciones sofisticadas que aseguran una recepción y
operación superior. El producto ha sido proyectado para facilitar su uso al máximo, pero
muchas funciones requieren explicación. El propósito de este manual de operación es
ayudarle a beneficiarse completamente del potencial del producto y maximizar su disfrute
de audición.
Se recomienda familiarizarse con las funciones y operaciones leyendo con detención el
manual antes de usar el producto. Es especialmente importante leer y observar la
“Precaución” en la página 8 y en otras secciones.
En este manual se explica la operación de la unidad principal. Usted puede realizar las
mismas operaciones con el controlador remoto de volante.
Acerca del sintonizador DAB
Como este producto se equipa con un sintonizador DAB, nunca conecte un sintonizador
DAB externo. En caso contrario, eso puede causar un malfuncionamiento.
5
Reposición del microprocesador
ENGLISH
El microprocesador se debe reposicionar en las siguientes condiciones:
Cuando utilice este producto por la primera vez después de la instalación.
Cuando el aparato no funciona apropiadamente.
Cuando mensajes extraños (incorrectos) aparecen en el visualizador.
• Para reposicionar el microprocesador, presione el botón RESET en la
unidad principal con la punta de un lápiz u otro instrumento puntiagudo.
ESPAÑOL
DEUTSCH
FRANÇAIS
ITALIANO
NEDERLANDS
6
Antes de usar este producto
Acerca del modo de demostración
Este producto presenta dos modos de demostraciones. Uno es el modo de demostración de
retroceso el otro es el modo de demostración de característica.
Demostración de retroceso
Si no realiza ninguna operación dentro de 30 segundos, las indicaciones de la pantalla
comienzan a retroceder, y luego continúan retrocediendo cada 10 segundos. Al presionar el
botón 5 cuando se desactiva este producto, mientras el interruptor de encendido se ajusta a
ACC y ON cancela el modo de demostración de retroceso. Presione el botón 5 nuevamente
para iniciar la demostración de retroceso.
Demostración de característica
La demostración de característica se inicia cuando la alimentación de este producto se
desactiva mientras el interruptor de encendido se ajusta a ACC u ON.
La presión del botón 6 durante la operación de demostración de característica cancela el
modo de demostración de característica. Presione el botón 6 nuevamente para iniciar la
demostración de característica.
Tenga en cuenta que si la demostración de característica continúa funcionando cuando se
apaga el motor del coche, la batería puede agotarse.
Nota:
• No se puede cancelar el modo de demostración, cuando el panel delantero está abierto.
• El cable rojo (ACC) de este producto se debe conectar al terminal acoplado con las operaciones de
activación/desactivación del encendido. Caso contrario, la batería del vehículo puede drenarse.
7
Precaución
ENGLISH
• Una etiqueta con la inscripción “CLASS 1 LASER PRODUCT” se fija en la parte
inferior del reproductor.
CLASS 1
LASER PRODUCT
ESPAÑOL
DEUTSCH
• El Pioneer CarStereo-Pass es para usar solamente en Alemania.
• Guarde este manual a mano como referencia para los procedimientos de operación y
precauciones.
• Mantenga siempre el volumen bajo lo suficiente para oír los sonidos de tráfico.
• Proteja el producto contra la humedad.
• Si la batería del automóvil se desconecta por alguna razón, la memoria programada será
borrada y deberá ser programada nuevamente.
En caso de problema
Cuando este producto no funciona correctamente, comuníquese con su concesionario o
centro de servicio Pioneer autorizado.
FRANÇAIS
ITALIANO
NEDERLANDS
8
Controlador remoto y cuidado
Uso del controlador remoto de volante
Precaución:
• No opere esta unidad mientras maneja el volante, o podría resultar en un accidente de tráfico.
• En el caso de que inevitablemente opere esta unidad mientras conduce, mire hacia adelante
cuidadosamente. De otro modo, prepárese para correr el riesgo de verse implicado en un accidente
de tráfico.
• Si ocurriera cualquiera de los siguientes problemas, inmediatamente deje de usar esta unidad y
consulte el concesionario a quien compró esta unidad:
– la unidad emite humo.
– la unidad emite olores anormales.
– un objeto extraño ha entrado en la unidad.
– se ha derramado líquido sobre o dentro de la unidad.
Si continúa utilizando esta unidad sin reparar el fallo, la unidad se dañará aún más, lo que llevará a
un serio accidente o incendio.
• No deje esta unidad libre (sin fijar) dentro del coche. Cuando el coche se detenga o gire una curva,
la unidad podría caerse en el piso. Si la unidad rodara y se pusiera debajo del pedal del freno, esto
podría evitar que el conductor haga el frenado debidamente, causando serios problemas. Asegúrese
de fijar esta unidad al volante.
• No desarme ni haga cambios en esta unidad, ya que podría resultar en fallos.
Pila
7 Instale la pila de litio
• Retire la cubierta en la parte trasera del controlador remoto de volante e
inserte la pila con los polos (+) y (–) orientados en la dirección apropiada.
9
ENGLISH
7 Para cambiar la pila de litio
• Retire la pila de litio.
ESPAÑOL
Precaución:
DEUTSCH
• Cambie la pila con una pila de litio CR2032.
• Cambie la pila en la unidad utilizando una barra puntiaguda no metálica.
ADVERTENCIA:
• Mantenga la pila de litio fuera del alcance de los niños. Si la pila fuese digerida,
consulte un médico inmediatamente.
PRECAUCIÓN:
FRANÇAIS
ITALIANO
• No recargue, desarme, caliente ni tire la pila al fuego.
• Utilice solamente una pila de litio CR2032 (3 V). No utilice otros tipos de pilas con esta
unidad.
• No toque la pila con instrumentos metálicos.
• No guarde la pila de litio con materiales metálicos.
• Para deshacerse de pilas usadas, siga los reglamentos gubernamentales y leyes públicas
del medio ambiente de su país/área.
• Siempre revise cuidadosamente que está cargando la pila con los polos (+) y (–)
dirigidos en las direcciones correctas.
NEDERLANDS
10
Operación básica
Para escuchar música
A continuación se explican los preparativos requeridos antes que se pueda escuchar la
música.
Nota:
• Debe haber un disco en el producto. (Vea la página 14.)
1. Seleccione la fuente deseada (por ejemplo: el sintonizador).
Cada presión cambia la fuente ...
Cada vez que se presiona el botón SOURCE/OFF, la fuente cambia en el siguiente orden:
Reproductor de CD incorporado (Disco compacto) = TV = Sintonizador = Sintonizador
DAB (Sintonización de audio digital) = Reproductor Multi-CD = Unidad externa 1
= Unidad externa 2 = AUX
Nota:
• Unidad externa se refiere a un productor Pioneer (tal como un producto disponible en el futuro)
que, mientras sea incompatible como una fuente, permite el control de funciones básicas por este
producto. Dos unidades externas se pueden controlar por este producto, mientras “External” se
visualiza si se selecciona la unidad externa 1 o unidad externa 2. Cuando se conectan dos unidades
externas, la asignación de las unidades a unidad externa 1 y unidad externa 2 se hace
automáticamente por este producto.
• En los siguientes casos, la fuente sonora no cambia:
* Cuando un producto correspondiente a cada fuente no se conecta a este producto.
* No hay un disco en este producto.
* No hay un cargador de CD en el reproductor de Multi-CD.
* El modo AUX (componente auxiliar) está desactivado. (Vea la página 64.)
• Cuando se conecta el conductor azul/blanco de este producto al terminal de control de relé de
antena automática del vehículo, la antena automática del vehículo se extiende cuando se conecta la
fuente del producto. Para retraer la antena, desconecte la fuente.
2. Suba o baje el volumen.
3. Desactive la fuente.
Sostenga durante 1 segundo.
11
ENGLISH
Operación básica del sintonizador
La función AF de este producto se puede activar y desactivar. Se debe desactivar la
función AF para operaciones de sintonización normales. (Vea la página 26.)
Sintonización de búsqueda y manual
Sintonización manual (paso por paso)
0,5 segundos o menos
Sintonización de búsqueda
0,5 segundos o más
ESPAÑOL
• Se puede seleccionar el método de sintonización cambiando el
lapso de tiempo de presión del botón 2/3.
Nota:
DEUTSCH
• Si continúa presionando el botón por más de 0,5 segundos, puede saltas las
emisoras. La sintonización de búsqueda empieza así que se suelta el botón.
• El indicador “
” se enciende cuando se selecciona una emisora estéreo.
Indicador de número preajustado
Indicador de banda
Indicador de frecuencia
FRANÇAIS
ITALIANO
Sintonización
de emisoras preajustadas
Banda
• Se pueden memorizar emisoras en los botones
1 a 6 para una llamada fácil de las emisoras a
simple tacto.
2 segundos o menos
Memoria de preajuste de una emisora
2 segundos o más
NEDERLANDS
Llamada de emisora preajustadas
FM-1 = FM-2
= FM-3 = MW/LW
Nota:
• Se puede almacenar en la memoria hasta un máximo de
18 emisoras FM (6 en FM-1, FM-2 y FM-3) y 6 emisoras
MW/LW.
• También se pueden utilizar los botones 5 y ∞ para llamar
a las emisoras memorizadas en los botones 1 a 6.
12
Operación básica
Operación básica del reproductor de CD incorporado
Expulsión
Presione el botón una vez: el
panel delantero abre y la
unidad expulsa el disco.
En caso de abrir el panel
delantero, podrá expulsar el
CD.
Nota:
Indicador de tiempo de reproducción
Indicador de número de pista
• Se puede activar o
desactivar la función de CD
con el disco en la producto.
(Vea la página 11.)
• El disco parcialmente
insertado después de la
expulsión pueden dañarse o
caerse.
Cambio de visualización (solamente para los discos CD TEXT)
Cada vez que se presiona el botón DISPLAY, la visualización cambia en el siguiente
orden:
Título de disco
Tiempo de reproducción
Título de disco
Artista del disco
Título de disco
Título de la pista
Título de disco
Artista de la pista
Se puede desplazar la visualización para ver el restante del texto presionando el botón
DISPLAY durante 2 segundos.
Nota:
• Un disco CD TEXT es un CD que presenta información de texto tal como un título de disco,
nombre de artista y título de la pista.
• Si cierta información no es grabada en un disco CD TEXT, se visualiza “No ~”
(por ejemplo: “No Title”).
13
ENGLISH
Búsqueda de pista y avance rápido/retroceso
• Se puede seleccionar entre la búsqueda de pista o el avance
rápido/retroceso presionando el botón 2/3 durante un lapso diferente
de tiempo.
0,5 segundos o menos
Avance rápido/retroceso
Continúe presionando
ESPAÑOL
Búsqueda de pista
DEUTSCH
Ranura de carga de CD
FRANÇAIS
Si inserta un CD, el panel delantero se cierra automáticamente.
El reproductor de CD incorporado reproduce un CD estándar de
12 cm u 8 cm (simple) a la vez. No utilice un adaptador cuando
reproduzca discos de 8 cm.
Nota:
ITALIANO
• Si no se puede insertar un disco completamente o la reproducción falla,
asegúrese de que el lado grabado se encuentre hacia abajo. Presione el botón
EJECT y verifique el disco para ver si hay daños, antes de reinsertarlo.
• Si el reproductor de CD incorporado no funciona adecuadamente, aparece
un mensaje de error (tal como “ERROR-14”) en el visualizador. Vea
“Mensajes de error del reproductor de CD incorporado” en la página 71.
• No inserte nada que no sea un CD en la ranura de carga de CD.
Abierto
Presione el botón EJECT durante algún tiempo: el panel
delantero abre pero la unidad no expulsa el disco.
En caso de abrir el panel delantero, lo puede cerrar.
NEDERLANDS
Nota:
• Cuando abra el panel delantero, los botones 1 a 6 no se encuentran
disponibles.
ADVERTENCIA:
• No utilice con el panel delantero abierto. Si lo deja abierto, puede
resultar en lesiones en el caso de un accidente.
14
Operación básica
Operación básica del reproductor de Multi-CD
Este producto puede controlar un reproductor de Multi-CD (en venta por separado).
Búsqueda de pista y avance rápido/retroceso
• Se puede seleccionar entre la búsqueda de
pista o el avance rápido/retroceso
presionando el botón 2/3 durante un lapso
diferente de tiempo.
Búsqueda de pista
0,5 segundos o menos
Avance rápido/retroceso
Continúe presionando
Indicador de número de pista
Indicador de número de disco
Indicador de tiempo
de reproducción
Búsqueda de disco
Cambio de visualización (Al reproducir un disco CD TEXT en un reproductor de
Multi-CD compatible con CD TEXT)
Cada vez que se presiona el botón DISPLAY, la visualización cambia en el siguiente
orden:
Título de disco
Tiempo de reproducción
Título de disco
Artista del disco
Título de disco
Título de la pista
Título de disco
Se puede desplazar la visualización para ver el restante del texto presionando el botón
DISPLAY durante 2 segundos.
Nota:
15
• Un disco CD TEXT es un CD que presenta información de texto tal como un título de disco,
nombre de artista y título de la pista.
• Si cierta información no es grabada en un disco CD TEXT, se visualiza “No ~”
(por ejemplo: “No Title”).
• No se puede conmutar al modo de ingreso de título de disco desde el menú de ajustes
detallados.
ENGLISH
Búsqueda de número de disco (para tipos de 6 discos, 12 discos)
• Se puede seleccionar los discos directamente con los botones 1 a 6. Basta
presionar el número correspondiente al disco que desea escuchar.
Nota:
• Cuando hay un reproductor de Multi-CD de 12 discos conectado y se desea seleccionar los discos
de 7 a 12, presione los botones 1 a 6 durante 2 segundos.
ESPAÑOL
Búsqueda aproximada de número de disco (solamente para el tipo de 50 discos)
Esta función útil le permite seleccionar discos cargados en un reproductor de Multi-CD de
50 discos usando los botones 1 a 5. Los 50 discos se dividen en cinco bloques, con cada
bloque asignado a uno de los botones de 1 a 5.
• Seleccione el bloque deseado con los botones 1 a 5.
Nota:
DEUTSCH
• Después de terminar búsqueda aproximada, utilice los botones 5 y ∞ para seleccionar un disco
deseado.
Nota:
FRANÇAIS
• El reproductor de Multi-CD puede realizar una operación preparatoria, tal como verificar la
presencia de un disco o como leer las informaciones de un disco, cuando se enciende el
reproductor o cuando se selecciona un nuevo disco para reproducción. Se visualiza “READY”.
• Cuando se coloca un cargador en un reproductor de Multi-CD de 50 discos, se leen las
informaciones en todos los discos en el cargador.
Si inicia la reproducción de un disco en un reproductor Multi-CD del tipo de 50 discos, antes de
que la lectura de todos los discos se haya completado, la lectura de la información se para a mitad
de camino. Esto evitará que pueda usar la función ITS. (Si intenta usar esta función, se visualizará
“Not Ready”.)
Si eso ocurre, la lectura de las informaciones empieza de nuevo cuando se conmuta a un
componente que no sea el reproductor de Multi-CD de 50 discos.
• Si un reproductor de Multi-CD no funciona adecuadamente, se visualiza un mensaje de error tal
como “ERROR-14”. Consulte el manual del propietario del reproductor de Multi-CD.
• Si no hay discos en el cargador de CD del reproductor de Multi-CD, se visualiza “No Disc”.
• Se visualiza “LOADING” en los siguientes casos:
* Si el disco está en la bandeja extra.
* Si se mueve el disco de la bandeja extra para el cargador.
(Consulte el manual del propietario del reproductor de Multi-CD de 50 discos.)
• Con esta unidad no se pueden usar las funciones “Ejecting a Single Disc” (expulsión de un solo
disco), “Frequency Play” (reproducción de frecuencia), “Music Group Play” (reproducción de
grupo de música) o “ABC Disc Title Search” (búsqueda de título de disco ABC).
ITALIANO
NEDERLANDS
16
Operación básica
Operación básica de DAB
Cambio de visualización
Cada vez que se presiona el botón DISPLAY, la visualización cambia en el siguiente
orden:
Etiqueta de servicio
Etiqueta PTY
Etiqueta de servicio
Etiqueta de componente
de servicio
Etiqueta de servicio
Etiqueta de conjunto
Etiqueta dinámica
Nota:
• Con un componente de servicio que no tiene etiqueta de componente de servicio o etiqueta
dinámica, el cambio a etiqueta de componente de servicio y etiqueta dinámica no es posible.
• Con visualizaciones diferentes de etiqueta PTY, si no se lleva a cabo ninguna operación dentro de
8 segundos ni se presiona ningún botón diferente del botón DISPLAY, las indicaciones de la
etiqueta PTY reaparecen.
• La información se correlaciona con la lista en la sección “Lista de PTY” en la página 32.
Indicador de banda
Etiqueta de servicio
Sintonización
de emisoras preajustadas
Etiqueta PTY
• Los servicios se pueden memorizar en los
botones de 1 a 6 para una llamada fácil de las
emisoras a simple tacto.
Llamada de emisora preajustadas
2 segundos o menos
Memoria de preajuste de una emisora
2 segundos o más
Nota:
17
• Hasta 18 componentes de servicio se pueden almacenar en
la memoria.
• También se pueden utilizar los botones 5 o ∞ para llamar
a los componentes de servicio memorizados en los
botones de 1 a 6.
ENGLISH
Indicador DAB
Hay un indicador “DAB” en el visualizador. Eso indica que la recepción DAB es
posible.
Nota:
• Si no se produce sonido aún cuando “DAB” está iluminado, cambie el servicio. El
servicio que estaba escuchando puede tener terminado.
7 Al escuchar DAB
ESPAÑOL
Se ilumina durante la recepción de conjunto.
7 Al escuchar a una fuente no DAB
Se ilumina cuando se está en un área en donde la recepción DAB es posible.
Selección de conjunto o servicio
Seleccione un servicio deseado
0,5 segundos o menos
Sintonice a una frecuencia alta o baja (conjunto)
0,5 segundos o más*
DEUTSCH
Cuando primero cambia a DAB, se realiza la búsqueda automática para
encontrar un conjunto DAB. (La búsqueda automática también se lleva a cabo
de la misma manera cada vez que cambia las bandas.)
Una vez que se reciba el conjunto, la búsqueda automática se termina.
FRANÇAIS
* Al presionar el mismo botón, la búsqueda se detiene y la unidad cambia al modo de
espera para recepción de la frecuencia de conjunto.
ITALIANO
Banda
DAB1 = DAB2 = DAB3
Para permitir que la unidad memorice más servicios, las frecuencias se ordenan
en tres bandas: 1, 2 y 3. (Las frecuencias (conjunto) que se pueden recibir son
iguales para 1, 2 y 3.)
NEDERLANDS
Nota:
• Al cambiar a cada una de las bandas por primera vez, la búsqueda automática se lleva a
cabo para los conjuntos que se pueden recibir. (La frecuencia inicial para la búsqueda
automática en cada banda difiere. Por esta razón, cuando se reciben frecuencias
múltiples, un frecuencia diferente se recibe automáticamente en cada banda.)
18
Operación básica
Visualizaciones y botones correspondientes
El visualizador de este producto presenta los indicadores de guía de botones. Estos
indicadores se iluminan para indicar qué botones 5/∞/2/3 se pueden utilizar. Cuando se
está en el menú de funciones (vea la siguiente sección), el menú de ajustes detallados (vea
la página 22), menú de ajustes iniciales (vea la página 62), o menú de audio (vea la página
52), los indicadores también le permiten ver más fácil qué botones 5/∞/2/3 se pueden
utilizar para activar y desactivar las funciones, cambiar las selecciones de repetición, y
realizar otras operaciones.
Los indicadores y los botones correspondientes se muestran a continuación.
7 Unidad principal
7 Controlador remoto
de volante
7 Visualizador
z
z
1
Cuando 1 se ilumina en el visualizador, realice las operaciones apropiadas con los
botones z.
Selección del menú de funciones
El menú de funciones le permite operar funciones simples para cada fuente.
Nota:
• Después de seleccionar el menú de funciones, si no se realiza ninguna operación dentro de
aproximadamente 30 segundos, el menú de funciones se cancela automáticamente.
1. Seleccione el modo deseado en el menú de funciones. (Vea la siguiente
sección, “Funciones del menú de funciones”.)
Cada presión cambia el modo ...
19
2. Opere un modo (por ejemplo: la reproducción aleatoria).
ENGLISH
ESPAÑOL
El botón usado y la operación que realiza se
indican por el indicador de guía de botones.
Presione el botón 5 para activar el indicador de
guía de botones, y el botón ∞ para desactivarlo.
3. Cancele el menú de funciones.
DEUTSCH
Funciones del menú de funciones
En la siguiente tabla se muestran las funciones para cada fuente en el menú de funciones.
En la tabla también se muestran las indicaciones para cada función, operaciones y botones
usados para realizar las operaciones. Para más detalles, o cuando desea saber más sobre
una operación, refiérase al número de página indicado en la tabla.
FRANÇAIS
7 Sintonizador
Página
5: Activación
∞: Desactivación
24
Función regional (Regional)
5: Activación
∞: Desactivación
27
Sintonización de búsqueda local (LOCAL)
1 5: Activación
3 ∞: Desactivación
2 2 o 3: Selección (Sensibilidad)
24
Función TA (Traffic Announcement)
5: Activación
∞: Desactivación
28
Función AF (AlternativeFrequency)
5: Activación
∞: Desactivación
26
Ajuste de interrupción de programa
de noticias (News)
5: Activación
∞: Desactivación
31
NEDERLANDS
Botón: Operación
Memoria de las mejores emisoras
(Best Stations Memory)
ITALIANO
Nombre de la función (Visualización)
20
Operación básica
7 Sintonizador DAB
Nombre de la función (Visualización)
Botón: Operación
Página
Soporte de anuncio
(Announcement Support)
1 5: Activación
2 ∞: Desactivación
2 2 o 3: Selección (modo)
36
Seguimiento de servicio (Service Follow)
5: Activación
∞: Desactivación
39
Componente de servicio
(Primary/Secondary)
2 o 3: Selección
40
Lista de servicios disponibles
(Service List)
1 2 o 3: Selección (servicio)
2 5: Reproducción
40
Lista de servicios preajustados
(SRVC. List)
1 2 o 3: Selección (servicio)
2 5: Reproducción
41
7 Reproductor de CD incorporado
Nombre de la función (Visualización)
Botón: Operación
Página
Reproducción con repetición (Play Mode)
5: Activación
∞: Desactivación
45
Reproducción aleatoria (RandomPlay)
5: Activación
∞: Desactivación
45
Pausa (Pause)
5: Activación
∞: Desactivación
46
Nombre de la función (Visualización)
Botón: Operación
Página
Reproduccíon con repetición (Play Mode)
2 o 3: Selección (Gama de reproducción) 47
Selección de discos mediante la lista de
títulos de disco (Disc List)
1 2 o 3: Selección (Título de disco)
2 5: Reproducción
51
Reproducción aleatoria (RandomPlay)
5: Activación
∞: Desactivación
47
Pausa (Pause)
5: Activación
∞: Desactivación
48
Compresión y DBE (Compression)
5 o ∞: Selección
(Función de calidad sonido)
48
7 Reproductor de Multi-CD
21
Selección del menú de ajustes detallados
ENGLISH
En el menú de ajustes detallados, se pueden ejecutar funciones convenientes y complejas
para cada fuente.
1. Seleccione el menú de ajustes detallados.
ESPAÑOL
Sostenga durante 2 segundos.
2. Opere un modo.
3. Cancele el menú del ajustes detallados.
DEUTSCH
Nota:
• Se puede cancelar el menú de ajustes detallados presionando el botón FUNCTION de nuevo
durante 2 segundos.
FRANÇAIS
ITALIANO
NEDERLANDS
22
Operación básica
Funciones del menú de ajustes detallados
En la siguiente tabla se muestran las funciones para cada fuente en el menú de ajustes
detallados. En la tabla también se muestran las indicaciones para cada función,
operaciones y botones usados para realizar las operaciones. Para más detalles, o cuando
desea saber más sobre una operación, refiérase al número de página indicado en la tabla.
7 Reproductor de CD incorporado
Nombre de la función (Visualización)
Botón: Operación
Página
Ingreso de título de disco (Title Input ABC)
1 5 o ∞: Selección (Carácter)
2 2 o 3: Selección (Posición)
3 3: Memoria
46
Nombre de la función (Visualización)
Botón: Operación
Página
Ingreso de título de disco (Title Input ABC)
1 5 o ∞: Selección (Carácter)
2 2 o 3: Selección (Posición)
3 3: Memoria
49
7 Reproductor de Multi-CD
23
Operación del sintonizador
Sintonización de búsqueda local (LOCAL)
ENGLISH
Cuando el modo local está activado (indicador “LOC” se enciende), se puede seleccionar
solamente emisoras de señales fuertes.
1. Presione el botón FUNCTION y seleccione el modo local (LOCAL) en el
menú de funciones.
ESPAÑOL
2. Active o desactive el local con los
botones 5/∞.
3. Seleccione la sensibilidad de
búsqueda local deseada con los
botones 2/3.
DEUTSCH
FM
: LEVEL 1 Ô LEVEL 2 Ô LEVEL 3 Ô LEVEL 4
MW/LW: LEVEL 1 Ô LEVEL 2
Nota:
• El ajuste LEVEL 4 permite la recepción solamente de las emisoras con las señales más fuertes,
mientras los ajustes inferiores le permiten recibir progresivamente las emisoras con señales más
débiles.
FRANÇAIS
Memoria de las mejores emisoras (Best Stations Memory)
La función BSM (Best Stations Memory) almacena las emisoras en la memoria
automáticamente.
1. Presione el botón FUNCTION y seleccione el modo BSM (Best Stations
Memory) en el menú de funciones.
ITALIANO
2. Active el BSM con el botón 5.
Las emisoras con las señales más
fuertes serán almacenadas bajo los
botones 1–6, por orden de fuerza de
sus señales.
NEDERLANDS
• Para cancelar el proceso,
presione el botón ∞ en el menú
de funciones antes del término
de la memorización.
24
Uso de las funciones RDS
¿Qué es RDS?
RDS (Radio Data System) es un sistema para transmisión de dados con los programas de
FM. Esos datos, que son inaudibles, proveen una variedad de funciones tales como:
nombre de servicio de programa, indicación de tipo de programa, espera por anuncio de
tráfico, sintonización automática y sintonización por tipo de programa, para ayudar los
oyentes de radio a sintonizar una emisora deseada.
Nota:
• El servicio RDS puede no ser disponible para todas las emisoras.
• Las funciones RDS, como AF (Alternative Frequencies search) y TA (Traffic Announcement
standby), son solamente activas cuando su radio se sintoniza en emisoras RDS.
Visualización del nombre de servicio de programa
Con esta función, los nombres de redes/emisoras que proveen servicios RDS reemplazan la
frecuencia en el visualizador por algunos segundos después de sintonizada la emisora.
• Cuando desee saber la frecuencia de la emisora actual, cambie la
visualización.
Cada presión cambia la visualización ...
Cada vez que se presiona el botón DISPLAY, la visualización cambia en el siguiente
orden:
Nombre de servicio de programa
Información PTY
Frecuencia
Información PTY
Nota:
• Después de cambiar las visualizaciones, si no se realiza una operación dentro de 8 segundos, el
nombre de servicio de programa se visualiza automáticamente.
7 Información PTY
La información PTY (código de identificación de tipo de programa) para la emisora
sintonizada actualmente aparece en el visualizador. La información se correlaciona con la
lista en la sección “Lista de PTY” en la página 32.
Nota:
• Si se recibe un código PTY cero de una emisora, “None” (ninguno) será visualizado. Eso indica que
la emisora no ha definido el contenido de sus programas.
7 Frecuencia
La frecuencia de la emisora actualmente aparece sobre en el visualizador.
25
Función AF (AlternativeFrequency)
ENGLISH
La función AF (Alternative Frequencies search) se usa para buscar otras frecuencias en la
misma red de la emisora sintonizada actualmente. La función sintoniza de nuevo el
receptor automáticamente a una otra frecuencia en la red con señales más fuertes, cuando
hay problemas en la recepción de la emisora sintonizada actualmente, o si es posible
obtener una mejor recepción en una frecuencia diferente.
Nota:
ESPAÑOL
• La función AF sintoniza el receptor solamente en emisoras RDS cuando se usa la sintonización de
búsqueda o la función BSM con el indicador “AF ” encendido.
• Cuando se llama una emisora preajustada, el sintonizador puede actualizar la emisora preajustada
con una nueva frecuencia desde la lista AF de la emisora. (Esto solamente se dispone cuando se
usan los preajustes en las bandas FM-1 y FM-2.) Ningún número preajustado aparece en el
visualizador si los datos RDS para la emisora recibida son diferentes de los datos para la emisora
almacenada originalmente.
• El sonido puede interrumpirse temporalmente por un otro programa durante la búsqueda de
frecuencia AF.
• Cuando el sintonizador se sintoniza en una emisora no RDS, el indicador “AF ” destella.
• La función AF se puede activar y desactivar independientemente para cada banda FM.
DEUTSCH
Activación/desactivación de la función AF
La función AF está activada por omisión.
1. Presione el botón FUNCTION y seleccione el modo AF
(AlternativeFrequency) en el menú de funciones.
FRANÇAIS
2. Active o desactive la función AF mientras esté en una banda FM.
ITALIANO
NEDERLANDS
26
Uso de las funciones RDS
Función de búsqueda PI
El sintonizador busca por una otra frecuencia transmitiendo el mismo programa.
“PI Seek” (búsqueda PI) aparece en el visualizador y el volumen de la radio se enmudece
durante la búsqueda PI. El enmudecimiento cesa después de completada la búsqueda PI,
tenga la búsqueda PI sido exitosa o no. Si la búsqueda PI no es exitosa, el sintonizador
vuelve a la frecuencia anterior.
Búsqueda PI
Si el sintonizador no logra localizar una frecuencia alternativa apropiada o si la señal de
radiodifusión es muy débil para una recepción apropiada, la búsqueda PI comenzará
automáticamente.
Búsqueda PI automática (para la emisora preajustada)
Cuando no se pueden llamar a emisoras preajustadas, como durante un viaje, se puede
ajustar el producto para realizar la búsqueda PI también durante la llamada de emisoras
preajustadas.
La búsqueda PI automática está desactivada por omisión.
Nota:
• Para más detalles sobre cómo activar y desactivar la búsqueda PI automática, consulte a la sección
“Ajustes iniciales”.
Función regional (Regional)
Cuando se usa AF para que el sintonizador vuelva a sintonizar automáticamente, la
función regional limita la selección a los programas regionales de radioemisión.
Nota:
• Los programas regionales y redes regionales se organizan de manera diferente dependiendo del país
(es decir, pueden cambiar de acuerdo a la hora, estado o área de radiodifusión).
• El número preajustado puede aparecer en el visualizador si el receptor sintoniza una emisora
regional diferente de la emisora ajustada originalmente.
• La función regional se puede activar o desactivar independientemente para cada banda FM.
• “REG” se visualiza si activa la función regional cuando se cancela el menú de funciones.
Activación/desactivación de la función regional
Inicialmente, la función regional está activada.
1. Presione el botón FUNCTION y seleccione el modo regional (Regional) en el
menú de funciones.
2. Active o desactive la función Regional mientras esté en una banda FM.
27
Función de espera de anuncio de tráfico (Traffic Announcement)
ENGLISH
La función TA (espera por anuncio de tráfico) le permite recibir anuncios de tráfico
automáticamente, independientemente de la fuente que esté escuchando. La función TA se
puede activar para una emisora TP (una emisora que transmite información de tráfico) o
una emisora TP de otras redes mejoradas (una emisora que transmite informaciones interreferenciales remisivas a las emisoras TP).
Activación/desactivación de la función TA
ESPAÑOL
1. Sintonice una emisora TP o TP de otras redes mejoradas.
El indicador TP (“TRFC”) se ilumina cuando el sintonizador es sintonizado a una emisora
TP o a una emisora TP de otras redes mejoradas.
2. Active la función TA.
DEUTSCH
“TRFC2”
El indicador “TRFC2” se enciende, indicando que el sintonizador está esperando por
anuncios de tráfico.
FRANÇAIS
Nota:
• Si se activa la función TA cuando se está sintonizado en una emisora TP o TP de otras redes
mejoradas, solamente “T” en el indicador “TRFC” se visualiza.
Repita la operación precedente cuando ningún anuncio de tráfico está siendo recibido para
desactivar la función TA.
Nota:
ITALIANO
• La función TA también se puede activar/desactivar en el menú de funciones.
• El sistema regresa a la fuente original al final de la recepción de anuncio de tráfico.
• La función TA se podrá activar desde fuentes diferentes del sintonizador si el sintonizador estaba
ajustado a la banda FM, pero eso no será posible si ello estaba ajustado a la banda MW/LW.
• Si el sintonizador estaba ajustado a FM, activar la función TA le permite operar otras funciones de
sintonización mientras escucha fuentes diferentes del sintonizador.
• Solamente emisoras TP o TP de otras redes mejoradas se sintonizan durante el modo de sintonización de búsqueda cuando el indicador “TRFC2” o “T” está encendido.
• Solamente emisoras TP o TP de otras redes mejoradas se almacenan por la función BSM cuando el
indicador “TRFC2” o “T” está encendido.
• Cuando se escucha a DAB, activar/desactivar la función DAB TA activa/desactiva
simultáneamente el anuncio de tráfico RDS.
NEDERLANDS
28
Uso de las funciones RDS
Cancelación de anuncios de tráfico
• Presione el botón TA mientras recibe un anuncio de tráfico para cancelar el
anuncio y volver a la fuente original.
El anuncio se cancela pero el sintonizador permanece en el modo TA hasta que se presione
el botón TA nuevamente.
Ajuste del volumen de la función TA
Cuando comienza un anuncio de tráfico, el volumen se ajusta automáticamente a un nivel
preajustado para permitirle oír el anuncio claramente.
• Ajuste el volumen durante la recepción de un anuncio de tráfico.
El nuevo volumen ajustado se almacena en la memoria, siendo llamado para los anuncios
de tráfico subsecuentes.
Función de alarma TP
Aproximadamente 30 segundos después que el indicador “TRFC2” cambia a “T” debido a
una señal débil, un tono de 5 segundos suena para que se seleccione una otra emisora TP o
TP de otras redes mejoradas.
• Cuando la función de seguimiento de servicio DAB está activada.
• Cuando esta unidad (durante recepción DAB) no puede recibir claramente un
componente de servicio que soporta anuncio de tráfico o de transporte.
• Cuando esta unidad RDS no puede recibir una emisora TP o TP de otras redes
mejoradas.
• Si usted está escuchando al sintonizador, sintonice una otra emisora TP o
emisora TP de otras redes mejoradas.
En fuentes diferentes de sintonizador, el sintonizador busca automáticamente la emisora
TP con la señal más fuerte en el área actual 10 (ó 30)* segundos después que el indicador
“TRFC2” cambia a “T”.
* Tiempo requerido para que la búsqueda comience.
Función TA activada
10 segundos
Funciones TA, AF activadas 30 segundos
29
Función PTY
ENGLISH
Con la clasificación de ancho y estrecho del tipo de programa, la función PTY proporciona
dos maneras para seleccionar las emisoras por el tipo de programa que se está emitiendo
(PTY Search). La función también provee la sintonización automática a radiodifusiones de
emergencia (PTY Alarm).
Nota:
ESPAÑOL
• No hay necesidad de llevar a cabo el ajuste de búsqueda PTY de nuevo si los ajustes han sido
hechos previamente. Después de cambiar al modo de ajuste de búsqueda PTY en el paso 1,
simplemente lleve a cabo la búsqueda PTY en el paso 4.
Búsqueda PTY
1. Seleccione el modo de ajuste de búsqueda PTY.
DEUTSCH
2. Seleccione el método de búsqueda PTY (ancho, estrecho).
FRANÇAIS
3. Seleccione uno entre los servicios PTY.
ITALIANO
4. Inicie la búsqueda PTY.
NEDERLANDS
El sintonizador busca por una emisora que transmite el PTY deseado.
Para cancelar el modo de ajuste de búsqueda PTY, sostenga presionado el botón PTY
durante 2 segundos.
Nota:
• El programa de algunas emisoras puede ser diferente de lo indicado por el PTY transmitido.
• Si no se encuentra ninguna emisora transmitiendo el tipo de programa seleccionado,
“NOT FOUND” (no encontrado) se visualiza por 2 segundos, y el sintonizador regresa a la emisora
original.
30
Uso de las funciones RDS
Ajuste de interrupción de programa de noticias (News)
La recepción automática de los programas de noticias con código PTY puede ser activada
o desactivada. Cuando un programa de noticias recibido termina, la recepción del
programa precedente continúa.
• Ajuste la interrupción a activado o desactivado.
Sostenga durante 2 segundos.
“NEWS”
Nota:
• El ajuste de interrupción de programa de noticias también se puede activar y desactivar en el menú
de funciones.
• Cuando “N” en el indicador “NEWS” se visualiza, eso indica que la interrupción ha sido activada.
• Cuando “2” se visualiza en el lado derecho del indicador, eso indica que un programa de noticias
ha sido recibido.
Alarma PTY
La alarma PTY es un código PTY especial para anuncios relativos a emergencias tales
como desastres naturales. Cuando el sintonizador recibe el código de alarma de radio,
“ALARM” (alarma) aparece en el visualizador y el volumen se ajusta al volumen TA.
Cuando la emisora deja de transmitir el anuncio de emergencia, la unidad vuelve a la
fuente anterior.
Cancelación de anuncios
• Presione el botón TA durante la recepción de anuncio para cancelar el
anuncio y volver a la fuente anterior.
31
Lista de PTY
Estrecho
Detalles
News&Inf
News
Noticias.
Affairs
Temas de actualidad.
Weather
Informes del tiempo/Información meteorológica.
Finance
Informes del mercado de valores, comercio,
operaciones de compraventa, etc.
Pop Mus
Música popular.
Rock Mus
Música moderna contemporánea.
Easy Mus
Música “fácil de escuchar”.
Oth Mus
Otros tipos de música, que no se clasifican por
categorías.
Jazz
Programas basados en música jazz.
Country
Programas basados en música campera.
Nat Mus
Programas basados en música nacional.
Oldies
Música antigua, programas basados en la
“Edad de Oro”.
Programas basados en música folklórica.
Música clásica ligera.
Classic
Música clásica seria.
Educate
Programas educacionales.
Drama
Todas las obras y seriales de radio.
Culture
Programas relacionados con cualquier aspecto
de la cultura nacional o regional.
Science
Programas relativos a la naturaleza, ciencias y
tecnología.
Varied
Programas de entretenimiento ligero.
Children
Programas para niños.
Programas de asuntos sociales.
Religion
Programas o servicios de asuntos religiosos.
Phone In
Programas basados en teléfono.
Touring
Programas de viaje, sin anuncios de problemas
de tráfico.
Leisure
Programas relativos a pasatiempos favoritos y a
actividades recreativas.
Document
Programas documentales.
NEDERLANDS
Social
ITALIANO
Folk Mus
L. Class
FRANÇAIS
Others
Programas deportivos.
DEUTSCH
Classics
Información general y consejos.
Sport
ESPAÑOL
Popular
Info
ENGLISH
Ancho
32
Uso de las funciones RDS
Texto de radio
Este sintonizador puede visualizar los datos de texto de radio transmitidos por emisoras
RDS, tales como informaciones de la emisora, el nombre de la canción que está siendo
recibida actualmente, y el nombre del artista.
Nota:
• Cuando se recibe texto de radio, el indicador “RT” se ilumina.
• El sintonizador memoriza automáticamente las tres últimas transmisiones de texto de radio
recibidas, reemplazando el texto de la recepción más antigua con el texto nuevo recibido.
• Se pueden almacenar hasta seis transmisiones de texto de radio en los botones 1-6.
• Si no se lleva a cabo ninguna operación dentro de 8 segundos, el modo de texto de radio se cancela.
Visualización de texto de radio
1. Seleccione el modo de texto de radio.
Sostenga durante 2 segundos.
“RT”
Nota:
• Presione el botón TEXT una vez más, y el modo de texto de radio se cancela.
• Cuando ningún texto de radio está siendo recibido, “NO TEXT” se visualiza, y el modo de texto de
radio se cancela después de 8 segundos.
2. Llamada de las tres últimas transmisiones de texto de radio de la memoria
del sintonizador.
Presionar el botón cambia entre las cuatro visualizaciones de datos de texto de radio.
Nota:
• Si no hay datos de texto de radio almacenados en el sintonizador, este botón no funciona.
33
Almacenamiento de texto de radio en la memoria
ENGLISH
1. Siga los pasos 1 y 2 de “Visualización de texto de radio”, y seleccione el texto
de radio que desea almacenar en la memoria.
2. Presione uno de los botones 1-6 durante 2 segundos para almacenar el texto
de radio deseado. (Por ejemplo: Presione el botón 4 durante 2 segundos.)
ESPAÑOL
Sostenga durante 2 segundos.
El texto de radio se almacena en la memoria bajo el botón seleccionado.
Llamada de texto de radio preajustado
DEUTSCH
1. Seleccione el modo de texto de radio.
Sostenga durante 2 segundos.
FRANÇAIS
2. Presione uno de los botones 1-6 para llamar a un texto de radio preajustado
bajo tal botón. (Por ejemplo: Presione el botón 4.)
ITALIANO
Nota:
• Se pueden también utilizar los botones 5 y ∞ para llamar textos de radio memorizados en los
botones de 1 a 6.
NEDERLANDS
34
Uso de las funciones DAB
¿Qué es DAB?
DAB significa Digital Audio Broadcasting. Los beneficios de DAB son los siguientes:
• Alta calidad de sonido (casi como la calidad de CD es normal, aunque puede ser
reducida en algunos dispositivos, para permitir más servicios a ser emitidos).
• Recepción libre de interferencias.
Nota:
• Algunas emisoras puede realizar transmisiones de prueba.
Principios generales
La manera en que los servicios son transmitidos con DAB es muy diferente al usado en las
radioemisiones de MW/LW y FM. Con DAB, los servicios se incluyen en grupos,
normalmente llamados conjuntos o múltiplex. Un conjunto (ensemble) podría contener
típicamente alrededor de 6 servicios, aunque esto puede varia desde 1 hasta 10 o más
servicios al mismo tiempo. En una área pueden disponerse de varios conjuntos diferentes.
Algunos servicios individuales en un conjunto pueden ser subdivididos adicionalmente en
componentes de servicio. El servicio principal se denomina componente de servicio
primario, y los servicios subsidiarios son denominados componentes de servicio
secundario. Esta característica única de DAB tiene muchas aplicaciones posibles. Una
típica podría ser para un servicio deportivo llamado por ejemplo SPORT RADIO (radio
deporte), para agregar varios componentes de servicio secundario los sábados en la tarde,
con cada componente de servicio ofreciendo la información de un partido de fútbol o
evento deportivo diferente. De esta manera SPORT RADIO (radio deporte) podría ofrecer
al oyente la selección de varios eventos simultáneos más que ser forzado a seleccionar
solamente un evento.
Conjunto
Servicio
Componente de servicio primario
Servicio
Componente de servicio primario
Componente de servicio secundario
Componente de servicio secundario
7 Sobre los componentes de servicio
Los componentes de servicio incluyen audio y datos. La recepción de servicio de datos no
es posible con esta unidad. (En este manual, servicio refiérese al servicio de audio regular.)
35
Función de soporte de anuncio
ENGLISH
Aún cuando no escuche a fuentes no DAB, la función de soporte de anuncio le permite
escuchar automáticamente al soporte de anuncio ajustado. Cuando el anuncio por
interrupción termina, la unidad vuelve a la fuente original. Cuando escucha a una
transmisión DAB, usted puede cambiar el ajuste para la activación/desactivación de
interrupción para anuncio, excepto para los anuncios de alarma. El cambio entre los
anuncios es como sigue:
ESPAÑOL
Anuncio que está siempre activado:
• Alarma (Alarm)
Anuncios operados por el botón TA:
• Tráfico (Indicador “TRFC”)
• Transporte (Indicador “TRFC”)
Anuncios operados con el menú de funciones:
Noticias (News)
Tiempo (Weather)
Advertencia/Servicio (Warning)
Anuncio de eventos (Event)
Eventos especiales (Special Event)
Finanzas (Finance)
Deporte (Sports)
Información (Information)
DEUTSCH
•
•
•
•
•
•
•
•
Anuncios operados por el botón TA
FRANÇAIS
7 Activación/desactivación de anuncios de tráfico y de transporte
• Active/desactive el anuncios de tráfico y de transporte.
ITALIANO
“TRFC”
“2”
Cada vez que se presiona el botón TA, el anuncio se activa/desactiva.
Nota:
NEDERLANDS
• Cuando el componente de servicio que soporta anuncio de tráfico y transporte está seleccionado,
“TRFC2” se ilumina.
• Cuando el componente de servicio no soporta los anuncios de tráfico y transporte, solamente “T”
en “TRFC” se ilumina.
• Cuando escucha una radio FM, la activación/desactivación de la función RDS TA activará/desactivará
simultáneamente el destello del tráfico DAB y el destello de transporte.
Continúa en la siguiente hoja.
36
Uso de las funciones DAB
7 Cancelación de las interrupciones para anuncios de tráfico y de transporte
• Para cancelar una interrupción para anuncio de tráfico o de transporte y
volver a la fuente original, presione el botón TA durante la interrupción
para anuncio.
Nota:
• También se puede cambiar en orden entre los anuncios de interrupción. (Refiérase a “Cambio de los
anuncios por interrupción” en la página siguiente.)
Función de alarma TP
Cuando ocurren las siguientes condiciones, el indicador “TRFC 2” cambia a “T”, y
después de 30 segundos, la alarma TP suena durante 10 segundos, para que se seleccione
un componente de servicio que soporte los anuncios de tráfico y transporte.
• Cuando el ajuste de interrupción para anuncio de tráfico y transporte está activado.
• Cuando la función de seguimiento de servicio está activada.
• Cuando esta unidad (durante recepción DAB) no puede recibir claramente un
componente de servicio que soporta anuncio de tráfico o de transporte.
• Cuando esta unidad RDS no puede recibir una emisora TP o TP de otras redes
mejoradas.
• Cuando escucha una radioemisora DAB, luego de escuchar la alarma TP,
deberá volver a sintonizar a un servicio que soporte el destello de tráfico y el
destello de transporte, si desea tener la posibilidad de continuar
recibiéndolos.
Cuando se escucha a otras fuentes, 30 segundos después que el indicador “TRFC2”
cambia a “T”, la búsqueda comienza automáticamente para un componente de servicio en
el área que soporta los anuncios de tráfico y transporte.
37
Operación de los anuncios con el menú de funciones
ENGLISH
7 Activación/desactivación de los anuncios
1. Seleccione el modo de soporte de anuncio (Announcement Support) en el menú
de funciones.
2. Seleccione el soporte de anuncio deseado en el siguiente orden:
ESPAÑOL
Noticias (News) Ô Tiempo (Weather) Ô Anuncio (Announce)
3. Active/desactive el soporte de anuncio seleccionado.
DEUTSCH
Nota:
FRANÇAIS
• Cuando “NEWS”, “WTHR” o “ANNC” se visualiza, eso indica que el soporte de anuncio se
provee por el componente de servicio actual.
• Cuando la inicial de cada indicador de anuncio se visualiza, eso indica que se ha seleccionado el
soporte de anuncio. (Por ejemplo: “N” en “NEWS”.)
• Cuando “2” se visualiza en el lado derecho del indicador, eso indica que el anuncio
correspondiente al soporte de anuncio seleccionado se soporta por el componente de servicio actual.
• Cuando se activa “Anuncio”, “Advertencia/Servicio”, “Anuncio de eventos”, “Eventos especiales”,
“Finanzas”, “Deporte” e “Información” también se activan.
ITALIANO
Cambio de los anuncios por interrupción
Cuando hay anuncios múltiples en el modo de espera para interrupción, y usted está
escuchando a un anuncio, usted puede cambiarlos en orden.
•
Cambie al próximo anuncio.
NEDERLANDS
Cada presión cambia el anuncio ...
Cada vez que se presiona el botón SOURCE/OFF, la unidad cambia al próximo anuncio.
Cuando no hay más anuncios, la unidad vuelve al anuncio original.
38
Uso de las funciones DAB
Función de seguimiento de servicio
Si la recepción del servicio seleccionado empeora, la unidad busca automáticamente un
otro conjunto que soporta el mismo servicio. Dependiendo de las condiciones, se recibe un
conjunto que soporta una alarma y anuncio de tráfico.
1. Seleccione el modo de seguimiento de servicio (Service Follow) en el menú de
funciones.
2. Active/desactive el seguimiento de servicio.
Función de seguimiento de servicio (FM)
Cuando no puede encontrar un conjunto que soporte el mismo servicio, o cuando las
condiciones de recepción sean pobres, la función de seguimiento de servicio, cambia a una
radioemisora de FM idéntica. Sin embargo, el cambio no es posible si la recepción de una
radioemisora de una transmisión de FM idéntica es pobre, no existe, o no está referenciada por
la emisora DAB.
Durante la recepción FM, si DAB encuentra un servicio idéntico al servicio original, y la
recepción es mejor, la recepción DAB continúa. Luego, la selección se lleva a cabo en
línea con el componente de servicio seleccionado con el primero servicio.
Nota:
• Active la función de seguimiento de servicio, y la función de seguimiento de servicio (FM) se
activa automáticamente.
• La función de seguimiento de servicio (FM) es una función DAB. Si la fuente inicial que se
escucha es RDS (FM), el cambio a DAB no se lleva a cabo.
• Aún que se cambie a una transmisión FM, el botón solamente funciona durante la operación DAB.
7 Cuando el indicador “NET” destella
Cuando el servicio seleccionado no tiene información de estación transmisora para una
emisora FM idéntica, si las condiciones de recepción para tal servicio se empeoran, el
indicador “NET” empieza a destellar para indicar que la función de seguimiento de
servicio (FM) no puede operar.
39
Función de componente de servicio
ENGLISH
Si el servicio recibido actualmente tiene un componente de servicio secundario (“EXTRA”
se ilumina), el cambio de componente de servicio es posible.
1. Seleccione el modo de cambio de componente de servicio
(Primary/Secondary) en el menú de funciones.
2. Seleccione el componente de servicio deseado.
ESPAÑOL
Función de lista de servicios disponibles
DEUTSCH
Si el conjunto que está siendo recibido actualmente tiene servicios múltiples, las listas de
cada 6 servicios se visualizan. Se puede seleccionar el servicio deseado de una lista de
servicio.
1. Seleccione el modo de lista de servicios disponibles (Service List) en el menú
de funciones.
2. Seleccione el servicio deseado de la lista de servicios.
FRANÇAIS
3. Reproduzca el servicio seleccionado con el botón 5.
ITALIANO
NEDERLANDS
40
Uso de las funciones DAB
Función de lista de servicios preajustados
Si se ha almacenado servicios en la memoria, una lista de servicios preajustados se
visualiza y se puede seleccionar el servicio deseado de la lista.
1. Seleccione el modo de lista de servicios preajustados (SRVC. List) en el menú
de funciones.
2. Seleccione el servicio deseado de la lista de servicios.
3. Llame al servicio seleccionado.
Nota:
• No se puede operar este modo si no hay servicios almacenados en la memoria.
• Para almacenar un servicio, refiérase a “Sintonización de emisoras preajustadas” en la página 17.
41
Función PTY disponible
ENGLISH
Las listas de cada 6 PTY que está en el conjunto actual se puede visualizar por la presión
del botón PTY. Se puede seleccionar el PTY deseado de la lista.
Las funciones DAB PTY son ligeramente diferentes de las funciones RDS PTY. No
confunda las funciones DAB PTY con las funciones RDS PTY.
Búsqueda PTY
ESPAÑOL
1. Seleccione el modo de ajuste de búsqueda PTY.
DEUTSCH
2. Seleccione uno entre los servicios PTY.
3. Inicie la búsqueda PTY.
FRANÇAIS
El DAB recibes el servicio PTY deseado.
Nota:
ITALIANO
• El método PTY que se visualiza es Narrow (corto). El método Wide (ancho) no se puede
seleccionar cuando se usa DAB como la fuente. (Vea la página 32.)
• El PTY seleccionado se visualiza con una profundidad de color diferente del PTY no seleccionado.
Cancelación del modo de ajuste de búsqueda PTY
• Para cancelar el modo de ajuste de búsqueda PTY en el medio, presione
el botón PTY durante 2 segundos.
NEDERLANDS
Sostenga durante 2 segundos.
42
Uso de las funciones DAB
Función de etiqueta dinámica
La etiqueta dinámica le provee una información con caracteres sobre el componente de
servicio que está escuchando actualmente. Usted puede mover la información visualizada.
Nota:
• Cuando se recibe la etiqueta dinámica, el indicador “TEXT” se ilumina.
• El sintonizador memoriza automáticamente las tres últimas etiquetas dinámicas recibidas,
reemplazando el texto de la recepción más antigua con el nuevo texto recibido.
• Se puede almacenar hasta seis transmisiones de etiquetas dinámicas en los botones 1-6.
Visualización de etiqueta dinámica
1. Seleccione el modo de etiqueta dinámica.
“TEXT”
Nota:
• Presione el botón TEXT una vez más, y el modo de etiqueta dinámica se cancela.
• Cuando ninguna etiqueta dinámica está siendo recibido, “NO TEXT” se visualiza.
2. Llamada de las tres últimas transmisiones de etiqueta dinámica de la
memoria del sintonizador.
Presionar el botón cambia entre las cuatro visualizaciones de datos de etiqueta dinámica.
Nota:
• Si no hay datos de etiqueta dinámica almacenados en el sintonizador, este botón no funciona.
3. Desplace la etiqueta dinámica con el botón ∞.
Nota:
• Al visualizar la etiqueta dinámica, no opere hasta que estacione su automóvil con seguridad.
• Si se presiona el botón 5 durante el movimiento de la información, se vuelve a la primera línea.
• Si se selecciona el modo de etiqueta dinámica de nuevo después de haberlo cancelado, la información
puede cambiar a la última etiqueta disponible.
• Se puede ver la etiqueta dinámica presionando el botón ENTERTAINMENT. En este caso, los
datos visualizados actualmente se actualizan. Para los detalles, refiérase a “Cambio a la
visualización de entretenimiento” en la página 68.
43
Almacenamiento de etiquetas dinámicas en la memoria
ENGLISH
1. Siga los pasos 1 y 2 de “Visualización de etiqueta dinámica”, y seleccione la
etiqueta dinámica que desea almacenar en la memoria.
2. Presione uno de los botones 1-6 durante 2 segundos para almacenar la
etiqueta dinámica deseada. (Por ejemplo: Presione el botón 4 durante 2
segundos.)
ESPAÑOL
Sostenga durante 2 segundos.
DEUTSCH
Llamada de una etiqueta dinámica preajustada
1. Seleccione el modo de etiqueta dinámica.
FRANÇAIS
2. Presione uno de los botones 1-6 para llamar a una etiqueta dinámica
preajustada bajo tal botón. (Por ejemplo: Presione el botón 4.)
ITALIANO
NEDERLANDS
44
Uso del reproductor de CD incorporado
Reproducción con repetición (Play Mode)
La reproducción con repetición reproduce la misma pista repetidamente.
1. Presione el botón FUNCTION y seleccione el modo de repetición
(Play Mode) en el menú de funciones.
2. Active o desactive la
reproducción con repetición con
los botones 5/∞.
Nota:
• Si se realiza la búsqueda de pista o avance rápido/retroceso, la reproducción con repetición se
cancela automáticamente.
Reproducción aleatoria (RandomPlay)
La reproducción aleatoria reproduce las pistas de un CD en un orden aleatorio para más
variedad.
1. Presione el botón FUNCTION y seleccione el modo aleatorio (RandomPlay)
en el menú de funciones.
2. Active o desactive la
reproducción aleatoria con los
botones 5/∞.
45
Pausa (Pause)
ENGLISH
Pausa permite detener temporalmente la reproducción de la pista actual.
1. Presione el botón FUNCTION y seleccione el modo de pausa (Pause) en el
menú de funciones.
2. Active o desactive la pausa con
los botones 5/∞.
ESPAÑOL
Ingreso de título de disco (Title Input ABC)
Se puede ingresar hasta 48 títulos de disco para discos en el reproductor de CD
incorporado. (Vea “Ingreso de título de disco” en la página 49 bajo la sección “Uso de
reproductores de Multi-CD”.)
DEUTSCH
Nota:
• Después que títulos para 48 discos han sido ingresados, los datos para un disco nuevo sobreponen
los datos más antiguos.
• Si conecta el reproductor Multi-CD, puede ingresar los títulos de los discos hasta para 100 discos.
• Cuando se reproduce un disco CD TEXT en este producto, no puede cambiar a este modo.
FRANÇAIS
ITALIANO
NEDERLANDS
46
Uso de reproductores de Multi-CD
Reproducción con repetición (Play Mode)
Existen tres gamas de reproducción con repetición: Repetición de una pista, repetición de
disco y repetición de reproductor de Multi-CD. La gama de reproducción con repetición es
la repetición de reproductor de Multi-CD.
1. Presione el botón FUNCTION y seleccione el modo de selección de repetición
(Play Mode) en el menú de funciones.
2. Seleccione la gama de
reproducción con repetición
deseada con los botones 2/3.
Repetición de reproductor de MultiCD = Repetición de una pista
= Repetición de disco
Gama de reproducción
Visualización
Indicador
Repetición de reproductor de Multi-CD
Magazine Repeat
---------------
Repetición de una pista
Track Repeat
Repetición de disco
Disc Repeat
Nota:
• Si selecciona otros discos durante la reproducción con repetición, el modo de reproducción con
repetición cambia para repetición de reproductor Multi-CD.
• Se lleva a cabo la búsqueda de pista o avance rápido/retroceso durante la repetición de una pista, el
modo de reproducción con repetición cambia a repetición de disco.
Reproducción aleatoria (RandomPlay)
Las pistas se reproducen aleatoriamente dentro de la gama de reproducción con repetición
seleccionado de acuerdo a la explicación en “Reproducción con repetición” precedente.
1. Presione el botón FUNCTION y seleccione el modo aleatorio (RandomPlay)
en el menú de funciones.
2. Active o desactive la
reproducción aleatoria con los
botones 5/∞.
Después de seleccionar la gama de
reproducción con repetición deseado
desde los referidos en “Reproducción
con repetición” precedente, active la
reproducción aleatoria de reproductor
de Multi-CD.
Nota:
• La repetición de una pista cambia a la repetición de disco cuando activa la reproducción aleatoria.
47
Pausa (Pause)
ENGLISH
Pausa permite detener temporalmente la reproducción de la pista actual.
1. Presione el botón FUNCTION y seleccione el modo de pausa (Pause) en el
menú de funciones.
2. Active o desactive la pausa con
los botones 5/∞.
ESPAÑOL
Compresión y DBE (Compression)
El uso de las funciones Comp. (Compression) y DBE (Dynamic Bass Emphasis) le permite
ajustar la calidad sonora del reproductor de Multi-CD. Ambas las funciones le permiten
ajustar en dos niveles.
La función Comp. (Compression)
ajusta los desequilibrios entre los
sonidos altos y bajos en volúmenes más
altos.
7 DBE
DEUTSCH
7 Comp.
La función DBE (Dynamic Bass
Emphasis) intensifica los niveles de
graves para producir un sonido más
fuerte.
Conmutación Comp./DBE ON/OFF
FRANÇAIS
1. Presione el botón FUNCTION y seleccione el modo de cambio de
Comp./DBE (Compression) en el menú de funciones.
2. Seleccione el modo deseado con
los botones 5/∞.
Comp. OFF = Comp. 1 = Comp. 2
= Comp. OFF = DBE 1 = DBE 2
ITALIANO
Nota:
• Se pueden utilizar estas funciones con reproductores de Multi-CD que las tienen. Si el reproductor
no tiene las funciones Comp./DBE, se visualiza “No Comp.” si se intenta utilizarlas.
NEDERLANDS
48
Uso de reproductores de Multi-CD
Título de disco
Ingreso de título de disco (Title Input ABC)
Esta función le permite ingresar hasta un máximo de 100 títulos de disco compuestos de
hasta 10 letras. Además, esta función le permite fácilmente buscar y seleccionar un disco
deseado para reproducción.
1. Reproduzca el disco al cual desea ingresar un título.
2. Seleccione el modo de ingreso de título de disco (Title Input ABC) en el
menú de ajustes detallados. (Vea la página 22.)
Nota:
• Cuando se reproduce un disco CD TEXT en un reproductor Multi-CD compatible con CD TEXT,
no puede cambiar a este modo.
• Un disco CD TEXT es un CD que presenta información de texto tal como un título de disco, nombre
de artista y título de la pista.
3. Cambie el tipo de caracteres
deseado con el botón 1.
A cada presión del botón 1 cambia el
tipo de caracteres en el orden siguiente:
Alfabeto (Mayúsculas), números y
símbolos = Alfabeto (minúsculas)
= Caracteres europeos, tal como
aquéllos acentuados (ejemplo, á, à, ä, ç)
Nota:
• Se puede seleccionar el ingreso al modo de números y símbolos presionando el botón 2.
4. Seleccione las letras, números y
símbolos con los botones 5/∞.
Para ingresar un espacio, seleccione
el cursor centelleante “_”.
49
ENGLISH
5. Mueva la caja izquierda y
derecha con los botones 2/3.
ESPAÑOL
6. Al completar el ingreso del título,
haga la 10ma. letra centellear, y
memorice presionando el botón
3.
Nota:
• Los títulos permanecen en la memoria, aún después que se saque el disco del cargador de CD, y se
llaman cuando se inserta el disco nuevamente.
• Después de haber ingresado títulos para 100 discos, los datos para un nuevo disco sobreponen los
datos del disco que no haya sido reproducido por el período de tiempo más largo.
• Se puede visualizar el título para el disco siendo reproducido actualmente.
DEUTSCH
FRANÇAIS
ITALIANO
NEDERLANDS
50
Uso de reproductores de Multi-CD
Selección de discos mediante la lista de títulos de disco (Disc List)
Se visualiza a cada 6 discos. Puede pasar visualizando la visualización.
Para reproducir un disco para el cual ha ingresado el título en un reproductor Multi-CD y
un disco CD TEXT en un reproductor Multi-CD compatible con CD TEXT, sigas los
procedimientos siguientes.
1. Presione el botón FUNCTION y seleccione el modo de lista de títulos de
disco (Disc List) en el menú de funciones.
2. Seleccione el título del disco
deseado con los botones 2/3.
Para los discos cuyos títulos no se
han ingresado títulos, se visualiza
“No Disc Title”.
“No Disc” se visualiza cerca del
número de disco cuando no hay un
disco en el cargador.
Nota:
• También puede seleccionar y reproducir el título del disco deseado directamente con los botones
1 al 6.
3. Reproduzca el disco seleccionado
con el botón 5.
51
Ajuste de audio
Selección de la curva del ecualizador
ENGLISH
Se puede cambiar entre las curvas del ecualizador.
• Desplace el selector EQ hacia arriba o abajo para seleccionar la curva del
ecualizador deseada.
ESPAÑOL
“CUSTOM”
SUPER BASS (super graves) +
= POWERFUL (potente) +
= NATURAL (natural)
+
= VOCAL (vocal) +
= CUSTOM (personalizado) +
= FLAT (plano)
Nota:
DEUTSCH
• “CUSTOM” almacena una curva del ecualizador a la que se han hechos ajustes. (Refiérase a la
parte titulada “Ajuste de la curva del ecualizador” en la página 53 y “Ajuste fino de la curva del
ecualizador” en la página 54.)
• Puede crear curvas “CUSTOM” diferentes para fuentes diferentes. (El reproductor de CD
incorporado y el reproductor de Multi-CD se ajustan automáticamente al mismo ajuste de la curva
del ecualizador.)
• Cuando “CUSTOM” está seleccionado, la curva y nombre visualizados cambian a los
seleccionados antes de los ajustes ser hechos (refiérase a las páginas 53 y 54) y también se visualiza
“CUSTOM”. Inicialmente, “FLAT” y “CUSTOM” aparecen en la visualización.
FRANÇAIS
Ingreso al menú de audio
Con este menú se puede ajustar la calidad sonora.
Nota:
ITALIANO
• Luego de ingresar el menú de audio, si no realiza una operación dentro de unos 30 segundos, el
menú de audio se cancela automáticamente.
• Las funciones del menú de audio cambian dependiendo en el ajuste del controlador del altavoz de
graves secundario y salida del altavoz trasero, en el menú de ajustes iniciales. (Refiérase a la parte
titulada “Cambio de la salida del altavoz trasero” y “Ajuste del control del altavoz de graves” a las
páginas 65 y 66.)
1. Seleccione el modo deseado en el menú de audio.
NEDERLANDS
Cada presión cambia el modo ...
2. Opere un modo.
3. Cancele el menú de audio.
52
Ajuste de audio
Funciones del menú de audio
El menú de audio presenta las funciones siguientes.
Ajuste del equilibrio (FAD/BAL)
Esta función le permite seleccionar un ajuste de potenciómetro/equilibrio que proporciona
las condiciones de audición ideales para todos los presentes.
1. Presione el botón AUDIO y seleccione el modo de potenciómetro/equilibrio
(FAD/BAL) en el menú de audio.
2. Ajuste el equilibrio de los
altavoces delanteros/traseros con
los botones 5/∞.
Se visualiza “Fader Front:15” – “Fader
Rear:15” a medida que se mueve desde
adelante hacia atrás.
3. Ajuste el equilibrio de los
altavoces izquierdos y derechos
con los botones 2/3.
Se visualiza “Balance Left:9” – “Balance
Right:9” a medida que se mueve de la
izquierda a la derecha.
Nota:
• Cuando el ajuste de salida del altavoz trasero es “Sub woofer output”, no se puede ajustar el
equilibrio de los altavoces delantero/trasero. (Vea la página 65.)
• “Fader F/R:0 0” es el ajuste apropiado cuando se usan 2 altavoces.
Ajuste de la curva del ecualizador (EqualizEr)
Los ajustes de la curva del ecualizador seleccionada actualmente se pueden ajustar de la
manera deseada. Los ajustes de la curva del ecualizador se memorizan en “CUSTOM”.
1. Presione el botón AUDIO y seleccione el modo de ecualizador (EqualizEr)
en el menú de audio.
2. Seleccione la banda que desea para
ajustar con los botones 2 y 3.
LOW (bajo) BAND +
= MID (medio)
BAND +
= HIGH (alto) BAND
3. Refuerce o atenúe la banda
seleccionada con los botones 5/∞.
Se visualiza “+6” – “–6”.
Nota:
53
• Si realiza ajustes cuando selecciona una curva diferente a “CUSTOM”, la curva recién ajustada se
reemplaza con la curva ajustada anteriormente. Luego, una nueva curva y nombre con “CUSTOM”
aparecen en la visualización mientras selecciona la curva del ecualizador. (Vea la página 52.)
Ajuste fino de la curva del ecualizador (EqualizEr)
ENGLISH
Se puede ajustar la frecuencia central y el factor Q (características de curva) de cada banda
de curva seleccionada actualmente (LOW BAND/MID BAND/HIGH BAND). Los ajustes
de la curva del ecualizador se almacenan en “CUSTOM”.
Nivel (dB)
Frecuencia central
ESPAÑOL
Q=2N
Q=2W
Frecuencia (Hz)
1. Presione el botón AUDIO durante 2 segundos para seleccionar el ajuste
fino de la curva del ecualizador.
DEUTSCH
2. Presione el botón AUDIO para
seleccionar la banda deseada
para el ajuste.
FRANÇAIS
3. Seleccione la frecuencia deseada
para cada banda con los botones
2/3.
LOW (bajo) BAND: 40 Ô 80 Ô 100
+
= 160 (Hz)
MID (medio) BAND: 200 Ô 500 Ô 1 k
Ô 2 k (Hz)
HIGH (alto) BAND: 3,15 k Ô 8 k Ô 10 k
Ô 12,5 k (Hz)
ITALIANO
4. Seleccione el factor Q deseado
con los botones 5/∞.
2N +
= 1N +
= 1W +
= 2W
Nota:
NEDERLANDS
• Si realiza ajustes cuando selecciona una curva diferente a “CUSTOM”, la curva recién ajustada se
reemplaza con la curva ajustada anteriormente. Luego, una nueva curva y nombre con “CUSTOM”
aparecen en la visualización mientras selecciona la curva del ecualizador. (Vea la página 52.)
54
Ajuste de audio
Ajuste de sonoridad (LoudnEss)
La función de sonoridad compensa las deficiencias en las gamas de sonido altas y bajas en
volúmenes bajos. Se puede seleccionar un nivel de sonoridad deseado.
1. Presione el botón AUDIO y seleccione el modo de sonoridad (LoudnEss) en el
menú de audio.
2. Active o desactive la función de
sonoridad con los botones
5/∞.
3. Seleccione el nivel deseado con
los botones 2/3.
Low (bajo) +
= Mid (medio)
+
= High (alto)
Salida de altavoz de graves secundario (Sub W-1)
Cuando se conecta un altavoz de graves secundario, active (ON) la salida del altavoz de
graves secundario.
Inicialmente, la salida del altavoz de graves secundario se encuentra desactivada (OFF).
La fase de la salida del altavoz de graves secundario se puede cambiar entre normal, u 0°
(“Phase:NOR”), y inversa, o 180° (“Phase:REV”). 0° está activada por omisión.
Nota:
• Cuando el ajuste del controlador de graves secundario se encuentra en “Sub woofer control
External”, no puede cambiar el modo de activación y desactivación (ON/OFF) del altavoz de
graves secundario; este ajuste no es necesario. (Vea la página 66.)
• Seleccione el ajuste de desactivación cuando no desea que el altavoz de graves secundario opere.
1. Presione el botón AUDIO y seleccione el modo de activación/desactivación
del altavoz de graves (Sub W-1) en el menú de audio.
2. Active o desactive la salida de
altavoz de graves secundario
con los botones 5/∞.
3. Cambie la fase de la salida del
altavoz de graves secundario
con los botones 2/3.
55
Fijación de los ajustes de altavoz de graves secundario (Sub W-2)
ENGLISH
Cuando la salida del altavoz de graves está activada (ON), puede ajustar la frecuencia de
corte y el nivel de salida del altavoz de graves secundario.
1. Presione el botón AUDIO y seleccione el modo de ajuste del altavoz de
graves (Sub W-2) en el menú de audio.
ESPAÑOL
2. Seleccione la frecuencia de
50 Hz, 80 Hz o 125 Hz con
los botones 2/3.
3. Aumente o disminuya el nivel de
salida con los botones 5/∞.
Se visualiza “+6” – “–6”.
DEUTSCH
Nota:
• Se puede seleccionar el modo de ajuste de altavoz de graves secundario solamente cuando la salida
de altavoz de graves secundario se encuentra activada en el modo de activación/desactivación de
altavoz de graves secundario.
Salida sin extinción (Non FadE-1)
FRANÇAIS
Cuando el ajuste de la salida sin extinción está activada, la señal de audio no pasa a través
de la unidad de paso bajo de esta unidad (para el altavoz de graves secundario), sino que se
genera a través de la salida RCA.
Nota:
• Cuando el ajuste del controlador de altavoz de graves secundario es solamente “Sub woofer control
External”, se puede cambiar el modo de activación/desactivación (ON/OFF) de la salida sin
extinción. (Vea la página 66.)
1. Presione el botón AUDIO y seleccione el modo de activación/desactivación
de salida sin extinción (Non FadE-1) en el menú de audio.
ITALIANO
2. Active y desactive (ON/OFF) la
salida sin extinción con los
botones 5/∞.
NEDERLANDS
56
Ajuste de audio
Ajuste del nivel de salida sin extinción (Non FadE-2)
Cuando la salida sin extinción está activada (ON), puede ajustar el nivel de salida sin
extinción.
1. Presione el botón AUDIO y seleccione el modo de ajuste de salida sin
extinción (Non FadE-2) en el menú de audio.
2. Aumente o disminuya el nivel
de salida con los botones 5/∞.
Se visualiza “0” – “–15”.
Nota:
• El modo de ajuste de salida sin extinción puede seleccionarse solamente cuando la salida sin
extinción se encuentra activada (ON) en el modo de activación/desactivación de la salida sin
extinción.
Filtro de paso alto (High Pass)
Cuando no desee producir sonidos en la salida de la gama de frecuencias de salida del
altavoz de graves secundario en los altavoces delanteros y traseros, active (ON) el filtro de
paso alto. Solamente las frecuencias más altas que las frecuencias en la gama seleccionada
se producirán por los altavoces delanteros y traseros.
Precaución:
• Se pueden activar la función F.I.E. y función de filtro de paso alto al mismo tiempo.
1. Presione el botón AUDIO y seleccione el modo de ajuste de filtro de paso alto
(High Pass) en el menú de audio.
2. Active y desactive la función de
filtro de paso alto con los
botones 5/∞.
3. Seleccione la frecuencia deseada
con los botones 2/3.
50 +
= 80 +
= 125 (Hz)
57
Función de mejorador de imagen delantera (FIE)
ENGLISH
La función F.I.E. (Front Image Enhancer) provee un método simple de mejorar la imagen
delantera mediante el corte de la salida de las frecuencias de gama media y alta desde los
altavoces traseros, limitando sus salidas a las frecuencias de gama baja. Se puede
seleccionar la frecuencia que desea cortar.
Precaución:
ESPAÑOL
• Se pueden activar la función F.I.E. y función de filtro de paso alto al mismo tiempo.
• Cuando se desactiva la función F.I.E., la salida de los altavoces traseros se genera en todas las
frecuencias, y no solamente suenan los graves. Reduzca el volumen antes de desactivar la función
F.I.E. para evitar un aumento repentino del volumen.
1. Presione el botón AUDIO y seleccione el modo F.I.E. (FIE) en el menú de
audio.
2. Active o desactive la función
F.I.E. con los botones 5/∞.
DEUTSCH
3. Seleccione la frecuencia deseada
con los botones 2/3.
100 +
= 160 +
= 250 (Hz)
FRANÇAIS
Nota:
• Después de activar la función F.I.E., seleccione el modo de potenciómetro/equilibrio en el menú de
audio, y ajuste los niveles de volumen de los altavoces delanteros y traseros, hasta que se equilibren.
• Cuando el ajuste de salida del altavoz trasero es “Sub woofer output”, no se puede cambiar al modo
F.I.E. (Refiérase a la página 65.)
• Desactive la función F.I.E. cuando utilice un sistema de 2 altavoces.
ITALIANO
NEDERLANDS
58
Ajuste de audio
Función de ajuste de nivel de fuente (SLA)
La función SLA (Ajuste de nivel de sonido) evita saltos radicales en el volumen cuando se
cambia entre fuentes. Los ajustes se basan en el volumen de FM, que permanece sin
cambiar.
1. Compare el volumen de FM con el volumen de la otra fuente. (Por ejemplo:
el reproductor de CD incorporado.)
2. Presione el botón AUDIO, y seleccione el modo SLA (SLA) en el menú de
audio.
3. Aumente o disminuya el nivel
con los botones 5/∞.
Se visualiza “+4” – “–4”.
Nota:
• Como el volumen de FM es el control, la función SLA no es posible en los modos FM.
• El nivel del volumen para MW/LW, que difiere del nivel de volumen del ajuste básico para FM,
también se puede ajustar de manera similar a las otras fuentes diferentes del sintonizador.
• El reproductor de CD incorporado y el reproductor Multi-CD se ajustan automáticamente al mismo
ajuste de volumen.
• La unidad externa 1 y la unidad externa 2 se ajustan automáticamente al mismo ajuste de volumen.
Función de nivelador de sonido automático (ASL)
Durante una conducción, el ruido dentro del automóvil cambia de acuerdo a la velocidad
de conducción y condiciones de la ruta. El nivelador de sonido automático (ASL)
monitorea tal variación de ruido y aumenta automáticamente el nivel de volumen, si este
ruido se convierte mayor. La sensibilidad (variación de nivel de volumen a nivel de ruido)
del ASL puede ajustarse a uno de los cinco niveles disponibles.
1. Presione el botón AUDIO y seleccione el modo de nivelador de sonido
automático (ASL) en el menú de audio.
2. Active y desactive la función de
nivelador de sonido automático
con los botones 5/∞.
3. Seleccione el nivel deseado en el
orden siguiente con los botones
2/3.
Low (bajo) Ô Mid-Low (medio-bajo) Ô Mid (medio)
Ô Mid-High (medio-alto) Ô High (alto)
59
Extracción y colocación del panel delantero
Protección contra robo
ENGLISH
El panel delantero de la unidad principal es extraíble como una medida antirrobo.
Precaución:
• Nunca fuerce ni tampoco agarre el visualizador con mucha fuerza al extraer o colocar el panel
delantero.
• No exponga el panel delantero a fuertes impactos.
• No deje el panel delantero en áreas expuestas a los rayos directos del sol o a altas temperaturas.
ESPAÑOL
Extracción del panel delantero
1. Abra el panel delantero.
DEUTSCH
Precaución:
• Unos pocos segundos después de activar/desactivar el interruptor de encendido, el panel delantero
se mueve automáticamente. Cuando esto sucede, sus dedos pueden quedar atrapados en el panel, de
modo que mantenga sus manos alejadas del panel.
2. Deslice y retire el panel
delantero hacia su posición.
FRANÇAIS
Tenga cuidado de no tirar del
panel delantero fuertemente ni
dejarlo caer.
Sección de liberación
Precaución:
• Cuando retira el panel delantero, asegúrese de presionar la sección de liberación corrugada en la
parte trasera del panel delantero mientras tira.
ITALIANO
3. Utilice la caja protectora
suministrada para
guardar/transportar el
panel delantero extraído.
NEDERLANDS
60
Extracción y colocación del panel delantero
Colocación del panel delantero
1. Asegúrese de cerrar la cubierta interna.
2. Vuelva a colocar el panel
delantero encajándolo en su
lugar.
Sonido de advertencia
Si no se extrae el panel delantero dentro de 5 segundos después de desactivar el encendido,
se producirá un sonido de advertencia.
Nota:
• Se puede cancelar la función de sonido de advertencia. (Vea la página 64.)
61
Ajustes iniciales
Selección del menú de ajustes iniciales
ENGLISH
Con este menú se pueden realizar los ajustes iniciales para el producto.
1. Desactive las fuentes.
2. Seleccione el menú de ajustes iniciales.
ESPAÑOL
Sostenga durante 2 segundos.
3. Seleccione el modo deseado.
DEUTSCH
Cada presión cambia el modo ...
4. Opere un modo.
5. Cancele el menú de ajustes iniciales.
FRANÇAIS
Nota:
• La presión del botón FUNCTION durante 2 segundos también cancela el menú de ajustes iniciales.
ITALIANO
NEDERLANDS
62
Ajustes iniciales
Funciones del menú de ajustes iniciales
El menú de ajustes iniciales provee las siguientes funciones.
Cambio del paso de sintonía de FM (FM Tuning Step)
Normalmente ajustado en 50 kHz durante la sintonización por búsqueda en el modo FM, el
intervalo de sintonía cambia a 100 kHz cuando se activa el modo AF o TA.
Puede ser preferible ajustar el intervalo de sintonía a 50 kHz en el modo AF.
1. Presione el botón FUNCTION y seleccione el modo de paso de sintonía de
FM (FM tuning step) en el menú de ajustes iniciales.
2. Seleccione el paso de sintonía
deseado con los botones 2/3.
Nota:
• El intervalo de sintonía permanece ajustado en 50 kHz durante la sintonización manual.
• El intervalo de sintonía vuelve a 100 kHz si se la pila se desconecta temporariamente.
Ajuste de la función de prioridad DAB (DAB Priority)
Se puede ajustar el producto en este modo de modo que la interrupción de información de
tráfico de DAB tenga prioridad sobre la función de anuncio de tráfico RDS (TA).
7 Cuando está activado
Durante la recepción DAB, cuando el componente de servicio seleccionado soporta los
anuncios de tráfico y transporte, la recepción no se interrumpe por el anuncio de tráfico
RDS (TA).
7 Cuando está desactivado
La interrupción se lleva a cabo por el primer anuncio de noticias recibido desde las
transmisiones de información de tráfico RDS y DAB.
1. Presione el botón FUNCTION y seleccione el modo de ajuste de prioridad
DAB (DAB Priority) en el menú de ajustes iniciales.
2. Active o desactive el ajuste de
prioridad DAB con los botones
5/∞.
63
Cambio de la búsqueda PI automática (Auto PI Seek)
ENGLISH
Durante la operación de búsqueda PI de emisora preajustada, puede activar o desactivar la
función de búsqueda PI automática. (Vea “Función de búsqueda PI” en la página 27.)
1. Presione el botón FUNCTION y seleccione el modo de búsqueda PI
automática (Auto PI Seek) en el menú de ajustes iniciales.
ESPAÑOL
2. Active o desactive la búsqueda
PI automática con los botones
5/∞.
Ajuste del sonido de advertencia (Warning Tone)
Se puede activar y desactivar la función de sonido de advertencia. (Vea “Sonido de
advertencia” en la página 61.)
DEUTSCH
1. Presione el botón FUNCTION y seleccione el modo de advertencia (Warning
Tone) en el menú de ajustes iniciales.
2. Active o desactive el sonido de
advertencia con los botones
5/∞.
FRANÇAIS
Conmutación del modo AUX (AUX)
Es posible usar un equipo auxiliar (AUX) con este producto.
Active el modo AUX cuando utilice un equipo externo con este producto.
1. Presione el botón FUNCTION y seleccione el modo de ajuste AUX (AUX)
en el menú de ajustes iniciales.
ITALIANO
2. Active o desactive el AUX con
los botones 5/∞.
NEDERLANDS
64
Ajustes iniciales
Ajuste del reductor de luz (Dimmer)
Para evitar que el visualizador de este producto quede muy brillante durante la noche,
cuando se encienden los faros del vehículo la luz del visualizador se atenúa.
Esta función se puede activar o desactivar.
1. Presione el botón FUNCTION y seleccione el modo del reductor de luz
(Dimmer) en el menú de ajustes iniciales.
2. Active o desactive el reductor
de luz con los botones 5/∞.
Selección del color de iluminación (Illumination Color)
Este producto se equipa con dos colores de iluminación, verde y rojo.
Puede seleccionar el color de iluminación deseado.
1. Presione el botón FUNCTION y seleccione el modo de color de iluminación
(Illumination Color) en el menú de ajustes iniciales.
2. Seleccione el color de iluminación
deseado con los botones 2/3.
Cambio de la salida del altavoz trasero (Rear Speaker Out)
Los cables de los altavoces traseros del producto pueden usarse para una conexión de
altavoz de gama completa (“Full Range output”) o altavoz secundario (“Sub woofer
output”). Si cambia el ajuste de cable del altavoz trasero al ajuste “Sub woofer output”,
puede conectar el cable del altavoz trasero directamente a un altavoz trasero sin usar un
amplificador auxiliar.
1. Presione el botón FUNCTION y seleccione el modo de salida del altavoz
trasero (Rear Speaker Out) en el menú de ajustes iniciales.
2. Seleccione la salida del altavoz
trasero con los botones 5/∞.
Nota:
• Cuando no hay conectado un altavoz de graves secundario al cable de altavoz trasero, seleccione
“Full Range output”.
• Aun si cambia este ajuste, no habrá salida a menos que active (ON), la salida de altavoz de graves
secundario (refiérase a la página 55) en el menú de audio.
65
Ajuste del control del altavoz de graves (Sub woofer control)
ENGLISH
Cuando los cables de los altavoces traseros se conectan a altavoces de gama completa
(cuando se selecciona “Full Range output”), no puede conectar la salida del altavoz de
graves secundario RCA a un altavoz de graves secundario. En este caso, deberá
seleccionar el uso del controlador de altavoz de graves secundario incorporado (filtro de
paso bajo, fase) “Internal” o el auxiliar “External”.
ESPAÑOL
1. Presione el botón FUNCTION y seleccione el modo de control de graves
secundario (Sub woofer control) en el menú de ajustes iniciales.
2. Cambie el ajuste del controlador
de altavoz de graves secundario
con los botones 2/3.
Nota:
DEUTSCH
• Cuando la salida de altavoz trasero es “Sub woofer output”, no puede cambiar el controlador del
altavoz de graves secundario.
• Si cambia el controlador de altavoz de graves secundario, la salida de altavoz de graves secundario
y la salida sin extinción en el menú de audio vuelven a los ajustes de fábrica.
• Aun si cambia este ajuste, no habrá salida a menos que active (ON) la salida sin extinción (refiérase
a la página 56), o salida de altavoz de graves secundario (refiérase a la página 55) en el menú de
audio.
Abertura automática (FLAP AUTO)
FRANÇAIS
Para la protección contra robos, el panel delantero se abre automáticamente y se puede
extraer fácilmente.
Inicialmente, esta función está activada.
1. Presione el botón FUNCTION y seleccione el modo de abertura automática
(FLAP AUTO) en el menú de ajustes iniciales.
ITALIANO
2. Active o desactive la abertura
automática con los botones
5/∞.
NEDERLANDS
66
Ajustes iniciales
Selección del papel de pared (Wall Paper)
Este producto se equipa con cuatro tipos de papel de pared.
1. Presione el botón FUNCTION y seleccione el modo de papel de pared
(Wall Paper) en el menú de ajustes iniciales.
2. Seleccione el papel de pared
deseado con los botones 2/3.
Selección del brillo (Brightness)
Puede seleccionarse el brillo de la visualización. Se visualiza “0” – “31”.
1. Presione el botón FUNCTION y seleccione el modo de brillo (Brightness) en
el menú de ajustes iniciales.
2. Seleccione el brillo deseado con
los botones 2/3.
67
Otras funciones
Cambio a la visualización de entretenimiento
ENGLISH
Puede cambiar la visualización a las pantallas de película, etc., mientras escucha cada
fuente. (Por ejemplo: Modo de pantalla de película)
• Seleccione la visualización de entretenimiento deseada.
ESPAÑOL
Cada presión cambia la visualización ...
7 Cuando se escucha a fuentes no DAB
DEUTSCH
Cada presión del botón ENTERTAINMENT cambia la visualización en el orden siguiente:
Modo de pantalla de película = Visualización antes de entrar en la visualización de
entretenimiento
7 Cuando se escucha a una fuente DAB
Cada presión del botón ENTERTAINMENT cambia la visualización en el orden siguiente:
Modo DLS = Modo de pantalla de película = Visualización antes de entrar en la
visualización de entretenimiento
Nota:
FRANÇAIS
• Cuando se visualiza la etiqueta dinámica (DLS) presionando el botón ENTERTAINMENT, los
datos visualizados actualmente se actualizan siempre.
ITALIANO
NEDERLANDS
68
Otras funciones
Uso de la fuente AUX
Un interconector IP-BUS-RCA, como el CD-RB20 ó CD-RB10 (vendidos
separadamente), permite la conexión de este producto a un equipo auxiliar con una salida
RCA.
Para los detalles, consulte el manual de instrucciones del interconector IP-BUS-RCA.
Selección de la fuente AUX
• Seleccione AUX. (Vea la página 11.)
Cada presión cambia la fuente ...
Ingreso de título para la fuente AUX
Se puede cambiar la visualización del título para el fuente AUX.
1. Seleccione el modo de ingreso de título para la fuente AUX (Title Input
ABC) en el menú de ajustes detallados.
Sostenga durante 2 segundos.
2. Ingrese el título.
Vea “Ingreso de título de disco” en la página 49 y realice los pasos de 3 a 6 de la misma
manera.
Enmudecimiento de teléfono celular
El sonido de este sistema se enmudece automáticamente cuando se hace o se recibe una
llamada usando un teléfono celular conectado a este producto.
• El sonido se desactiva, “MUTE” se visualiza, y no se puede hacer ningún ajuste de
audio. La operación vuelve a la normal cuando se termina la conexión telefónica.
69
Reproductor de CD y cuidado
Precaución
ENGLISH
COMPACT
DIGITAL AUDIO
ESPAÑOL
• Reproduzca solamente discos CD que lleven la
marca Compact Disc Digital Audio. (Si un CD
presenta la marca en la parte derecha superior sobre
el lado de título del disco, ese disco es un disco CD
TEXT. Existen algunos discos CD TEXT que no
tienen la marca en la parte derecha superior.)
• Este producto ha sido concebido para usar solamente
con discos compactos convencionales, totalmente
circulares. El uso de discos compactos con otras
formas no se recomienda para este producto.
DEUTSCH
• Compruebe todos los discos CD antes de reproducir, y deseche los discos fisurados,
rayados o alabeados.
• La reproducción normal de discos CD-R diferentes de discos grabados con un grabador
de CD de música puede no ser posible.
• La reproducción de discos CD-R de música, aún que de discos grabados con un
grabador de CD de música, puede no ser posible con este producto debido a las
características del disco o arañazos o suciedad en el disco. La suciedad o condensación
en el lente dentro del producto también puede impedir la reproducción.
• Los títulos y otras informaciones de texto grabados en un disco CD-R pueden no
visualizarse con este producto.
• Este producto cumple con la función de salto de pista de disco CD-R. Las pistas que
contienen información de salto de pista se saltan automáticamente.
• Lea las precauciones con los discos CD-R antes de usarlos.
FRANÇAIS
• Limpie los discos sucios o humedecidos desde el
centro hacia afuera con un paño suave.
ITALIANO
•
•
•
•
•
NEDERLANDS
Cuando manipule los discos, evite tocar la superficie grabada (iridiscente).
Cuando no los use, guarde los discos en sus cajas.
Mantenga los discos alejados de la luz directa del sol y altas temperaturas.
No fije etiquetas ni aplique agentes químicos a los discos.
Puede formarse condensación dentro del reproductor cuando se usa el calefactor en el
invierno, interfiriendo así con la reproducción. Desactive la alimentación durante más o
menos una hora y limpie los discos humedecidos con un paño suave.
• Impactos o saltos en la ruta pueden interrumpir la reproducción de los discos CD.
70
Reproductor de CD y cuidado
Mensajes de error del reproductor de CD incorporado
Cuando ocurren problemas con la reproducción de CD, aparece un mensaje de error en el
visualizador. Vea la tabla siguiente para identificar el problema, y luego tome la acción
recomendada. Si el error persistiera, comuníquese con su concesionario o Centro de
Servicio PIONEER más cercano.
71
Mensaje
Causa posible
Acción recomendada
ERROR- 11, 12, 17, 30
Disco sucio.
Limpie el disco.
ERROR- 11, 12, 17, 30
Disco rayado.
Cambie el disco.
ERROR- 14
Disco sin grabar.
Verifique el disco.
ERROR- 10, 11, 12, 14,
17, 30, A0
Problema eléctrico
o mecánico.
Active o desactive el encendido, o
cambie a una fuente diferente. Luego,
vuelva al reproductor de CD.
ERROR- 44
Todas las pistas están
ajustadas para salto de pista.
Cambie el disco.
HEAT
Sobrecalentamiento del
reproductor de CD.
Pare la reproducción hasta que
disminuya la temperatura del reproductor.
A Title (English)
Especificaciones
Sistema .................. Sistema de audio de discos compactos
Discos usables .......................................... Disco compacto
Formato de las señales .... Frecuencia de muestreo: 44,1 kHz
Número de cuantización de bits: 16; lineal
Características de la frecuencia ...... 5 – 20.000 Hz (±1 dB)
Relación de señal a ruido ........ 96 dB (1 kHz) (red IEC-A)
Gama dinámica ............................................ 94 dB (1 kHz)
Número de canales ............................................ 2 (estéreo)
ESPAÑOL
Reproductor de CD
Fuente de alimentación .................................... 14,4 V CC
(10,8 – 15,1 V permisible)
Sistema de conexión a tierra ........................ Tipo negativo
Consumo de energía máximo .................................. 11,5 A
Dimensiones
(Tamaño del montaje)
.......................... 180 (An) × 50 (Al) × 155,6 (Pr) mm
(Cara anterior) .... 170 (An) × 45 (Al) × 23,8 (Pr) mm
Peso ........................................................................ 1,85 kg
ENGLISH
General
Sintonizador DAB
Audio
Gama de las frecuencias
(Banda III) ........ 174,928 – 239,200 MHz (5A – 13F)
(Banda L) .... 1.452,960 – 1.490,624 MHz (L1 – L23)
Sensibilidad utilizable
(Banda III) ................................................ –97,5 dBm
(Banda L) .................................................. –100 dBm
Modo ................................................................ I, II, III, IV
DEUTSCH
Sintonizador FM
Gama de frecuencias ................ 87,5 – 108 MHz (50 kHz)
Sensibilidad utilizable ............................................ 11 dBf
(1,0 µV/75 Ω, mono, Señal/ruido: 30 dB)
Umbral de silenciamiento a 50 dB .......................... 16 dBf
(1,7 µV/75 Ω, mono)
Relación de señal a ruido .................... 70 dB (red IEC-A)
Distorsión ........................ 0,3% (a 65 dBf, 1 kHz, estéreo)
Respuesta de frecuencia .............. 30 – 15.000 Hz (±3 dB)
Separación estéreo ...................... 40 dB (a 65 dBf, 1 kHz)
FRANÇAIS
Sintonizador MW
Gama de frecuencias .................. 531 – 1.602 kHz (9 kHz)
Sensibilidad utilizable ............ 18 µV (Señal/ruido: 20 dB)
Selectividad .............................................. 50 dB (±9 kHz)
Sintonizador LW
ITALIANO
Gama de frecuencias .................................. 153 – 281 kHz
Sensibilidad utilizable ............ 30 µV (Señal/ruido: 20 dB)
Selectividad .............................................. 50 dB (±9 kHz)
NEDERLANDS
Potencia de salida máxima .................................. 50 W × 4
50 W × 2 canales/4 Ω + 70 W × 1 canal/2 Ω
(para altavoz de graves secundario)
Potencia de salida continua ................................ 22 W × 4
(DIN45324, +B = 14,4 V)
Impedancia de carga
.............. 4 Ω (4 – 8 Ω [2 Ω para 1 canal] permisible)
Nivel de pre-salida máxima/
impedancia de salida .............................. 4,6 V/100 Ω
Ecualizador (Ecualizador paramétrico de 3 bandas)
(Bajo) ........................ Frecuencia: 40/80/100/160 Hz
Factor Q: 0,35/0,59/0,95/1,15
(+6 dB cuando está reforzado)
Ganancia: ±12 dB
(Medio) ............................ Frecuencia: 200/500/1k/2k Hz
Factor Q: 0,35/0,59/0,95/1,15
(+6 dB cuando está reforzado)
Ganancia: ±12 dB
(Alto) ................ Frecuencia: 3,15k/8k/10k/12,5k Hz
Factor Q: 0,35/0,59/0,95/1,15
(+6 dB cuando está reforzado)
Ganancia: ±12 dB
Contorno de sonoridad
(Bajo) .................. +3,5 dB (100 Hz), +3 dB (10 kHz)
(Medio) ............ +10 dB (100 Hz), +6,5 dB (10 kHz)
(Alto) ................ +11 dB (100 Hz), +11 dB (10 kHz)
(volumen: –30 dB)
HPF
Frecuencia ............................................ 50/80/125 Hz
Pendiente .................................................. –12 dB/oct.
Altavoz de graves secundario
Frecuencia ............................................ 50/80/125 Hz
Pendiente .................................................. –18 dB/oct.
Ganancia ........................................................ ±12 dB
Fase .................................................... Normal/Inversa
Nota:
• Las especificaciones y el diseño están sujetos a
posibles modificaciones sin previo aviso debido a
mejoramientos.
72
PIONEER CORPORATION
4-1, MEGURO 1-CHOME, MEGURO-KU, TOKYO 153-8654, JAPAN
PIONEER ELECTRONICS (USA) INC.
P.O. Box 1760, Long Beach, California 90801, U.S.A.
TEL: (800) 421-1404
PIONEER EUROPE NV
Haven 1087, Keetberglaan 1, B-9120 Melsele, Belgium
TEL: (0) 3/570.05.11
PIONEER ELECTRONICS AUSTRALIA PTY. LTD.
178-184 Boundary Road, Braeside, Victoria 3195, Australia
TEL: (03) 9586-6300
PIONEER ELECTRONICS OF CANADA, INC.
300 Allstate Parkway, Markham, Ontario L3R OP2, Canada
TEL: (905) 479-4411
PIONEER ELECTRONICS DE MEXICO, S.A. de C.V.
San Lorenzo 1009 3er. Piso Desp. 302
Col. Del Valle Mexico, D.F. C.P. 03100
TEL: 5-688-52-90
Published by Pioneer Corporation.
Copyright © 2000 by Pioneer Corporation.
All rights reserved.
Publication de Pioneer Corporation.
Copyright © 2000 Pioneer Corporation.
Tous droits de reproduction et de traduction réservés.
Printed in Japan
Imprimé au Japon
<KSNFF/00H00001>
<CRD3259-A> EW