1
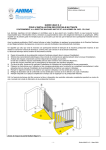
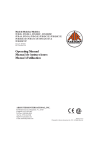
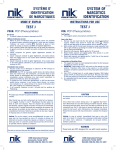
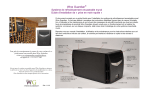
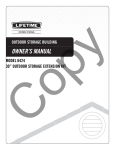
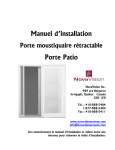
5/24/2006
®
VISIT THE LIFETIME WEB SITE / VISITE EL SITIO WEB DE LIFETIME / VISITEZ LE SITE WEB DE LIFETIME :
WWW.LIFETIME.COM
**For U.S. and Canada Customers ONLY / Para los clientes de los E.E.U.U. et Canadá
solamente / Pour les clients des États Unis et Canada seulemente :**
IF ASSISTANCE IS NEEDED / SI NECESITA ASISTENCIA / SI AVEZ BESOIN DE
L’ASSISTANCE,
DO NOT CONTACT THE STORE! / ¡NO PÓNGASE EN CONTACTO CON EL
COMERCIANTE! / NE CONTACTEZ PAS LE COMMERCE !
CALL OUR CUSTOMER SERVICE DEPARTMENT AT / LLAME A NUESTRO DEPARTAMENTO DE SERVICIO A CLIENTES A / APPELEZ NOTRE DEPARTMENT DE SERVICE À LA
CLIENTÈLE À :
C
op
y
1 (800) 225-3865
HOURS: 7:00 a.m. to 5:00 p.m. Monday through Friday, 7:00 a.m. to 12 noon Saturday (Mountain Standard Time)
HORAS: 7:00 a.m. a 5:00 p.m. Lunes a Viernes, 7:00 a.m. a mediodía Sábado (Hora estándar de la montaña)
HEURS : 7:00 a.m. à 5:00 p.m. Lundi à Vendredi, 7:00 a.m. à midi samedi (Heure Normale des Rocheuses)
**Customers outside the U.S. or Canada, please contact the store**
** Clientes fuera de los E.E.U.U. o Canadá, póngase en contacto con el comerciante**
**Clientes en dehors des États Unis ou du Canada, contactez le commerce**
Outdoor Storage Shed Shutter Kit
Kit de contraventanas para el Cobertizo para exteriores
Kit de volets pour l’abri exterieur
MODEL #0111/ MODELO #0111 / MODÈLE NO. 0111
ASSEMBLY INSTRUCTIONS AND
OWNER’S MANUAL
Instrucciones de armado y
manual del propietario
Instructions de montage et
manual de l’utilisateur
Save this instruction in the event that the manufacturer has to be contacted for replacement parts.
Guarde estas instrucciones en caso de que tenga que ponerse en contacto con el fabricante para
obtener piezas de reemplazo.
Gardez ces instructions juste au cas oú vous avez besoin de contacter la manufacture pour vous
procurer des pièces de replacement.
INSTRUCTION #1013354
PARTS LIST
ID Part # Description
AA 1009670 Shutter
Shutter Hardware [1009265]
SA BS02000 1/4” x 3/4” Screw TOOLS AND MATERIALS
REQUIRED FOR ASSEMBLY
(Not Included)
Qty
2
1. Phillips Screwdriver
2. Measuring Tape
3. Electric Drill
4. 1/4” Drill Bit
8
LISTA DE PIEZAS
ID Parte # Description
Qty
AA 1009670 Contraventana
2
Piezas de contraventana [1009265]
SA BS02000 Tornillo de .635 cm x 1.91 cm 8
LISTE DE PIÈCES
Herramientas y materiales
requeridos para el
ensamblaje
(No incluidos)
1. Destornillador Phillips
2. Cinta métrica
3. Taladro eléctrico
4. Broca de .635 cm
ID Partie # Description
Qty
AA 1009670 Volet
2
Pièces de volet [1009265]
SA BS02000 Vis de .635 cm x 1.91 cm 8
Outils et materiels requis
pour le montage
(Non inclus)
SA
1. Tournevis Phillips
2. Mètre ruban
3. Perceuse électrique
4. Foret de .635 cm
Note: Identify the size of your shed and then use the correct section
Atención: Identifique la medida de su cobertizo y, entonces, use la sección correcta.
Remarque : Identifiez la grosseur de votre abri et, ensuite, utilisez la section correct
8-foot Sheds / Cobertizos de 8’ / Abris de 8’
(Any shed with a 8’ width (example: 8’ x 7.5’) / Cualquier cobertizo con una anchura de 2,44 m (ejemplo: 2,44
mx 2,29 m) / Quelconque abri avec une largeur de 2,44 m (exemple : 2,44 m x 2,29 m))
STEP 1 / PASO 1 / ÉTAPE 1
a.Below is a map potential screw hole locations. You will use these locations in step #2. Some Sheds will have small
bumps molded into the plastic at the locations shown. If there are no bumps, measure carefully before drilling in
step #2. The Left side holes are found in the first and third grooves, counting from the left wall seam. The right
side holes are in the first and third grooves, counting from the right wall seam.
a.Hay un mapa debajo mostrando las ubicaciones potenciales de los agujeros para los tornillos. Utilizará estas
ubicaciones en el paso #2. Algunos cobertizos tendrán pequeñas protuberancias moldeadas en el plástico a las
ubicaciones ilustradas. Si no hay protuberancias, meda cuidadosamente antes de taladrar en el paso #2. Se
encuentra los agujeros del lado izquierdo en la primera y la tercera ranuras, contando de la juntura de la pared
izquierda. Se encuentra los agujeros del lado derecho en la primera y la tercera ranuras, contando de la juntura
de la pared derecha.
a.Il y a une image ci-dessous en illustrant les positions potentielles des trous pour les vis. Vous utiliserez ces
positions dans l’étape no. 2. Quelques abris auront des petits chocs modelés dans le plastique aux positions
illustrées. S’il n’y a pas de chocs, mesurez avec soin avant de percer les écrous dans l’étape no. 2. Vous pouvez
trouver les trous de côté gauche dans la première y la troisième cannelures, en comptant de la crique dans le mur
gauche. Vous pouvez trouver les trous de côté droit dans la première et la troisième cannelures, en comptant
de la crique dans le mur droit.
Grooves from Left:
Grooves from right
Ranuras de la derecha
Ranuras de la izquierda
Cannelures du côté droit
Cannelures du côté gauche
#1
#3
#3
#1
9 1/2”
81,92 cm
32 1/4”
24,13 cm
STEP 2 / PASO 2 / ÉTAPE 2
a. Use a 1/4” Drill Bit and drill holes from the inside of the shed at the locations shown. Refer to Step #1 for
measurements.
a. Usando una broca de .635 cm, taladre los agujeros del interior del cobertizo a las ubicaciones ilustradas. Refiérase
a los en el Paso #1.
a. En utilisant un foret de .635 cm, percez les trous de l’intérieur de l’abri aux positions illustrées. Consultez les
mesures dans l’Étape No. 1.
Window Panel located
here
Panel de ventana ubicado aquí
Panneau de fenêtre ici
Left Wall Panel
Panel de la pared ezquierda
Panneau mural gauche
Right Wall Panel
Panel de la pared derecha
Panneau mural droit
STEP 3 / PASO 3 / ÉTAPE 3
a. Look at the diagrams below and the holes at the top of the bottom of the shed to determine which set you should
use.
b. Have one person line up the correct holes in the back of the shutters, with the holes that you pre-drilled. A second
person, inside the shed will insert a 1/4” Screw (SA) through the shed and into the Shutter (AA). Do this for
each of your pre-drilled holes.
a. Inspeccione los diagramas debajo y los agujeros a la parte superior y a la parte inferior del cobertizo para
determinar el juego que debe usar.
b. Una persona debe alinear los agujeros correctos en la contraventana con los agujeros pretaladrados en el cobertizo.
Una segunda persona, dentro del cobertizo, insertará un Tornillo de .635 cm (SA) a través del cobertizo y los
introducirá en la Contraventana (AA). Repeta este paso para cada agujero pretaladrado.
a. Examinez les figures ci-dessous et les trous à la partie superieur et à la partie inferieur de l’abri pour déterminer
quel jeu que vous devez utiliser.
b. Une personne doit aligner les trous corrects dans le volet avec les trous prépercés dans l’abri. Une autre personne,
à l’interieur de l’abri, insertera un Vis de .635 cm (SA) à travers de l’abri et les introduira dans le Volet (AA).
Répétez cet étape pour chaque trous prépercé.
2 3
1
2 3 1
Back of Shutter
Parte delantera de la contraventana
Partie arrière du volet
Use hole #1 (the far right hole
in each grouping) for this
shutter.
Use hole #2 (the far left
hole in each grouping) for
this shutter.
Use agujero #2 (el agujero
izquierdo de cada agrupación)
para esta contraventana.
Utilisez trous no. 2 (le
trous gauche de chaque
groupement) pour ce volet.
Use agujero #1 (el agujero
derecho de cada agrupación)
para esta contraventana.
Utilisez trous no. 1 (le trous droit
de chaque groupement) pour ce
volet.
Outside of Shed / Exterior del cobertizo / Exterieur de l’abri
10-foot Sheds / Cobertizos de 3,5 m / Abris de 3,5 m
(Any shed with a 10’ width (example: 10’ x 13’) / Cualquier cobertizo con una anchura de 3,5 m (ejemplo: 3,5
m x 3,96 m) / Quelconque abri avec une largeur de 3,5 m (exemple : 3,5 m x 3,96 m))
STEP 1 / PASO 1 / ÉTAPE 1
a.Below is a map of potential screw hole locations. You will use these locations in step #2. Some Sheds will have
small bumps molded into the plastic at the locations shown. If there are no bumps, measure carefully before
drilling in step #2. The Left side holes are found in the second and fourth grooves, counting from the left wall
seam. The right side holes are in the first and third grooves, counting from the right wall seam.
a.Hay un mapa debajo mostrando las ubicaciones potenciales de los agujeros para los tornillos. Utilizará estas
ubicaciones en el paso #2. Algunos cobertizos tendrán pequeñas protuberancias moldeadas en el plástico a las
ubicaciones ilustradas. Si no hay protuberancias, meda cuidadosamente antes de taladrar en el paso #2. Se
encuentra los agujeros del lado izquierdo en la primera y la tercera ranuras, contando de la juntura de la pared
izquierda. Se encuentra los agujeros del lado derecho en la primera y la tercera ranuras, contando de la juntura
de la pared derecha.
a.Il y a une image ci-dessous en illustrant les positions potentielles des trous pour les vis. Vous utiliserez ces
positions dans l’étape no. 2. Quelques abris auront des petits chocs modelés dans le plastique aux positions
illustrées. S’il n’y a pas de chocs, mesurez avec soin avant de percer les écrous dans l’étape no. 2. Vous pouvez
trouver les trous de côté gauche dans la première y la troisième cannelures, en comptant de la crique dans le mur
gauche. Vous pouvez trouver les trous de côté droit dans la première et la troisième cannelures, en comptant
de la crique dans le mur droit.
Grooves from right
Ranuras de la derecha
Grooves from Left:
Ranuras de la izquierda
Cannelures du côté droit
Cannelures du côté gauche
#2
10”
32 3/4”
83.19 cm
25.4 cm
#4
#3
#1
STEP 2 / PASO 2 / ÉTAPE 2
a. Use a 1/4” Drill Bit and drill holes from the inside of the shed at the locations shown. Refer to step #1 for
measurements.
a. Usando una broca de .635 cm, taladre los agujeros del interior del cobertizo a las ubicaciones ilustradas. Refiérase
a los en el Paso #1.
a. En utilisant un foret de .635 cm, percez les trous de l’intérieur de l’abri aux positions illustrées. Consultez les
mesures dans l’étape no. 1.
Window Panel located here
Panel de ventana ubicado aquí
Panneau de fenêtre ici
Left Wall Panel
Panel de la pared ezquierda
Panneau mural gauche
Right Wall Panel
Panel de la pared derecha
Panneau mural droit
STEP 3 / PASO 3 / ÉTAPE 3
a. Look at the diagrams below and the holes at the top of the bottom of the shed to determine which set you should
use.
b. Have one person line up the correct holes in the back of the shutters, with the holes that you pre-drilled. A second
person, inside the shed will insert a 1/4” Screw (SA) through the shed and into the Shutter (AA). Do this for
each of your pre-drilled holes.
a. Inspeccione los diagramas debajo y los agujeros a la parte superior y a la parte inferior del cobertizo para
determinar el juego que debe usar.
b. Una persona debe alinear los agujeros correctos en la contraventana con los agujeros pretaladrados en el cobertizo.
Una segunda persona, dentro del cobertizo, insertará un Tornillo de .635 cm (SA) a través del cobertizo y los
introducirá en la Contraventana (AA). Repeta este paso para cada agujero pretaladrado.
a. Examinez les figures ci-dessous et les trous à la partie superieur et à la partie inferieur de l’abri pour déterminer
quel jeu que vous devez utiliser.
b. Une personne doit aligner les trous corrects dans le volet avec les trous prépercés dans l’abri. Une autre personne,
à l’interieur de l’abri, insertera un Vis de .635 cm (SA) à travers de l’abri et les introduira dans le Volet (AA).
Répétez cet étape pour chaque trous prépercé.
2 3
1
2 3 1
Back of Shutter
Parte delantera de la contraventana
Partie arrière du volet
Use hole #3 (the center hole
in each grouping) for this
shutter.
Use agujero #3 (el agujero
central en cada agrupación)
para esta contraventana.
Utilisez trous No. 3 (le trous
central de chaque groupement)
pour ce volet.
Use hole #3 (the center hole in
each grouping) for this shutter.
Use agujero #3 (el agujero
central en cada the center
hole agrupación) para esta
contraventana.
Utilisez trous No. 3 (le trous
central de chaque groupement)
pour ce volet.
Outside of Shed / Exterior del cobertizo / Exterieur de l’abri
Enhance your Lifetime® Outdoor Shed by purchasing the following Shed Accessories:
Realice su Cobertizo para Exteriores Lifetime® comprando los equipos siguientes. Para
obtener piezas de repuesto, llame a nuestro departamento de Atención al Cliente:
Améliorez votre hangar Lifetime® Outdoor Shed par l’achat des kits ou des pièces de
rechange suivants. Appelez notre Service à la Clientèle au numéro:
Model # / Modelo # / Modèle No.
0110 Corner Shelf (2 pack) / Estante anguloso (paquete de 2 ) / Étagère d’angle (pack de 2)
Two 10” radius Shelves with hardware / Dos estantes angulosos de 25,4 cm con accesorioes /
Deux étagères d’angle de 25,4 cm avec accessoires
0130 32” Shelf Kit w/ hardware (3 pack) / Equipo de 81,1 cm con accesorios (paquete de 3) / Kit
d’étagère de 81,1 cm avec accessoires (pack de 3)
Three 32” x 10” Steel-Reinforced Shelves with shelf brackets and hardware / Tres estantes de
81,1 cm x 25,4 cm reforzados por acero con soportes y accesorios / Trois étagères de 81,1 cm x
25,4 cm renforcées par acier avec supports et accessoires
0150 8’ Shelf Kit w/ hardware / Equipo de estante de 2,44 m con accesorios ? Kit Étagère de 2,44 m avec
accessoires
One 96” x 9” Steel-Reinforced Shelf with shelf bracket and hardware / Un estante de 2,44 m x
22,86 cm reforzado por acero con soportes y accesorios / Une étagère de 2,44 m x 22,86 cm
renforcé par acier avec supports et accessoires
0170 Pegboard w/ hardware / Tablero de madera prensada perforada con accesorios / Panneau perforé
avec accessoires
One 22.5” x 22.5” Pegboard Panel with hooks. Great for hanging large and small items such as:
rakes, shovels, and hand tools / Un tablero perforado de 57.15 cm x 57,15 cm con ganchos.
Para colgar artículos grandes y pequeños tales como rastrillos, palas y herramientas manuales
Un panneau perforé de 57,15 cm x 57,15 cm avec crochets. Pour accrocher les articles grands
et petits tels commes : les râteaux, les pelles et les outils à main.
0190 Shelf Support Channel / Canal de soporte para el estante / Voie de support d’étagère
Two Shelf Support Channels that allow the 32” shelves on either of the side walls of your shed
/ Dos canales de soporte de estantes que soportan los estantes de 81,1 cm en las dos paredes
laterales de su cobertizo / Deux voies de support d’étagère qui soutiennent les étagères de 81,1
cm sur les deux murs latéraux de votre abri
6420 30” Shed Extension Kit / Equipo de extensión de 76,2 cm para su cobertizo / Kit d’extension de
76,2 cm pour votre abri
Extend your shed two and a half feet for the ultimate storage building / Extende su cobertizo 2’,6”
para tener el cobertizo último / Étendez votre abri 2’,6” pour avoir l’abri ultime.
0110
0130
0150
0170
6420
To purchase shed accessories, visit us at:
Para compraer eccesorios para su cobertizo, visítenos a:
Pour achetez des accessoires pour votre abri, visitez-nous à :
www.buylifetime.com
Or call us / O llaménos / Ou appelez-nous :
1 (800) 424-3865
** Los clientes fuera de los EE.UU. y el Canadá deberán comunicarse con la tienda donde compraron el
cobertizo para obtener ayuda. **
** Les clients situés à l’extérieur des États-Unis ou du Canada peuvent s’adresser au magasin pour
assistance. **