1
CLICKER
®
MODEL KLIK1U
Universal Garage Door Opener Remote Control
STOP
To prevent possible SERIOUS INJURY or DEATH from a moving gate or garage door:
• ALWAYS keep remote controls out of reach of children. NEVER permit children to
operate, or play with remote control transmitters.
• Activate gate or door ONLY when it can be seen clearly, is properly adjusted and
there are no obstructions to door travel.
• ALWAYS keep gate or garage door in sight until completely closed. NEVER permit
anyone to cross path of moving gate or door.
Read instructions thoroughly BEFORE beginning.
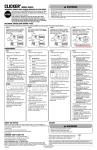
Start with garage door closed. Identify garage door opener type -Smart/Learn
button or DIP Switch. Smart/Learn button or DIP Switches are located on motor
unit or external receiver. Refer to owner’s manual if necessary.
Clicker products are intended to be used only with garage door openers
manufactured after 1993 that utilize photo-eyes safety sensors. These are
always located on or near the bottom of the door track. If your garage door
does not have the sensors attached and working, the opener is not
compliant with current federal safety regulations and should be replaced.
Proceed with instructions according to your type of garage door opener.
DIP SWITCH
SMART/LEARN BUTTON
1
See Chart A to
determine # of times to
press button and write
in blank on step 5.
2
CHART A
1
CHART B
# of
times to
press
button
Brand
Type/Color of
Smart/Learn
Year
# of
times to
press
button
Brand
Description
Year
1
2
3
4
5
Linear®
Chamberlain®*
Chamberlain®*
Chamberlain®*
Genie®
Overhead Door®
Genie®
Overhead Door®
Stanley®
Wayne Dalton®
Chamberlain®*
Mega-Code
Orange/Red
Purple
Green
‘97-Current
‘97-’03
‘95-’Current
‘93-’96
11
12
Chamberlain®*
Chamberlain®*
‘90-’92
Intellicode
‘95-’05
Intellicode
Secure Code
Rolling Code
9 Position
‘05 Current
‘98
‘99
‘90-’92
9 Position
9 Position
Canada
12 Position
10 Position
8 Position
10 Position
9 Position
‘83-’89
‘85
‘76
‘83-’89
‘76
‘85
8 Position
7 Position
‘76
‘83-’89
6
7
9
11
13
14
15
16
17
18
Genie®
Linear Multicode®
Chamberlain®
Stanley/Multicode®
Genie®
Linear®
Moore-O-Matic®
Chamberlain®*
19
*NOTE: LiftMaster, Do-It, Master Mechanic, Raynor, True Value and Sears Craftsman are compatible
with Chamberlain technology.
OR
3
3
4
5
6
7
8
9
10 11 12
DIP SWITCH
Motor
Unit
2
SMART/LEARN BUTTON
2
1
3
See Chart B to
determine # of times to
press button and write
in blank on step 5.
ON
1
2
Existing Remote
3
KG
4
1
2
KG
4
3
KG
Clicker Remote
Match DIP switches. Turn
extra switches OFF.**
Press program button until
LED lights.
KG
Motor Unit
Press program button
until LED lights.
Press and release the
smart/learn button.
5
5
NOTE: Your opener may
appear different and you
may have to remove the
light lens to access the
learn button.
Select a button to program.
Press button
times
ensuring LED stops
flashing after each press.
Code is accepted when
one of the following
occurs:
LED Indicator
Button 1
Program Button
10 11 12
OR
DIP Switches
7
8
OR
9
Click
Button 2
Select a button to program.
Press button
times
ensuring LED stops
flashing after each press.
Code is accepted when
door activates.
2
3
4
5
6
6
1
NOTE: If there are
problems programming to
button 1, program to
button 2.
Battery
Press program button.
6
Battery Cover
REMOTE CONTROL BATTERY
7
Press program button.
7
Programming complete.
Press selected button to
test. If unit does not work,
return to Step 3.
www.clickerproducts.com
1-800-442-1255
Chamberlain, LiftMaster and Moore-O-Matic are Trademarks of Chamberlain Group. Genie
is a Trademark of Overhead Door Corporation. Overhead Door is a Trademark of Overhead
Door Corporation. Linear is a Trademark of Linear Corporation. Master Mechanic is a
Trademark of TruServ. Sears is a Trademark of Sears & Roebuck. Stanley is a Trademark
of The Stanley Works. Wayne Dalton is a trademark of Wayne Dalton Corporation. Do It is
a trademark of Do It Best Corporation.
114A3485C
To prevent possible SERIOUS INJURY or DEATH:
• NEVER allow small children near batteries.
• If battery is swallowed, immediately notify doctor.
To reduce risk of fire, explosion or chemical burn:
• Replace ONLY with 3V2032 coin batteries.
• Do NOT recharge, disassemble, heat above 100°C (212°F) or
incinerate.
Dispose of batteries properly. Replace ONLY with 3V2032
coin batteries.
NOTICE: To comply with FCC and or Industry Canada (IC) rules, adjustment or modifications of this
receiver and/or transmitter are prohibited, except for changing the code setting or replacing the battery.
THERE ARE NO OTHER USER SERVICEABLE PARTS.
Tested to Comply with FCC Standards FOR HOME OR OFFICE USE. Operation is subject to the following
two conditions: (1) this device may not cause harmful interference, and (2) this device must accept any
interference received, including interference that may cause undesired operation.
© 2008, Clicker Corporation
All Rights Reserved
Programming complete.
Press selected button to
test. If unit does not work,
return to Step 3.
NOTE:
2 Position DIP
ON
Switch:
If programming fails reverse
DIP switches (OFF to ON and
ON to OFF).
**3 Position DIP Switch:
For Chamberlain remotes DO NOT
use the “0” position, use “+” or “-”.
If you already have a 3-button
remote, DIP switch #1 must be set to
“-” if the large button is to open the door. It may be
necessary to reprogram original remote controls.
CLICKER
®
ADVERTENCIA
Modelo KLIK1U de CLICKER
Control remoto universal para abridores de puertas de garajes
Lea completamente ls instrucciones ANTES de empezar.
ALTO
Para impedir posibles LESIONES GRAVES o MORTALES debido al movimiento de una
compuerta o puerta de garaje:
• Mantenga SIEMPRE los controles remotos fuera del alcance de los niños. No permita
NUNCA a niños que las operen ni que jueguen con los transmisores de control remoto
• Active la compuerta o la puerta SÓLO cuando la pueda ver claramente, esté bien
ajustada y no haya obstrucciones en el recorrido de la puerta.
• Mantenga SIEMPRE la compuerta o la puerta del garaje a la vista hasta que esté
completamente cerrada. No deje NUNCA que nadie cruce la trayectoria de la compuerta
o puerta en movimiento.
Empiece con la puerta del garaje cerrada. Identifique el tipo de abridor de puerta de garaje –
botón Smart/Learn o interruptor DIP. El botón Smart/Learn o los interruptores DIP están
ubicados en la unidad del motor o receptor externo. Consulte el manual del propietario si es
necesario. Pase a las instrucciones que correspondan al tipo de abridor de puerta de garaje.
Los productos de Clicker son pensados ser utilizados sólo con abre-puertas de garaje
fabricó después de 1993 que utiliza sensores de seguridad de foto. Estos siempre son
situados en/o cerca del parte inferior de riel de la puerta. Si su puerta de garaje no
tiene estos sensores conectado y trabajar, el abre-puerta no es sumiso con normas de
seguridad federales actuales y debe ser reemplazado.
1
INTERRUPTOR DIP
TABLA A
2
Tipo/Color de
Smart/Learn
Año
1
2
3
4
5
Mega-Code
Anaranjado/Rojo
Violeta
Verde
‘97-actual
‘97-’03
‘05-actual
‘93-’96
Linear®
Chamberlain®*
Chamberlain®*
Chamberlain®*
Genie®
Overhead Door®
Genie®
Overhead Door®
Stanley®
Wayne Dalton®
Chamberlain®*
7
9
11
1
TABLA B
Veces que
Marca
hay que
oprimir el botón
6
A
PREC
BOTÓN SMART/LEARN
Vea la Tabla A para
determinar el número
de veces que se debe
oprimir el botón y
escriba en el espacio
en blanco del paso 5.
ADV
Intellicode
‘95-‘05
Intellicode
Código seguro
Código variable
9 Position
‘05-actual
‘98
‘99
‘90-’92
Veces que
Marca
hay que
oprimir el botón
11
12
Chamberlain®*
Chamberlain®*
13
14
15
16
17
18
Genie®
Linear Multicode®
Chamberlain®
Stanley/Multicode®
Genie®
Linear®
Moore-O-Matic®
Chamberlain®*
19
Descripción
Año
9 Posiciones
9 Posiciones
Canada
12 Posiciones
10 Posiciones
8 Posiciones
10 Posiciones
9 Posiciones
‘90-’92
8 Posiciones
7 Posiciones
‘76
‘83-’89
‘83-’89
‘85
‘76
‘83-’89
‘76
‘85
Vea la Tabla B para
determinar el número de
veces que se debe
oprimir el botón y escriba
en el espacio en blanco
del paso 5.
2
*NOTA: LiftMaster, Do-It, Master Mechanic, Raynor, True Value y Sears Craftsman son compatibles con la
tecnología Chamberlain .
8
9
10 11 12
INTERRUPTOR DIP
7
O
1
2
3
4
5
BOTÓN SMART/LEARN
Unidad del
motor
6
3
3
ON
1
2
3
Control remoto
existente
Oprima el botón de
programación hasta que se
enciendan las luces LED.
4
1
2
Haga corresponder los
interruptores DIP. Ponga los
interruptores adicionales en OFF.
KG
KG
4
3
KG
Control remoto
Clicker
KG
Unidad del motor
Oprima el botón de
programación hasta que se
enciendan las luces LED.
Oprima y suelte el botón
Smart/Learn
5
NOTA: Su abridor puede
tener un aspecto diferente y
tal tenga que quitar la lente
de la luz para tener acceso
al botón learn.
Seleccione un botón para
programar. Oprima el botón
veces asegurándose de que el
LED deje de destellar después
de cada pulsación. El código se
acepta cuando se produce una
de las cosas siguientes:
5
Indicador LED
Botón 1
Botón 1
9
Interruptores DIP
8
Botón de programación
7
O
1
2
3
4
5
6
O
10 11 12
Chasquidos
Seleccione un botón para
programar. Oprima el botón
veces asegurándose de que el
LED deja de destellar
después de cada
pulsación. Se acepta el
código cuando se activa
la puerta.
6
NOTA: SI tiene problemas
programada a botón 1,
programar al botón 2.
Pila
6
Oprima el botón de
programación.
Cubierta de las pilas
Oprima el botón de
programación.
ADVERTENCIA
7
La programación está completa.
Oprima el botón seleccionado
para probar. Si la unidad no
funciona, vuelva al paso 3.
www.clickerproducts.com
1-800-442-1255
Chamberlain, LiftMaster y Moore-O-Matic son marcas comerciales de
Chamberlain Group. Genie es una marca comercial de Overhead Door
Corporation. Overhead Door es una marca comercial de Overhead Door
Corporation. Linear es una marca comercial de Linear Corporation. Stanley
es una marca comercial de The Stanley Works. Wayne Dalton es una marca
comercial de Wayne Dalton Corporation. Do It es una marca comercial de
Do It Best Corporation.
114A3485C
Pila del control remoto
Para evitar la posibilidad de LESIONES GRAVES O incluso LA MUERTE:
• NUNCA permita que los niños pequeños estén cerca de las baterías.
• Si alguien se traga una batería, llame al médico de inmediato.
Para reducir el riesgo de incendio, explosión o combustión química:
• Reemplace ÚNICAMENTE con baterías planas 3V2032.
• NO recargue, desarme, caliente por encima de 212 °F (100 °C) o incinere.
Deschacerse de su pila de la manera adecuada. Dispose of
batteries properly. Reemplace las pilas solamente por pilas de
botón 3V2032.
AVISO: Para cumplir con las reglas de la FCC y/o de Canadá (IC), ajustes o modificaciones de este receptor y/o
transmisor están prohibidos, excepto por el cambio de la graduación del código o el reemplazo de la pila. NO
HAY OTRAS PIEZAS REPARABLES DEL USUARIO.
Se ha probado para cumplir con las normas de la FCC para USO DEL HOGAR O DE LA OFICINA. La operación
está sujeta a las dos condiciones siguientes:(1) este dispositivo no puede causar interferencia perjudicial, y (2)
este dispositivo debe aceptar cualquier interferencia recibida, incluyendo la interferencia que puede causar una
operación no deseable.
© 2008, Clicker Corporation
Todos los derechos reservados
7
ADVERTENCIA
La programación está completa.
ADVERTENCIA
Oprima el botón seleccionado
para probar. Si la unidad no
funciona, vuelva al Paso 3.
NOTA:
Interruptor DIP de 2
posiciones:
Si falla la programación invierta las
posiciones de los interruptores dip (OFF a
ON y ON a OFF).
ON
PRECAUCIÓN
**3 Coloque el interruptor DIP:
Para controles remotos Chamberlain NO use la
posición “0”, use “+” o “-”. Si ya tiene un control
remoto de 3 botones, el interruptor DIP 1 debe
fijarse en “-” si el botón grande es para abrir la puerta. Tal vez sea
necesario reprogramar los controles remotos originales.