1
CLICKER
WARNING
MODEL CLT1D
Universal Garage Door Opener Remote Control
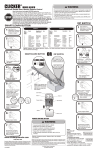
The Clicker remote can be programmed to operate up to 2 garage door openers or
gates, including different brands. All programming is done using the:
• Brand Switches
• Remote Control DIP Switches
• Remote Control Push Buttons, A and B, and LED Indicator
To prevent possible SERIOUS INJURY or DEATH from a moving gate or garage door:
• ALWAYS keep remote controls out of reach of children. NEVER permit children to operate, or
play with remote control transmitters.
• Activate gate or door ONLY when it can be seen clearly, is properly adjusted, and there are
no obstructions to door travel.
• ALWAYS keep gate or garage door in sight until completely closed. NEVER permit anyone to
cross path of moving gate or door.
CAUTION
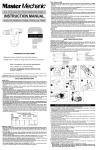
LED
Button A
BRAND Switches
UP position is ON
DOWN position is OFF
ON
DIP Switches
UP position is ON
DOWN position is OFF
ON
External Ceiling or
Wall Mounted Receiver DIP Switches or
Smart-Learn Button
BRAND
Switches
DIP
Switches
NOTE: Use pen or small screwdriver
to move dip switches.
1
Motor Unit
& Receiver
Button B
Battery
Slide Battery
cover down
to remove
Remote
Control
4
PREPARATION
Determine the BRAND ID of the existing garage door opener or handheld remote
controls. If all remote controls are lost, the BRAND ID is located on the ceiling
mounted motor unit or on the external receiver near the flexible wire antenna.
Also, determine if your motor unit/receiver system has DIP SWITCHES or a
SMART-LEARN BUTTON. Some models require removing the light lens. For further
information, consult your garage door opener manual.
Proceed to the appropriate section for your type of opener.
2
Press and hold both buttons until LED begins to flash. When LED
flashes, release both buttons and immediately press the button that
you want to activate the door and release.
Your clicker is now programmed, proceed to step 5 or 6.
• For Chamberlain, Sears, LiftMaster and Master Mechanic if your
garage door opener has a Smart-Learn button, continue on to step 5.
• For all other types continue to step 6.
5
SET BRAND SWITCH
Using the chart below that pertains to your brand, set brand switches
on Clicker remote.
NOTES:
• Some garage door openers use wire connectors instead of DIP
switches. If wire is present it is “ON.” If wire is absent or cut, it is
“OFF.” Consult your garage door opener manual for further
information.
• If you have a unit with Yellow, White or Gray Smart-Learn button and
you do not have a remote, set the first 9 dip switches to your choice.
The remaining 10-12 should be set to off. Proceed to step 4.
BRAND ID / SYSTEM
(7 Code Switch Systems)
CHAMBERLAIN, SEARS, LIFTMASTER, MASTER MECHANIC, DO IT
(8 Code Switch Systems)
CHAMBERLAIN, SEARS, LIFTMASTER, MASTER MECHANIC, DO IT
(9 Code Switch Systems)
CHAMBERLAIN, SEARS, LIFTMASTER, MASTER MECHANIC, DO IT
(Yellow, White or Grey Learn Button)
GENIE (9 Code Switch Systems)
GENIE (12 Code Switch Systems)
LINEAR, MOORE-O-MATIC (8 Code Switch Systems)
STANLEY (10 Code Switch Systems)
SMART-LEARN BUTTON PROGRAMMING
A. Press and release Smart-Learn button.
B. Press and hold button selected in step 4 for 3 seconds.
NOTE: If you have a Chamberlain, Sears, Liftmaster, Master
Mechanic or Do It motor unit/receiver with a Yellow, White or Gray
Smart-Learn button, it will activate immediately upon successful
programming. If your motor unit/receiver has a Green, Orange, Red
or Purple Smart-Learn button, the light bulb will blink signifying it has
learned the Clicker remote control code.
➡
BRAND SWITCHES
CHAMBERLAIN, SEARS, LIFTMASTER, MASTER MECHANIC, DO IT
PROGRAMMING THE PUSH BUTTON
ON OFF OFF ON
OFF OFF OFF ON
ON
ON OFF OFF
ON
ON OFF OFF
OFF
ON
OFF
OFF
OFF
OFF
ON
OFF
ON
ON
OFF
OFF
OFF
OFF
OFF
OFF
6
1
2
3
KG
KG
PROGRAMMING IS COMPLETE
Programming is complete. To test, press the button selected to activate garage door.
NOTE: For Genie, Stanley, Linear and Moore-O-Matic if programming does not work,
review brand and dip settings and repeat steps 4 through 6. Also, try reversing the dip
switch settings (Turn ON to OFF and OFF to ON). Brand code switches remain the
same.
NOTE: If programming to more than one motor unit; after successfully programming
button “A,” determine the brand of the second garage door opener. Follow the
instructions pertaining to that particular brand to program button “B.” Programming a
different code into button “B” will not affect button “A.” The codes and brand switch
settings are retained within their specific Clicker button.
Proceed to step 3.
BRAND ID / SYSTEM
BRAND SWITCHES
CHAMBERLAIN, SEARS, LIFTMASTER, MASTER MECHANIC, DO IT
(Green Learn Button)
CHAMBERLAIN, SEARS, LIFTMASTER, MASTER MECHANIC, DO IT
(Orange/Red Learn Button)
CHAMBERLAIN, SEARS, LIFTMASTER, MASTER MECHANIC, DO IT
(Purple Learn Button)
ON
ON
ON OFF
OFF ON
ON OFF
OFF OFF ON
ON
When the remote range is diminished, operation is intermittant, or the LED dims,
replace the battery. Memory is not lost when the battery is removed.
NOTE: Dispose of old batteries properly.
Proceed to step 4.
3
REMOTE CONTROL BATTERY
SET THE DIP SWITCHES
Open existing remote to expose code switches or obtain the switch settings from your
receiver.
Match the Clicker’s DIP switches to already existing receiver/remote DIP switches. Set
extra DIP switches in the Clicker remote to the off position.
NOTE: For Chamberlain, Sears, LiftMaster and Master Mechanic, if the
receiver/remote DIP switch has three positions labeled “+,” “0” and “-," do not use the
“0” position.
If you have a three button remote, #1 switch must be set to “-” if you would like the
large button to open the door.
Existing
remote
Clicker
remote
NOTICE: To comply with FCC and or Industry Canada (IC) rules, adjustment or modifications of this receiver and/or transmitter are
prohibited, except for changing the code setting or replacing the battery. THERE ARE NO OTHER USER SERVICEABLE PARTS.
Tested to Comply with FCC Standards FOR HOME OR OFFICE USE. Operation is subject to the following two conditions: (1) this device
may not cause harmful interference, and (2) this device must accept any interference received, including interference that may cause
undesired operation.
TECHNICAL SUPPORT
www.clickerproducts.com
1-800-442-1255
Chamberlain, LiftMaster and Moore-O-Matic are Trademarks of Chamberlain Group. Genie is a Trademark of Overhead Door
Corporation. Linear is a Trademark of Linear Corporation. Master Mechanic is a Trademark of TruServ. Sears is a Trademark
of Sears & Roebuck. Stanley is a Trademark of The Stanley Works. Do It is a trademark of DoIt Best Corporation.
Match existing DIP
switches. Remaining
switches are off.
114A3272B
©2006, Clicker Corporation
All Rights Reserved
CLICKER
ADVERTENCIA
WARNING
MODELO CLT1D
Control remoto universal de apertura de puertas de garaje
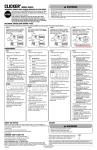
El control remoto Clicker puede programarse para funcionar hasta con 2 controles
de apertura de puertas de garaje o portones, incluso de diferentes marcas. Toda la
programación se realiza mediante los:
• Interruptores de marca
• Interruptores DIP de control remoto
• Botones del control remoto A y B e indicador LED
Para evitar posibles LESIONES GRAVES o MUERTE debido al movimiento de un portón o
puerta de garaje:
• Mantenga SIEMPRE los controles remotos fuera del alcance de los niños. NUNCA permita
que un niño opere juegue con los transmisores de control remoto.
• Accione la puerta o compuerta SÓLO cuando pueda verla bien, esté ajustada correctamente
y no haya obstrucciones que impidan su movimiento.
• Mantenga SIEMPRE la compuerta o puerta del garaje a la vista hasta que esté
completamente cerrada.
CAUTION
LED
Interruptores
de MARCA
La posición hacia
ARRIBA significa
ENCENDIDO
La posición hacia
ABAJO significa
APAGADO
Unidad de motor
y receptor
Botón A
Botón B
ON
Receptor externo instalado
en el techo o en la pared
Interruptores
de MARCA
Interruptores
DIP
Batería
ON
Interruptores DIP
La posición hacia
ARRIBA significa
ENCENDIDO
La posición hacia
ABAJO significa APAGADO
NOTA: Utilice un bolígrafo o un
Deslice la tapa de
la batería hacia
abajo para retirarla
Control
remoto
desarmador pequeño para
desplazar los interruptores DIP.
1
4
PREPARACIÓN
Compruebe la IDENTIFICACIÓN DE MARCA del control de apertura de puertas de
garaje o de los controles remotos portátiles existentes. Si se pierden todos los
controles remotos, la IDENTIFICACIÓN DE MARCA se encuentra en la unidad de
motor instalada en el techo o en el receptor externo cerca de la antena flexible.
Asimismo, compruebe si el sistema receptor/unidad de motor tiene INTERRUPTORES
DIP o un BOTÓN DE APRENDIZAJE INTELIGENTE. En algunos modelos es
necesario retirar los indicadores luminosos. Para obtener más información, consulte el
manual relativo al control de apertura de puertas de garaje.
Consulte la sección apropiada de acuerdo al tipo de control de apertura.
2
Interruptores DIP o
botón de aprendizaje
inteligente
CONFIGURACIÓN DEL INTERRUPTOR DE MARCA
Utilizando la siguiente gráfica de acuerdo a su marca, configure los
interruptores de marca en el Clicker.
NOTAS:
• Algunos controles de apertura de puertas de garaje utilizan
conectores de cable en lugar de interruptores DIP. Si el conector
está presente, significa “ENCENDIDO”. Si no está o está cortado,
significa “APAGADO”. Para obtener más información, consulte el
manual del control de apertura de puertas de garaje.
• Si tiene una unidad con botón de aprendizaje inteligente amarillo, blanco o gris y no
tiene un control remoto, configure los primeros 9 interruptores DIP de la manera que
desee. Los 10-12 interruptores restantes deben estar configurados en posición de
apagado. Siga con el paso 4.
➡
IDENTIFICACIÓN DE MARCA / SISTEMA
INTERRUPTORES DE MARCA
CHAMBERLAIN, SEARS, LIFTMASTER, MASTER MECHANIC, DO IT ENCENDIDO APAGADO APAGADO ENCENDIDO
(Sistemas de interruptor de 7 códigos)
CHAMBERLAIN, SEARS, LIFTMASTER, MASTER MECHANIC, DO IT
(sistemas de interruptor de 8 códigos)
APAGADO APAGADO APAGADO ENCENDIDO
CHAMBERLAIN, SEARS, LIFTMASTER, MASTER MECHANIC, DO IT ENCENDIDO ENCENDIDO APAGADO APAGADO
(Sistemas de interruptor de 9 códigos)
CHAMBERLAIN, SEARS, LIFTMASTER, MASTER MECHANIC, DO IT ENCENDIDO ENCENDIDO APAGADO APAGADO
(botón de aprendizaje amarillo, blanco o gris)
GENIE (Sistemas de interruptor de 9 códigos)
GENIE (Sistemas de interruptor de 12 códigos)
LINEAR, MOORE-O-MATIC (Sistemas de interruptor de 8 códigos)
STANLEY (Sistemas de interruptor de 10 códigos)
APAGADO APAGADO ENCENDIDO
ENCENDIDO APAGADO ENCENDIDO
APAGADO ENCENDIDO APAGADO
APAGADO APAGADO APAGADO
APAGADO
APAGADO
APAGADO
APAGADO
Siga con el paso 3.
IDENTIFICACIÓN DE MARCA / SISTEMA
PROGRAMACIÓN DEL BOTÓN
Mantenga presionados ambos botones hasta que el LED comience a
parpadear. Cuando parpadee el LED, suelte ambos botones y presione
inmediatamente el botón que desea que active la puerta y suéltelo.
Ahora que su control remoto Clicker está programado, siga con el
paso 5 ó 6.
• Para Chamberlain, Sears, LiftMaster y Master Mechanic, si su control
de apertura de puertas de garaje tiene un botón de aprendizaje
inteligente, siga con el paso 5.
• Para todos los demás tipos siga con el paso 6.
5
PROGRAMACIÓN DEL BOTÓN DE APRENDIZAJE INTELIGENTE
A. Presione y suelte el botón de aprendizaje inteligente.
B. Mantenga presionado el botón seleccionado en el paso 4 durante
3 segundos.
NOTA: Si tiene un receptor/unidad de motor Chamberlain, Sears,
Liftmaster, Master Mechanic o Do It con un botón de aprendizaje
inteligente amarillo, blanco o gris, se activará inmediatamente
después de una programación correcta. Si el receptor/unidad de
motor tiene un botón de aprendizaje inteligente verde, naranja, rojo
o morado, el foco parpadeará, lo cual significa que ha reconocido el
código del control remoto Clicker.
6
1
2
3
KG
KG
PROGRAMACIÓN FINALIZADA
La programación se ha completado. Para realizar una prueba, presione el botón
seleccionado para activar la puerta del garaje.
NOTA: para Genie, Stanley, Linear y Moore-O-Matic, si la programación no funciona,
compruebe las configuraciones de los interruptores DIP y de marca y repita los pasos
del 4 al 6. Asimismo, trate de invertir las configuraciones del interruptor DIP (cambie
de ON a OFF y de OFF a ON). Los interruptores de código de marca permanecen
idénticos.
NOTA: Si programa más de una unidad de motor; después de programar
correctamente el botón “A", defina la marca del segundo control de apertura de
puertas de garaje. Siga las instrucciones que corresponden a esa marca en particular
para programar el botón “B”. Programar un código diferente en el botón “B” no
afectará al botón “A”. Las configuraciones de los interruptores de marca y de los
códigos son memorizadas en su botón específico del Clicker.
INTERRUPTORES DE MARCA
CHAMBERLAIN, SEARS, LIFTMASTER, MASTER MECHANIC, DO IT ENCENDIDO ENCENDIDO ENCENDIDO APAGADO
(Botón de aprendizaje verde)
CHAMBERLAIN, SEARS, LIFTMASTER, MASTER MECHANIC, DO IT
(Botón de aprendizaje naranja/rojo)
CHAMBERLAIN, SEARS, LIFTMASTER, MASTER MECHANIC, DO IT
(Botón de aprendizaje morado)
APAGADO ENCENDIDO ENCENDIDO APAGADO
APAGADO APAGADO ENCENDIDO ENCENDIDO
Siga con el paso 4.
3
CONFIGURACIÓN DE LOS INTERRUPTORES DIP
Abra el control remoto existente para ver los interruptores de código u obtener las
configuraciones del interruptor de su receptor.
Correlacione los interruptores DIP del Clicker con los interruptores DIP del control
remoto/receptor existentes. Configure los interruptores DIP adicionales en el control
remoto Clicker en la posición de apagado.
NOTA: Para Chamberlain, Sears, LiftMaster y Master Mechanic, si el interruptor DIP
del control remoto/receptor tiene tres posiciones marcadas con “+”, “0” y “-”, no utilice
la posición “0”.
Si tiene un control remoto de tres botones, el interruptor nº1 debe configurarse a “-”
si desea que el botón más grande abra la puerta.
Control remoto
existente
Correlacione los
interruptores DIP
existentes. Los
demás interruptores
están apagados.
114A3272B
Clicker
BATERÍA DEL CONTROL REMOTO
Reemplace la batería cuando se reduzca el rango del control remoto, cuando el
funcionamiento sea intermitente o cuando se atenúe el LED. La memoria no se borra
al retirar la batería.
NOTA: Deseche las baterías usadas en el lugar adecuado.
AVISO: Para cumplir con las normas de la FCC y/o de la IC (Industry Canada), queda prohibido realizar ajustes o modificaciones en este
receptor y/o transmisor, excepto para cambiar la configuración del código o para reemplazar la batería. NO CONTIENE PIEZAS QUE EL
USUARIO PUEDA REPARAR.
Probado para cumplir con las normas de la FCC PARA USO EN LA OFICINA O EN EL HOGAR. El funcionamiento está sujeto a las dos
condiciones siguientes: (1) este dispositivo no puede causar interferencias perjudiciales y, (2) este dispositivo debe aceptar cualquier
interferencia recibida, incluyendo cualquier interferencia que pueda ocasionar un funcionamiento no deseado.
SOPORTE TÉCNICO
www.clickerproducts.com
1-800-442-1255
Chamberlain, LiftMaster y Moore-O-Matic son marcas registradas de Chamberlain Group. Genie es una marca comercial
registrada de Overhead Door Corporation. Linear es una marca comercial registrada de Linear Corporation. Master
Mechanic es una marca comercial registrada de TruServ. Sears es una marca comercial registrada de Sears & Roebuck.
Stanley es una marca comercial registrada de The Stanley Works. Do It es una marca comercial registrada de DoIt
Best Corporation.
©2006, Clicker Corporation
Todos los derechos reservados