1
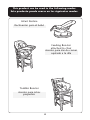
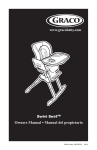
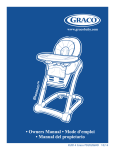
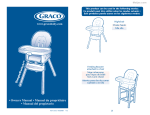
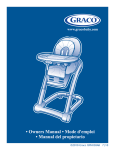
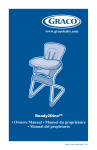
www.gracobaby.com
Swivi Seat™ 3-in-1 Booster
• Owners Manual • Manual del propietario
©2014 Graco PD283577F
10/14
This product can be used in the following modes:
Este producto puede usarse en los siguientes modos:
Infant Recline
Reclinación para el bebé
Feeding Booster
attached to chair
Asiento para dar de comer
sujetado a la silla
Toddler Booster
Asiento para niños
pequeños
2
Failure to follow these warnings and the
assembly instructions could result in serious injury or death.
• PLEASE SAVE OWNER’S
MANUAL FOR FUTURE USE.
• DO NOT FORCE TRAY
against child. Use only the two
adjustment positions. Be sure
both adjustment fingers are
engaged in armrest slots.
• FOR YOUR CHILD’S SAFETY,
read the labels and the owner’s
manual before using product.
• STRANGULATION HAZARD:
Do not place product in any
location where there are cords,
such as window blind cords,
drapes, phone cords, etc.
• BEFORE EACH USE. Inspect the
toddler booster for damaged
hardware, loose joints, missing
parts, or sharp edges.
• DO NOT USE toddler booster if
any parts are missing or broken.
• FOLLOW ASSEMBLY
INSTRUCTIONS CAREFULLY.
If you experience any difficulties,
please contact the Customer
Service Department.
• DO NOT substitute parts.
• FALL HAZARD Never move or
lift booster seat with child in it.
• DISCONTINUE USING YOUR
TODDLER BOOSTER should it
become damaged or broken.
• ADULT ASSEMBLY REQUIRED.
• NEVER LEAVE CHILD
UNATTENDED. Always keep your
• PREVENT SERIOUS INJURY OR
child in view in product.
DEATH. Do not use in motor
• PREVENT SERIOUS INJURY OR
vehicles.
DEATH FROM SLIDING OUT,
• DO NOT ADJUST the recline of
FALLS, OR TIPPING OVER.
product with your child in it.
Always use seat belt. Secure your
• ALWAYS USE booster straps to
child at all times with the
attach feeding booster seat to
restraint system provided, either
any chair. Always ensure straps
in the reclining or upright
are pulled tightly.
position.
The tray is not designed to hold
• IF FEEDING BOOSTER SEAT
your child in the product. It is
CANNOT be securely and safely
recommended that the product
attached to the adult chair, do
be used in the upright position
not use feeding booster seat with
only by children capable of
that chair.
sitting upright unassisted.
• THIS FEEDING BOOSTER SEAT
is designed to be used by a child
• NEVER allow a child to push
up to 5 years of age and up to 50
away from table.
lbs (22.7kg).
• USE ONLY Swivi Seat™
toddler booster accessories with
this product.
3
• ALWAYS SECURE CHILD IN
THE RESTRAINT UNTIL CHILD
IS ABLE to get in and out of the
feeding booster without help
(about 2 1/2 years old), the child
should be secured in the feeding
booster seat at all times by the
restraining system. The tray is not
designed to hold the child in the
chair.
• DO NOT USE the booster on a
stool, swivel chair, folding chair
or any other type of chair to
which this booster cannot be
firmly attached. The
recommended type of chair shall
be with four legs, a high
backrest, and a firm seat.
•Use the fully recline position
until infant can hold up head
without help (about 4 months
old).
4
Si no se obedecen estas advertencias y se siguen las instrucciones
de montaje, podría resultar en lesiones graves o la muerte.
• POR FAVOR, CONSERVE EL
MANUAL DEL
PROPIETARIO PARA
UTILIZARLO EN EL FUTURO.
• PREVENGA LESIONES SERIAS
O LA MUERTE CAUSADAS
POR RESBALONES, CAÍDAS,
O TUMBO. Use siempre el
cinturón de seguridad. Asegure
a su niño en todo momento
con el sistema de seguridad
provisto, en la posición vertical
o reclinada.
La bandeja no ha sido diseñada
para mantener a su niño en el
producto. Se recomienda que
niños capaces de sentarse sin
ayuda usen el producto
solamente en la posición
vertical.
• PARA SEGURIDAD DE SU
NIÑO, lea las etiquetas y el
manual del propietario antes de
usar el producto.
• ANTES DE CADA USO.
Inspeccione el asiento para
niños pequeños para determinar
si hay herrajes rotos, juntas
sueltas, piezas que faltan o
bordes filosos.
• NO USE el asiento para niños
pequeños si alguna de las piezas
faltan o están rotas.
• NUNCA deje que un niño se
aparte de la mesa.
• NO sustituya piezas.
• NO FUERCE LA BANDEJA
contra el niño. Use
solamente las dos posiciones de
ajuste. Asegúrese de que ambos
dedos de ajuste están trabados
en las ranuras de los
apoyabrazos.
• FALL HAZARD Never move or
lift booster seat with child in it.
• SE REQUIERE MONTAJE
POR UN ADULTO.
• NUNCA DEJE A SU NIÑO
DESATENDIDO. Siempre tenga
su niño a la vista.
• PELIGRO ESTRANGULACIÓN:
No ponga el producto en
ningún lugar donde haya
cordones, tales como cordones
de persianas, cortinas, teléfonos,
etc.
5
• SIGA LAS INSTRUCCIONES
DE ENSAMBLAJE
CUIDADOSAMENTE. Si
experimenta alguna dificultad,
por favor, contacte al
Departamento de Servicio
al Cliente.
• USE SOLAMENTE accesorios
para rl sdirnyo para niños
pequeños Swivi Seat™ con este
producto.
• HASTA QUE EL NIÑO PUEDA
subirse y bajarse del asiento
para dar de comer sin ayuda (a
los dos años y medio),
SIEMPRE DEBERÁ ESTAR
ASEGURADO AL ASIENTO
para dar de comer en todo
momento por el sistema de
seguridad. La bandeja no ha
sido diseñada para mantener a
su niño en la silla.
• NO USE el asiento sobre una
banqueta, silla giratoria, silla
plegable o cualquier otro tipo
de silla a la que el asiento no
pueda ser sujetado firmemente.
El tipo recomendado de silla
debe tener cuatro patas, un
respaldo alto y un asiento firme.
•Use la posición más
reclinada hasta que el bebé
pueda sostener la cabeza sin
ayuda (aproximadamente a 4
meses de edad).
• DEJE DE USAR SU ASIENTO
PARA NIÑOS PEQUEÑOS en
caso de que esté dañado o roto.
• PREVENGA LESIONES
GRAVES O LA MUERTE. No la
use en vehículos de automotor.
• NO AJUSTE la reclinación del
producto cuando el niño está
sentado.
• USE SIEMPRE las correas del
asiento para sujetar el asiento
para dar de comer a cualquier
silla. Asegúrese siempre de que
las correas estén tirantes.
• SI EL ASIENTO PARA DAR DE
COMER NO se puede asegurar
e instalar con seguridad a una
silla para adultos, no use el
asiento para dar de comer con
dicha silla.
• ESTE ASIENTO PARA DAR DE
COMER ha sido diseñado para
que lo use un niño de hasta 5
años de edad como maximo y
que pese hasta 50 libras
(22,7 kg).
6
Parts list • Lista de las piezas
This model may not include some
features shown below. Check
that you have all the parts for this
model BEFORE assembling your
product. If any parts are missing,
call Customer Service.
Este modelo podría no incluir
algunas de las características que se
indican a continuación. Verifique
que tiene todas las piezas de este
modelo ANTES de armar su
producto. Si falta alguna pieza,
llame al Departamento de Servicio
al Cliente.
No tools required.
No requiere
herramientas.
ALL MODELS • TODOS MODELOS
CERTAIN MODELS • CIERTOS MODELOS
7
Backrest • Respaldo del asiento
1
Insert seat back guides into seat
base.
Inserte las guías del respaldo del
asiento en la base del asiento.
8
2
Rotate seat back until it attaches
to base.
Gire el respaldo del asiento hasta
que se sujete a la base.
SNAP!
¡RUIDO!
9
Seat Pad • Almohadilla del asiento
1
Pull waist straps through openings in
seat pad.
Pase las correas de la cintura a través
de las aberturas en la almohadilla del
asiento.
2
Pull shoulder straps and crotch strap
through openings in seat pad.
Pase la correa de la entrepierna y de
los hombros a través de la abertura en
la almohadilla del asiento.
3
Wrap seat pad over the top of the
infant seat.
Pase la almohadilla del asiento por
arriba del asiento para bebé.
4
Secure seat pad to front of infant seat
as shown.
Asegure la almohadilla del asiento al
frente del asiento para bebé como se
indica.
10
Body Support (certain models)
• Soporte del cuerpo (ciertos modelos)
1
Place body support on top of the seat
pad.
Ponga el soporte del cuerpo arriba de
la almohadilla del asiento.
2
Pull waist straps through openings in
body support.
Pase las correas de la cintura a través
de las aberturas en el soporte del
cuerpo.
3
Pull shoulder straps through openings
in body support.
Pase las correas del hombro a través
de las aberturas en el soporte del
cuerpo.
11
To Use Tray • Para usar la bandeja
Squeeze release levers on each side of
tray, slide tray on seat, and snap into
side tray locks.
1
Apriete las palancas de liberación en
cada costado de la bandeja, deslice la
bandeja sobre el asiento y trabe las
trabas laterales de la bandeja.
SNAP!
¡RUIDO!
2
To release squeeze release levers on
each side of tray and slide off.
Para liberarla, apriete las palancas de
liberación en cada costado de la
bandeja y deslícela.
OR/O
To release push button on front of tray.
Para liberarla, empuje el botón de
adelante de la bandeja.
12
Tray Cover • Tapa de la bandeja
Dishwasher safe.
Se puede lavar en el lavaplatos.
1
Attach tray cover by pushing it down
on the tray.
Instale la tapa de la bandeja
empujándola hacia abajo sobre la
bandeja.
SNAP!
¡RUIDO!
2
To remove pull up on the back of the
tray.
Para sacarla, tire hacia arriba desde
atrás de la bandeja.
13
To Recline Seat • Para recliner el asiento
WARNING
DO NOT adjust the seat recline with
the child in it. Tray must be removed when the seat is in the fully
reclined position.
ADVERTENCIA
NO ajuste la reclinación del
asiento cuando el niño está sentado. Se debe sacar la bandeja cuando el asiento está en la posición completamente reclinada.
1
Press button on front of seat and
push down or pull up to adjust.
Oprime el botón del frente del
asiento y empuje hacia abajo o
tire hacia arriba para ajustarlo.
2
There are 4 recline positions.
Hay 4 posiciones de reclinación.
Tray must be removed when the
seat is in the reclined position.
Se debe sacar la bandeja cuando
el asiento está en la posición
reclinada.
14
To Rotate Seat • Para girar el asiento
WARNING
DO NOT adjust the seat with the
child in it.
ADVERTENCIA
NO ajuste el asiento cuando
el niño está sentado.
Locate one of the handles on the
side of the booster and pull
towards the direction you want
to rotate the seat.
1
OR/O
Ubique una de las manijas en el
costado del asiento y tírela hacia
la dirección en que usted desea
girar el asiento.
2
There are 3 positions.
Hay 3 posiciones.
15
To Secure Child • Para asegurar al niño
WARNING
Falling Hazard: Always use the seat belt.
ADVERTENCIA
Peligro de caída :
Use siempre el cinturón de seguridad.
5 Point Harness • Arnés de 5 puntos
1
4
Use slide adjuster at shoulder and
waist for tighter adjustment.
Use el ajuste deslizable en el
hombro y la cintura para hacer
ajustes más apretados.
2
3
5
16
3 Point Buckle • Hebilla de 3 puntos
To convert to 3-pt harness.
Para convertirlo en un arnés de 3 puntos.
6
8
Use slide adjuster at waist for
further adjustment.
7
Use el ajuste deslizable en la
cintura para hacer ajustes
adicionales.
9
10
17
11
When changing harness strap slots,
MAKE SURE harness straps are
going through same slots in seat
pad and seat back.
The harness straps must go into
slot that is even with or slightly
above the shoulders. Avoid
twisting straps.
Cuando cambia las ranuras de la
correa del arnés, ASEGÚRESE de
que las correas del arnés pasan por
las mismas ranuras en la
almohadilla y el respado del
asiento.
Las correas del arnés deben pasar
por la ranura a la altura o apenas
por encima de los hombros. Evite
doblar las correas.
18
Using as Toddler Booster • Uso como
asiento para niños pequeños
1
Disconnect seat back from base.
2
Remove seat back and pad from
seat base.
Desconecte el respaldo del asiento
de la base.
Saque el respaldo del asiento y la
almohadilla de la base del asiento.
19
Attaching booster seat to chair
• Cómo sujetar el asiento para niños a la silla
Turn infant/toddler feeding
booster seat over.
1
Unfasten clips.
De vuelta el asiento para
dar de comer al bebé/niño
pequeño.
Destrabe las presillas.
20
Place feeding booster on a chair
with no armrests and that has a
back, ensuring that the straps are
hanging freely.
3
Make sure that there are no
extra seatpads or cushions on
the chair that you are using with
the booster.
Ponga el asiento para dar de
comer sobre una silla sin
apoyabrazos que tenga respaldo,
asegurándose de que las correas
cuelgan libremente.
OR
O
Asegúrese de que no haya
almohadones o almohadillas del
asiento sobre la silla que usa con
el asiento.
4
Wrap top straps around back of
seat and secure clip. Tighten by
pulling on the adjustment strap.
Envuelva las correas de arriba
alrededor del respaldo del
asiento y asegúrelas con la traba.
Ajústelas tirando de la correa de
ajuste.
SNAP!
¡RUIDO!
21
Wrap bottom straps around base of
seat and secure clip under the seat.
Tighten by pulling on the loose straps.
CHECK to make sure feeding booster
is securely attached by moving from
side to side.
5
Envuelva las correas de abajo
alrededor de la base del asiento y
asegúrelas con la traba debajo del
asiento. Ajústelas tirando de las correas
flojas.
VERIFIQUE para asegurarse de que el
asiento para dar de comer esté
debidamente sujetado moviéndolo de
lado a lado.
SNAP!
¡RUIDO!
6
Ensure the feeding booster is
attached correctly by pulling
up on it.
Asegure que el asiento para dar
de comer esté sujetado
correctamente tirándolo hacia
arriba.
OR
O
22
To Remove Feeding Booster from Chair • Cómo sacar el asiento para dar de comer
de la silla
WARNING
with the child in it.
DO NOT remove feeding booster seat
FALL HAZARD Never move or lift booster seat with child in it.
ADVERTENCIA NO saque el asiento para dar
de comer con el niño sentado.
PELIGRO DE CAÍDAS: Nunca mueva ni levante el asiento para
niños si el niño está sentado.
1
Unfasten clips on bottom of
seat.
Destrabe las presillas de abajo
del asiento.
2
Unfasten clips from back of
seat.
Destrabe las presillas de atrás
del asiento.
23
Remove feeding booster seat
from chair.
3
Saque el asiento para dar de
comer de la silla.
OR
O
Attach straps to each other
and pull strap to tighten to
seat.
4
Sujete las correas entre ellas y
tírela para sujetar el asiento.
24
Notes • Notas
25
Notes • Notas
26
Care and Maintenance
• FROM TIME TO TIME CHECK YOUR BOOSTER for worn parts,
loose screws, torn vinyl or stitching. Replace or repair the parts as
needed. Use only Graco replacement parts.
• TO CLEAN BOOSTER FRAME, use only household soap and warm
water. NO BLEACH or detergent.
• TO CLEAN REMOVABLE SEAT COVER, Refer to your care tag on
your seat pad for washing instructions. NO BLEACH
or detergent.
Cuidado y mantenimiento
• DE VEZ EN CUANDO, INSPECCIONE SU ASIENTO PARA NIÑOS
para determinar si hay piezas gastadas, tornillos flojos, vinilo o puntos
rotos. Cambie o repare las piezas según sea necesario. Use
solamente las piezas de repuesto Graco.
• PARA LIMPIAR EL ARMAZÓN DEL ASIENTO PARA NIÑOS use
únicamente jabón y agua tibia. NO UTILICE BLANQUEADOR ni
detergente doméstico.
• PARA LIMPIAR LA FUNDA DEL ASIENTO REMOVIBLE, consulte la
etiqueta de cuidado de la almohadilla del asiento para obtener las
instrucciones para el lavado. NO USE BLANQUEADOR ni detergente.
27
Replacement Parts • Warranty Information (USA)
Información sobre la garantía y las piezas de repuesto
(EE.UU.)
In
To
purchase parts or
accessories or for warranty
information in the United
States, please contact us at the
following:
Para comprar piezas o
accesorios o para obtener
información sobre la
garantía en los Estados
Unidos, por favor comuníquese
con nosotros en:
www.gracobaby.com
or/ó
1-800-345-4109
Product Registration (USA)
Registro del producto (EE.UU.)
To register your Graco product from within the U.S.A. visit us
online at www.gracobaby.com/productregistration or return registration
card provided with your product. We currently do not accept product
registrations from those living outside the United States of America.
Para registrar su producto Graco desde dentro de los EE.UU., visítenos
en línea en www.gracobaby.com/productregistration o envíe la tarjeta
de registro provista con su producto. Actualmente no aceptamos
registros de los productos de quienes viven fuera de los Estados
Unidos de América.
28