1
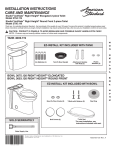
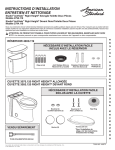
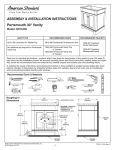
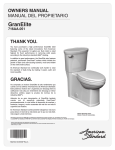
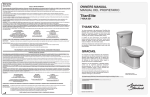
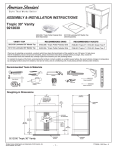
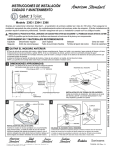
Warranty:
Garantía:
Clean® ActiVate™ Touchless Toilet
Inodoro Sin Contacto Clean® ActiVate™
TOILET LIMITED WARRANTY
This toilet comes with a limited lifetime warranty on chinaware, a limited 5 year warranty on all mechanical parts of the toilet, 1 year warranty on electronic parts and a
limited 1 year warranty on the toilet seat if included with product. If inspection of this AS America, Inc. (“American Standard”) plumbing product, inclusive of the chinaware and
all mechanical parts, confirms that it is defective in materials or workmanship, American Standard will repair or, at its option, exchange the product for the same or a similar model.
This limited warranty applies only to the original purchaser and installation of the products. In the event of a limited warranty claim, proof of purchase will be required
– save sales receipts.
For this warranty to become effective, the warranty registration process must be completed via the internet or telephone per the warranty registration instructions.
701AA.109
This limited warranty does not apply to commercial installations. The warranty for commercial installations is 1 years on chinaware, 1 years on mechanical parts, 1 year warranty on
electronic parts and a limited 1 year warranty on the toilet seat if included with product. OWNERS MANUAL
MANUAL DEL PROPIETARIO
This warranty does not apply to local building code compliance. Since local building codes vary considerably, the purchaser of the product should check with a local building or
plumbing contractor to ensure local code compliance before installation.
This warranty will be void if the product has been moved from its initial place of installation; if it has been subjected to faulty maintenance, abuse, misuse, accident or other
damage; if it was not installed in accordance with American Standard’s instructions; or if it has been modified in a manner inconsistent with the product as shipped by
American Standard.
WARNING: This warranty DOES NOT COVER any damages caused by the use of in-tank cleaners. These products can seriously corrode the fittings in the tank. This damage can
cause leakage and property damage. American Standard will not be responsible or liable for any damage caused by the use of in-tank cleaners.
American Standard’s option to repair or exchange the product under this warranty does not cover any labor or other costs of removal or installation including any costs of any
surrounding material such as tile or marble. American Standard is not responsible for any other incidental or consequential damages attributed to a product defect or to
the repair or exchange of a defective product, all of which are expressly excluded from this warranty. (Some states or provinces do not allow the exclusion or limitation of
implied warranties, so this exclusion may not apply to you.)
This warranty gives you specific rights. You may have other statutory rights that may vary from state to state or province to province, in which case this warranty does not affect
such statutory rights.
In the United States:
American Standard Brands
P.O. Box 6820
Piscataway, New Jersey 08855
Attention: Director of Customer Care
For residents of the United States, warranty
information may also be obtained by calling the
following toll free number: (800) 442-1902
www.americanstandard.com
In Canada:
AS Canada, ULC
5900 Avebury Rd.
Mississauga, Ontario
Canada L5R 3M3
Toll Free: (800) 387-0369
www.americanstandard.ca
THANK YOU.
Welcome to your new high-performance Clean® ActiVate™ touchless toilet,
featuring the latest innovation by American Standard.
ActiVate™ touchless flush technology is the reliable, germ-free no-touch
flush, offering consistent peak performance with each flush.
In Mexico:
American Standard B&K Mexico
S. de R.L. de C.V.
Via Morelos #330
Col. Santa Clara
Ecatepec 55540 Edo. Mexico
PRODUCT FEATURES AND BENEFITS
A FLUSH YOU CAN RELY ON EVERY TIME
Our smart sensor ensures consistent, optimal performance & prevents
unintentional flushes
LONG LASTING 2 YEAR BATTERY LIFE*
Powered by 4 AA batteries (included) & features a low battery indicator
Toll Free: 01-800-839-1200
www.americanstandard.com.mx
*Based on an average of 12 flushes per day
PLEASE COMPLETE AMERICAN STANDARD WARRANTY REGISTRATION PROCESS AND SAVE THIS WARRANTY INFORMATION
IMPORTANT:
CONVENIENT MANUAL FLUSH OPTION
Button is conveniently located on the sensor to manually flush if needed
Registration of the toilet must be completed for this warranty to become effective. Your registration will make it easier to contact you in the event of a product recall.*
POWER-OFF MODE FOR EASE OF CLEANING
Easy 1-step deactivation of sensor avoids unwanted flushes while cleaning
INSTRUCTIONS: Register your toilet at www.americanstandard.com. Please save your proof of purchase (sale receipt).
STAYS CLEANER LONGER WITH EVERCLEAN SURFACE
The smooth sides of the toilet base and EverClean® Surface make it is
easier to clean. EverClean finish is much smoother than ordinary toilet
surfaces and inhibits the growth of stains and odor causing bacteria, mold
and mildew on the surface.
If you need assistance or do not have access to our website, please contact American Standard Customer Care at: (800) 442-1902.
An American Standard representative will assist in completing the warranty registration.
* In California, your warranty rights remain intact even if you do not complete the registration process.
THIS WARRANTY IS NOT TRANSFERABLE FROM ORIGINAL CONSUMER PURCHASER.
GRACIAS.
Bienvenido a su nuevo inodoro sin contacto de alto rendimiento Clean®
ActiVate™, que presenta la última innovación de American Standard.
GARANTÍA LIMITADA DEL INODORO
COMPLETE EL PROCESO DE REGISTRO DE GARANTÍA DE AMERICAN STANDARD Y CONSERVE ESTA INFORMACIÓN DE GARANTÍA
IMPORTANTE:
El registro del inodoro debe concretarse para que esta garantía entre en vigor. El registro facilitará el contacto con usted en el caso del retiro de un producto.*
INSTRUCCIONES: En Estados Unidos, registre su inodoro en www.americanstandard.com. Por favor guarda tu comprobante de compra (ticket de compra).
Si necesitas asistencia o no tienes acceso a nuestra página web, por favor contacta American Standard Customer Care al (800) 442-1902.
Un representante de American Standard te asistirá en completar el registro de la garantía. En México, llame al 01-800-839-1200.
pg
8
*En California, tus derechos de garantía permanecen intactos incluso si no completas el proceso de registro.
ESTA GARANTÍA NO ES TRANSFERIBLE POR EL COMPRADOR ORIGINAL.
La tecnología de descarga sin contacto ActiVate™ es la descarga sin
contacto confiable y libre de gérmenes que ofrece un rendimiento pico
constante en cada descarga.
CARACTERÍSTICAS Y BENEFICIOS DEL PRODUCTO
UNA DESCARGA EN LA QUE PUEDE CONFIAR CADA VEZ
Nuestro sensor inteligente asegura un rendimiento constante y óptimo
y evita descargas involuntarias
LARGA DURACIÓN DE LA BATERÍA DE 2 AÑOS*
Funciona con 4 baterías AA (incluidas) y contiene un indicador de batería baja
*Según un promedio de 12 descargas por día
CONVENIENTE OPCIÓN DE DESCARGA MANUAL
El botón está convenientemente ubicado en el sensor para realizar una
descarga manual de ser necesario
MODO APAGADO PARA UNA LIMPIEZA MÁS FÁCIL
El sensor se desactiva con un solo paso fácil y se evita así las descargas
no deseadas al limpiar
SE MANTIENE LIMPIO MÁS TIEMPO GRACIAS A LA SUPERFICIE
EVERCLEAN
Los lados lisos de la base del inodoro y la superficie EverClean® facilitan
la limpieza. El acabado EverClean es mucho más liso que las superficies
normales de los inodoros e inhibe el crecimiento de manchas y bacterias
que causan olor, de verdín y moho en la superficie.
7302168- 100 Rev. B E N /S P
Este inodoro posee una garantía limitada de por vida para la porcelana, una garantía limitada de 5 años para las partes mecánicas del inodoro, una garantía de 1 año para las
piezas eléctricas y una garantía limitada de 1 año para el asiento del inodoro si se incluye con producto. Si la inspección de este producto de plomería de AS America, Inc. (“American
Standard”), incluidas las piezas de cerámica y todos los componentes mecánicos, confirma defectos en sus materiales o fabricación, American Standard reparará o, cambiará el producto por
un
modelo igual o similar.
Esta garantía limitada se aplica exclusivamente al comprador e instalación originales de estos productos. En caso de que se efectúe un reclamo bajo garantía limitada, será necesario adjuntar
una
demostración de compra; guarde los recibos de compra.
Para que esta garantía entre en vigor, el proceso de finalización de la garantía debe concretarse vía Internet o telefónica según las instrucciones de registro de garantía.
Esta garantía limitada no se aplica a las instalaciones comerciales. La garantía para las instalaciones comerciales es de 1 año para la porcelana, de 1 año para las partes mecánicas, una
garantía de 1 año para las piezas eléctricas y una garantía limitada de 1 año para el asiento del inodoro si se incluye con producto. Esta garantía limitada no se aplica al cumplimiento de las normas de construcción locales. Dado que los códigos de construcción local varían considerablemente, el comprador del producto
debe, antes de la instalación, consultar con su contratista de construcción o plomería local si quiere garantizar el cumplimiento de las normas locales.
Esta garantía será nula si el producto es retirado de su lugar original de instalación; si ha sido sufrido mantenimiento incorrecto, abuso, mal uso, accidentes u otros daños; si no se lo instala de
acuerdo con las instrucciones de American Standard; o si se ha modificado de forma incompatible con el producto enviado por American Standard.
ADVERTENCIA: Esta garantía NO CUBRE ningún daño causado por el uso de limpiadores para el interior del tanque. Estos productos pueden corroer seriamente los accesorios en el tanque.
Este daño puede provocar goteos y daños a la propiedad. American Standard no se hará cargo ni será responsable de ningún daño causado por el uso de limpiadores para el interior
del
tanque.
La opción de American Standard de reparar o cambiar el producto según esta garantía no cubre la mano de obra ni otros costos de extracción o instalación, incluidos los costos de cualquier
material circundante como azulejos o mármol. American Standard no es responsable de ningún otro daño indirecto o fortuito atribuido a defectos en el producto o a las reparaciones
o al recambio de un producto con fallas, por lo que se los excluye expresamente de esta garantía. (Algunos estados o provincias no permiten hacer exclusiones o limitaciones de las
garantías implícitas, de modo que esta exclusión puede no corresponderle.)
Esta garantía le otorga derechos específicos. Los derechos estatales que usted pueda tener y que posiblemente varían de un estado a otro o de una provincia a otra, no quedan afectados por
esta garantía.
En Canadá:
En los Estados Unidos:
En México:
AS Canada, ULC
American Standard Brands
American Standard B&K México
5900
Avebury
Rd.
P.O. Box 6820
S. de R.L. de C.V.
Mississauga, Ontario
Piscataway, New Jersey 08855
Vía Morelos #330
Canadá L5R 3M3
Atención: Director de Servicio al Cliente
Col. Santa Clara
Ecatepec 55540 Edo.México
Número sin cargo: (800) 387-0369
Para los residentes en los Estados Unidos, la
www.americanstandard.ca
información de la garantía puede obtenerse también
Número sin cargo: 01-800-839-1200
llamando al siguiente número sin cargo: (800) 442-1902
www.americanstandard.com.mx
www.americanstandard.com
Product names listed herein are trademarks of AS America, Inc.
Los nombres de productos que aparecen en este documento son marcas comerciales de AS America, Inc.
© AS America, Inc. 2014
7302163-100 Rev. B EN/SP
Model 701AA.109 shown.
Modelo 701AA.109 demostrado.
Rough-In Dimensions: 701AA.109 Clean® ActiVate™ Touchless Toilet
NOTE: Distance from wall to closet flange centerline must be as listed below:
Dimensiones de Ajuste : Inodoro Sin Contacto 701AA.109 Clean® ActiVate™
NOTA: La distancia desde la pared a la línea central de la brida para inodoro debe ser la que se indica a continuación:
GUÍA DE SOLUCIÓN DE PROBLEMAS
FINISHED WALL
PARED TERMINADA
1-1/8"
(29mm)
30-1/4"
(768mm)
8-3/4"
(221mm)
C/L OF SEAT POST
HOLES 5-1/2"
(140mm) CENTERS
LÍNEA CENTRAL DE LOS
AGUJEROS DE MONTAJE
DEL ASIENTO 140mm
(5-1/2" DEL CENTRO)
18-1/2"
(470mm)
2-5/8"
(67mm)
3-1/8"
(81mm)
4-1/2"
(114mm)
No descarga o descarga
con retraso
15-3/4"
(399mm)
12"
(305mm)
13-11/16"
(347mm)
FINISHED
FLOOR
PISO TERMINADO
C/L OF OUTLET
LINEA CENTRAL DE
CONECTOR DEL DESAGUE
g. El inodoro está tapado
30-3/4"
(781mm)
h. El inodoro está en modo bloqueo (se inició la descarga durante
un ciclo ya existente de descarga/llenado)
i. El movimiento de la mano sin contacto fue demasiado rápido
j. El movimiento de la mano sin contacto no fue en el
área de detección del sensor
k. Válvula de suministro de agua cerrada
l. Línea de suministro bloqueada
BACK VIEW (for reference)
VISTA POSTERIOR (para referencia)
6"
(152mm)
12-3/16"
(309mm)
IMPORTANTE: Se requiere suministro de agua en la pared a 2-1/4" u 8" desde la línea central del inodoro (consulte la sección
de preparación). La primera posición sugerida es oculto detrás del inodoro. La geometría del inodoro otorga espacio para
esta instalación. La segunda posición sugerida es a un costado del inodoro. Entre estas dos posiciones, el espacio para el
suministro entre la pared y el inodoro se limita a 4-1/2". En este caso, revise el suministro y las dimensiones de la manguera.
Descarga no deseada
LISTA DE PARTES
PARTS LIST
Parts are determined by toilet tank number which can be found marked inside tank. Las partes se determinan según el número de tanque de inodoro que figura dentro del tanque.
NOTA: "XXX" representa las opciones de color o acabo del accesorio. Especifíquelo al realizar el pedido.
NOTE: "XXX" represents color or trim finish options. Specify when ordering.
DESCRIPTION / DESCRIPTION
735158-400.XXX
Tank Cover
Tapa del tanque
Universal Inlet Valve Assembly
Kit de válvula de entrada universal
Flush Valve Tower Assembly w/ Gasket, Washer & Nut
Conjunto de torre de la válvula de descarga con junta, arandela y tuerca
Hose Assembly w/ Lock Sleeves
Conjunto de manguera con manguitos de seguridad
Flush Valve Float w/ Seal
Flotador de válvula de descarga con empaque
Actuator Less Battery Holder Case
Accionador menos caja de baterías
Battery Holder Case
Caja de baterías
Tank to Bowl Coupling Kit w/ Gasket
Kit de acoplamiento del tanque a la taza con junta
Floor Mounting Hardware Kit - (T-Bolts, Retainers & Screw Knobs)
Kit de ferretería para montaje en el piso (tornillos T, sujetadores y perillas de tornillos)
Bolt Cap Kit - (Includes Covers, Sleeves & Retaining Rings)
Kit de tapas de pernos - (incluye tapas, manguitos y aros de retención)
7381551-401.0070A
7381553-201.0070A
7381549-201.0070A
7381550-201.0070A
7381552-201.0070A
7381147-200.0070A
7381437-200.0070A
7301540-200.XXX0A
pg
2
a. Nivel de agua incorrecto
a. Un nivel de agua demasiado bajo o alto afectará el rendimiento de la descarga y puede causar fugas. Llene el tanque
con agua hasta el nivel correcto, tal como se especifica en la etiqueta ubicada en la parte posterior del tanque.
b. Retire los desechos en la superficie de sellado que causan la fuga.
c. Ajuste la tuerca del vástago para eliminar la fuga.
d. Hay fugas a través del tubo de rebosadero debido que la configuración del flotador de la válvula de
llenado es demasiado alta. Baje la configuración del flotador hasta que la válvula de llenado se vuelva a
llenar hasta el nivel de agua correcto.
a. Conecte la grapa de rellenado al tubo de rebosadero.
PARTS LIST ALSO UNDER TANK LID.
LA LISTA DE PARTES TAMBIÉN ESTÁ DEBAJO DE LA TAPA DEL TANQUE.
a. La grapa o el tubo de rellenado no está instalado en el tubo
de rebosadero
b. Nivel de agua incorrecto
b. Un nivel de agua demasiado bajo o alto afectará el rendimiento de la descarga. Llene el tanque con agua
hasta el nivel correcto, tal como se especifica en la etiqueta ubicada en la parte posterior del tanque.
c. El botón de descarga manual no fue presionado por completo
c. Presione aun más el botón de descarga manual.
a. Movimiento u objeto en el área del sensor
b. Autodescarga
a. Retire el artículo del área de activación del sensor.
b. Cuando no esté en uso, el sistema iniciará una descarga automática cada 12 días.
a. El modo sin contacto está activo (las baterías están
conectadas, el sistema no está APAGADO)
b. El botón manual no fue presionado por completo
c. No hay agua en el tanque
d. La manguera de aire no está conectada
a. Si un usuario intenta presionar el botón manual, el sistema sin contacto reconocerá el movimiento en el
área de activación e iniciará la descarga antes de que el usuario pueda presionar el botón.
b. Presione aun más el botón de descarga manual.
c. Llene el tanque con agua hasta el nivel especificado en la etiqueta ubicada en la parte posterior del tanque.
d. Conecte la manguera de agua con la válvula en un extremo y la unidad de activación en el otro
extremo. Deslice los collares de la manguera sobre los extremos para fijarla en su lugar.
e. Un nivel de agua demasiado bajo o alto afectará el rendimiento de la descarga. Llene el tanque con agua
hasta el nivel correcto, tal como se especifica en la etiqueta ubicada en la parte posterior del tanque.
e. Nivel de agua incorrecto
El LED rojo tiene luz intermitente
durante la descarga
c. Un nivel de agua demasiado bajo o alto afectará el rendimiento de la descarga. Llene el tanque con agua hasta
el nivel correcto, tal como se especifica en la parte posterior del tanque.
d. Conecte la manguera de aire con la válvula en el extremo de la unidad de activación.
e. Llene el tanque con agua hasta el nivel especificado en la etiqueta ubicada en la parte posterior del tanque.
f. La función de encendido/apagado coloca el sensor en modo apagado durante 10 minutos, lo que
permite limpiar el área del baño sin que se descargue constantemente el inodoro sin contacto. La función
se activa tocando el ícono de encendido durante 3 a 6 segundos. Salga del modo encendido/apagado
tocando el ícono de encendido durante 3 a 6 segundos, tal como lo indican los 4 destellos del LED azul.
g. Primero desactive el sensor desconectando el conector de las baterías de la unidad del sensor y use el
botón de descarga manual si necesita descargar después de destapar el inodoro. Una vez que el
inodoro esté destapado, puede volver a conectar el conector de las baterías a la unidad del sensor y
operar el sensor normalmente.
h. Después de iniciar una orden de descarga, el inodoro entrará temporalmente en "modo bloqueo" y no
aceptará otra orden de descarga hasta aproximadamente 35 segundos después. Esto es necesario para
que el sistema realice un ciclo completo de descarga y rellenado.
i. Inicie un movimiento de la mano un tanto más lento dentro del área del sensor.
j. El área de detección del sensor está directamente delante de la cara del sensor y hasta 3 pulgadas
de la superficie.
k. Abra la válvula y deje que el tanque se llene de agua.
l. Cierre el suministro de agua, desconecte la línea de suministro e inspeccione todas las juntas y
arandelas. Vuelva a armar.
a. Queda poca batería.
a. Reemplace las baterías.
a. El sensor está APAGADO
a. Salga del modo APAGADO tocando el ícono de encendido durante 3 a 6 segundos, tal como lo indican
los 4 destellos del LED azul.
El LED azul no tiente luz
intermitente
a. El sistema recibió una orden de descarga y
está ejecutando un ciclo de descarga
a. N/D
El LED brilla rojo y azul
a. El sistema está ejecutando la fase inicial de arranque después
de conectar las baterías
a. N/D Es el comportamiento normal del sensor al iniciarse.
a. Mala conexión con la línea de suministro
b. Mala conexión de la taza al tanque/piso
a. Revise el paso 10 de las instrucciones de instalación.
b. Revise los pasos 3 a 8 del procedimiento de instalación.
a. Anillo de cera no comprimido por completo
b. El piso no está nivelado
a. Vuelva a ajustar las perillas de la taza al piso.
b. Use los calces del inodoro y/o coloque una gota de calafateo alrededor de la base del inodoro.
El LED rojo tiene luz intermitente
constantemente
El inodoro tiene una fuga
La taza del inodoro se balancea
después de la instalación
PL 7302164-100
PART NO. / No DE PIÈCE
No funciona el botón
manual
a. Instale 4 baterías AA alcalinas en la caja de baterías de activación.
b. Reemplace las 4 baterías AA en la caja de baterías de activación con nuevas baterías.
m. Cierre el suministro de agua. Retire la tapa y limpie según las instrucciones de mantenimiento de
Fluidmaster en: http://www._uidmaster.com//valve-runs-non-stop.html
b. Desechos en la superficie de sellado
c. Tuerca de vástago floja
d. El nivel de rellenado del agua es demasiado alto
Descarga parcial
Acción Correctiva
m. Arena o desechos en el control de agua
Fuga
IMPORTANT: Water supply on the wall is required at 2-1/4" or 8" from centerline of the toilet (see rough-in). First suggested
position is hidden behind the toilet. The geometry of the toilet gives space for this installation. The second suggested position is
next to the toilet. Between these two positions, the space for the supply between wall and toilet is limited to 4-1/2". In this case,
check your supply and hose dimensions.
7381125-400.0070A
a. No hay baterías
b. Baterías muertas. Una luz brillará de manera intermitente
cada vez que el sensor se opera para indicar batería baja.
c. Nivel incorrecto de agua en el tanque
d. La manguera de aire no está conectada
e. No hay agua en el tanque
f. El sensor está APAGADO. Una luz roja brillará de manera
intermitente cuando el sensor está APAGADO.
14"
SUPPLY AS
(356mm)
REQUIRED
(position 1 or
position 2)
SUMINISTRO
SEGÚN SE
REQUIERA
(posición 1 ó
posición 2)
16-1/2"
2-1/4"
(419mm)
8"
(57mm)
5-1/2"
(204mm)
(140mm)
7-1/2"
(191mm)
Posible Causa
Problema/Indicador
pg
7
Inside The Box:
Dentro De La Caja:
Troubleshooting Guide
AA
Problem/Indicator
No flush or delayed flush
a. No batteries
b. Dead batteries. A light will blink red every time the
sensor is operated to indicate low battery.
c. Incorrect water level in tank
d. Air Hose not connected
e. No water in the tank
f. Sensor is OFF. A red light will flash when
the sensor is OFF.
g. Toilet is clogged
h. Toilet is in lock out mode (flush command was initiated during an
existing flush/fill cycle)
i. Touchless hand swipe was too fast
j. Touchless hand swipe was not in sensor detection area
k. Water supply valve closed
l. Supply line blocked
m. Sand or debris lodged in water control
Leaking
a. Incorrect water level
b. Debris on sealing surface
c. Loose Shank Nut
d. Refill water level is too high
Partial Flush
Unintended Flush
Manual Button not working
a. Install 4 alkaline AA batteries to the Activation Battery Case.
b. Replace 4 AA batteries in the Activation Battery Case with new batteries.
c. If water level is too low or too high, flush performance is affected. Fill water in the tank to the correct
level, as specified on the back of the tank.
d. Connect Air Hose to the Valve at end of the Activation Unit.
e. Fill the tank with water to the level specified on the label on the back of tank.
f. On/Off feature puts the sensor into an off mode for 10 minutes, allowing one to clean in the bathroom
area without constantly flushing the touchless toilet. Feature is activated by touching the Power Icon for
3-6 seconds. Exit On/Off mode by touching the Power Icon for 3-6 seconds, as indicated by 4 flashes of
the blue LED.
g. First deactivate the sensor by disconnecting the battery connector from the sensor unit and use the
manual flush button if you need to flush after unclogging the toilet. Once the toilet is unclogged, you
can reconnect the battery connector to the sensor unit and operate the sensor normally.
a. If water level is too low or too high, flush performance is affected and leaking may occur.
Fill water in the tank to the correct level, as specified on the label on the back of tank.
b. Remove debris on sealing surface causing the leak.
c. Tighten the Shank nut to eliminate the leak.
d. Leaking occurs through the overflow tube due to the Fill Valve float setting too high. Lower the float
setting until the Fill Valve refills to the correct water level.
a. Motion or object in sensor area
b. Autoflush
a. Remove item from the sensor activation area.
b. When not in use, the system will initiate an automatic flush every 12 days.
a. Touchless Mode is Active (batteries are connected,
system is not in turned OFF)
b. Manual Button is not depressed completely
c. There is no water in the tank
d. Air Hose not connected
a. If a user attempts to press the Manual Button, the Touchless system will recognize motion in the
activation area and initiate the flush before the user is able to press the button.
b. Press the Manual Flush Button in further.
c. Fill the tank with water to the level specified on the label on the back of tank.
d. Connect Air Hose to the Valve at one end and the Activation Unit at the other end. Slide hose collars
over ends to lock in place.
e. If water level is too low or too high, flush performance is affected. Fill water in the tank to the correct
level, as specified on the label on the back of tank.
Red LED flashes during flush
a. Remaining battery power is low.
a. Replace batteries.
Red LED constantly flashing
a. Sensor has been turned OFF
a. Exit OFF Mode by touching the Power Icon for 3-6 seconds, as indicated by 4 flashes of the blue LED.
a. System has received a flush command and is
executing a flush cycle
a. NA
a. System is executing initial boot up phase after batteries
are connected
a. NA. This is normal behavior for the sensor at start up.
a. Poor supply line connection
b. Poor bowl to tank/floor connection
a. Review Step 10 of installation instructions.
b. Review Step 3 through 8 of installation procedure.
a. Wax ring not fully compressed
b. Floor not level
a. Retighten bowl-to-floor knobs.
b. Use toilet shims and/or place a bead of caulk around the base of the toilet.
Blue LED is flashing
LED flashing red and blue
Toilet leaks
Toilet bowl rocks after installation
Empaque De Acoplamiento
Taza A Tanque
Attachment Handles
with Nuts (2)
Manijas De Unión
Con Tuercas
Plastic
Washers (2)
Arandelas Plásticas
Bolt Covers (2)
Bowl-To-Floor Knobs (2)
T-Bolts with Retainer (2)
Wax Ring
Cubrepijas (2)
Perillas De La Taza Al Piso (2)
Tornillos T Con Sujetador
Arillo de Cera
SOLD SEPARATELY
SE VENDE POR SEPARADO
* Asiento De Inodoro
* For seat installation, see
instructions included with seat.
Water Supply Line
Línea de Suministro de Agua
* Para instalar el asiento, revise las
instrucciones incluidas con el asiento .
Before You Start:
For Assistance Call Customer Care at: (800) 442-1902
Antes De Comenzar La Instalación:
Para asistencia llame a Atención al cliente: (800) 442-1902
www.americanstandard-us.com
If Removing An Existing Toilet
Quitando Un Inodoro Existente
Turn Off Water Supply
Cierre el Abastecimiento de Agua
Flush to remove water from
tank; sponge remaining
water from bowl before
removing toilet.
Jale la cadena para sacar
el agua del tanque; absorba
el agua restante con una
esponja antes de quitar el
excusado.
Clean Flange
Placa Limpia
!
Caution: If leaving floor flange open for
more than 1-2 hours, cover flange to
prevent escaping sewer gasses.
Advertencia: si se deja la brida del piso
abierta por más de 1 a 2 horas, cubra la
brida para evitar que los gases del
alcantarillado penetren en el baño.
Installation Instructions:
Instrucciones De Instalación: BACK-TO-BACK INSTALLATION
INSTALACIÓN EN OPOSICIÓN
Depending upon your plumbing and venting conditions, the flow from this toilet in a back-to-back
installation may create a vacuum on the system and draw water from the opposing bowl. The
National Standards Plumbing Code prohibits the use of a cross fitting for drainage as throw over
is possible. The code does approve a directional "Y" style fitting with proper venting to direct the
water downward and away from the other toilet.
Tipo de accesorio recomendado para
instalaciones en oposición.
6
Tank To Bowl Gasket
Baterías AA (4)
* Toilet Seat
Recommended fitting type for
back-to-back installations.
pg
AA
AA Batteries (4)
k. Open valve and allow water to fill tank.
l. Shut off water supply, disconnect supply line and inspect all gaskets and washers.
Reassemble.
m. Shut off water supply. Remove cap and clean as per Fluidmaster maintenance instructions at:
http://www.fluidmaster.com//valve-runs-non-stop.html
c. Manual Flush Button not fully depressed
e. Incorrect water level
AA
h. After a flush command is initiated, the toilet will enter a temporary "lock out mode", and not accept
another flush command until approximately 35 seconds. This is required in order for the system to
complete a full flush & refill cycle.
i. Initiate a slightly slower hand swipe within the sensor area.
j. Sensor detection area is directly in front of the sensor face and up to 3 inches away from the surface.
a. Connect the refill clip to the Overflow Tube.
b. If water level is too low or too high, flush performance is affected. Fill water in the tank to the correct
level, as specified on the label on the back of tank.
c. Press the Manual Flush Button in further.
a. Refill clip/tube is not installed in the Overflow Tube
b. Incorrect water level
AA
Corrective Action
Possible Cause
Según las condiciones de plomería y ventilación, el flujo de este inodoro en una instalación espalda con
espalda puede crear un vacío en el sistema y tomar agua de la taza contraria. El Código Nacional de Normas
de Plomería (National Standards Plumbing Code) prohíbe el uso de un accesorio cruzado para el drenaje,
debido a la posibilidad de rechazo. El código aprueba un accesorio direccional tipo "Y" con una ventilación
adecuada para dirigir el agua hacia abajo y lejos del otro inodoro.
pg
3
1
2
9
3
WATER LEVEL ADJUSTMENT KNOB*
ACTUATOR FACE
CARA DEL ACCIONADOR
Press firmly.
MANUAL FLUSH BUTTON
BOTÓN DE DESCARGA MANUAL
Presionar firmemente.
*See Step 1 of “TO OPERATE TOILET” of
“OPERATIONAL GUIDE” below.
PERILLA DE AJUSTE DEL NIVEL DE AGUA*
*Ver el paso 1 de “PARA OPERAR EL INODORO” de la
“GUÍA DE FUNCIONAMIENTO” más abajo.
POWER ICON
ÍCONO DE ENCENDIDO
FILL VALVE
VÁLVULA DE
LLENADO
HOSE LOCK
COLLARS
COLLARES PARA
FIJAR LA
MANGUERA
TIP: Place 2 pieces of masking tape on floor
(as shown) to help with alignment in step 4.
ACTUATOR
ACCIONADOR
CONSEJO: Coloque 2 trozos de cinta protectora
en el piso (como se muestra) para ayudar con el
alineamiento del paso 4.
4
5
6
AIR HOSE
MANGUERA DE AIRE
AA BATTERY PACK
PAQUETE DE BATERÍAS AA
FLUSH VALVE TOWER
Adjust water level to the water level line
indicated on the back of the tank.
TORRE DE LA VÁLVULA DE DESCARGA
Ajuste el nivel de agua hasta la línea de nivel de
agua indicada en la parte posterior del tanque.
OPERATIONAL GUIDE / GUÍA DE FUNCIONAMIENTO
Apply weight evenly. Do not move after
placement. Water tight seal may break.
Aplique peso de manera uniforme. No lo
mueva después de ubicarlo. Puede
romperse el sellado hermético.
7
Thread, then hand tighten
water supply.
Enrosque y luego ajuste a
mano el suministro de agua.
!
Hand Tighten Only.
Do Not Overtighten.
!
Ajuste a mano únicamente.
No ajuste en exceso.
Ajuste las manijas alternadamente
hasta que el tanque esté en contacto
con la taza. ¡AJUSTE
A MANO ÚNICAMENTE!
4
Step 2) Insert battery tray back into the battery housing and connect sensor plug to battery tray. Sensor will flash red once
followed by 3 consecutive blue flashes.
Paso 2) Inserte la bandeja de las baterías en el compartimiento de las baterías y conecte el enchufe del sensor en la bandeja de las baterías.
El sensor brillará con una luz roja una vez seguida de 3 luces azules intermitentes consecutivas.
Step 1) Turn on water supply. Adjust water level to water level line indicated on the back of the tank by turning Water Level Adjustment Knob on fill valve to move
float cup up or down. Turning knob clockwise raises water level. Turning knob counterclockwise lowers water level.
It is critical that water be filled exactly to specified water level for optimum performance.
el suministro de agua. Ajuste el nivel del agua a la línea de nivel de agua indicada en la parte posterior del tanque girando la perilla de ajuste
* Paso 1) Encienda
del nivel de agua en la válvula de llenado para mover el flotador hacia arriba o hacia abajo. Si gira la perilla en sentido horario, aumentará el nivel
de agua. Si gira la perilla en sentido antihorario, bajará el nivel de agua.
**Para lograr un rendimiento óptimo, es fundamental que el agua tenga exactamente el nivel especificado.
*
TO OPERATE TOILET
PARA OPERAR EL INODORO
!
WARNING: Overtightening of water
supply line nuts could result in
breakage and potential flooding. If
the connection leaks after hand
tightening, replace the supply line.
Do not use any type of sealant on
the water supply connection. Use
of plumber’s putty, pipe dope, or
any other type of sealant will void
the warranty.
ADVERTENCIA: Si aprieta demasiado las
tuercas de la tubería que suministra agua,
puede provocar una rotura y causar una
inundación. Si la conexión tiene una fuga
después de apretar todo a mano, reemplace
el tubo de suministro de agua. No utilice
ninguna clase de sellador en la conexión de
la tubería. El uso de masilla de plomería,
lubricante o cualquier otra clase de sellador
invalidará la garantía.
pg
!
PARA INSTALAR LAS BATERÍAS
(4) Baterías AA ÚNICAMENTE
(NO USE DE 9 VOLTIOS)
Step 1) Lift open rubber battery housing cover, remove battery tray and install 4 alkaline AA batteries into the battery tray.
Paso 1) Abra la tapa del compartimiento de goma de las baterías, retire la bandeja de las baterías e instale 4 baterías AA alcalinas en la bandeja.
Step 3) Route wires through slot in battery housing and close battery housing cover making sure it is secure to prevent corrosion.
Paso 3) Dirija los cables hacia la ranura en el compartimiento de las baterías y cierre la tapa de dicho compartimiento asegurándose de que
esté bien cerrada para evitar la corrosión.
8
Tighten handles alternately until
tank contacts bowl. HAND
TIGHTEN ONLY!
!
TO INSTALL BATTERIES
(4) AA Batteries ONLY
(DO NOT USE 9 VOLT)
* For seat installation, see instructions included with seat.
* Para instalar el asiento, revise las instrucciones incluidas con el asiento.
Step 2) To flush toilet, swipe hand within 3 inches of activation sensor on side of toilet. Sensor will flash blue twice.
Paso 2) Para descargar el inodoro, mueva la mano dentro de 3 pulgadas del sensor de activación en la parte lateral del inodoro. El sensor brillará con una luz azul dos veces.
TO OPERATE ON/OFF FEATURE
On/Off feature puts the sensor into an off mode for 10
minutes, allowing time to clean in the bathroom area
without constantly flushing the touchless toilet.
PARA OPERAR LA FUNCIÓN DE
ENCENDIDO/APAGADO
**La función de encendido/apagado coloca al sensor
en modo apagado durante 10 minutos, lo que permite
limpiar el área del baño sin que se descargue
constantemente el inodoro sin contacto.
Step 1) Feature is activated by touching the Power Icon for 3-6 seconds. Sensor will flash blue twice and then constantly flash red while in this mode.
Paso 1) La función se activa tocando el ícono de encendido durante 3 a 6 segundos. El sensor brillará con una luz azul dos veces y luego brillará de manera
constante con una luz roja mientras siga en este modo.
Step 2) Exit off mode by touching the Power Icon for 3-6 seconds. Sensor will flash blue 4 times.
Paso 2) Salga del modo apagado tocando el ícono de encendido durante 3 a 6 segundos. El sensor brillará con una luz azul 4 veces.
Care and Cleaning
Cuidado y Limpieza
When cleaning your toilet, wash it with mild, soapy water, rinse
thoroughly with clear water and dry with a soft cloth.
Cuando limpie el inodoro, lávelo con agua con jabón suave, enjuague
completamente con agua limpia y seque con un paño suave.
WARNING: Do not use in-tank cleaners. These products can
seriously corrode fittings in the tank. This damage can cause
leakage and property damage. American Standard shall not
be responsible or liable for any damage caused by the use
of in-tank cleaners.
ADVERTENCIA: No use limpiadores dentro del tanque. Esos productos
pueden corroer seriamente los accesorios del tanque. Dicho daño
puede provocar fugas y daños a la propiedad. American Standard no
será responsable civil ni legal por ningún daño provocado por el
uso de limpiadores dentro del tanque.
5
pg