1
CARE & CLEANING, CONT.
OVEN LIGHT
CAUTION:
➢ Disconnect power to range before
replacing light bulb.
➢ Use a dry potholder to prevent possible harm to hands when replacing
bulb.
➢ Be sure bulb is cool before touching bulb.
➢ Do not touch hot bulb with a damp
cloth as this may cause the bulb to
break.
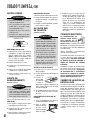
BULB COVER
TO REMOVE:
1. Empty drawer and pull out to the first
stop position.
TO REPLACE WARMING DRAWER:
2. Lift up the front of the drawer.
2. Align
the
glide
on
each side of
the drawer
with the glide
slots on the
range.
3. Pull out to the second stop position.
4. Grasp sides and lift drawer top up and
out.
TO REPLACE:
1. Fit the ends of the drawer glides into
the rails in the range.
2. Lift up the front of the drawer and gently push in to the first stop position.
3. Lift drawer up again and push until
drawer is closed.
WARMING DRAWER
(Select models)
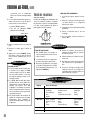
WIRE
RETAINER
TO REPLACE OVEN LIGHT BULB:
1. When oven is cool, hold bulb cover in
place, then slide wire retainer off
cover. NOTE: Bulb cover will fall if not
held in place while removing wire
retainer.
2. Remove bulb cover and light bulb.
3. Replace with a 40 watt appliance bulb.
4. Replace bulb cover and secure with
wire retainer.
5. Reconnect power to the range. Reset
clock.
STORAGE DRAWER
(Select models)
CAUTION:
➢ Do not store plastic, paper products, food or flammable materials
in this drawer. The drawer may
become too warm for these items
when the oven is in use.
CAUTION:
➢ Do not store plastic, paper products, or flammable materials in the
warming drawer. The drawer may
become too warm for these items
when the oven above is in use or
the warming drawer is preheated.
➢ To avoid contact with the warming
drawer heating element, pull drawer all the way out to add or remove
food.
➢ Never use oven cleaners to clean
the warming drawer.
TO REMOVE WARMING DRAWER:
1. Empty drawer and pull out to its full
open position.
2. Locate the black triangle lever on each
side of the drawer.
3. Press the lever down on the right side
and lift the lever up on the left side at
the same time. Then pull drawer out
another inch.
The storage drawer can be removed to
allow you to clean under the range.
4. Carefully pull the drawer all the way
out holding on to the sides, not the
drawer front.
17
1. Pull the bearing glides to the front of
the chassis glide.
3. Push the drawer into the range until
levers “click” (approximately 2 inches).
Pull the drawer open again to seat
bearing glide into position. If you do
not hear the levers “click” or the bearing glides do not feel seated, remove
the drawer and repeat steps 1 through
3. This will minimize possible damage
to the bearing glides.
ELECTRICAL
CONNECTION
Appliances which
require electrical
power are equipped
with a three-prong grounding plug
which must be plugged directly into a
properly grounded three-hole 120 volt
electrical outlet.
Always disconnect power to appliance
before servicing.
The three-prong grounding plug offers
protection against shock hazards. DO
NOT CUT OR REMOVE THE THIRD
GROUNDING PRONG FROM THE
POWER CORD PLUG.
If an ungrounded, two-hole or other type
electrical outlet is encountered, it is the
personal responsibility of the appliance owner to have the outlet replaced
with a properly grounded three-hole
electrical outlet.
OVEN BOTTOM
Protect oven bottom against spillovers, especially acidic or sugary spills, as they may discolor the porcelain enamel. Use the correct
pan size to avoid spillovers and boilovers. Do
not place aluminum foil directly on the
oven bottom.