1
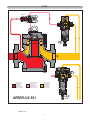
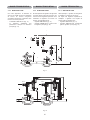
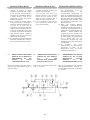
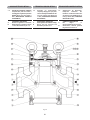
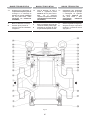
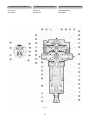
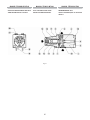
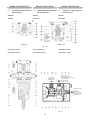
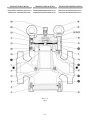
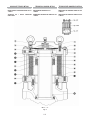
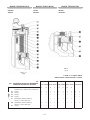
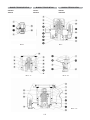
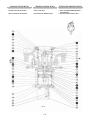
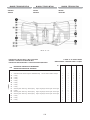
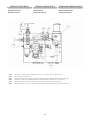
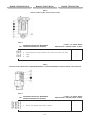
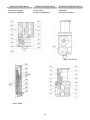
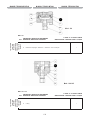
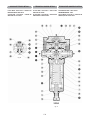
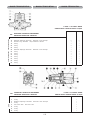
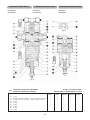
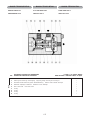
MANUALE TECNICO MT049
TECHNICAL MANUAL MT049
TECHNISCHES HANDBUCH MT049
impulso svitando il dado pos. 44 .
34) Svitare il dado pilota pos. 2 e togliere
lo stesso unitamente alla molla pos.
21 e all'otturatore pos. 17
35) Allentare le viti pos. 24 e togliere la
flangia inferiore pos. 11 , il disco di
protezione pos. 48 e la membrana pos.
16 .
36) Allentare il dado pos. 25 e togliere dal
corpo pilota pos. 4 l'albero della sede
valvola pos. 3 .
37) Controllare attentamente il buono stato
della sede valvola e in particolare il
pistoncino modulante pos. 39 .
38) Sostituire tutti i componenti facenti
parte del kit ricambi.
34) Unscrew the pilot nut, pos. 2 , and
remove it along with the spring, pos.
21 , and the obturator, pos. 17 .
35) Slacken the screws, pos. 24 , and
remove the bottom flange, pos. 11 , the
protection plate, pos. 48 , and the
diaphragm, pos. 16 .
36) Slacken the nut, pos. 25 , and remove
the shaft of the valve seat, pos. 4 ,
from the pilot body, pos. 3 .
37) Carefully check that the valve seat is in
good condition and, in particular, the
modulating piston, pos. 39 .
38) Change all the parts included in the
spare parts kit.
31) Die Schrauben Pos. 44 lösen und
den oberen Pilotreglerflansch Pos.
2 zusammen mit der Feder Pos. 21
abnehmen.
32) Die Impulsmembraneinheit Pos. 44 ,
46 , 49 , 47 , 35 und den Ring
Pos. 35 herausnehmen.
33) Die Impulsmembraneinheit durch
Lösen der Mutter Pos. 44 demontieren.
34) Die Pilotregler - Mutter Pos. 2
abschrauben und sie zusammen mit
der Feder Pos. 21 und dem Stellglied
Pos. 17 abnehmen.
35) Die Schrauben Pos. 24 lösen und den
unteren Flansch Pos. 11 , den
Schutzteller Pos. 48 und die Membrane
Pos. 16 abnehmen.
36) Die Mutter Pos. 25 lösen und vom
Pilotreglergehäuse Pos.
die
4
Ventilsitzwelle Pos. 3 abnehmen.
37) Den Ventilsitz und vor allem den
kleinen Stellkolben Pos. 39 sorgfältig
auf guten Zustand überprüfen.
38) Alle Teile ersetzen, die zum ErsatzteilSet gehören.
REASSEMBLING THE 302/A PILOT
RIMONTAGGIO PILOTA 302/A
39) Rimontare sul corpo pilota pos. 4
l'alberino della sede valvola pos. 3
interponendo il supporto membrana
pos. 5 .
40) Avvitare e stringere il dado pos. 25 .
41) Rimontare sul supporto membrana
pos. 5 la membrana inferiore pos. 16
e il disco di protezione pos. 15 ed
avvitare il dado pos. 25 .
42) Inserire l'otturatore pilota pos. 17 , la
molla pos. 21 ,la membrana pos.
16 e il disco di protezione pos. 48 .
43) Avvitare il dado pilota pos. 2 .
44) Controllare e centrare il supporto
membrana pos. 5 .
45) Rimontare sul corpo pilota pos. 4 la
flangia inferiore pos. 11 e fissare le viti
pos. 24 .
46) Riassemblare il complesso membrana
di impulso avvitando il dado pos. 14 .
47) Rimontare l'anello pos. 12 , il complesso
membrana di impulso, la molla pos.
20 e la flangia superiore pilota pos.
1
e
fissare
le
viti
pos.
23 .
48) Rimontare sul corpo pilota pos. 4 il
manicotto pos. 6 e la staffa pilota
pos. 14 e fissare avvitando le viti
pos. 24 .
49) Posizionare il supporto molla pos. 13 ,
la molla pos. 22 , il supporto molla pos.
7 e fissare il tappo pilota pos. 8 .
SMONTAGGIO VALVOLA DI REGOLAZIONE
FLUSSO AR73
50) Svitare dal manicotto valvola pos. 13 il
tappo filtro pos. 15 .
51) Allentare le viti di fissaggio pos. 9 e
separare il corpo valvola pos. 1 dal
manicotto valvola pos. 13 .
52) Sostituire tutti i componenti facenti
parte del kit ricambi.
39) Reassemble the shaft of the valve seat,
pos. 4 , on the pilot body, pos. 3 ,
with the interposition of the diaphragm
support, pos. 5 .
40) Screw in and tighten the nut, pos. 25 .
41) Reassemble the bottom diaphragm,
pos. 5 , and the protection plate, pos.
16 , on the diaphragm support, pos.
15 , and screw in the nut, pos. 25 .
42) Insert the pilot obturator, pos. 17 , the
spring, pos. 21 , the diaphragm, pos.
16 , and the protection plate, pos.
48 .
43) Screw in the pilot nut, pos. 2 .
44) Check and centre the diaphragm
support, pos. 5 .
45) Reassemble the bottom flange, pos.
4 , on the pilot body pos. 11 and fix
the screws, pos. 24 .
46) Reassemble the impulse diaphragm
assembly, screwing in the nut, pos.
14 .
47) Reassemble the ring, pos. 12 , the
impulse diaphragm assembly, the
spring, pos. 20 , and the pilot top flange,
pos. 1 , and fix the screws, pos. 23 .
48) Reassemble the sleeve, pos. 4 , and
the pilot bracket, pos. 6 , on the valve
body, pos. 14 , and fix by screwing in
the screws, pos. 24 .
49) Position the spring support, pos. 13 ,
the spring, pos. 22 , and the spring
support, pos. 7 , and fix the pilot plug,
pos. 8 .
DISASSEMBLING THE AR73 FLOW
REGULATOR VALVE
50) Unscrew the filter plug, pos. 13 , from
the valve sleeve, pos. 15 .
51) Slacken the fixing screws, pos. 9 , and
separate the valve body, pos. 1 , from
the valve sleeve, pos. 13 .
52) Change all the parts included in the
spare parts kit.
92
WIEDERZUSAMMENBAU PILOT. 302/A
39) Am Pilotreglergehäuse Pos. 4 wieder
die Ventilsitzwelle Pos. 3 mit dem
Membranhalter Pos. 5 dazwischen
montieren.
40) Die Mutter Pos. 25 einschrauben und
festziehen.
41) Auf dem Membranhalter Pos. 5 die
untere Membrane Pos. 16 und den
Schutzteller Pos. 15 aufsetzen und die
Mutter Pos. 25 festschrauben.
42) Das Pilotregler-Stellglied Pos. 17 , die
Feder Pos. 21 , die Membrane Pos.
16 und den Schutzteller Pos. 48
einsetzen.
43) Die Pilotregler - Mutter Pos. 2 fest schrauben.
44) Den Membranhalter Pos. 5 überprüfen und zentrieren.
45) Am Pilotreglergehäuse Pos. 4 den
unteren Flansch Pos. 11 wieder
montieren und die Schrauben Pos. 24
festziehen.
46) Die Impulsmembraneinheit wieder
zusammenbauen und die Mutter Pos.
14 anziehen.
47) Den Ring Pos. 12 , die Impulsmembraneinheit, die Feder Pos. 20
und den oberen Pilotregler-Flansch
Pos. 1 wieder montieren und durch
Festziehen der Schrauben Pos. 23
befestigen.
48) Am Pilotreglergehäuse Pos. 4 die
Buchse Pos. 6 und den PilotreglerHaltebügel Pos. 14 wieder montieren
und durch Festziehen der Schrauben
Pos. 24 befestigen.