1
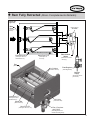
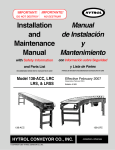
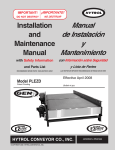
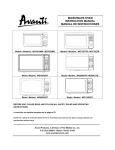
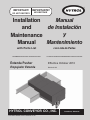
IMPORTANT! ¡IMPORTANTE!
DO NOT DESTROY
NO DESTRUIR
Manual
Installation
de Instalación
and
y
Maintenance
Mantenimiento
Manual
with Parts List
con Lista de Partes
RECOMMENDED SPARE PARTS HIGHLIGHTED IN GRAY
LAS PARTES DE REPUESTO RECOMENDADAS SE RESALTAN EN GRIS
Extenda Pusher
Empujador Extenda
Effective October 2010
Bulletin # 626
HYTROL CONVEYOR CO., INC.
© COPYRIGHT PENDING–HYTROL CONVEYOR CO., INC.
Jonesboro, Arkansas
l Table of Contents
l Tabla de Contenido
INTRODUCTION
Receiving and Uncrating . . . . . . . . . . . . . 3
INTRODUCCIÓN
Recepción y Desembalaje . . . . . . . . . . . 3
INSTALLATION
Assembly . . . . . . . . . . . . . . . . . . . . . . . 4, 5
Electrical Equipment . . . . . . . . . . . . . . . . 6
INSTALACIÓN
Ensamble . . . . . . . . . . . . . . . . . . . . . . 4, 5
Equipo Eléctrico . . . . . . . . . . . . . . . . . . . 6
OPERATION
Sequence of Operation . . . . . . . . . . . . 7, 9
Stroke Length/Proximity Switch
Adjustment . . . . . . . . . . . . . . . . . . . . . 10
Speed (Main Air Pressure) Adjustment 11
OPERACIÓN
Secuencia de Operación . . . . . . . . . . . 8, 9
Longitud de Carrera / Ajuste del
Interruptor de Proximidad . . . . . . . . . . 10
Ajuste de Velocidad
(Presión Principal de Aire ) . . . . . . . . . 11
MAINTENANCE
Maintenance Precautions . . . . . . . . . . .
Preventive Maintenance Checklist . . . .
Trouble Shooting . . . . . . . . . . . . . . . . . .
How to Order Replacement Parts . . . . .
MANTENIMIENTO
Medidas de Seguridad . . . . . . . . . . . . .
Lista del Plan de Mantenimiento . . . . . .
Resolviendo Problemas . . . . . . . . . . . .
Como Ordenar Partes de Repuesto . . .
PARTS DRAWINGS AND LIST
Support Assembly Drawing . . . . . . . . . .
Assembly Drawing - SA-039645 . . . . .
Guide Kit - SA-046607 . . . . . . . . . . . . .
Cylinder Kit - DG-001263 . . . . . . . . . . .
Filter / Regulator Kit . . . . . . . . . . . . . . .
24VDC - DG-001262
120VAC - DG-001333
Valve Kit . . . . . . . . . . . . . . . . . . . . . . . .
24VDC - DG-001293
120VAC - DG-001335
Electrical Connections - 24VDC
DG-001295 . . . . . . . . . . . . . . . . . . . . .
Electrical Connections - 120VAC
DG-001325 . . . . . . . . . . . . . . . . . . . . .
2
12
12
13
14
14
15
16
17
18
19
20
21
DIBUJO Y LISTA DE PARTES
Dibujo de Ensamble del Soporte . . . . .
Dibujo de Ensamble - SA-039645 . . . .
Kit de la Guía - SA-046607 . . . . . . . . . .
Kit del Cilindro - DG-001263 . . . . . . . . .
Equipo Filtro/Regulador . . . . . . . . . . . .
24VCD - DG-001262
120VCA - DG-001333
Kit de Válvula - DG-001293 . . . . . . . . .
24VCD - DG-001293
120VCA - DG-001335
Conexiones Eléctricas - 24VCD
DG-001295 . . . . . . . . . . . . . . . . . . . . .
Conexiones Eléctricas - 120VCA
DG-001325 . . . . . . . . . . . . . . . . . . . . .
12
12
13
14
14
15
16
17
18
19
20
21
INTRODUCTION
INTRODUCCIÓN
This manual provides guidelines and procedures for
installing, operating, and maintaining your Extenda
Pusher. A complete parts list is provided with
recommended spare parts highlighted in gray. Important
safety information is also provided throughout the
manual.
Este manual provee las pautas y los procedimientos
para instalar, operar y mantener su empujador Extenda.
Se proporciona una lista completa de partes, con partes
de repuesto recomendadas que se resaltan en gris.
También se proporciona información importante de
seguridad a lo largo de este manual.
For safety to personnel and for proper operation of your
pusher, it is recommended that you read and follow the
instructions provided in this manual.
Para seguridad del personal y para un funcionamiento
apropiado del empujador, se recomienda que lean y
sigan las instrucciones proporcionadas en este manual.
l Receiving and
l Recepción y
Uncrating
Desembalaje
1. . . Check the number of items received against the
bill of lading.
2. . . Examine condition of equipment to determine if
any damage occurred during shipment.
3. . . Move all crates to area of installation.
4. . . Remove crating and check for optional equipment
that may be fastened to the equipment. Make sure
these parts (or any foreign pieces) are removed.
1. . . Verifique el número de partes recibidas con respecto
al conocimiento de embarque.
2. . . Examine las condiciones del equipo con el fin de
determinar si algún daño ha ocurrido durante el
transporte.
3. . . Traslade todo el equipo al área de instalación.
4. . . Remueva todos los empaques y verifique si hay
partes opcionales que puedan estar atadas al
equipo. Asegúrese de que estas partes (u otras
partes externas) sean removidas.
NOTE: If damage has occurred or freight is
missing, see the “Important Notice” attached to
the crate.
NOTA:
Si algún daño ha ocurrido o falta
cargamento, vea las “Notas Importantes” adheridas
al embalaje.
Inspection Notes:
Notas de Inspección:
3
INSTALLATION
l
Assembly
l
Ensamble
The Extenda Pusher comes completely assembled
except for installing supports, connecting air and electrical
supply, and mounting to conveyor.
El Empujador Extenda viene completamente ensamblado
con excepción de los soportes, las conexiones a las fuentes
eléctricas y de aire, y el montaje al transportador.
If pusher is to be mounted to a new conveyor, install
conveyor as described in the installation and maintenance
manual for the conveyor.
Si el Empujador va a ser instalado en un transportador
nuevo, instale el transportador como se describe en su
propio manual de instalación y mantenimiento.
Instructions for installing the pusher are as follows:
MOUNTING TO CONVEYOR
Las instrucciones para instalar el empujador son las
siguientes:
MONTAJE AL TRANSPORTADOR
1. . . Determine location of the Extenda Pusher by finding
center line of take-away conveyor. (Figure 5A)
2. . . Fasten K-Brackets to conveyor frame as shown in
(Figure 5B). NOTE: If pusher is mounting to bed
type conveyor, the K-Brackets are not required.
3. . . Attach supports to center leg attachment angle and
support angle. (Figure 5C)
4. . . Set pusher in place with bottom of ram face located
1/4 inch min. above conveying surface with 3/8 inch
bolts. (Figure 5B)
5. . . Lag supports to floor. (Figure 5C)
1. . . Encuentre la línea central del transportador receptor de
paquetes para determinar la ubicación del empujador.
(Figura 5A).
2. . . Asugure las ménsulas tipo K al canal del transportador
como se muestra en la Figura 5B. NOTA: Si el empujador
es instalado en un transportador de cama, no se
requieren las ménsulas tipo K.
3. . . Fije los soportes al ángulo de acoplamiento de soporte
central y al ángulo del soporte (Figura 5C).
4. . . Fije el empujador en su lugar con pernos de 3/8
de pulgada, ubicando la parte inferior de la cara del
brazo a mínimo 1/4 de pulgada sobre la superficie del
transportador (Figura 5B).
5. . . Fije los soportes al piso (Figura 5C).
AIR SUPPLY
SUMINISTRO DE AIRE
6. . . Connect main air line to Filter Regulator. (Figure
5A).
7. . . Set working pressure on regulator as described
in the speed adjustment (main air) instructions on
Page 11.
NOTE: See Packing Envelope for maintenance
instructions on How To Adjust and Lubricate
the FRL.
ELECTRICAL
8. . . Install electrical controls and connect to control
boxes. See Pages 6 , 20 and 21.
4
INSTALACIÓN
6. . . Conecte la línea principal de aire al Filtro Regulador
(Figura 5A).
7. . . Fije la presión de trabajo en el regulador principal como
se describe en las instrucciones de ajuste de velocidad
(suministro principal de aire) en la Página 11.
Nota: Vea el Sobre de Empaque para instrucciones
de mantenimiento sobre Como Ajustar y Lubricar
el FRL.
ELÉCTRICOS
8. . . Instale los controles eléctricos y conéctelos a las cajas de
controles. Vea páginas 6 , 20 y 21.
Figure 5A
(Figura 5A)
(Empujador Extenda)
(Retraído)
Extenda Pusher
(Retracted)
(Filtro/Regulador)
Filter Regulator
Center Line
(Línea Central)
Center Line
(Línea Central)
Main Air
Supply
(Suministro Principal
de Aire)
Take-Away
Conveyor
(Transportador
Receptor)
Figure 5B
(Figura 5B)
1/4 in.
K-Bracket
(Ménsula tipo K)
Conveyor Frame
(Canal del Tranportador)
Extenda Pusher
(Retracted)
(Empujador Extenda)
(Retraído)
Main Air In
(Suministro Principal
de Aire)
Figure 5C
(Empujador Extenda)
(Figura 5C)
(Extendido)
Extenda Pusher
(Extended)
Pusher Base
(Base del
Empujador)
Attach Supports
Lag to Floor
(Typ 4 Plcs)
(Fijar al piso)
(Typ Both Sides)
(Fijar los Soportes)
(en dos lados generalmente)
(en cuatro lugares generalmente)
Attach Supports
(Typ Both Sides)
(Fijar los Soportes)
(en dos lados generalmente)
5
l Electrical Equipment
WARNING!
Electrical controls shall be installed and wired
by a qualified electrician. Wiring information for
the controls are furnished by the equipment
manufacturer.
¡ADVERTENCIA!
Los controles eléctricos deben ser conectados
e instalados por un electricista calificado. La
información sobre el cableado de los controles
será proporcionada por el fabricante del equipo.
CONTROLS
CONTROLES
Electrical Code: All motor controls and wiring shall conform
to the National Electrical Code (Article 670 or other
applicable articles) as published by the National Fire
Protection Association and as approved by the American
Standards Institute, Inc.
Código Eléctrico: Todo Equipo Eléctrico y las conexiones
deben ajustarse al “National Electrical Code” (Artículo
670 u otros artículos aplicables) como fue publicado por la
“National Fire Protection Association” y aprobado por el
“American Standards Institute, Inc”.
CONTROL STATIONS
ESTACIONES DE CONTROL
A) Control stations should be so arranged and located that
the operation of the equipment is visible from them, and
shall be clearly marked or labeled to indicate the function
controlled.
A) Las estaciones de control deberán estar arregladas y
ubicadas en lugares donde el funcionamiento del equipo sea
visible y deberán estar claramente marcadas o señaladas
para indicar la función controlada.
SAFETY DEVICES
DISPOSITIVOS DE SEGURIDAD
A) All safety devices, including wiring of electrical safety
devices, shall be arranged to operate in a “Fail-Safe”
manner, that is, if power failure or failure of the device itself
would occur, a hazardous condition must not result.
A) Todos los dispositivos de seguridad, incluyendo la conexión de dispositivos eléctricos, deben estar dispuestos
para operar en una manera de “autoprotección”; es decir,
si se presenta una pérdida de corriente o un fallo en el
mismo dispositivo, esto no debe resultar en una situación
peligrosa.
B) Emergency Stops and Restarts. Conveyor controls
shall be so arranged that, in case of an emergency stop,
manual reset or start at the location where the emergency
stop was initiated, shall be required of the conveyor(s) and
associated equipment to resume operation.
C) Before restarting a conveyor which has been stopped
because of an emergency, an inspection of the conveyor
shall be made and the cause of the stoppage determined.
The starting device shall be locked out before any attempt
is made to remove the cause of stoppage, unless operation
is necessary to determine the cause or to safely remove the
stoppage.
Refer to ANSI Z244.1-1982, American National Standard for
Personnel Protection – Lockout/Tagout of Energy Sources
– Minimum Safety Requirements and OSHA Standard
Number 29 CFR 1910.147 “The Control of Hazardous
Energy (Lockout/Tagout).”
6
l Equipo Eléctrico
B) Paradas de Emergencia y Reactivadores. Los controles
del transportador deberán estar dispuestos de tal manera
que, en caso de una parada de emergencia, se requiera un
activador o un arrancador manual en el lugar donde la parada
de emergencia se presente para reanudar la operación del
transportador o transportadores y el equipo asociado.
C) Antes de reiniciar un transportador que ha sido detenido
por una emergencia, debe realizarse una revisión del
transportador y determinarse la causa de la parada. El
dispositivo de arranque deberá ser bloqueado antes de
intentar corregir el problema, a no ser que la operación del
transportador sea necesaria para determinar la causa de la
parada o para solucionar el problema.
Refiérase al ANSI Z244.1-1982, American National Standard
for Personnel Protection - Lockout/Tagout of Energy Sources
- Minimum Safety Requirements and OSHA Standard
Number 29 CFR 1910.147 “The Control of Hazardous
Energy (Lockout/Tagout).”
OPERATION
l Sequence of Operation
The Extenda Pusher is comprised of a number of pneumatic and electrical parts to sense the position of the
ram. One cycle of the pusher is described in the following sequence. Reference Page 9 (Figure 9A)
1. . . RAM FULLY RETRACTED
When the pusher is in the stand-by mode (retracted), air is supplied through the air valve, port-B to the retract
end of the cylinders, holding the ram in the retracted position. The P2 proximity switch, home position sensor,
is activated.
2. . . SIGNAL TO BEGIN CYCLE
Contact “X” is closed momentarily. (This is the signal from a photo-eye, programmable controller, etc., to activate
the pusher.) The solenoid is energized which shifts air to the valve, Port-A, sending air to the extend end of the
cylinders to begin the cycle. As the ram extends, P2 home proximity switch is de-activated.
NOTE: The length of time for that signal needs to be long enough to clear the home proximity switch.
3. . . BEGINNING OF RETRACT STROKE
As the ram nears the end of the extend stroke, it activates P1, the extend proximity switch, which in turn activates
the solenoid, Port-B, of the air valve. Air is shifted from the extend end of the cylinders to the retract end, causing
the ram to begin the retract stroke. (The ram is reversed before the cylinder is fully extended to cushion the
stroke.)
4. . . END OF RETRACT STROKE
As the ram approaches the end of the retract stroke, it activates P1, which in turn activates the solenoid, Port-A
of the air valve. This sends a burst of air into the extend end of the cylinder, cushioning the impact of the ram as
it returns to the fully retracted position.
NOTE: Some of the cushion air is allowed to exhaust through the air valve and through a flow control
valve, which allows the cushioning action to be adjusted for proper operation. (See Figure 19A)
NOTE:
The above sequence is for the pusher as it is wired at the factory. (See Wiring Diagram on Pages 20 and
21 (Figure 20A and 21A).
CAUTION!
The activation signal must be off before the
extend proximity switch is cleared. A longer
signal will override the retract signal given
by the extend prox, allowing the ram to over
extend and “bottom-out”, possibly damaging
the cylinder.
7
OPERACIÓN
l Secuencia de Operación
El empujador Extenda está compuesto de un número de partes neumáticas y eléctricas para percibir la posición del brazo.
La siguiente secuencia describe un ciclo del empujador. Refiérase a la Página 9. (Figura 9A)
1. . . BRAZO TOTALMENTE RETRAÍDO
Cuando el empujador está en el modo stand-by (retraído), se suministra aire a través de la válvula de aire (Puerto B),
al extremo retractor de los cilindros, manteniendo así el brazo en posición de retracción. El interruptor de proximidad
P2, sensor de la posición de retracción, es activado.
2. . . SEÑAL PARA COMENZAR EL CICLO
El contacto “X” se cierra momentáneamente. (Ésta es la señal de la fotocelda, del controlador programable, etc., para
activar el empujador). El solenoide recibe energía transfiriendo aire a la válvula (Puerto A) y enviando aire al extremo
extensor de los cilindros para comenzar el ciclo. A medida que el brazo se extiende, el interruptor de proximidad P2
es desactivado.
NOTA: El periodo de tiempo para esta señal debe ser lo suficientemente largo para desactivar el interruptor
de proximidad.
3. . . INICIO DE LA CARRERA DE RETRACCIÓN
A medida que el brazo se aproxima al final de la carrera de extensión, éste activa P1 el interruptor de proximidad
de extensión, el cual activa a su vez el solenoide (Puerto B) de la válvula de aire. El aire se transfiere del extremo
extensor de los cilindros al extremo retractor, causando que el brazo comience la carrera de retracción. (El brazo
da marcha atrás antes de que el cilindro se extienda totalmente para amortiguar la carrera.)
4. . . FINAL DE LA CARRERA RETRACCIÓN
A medida que el brazo se aproxima al final de la carrera de retracción, esté activa P1, el cual activa a su vez el
solenoide (Puerto A) de la válvula de aire. Ésto envía una ráfaga de aire dentro del extremo extensor del cilindro,
amortiguando el impacto del brazo a medida que éste vuelve a la posición de total retracción.
NOTA: Parte del aire de amortiguación escapa a través de la válvula de aire y de la válvula de control de flujo,
lo cual permite que la acción de amortiguación sea ajustada para una operación apropiada. (Refiérase a la
Figura 19A).
NOTA:
La secuencia anterior es para el empujador cuya conexión ha sido hecha en la fábrica. (Vea el Diagrama de
Conexión de las Páginas 20 y 21, Figuras 20A y 21A).
¡CUIDADO!
La señal de activación debe estar apagada
antes de que el interruptor de proximidad
de extensión sea desactivado. Una señal de
activación de larga duración puede anular la
señal de retracción dada por el interruptor
de proximidad de extensión, haciendo con
que el brazo se sobre extienda causando un
posible daño en el cilindro.
8
l Ram Fully Retracted
(Brazo Completamente Retraído)
Figure 9A
(Figura 9A)
Ram
Face
Válvula de Aire
Air Valve
(Cara del
Brazo)
B
A
Sensor Bar (Barra Sensora)
Extend Prox P1
(Interruptor de Prox.
de Extensión P1)
Flow Control
Valves
Home Prox P2
(Interruptor de
Prox. P2)
(Válvulas de Control
de Flujo)
Ram
(Brazo)
Air Cylinders
(Cilindros de Aire)
Filter/Regulator
(Filtro/Regulador)
Main Air
Supply
(Suministro Principal de Aire)
Extend Prox P1
(Interruptor de Prox.
de Extensión P1)
Air Valve
Sensor Bar
(Válvula de Aire)
(Barra Sensora)
Home Prox P2
(Interruptor de Prox. P2)
Filter / Regulator
with E-Stop
(Filtro/Regulador con
Parada de Emergencia)
9
lStroke Length/Proximity
lLongitud de Carrera / Ajuste
The Extenda Pusher is available in four stroke lengths: 16”,
22”, 28” and 34”. The stroke length may be set at any point
within the range of each model. Stroke may be varied by
adjusting the extend proximity switch (P1). This procedure,
as well as other adjustments required to set the proximity
switches, are described below.
El Empujador Extenda está disponible en cuatro rangos de
longitud de carrera: 16”, 22”, 28” y 34”. La longitud de carrera se
puede fijar en cualquier punto dentro del rango de cada modelo.
La carrera se puede modificar mediante el ajuste del interruptor
de proximidad de extensión (P1). Este procedimiento, como
otros ajustes requeridos en los interruptores de proximidad, se
describen a continuación.
AJUSTE DE LA LONGITUD DE CARRERA (P1)
1. . . Afloje un poco los tornillos de la placa de montaje del
interruptor. (Figura 10AA)
2. . . Deslice el interruptor en las ranuras de la cama del
empujador para ajustar la carrera: hacia el transportador
para aumentar la carrera y alejándose del transportador
para disminuirla. (Figura 10A)
3. . . Revise el ajuste de la carrera colocando el empujador en
marcha por un ciclo. Si se requiere un ajuste adicional,
repita el paso 2.
4. . . Apriete los tornillos de la placa de montaje del interruptor.
(Figura 10AA)
Switch Adjustment
STROKE LENGTH ADJUSTMENT (P1)
1. . . Loosen the switch mounting nuts slightly. (Figure
10AA).
2. . . Slide the switch in the slots in the pusher bed to adjust
stroke: toward conveyor to increase stroke, away from
conveyor to decrease. (Figure 10A)
3. . . Check the stroke setting by cycling the pusher.
If further adjustment is needed, repeat Step 2.
4. . . Tighten the switch mounting nuts. (Figure 10AA)
HOME PROXIMITY SWITCH ADJUSTMENT (P2)
1. . . If the Home Proximity Switch needs adjustment, follow
steps 1 through 4 above.
del Interruptor de Proximidad
ADJUSTE DEL INTERRUPTOR DE PROXIMIDAD (P2)
1. . . Si el interruptor de proximidad requiere ajuste, siga los
pasos del 1 al 4 mencionados anteriormente.
Figure 10A
Mounting Nuts
(Figura 10A)
Adjustment Slot
(Tornillos de
Montaje)
Inc
re
(Ranura de ajuste)
as
eS
Figure 10AA
tro
ke
(Figura 10AA)
(P1)
Prox Switch
(Interruptor de
Proximidad)
Pusher Base
(Base del Empujador)
(P2)
Adjustment Slot
(Ranura de ajuste)
VERTICAL ADJUSTMENT (ALL SWITCHES)
1. . . Close air supply valve and disconnect power supply.
Remove plastic guards. NOTE: The guard is held in
place by 4 fasteners. (Figure 11A)
2. . . Manually position the ram so that the sensor bar is
directly above the switch.
3. . . Loosen the jam nuts on the switch.(Figure 10AA)
Position the switch so that there is a 1/4” gap between
the switch and the sensor bar. (Figure 11A). Tighten
the jam nuts securely.
10
AJUSTE VERTICAL (TODOS LOS INTERRUPTORES)
1. . . Cierre la válvula de aire y desconecte la fuente de poder.
Remueva la guardas plásticas.NOTA:La guarda se ajusta
en su lugar con cuatro aseguradores (Figura 11A).
2. . . Posicione manualmente el brazo de manera que la barra
sensora quede directamente sobre el interruptor.
3. . . Afloje las contratuercas del interruptor. (Figura 10AA)
Posicione el interruptor de manera que quede un espacio
de 1/4” entre el interruptor y la barra sensora. (Figura 11A).
Apriete las contratuercas firmemente.
Figure 11A
(Figura 11A)
Plastic Guard
(Guarda Plástica)
Prox Switch
(Interruptor de Prox)
Sensor Bar
(Barra Sensora)
1/4 inch
Cover Fasteners
(Typ. Both Sides)
(Aseguradores de la Cubierta)
(Generalmente en dos Lados)
l Speed (Main Air
Pressure) Adjustment
l Ajuste de Velocidad
(Presión Principal de Aire)
Pusher speed (cycle time) will vary depending on the weight
of the product being pushed. However, speed (and impact
force) may be controlled by adjusting the main pressure
regulator. The following procedure is suggested to set
the proper operating pressure for your particular range of
product weights. NOTE: Flow Control Valve may require
adjustment after main pressure change.
La velocidad del empujador (tiempo del ciclo) puede variar
dependiendo del peso del producto a ser empujado. Sin
embargo, la velocidad (y la fuerza del impacto) se puede
controlar ajustando el regulador de presión principal. Se
recomienda el siguiente procedimiento para establecer la
presión de operación apropiada para el rango específico de
peso de sus productos. NOTA: Si la presión principal cambia,
la válvula de control de flujo puede requerir ajuste.
IF YOUR PRODUCT WEIGHT IS CONSISTENT (± 5 lbs.):
1. . . Set pressure at 80 PSI and adjust as needed.
2. . . Place product on conveyor and operate pusher.
a) If pusher “throws” product or causes product to
tumble, decrease pressure approximately 10 PSI, and
adjust flow control valve Port A to decrease air flow
and repeat test. Port B is typically opened to maximum
setting. (Figure 9A)
b) Repeat until desired pushing action is achieved.
NOTE: Recommended pressure range: 60 to 80 PSI.
IF YOUR PRODUCT WEIGHT VARIES CONSIDERABLY:
1. . . Set pressure at 80 PSI and adjust as needed.
2. . . Select heaviest product and set pressure as described
in Step 2 above. Select the lowest pressure that will
push the product at the required speed.
3. . . Select the lightest product and test. If pushing action
is unacceptable:
a) If possible, decrease the difference in product
weights. (This applies to order picking operations using
totes, etc.)
b) Vary main pressure as described above to find the
pressure that works best for most product weights.
SI EL PESO DE SU PRODUCTO ES CONSISTENTE (± 5 lbs.):
1. . . Fije la presión en 80 PSI y ajuste como sea necesario.
2. . . Coloque el producto sobre el transportador y opere el
empujador.
a) Si el empujador “arroja” el producto o provoca
que el producto ruede, disminuya la presión 10 PSI
aproximadamente, ajuste la válvula de control de flujo
(Puerto A) para disminuir el flujo de aire y repita la
prueba. Generalmente, el (Puerto B) está completamente
abierto en el máximo nivel. (Figura 9A)
b) Repita hasta que se obtenga la acción de empuje
deseada. NOTA: Rango de presión recomendado: 60
a 80 PSI.
SI EL PESO DEL PRODUCTO VARIA CONSIDERABLEMENTE
1. . . Fije la presión en 80 PSI y ajuste como sea necesario.
2. . . Seleccione el producto más pesado y fije la presión como
se ha descrito previamente en el Paso 2. Seleccione la
presión más baja que empuje el producto a la velocidad
requerida.
3. . . Seleccione el producto más liviano y pruebe. Si la acción
de empuje es inaceptable:
a) Si es posible, disminuya la diferencia de peso entre
productos. (Esto aplica en operaciones de selección de
ordenes usando contenedores plásticos, etc.)
b) Ajuste la presión principal como se describe previamente
para encontrar la presión que funcione mejor con la
mayoría de pesos de los productos.
11
MAINTENANCE
l Maintenance Precautions
MANTENIMIENTO
l Medidas en el
Mantenimiento
A) Maintenance, such as lubrication and adjustments shall
be performed only by qualified and trained personnel.
A) El mantenimiento, tal como lubricación y ajustes, deberá
B) It is important that a maintenance program be established
to insure that all conveyor components are maintained in a
condition which does not constitute a hazard to personnel.
B) Es importante que se establezca un programa de
mantenimiento para asegurar que todos los componentes
del transportador sean mantenidos en condiciones que no
constituyan un peligro para el personal.
C) When a conveyor is stopped for maintenace purposes,
starting devices or powered accessories shall be locked
or tagged out in accordance with a formalized procedure
designed to protect all persons involved with the conveyor
against an unexpected start. Reference (Figure 18A).
D) Replace all safety devices and guards before starting
equipment for normal operation.
E) Whenever practical, DO NOT lubricate conveyors while
they are in motion. Only trained personnel aware of the
hazard of the conveyor in motion shall be allowed to
lubricate.
Safety Guards
Maintain all guards and safety devices IN POSITION and
IN SAFE REPAIR.
Warning Signs
Maintain all warning signs in legible condition and obey all
warnings. See SAFETY MANUAL for examples of warning
signs
ser realizado solamente por personal calificado y entrenado.
C) Cuando un transportador esta parado por razones de
mantenimiento, los dispositivos de arranque o accesorios
motorizados deberán ser asegurados o desconectados
conforme a un procedimiento formalizado, diseñado para
proteger a toda persona o grupos involucrados con el
transportador de un arranque inesperado. (Figura 18A)
D) Antes de poner en marcha el equipo en una operación
normal, vuelva a colocar todos los dispositivos de seguridad y
las guardas.
E) Siempre que sea práctico, NO lubrique los transportadores
mientras se encuentren en movimiento. Solo el personal
entrenado que tenga conocimiento de los peligros del
transportador en movimiento, se le permitirá hacer la
lubricación.
Protecciones De Seguridad
Mantenga todas las guardas y dispositivos de seguridad EN
SU POSICIÓN y EN BUENAS CONDICIONES.
Señales De Advertencia
Mantenga todas las señales de advertencia en buenas
condiciones y obedézcalas. Remítase a la “SAFETY MANUAL”
para ver ejemplos de señales de advertencia.
l Preventive Maintenance
l Lista del Plan de
DAILY
1. . . Check air pressure in regulator, See Instructions on
DIARIAMENTE
Checklist
Page 11.
2. . . Check for water in filter bowl. Drain when water level
reaches the lower baffle.
3. . . Check for excessive noise or vibration during
operation.
WEEKLY
1. . . Check cylinder rod for dirt build-up. Clean as needed.
MONTHLY
1. . . Check ram guides for wear. Clean off excess dirt buildup.
12
Mantenimiento
1. . . Revise la presión de aire en el regulador. Vea instrucciones
en la Página 11.
2. . . Revise el agua en el recipiente del filtro. Vacíe cuando el
nivel del agua alcance el punto más bajo del desviador.
3. . . Revise si se produce ruido o vibración excesiva durante
la operación.
SEMANALMENTE
1. . . Revise si se ha acumulado suciedad en la barra del
cilindro. Limpie si es necesario.
MENSUALMENTE
1. . . Revise si se han desgastado las guías del brazo. Retire
la suciedad que se haya acumulado.
l
Trouble Shooting
TROUBLE
Pusher will not activate.
SOLUTION
CAUSE
1) No power to pusher
2) Air loss to pusher
3) No activation signal to pusher
Pusher stroke too long or hits hard on extend 1) Extend proximity switch too close to front stroke.
of pusher
2) Activation signal too long
1) Check power source.
2) Check air supply.
3) Check signal source.
1) Adjust proximity switch. (See Page 10).
2) Decrease activation signal time. (200 milliseconds maximum).
Pusher stroke too short.
1) Extend proximity switch too close to rear
of pusher
1) Adjust proximity switch. (See Page 10).
Little or no cushion on retract stroke.
1) Cushion “bleed-off” needs adjustment
2) Home proximity switch out of adjustment
1) Adjust cushion “bleed-off”. (See Page 11).
2) Adjust proximity switch. (See Page 10).
Ram “bounces” at end of retract stroke or 1) Cushion “bleed-off” needs adjustment
remains partially extended.
1) Adjust cushion “bleed-off”. (See Page 11).
Pusher is sluggish; may not push product.
1) Adjust main regulator. (See Page 11).
1) Main regulator pressure too low
Pusher hits hard in both directions, may hit 1) Main regulator pressure too high
package too hard.
1) Adjust main regulator. (See Page 11).
Ram extends completely, hits hard, and 1) Extend proximity switch out of adjustment
remains extended.
2) Extend signal excessive
1) Adjust proximity switch. (See Page 10).
2) Adjust signal duration
l
Resolviendo Problemas
PROBLEMA
CAUSA
SOLUCIÓN
El empujador no se activa.
1) El empujador no recibe poder.
2) Pérdida de aire al empujador.
3)No hay señal de activación al empujador.
1) Revise la fuente de poder.
2) Revise la fuente de aire.
3) Revise el origen de la señal.
La carrera del empujador es demasiado larga
o golpea fuerte en la carrera de extensión.
1) El interruptor de proximidad del extensor
está demasiado cerca a la parte delantera
del empujador.
2)La señal de activación es demasiado larga.
1) Ajuste el interruptor de proximidad. (Ver Pág. 10).
La carrera del empujador es demasiado
corta.
1) El Interruptor de proximidad del extensor
está demasiado cerca a la parte trasera
del empujador.
1) Ajuste el interruptor de proximidad. (Ver Pág. 10).
Poco o nada de amortiguación en la carrera
de retracción.
1) La descarga de amortiguación necesita
ajuste.
2) El Interruptor de Proximidad está
desajustado
1) Ajuste la descarga de amortiguación. (Ver Pág. 11)
Brazo “rebota” al final de la carrera de
retracción o permanece parcialmente
extendido.
1) La descarga de amortiguación necesita
ajuste.
1) Ajuste la descarga de amortiguación. (Ver Pág. 11)
El empujador está lento; no empuja el
producto.
1) La presión del regulador principal es
demasiado baja.
1) Ajuste el regulador principal. (Ver Pág. 11)
El empujador golpea fuerte en ambas
direcciones. Puede golpear el producto
demasiado fuerte.
1) La presión del regulador principal es
demasiado alta.
1) Ajuste el regulador principal. (Ver Pág. 11)
El brazo se extiende completamente, golpea
fuerte y permanece extendido.
1) El interruptor de proximidad de extensión
está desajustado.
2) Señal de extensión excesiva.
1) Ajuste el interruptor de proximidad. (Ver Pág. 10)
2) Disminuya el tiempo de activación de la señal.
(200 milisegundos máx.)
2) Ajuste el Interruptor de Proximidad. (Ver Pág. 10)
2) Ajuste la duración de las señal de extensión.
13
l How to Order
l Como Ordenar
Included in this manual is a parts drawing with a complete
replacement parts list. When ordering replacement parts,
please refer to the ordering procedure below:
Dibujos de las partes y listas completas de las partes
de repuesto están incluidos en este manual. Cuando
ordene partes de repuesto, por favor refiérase al siguiente
procedimiento:
1. . . Contact Distributor from which equipment
was originally purchased or nearest HYTROL
Distributor.
2. . . Provide Distributor with the model and the part
description and number from Parts List.
3. . . Advise if you are in a breakdown situation, so
expedited service is provided.
1. . . Contacte al Distribuidor que le vendió el equipo
Partes de Repuesto
Replacement Parts
originalmente o al distribuidor de Hytrol más
cercano.
2. . . Proporcione al Distribuidor el modelo y la descripción
de la parte y el número que aparece en la Lista de
Partes.
3. . . Informe si se encuentra en una situación crítica para
prestarle el servicio lo más rápido posible.
lSupport Assembly Drawing (Dibujo de Ensamble de Soporte)
Figure 14A
(Figura 14A)
A
Mounting Holes
PW = Extenda Pusher Width (Ancho del Empujador Extenda)
(Huecos de Montaje)
FH = Support Frame Height (Altura de Estructura del Soporte)
A = Support Frame Width (Ancho de Estructura del Soporte)
B = Dist. Floor to Top Mount Hole (Dist. del Piso al Tope del Hueco de Montaje)
C = Foot Assembly Height (Altura del Ensamble del Pie del Soporte)
14
PW
FH
A
B
C
ITEM #1
ITEM #2
18 in.
24 in.
30 in.
36 in.
6 in.
6 in.
6 in.
6 in.
20 in.
23 in.
26 in.
29 in.
6-7/8 in. to 9-7/8 in.
6-7/8 in. to 9-7/8 in.
6-7/8 in. to 9-7/8 in.
6-7/8 in. to 9-7/8 in.
5-1/8 in.
5-1/8 in.
5-1/8 in.
5-1/8 in.
G-00609-020
G-00609-023
G-00609-026
G-00609-029
G-00611
G-00611
G-00611
G-00611
18 in.
24 in.
30 in.
36 in.
9 in.
9 in.
9 in.
9 in.
20 in.
23 in.
26 in.
29 in.
9-7/8 in. to 12-7/8 in.
9-7/8 in. to 12-7/8 in.
9-7/8 in. to 12-7/8 in.
9-7/8 in. to 12-7/8 in.
7-1/4 in.
7-1/4 in.
7-1/4 in.
7-1/4 in.
G-00610-020
G-00610-023
G-00610-026
G-00610-029
G-00613
G-00613
G-00613
G-00613
18 in.
24 in.
30 in.
36 in.
12 in.
12 in.
12 in.
12 in.
20 in.
23 in.
26 in.
29 in.
12-7/8 in. to 15-7/8 in.
12-7/8 in. to 15-7/8 in.
12-7/8 in. to 15-7/8 in.
12-7/8 in. to 15-7/8 in.
7-1/4 in.
7-1/4 in.
7-1/4 in.
7-1/4 in.
G-00616-020
G-00616-023
G-00616-026
G-00616-029
G-00613
G-00613
G-00613
G-00613
18 in.
24 in.
30 in.
36 in.
15 in.
15 in.
15 in.
15 in.
20 in.
23 in.
26 in.
29 in.
15-7/8 in. to 18-7/8 in.
15-7/8 in. to 18-7/8 in.
15-7/8 in. to 18-7/8 in.
15-7/8 in. to 18-7/8 in.
7-1/4 in.
7-1/4 in.
7-1/4 in.
7-1/4 in.
G-00617-020
G-00617-023
G-00617-026
G-00617-029
G-00613
G-00613
G-00613
G-00613
18 in.
24 in.
30 in.
36 in.
18 in.
18 in.
18 in.
18 in.
20 in.
23 in.
26 in.
29 in.
18-7/8 in. to 24-7/8 in.
18-7/8 in. to 24-7/8 in.
18-7/8 in. to 24-7/8 in.
18-7/8 in. to 24-7/8 in.
10-1/4 in.
10-1/4 in.
10-1/4 in.
10-1/4 in.
G-00618-020
G-00618-023
G-00618-026
G-00618-029
G-00614
G-00614
G-00614
G-00614
18 in.
24 in.
30 in.
36 in.
24 in.
24 in.
24 in.
24 in.
20 in.
23 in.
26 in.
29 in.
24-7/8 in. to 30-7/8 in.
24-7/8 in. to 30-7/8 in.
24-7/8 in. to 30-7/8 in.
24-7/8 in. to 30-7/8 in.
10-1/4 in.
10-1/4 in.
10-1/4 in.
10-1/4 in.
G-00619-020
G-00619-023
G-00619-026
G-00619-029
G-00614
G-00614
G-00614
G-00614
18 in.
24 in.
30 in.
36 in.
30 in.
30 in.
30 in.
30 in.
20 in.
23 in.
26 in.
29 in.
30-7/8 in. to 42-7/8 in.
30-7/8 in. to 42-7/8 in.
30-7/8 in. to 42-7/8 in.
30-7/8 in. to 42-7/8 in.
18-3/8 in.
18-3/8 in.
18-3/8 in.
18-3/8 in.
G-00620-020
G-00620-023
G-00620-026
G-00620-029
G-00615
G-00615
G-00615
G-00615
FH
B
C
5/8 Min.
Frame Assembly
(Ensamble de la Estructura)
1
2
Foot Assembly
(Ensamble del Pie)
ITEM QTY
DESCRIPTION
PART NUMBER
1
1 HS SUPT FRAME WELDMENT SEE CHART
2
2
HS FOOT WELDMENT
SEE CHART
PARTS DRAWING AND LIST
(DIBUJO y LISTA de PARTES)
l Assembly Drawing - SA-039645
(Dibujo de Ensamble)
Figure 15A
(Figura 15A)
9
(Not Shown)
10
25 24
REF #
1
2
3
----4
----5
----6
--7
----8
---
PART #
092.1639
923.0089
-928.00291
928.029
928.00292
928.00293
-928.00301
928.0030
928.00302
928.00303
-928.00311
928.0031
928.00312
928.00313
-DG-001262
DG-001333
-DG-001263-018
DG-001263-024
DG-001263-030
DG-001263-036
-DG-001293
DG-001335
DESCRIPTION
Rubber Vibration Mount - 3/4 in. Dia. X 3/8 in. Thick
Bumper
Primary Guard (Specify Stroke)
16 in. Stroke
22 in. Stroke
28 in. Stroke
34 in. Stroke
Secondary Guard (Specify Stroke)
16 in. Stroke
22 in. Stroke
28 in. Stroke
34 in. Stroke
Base Guard (Specify Stroke)
16 in. Stroke
22 in. Stroke
28 in. Stroke
34 in. Stroke
Filter Regulator Kit
24VDC
120VAC
Cylinder Kit (Specify Stroke)
16 in. Stroke
22 in. Stroke
28 in. Stroke
34 in. Stroke
Valve Kit
24VDC
120VAC
REF #
9
--10
11
12
13
14
15
16
17
18
19
----20
21
----22
23
24
25
PART #
-DG-001295
DG-001325
G-00571
PT-103684
PT-103685
PT-103687
PT-103699
PT-105363
PT-105726
PT-108204
PT-108723
-SA-046607-018
SA-046607-024
SA-046607-030
SA-046607-036
WA-030921
-WA-030922-018
WA-030922-024
WA-030922-030
WA-030922-036
091.109
094.1141
See Page 14
See Page 14
DESCRIPTION
Electrical Connections
24VDC
120VAC
K-Bracket (Specify Conveyor Model)
Valve Mounting Bracket (Hidden)
Primary Ram Channel
Secondary Ram Channel
Valve Cover
Ram Face - 8 in. x 24 in.
Cylinder Block
Center Leg Attachment Angle
Support Angle
Guide Kit (Specify Stroke)
16 in. Stroke
22 in. Stroke
28 in. Stroke
34 in. Stroke
Rear Secondary Brace Weldment
Base Weldment (Specify Stroke)
16 in. Stroke
22 in. Stroke
28 in. Stroke
34 in. Stroke
Cable Tie - 5-1/2 in. Long (Not Shown)
Push Button (Not Shown)
Support Frame Weldment (Specify Stroke)
Support Foot Weldment
15
l Guide Kit - SA-046607
(Kit de la Guía)
Figure 16A
(Figura 16A)
6
Aluminum Profile
(Perfil de Aluminio)
1
Aluminum Profile
(Perfil de Aluminio)
Linear Bearing
(Cojinete Linear)
3
Sensor Bar
(Barra Sensora)
2
4
7
5
UHMW Guide
(Guia UHMW)
See Page 14 for Information on How to Order Replacement Parts
Vea la Página 14 para Información sobre Como Ordenar Partes de Repuesto
Recommended Spare Parts highlighted in Gray
Las Partes de Repuesto Recomendadas se Resaltan en Gris
16
Ref.
No.
1
2
3
4
----5
-----
Part
No.
096.115
928.0012
928.0014
-928.00261
928.0026
928.0010
928.00263
-928.00281
928.0028
928.0019
928.00282
Description
Locktite
Double Flange Linear Bearing
T-Nut - 1/4-20
Aluminum Profile - 1530 T-Slotted
17-1/4 in. Long - 16 in. Stroke
20-1/4 in. Long - 22 in. Stroke
23-1/4 in. Long - 28 in. Stroke
26-1/4 in. Long - 34 in. Stroke
UHMW Guide
17-1/4 in. Long - 16 in. Stroke
20-1/4 in. Long - 22 in. Stroke
23-1/4 in. Long - 28 in. Stroke
26-1/4 in. Long - 34 in. Stroke
Ref.
No.
6
----7
-----
Part
No.
-928.00262
928.0027
928.0011
928.00264
-PT-106740-018
PT-106740-024
PT-106740-030
PT-106740-036
Description
Aluminum Profile - 1530 T-Slotted
18 in. Long - 16 in. Stroke
21 in. Long - 22 in. Stroke
24 in. Long - 28 in. Stroke
27 in. Long - 34 in. Stroke
Sensor Bar (Specify Stroke)
18 in. Long - 16 in. Stroke
21 in. Long - 22 in Stroke
24 in. Long - 28 in. Stroke
27 in. Long - 34 in. Stroke
l Cylinder Kit - DG-001263
(Kit del Cilindro)
Figure 17A
(Figura 17A)
6
3
5
2
9
7
(Válvula de Aire)
Air Valve
1
3
4
14
9
3
7
8
9
6
2
2-1/2 in. Bore Cylinder
10 11 12 13
(Cilindro con dia.Int.de 2-1/2 pulg)
Mounting
Clevis
Filter/Regulator
(Abrazadera
de Montaje)
(Filtro/Regulador)
Flow Control
Valves
2 in. Bore Cylinders
(Cilindro con dia.Int.de 2 pulg)
Air Valve
Main Air
Supply
(Válvulas de
Control de Flujo)
(Suministro
Principal de Aire)
(Válvula de Aire)
Filter/Regulator
(Filtro/Regulador)
Air Input
(Entrada de Aire)
E-Stop with Lock Out
(Parada de Emergencia con Bloqueo)
See Page 14 for Information on How to Order Replacement Parts
Vea la Página 14 para Información sobre Como Ordenar Partes de Repuesto
Recommended Spare Parts highlighted in Gray
Las Partes de Repuesto Recomendadas se Resaltan en Gris
Ref.
No.
1
–
–
–
–
2
–
–
–
–
Part
No.
–
928.00231
928.0023
928.0016
928.00232
–
928.00221
928.0022
928.0020
928.00222
Description
Air Cylinder
18 in. OAW 24 in. OAW 30 in. OAW 36 in. OAW Air Cylinder
18 in. OAW 24 in. OAW 30 in. OAW 36 in. OAW -
9 in. Stroke, 2-1/2 in. Bore
12 in. Stroke, 2-1/2 in. Bore
15 in. Stroke, 2-1/2 in. Bore
18 in. Stroke, 2-1/2 in. Bore
9 in. Stroke, 2 in. Bore
12 in. Stroke, 2 in. Bore
15 in. Stroke, 2 in. Bore
18 in. Stroke, 2 in. Bore
Ref.
No.
3
4
5
6
7
8
9
10
11
12
13
14
Part
No.
928.0021
923.0132
923.0131
094.108642
094.14089
094.1486
094.14082
094.11496
091.109
094.1141
091.1091
MP-001962
Description
Alignment Coupler - 1/2-20
Clevis Bracket Kit - 2-1/2 in. Bore Cylinder
Clevis Bracket Kit - 2 in. Bore Cylinder
Quick Exhaust, Flow Control & Silencer
Brass Union Tee - 1/2 in. Plst.-1/2 in. Plst.
Plastic Plug - 1/2 in. OD - Push-in Type
Plastic Elbow - Male, 1/2 in. Plst.-1/4 in. NP
1/2 in. OD Polyurethane Tubing (Black)
Cable Tie - 5-1/2 in. Long (Not Shown)
Push Button Mount for Cable Tie (Not Shown)
Cable Tie - 8 in. Long (Not Shown)
Bumper
17
l Filter / Regulator Kit - 24VDC & 120VAC
(Equipo Filtro/Regulador - 24VCD & 120 VCA)
Figure18A
(Figura 18A)
E-Stop
(Parada de Emergencia)
Lock-Out / Tag-Out
(Bloqueo/Etiquetado)
(Suministro Principal de Aire)
Filter / Regulator
(Filtro/Regulador)
See Page 14 for Information on How to Order Replacement Parts
Vea la Página 14 para Información sobre Como Ordenar Partes de Repuesto
Recommended Spare Parts highlighted in Gray
Las Partes de Repuesto Recomendadas se Resaltan en Gris
Ref.
No.
1
2
3
4
5
18
Part
No.
094.190
094.14045
094.1903
094.11496
923.0129
24VDC - DG-001262
Description
Air Line Filter/Regulator W/Bracket, 1/2 in.NPT
Brass Conn.-Str.Male, 1/2 in. NPT- 1/2 in.PLS
1/2 in. Spacer for Airline Components
1/2 in.OD Polyurethane Tubing (Not Shown)
E-Stop W/Air Flow Soft Start
Ref.
No.
1
2
3
4
5
Part
No.
094.190
094.14045
094.1903
094.11496
923.01301
120VAC - DG-001333
Description
Air Line Filter/Regulator W/Bracket, 1/2 in.NPT
Brass Conn.-Str.Male, 1/2 in. NPT- 1/2 in.PLS
1/2 in. Spacer for Airline Components
1/2 in.OD Polyurethane Tubing (Not Shown)
E-Stop W/Air Flow Soft Start
l Valve Kit - 24VDC & 120VAC
(Kit de Válvula 24VDC & 120VCA)
Figure 19A
(Figura 19A)
Flow Control Valve
(Válvula de Control de Flujo)
Solenoid
Air Valve
(Válvula Solenoide de Aire)
Valve Base
(Base de la Válvula)
(24VDC Only)
(Not Shown)
Muffler
(Amortiguador
de Ruido)
Silencer
(Silenciador)
See Page 14 for Information on How to Order Replacement Parts
Vea la Página 14 para Información sobre Como Ordenar Partes de Repuesto
Recommended Spare Parts highlighted in Gray
Las Partes de Repuesto Recomendadas se Resaltan en Gris
Ref.
No.
1
2
3
4
5
6
7
8
Part
No.
092.0851
094.14085
094.14088
900.0249
923.0059
928.0015
928.0024
928.0025
24VDC - DG-001293
Description
1/2-14 NPT Conduit Fitting Tiger Grip Locknut
Plastic Elbow - Male, 360 Deg. Swivel
Plastic Swivel Tee - Male 1/2 in.NPT - 1/2 in.PLS
Flow Control Valve - W/Knob Adjustment
Muffler - 1/8 in. NPT
Silencer - 1/2 in. NPT
4-Way Double Solenoid Air Valve - 24VDC
Base for 928.0024 Valve
120VAC - DG-001335
Ref.
Part
Description
No.
No.
1
092.0851
1/2-14 NPT Conduit Fitting Tiger Grip Locknut
2
094.14085 Plastic Elbow - Male, 360 Deg. Swivel
3
094.14088 Plastic Swivel Tee - Male 1/2 in.NPT - 1/2 in.PLS
4
900.0249
Flow Control Valve - W/Knob Adjustment
5
923.0059
Muffler - 1/8 in. NPT
6
928.0015
Silencer - 1/2 in. NPT
7
094.108086 4-Way Double Solenoid Air Valve - 120VAC
19
6
(Derivado)
1
2
3
4
1
2
3
4
BRANCH # 2
(Derivado)
(Derivado)
BRANCH # 1
Description
8"
24
VOLTS
(24 VCD únicamente)
DC
ONLY
(24 VCD únicamente)
Vipersort Pusher Y Splitter(1)M12-(2)M12
Splitter - Euro, M-to-2F
Cable-4-Pin, 1M, Str. Push M to Pigtail
Cable-4-Pin, 1M, Str. Push M to Str. Push F
Cordset - 3M, Straight Female
Home Prox Switch - 18MM, 24VDC, Norm Open
Extend Prox Switch - 18MM, 24VDC, Norm Close
1
2
3
4
1
2
Part
No.
941.400111
941.400114
941.421001
941.421301
941.423003
941.650180
941.650181
(Troncal)
TRUNK
1
2
3
4
1
2
3
4
(Derivado)
BRANCH # 1
(Troncal)
36"
TRUNK
Ref.
No.
1
2
3
4
5
6
7
2
BRANCH # 2
(Azul)
BLUE
(Negro)
BLACK
4
1
2
3
4
(Interruptor de (Interruptor de
Proximidad
Proximidad)
de Extensión)
Extend Prox
7
(Amarillo)
YELLOW
1
Home Prox
20
2
3
24
VOLTS
DC
ONLY
5
(Negro) EXTEND SOLENOID VALVE
(Válvula Solenoide de Ext.)
(Azul)
(Común)
COMMON
(Marrón) +24VDC
(24VCD)
Válvula Solenoide
SMC 928.0024
Base de Válvula
928.0025
BLACK (4)
(Común)
(Azul)
(Blanco) HOME - PROX SWITCH
(Interruptor de Prox)
WHITE (2)
NOTE: THESE CONNECTIONS ARE MADE
INSIDE THE SOLENOID VALVE
AND ARE NOT FOR CONTROL
SYSTEM WIRING OR USE.
(NOTA: Estas conexiones están
hechas dentro de la válvula y no deben
ser usadas para conectar el sistema
de control o cualquier otro fin.)
(Solenoide de Extensión)
WHITE (2) (Blanco) RETRACT SOLENOID
(Solenoide de Retracción)
BLACK (4)
(Negro) EXTEND SOLENOID
BLUE (3)
BROWN (1)
+24VDC
COMMON
(Marrón) (24VCD)
BLUE (3)
BROWN (1)
SMC SOLENOID
VALVE 928.0024
VALVE BASE
928.0025
6 TYP
TAG
FIGURE 20A
(Figura 20A)
1
(Etiqueta)
l Electrical Connections - 24VDC - DG-001295
(Conexiones Eléctricas - 24VCD)
l Electrical Connections - 120VAC - DG-001325
(Conexiones Eléctricas - 120VCA)
5
Home Prox
6
GREY
(Gris)
Extend Prox
1
2
3
4
1
2
3
4
3
BLACK
RED
(Rojo)
(Negro)
2
1
Ref.
No.
1
2
3
4
5
6
2
1
2
3
4
36"
TRUNK
(Troncal)
TRUNK
(Troncal)
Part
No.
941.400111
941.400114
941.421301
941.423003
941.650182
941.650183
1
8"
1
2
3
4
1
2
3
4
TAG
4
+120VAC
(Marrón) (120VCA)
(Azul)
(Negro) EXTEND SOLENOID VALVE
(Válvula Solenoide de Ext.)
(Común)
(Blanco) HOME - PROX SWITCH
(Interruptor de Prox)
COMMON
BLUE (3)
BROWN (1)
WHITE (2)
BLACK (4)
(Válvula
Solenoide
SMC
094.108086)
(Común)
COMMON
(Marrón) +120VAC
(120VAC)
(Azul)
(Negro) EXTEND SOLENOID VALVE
(Solenoide de Extensión)
NOTE: THESE CONNECTIONS ARE MADE
INSIDE THE SOLENOID VALVE
AND ARE NOT FOR CONTROL
SYSTEM WIRING OR USE.
(NOTA: Estas conexiones están
hechas dentro de la válvula y no
deben ser usadas para conectar el
sistema de control o cualquier otro fin.)
BLACK (4)
WHITE (2) (Blanco) RETRACT SOLENOID
(Solenoide de Retracción)
BLUE (3)
BROWN (1)
SMC SOLENOID
VALVE
094.108086
6 TYP
(Etiqueta)
120
VOLTS
(120 VCA únicamente)
AC
ONLY
120
VOLTS
(120VCA únicamente)
AC
ONLY
BRANCH # 1
(Derivado)
BRANCH # 2
(Derivado)
Description
2
Vipersort Pusher Y Splitter(1)M12-(2)M12
Splitter - Euro, M-to-2F
Cable-4-Pin, 1M, Str. Push M to Str. Push F
Cordset - 3M, Straight Female
Home Prox Switch - 18MM, 120VAC, Norm Open
Extend Prox Switch - 18MM, 120VAC, Norm Close
1
2
3
4
1
BRANCH # 2
BRANCH # 1
(Derivado)
(Derivado)
(Interruptor de (Interruptor de
Proximidad
Proximidad)
de Extensión)
FIGURE 21A
(Figura 21A)
21
Notes:
(Notas:)
22
Notes:
(Notas:)
23
HYTROL CONVEYOR COMPANY, INC.
2020 Hytrol Drive
Jonesboro, Arkansas 72401
Phone: (870) 935-3700
www.hytrol.com
EFFECTIVE OCTOBER 2010
Printed in the USA by Toof Printing