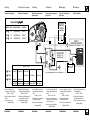
1
H600/900 freefall Horizontal Windlass
Owners Installation, Operation & Servicing Manual
H600/900 freefall Horizontal-Ankerwinde
D
Installations-, Betriebs- und Wartungshandbuch
H600/900 freefall Guindeau Horizontal
F
Manuel d’installation, de fonctionnement et d’entretien
H600/900 freefall Molinete Horizontal
E
Manual de Instalación, Operación y Servicio
H600/900 freefall Verricello salpa ancora Orizzontale
I
Guida all’installazione, all’uso e alla manutenzione
H600/900 freefall Horisontal Vinsch
S
Bruksanvisning för installation, drift och service
H600/900
freefall Horizontal Windlass
Contents
Installation
Installation
Installation
Instalación
Installazione
Installation
Operation
Betrieb
Fonctionnement
Operación
Funzionamento
Drift
Preparation
Vorbereitungen
Préparation
Preparación
Preparazione
Förberedelser
SERIAL Nº
SIMPSON-LAWRENCE LTD
GLASGOW 0141-427-5331
Safety and use
Sicherheit und Anwendung
Sécurité et utilisation
Seguridad y uso
Sicurezza ed uso
Säkerhet och användning
Servicing
Wartung
Entretien
Servicio
Manutenzione
Underhåll
Schedule
Zeitplan
Entretien
Fechas
Schedulazione
Förteckning
Fitting
Montage
Mise en place
Acoplamiento
Montaggio
Montering
Parts
Bauteile
Pièces
Piezas
Parti
Delar
Wiring
Elektrische Leitungen
Câblage
Cableado
Cablaggio
Ledningar
Appendix
Anhang
Annexe
Apéndice
Appendice
Appendix
Loading
Ladung
Chargement
Carga
Carico
Belastning
● Preparation
● Vorbereitungen
● Préparation
● Preparación
● Preparazione
4
● Förberedelser
IMPORTANT : Read these notes before continuing.
Note windlass model, serial number and voltage here.
WICHTIG : Vor dem Weiterarbeiten bitte folgende Hinweise lesen.
Tragen Sie Modell, Seriennummer und Spannung der Ankerwinde hier ein.
IMPORTANT : Veuillez lire ces instructions avant de poursuivre.
Noter ici le modèle, le numéro de série et le tension du guindeau.
IMPORTANTE : Lea estas notas antes de continuar.
Apuntar aquí el modelo de cabrestante, el número de serie y la tensión.
IMPORTANTE : prima di continuare, leggere la nota seguente.
Annotare qui di seguito il modello, il numero di serie e la tensione.
H
f
V
SERIAL Nº
SIMPSON-LAWRENCE LTD
GLASGOW 0141-427-5331
VIKTIGT : Läs dessa anvisningar innan ni fortsätter.
Warning!
●
●
●
●
●
●
Keep limbs, fingers, clothing and
hair clear of windlass and anchor
rope/chain during operation.
Ensure there are no swimmers or
divers nearby when dropping
anchor.
Windlass must not be used as the
sole means of securing the anchor
to the bow fitting. Anchors should
be independently secured to
prevent accidental release.
Classification Societies require that
a vessel lying at anchor must have
its anchor rope/chain secured to a
suitable independent strong
point.
Any independent strong point
must be strong enough to hold
anchor and anchor rope/chain
under storm conditions.
Automatic freefall requires free
movement of the anchor and rope/
chain for continuous operation.
Note that the presence of knots in
the rope will restrict or even prevent
its free running.
Installation
Warnung!
●
●
●
●
●
●
Halten Sie Gliedmaßen, Finger,
Kleidung und Haare von Winde und
Ankerseil/Kette während des Betriebs
entfernt.
Gehen Sie sicher, daß sich keine
Schwimmer oder Taucher in der Nähe
aufhalten, wenn Sie den Anker
auswerfen.
Winde darf nicht als ausschließliche
Befestigung des Ankers an der
Bugeinpassung verwendet werden.
Anker müssen unabhängig befestigt
werden, um versehentlliches
Loslösen zu verhindern.
Behörden erfordern, daß Ankerseil/
Kette eines vor Anker liegenden
Seefahrzeugs an einem
unabhängigen Stützpunkt befestigt
ist.
Jeglicher unabhängige Stützpunkt
muß ausreichend stark sein, um Anker
und Ankerseil/Kette bei
Sturmbedingungen zu halten.
Beim automatischen Freifall ist eine
freie Bewegung von Anker und/oder
Kette notwendig, um einen
kontinuierlichen Betrieb zu
gewährleisten. Bitte beachten Sie,
daß das Vorhandensein von Knoten
und Knicken in der Leine den freien
Lauf der Ankerwinde einschränkt oder
sogar ganz verhindern kann.
Installation
Notera ankarspelets model och serie nummer här.
Recommandations!
●
●
●
●
●
●
Gardez les membres, doigts,
vêtements ou cheveux à distance
durant le fonctionnement du guindeau
et de la corde/chaîne d’ancre.
Assurez-vous qu’il n’y a pas de
nageurs ou de plongeurs à proximité
lorsque vous jetez l’ancre.
Le guindeau ne doit pas être utilisé
comme seul moyen de fixation de
l’ancre à l’avant du bateau. Les
ancres doivent avoir un point de
fixation indépendant pour prévenir
tout déclenchement accidentel.
Les agences de normalisation exigent
qu’un vaisseau ancré ait la chaîne/
corde de son ancre fixée à un point
d’attache indépendant solide.
Tout point d’attache indépendant
solide doit être suffisamment solide
pour retenir l’ancre et la corde/chaîne
d’ancre par gros temps.
Pour qu’il ait chute libre automatique,
il faut qu’il y ait libre mouvement de
l’ancre et de la corde/chaîne pour
assurer la continuité de l’opération.
Notez que la présence de noeuds ou
d’enchevêtrements dans la corde
restreint ou est même susceptible
d’empêcher le bon fonctionnement du
guindeau.
Installation
¡Advertencia!
●
●
●
●
●
●
Mantenga sus miembros, dedos,
prendas y cabello alejados del torno y
la cuerda/cadena de anclaje durante
el funcionamiento del aparato.
Asegúrese de que no hay nadadores
ni buceadores en las inmediaciones
al tirar anclas.
El torno no debe utilizarse como
único medio de asegurar el ancla al
acoplamiento de proa. Las anclas
deberían asegurarse
independientemente para evitar que
se suelten por accidente.
Las Sociedades de Clasificación
exigen que una nave anclada ha de
tener su cuerda/cadena de anclaje
asegurada a un punto
independiente y fuerte adecuado.
Un punto independiente y fuerte
debe ser lo suficientemente fuerte
como para sostener la cuerda/cadena
de anclaje en condiciones de
tormenta.
La caída libre automática requiere el
movimiento libre del ancla y de la
cuerda/del cable para un
funcionamiento continuo. Notar que
la presencia de nudos o gazas
(vueltas) en la cuerda restringirá o
hasta impedirá la marcha (el
funcionamiento) libre del cabrestante.
Instalación
Avvertimenti!
●
●
●
●
●
●
Tenere gli arti, le dita, i capi di
abbigliamento e i capelli lontani sia
dal verricello sia dalla cima e dalla
catena dell’ancora mentre il
dispositivo è in moto.
Accertarsi che non vi siano bagnanti
o sommozzatori nelle vicinanze
prima di gettare l’ancora.
Il verricello non va usato quale
unico mezzo per fissare l’ancora al
supporto di prua. Le ancore vanno
fissate indipendentemente per
evitare il loro rilascio accidentale.
Le normative della capitaneria di
porto stabiliscono che, quando il
battello è ancorato, la cima e la
catena dell’ancora devono essere
fissate ad uno strozzatoio
indipendente e resistente.
Qualsiasi strozzatoio indipendente
deve essere sufficientemente
robusto da trattenere l’ancora o la
cima e la catena in condizioni di
burrasca.
La caduta libera automatica
richiede un movimento libero
dell’ancora o della fune/catena per
poter funzionare in modo
continuativo. Tenere presente che
la presenza di nodi o intrecci nella
fune limita o addirittura ostacola lo
scorrimento libero del verricello.
Installazione
Varningar!
●
●
●
●
●
●
Håll undan kroppsdelar, fingrar,
kläder och hår från vinsch och
ankarrep/kedja under drift.
Kontrollera att det inte finns badare
och dykare i närheten när ankaret
släpps ner.
Använd ej vinschen som enda
hållpunkt för fastsättning av ankaret
till boget (stävet). Ankaret skall vara
väl förankrat separat för att
förhindra oavsiktligt nersläpp.
Regler kräver att båt som ligger för
ankar måste ha ankarrep/kedja
fastgjord till lämplig oberoende
säker punkt.
Noga kontrollera att denna
separata hållpunkt är tillräckligt
kraftig att hålla ankaret och
ankarrep/kedja vid
stormförhållanden.
För oavbruten drift av automatiskt
frifall krävs att ankaret och repet/
kedjan kan löpa fritt. Observera att
om det finns knutar på repet eller
om repet är snott eller trasslat
kommer det att försvåra eller t. o. m.
omöjliggöra fri drift av ankarspelet.
Installation
● Preparation
Warning!
●
●
●
●
●
Neither the windlass nor its deck
mounting are designed to
withstand anchoring loads
generated under storm conditions.
Do not use windlass for ANY
purpose other than deployment
and recovery of anchor.
A circuit breaker/isolator should
always be used with this windlass
to protect the motor and cables
from overheating and damage.
Always switch off this windlass at
the circuit breaker/isolator when
not in use. Failure to do so may
result in the accidental freefall
of the anchor rode should the
DOWN switch be operated.
For combined anchor rope/chain
installations;
(i) Use three strand rope only,
multi-plait rope should not be
used;
(ii) Join rope to chain with a tight,
tapered back splice, which will
flow freely through the windlass.
If you do not know how to splice
rope to chain correctly, then
seek professional help.
Installation
● Vorbereitungen
● Préparation
● Preparación
● Preparazione
● Förberedelser
Warnung!
Recommandations!
¡Advertencia!
Avvertimenti!
Varningar!
●
●
●
●
●
Weder die Winde noch deren
Deck-Anbringung sind für
Ankerladungen bei starken
Sturmbedingungen ausgerüstet.
Die Winde darf
AUSSCHLIEßLICH für das
Auswerfen und Einholen des
Ankers verwendet werden.
Um Motor und Kabel vor
Überhitzen und Beschädigung zu
schützen, sollte für diese Winde
immer ein Stromunterbrecher/
Isolator verwendet werden.
Wenn nicht in Gebrauch, Winde
immer am Stromunterbrecher/
Isolator abschalten. Wird diese
Anweisung nicht befolgt, so
kann es beim Betätigen des
Schalters HERUNTER zu einem
versehentlichen Freifall des
Ankergeschirrs kommen.
Für kombinierte Installation von
Ankerseil/Kette;
(i) verwenden Sie nur aus drei
Litzen gedrehtes Seil (nicht
mehrfach geflochten);
(ii) Befestigen Sie das Seil mit
einem guten, festen spanischen
Takling an der Kette, der sich frei
durch die Ankerwinde bewegt.
●
●
●
●
●
Ni le guindeau ni son socle ne sont
conçus pour supporter des charges
d’ancrage générées par gros
temps.
Ne pas utiliser le guindeau
AUTREMENT que pour jeter et
lever l’ancre.
Un coupe-circuit/isolateur devra
être utilisé avec ce guindeau pour
éviter que le moteur et les fils ne
surchauffent et soient
endommagés.
Laissez toujours ce guindeau en
position éteinte au point du coupecircuit/isolateur lorsqu’il n’est pas
en fonctionnement. Si vous ne
faites pas ceci, cela peut avoir
comme résultat la chute libre
accidentelle de la tige d’ancrage,
au cas où l’interrupteur soit
poussé vers le bas.
Pour les installations de corde/
chaîne d’ancre combinées;
(i) Utilisez uniquement une corde à
trois brins, et non pas une corde
multi-brins;
(ii) Attachez la corde à la chaîne en
effectuant une épissure arrière
bien serrée qui puisse passer
librement à travers le guindeau.
Suchen Sie professionelle Hilfe,
wenn Sie Seil nicht fachgerecht
an die Kette spleißen können.
Si vous ne savez pas comment
épisser la corde à la chaîne,
demandez l’aide d’un professionnel.
Installation
Installation
●
●
●
●
●
Ni el torno ni el acoplamiento de
cubierta están diseñados para
soportar las cargas generadas por
condiciones de tormenta.
No utilice el torno para NINGÚN
otro propósito que no sea el
lanzamiento o recogida del ancla.
Siempre debería utilizarse un
interruptor diferencial/aislador con
este torno para proteger al motor
y a los cables contra el
recalentamiento y posibles daños.
Desconecte siempre este torno
con su interruptor diferencial/
aislador cuando no lo vaya a
utilizar. El no cumplir con estas
instrucciones puede provocar
la caída libre accidental de la
cadena del ancla en caso de
actuarse el interruptor BAJAR.
Instalaciones con combinación
cadena/cuerda;
(i) Use únicamente cuerdas de
tres tiras. No deberían usarse
cuerdas multifilamentos;
(ii) Juntar la cuerda con la cadena
formando un ayuste inverso muy
cerrado de manera que corra
libremente por el cabrestante.
Si no sabe cómo realizar una
junta de cuerda a cadena
correctamente, solicite
asistencia técnica.
Instalación
●
●
●
●
●
Né il verricello salpa ancora né il
suo supporto sono progettati per
sostenere il carico dell’ancora
generatosi in condizioni di
burrasca.
Non usare il verricello SE NON
per gettare e sollevare l’ancora.
Un interruttore automatico o un
sezionatore vanno sempre usati
con questo verricello per evitare
che il motore e i cavi si
surriscaldino o vengano
danneggiati.
Quando non viene usato,
spegnere sempre il verricello per
mezzo dell’interruttore automatico
o del sezionatore. La mancata
esecuzione di tale operazione
potrebbe avere come
conseguenza la caduta libera
accidentale della fune
dell’ancora quando l’interruttore
DOWN è in funzione.
Per l’installazione mista della
catena e della cima dell’ancora;
(i) Usare esclusivamente una cima
a tre trefoli; non usare cime
miltiintrecciate;
(ii) Unire la fune alla catena con
una buona impiombatura
‘all’indietro’ stretta, che scorra
liberamente nell’argano.
●
●
●
●
●
Varken vinsch eller vinschens
montering till däcket är avsedd att
tåla belastning av ankaret under
stormförhållanden.
Använd endast vinschen TILL
sänkning och upptagning av
ankaret.
Använd alltid en
strömkretsbrytare/isolator till
denna vinsch för att skydda motor
och kablar från överhettning och
skador.
Slå av vinschen vid
strömkretsbrytaren när den ej
används. Försummelse av dkan
resultera I ett oväntat fritt fall av
ankarrepet om strömbrytaren
skulle ställas I NER-läge.
För montering av kombinerad
ankarrep/kedja;
(i) Använd endast tre treslagen
rep, ej flerflätat;
(ii) Foga repet till kättingen genom
en stark splitsförband som
passerar fritt genom ankatspelet.
Sök professionellt råd om ni är
tveksam till hur man splitsar
repet korrekt.
Qualora non si sappia come
impiombare la cima alla catena,
rivolgersi ad un esperto.
Installazione
Installation
5
● Preparation
● Vorbereitungen
● Préparation
● Preparación
● Preparazione
● Förberedelser
Packing list
Tools
Additional parts
Bestandteile
Werkzeuge
Zubehör
Liste du contenu
Outils
Pièces supplémentaires
Embalaje
Herramientas
Piezas adicionales
Distinta di imballaggio
Attrezzi
Parti supplementari
Material lista (innehållsförteckning)
Verktyg
Extra delar
6
10mm (3/8”)
45mm (1 3/4”)
16mm (5/8”)
8mm (5/16”)
11mm (7/16”)
3 x 8mm (ISO)
2 x 13mm (1/2”)
SERIAL Nº
SIMPSON-LAWRENCE LTD
GLASGOW 0141-427-5331
3 x 8mm (ISO)
●
For switch gear options, see
diagram on page 12 and 13.
Installation
●
Für Schaltvorrichtungsangaben
siehe Diagramm auf siete 12
und 13.
Installation
●
Pour les options d’interrupteur
de vitesse, voir schéma page
12 et 13.
Installation
●
Dispositivos eléctricos,
consúltese el diagrama de la
página 12 y 13.
Instalación
●
Per l’apparecchiatura elettrica
di comando opzionale, vedere
il diagramma a pagina 12 + 13.
Installazione
●
För val av strömbrytaranordning se diagram på sidan
12 och 13.
Installation
● Preparation
● Vorbereitungen
✓
✗
● Préparation
● Preparación
✓
1
4
✗
● Preparazione
● Förberedelser
2
+6˚
3
SERIAL Nº
SIMPSON-LAWRENCE LTD
GLASGOW 0141-427-5331
5
6
7
SERIAL Nº
SERIAL Nº
SIMPSON-LAWRENCE LTD
GLASGOW 0141-427-5331
SIMPSON-LAWRENCE LTD
GLASGOW 0141-427-5331
300mm
(12”)
✓
✗
Plan location carefully.
1. Ensure the anchor rope/chain will feed
correctly.
2. Ensure rope/chain, and bow roller
centre lines match.
3. Anchor rope/chain should not be more
than 6° above gipsy.
4. Ensure at least 300mm (12”) between
underside of deck and stored anchor
rope/chain.
5. Uneven decks require mounting pad.
6. Reinforce lightweight decks.
7. If the deck is thicker than 130mm (51/
8”), use longer studs.
NOTE: When planning the installation
of your windlass, care should be
taken to allow for the coiling of rope
below deck, avoiding knots and
jamming which could obstruct the
freefall action of the windlass. DO
NOT use a permanent adhesive/
sealant to install the windlass.
Planen Sie die Positionierung sorgfältig.
1. Stellen Sie sicher, daß Ankerseil/Kette
korrekt geführt wird.
2. Stellen Sie sicher, daß Ankerseil/Kette
und Bugroller mittig sind.
3. Ankerseil/-Kette sollte sich nicht mehr
als 6° über dem Verholspillkopf
befinden.
4. Der Abstand zwischen Deckunterseite
und eingeholter Ankerseil/Kette muß
mindestens 300mm (12”) betragen.
5. Unebene Decks erfordern ein
Montagekissen.
6. Verstärken Sie Leichtgewichtdecks.
7. Fals Deck dicker als 130mm (51/8”),
verwenden Sie längere Stifte.
HINWEIS: Bei der den Einbau Ihrer
Ankerwinde vorausgehenden Planung
sollten Sie das Aufrollen des Seils unter
Deck berücksichtigen - dabei sind
Knotenbildung und ein Festfahren des
Seils zu vermeiden, da sich diese
negativ auf den Freifall-Betrieb der
Ankerwinde auswirken könnten.
VERWENDEN SIE KEINEN
Permanentkleber/-dichtungsstoff zum
Installieren der Ankerwinde.
Prévoyez l’emplacement avec attention
1. Assurez-vous que la corde/chaîne
d’ancre s’introduit correctement.
2. Assurez-vous que la corde/chaîne
d’ancre et les lignes centrales de
l’enrouleur de proue correspondent.
3. La corde/chaîne d’ancre ne devrait pas
être à plus de 6° au dessus du
barbotin.
4. Prévoyez au moins 300mm (12”) entre
le dessous du pont et l’espace de
stockage de la corde/chaîne d’ancre.
5. Les ponts à surface inégale
nécessitent une plaque de montage.
6. Renforcez les ponts légers.
7. Si l’épaisseur du pont est supérieure à
130mm (51/8”), utilisez des boulons
plus longs.
NOTE: En préparant l’installation de
votre guindeau, il faut tenir compte de
l’enroulement de la corde sur le pont
inférieur, et éviter des noeuds et des
blocages qui pourraient obstruer la
chute libre du guindeau. NE PAS
UTILISER d’adhésif/d’enduit
d’étanchéité permanent pour installer
le guindeau.
Prepare el emplazamiento
cuidadosamente
1. Asegúrese de que la cuerda/cadena de
anclaje se suelta correctamente.
2. Asegúrese de que la cuerda/cadena y
las líneas centrales de rodaje proa
están alineadas.
3. La cuerda o cadena del ancla no debe
estar a más de seis pulgadas por
encima de la gitana.
4. Asegure al menos 300mm (12”) entre
la barriga de cubierta y la cuerda/
cadena almacenadas.
5. Las cubiertas desniveladas necesitarán
una almohadilla de compensación.
6. Refuerce las cubiertas ligeras.
7. Si la cubierta es más ligera de 130mm
(51/8”), use espárragos más largos.
NOTA: En el momento de planear la
instalación del cabrestante, se
recomienda tener en cuenta las vueltas
de cuerda que pudiera haber bajo
cubierta, para evitar los nudos y las
obstrucciones que pudieran impedir el
movimiento en caída libre del
cabrestante. NO USAR un adhesivo o
sellador permanente para instalar el
cabrestante.
Studiare attentamente ove posizionare
del verricello
1. Verificare che la cima e la catena
dell’ancora avanzino in modo corretto.
2. Verificare che le linee centrali della cima e
della la catena e del cilindro di prua siano
allineate.
3. La fune/catena dell’ancora non deve
essere a più di 6° al di sopra dell’argano.
4. Verificare di aver lasciato almeno 300mm
(12”) di spazio tra la parte sottostante il
ponte e il posto ove sono stivate catena e
cima.
5. Se il ponte è irregolare, usare cuscinetti
di montaggio.
6. I ponti non spessi vanno rinforzati.
7. Se lo spessore del ponte è superiore a
130mm (51/8”), usare prigionieri più
lunghi.
IMPORTANTE: Quando si progetta
l’installazione dell’argano, bisogna
tenere presente che la fune dovrebbe
essere arrotolata sotto il ponte, evitando
così che si blocchi o la formazione di
nodi, eventualità che potrebbero ostruire
la caduta libera dell’argano. Non
utilizzare un adesivo/mastice permanente
per installare l’argano.
Noga planera vinschens placering
1. Konrollera att ankarrepet/kedjan
fungerar korrekt.
2. Kontrollera att ankarrepet/kedjan och
däckets mittlinje är parallella.
3. Ankare och kätting/lina får inte vara
mer än 6 grader över kättinghjulet.
4. Kontrollera att utrymmet mellan
däckets undersida och förvaringen av
ankarrepet/ kedjan är minst 300mm
(12”).
5. Ojämna däck måste jämnas med
underlag.
6. Lättvikts-däck måste förstärkas.
7. Om däcket är mer än 130mm (51/8”),
måste längre skruvar användas.
OBSERVERA: Vid planerandet
installation av ankarspelet se till att
repet kan ringla sig under däck utan
att knutar eller andra ojämnheter
bildas som kan förhindra att
ankarspelet kan falla fritt. Använd
aldrig lim typ aralit för att montera
ankarspelet.
Installation
Installation
Installation
Instalación
Installazione
Installation
7
● Fitting
● Montage
● Mise en place
● Acoplamiento
1
● Montaggio
● Montering
2
8
3
✗
✗
✓
4
5
1. Position and fix template in line
with anchor rope/chain centre line.
2. Drill stud and cable holes.
3. Cut 2 x 45 mm (1¾”) holes for the
anchor rope/chain.
4. Remove excess material from
chain pipe hole ensuring that it is
free from obstructions and is
aligned correctly.
5. Smooth and seal edges before
fitting by using either, a marine
paint, gel coat or two pack epoxy.
1. Schablone wird mit Mittellinie der
Ankerseil/Kette abgestimmt
positioniert und angebracht.
2. Bohren Sie die Kettensteg- und
Kabeltrossenlöcher.
3. Schneiden Sie eine 2 x 45 mm (1¾”)
Öffnung für Ankerseil/Kette.
4. Entfernen Sie überschüssiges
Material aus der Kettenrohrklüse und
überprüfen Sie dabei, daß sie
unverstopft und korrekt ausgerichtet
ist.
5. Glätten Sie vor dem Einbau die
Kanten und dichten Sie diese ab,
wozu entweder ein Schiffsanstrich,
eine Gelschicht oder ein zweiteiliges
Epoxidharz zu verwenden ist.
1. Placez et fixer le modèle dans
l’alignement de la corde/chaîne
d’ancre.
2. Percez des trous pour les goujons
et les câbles.
3. Percez deux trous de 45 mm (1¾”)
pour la corde/chaîne d’ancre.
4. Enlever tous résidus du trou de
l’écubier de pont, et vérifier qu’il ne
soit pas obstrué et qu’il soit
correctement aligné.
5. Aplanir et sceller les bords avant le
montage en utilisant soit de la
peinture marine, soit un enduit
gélifié soit de la résine epoxy
(composée de peinture et de
catalyseur).
1. Posicione y fije la plantilla de
forma lineada con la línea central
de la cadena/cuerda de anclaje.
2. Taladrar agujeros o boquetes para
colocar tachuelas y cable.
3. Recorte un orificio 2 x 45 mm
(1¾”) de diámetro para la cuerda/
cadena de ancleje.
4. Quitar el material de sobra del
boquete de la cadena o tubo para
que quede libre de obstrucciones y
para que quede bien alineado.
5. Alisar y seller los bordes antes del
montaje final, usando o una capa
de pintura marina tipo gel o la
resina epoxídica hecha a base de
la mezcla de dos tubos de pintura
y catalizador.
1. Posizionare e fissare la sagoma
allineandola alla linea centrale
della catena e della cima
dell’ancora.
2. Trapanare i fori per i perni e per il
cavo.
3. Tagliare un foro di 2 x 45 mm
(1¾”) per la catena e la cima
dell’ancora.
4. Rimuovere il materiale in eccesso
dal foro del tubo per la catena,
assicurandovi così che non sia
ostruito e che sia correttamente
posizionato.
5. Lisciare e sigillare i bordi prima
dell’installazione utilizzando o una
vernice marittima, o uno strato di
gel o resina epossidica in due
tubetti.
1. Placera och fixera mall i linje med
mittlinjen av ankarrepet/kedjan.
2. Borra hål för fästbulten och kabeln.
3. Sâga ut 2 x 45 mm (1¾”) hål för
ankarrepet/kedjan.
4. Tillse att hålet för katting/linan är
fritt och att det stämmer med
ankarspelets hål.
5. Runda av kanterna och måla med
topcoat för att förhindra
vattenläckage in i laminatet.
Installation
Installation
Installation
Instalación
Installazione
Installation
● Fitting
● Montage
● Mise en place
1
2
7
8
● Acoplamiento
3
● Montaggio
4
● Montering
5
6
12
SERIAL Nº
ON-LAWRENCE LTD
GOW 0141-427-5331
9
5mm
max
11
10
1.
2.
3.
4.
5.
6.
7.
Fit studs to windlass.
Attach two plain nuts (supplied).
Tighten nuts.
Screw in studs firmly.
Loosen nuts.
Remove and discard nuts.
Apply a silicone sealant to edges.
DO NOT use a permanent
adhesive/sealant.
8. Fit windlass to deck.
9. Partially tighten nyloc nuts.
10. Allow sealant to set.
11. Tighten nyloc nuts fully. Apply
caution as over tightening may
crush the deck.
12. Trim studs to prevent snagging
anchor rope/chain if necessary.
1. Befestigen Sie Stifte an der Winde.
2. Montieren Sie zwei einfache Muttern
(geliefert).
3. Ziehen Sie die Muttern an.
4. Schrauben Sie die Stifte fest.
5. Lösen Sie die Muttern.
6. Entfernen und entsorgen Sie die
Muttern.
7. Bringen Sie an den Kanten einen
Silizium-Dichtungsstoff auf.
VERWENDEN SIE KEINEN
Permanentkleber/-dichtungsstoff.
8. Bringen Sie Winde auf dem Deck an.
9. Ziehen Sie die Nyloc-Muttern leicht an.
10. Lassen Sie Dichtungsmittel hart werden.
11. Ziehen Sie die Nyloc-Muttern vollständig
an. Gehen Sie dabei behutsam vor, da
ein übermäßig starkes Anziehen das
Deck beschädigen kann.
12. Kürzen Sie die Stege falls notwendig,
um so einen Abrieb des Ankertaus/der
Ankerkette zu verhindern.
1. Placez les boulons au guindeau.
2. Attacher deux écrous simples
(fournis dans ce lot).
3. Serrez les écrous.
4. Serrez les boulons fermement.
5. Desserrez les écrous.
6. Enlever et jeter les écrous.
7. Appliquer du silicone sur le bords.
NE PAS UTILISER d’adhésif/
d’enduit d’étanchéité
permanent.
8. Introduisez le guindeau.
9. Resserrer en partie les écrous
‘nyloc’.
10. Laissez l’enduit prendre.
11. Resserrer complètement les
écrous ‘nyloc’. Faire attention. Le
fait de trop serrer les écrous
pourrait écraser le pont.
12. Le cas échéant, égauchissez les
goujons afin d’empêcher qu’ils
n’accrochent la corde/chaîne de
l’ancre.
1. Coloque los espárragos al torno.
2. Poner las dos tuercas simples
(adjuntas).
3. Aprieta las tuercas.
4. Atornille los espárragos con firmeza.
5. Afloje las tuercas.
6. Quitar y tirar las tuercas.
7. Poner un sellador de silicona en los
bordes. NO USAR un adhesivo o
sellador permanente.
8. Instale el torno a cubierta.
9. Apretar parcialmente las tuercas
marca ‘Nyloc’.
10. Deje que se endurezca el sellante.
11. Apretar plenamente las tuercas
marca ‘Nyloc’. Hacer esto con
cuidado puesto que el apretar con
demasiado fuerza puede aplastar la
cubierta.
12. Limar las tachuelas para evitar que la
cuerda o la cadena del ancla se
quede enganchada.
1. Fissare i prigionieri al verricello.
2. Mettere 2 dadi semplici (in
dotazione).
3. Serrare i dadi.
4. Avvitare saldamente i prigionieri.
5. Allentare i dadi.
6. Rimuovere e eliminare i dadi.
7. Applicare il mastice al silicone ai
bordi. NON utilizzare un
adesivo/mastice permanente.
8. Montare il verricello sul ponte.
9. Stringere solo parzialmente i dadi
nyloc.
10. Lasciare che il mastice si indurisca.
11. Stringere a fondo i dadi nyloc.
Fare attenzione a non stringere i
dadi troppo forte in quanto questo
può danneggiare il ponte.
12. Se necessario tagliare l perni per
evitare che la cuerda/cadena
dell’ancora rimanga impigliata.
1.
2.
3.
4.
5.
6.
7.
Sätt i skruvarna på vinschen.
Montera.
Spänn muttrarna.
Skruva i skruvarna hårt.
Lösgör muttrarna.
Montera av och kasta muttrarna.
Stryk på silikon eller liknande.
Använd aldrig lim typ aralit.
8. Sätt fast vinschen på däcket.
9. Korsdra muttrarna.
10. Låt tätning torka.
11. Efterdra muttrarna. Se till att Ni
inte drar för hårt så att däcket inte
skadas.
12. Om nödvändigt, justera
fästbultarnas längd för att undvika
att ankarrep/kedja kan hakas upp.
Installation
Installation
Installation
Instalación
Installazione
Installation
9
10
● Wiring
● Elektrische Leitungen
Caution
Plan wiring installation to suit
controls and to give operator full
view of windlass.
● Use marine grade copper wire.
● Fit copper crimp terminals to wire
ends.
● Keep windlass wiring separate
from other wiring, and connect to
starter battery where possible.
● The control box/solenoid and
circuit breaker must be kept dry.
● All switches must be wired in
parallel.
● If the windlass operates in the
wrong direction, change over the
cable connections at the windlass
motor.
●
If you are not sure you understand
the guidelines, seek professional
help.
● Ensure installation complies with
USCG, ABYC, NMMA or other
local regulations.
● If necessary add a grounding strap
between the mounting studs and
an earthing point.
● Cableado
● Cablaggio
Attention
Precaución
Attenzione
Vorsicht
Planen Sie Kabelinstallation in
Abstimmung mit der Steuerung
und so, daß der Bediener freie
Sicht auf die Winde behält.
● Verwenden Sie seegeeigneten
Kupferdraht.
● Versehen Sie Kabel mit
Kupferfalzenden.
● Die Leitungen für die Winde
getrennt von übrigen Leitungen
halten und wenn möglich an
Starterbaterie anschließen.
● Halten Sie Schaltkasten/Solenoid
und Stromunterbrecher trocken.
● Alle Schalter müssen parallel
verkabelt werden.
● Wenn die Winde in die falsche
Richtung arbeitet, tauschen Sie
die Kabelverbindungen am
Windenmotor aus.
●
Warning!
●
● Câblage
Prévoyez une installation
électrique qui soit conforme et qui
laisse à l’opérateur une vue
complètement dégagée sur le
guindeau.
● Utilisez des fils de cuivres de
qualite marine.
● Placez des cosses à œil au bout
des fils.
● Maintenez les fils du guindeau
séparés de tous les autres fils et
connectez à la batterie de
démarrage lorsque cela est
possible.
● Le boîtier de Relais et le coupecircuit doivent être gardés au sec.
● Tous les interrupteurs doivent être
connectés en parallèle.
● Si le guindeau fonctionne dans le
mauvais sens, intervertissez les
connexions sur le moteur du
guindeau.
●
Warnung!
Wenn Sie sich nicht ganz im
Klaren über die Richtlinien sind,
suchen Sie professionelle Hilfe.
● Stellen Sie sicher, daß die
Installation den Erfordernissen von
USCG, ABYC, NMMA oder
anderen örtlichen Richtlinien
entspricht.
● Fügen Sie bei Bedarf einen
Erdungsdraht zwischen
Befestigungsstiften und einer
Erdungsstelle ein.
●
Recommandations!
Si vous ne comprenez pas les
instructions, demandez l’aide d’un
professionnel.
● Assurez-vous que l’installation est
conforme aux normes USCG,
ABYC, NMMA ou autres normes
locales.
● Le cas échéant, attacher un ruban
de mise à la terre entre les
boulons de montage et un point de
mise à la terre.
●
Überprüfen Sie
Check
La instalación del cableado ha de
adecuarse a los controles y
ofrecer al operario una visión total
del torno.
● Use cable de cobre para
aplicaciones marinas.
● Coloque terminales de cobre
rizado a los extremos de los
cables.
● Mantenga el cableado del torno
separado de otros cableados y
conecte a la batería de arranque si
le es posible.
● Deben mantenerse secos la caja
de control/solenoide e interruptor
diferencial.
● Todos los interruptores han de
cablearse en paralelo.
● Si el torno operase en dirección
opuesta, cambie los conectores de
los cables del motor del torno.
●
Pianificare attentamente il
cablaggio in base ai comandi e in
modo che l’operatore possa
sempre vedere il verricello.
● Usare fili di rame di tipo marino.
● Fissare i terminali aggraffati alle
estremità dei fili.
● Tenere il cablaggio del verricello
separato dagli altri cablaggi e, ove
possibile, collegare la batteria di
avviamento.
● La scatola di comando, il
solenoide e l’interruttore
automatico devono essere sempre
asciutti.
● Tutti gli interruttori vanno cablati
parallelamente.
● Se il verricello funziona in
direzione errata, scambiare i cavi
di collegamento al motore del
verricello.
●
¡Advertencia!
Si tiene alguna dificultad para
comprender las instrucciones,
solicite asistencia técnica.
● Asegúrese de que la instalación
cumple con las normas USCG,
ABYC, NMMA u otras normas
locales.
● Si resulta necesario, añadir una
cuerda de enlace entre las
tachuelas de montaje y un
contacto o una conexión a tierra.
●
Vérifiez
● Ledningar
Varning
Planera noga installation av
elektriska ledningar till att matcha
kontrollanordning, samt se till att
användaren har full uppsikt över
vinschen.
● Använd endast lämplig (marin-)
kopparledning.
● Använd klämkoppling av koppar till
ledningsändarna.
● Se till att vinschens ledningar är
isolerade från annan elektrisk
ledning, och kopplad till
startbatteriet på lämpligt ställe.
● Kontroll-låda/strömbrytarrelä och
strömkretsbrytare måste hållas
torra.
● Alla strömbrytare måste kopplas
parallellt.
● Om vinschen rullar i fel riktning,
koppla om ledningarna i vinschens
motor.
●
Avvertimento!
Se si dubita di aver compreso
appieno le linee guida, consultare
un esperto.
● Verificare che l’installazione sia
conforme alle norme USCG,
ABYC, NMMA o ad altre
normative locali.
● Se necessario aggiungere una
cinghia di messa a terra tra i perni
di fissazione e la massa.
●
Compruebe
Varningar!
Sök professionell hjälp om ni har
svårigheter med att förstå
anvisningarna.
● Kontrollera att installation iakttar
lokala regler.
● Om nödvändigt förbind
monteringsbultarna med en
jordpunkt.
●
Controllare che:
Kontrollera
●
The windlass operates in the
correct direction from all switches.
● That the windlass does not cause
electro-magnetic interference to
other equipment.
●
daß die Winde von allen Schaltern
aus in die richtige Richtung läuft.
● daß die Winde keine
elektromagnetischen Störungen in
anderen Geräten hervorruft.
●
Que le guindeau fonctionne dans
la bonne direction à partir de tous
les interrupteurs.
● Que le guindeau ne provoque pas
d’interférence électromagnétique
avec d’autres appareils.
●
Que el torno funciona en la
dirección correcta con todos los
interruptores.
● Que el torno no provoca
interferencias electromagnéticas a
otro equipo.
●
Tutti gli interruttori consentano la
rotazione del verricello nella senso
corretta;
● Il verricello non causi interferenze
elettromagnetiche su altre
apparecchiature.
●
Att vinschen fungerar i rätt
riktning från alla kontakter/
strömbrytare.
● Att vinschen ej åstadkommer
elektrisk-magnetiska störningar
och påverkar annan utrustning.
Installation
Installation
Installation
Instalación
Installazione
Installation
● Wiring
● Elektrische Leitungen
● Câblage
Warning!
Warnung!
Attention !
This is not a wiring diagram. This
diagram is for guidance only.
Dies ist kein Verdrahtungsplan.
Diagramm nur als Richtlinie
gedacht.
● Cableado
¡Advertencia!
Ceci n’est pas un plan de circuit.
Ce diagramme n’est donné qu’à
titre indicatif.
Éste no es un diagrama de
cableado. Este diagrama sólo se
ofrece a modo de guía.
● Cablaggio
● Ledningar
Avvertimento!
Varning!
Questo non è un diagramma per il
cablaggio. Va usato
esclusivamente come guida.
Detta är ej ett ledningsdiagram,
endast för rådgivning.
4
2
SERIAL Nº
SIMPSON-LAWRENCE LTD
GLASGOW 0141-427-5331
6 7 8
3
5
1
-
+
Key
Schlüssel
Légende
Claves
Legenda
Beskrivning
1.
2.
3.
4.
5.
6.
7.
8.
1.
2.
3.
4.
5.
6.
7.
8.
1.
2.
3.
4.
5.
6.
7.
8.
1.
2.
3.
4.
5.
6.
7.
8.
1.
2.
3.
4.
5.
6.
7.
8.
1.
2.
3.
4.
5.
6.
7.
8.
Circuit breaker/isolator.
Cockpit switch.
Deck socket.
Foot switch(s).
Control box/solenoid.
Up wire.
Common wire.
Down wire.
Installation
Stromunterbrecher/Isolator.
Kockpit Schalter.
Deck Steckdose.
Fußschalter.
Schaltkasten/Magnetspule.
Oberes Kabel.
Gemeinsames Kabel.
Unteres Kabel.
Installation
Coupe-circuit/isolateur.
Interrupteur de cockpit.
Prise de pont.
Contacteur à pied.
Boîtier de Relais.
Fil de Montée.
Fil commun.
Fil de descente.
Installation
Interruptor diferencial/aislador.
Mando de Cabina.
Toma de cubierta.
Pedal(es).
Caja de control/solenoide.
Subida de cable.
Cable común.
Bajada de cable.
Instalación
Interruttore automatico, sezionatore.
Interruttore del pozzetto.
Presa del ponte.
Interruttore(i) a pedale.
Scatola di comando, solenoide.
Filo in salita.
Filo comune.
Filo in discesa.
Installazione
Strömkretsbrytare.
Styrspak.
Däckets uttag.
Fot-strömbrytare.
Kontroll-låda/ strömbrytarrelä.
Ledning (på-).
Ledning (mellan-).
Ledning (av-).
Installation
11
● Wiring
● Elektrische Leitungen
● Câblage
● Cableado
● Cablaggio
● Ledningar
Single Station Switchgear
Einstufiges Schaltgetriebe
Mécanisme de manoeuvre à
position unique
El interruptor de engranaje de
puesto único
Dispositivo d’interruttore a
punto unico
Enkel strömställare
al
efal
alll
Horizon 600/900freef
Model
Motor
Breaker/Isolator
Contactor
H600f
12V
50A (68000348)
0052531
H900f
12V
70A (68000240)
0052531
H900f
12
GUARDED
ROCKER
SWITCH
68000593
SERIAL Nº
SIMPSON-LAWRENCE LTD
GLASGOW 0141-427-5331
24V
50A (68000348)
0052508
Fuse
C
B
CIRCUIT
BREAKER/ISOLATOR
68000348 - 50A, 68000240 - 70A
CONTACTOR
0052531-12V
0052508-24V
D
H600f - 12v
10.7m (35ft)
19.8m (65ft)
27.4m (90ft)
---
---
H900f - 12v
---
---
15.2m (50ft)
25.9m (85ft)
32.0m (105ft)
H900f - 24v
22.8m (75ft)
33.5m (110ft)
---
---
---
6mm2 (8AWG)
●
●
●
Choice of cable thickness
depends on total cable length;
A+B+C+D+E =
Battery to windlass, windlass to
battery.
Switch wire thickness:
1.5 mm² (14 AWG)
Installation
+
E
A+B+C+D+E=
A
BATTERY
10mm2 (6AWG) 16mm2 (4AWG) 25mm2 (2AWG) 35mm2 (1AWG)
●
●
●
Wahl des Kabeldurchmessers
hängt ab von Gesamtkabellange;
A+B+C+D+E=
Von Batterie zur Ankerwinde und
von Ankerwinde zur Batterie.
Schalterkabeldurchmesser:
1.5 mm² (14 AWG)
Installation
●
●
●
Le choix d’épaisseur de câble
dépend de la longueur totale du
câble;
A+B+C+D+E=
Reliez la batterie au guindeau et
le guindeau à la batterie.
Epaisseur du fil d’interrupteur:
1.5 mm² (14 AWG)
Installation
●
●
●
La elección del grosor del cable
depende de la longitud total del
mismo;
A+B+C+D+E=
Desde la pila o batería hasta el
cabrestante, desde el cabrestante
hasta la pila o batería.
Grosor del cable del interruptor:
1.5 mm² (14 AWG)
Instalación
●
●
●
La scelta dello spessore dei cavi
dipende dalla lunghezza totale del
cavo stesso;
A+B+C+D+E=
Dalla batteria dall’argano,
dall’argano alla batteria.
Spessore del filo dell’interruttore:
1.5 mm² (14 AWG)
Installazione
●
●
●
Val av kabel-tjocklek beror på den
totala kabellängden;
A+B+C+D+E =
Från batteriet till ankarspelet.
Från ankarspelet till batteriet.
Tjocklek av strömbrytares ledning:
1.5 mm² (14AWG)
Installation
● Wiring
● Elektrische Leitungen
● Câblage
● Cableado
● Cablaggio
● Ledningar
Multi Station Switchgear
Mehrstufiges Schaltgetriebe
Mécanisme de manoeuvre à
positions multiples
El interruptor de engranaje de
puesto múltiple
Dispositivo d’interruttore a
punto multiplo
Multipel Strömställare
al
Horizon 600/900freef
efal
alll
Model
Motor
Breaker/Isolator
Contactor
H600f
12V
50A (68000348)
0052531
H900f
12V
70A (68000240)
0052531
H900f
24V
50A (68000348)
0052508
DECK
FOOT SWITCH
SET
HAND
HELD
CONTROL
GUARDED
ROCKER
SWITCH
68000598 Black
68000597 White
68000599
68000593
R
DOWN
UP
SERIAL Nº
SIMPSON-LAWRENCE LTD
GLASGOW 0141-427-5331
C
A+B+C+D+E=
B
H600f - 12v
10.7m (35ft)
19.8m (65ft)
27.4m (90ft)
---
---
H900f - 12v
---
---
15.2m (50ft)
25.9m (85ft)
32.0m (105ft)
H900f - 24v
22.8m (75ft)
33.5m (110ft)
---
---
---
6mm2 (8AWG)
●
●
Choice of cable thickness
depends on total cable length;
A+B+C+D+E =
Battery to windlass, windlass to
battery.
Switch wire thickness:
1.5 mm² (14 AWG)
Installation
68000348 - 50A, 68000240 - 70A
CONTACTOR
0052531-12V
0052508-24V
D
A
10mm2 (6AWG) 16mm2 (4AWG) 25mm2 (2AWG) 35mm2 (1AWG)
E
●
CIRCUIT
BREAKER/ISOLATOR
Fuse
●
●
●
Wahl des Kabeldurchmessers
hängt ab von Gesamtkabellange;
A+B+C+D+E=
Von Batterie zur Ankerwinde und
von Ankerwinde zur Batterie.
Schalterkabeldurchmesser:
1.5 mm² (14 AWG)
Installation
●
●
●
Le choix d’épaisseur de câble
dépend de la longueur totale du
câble;
A+B+C+D+E=
Reliez la batterie au guindeau et
le guindeau à la batterie.
Epaisseur du fil d’interrupteur:
1.5 mm² (14 AWG)
Installation
●
●
●
La elección del grosor del cable
depende de la longitud total del
mismo;
A+B+C+D+E=
Desde la pila o batería hasta el
cabrestante, desde el cabrestante
hasta la pila o batería.
Grosor del cable del interruptor:
1.5 mm² (14 AWG)
Instalación
●
●
●
La scelta dello spessore dei cavi
dipende dalla lunghezza totale del
cavo stesso;
A+B+C+D+E=
Dalla batteria dall’argano,
dall’argano alla batteria.
Spessore del filo dell’interruttore:
1.5 mm² (14 AWG)
Installazione
+
BATTERY
●
●
●
Val av kabel-tjocklek beror på den
totala kabellängden;
A+B+C+D+E =
Från batteriet till ankarspelet.
Från ankarspelet till batteriet.
Tjocklek av strömbrytares ledning:
1.5 mm² (14AWG)
Installation
13
● Loading
● Ladung
● Chargement
● Carga
● Carico
● Belastning
14
SERIAL Nº
SIMPSON-LAWRENCE LTD
GLASGOW 0141-427-5331
1
4
2
3
5
6
SERIAL Nº
SIMPSON-LAWRENCE LTD
GLASGOW 0141-427-5331
1. Before attempting to splice rope to
chain, read warning on page 5
(paragraph 7).
Warning! Before loading rode,
power windlass up to ensure gipsy is
in the drive position and not freefall.
2. Hold out control arm.
3. Feed anchor rope/chain into entry
hole. Feed until rope/chain drops
into chain locker.
4. Align rope/chain in gipsy, release
control arm.
5. Tie off anchor rope/chain to
suitable strong point.
6. Power load rest of anchor rope/
chain.
1. Bevor Sie versuchen, das Seil an
die Kette zu spleißen, lesen Sie
die Warnung auf Seite 5
(Paragraph 7).
WARNUNG: Schalten Sie die
Ankerwinde vor Laden des
Ankergeschirrs ein, um abzusichern,
daß sich der Verholspillkopf in der
Antriebsposition und NICHT auf
Freifall befindet.
2. Steuerungsarm herausziehen.
3. Führen Sie Ankerseil/Kette in
Öffnung, bis Seil/Kette in
Kettenhalterung einrastet.
4. Richten Sie das Seil/die Kette im
Verholspillkopf aus und drücken
Sie den Steuerhebel nach innen.
5. Befestigen Sie Ankerseil/Kette an
geeignetem Stützpunkt.
6. Seil/Kette mit Hilfe der elektrischen
Winde einholen.
1. Avant d’essayer d’épisser la corde
à la chaîne, lisez les
recommandations page 5
(paragraphe 7).
Attention! Avant de charger le
guide, remontez le guindeau pour
faire en sorte que le barbotin soit bien
enclenché et non en chute libre.
2. Tirez le bras de commande.
3. Introduisez la corde/chaîne dans
l’orifice d’entrée. Rentrez la corde/
chaîne jusqu’à ce qu’elle touche le
fond du casier.
4. Alignez la corde/chaîne sur le
barbotin, appuyez sur le levier de
contrôle.
5. Attachez la corde/chaîne à un
point d’attache qui convienne.
6. Chargez le reste de la corde/
chaîne au moteur.
1. Antes de intentar realizar una junta
de la cuerda a l cadena, lea la
advertencia de la página 5 (párrafo
7).
¡Aviso importante! Antes de cargar
la cadena o cable, potenciar el
cabrestante hacia arriba para
asegurar que la tuerca gitana está en
marcha y no en la caída libre.
2. Saque el brazo de control.
3. Introduzca la cuerda/cadena de
anclaje en el agujero de entrada.
Suelte cuerda hasta que la cuerda/
cadena caiga en el cierre de la
cadena.
4. Alinear cuidadosamente la cuerda
o la cadena en la tapa propulsora
barbotin y luego introduoir la
manivela de control, empujando
ligeramente.
5. Ate la cuerda/cadena a un punto
fuerte adecuado.
6. Cargue automáticamente el resto
de la cuerda/cadena de anclaje.
1. Prima di cercare di impiombare la
cima alla catena, leggere
l’avvertimento a pagina 5
(paragrafo 7).
ATTENZIONE! Prima di mettere
sotto carico la fune, accendere il
verricello per assicurarsi che l’argano
sia in posizione di trasmissione del
movimento e non in stato di caduta
libera.
2. Estrarre il braccio trasversale.
3. Far scivolare la cima e la catena
nel foro di entrata. Far avanzare
sino a quando la cima e la catena
cadono nell’alloggiamento della
catena.
4. Posizionare correttamente la
cuerda/catena nell’argano, inserire
la leva di controllo.
5. Fissare la cima e la catena ad un
supporto robusto.
6. Caricare elettricamente quanto
rimane della cima e della catena
dell’ancora.
1. Läs varning på sidan 5 (paragraf 7)
innan ni försöker splitsa repet till
kedjan.
Varning! Innan ankarlinan laddas,
slå på strömmen för att försäkra dig
om att ankarspelets drevtrumma är i
drivläge och inte frifall.
2. Dra ut kontrollspak.
3. För ner ankarrepet/kedjan i
ingångshålet. Se till att repet/
kedjan är väl nere i utrymmet.
4. Föra in ankarrep/kedja i ledaren,
skjuta in kontrollarmen.
5. Sätt fast ankarrepet/kedjan vid
lämplig hållpunkt.
6. Starta vinschen och rulla upp
resten av ankarrepet/kedjan.
Installation
Installation
Installation
Instalación
Installazione
Installation
● Safety and Use
● Sicherheit und Anwendung
✗
✗
● Sécurité et utilisation
✗
● Seguridad y uso
● Sicurezza ed uso
✗
✗
● Säkerhet och användning
2
1
W
✗
SERIA
SIMPSO
GLASGO N-LAWR
L Nº
ENCE
0141-42
LTD
7-5331
4
3
5
SERIAL Nº
SIMPSON-LAWRENCE LTD
GLASGOW 0141-427-5331
SERIAL Nº
SIMPSON-LAWRENCE LTD
GLASGOW 0141-427-5331
✗
SERIAL Nº
SIMPSON-LAWRENCE LTD
GLASGOW 0141-427-5331
1. Check for swimmers. Keep clear
of moving anchor rope/chain.
2. Do not overload windlass. Avoid
stalling windlass.
3. Splice should not be in windlass
with anchor raised.
4. Secure anchor to bow fitting to
prevent accidental release.
5. When riding at anchor, secure
anchor rope/chain to a suitable
independant strong point.
Warning: When not in use, you must
isolate windlass with circuit breaker/
isolator.
1. Gehen Sie sicher, daß sich keine
Schwimmer in der Nähe aufhalten.
Halten Sie Abstand von sich
bewegender Ankerseil/Kette.
2. Winde nicht überladen. Abwürgen
vermeiden.
3. Spleiß sollte nicht in der Winde
sein, wenn der Anker eingeholt ist.
4. Anker an Bugeinpassung sichern,
um versehentliches Loslösen zu
verhindern.
5. Wenn Sie vor Anker liegen,
Ankerseil/Kette an geeignetem
unabhängigem Stützpunkt sichern.
Warnung: Wenn nicht in Gebrauch
müssen Sie die Winde mit
Stromunterbrecher/Isolator isolieren.
1. Vérifiez qu’il n’y a pas de nageurs.
Tenez-vous éloigné de la corde/
chaîne d’ancre en mouvement.
2. Ne faites pas forcer le guindeau.
Evitez de le faire caler.
3. L’épissure ne doit pas se trouver
dans le guindeau lorsque l’ancre
est relevée.
4. Bloquez l’ancre à la proue pour
éviter qu’elle ne lâche.
5. Lorsque vous êtes ancré, fixez la
corde/chaîne de l’ancre à un point
d’attache solide qui convienne.
Recommandation: Lorsque le
guindeau est éteint vous devez
l’isoler avec le coupe-circuit/isolateur.
1. Compruebe que no hay nadie
buceando. Manténgase alejado de
la cuerda/cadena de anclaje.
2. No sobrecargue el torno. Evite
calar el torno.
3. No debería realizarse una junta en
el torno con el ancla elevada.
4. Asegure el ancla al acoplamiento
de proa para evitar que se suelte
por accidente.
5. Cuando navegue a ancla, asegure
la cadena/cuerda de anclaje a un
punto fuerte independiente.
Advertencia: Debe aislar el torno
con un interruptor diferencial/aislador
cuando no lo esté utilizando.
1. Controllare che non vi siano
bagnanti nelle vicinanze. Tenersi
lontani dalla cima e dalla catena
dell’ancora in movimento.
2. Non sovraccaricare il verricello.
Evitare che stalli.
3. L’impiombatura non deve essere
nel verricello quando l’ancora è
sollevata.
4. Fissare l’ancora al supporto di prua
per evitare il suo rilascio
accidentale.
5. Quando si è ancorati, fissare la
cima e la catena dell’ancora ad
uno strozzatoio indipendente e
robusto.
Avvertimento: quando il verricello
non è in funzione, isolarlo per mezzo
dell’interruttore automatico o del
sezionatore.
1. Kontrollera vattnet för badare. Var
försiktig med ankarrepet/ kedjan i
rörelse.
2. Var noga med att ej tvärstoppa och
överbelasta vinschen.
3. Den splitsade delen av repet skall
ej vara i vinschen när ankare är
uppe.
4. Säkra ankaret noggrant vid reling
för att undvika oavsiktligt nersläpp.
5. Vid segling för ankare, var noga
med att säkra ankarrep/kedja.
Varning: Vinschen måste vara
avstängd med strömkretsbrytare när
den ej används.
Operation
Betrieb
Fonctionnement
Operación
Funzionamento
Drift
15
16
● Safety and Use
● Sicherheit und Anwendung
● Sécurité et utilisation
2
1
1. Press the DOWN button for 2
seconds until the anchor is under
freefall (F). (Note: Pressing DOWN
for 5+ seconds will result in a clutch
re-engagement time of up to 30
seconds during the next UP
command.) If using a rope/chain
rode, motor astern to create the
desired scope (S).
2. Once the scope has been created,
press the UP button continuously
until freefall stops. It normally takes
about 10 seconds to fully re-engage
the internal clutch mechanism,
locking the windlass. Failure to do
this could result in rope/chain
creeping out.
3. Motor astern or drift to set the
anchor.
4. Press the UP button continuously to
recover the anchor.
Warning: To ensure continuous freefall
operation using rope/chain rodes, it is
important that the rope is free from
knots or hockles. To avoid this problem
we recommend periodically paying out
the rode whilst motoring astern (in deep
water) to unwind any knots or hockles
that may be present.
Operation
1. Drücken Sie zwei Sekunden lang die
Taste DOWN (runter), bis sich der
Anker im Freifall befindet (F).
(Achtung: Wird die DOWN-Taste 5+
Sekunden gedrückt, so resultiert das
in einer erneuten Einholzeit (UP hoch) von bis zu 30 Sekunden.) Wird
das Seil-/Kettengeschirr verwendet,
so erzeugen Sie durch leichtes
Rückwärtsfahren etwas Ausstich (S).
2. Haben Sie etwas Ausstich
geschaffen, so halten Sie dann die
Taste UP (hoch) bis zu 10 Sekunden
lang gedrückt, bis der Freifall
beendet ist. Dadurch wird der interne
Kupplungsmechanismus vollständig
eingerückt und die Ankerwinde
verriegelt. Ein Nichtbefolgen dieser
Anweisung kann ein weiteres
Auslaufen von Seil oder Kette
bedingen.
3. Fahren Sie rückwärts oder lassen Sie
sich treiben, um den Anker zu richten.
4. Halten Sie die Taste UP (hoch)
gedrückt, um den Anker einzuholen.
Achtung: Um einen kontinuierlichen
Freifall mit Seil-/Kettengeschirr zu
ermöglichen ist es wichtig, dass das Seil
keine Knoten oder Knicke aufweist.
Zur Vermeidung dieses Problems
empfehlen wir, dass das Geschirr bei
Rückwärtsfahrt (in tiefem Wasser)
regelmäßig ausgesteckt wird, um auf
diese Weise evtl. vorhandene Knoten
oder Knicke zu beseitigen.
Betrieb
● Seguridad y uso
1. Appuyez 2 secondes sur BAS jusqu’à
ce que l’ancre soit en chute libre (F).
(NB: En appuyant 5 secondes sur
BAS, vous en réenclencherez la
remontée (HAUT) qui peut durer
jusqu’à 30 secondes.) Si en utilisant
une corde/chaîne, marche arrière
pour créer l’amplitude désirée (S).
2. Une fois l’amplitude créée, appuyez
sans interruption sur le bouton HAUT
jusqu’à ce que la chute libre cesse.
Cela prend environ 10 secondes pour
réenclencher complètement le
mécanisme d’embrayage interne,
verrouillant le guindeau. Si vous ne
procédez pas ainsi, la corde/chaîne
pourrait s’éloigner furtivement.
3. Marche arrière ou dérive pour fixer
l’ancre.
4. Appuyez sur HAUT sans interruption
pour récupérer l’ancre
Attention: Pour vous assurer d’une
chute libre continue en utilisant corde/
chaîne, il est important que la corde soit
sans nœuds ni traces d’usure. Pour
éviter le problème, nous recommandons
de laisser filer la corde lors d’une marche
arrière (en eau profonde) pour délier tout
nœud qui pourrait exister.
Fonctionnement
● Sicurezza ed uso
● Säkerhet och användning
3
1. Apretar el botón de BAJAR (DOWN)
durante 2 segundos hasta que el
ancla esté en caída libre (F)
[Advertencia: Si se aprieta el botón
durante 5 segundos o más, el ancla
se recogería durante un período que
puede llegar a los 30 segundos
durante la siguiente orden de SUBIR
(UP)] Si se usa cuerda/cadena, se
debe maniobrar hacia popa para
crear el espacio deseado (S)
2. Una vez que se ha creado el espacio
deseado, apretar el botón de SUBIR
(UP) constantemente durante 10
segundos hasta que la caída libre
cese. Esta operación engrana
completamente el mecanismo de
embrague interno, asegurando así el
cabrestante. Si no se lleva a cabo
esta operación, la cuerda/cadena
corre el peligro de soltarse.
3. Maniobrar hacia popa o dejarse llevar
por la corriente para poner el ancla
4. Presionar el botón de SUBIR (UP)
para levar el ancla.
Advertencia: Para asegurar la
continuidad de la operación de caída
libre cuando se usa cuerda/cadena, es
importante que la cuerda no tenga
nudos o trabas. Para evitar este
problema, se recomienda ir soltando
cuerda periódicamente mientras se
maniobra hacia popa (en alta mar) para
deshacer cualquier nudo o traba que
pueda formarse.
1. Tenere premuto il pulsante DOWN
per 2 secondi fino a quando l’ancora
risulta sotto caduta libera (F).
(Attenzione: Tenendo premuto il
pulsante DOWN per + di 5 secondi si
avrà come risultato un nuovo
ingranamento (UP) che può durare
fino a 30 secondi.) Se si usa la fune/
catena accendere il motore per
creare un gioco (S).
2. Una volta che il gioco è stato creato
premere senza interruzione il
pulsante UP fino a 10 secondi, fino a
quando la caduta libera si ferma.
Questo ingranerà totalmente il
meccanismo della frizione interna,
bloccando l’argano. Il non
eseguimento di questa operazione
può avere come risultato lo
srotolamento della fune/ catena.
3. Azionare il motore in retromarcia o
scivolare a motore spento alla deriva
per sistemare l’ancora.
4. Premere il bottone (UP) senza
interruzione per recuperare l’ancora.
Attenzione: Per assicurare
un’operazione continuata di caduta
libera usando la fune/catena, è
importante che la fune non abbia nodi o
intrecci. Per evitare questo problema si
raccomanda periodicamente di mollare
la fune/catena mentre si aziona il motore
in retromarcia (in acqua alta) per
sciogliere eventuali nodi o intrecci che si
sono potuti formare.
Operación
Funzionamento
4
1. Tryck på NER- knappen i 2 sekunder
tills ankaret befinner sig i fritt fall (F).
(Varning: Tryck på NER i mer än 5
sekunder och det resulterar i
återinkoppling (UPP) i upp till 30
sekunder.) Om rep/kedjerep
användes, låt båten gå för att skapa
spännvidd (S).
2. När tillräcklig spännvidd skapats, håll
UPP-knappen nertryckt i upp till 10
sekunder tills det fria fallet avstannat.
Detta lägger in den interna
kopplingsmekanismen och låser
ankarspelet. Om detta inte görs kan
det resultera i att rep/kedja smyger
sig ut.
3. Låt båten backa eller driva för att
kasta ankar.
4. Håll UPP-knappen nedtryckt för att
dra upp ankaret.
Varning: För att vara säker på
kontinuerlig frifallsdrift när rep/kedjerep
användes är det viktigt att repet är fritt
från knutar eller öglor. För att undvika
sådana problem rekommenderar vi att
man emellanåt släpper ut repet medan
båten backar (på djupt vatten) för att
räta ut knutar eller öglor som kan ha
uppstått.
Drift
● Schedule
● Zeitplan
1
● Entretien
2
✓
● Fechas
3
✗
Regularly:
● Schedulazione
● Förteckning
4
5
SERIAL Nº
-
+
SIMPSON-LAWRENCE LTD
GLASGOW 0141-427-5331
Regelmäßig:
Régulièrement:
Periódicamente:
Ad intervalli regolari:
Regelbundet:
1. Winde mit frischem Wasser
waschen.
2. Montageschrauben und Muttern
festangezogen und in gutem
Zustand?
3. Elektrische Verbindungen auf
Korrosion überprüfen, reinigen und
leicht fetten.
1. Rincer le guindeau à l’eau douce.
2. Vérifiez que les boulons et écrous
de montage sont suffisamment
serrés et sont en bon état.
3. Examinez tous les fils électriques
pour la corrosion, nettoyez et huilez
légèrement.
1. Lave el torno con agua limpia.
2. Compruebe el apriete y estado de
los pernos de montaje y tuercas.
3. Examine todas las conexiones
eléctricas por si estuviesen
corroídas, límpielas y engrase
ligeramente.
1. Lavare il verricello con acqua dolce.
2. Controllare che i bulloni di
montaggio e i dadi siano serrati e in
buone condizioni.
3. Controllare che i collegamenti
elettrici non siano corrosi; pulirli ed
ingrassarli leggermente.
1. Tvätta av vinschen med rent vatten.
2. Kontrollera att alla fastsättningsskruvar och muttrar är spända och i
god kondition.
3. Kontrollera alla elektriska
kopplingar för att undvika korrosion,
rengör och smörj regelbundet.
Jährlich:
Une fois par an:
Anualmente:
Annualmente:
Årligen:
4. Check electric cables for damage.
Repair/renew as required.
5. Strip the above deck components,
clean and lightly grease.
4. Elektrische Kabel auf Schäden
überprüfen und gegebenenfalls
reparieren/erneuern.
5. Oben abgebildete Deckbestandteile
freilegen, reinigen und leicht fetten.
4. Vérifiez qu’aucun fil n’est
endommagé. Réparez/renouvelez si
nécessaire.
5. Démontez les pièces ci-dessus,
lavez et huilez légèrement.
4. Compruebe que los cables
eléctricos no están dañados.
Repare/renueve según requiera.
5. Retire los componentes de la
cubierta superior, límpielos y
engrase ligeramente.
4. Controllare che i cavi elettrici non
siano danneggiati, nel qual caso
ripararli o sostituirli.
5. Smontare i componenti succitati
del ponte, pulirli ed ingrassarli
leggermente.
4. Kontrollera elektriska kablar.
Reparera/ byt ut delar vid behov.
5. Ta isär ovanstående delar, rengör
och smörj vid behov.
Servicing
Wartung
Entretien
Servicio
Manutenzione
Underhåll
1. Wash down the windlass using
fresh water.
2. Check mounting bolts and nuts for
tightness and condition.
3. Examine all electrical connections
for corrosion, clean and lightly
grease.
Annually:
17
● Parts
● Bauteile
● Pièces
● Piezas
● Parti
18
● Delar
RC0761
RC0670
23
30
30
125
40
3
116
115
114
47
45
124
RC0860
C0860
41
46
41
35 12v H600
117
72
37 24v H900
126
40
72
36 12v H900
19
114
113
1
119
14
118
13
112
111
51
114
10
4
122
15
43
40
5
6
43
109
15
17
14
2
49
30
52
C0671
120 H600f
40
41
22
16
si
m
on
horizo
50
122
ps
-la
n0
00
20
21
16
60
62
44
Servicing
61
Wartung
Entretien
wre
ef
fre
20
Servicio
Manutenzione
Underhåll
nce
all
s
i
er
es
121 H900f
● Parts
● Bauteile
Item
No.
Description
1
2
3
4
5
6
10
13
14
15
16
17
19
20
21
22
23
30
35
36
37
40
or 40
or 40
or 40
or 40
41
43
44
45
46
47
49
50
51
52
60
61
62
72
109
111
112
Maincase
Gear Train Cover
Motor Cover
Mainshaft Gear
2nd Compound Gear
1st Compound Gear
Motor Drive Shaft Assembly
Steel Hardened & Ground Dowel
Steel Hardened & Ground Dowel
Teflon Flat Washer
Teflon Flat Washer
Needle Roller Bearing
Needle Roller Clutch Bearing
Needle Roller Bearing
Needle Roller Bearing
Needle Roller Bearing
Socket Screw
Socket Screw
12v/400W Electric Motor
12v/600W Electric Motor
24v/600W Electric Motor
Chain Only (C0671) 6mm Gipsy
Rope/Chain (RC0670) 6mm Gipsy
Rope/Chain (RC0761) 7mm Gipsy
Rope/Chain (RC0860) 8mm Gipsy
Chain Only (C0860) 8mm Gipsy
Guide Pillar
Needle Roller Bearing
Fleming, Chain Only
Control Arm
Torsion Spring
Pivot Pin
Wiper Seal
External Circlip
Socket Screw
Socket Screw
Screwed All Threads
Nyloc Nut
Washer
Cover Plug
Mainshaft
Drive Cone
Operating Nut
Servicing
● Pièces
Qty. Qty. Part/Service
H600f H900f Kit Number
1
1
1
1
1
1
1
1
2
2
2
1
1
2
1
1
3
1
1
1
1
1
1
1
1
2
1
1
1
1
1
1
3
8
3
3
3
1
1
1
1
Wartung
1
1
1
1
1
1
1
1
2
2
2
1
1
2
1
1
3
1
1
1
1
1
1
1
1
1
2
1
1
1
1
1
1
3
8
3
3
3
1
1
1
1
60540K01
60540K26
60540K02
60540K03
60540K04
60540K05
60540K08
60540K09
60540K09
60540K09
60540K09
60540K09
60540K09
60540K09
60540K09
60540K09
60540K10
60540K10
60540K12
60550K13
60550K14
60540K16
60541K37
60541K38
60550K19
60550K31
60540K21
60540K09
60540K20
60540K22
60540K22
60540K22
60540K24
60540K10
60540K10
60540K10
60540K25
60540K25
60540K25
60540K24
60541K32
60541K33
60541K33
Item
No.
Description
113
114
115
116
117
118
119
Freefall Housing
Housing Spacer
Thrust Washer
External Circlip
Socket Screw
Pawl
Pawl Spring
Service Kits
60540K01
60540K02
60540K03
60540K04
60540K05
60540K08
60540K09
60540K10
60540K12
60550K13
60550K14
60540K16
60541K37
60541K38
60550K19
60540K20
60540K21
60540K22
60540K24
60540K25
60540K26
60550K31
60541K32
60541K33
60541K34
60541K35
60541K36
6044111
Entretien
● Piezas
● Parti
Qty. Qty. Part/Service
H600f H900f Kit Number
1
1
1
1
1
1
1
1
1
1
1
1
1
1
60541K34
60541K35
60541K35
60541K35
60541K35
6044111
6044111
● Delar
Item
No.
Description
120
121
122
124
125
126
Horizon 600f Nameplate
Horizon 900f Nameplate
Housing Spacer
Shaft Washer
Set Screw
Washer Spring
Part Description
Qty. Qty. Part/Service
H600f H900f Kit Number
1
1
1
1
1
1
1
1
1
1
60541K36
60541K36
60541K35
60541K35
60541K35
60541K35
Parts Included in Kit
Maincase Assembly . . . . . . . . . . . . . . . . . . . . . . . . . . . . . . . . . . . . . . . . . . . . . . . . . . . . . . . . . . . . . . . . . . . . . . . . . . . 1, 13, 14, 22 & 49
Motor Cover Assembly . . . . . . . . . . . . . . . . . . . . . . . . . . . . . . . . . . . . . . . . . . . . . . . . . . . . . . . . . . . . . . . . . . . . . . . . . . . . . . 3 & 23 (x3)
Mainshaft Gear . . . . . . . . . . . . . . . . . . . . . . . . . . . . . . . . . . . . . . . . . . . . . . . . . . . . . . . . . . . . . . . . . . . . . . . . . . . . . . . . . . . . . . . . . . . .4
2nd Compound Gear Assembly . . . . . . . . . . . . . . . . . . . . . . . . . . . . . . . . . . . . . . . . . . . . . . . . . . . . . . . . . . . . . . 5, 14, 16 (x2) & 20 (x2)
1st Compound Gear Assembly . . . . . . . . . . . . . . . . . . . . . . . . . . . . . . . . . . . . . . . . . . . . . . . . . . . . . . . . . . . . . . .6, 13, 15 (x2) & 43 (x2)
Motor Drive Shaft Assembly . . . . . . . . . . . . . . . . . . . . . . . . . . . . . . . . . . . . . . . . . . . . . . . . . . . . . . . . . . . . . . . . . . . . . . . . . . . . . . . . . 10
Bearing Kit . . . . . . . . . . . . . . . . . . . . . . . . . . . . . . . . . . . . . . . . . . . . . . . . . . . . 13, 14, 15 (x2), 16 (x2), 17, 19, 20 (x2), 21, 22 & 43 (x2)
Fastener Kit . . . . . . . . . . . . . . . . . . . . . . . . . . . . . . . . . . . . . . . . . . . . . . . . . . . . . . . . . . . . 23 (x3), 24, 30 (x2), 50, 51 (x3), 52 (x8) & 73
H600 12V/400W Electric Motor Assembly . . . . . . . . . . . . . . . . . . . . . . . . . . . . . . . . . . . . . . . . . . . . . . . . . . . . . . . . . . . .35, 19 & 51 (x3)
H900 12V/600W Electric Motor Assembly . . . . . . . . . . . . . . . . . . . . . . . . . . . . . . . . . . . . . . . . . . . . . . . . . . . . . . . . . . . .36, 19 & 51 (x3)
H900 24V/600W Electric Motor Assembly . . . . . . . . . . . . . . . . . . . . . . . . . . . . . . . . . . . . . . . . . . . . . . . . . . . . . . . . . . . .37, 19 & 51 (x3)
Chain Only (C0671) 6mm Gipsy Assembly . . . . . . . . . . . . . . . . . . . . . . . . . . . . . . . . . . . . . . . . . . . . . . . . . . . . . . . . . . . . . . 40, 44 & 52
Rope/Chain (RC0670) 6mm Gipsy Assembly . . . . . . . . . . . . . . . . . . . . . . . . . . . . . . . . . . . . . . . . . . . . . . . . . . . . . . . . . . . . 40, 52 & 73
Rope/Chain (RC0761) 7mm Gipsy Assembly . . . . . . . . . . . . . . . . . . . . . . . . . . . . . . . . . . . . . . . . . . . . . . . . . . . . . . . . . . . . 40, 52 & 73
Rope/Chain (RC0860) 8mm Gipsy Assembly . . . . . . . . . . . . . . . . . . . . . . . . . . . . . . . . . . . . . . . . . . . . . . . . . . . . . . . . . . . . 40, 52 & 73
Fleming, Chain Only Kit . . . . . . . . . . . . . . . . . . . . . . . . . . . . . . . . . . . . . . . . . . . . . . . . . . . . . . . . . . . . . . . . . . . . . . . . . . . . . . . . 44 & 52
Guide Pillar Kit . . . . . . . . . . . . . . . . . . . . . . . . . . . . . . . . . . . . . . . . . . . . . . . . . . . . . . . . . . . . . . . . . . . . . . . . . . . . . . . . . . . . 30, 41 & 72
Control Arm Kit . . . . . . . . . . . . . . . . . . . . . . . . . . . . . . . . . . . . . . . . . . . . . . . . . . . . . . . . . . . . . . . . . . . . . . . . . . . . . . . . . . . .45, 46 & 47
Seal Kit . . . . . . . . . . . . . . . . . . . . . . . . . . . . . . . . . . . . . . . . . . . . . . . . . . . . . . . . . . . . . . . . . . . . . . . . . . . . . . . . . . . . . . . . . 29, 49 & 72
Mounting Kit . . . . . . . . . . . . . . . . . . . . . . . . . . . . . . . . . . . . . . . . . . . . . . . . . . . . . . . . . . . . . . . . . . . . .60 (x3), 61 (x3), 62 (x3) & 74 (x3)
G Gear Train Cover Assembly . . . . . . . . . . . . . . . . . . . . . . . . . . . . . . . . . . . . . . . . . . . . . . . . . . . . . . . . . . . . 2, 17, 21, 38, 39 & 52 (x7)
Chain Only (C0860) 8mm Gipsy Assembly . . . . . . . . . . . . . . . . . . . . . . . . . . . . . . . . . . . . . . . . . . . . . . . . . . . . . . . . . . . . . . 40, 52 & 73
Mainshaft Kit . . . . . . . . . . . . . . . . . . . . . . . . . . . . . . . . . . . . . . . . . . . . . . . . . . . . . . . . . . . . . . . . . . . . . . . . . . . . . . . . . . . . . . . .14 & 109
Drive Cone Kit . . . . . . . . . . . . . . . . . . . . . . . . . . . . . . . . . . . . . . . . . . . . . . . . . . . . . . . . . . . . . . . . . . . . . . . . . . . . . . . . . . . . . 111 & 112
Freefall Housing . . . . . . . . . . . . . . . . . . . . . . . . . . . . . . . . . . . . . . . . . . . . . . . . . . . . . . . . . . . . . . . . . . . . . . . . . . . . . . . . . . . . . . . . . 113
Housing Location Kit . . . . . . . . . . . . . . . . . . . . . . . . . . . . . . . . . . . . . . . . . . . . . . . . . . . . . . . . . 114, 115, 116, 117, 122, 124, 125 & 126
Horizon 600/900f Nameplate Kit . . . . . . . . . . . . . . . . . . . . . . . . . . . . . . . . . . . . . . . . . . . . . . . . . . . . . . . . . . . . . . . . . . . . . . . 120 & 121
Pawl & Spring Set . . . . . . . . . . . . . . . . . . . . . . . . . . . . . . . . . . . . . . . . . . . . . . . . . . . . . . . . . . . . . . . . . . . . . . . . . . . 118 (x3) & 119 (x3)
Servicio
Manutenzione
Underhåll
19
● Parts
● Bauteile
1
● Pièces
2
● Piezas
3
4
● Parti
5
● Delar
6
20
7
1. Isolate the windlass using circuit
breaker/isolator.
2. Disconnect the motor cables
from wiring loom.
3. Remove 3 nuts and washers
from under deck. Remove
windlass from deck and take to
workshop.
4. Remove 7 (4mm AF) gear case
socket head screws, remove
gear train cover from maincase.
5. Remove the motor cover by
unscrewing the 3 (4mm AF)
socket head screws.
6. Remove the motor by
unscrewing the 3 (5mm AF)
socket head screws.
7. Separate motor and maincase.
Installation is a reversal of above.
Re-grease as necessary and use
marine grade silicone sealant to seal
the maincase to the motor cover and
gear train cover.
1. Isolieren Sie die Winde mit
Stromunterbrecher/Isolator.
2. Lösen Sie die Motorkabel vom
Riemenschaft.
3. Lösen Sie die 3 unter dem Deck
befindlichen Muttern und
Unterlegscheiben. Lösen Sie die
Ankerwinde vorn Deck und
transportieren Sie die in die
Werkstatt.
4. Entfernen 7 (4mm AF)
GetriebegehäuseZylinderkopfschrauben und
entnebmen Sie das
Rädergetriebe aus dem
Hauptgehäuse.
5. Lösen Sie die Motorabdeckung
durch Lösen der 3 (4mm AF)
Zylinderkopfschrauben.
6. Entfernen Sie den Motor durch
Lösen der 3 (5mm AF)
Zylinderkopfschrauben.
7. Trennen Sie Motor und
Hauptgehäuse.
Installation in umgekehrter
Reihenfolge. Schmieren Sie nach
Bedarf neu und verwenden Sie einen
Siliziumdichtung der Schiffsklausse
zur Abdichtung des Hauptgehäuses
an der Motorabdeckung und
Rädergetriebeabdeckung.
1. Isolez le guindeau en utilisant un
coupe-circuit/isolateur.
2. Débranchez les fils du moteur du
circuit.
3. Enlevez les 3 écrous et rondelles
de dessous le pont. Enlevez le
guindeau du pont et portez-le à
l’atelier.
4. Enlever les 7 (4mm AF) écrous
de têtes de vis de la boîte
d’embrayage, enlever le
couvercle de l’engrenage du
boitier principal.
5. Enlevez le couvercle du moteur
en dévissant les 3 (4mm AF)
écrous de têtes de vis.
6. Enlever le moteur en dévissant
les trois (5mm AF) écrous de
têtes de vis.
7. Séparez le moteur du boîtier
principal.
Pour l’installation procédez à
l’inverse de la description ci-dessus.
Le cas échéant, regraisser et utiliser
du silicone marin pour sceller la
boîte au couvercle du moteur et au
couvercle de l’engrenage.
1. Aísle el torno utilizando el
diferencial/aislador.
2. Desconecte los cables del motor
del conducto general.
3. Quitar las 3 tuercas y arandelas
de debajo de la cubierta. Quitar
el cabrestante de la cubierta y
llevario al taller.
4. Quitar 7 tornillos (4mm AF) de
tipo encaje (socket head) de la
caja de embrague, quitar la tapa
que cubre el tren del embrague
de la instalación central.
5. Quitar la tapa del motor sacando
los 3 (4mm AF) tornillos allen.
6. Quitar el motor destornillando los
3 (5mm AF) tornillos de tipo
encaje (socket head).
7. Separar el motor de la caja
principal.
La instalación es el procedimiento
inverso de las instrucciones
anteriores. Volver a poner cuanta
grasa sea necesaria y usar o
sellador de silicona de categoría
marina para sellar la caja principal a
la cubierta del motor a la cubierta del
tren de embrague.
1. Isolare il verricello per mezzo
dell’interruttore automatico o del
sezionatore.
2. Scollegare i cavi del motore dal
cablaggio.
3. Rimuovere i 3 dadi e la rondelle
da sotto il ponte. Rimuovere
l’argano dal ponte e portario in
officina.
4. Rimuovere 7 (4mm AF) viti con
testa esagonale, rimuovere il
coperchio del treno di ingranaggi
dalla scatola principale.
5. Rimuovere il coperchio del
motore svitando le 3 (4mm AF)
viti.
6. Rimuovere il motore svitando le
3 (5mm AF) viti con testa
esagonalle.
7. Separare il motore dalla scatola
principale.
Assemblare eseguendo in modo
inverso le operazioni descritte in
precedenza. Riingrassare se
necessario e usare un mastice al
silicone qualità marittima per sigillare
la scatola principale al coperchio del
motore e al coperchio del treno
d’ingranaggi.
1. Stäng av vinschen med
strömkretsbrytaren.
2. Urkoppla motorns kablar från
ledningsspolen.
3. Ta bort de 3 muttrarna och
brickorna under däcksplankan.
Lyfta av ankarspelet och
transportera detta till verkstaden.
4. Ta bort de 7 (4mm AF) skruvar
som håller växellådans underdel,
Ta bort växellådskåpan.
5. Avlägsna motorkåpan genom att
skruva loss de 3 (4mm AF)
insexskruvarna.
6. Skruva loss de 3 (5mm AF)
insexskruvarna som fäster motorn
till huset.
7. Avlägsna motorn från huset.
Ihopsättning är densamma som ovan
fast i omvänd ordning. Smörj om
nödvändigt vid återinstallation.
Servicing
Wartung
Entretien
Servicio
Manutenzione
Underhåll
● Appendix
● Anhang
● Annexe
● Apéndice
● Appendice
● Appendix
Specifications
Technische Angaben
Spécifications
Características técnicas
Caratteristiche tecniche
Specifikationer
Voltage
Motor size
Maximum pull:
Chain in gipsy
Maximum pull:
Rope in gipsy
Recovery load
Line speed at
recovery load
Current draw at
recovery load
Weight
Spannung
Motorgröße
Maximale Ladung:
Kette in Verholkopf
Maximale Ladung:
Seil in Verholkopf
Arbeitsbelastung
Kettengeschwindigkeit
bei Arbeitsbelastung
Strömungszug bei
Arbeitsbelastung
Gewicht
Tension
Puissance du moteur
Charge maximale :
Chaîne dans la
poupée
Charge maximale:
Corde dans la poupée
Charge de travail
Vitesse de Montée en
charge
Courant en charge
Poids
Tensión
Tamaño del Motor
Carga máxima:
Cadena en rodaje
Carga máxima:
Cuerda en rodaje
Carga de trabajo
Velocidad de línea en
carga de trabajo
Tensión en carga de
trabajo
Peso
Tensione
Dimensioni del motore
Carico massimo:
Con catena nel
tamburo per alaggio
Carico minimo:
Con cima nel tamburo
per alaggio
Carico di lavoro
Velocità di linea al
carico di lavoro
Consumo di corrente
al carico di lavoro
Peso
Spänning
Motor storlek
Maximal belastning:
Kedja i
vinschtrumman
(gipsy)
Maximal belastning:
Rep i vinschtrumman
(gipsy)
Driftsbelastning
Repets hastighet i drift
Elförbrukning i drift
Vikt
H600f - 12v
400W (Output)
280kg (625lb)
280kg (625lb)
50kg (110lb)
19m/min (62ft/min)
45A
8.2kg (18lb)
410kg (900lb)
410kg (900lb)
50kg (110lb)
24.5m/min (80ft/min)
70A
8.2kg (18lb)
410kg (900lb)
410kg (900lb)
50kg (110lb)
30m/min (98ft/min)
35A
8.2kg (18lb)
550W (Input)
H900f - 12v
600W (Output)
750W (Input)
H900f - 24v
600W (Output)
750W (Input)
Servicing
Wartung
Entretien
Servicio
Manutenzione
Underhåll
21
● Appendix
● Anhang
● Annexe
D
W = 3.5 x D
● Apéndice
● Appendice
● Appendix
22
D
A
P=3xD
SERIAL Nº
RC0860
D
D
S-L 005800 3
24mm
8mm
14-16mm (9/16-5/8” U.S.A. only)
French NFE26-011
24mm
8mm
14-16mm (9/16-5/8” U.S.A. only)
German DIN 766
24mm
8mm
14-16mm (9/16-5/8” U.S.A. only)
American ACCO BBB
C0860
/16”
E
14-16mm (9/16-5/8” U.S.A. only)
A = 146mm
(5¾”)
B = 248mm
(9¾”)
24mm
8mm
French NFE26-011
24mm
8mm
C = 187mm
(73/8”)
24mm
8mm
D = 82mm
(3¼”)
E = 105mm
(41/8”)
American ACCO BBB
RC0670
25.4mm
5
D
S-L 005800 3
German DIN 766
RC0761
SIMPSON-LAWRENCE LTD
GLASGOW 0141-427-5331
P
25.4mm
5
/16”
S-L 0058012
21mm
7mm
12mm (½” U.S.A. only)
German DIN 766
22mm
7mm
12mm (½” U.S.A. only)
American ACCO BBB
21.6mm
¼”
12mm (½” U.S.A. only)
American G-4 ISO
21.3mm
¼”
12mm (½” U.S.A. only)
S-L 0058011
18mm
6mm
12mm (½” U.S.A. only)
French NFE26-011
18mm
6mm
12mm (½” U.S.A. only)
18.5mm
6mm
12mm (½” U.S.A. only)
S-L 0058011
18mm
6mm
French NFE26-011
18mm
6mm
18.5mm
6mm
German DIN 766
C
B
Horizon 600f max. length = 10.7 m (35’)
Horizon 900f max. length = 14.3 m (47’)
C0670
German DIN 766
LOA (Length Overall)
Servicing
Wartung
Entretien
Servicio
Manutenzione
Underhåll
● Appendix
● Anhang
● Annexe
Warranty
A
i
ii
iii
a
b
c
d
iv
v
vi
Vii
B
C
i
a
b
ii
D
● Appendice
● Appendix
Garantie
Lewmar warrants its products in normal usage to be free of defects in
materials and workmanship for a period of three years from date of purchase
by the original purchaser, subject to the conditions, limitations and
exceptions listed below. Any part, which proves to be defective in normal
usage during that three-year period, will be repaired or at Lewmar’s option,
replaced by Lewmar.
CONDITIONS AND LIMITATIONS
Lewmar’s liability shall be limited to repair or replacement of the goods or
parts defective in materials or workmanship.
Determination of the suitability of the material for the use contemplated by
the buyer is the sole responsibility of the buyer and Lewmar shall have no
responsibility in connection with such suitability.
Lewmar shall not be liable in any way for:
Failures, loss or damage due to use of products in applications for which
they are not intended.
Failures, loss or damage due to corrosion, ultra violet degradation, wear
and tear or improper installation.
Failures, loss or damage due to incorrect maintenance.
Failures, loss or damage due to conditions that exceed the product’s
performance specifications.
Product subject to warranty claim must be returned to Lewmar for
examination unless otherwise agreed by Lewmar in writing.
Lewmar shall not be responsible for shipping charges nor installation labour
associated with any warranty claim.
Service by anyone other than authorised Lewmar representatives shall
void this warranty unless it accords with Lewmar guidelines and standards
of workmanship.
Lewmar’s products are intended for use only for marine purposes. Buyers
intending to use them for any other purpose should seek advice from
Lewmar, and Lewmar shall be under no liability arising from use, which
Lewmar has not approved.
EXCEPTIONS
Warranty is limited to a period of one year from the date of purchase in the
case of the following:
• Bow thrusters
• Electric motors and electrical equipment
• Electronic controls
• Hydraulic pumps, valves and actuators
• Weather seals
• Products used in “Grand Prix” racing applications
LIABILITY
Lewmar’s liability under this warranty shall be to the exclusion of all other
warranties or liabilities (to the extent permitted by law). In particular (but
without limitation):
Lewmar shall not be liable for:
• Any indirect or consequential loss including (without limitation) any loss
of anticipated profits, damage to reputation or goodwill, loss of expected
future business, damages, costs or expenses payable to any third party or
any other indirect losses.
• Any damage to yachts or equipment.
• Death or personal Injury (unless caused by Lewmar’s negligence).
Lewmar grants no warranties regarding the fitness for purpose, use, nature
or satisfactory quality of the goods.
Where the laws of the country do not permit a warranty to be excluded,
then such warranty, if permitted by that country’s law, shall be limited to a
period of one year.
SEVERANCE CLAUSE
If any clause of these warranties is held by any competent authority to be
invalid or unenforceable in whole or in part of the validity of the other clauses
of this warranty and the remainder of the clause in question shall not be
affected.
Servicing
● Apéndice
Wartung
E This warranty gives you specific legal rights, and you may also have other
legal rights, which vary, from country to country.
Where the products are sold in the UK under a consumer transaction, the
buyer’s statutory rights are not affected
Lewmar Limited reserves the right to alter design and specification without
prior notice.
TERMS AND CONDITIONS OF SALE
All sales are subject to Lewmar’s General Terms and Conditions of Sale,
which can be obtained from Lewmar Limited Head Office in Havant. The
foregoing warranty and the following General Conditions of Sale form part
only of, but also supplement, Lewmar’s General Terms and Conditions of
Sale. In the event of any conflict between the foregoing warranty and the
following General Conditions of Sale on the one hand and Lewmar’s full
General Terms and Conditions of Sale on the other, Lewmar’s full General
Terms and Conditions of Sale shall prevail.
Prices
All prices are subject to change without prior notice due to the fluctuating
costs of materials and wages. Prices are ex-warehouse and are those
ruling at the date of despatch and exclude VAT, which will be charged as
appropriate.
Quotations
Any quotation is open for acceptance for a period of 30 days from the date
of quotation. Quotations can only be regarded as firm when they are put in
writing. (Verbal estimates are made purely for indicative purposes.)
Return of goods
RETURNED GOODS WILL NOT BE ACCEPTED NOR CREDIT ISSUED
UNLESS THE RETURN IS AUTHORISED BY LEWMAR IN WRITING.
An authorisation will be issued on approval of return.
All carriage charges on returned goods must be prepaid.
All returned goods accepted and subsequently returned to our stock will
be subject to a 15% restocking charge.
Items returned in a damaged condition will not be credited at full value.
Custom fabricated items or parts will not be accepted for return.
Catalogues
Sales literature and product manuals are available from Lewmar on request.
These items can also be ordered from our Web site.
Availability
Goods can be obtained from your local boat builder or chandler. We will be
pleased to inform you of your nearest supplier.
A
i
ii
iii
a
b
c
d
iv
v
vi
vii
B
C
i
a
b
ii
Entretien
Lewmar garantiert für einen Zeitraum von drei Jahren ab Kaufdatum – den
normalen Gebrauch der Produkte vorausgesetzt -, daß seine Produkte
keine Herstellungs- oder Materialfehler aufweisen. Diese Gewährleistung
erfolgt zu den Bedingungen und mit den Beschränkungen und Ausnahmen,
die nachstehend aufgeführt sind. Teile, die sich bei normalem Gebrauch
während der dreijährigen Garantiezeit als fehlerhaft erweisen, werden von
Lewmar repariert oder aufgrund Lewmar’s Entscheidung ausgetauscht.
BEDINGUNGEN UND EINSCHRÄNKUNGEN
Die Haftung von Lewmar ist auf die Reparatur oder den Austausch der
Teile beschränkt, die Material- oder Herstellungsfehler aufweisen.
Die Feststellung, ob das Material für die vom Käufer bezweckte
Verwendungsart geeignet ist, fällt unter die alleinige Verantwortung des
Käufers. Lewmar übernimmt keine Haftung im Zusammenhang mit einer
solchen Eignungsfeststellung.
Lewmar kann nicht haftbar gemacht werden für:
Versagen, Verlust oder Schäden aufgrund der Nutzung der Produkte in
Anwendungen, für die sie nicht bestimmt sind.
Versagen, Verlust oder Schäden durch Korrosion, UV-Zersetzung,
normalen Verschleiß oder falsche Installation.
Versagen, Verlust oder Schäden durch falsche Wartung.
Versagen, Verlust oder Schäden durch Überbeanspruchung der Produkte.
Produkte, für die Garantieansprüche geltend gemacht werden, müssen
an Lewmar zwecks Prüfung zurückgesandt werden, es sei denn, daß
Lewmar schriftlich eine andere Vereinbarung bestätigt hat.
Lewmar übernimmt keine Frachtkosten oder Kosten für Installationsarbeiten
im Zusammenhang mit einem Garantieanspruch.
Diese Garantie verfällt, wenn andere Personen als zugelassene LewmarVertreter Servicearbeiten in Bezug auf die Produkte durchführen, es sei
denn, daß diese Arbeiten den Richtlinien und Herstellungsstandards von
Lewmar entsprechen.
Lewmar Produkte sind ausschliesslich für den Einsatz im Wassersportbereich konzipiert. Käufer , die diese Produkte für jeglichen anderen Zweck
benutzen wollen , sollten das Einverständnis von Lewmar einholen; Lewmar
unterliegt dabei keiner Haftung durch den Gebrauch, den Lewmar nicht
ausdrücklich gebilligt hat.
AUSNAHMEN
Die Garantie ist in folgenden Fällen für die Zeitdauer eines Jahres,
beginnend mit dem Datum des Verkaufes befristet:
• Bugstrahlruder
• Elektrische Motoren und elektrische Ausrüstung
• Elektronische Steuerungen
• Hydraulische Pumpen, Ventile und Drehzahlregler
• Wetterdichtungen
• Produkte im “Grand Prix”-Einsatz
HAFTUNG
Die Haftung seitens Lewmar schließt alle anderen Garantien und
Verantwortlichkeiten (in dem Maße, wie das Gesetz dies zuläßt) aus.
Insbesondere (jedoch nicht limitativ):
haftet Lewmar nicht für
• eventuelle indirekte Schäden oder Folgeschäden einschließlich (jedoch
ohne Begrenzung) entgangener erwarteter Gewinne, des Verlusts von
erwartetem zukünftigem Geschäfte, Schädigung von Ruf oder Goodwill
sowie einschließlich Schäden, Kosten oder Aufwendungen, die an Dritte
zahlbar sind sowie einschließlich anderer indirekter Verluste;
• Schäden an Yachten oder Ausrüstung;
• Tod oder Personenschäden (ausgenommen verursacht durch
Fahrlässigkeit von Lewmar).
Lewmar gewährt keine Garantie bezüglich der Eignung der Produkte
hinsichtlich der vom Käufer bezweckten Nutzung, des Gebrauchs, der Art,
der Marktgängigkeit oder der befriedigenden Qualität der Produkte.
Wenn die relevanten Gesetzes des betreffenden Landes den Ausschluß
von Garantien nicht erlauben, wird die Garantie, falls die Gesetze dies
zulassen, auf ein (1) Jahr beschränkt.
Servicio
D ABTRENNBARKEIT EINZELNER BESTIMMUNGEN
Falls eine oder mehrere dieser Garantiebestimmungen von einer
zuständigen Behörde ganz oder teilweise für nicht gültig oder nicht
einklagbar erachtet werden, mindert dies nicht die Gültigkeit der übrigen
Bestimmungen dieser Garantie und des Rests der betreffenden
Bestimmung.
E Aufgrund dieser Garantie haben Sie bestimmte gesetzmäßige Rechte;
darüber hinaus stehen Ihnen gegebenenfalls von Land zu Land
unterschiedliche sonstige gesetzmäßige Rechte zu.
Werden die Produkte im UK unter Verbraucherbedingungen verkauft, sind
die gesetzmässigen Rechte des Käufers nicht betroffen.
Lewmar Limited behält sich das Recht vor, das Design, die Konstruktion
und die Spezifikationen von Produkten ohne vorherige Ankündigung zu
ändern.
ALLGEMEINE VERKAUFSBEDINGUNGEN
Alle Verkäufe unterliegen den Allgemeinen Verkaufsbedingungen von
Lewmar in ihrer vollständigen Fassung, die auf Anfrage bei der
Hauptniederlassung von Lewmar Marine in Havant, Großbritannien,
erhältlich ist. Die obige Garantie und die folgenden allgemeinen
Verkaufsbedingungen sind Bestandteil und Ergänzung dieser vollständigen
Allgemeinen Verkaufsbedingungen von Lewmar. Im Falle von
Widersprüchen zwischen der obigen Garantie und den folgenden
allgemeinen Verkaufsbedingungen einerseits und den vollständigen
Allgemeinen Verkaufsbedingungen von Lewmar andererseits sind die
vollständigen Allgemeinen Verkaufsbedingungen maßgeblich.
PREISE
Alle Preise unterliegen eventuellen Änderungen ohne vorherige
Ankündigung aufgrund von fluktuierenden Material- und Lohnkosten. Die
Preise verstehen sich ab Lager und ohne Mehrwertsteuer (die in Rechnung
gestellt wird, falls anwendbar) und sind die Preise, wie sie am Versanddatum
gelten.
ANGEBOTE
Alle Angebote sind für den Zeitraum von 30 Tagen ab dem Angebotsdatum
gültig. Angebote gelten nur als verbindlich, wenn sie schriftlich unterbreitet
wurden. (Mündliche Aussagen dienen nur zu Indikationszwecken.)
RÜCKSENDUNG VON WAREN
ZURÜCKGESANDTE WAREN WERDEN NUR DANN ANGENOMMEN
UND GUTGESCHRIEBEN, WENN LEWMAR DER RÜCKSENDUNG
SCHRIFTLICH ZUGESTIMMT HAT.
Eine Genehmigung wird bei Zustimmung zur Rücksendung ausgestellt.
Alle Frachtkosten für Rücksendungen müssen vom Rücksender im voraus
bezahlt werden.
Alle zurückgesandten Waren, die angenommen und später wieder an unser
Lager zurückgesandt wurden, unterliegen einer Wiedereinlagerungsgebühr
in Höhe von 15% des Warenwertes.
Artikel, die in beschädigtem Zustand zurückgesandt wurden, werden nicht
zum vollen Wert gutgeschrieben.
Sonderanfertigungen sind von der Rücknahme ausdrücklich
ausgeschlossen.
KATALOGE
Katalog- und Prospektmaterial sowie Produkthandbücher sind auf Anfrage
bei Lewmar erhältlich. Diese Artikel können auch auf unserer Internetseite
angefordert werden.
BEZUGSMÖGLICHKEITEN
Unsere Produkte können Sie bei Ihrer örtlichen Werft oder dem
ortsansässigen Lewmar-Händler beziehen. Wir teilen Ihnen gerne die
Anschrift des Lieferanten in Ihrer Nähe mit.
Manutenzione
Underhåll
23
● Appendix
● Anhang
● Annexe
Garantie
A
i
ii
iii
a
b
c
d
iv
v
vi
vii
B
C
i
a
b
ii
● Appendice
● Appendix
24
Garantía
LEWMAR garantit ses produits, dans des conditions normales d’utilisation,
contre toutes pièces défectueuses ou défauts de fabrication pendant trois
ans à partir de la date d’achat par l’acheteur d’origine, sous réserve des
conditions, restrictions et exceptions listées ci-après. Toute pièce qui s’avère
défectueuse à la suite d’une utilisation normale au cours de cette période
de trois ans sera réparée ou remplacée par LEWMAR, qui sera seul juge
du bien-fondé de sa décision de réparer ou remplacer ladite pièce.
Conditions et restrictions
La responsabilité de LEWMAR sera limitée à la réparation ou au
remplacement des marchandises ou pièces présentant des défauts de
matériel ou de fabrication.
Il incombe à l’acheteur seul de déterminer si le matériel est adapté à l’usage
auquel il le destine et LEWMAR ne saurait être tenu responsable de toute
décision en ce domaine.
LEWMAR ne reconnaît aucune responsabilité pour:
Les pannes, pertes et détériorations consécutives à une utilisation
inadéquate des produits.
Les pannes, pertes et détériorations causées par la corrosion, la
dégradation par ultraviolets, l’usure normale ou une installation inadéquate.
Les pannes, pertes et détériorations dues à un entretien inadéquat.
Les pannes, pertes et détériorations dues à des conditions qui ne sont pas
prévues par les spécifications du produit.
Tout produit faisant l’objet d’une réclamation sous garantie devra être
renvoyé à LEWMAR pour être examiné, sauf stipulation contraire par écrit
de LEWMAR.
LEWMAR n’est pas responsable des frais d’expédition ou de main d’œuvre
associés à toute réclamation sous garantie.
Tout entretien effectué par quiconque autre que les représentants agréés
LEWMAR annulera cette garantie, sauf s’il est effectué en accord avec les
directives et normes de fabrication de LEWMAR.
Les produits LEWMAR sont destinés à un usage marin. Les acheteurs
destinant les produits LEWMAR à un usage autre que celui-ci doivent
préalablement prendre conseil auprès de LEWMAR, qui décline toute
responsabilité vis-à-vis d’un type d’usage qui n’aurait pas été approuvé
par LEWMAR.
Exceptions
La garantie est limitée à une période d’un an à compter de la date d’achat
pour les produits suivants:
• Propulseur d’étrave
• Moteurs électriques et équipement électrique
• Commandes électroniques
• Pompes hydrauliques, valves et dispositifs de commande
• Joints étanches
• Produits utilisés dans les épreuves de type “Grands Prix”
Responsabilité
La responsabilité de LEWMAR dans le cadre de la présente garantie exclut
toutes autres garanties ou responsabilités, sous réserve du respect des
dispositions légales en vigueur et il est entendu que :
LEWMAR décline toute responsabilité pour:
• tout dommage indirect or tout préjudice financier consécutif incluant
notamment, sans que la liste soit exhaustive, la perte de revenus anticipée,
l’atteinte à la réputation ou à la clientèle, la perte de prospects, les
dommages et intérêts, le coût et les dépenses qui doivent être payés à
une tierce personne ou toute autre perte indirecte;
• tout dommage causé aux yachts ou aux équipements;
• le décès ou les dommages corporels des tiers (sauf en cas de faute
établie de LEWMAR).
Il n’existe aucune garantie de vendabilité ni d’aptitude au but ou à l’usage
ni de qualité satisfaisante de la marchandise.
Certains pays interdisent toute exclusion de garantie. Dans ce cas, la
garantie, si la loi l’autorise, sera limitée à une période d’un an.
Servicing
● Apéndice
Wartung
D Séparation de clause
Si l’une des clauses de cette garantie était invalidée ou jugée inapplicable
par une autorité compétente, en tout ou partie, la validité des autres clauses
de cette garantie, ou la partie non contestée de la clause en question, ne
serait pas affectée.
E Cette garantie vous donne des droits particuliers, mais vous pouvez
également bénéficier d’autres droits qui varient selon les pays.
Lorsque les produits sont vendus au Royaume-Uni dans le cadre d’une
opération de vente au public, les droits fondamentaux de l’acheteur restent
sans changement.
LEWMAR Ltd se réserve le droit de modifier la conception et les
spécifications de ses produits sans avertissement préalable.
CONDITIONS GENERALES DE VENTE
Toute vente est soumise aux Conditions Générales de Vente de LEWMAR
qui peuvent être obtenues sur demande adressée à Lewmar Limited Head
Office, Havant.
Les précédentes clauses de garantie ainsi que les conditions générales
de ventes qui suivent y compris les suppléments font partie intégrante des
Conditions Générales de Vente de LEWMAR et viennent les compléter.
En cas de conflit entre d’une part les précédentes clauses de garantie et
les conditions générales de vente qui suivent et d’autre part l’intégralité
des Conditions Générales de Vente de LEWMAR, il est entendu que ce
sont ces dernières qui prévaudront.
Prix
Tous les prix peuvent être modifiés sans avis préalable en fonction des
variations des prix des matériaux et du coût de la main d’œuvre. Les prix
sont ex-entrepôt et correspondent aux prix en cours à la date d’envoi; les
prix ne comprennent pas la TVA qui sera appliquée au taux en vigueur.
Devis
Tout devis reste soumis à réserve d’acceptation pendant une période de
30 jours suivant la date portée sur le devis. Les devis ne sont considérés
comme définitifs que lorsqu’ils sont donnés par écrit (les devis verbaux
sont donnés uniquement à titre indicatif).
Renvoi de marchandises
LES MARCHANDISES RETOURNEES NE SERONT PAS ACCEPTEES
ET AUCUN REMBOURSEMENT NE SERA ACCORDE SANS
AUTORISATION ECRITE DE LEWMAR.
Une autorisation sera délivrée à l’acceptation du retour.
Tous les frais de retour des marchandises doivent être réglés d’avance.
Toutes les marchandises acceptées et renvoyées ultérieurement à nos
magasins seront soumises à 15% de frais de remise en stock. Les articles
retournés en mauvais état ne seront pas remboursés dans leur totalité.
Les articles ou pièces fabriqués sur mesure ne peuvent pas être retournés.
Catalogues
Des catalogues, prospectus et manuels d’utilisation des produits LEWMAR
seront expédiés par LEWMAR sur demande. Les articles figurant dans les
documents énumérés ci-dessus peuvent également être commandés à
partir de notre site Web.
Disponibilité
Les marchandises sont en vente chez votre chantier ou shipchandler local.
Nous serons heureux de vous indiquer l’adresse du fournisseur le plus
proche de votre domicile.
A
i
ii
iii
a
b
c
d
iv
v
vi
vii
B
C
i
a
b
ii
Entretien
Lewmar garantiza sus productos en uso normal como exentos de defectos
en materiales y mano de obra por un período de tres años a partir de la
fecha de la compra por el comprador original, con sujeción a las
condiciones, limitaciones y excepciones indicadas a continuación.
Cualquier pieza que se demuestre que es defectuosa en su uso normal
durante el dicho período de tres años será reparada o, a elección de
Lewmar, sustituida por Lewmar.
CONDICIONES Y LIMITACIONES
La responsabilidad de Lewmar se limitará a la reparación o sustitución de
las mercancías o piezas defectuosas en sus materiales o fabricación.
La determinación de la adecuación del material para el uso que le pretende
dar el comprador es responsabilidad única del comprador y Lewmar no
tendrá responsabilidad alguna respecto a tal adecuación.
Lewmar no tendrá responsabilidad alguna por:
Averías, perdidas o daños debidas al uso de productos en aplicaciones
para las que no fueron diseñados.
Averías perdidas o daños debidas a la corrosión, degradación por rayos
ultravioleta, desgaste normal o instalación inadecuada.
Averías perdidas o daños debidas a mantenimiento incorrecto.
Averías perdidas o daños debidas a uso en condiciones que exceden las
especificaciones de utilización del producto.
El producto sujeto a reclamación de garantía ha de enviarse a Lewmar
para su examen a no ser que se acuerde de otra manera por escrito por
Lewmar.
Lewmar no será responsable de los gastos de transporte ni del trabajo de
instalación correspondiente a cualquier reclamación de garantía.
El mantenimiento llevado a cabo por cualquiera que no sea un
representante autorizado de Lewmar causará que la presente garantía
quede anulada a no ser que sea hecho de acuerdo con las directrices y
normas de mano de obra de Lewmar.
Los productos Lewmar están destinados solamente para uso en
aplicaciones marinas. Los compradores que pretendan utilizarlos en
cualquier otra aplicación deben consultarlo a Lewmar, y Lewmar no tendrá
ninguna responsabilidad surgida en una utilización no aprobada por
Lewmar.
EXCEPCIONES
La garantía se limita a un periodo de un año a partir de la fecha de la
compra en los casos siguientes:
• Propulsores de proa
• Motores eléctricos y equipo eléctrico
• Controles electrónicos
• Bombas, válvulas y actuadores hidráulicos
• Juntas de estanqueidad
• Productos usados en aplicaciones de competición tipo “Grand Prix”
RESPONSABILIDAD
La responsabilidad de Lewmar bajo esta garantía excluye la aplicación de
cualquier otra garantía o responsabilidad (dentro de los limites permitidos
por la ley). Particularmente (pero no exclusivamente):
Lewmar no será responsable de:
• Cualquier daño indirecto o consecuencia incluyendo (sin limitación)
cualquier perdida de beneficios previstos, daño a la reputación o crédito,
perdida de futuros negocios esperados, daños, costes o gastos pagaderos
a terceras partes o cualquier otra perdida.
• Cualquier daño a yates o su equipo.
• Muerte o lesiones a personas (excepto si son debidas a negligencia
por parte de Lewmar).
Lewmar no otorga garantías en lo referente a la adecuación al propósito,
uso, naturaleza, comerciabilidad o calidad satisfactoria de los productos
Cuando las leyes de un país no permitan la exclusión de una garantía,
dicha garantía estará limitada a un año, si la ley de tal país lo permite.
Servicio
D CLÁUSULA DE SEPARACIÓN
Si alguna cláusula de esta garantía es dada como invalida o no aplicable
en todo o en parte por alguna autoridad competente, la validez de la demás
cláusulas y del resto de la cláusula en cuestión no se vera afectada.
E Esta garantía le da a usted derechos legales específicos, y puede tener
además otros derechos legales que varían de un país a otro.
Cuando los productos son vendidos en el Reino Unido (UK) en una
transacción de consumo los derechos del estatuto del comprador no quedan
afectados.
Lewmar Limited se reserva el derecho a cambiar el diseño y las
especificaciones sin aviso previo.
*Esta garantía cubre todos los productos presentados en los catálogos de
Lewmar a partir de 1992 comprados después del 1 de Julio de 1992.
CONDICIONES GENERALES DE VENTA
Todas las ventas están sujetas a las condiciones generales de venta de
Lewmar, disponibles en la oficina principal de Lewmar Marine Ltd en Havant
(UK). La garantía precedente y las siguientes condiciones generales de
venta son solo una parte de las condiciones generales de venta de Lewmar.
Precios
Todos los precios quedan sujetos a cambio sin previo aviso debido a la
fluctuación de los costes de los materiales y salarlos. Los precios se
entienden por los materiales en nuestro almacén y serán los vigentes en
la fecha del despacho y no incluyen el IVA que se cargará según sea
apropiado.
Presupuestos
Cualquier presupuesto queda sujeto a su aceptación antes de transcurridos
30 días a partir de la fecha del mismo. Los presupuestos únicamente
pueden considerarse en firme si se presentan por escrito (las estimaciones
verbales se hacen puramente con fines indicativos).
Devolución de mercancías
LAS MERCANCÍAS DEVUELTAS NO SERÁN ACEPTADAS NI
ABONADAS A NO SER QUE LA DEVOLUCIÓN ESTÉ AUTORIZADA POR
ESCRITO POR LEWMAR.
Si se aprueba una devolución se emitirá una autorización.
Todos los gastos de transporte de las mercancías devueltas tienen que
ser a portes pagados.
Todas las mercancías cuya devolución sea aceptada y que,
consiguientemente sean devueltas a nuestros stocks quedarán sujetas a
un cargo del 15% por gastos reinserción en stock. Los artículos que se
devuelvan deteriorados no serán abonados por la totalidad de su valor.
Los artículos o piezas fabricados por encargo o según especificaciones
del cliente no serán aceptados para devolución.
Catálogos
Pueden obtenerse folletos de los productos dirigiéndose a Lewmar.
Disponibilidad
Nuestros productos se pueden obtener a través de astilleros y revendedores
locales. Tendremos mucho gusto en informarle de su proveedor Lewmar
más cercano.
Manutenzione
Underhåll
● Appendix
● Anhang
● Annexe
Garanzia
● Appendice
● Appendix
Garanti
La Lewmar garantisce che i suoi prodotti, utilizzati normalmente, siano
senza difetti sia nei materiali che nella lavorazione per un periodo di tre
anni dalla data di acquisto dal primo acquirente, secondo le condizioni,
limitazioni ed eccezioni elencate di seguito. Qualsiasi componente che
durante il normale uso venga trovato difettoso, nel periodo di tre anni
previsto dalla garanzia, verrà dalla Lewmar, a sua scelta, o riparato o
sostituito.
A. CONDIZIONI E LIMITAZIONI
I. La garanzia della Lewmar prevede esclusivamente la riparazione o la
sostituzione del prodotto o delle parti difettose per natura o per messa in
opera.
II. La definizione dell’idoneità d’uso del prodotto è sola responsabilità
dell’acquirente e la Lewmar non avrà responsabilità alcuna riguardo alla
scelta d’uso.
III. La Lewmar non sarà responsabile in alcun modo per:
a. Malfunzionamento, perdita o danno dovuto all’uso inadeguato dei prodotti.
b. Malfunzionamento, perdita o danno dovuto a corrosione, degradazione
da raggi ultravioletti, usura o installazione inadeguata.
c. Malfunzionamento, perdita o danno dovuto a manutenzione inadeguata.
d. Malfunzionamento, perdita o danno dovuto a condizioni che eccedano
quelle specificate per la performance del prodotto.
IV. Il prodotto per cui si reclama la garanzia deve essere rimandato alla Lewmar
per essere esaminato, a meno che non ci siano diversi accordi scritti con
la società stessa.
V. La Lewmar non sarà responsabile per alcuna spesa di spedizione o di
manodopera relativa all’installazione di materiale relativo a reclami di
garanzia.
VI. La manutenzione effettuata da persone non autorizzate dalla Lewmar
renderà nulla questa garanzia, a meno che la manutenzione stessa non
sia effettuata secondo le linee guida e gli standard di manodopera previsti
dalla Lewmar.
VII. I prodotti Lewmar sono intesi ad uso esclusivamente marino. Gli acquirenti
che intendano usarli a qualsiasi altro fine dovrebbero consigliarsi con la
Lewmar; quest’ultima non sarà responsabile per usi che la stessa non
abbia approvato.
B. ECCEZIONI
La garanzia viene limitata ad un periodo di un anno dalla data di acquisto
per i seguenti materiali:
• Propulsori di prua
• Motori elettrici ed equipaggiamento elettrico
• Controlli elettronici
• Pompe idrauliche, valvole e messa in moto
• Chiusure stagne
• Prodotti utilizzati in competizioni “Gran Prix”
C. RESPONSABILITÀ
I. La responsabilità della Lewmar per quanto riguarda questa garanzia
esclude tutte le altre garanzie e responsabilità (fino al limite consentito
dalla legge). In particolare (ma non circoscritte a quanto segue):
a. La Lewmar non sarà responsabile per:
• qualsiasi perdita indiretta o consequenziale, ivi inclusa (ma non limitata
a) qualsiasi perdita di introiti previsti, danni alla reputazione o avviamento,
perdita di lavori previsti, danni costi o spese pagabili a terzi o qualsivoglia
perdita indiretta.
• Danni a yachts o ad equipaggiamento.
• Morte o danni personali (a meno che non siano causati dalla negligenza
della Lewmar stessa).
b. La Lewmar non concede garanzie riguardanti l’idoneità d’uso, l’utilizzo, la
natura o la soddisfacente qualità del prodotto.
II. Ove le leggi della nazione non permettano l’esclusione della garanzia, la
garanzia stessa, se permesso dalle leggi della nazione, verrà limitata ad
un periodo di un anno.
Servicing
● Apéndice
Wartung
D. CLAUSOLA DISGIUNTIVA
Qualora una delle clausole di questa garanzia venisse reputata non valida
o non applicabile dalle competenti autorità nel suo insieme o in parte, la
validità delle altre clausole e quanto resta della clausola stessa non verrà
compromessa.
E. Questa garanzia prevede dei diritti specifici, altri diritti potrebbero essere
applicabili di nazione in nazione.
Ove i prodotti vengano venduti in Gran Bretagna con una transazione
commerciale i diritti statutari dell’acquirente non vengono modificati.
La Lewmar Limited si riserva il diritto di modificare il design e le specifiche
senza darne alcun preavviso.
TERMINI E CONDIZIONI DI VENDITA
Tutte le vendite sono soggette alle Condizioni e Termini Generali di Vendita
della Lewmar che possono essere richieste alla sede della Lewmar Limited
di Havant. La precedente garanzia e le seguenti Condizioni Generali di
Vendita formano parte integrante e supplemento delle Condizioni e Termini
Generali di Vendita della Lewmar. Nel caso la precedente garanzia e le
seguenti Condizioni Generali di Vendita contrastino con le Condizioni e
Termini Generali di Vendita della Lewmar quanto contenuto in quest’ultimo
documento prevarrà.
Prezzi
Tutti i prezzi sono soggetti a revisione senza preavviso per via dei
cambiamenti del costo dei materiali e dei salari. I prezzi sono da intendersi
franco-magazzino ed IVA esclusa, che verrà applicata come previsto; il
listino applicabile sarà quello del giorno di spedizione.
Offerte
Le offerte hanno una validità di 30 giorni dalla data di emissione. Le offerte
sono da reputarsi valide solo se messe per iscritto. (Le stime verbali sono
date solo ed esclusivamente ad uso indicativo.)
Merce resa
LA MERCE RESA NON VERRÀ ACCETTATA NÉ VERRANNO EMESSE
NOTE DI CREDITO A MENO CHE IL RESO NON SIA STATO
AUTORIZZATO PER ISCRITTO DALLA LEWMAR.
Una autorizzazione verrà emessa a seguito dell’approvazione del reso.
Tutte le spese di spedizione dei resi dovranno essere prepagate.
Tutto il materiale accettato come reso e ritornato al magazzino verrà
sottoposto ad un 15% di imposta di re-immagazzinaggio.
La merce resa danneggiata non verrà accreditata per l’intero valore.
La merce fatta su misura non verrà accettata come reso.
Cataloghi
Tutte le informazioni di vendita ed i manuali di prodotto sono disponibili
dalla Lewmar su richiesta. Questo materiale può essere richiesto tramite il
nostro sito Web.
Disponibilità
La merce può essere reperita anche tramite il vostro cantiere navale o
rivenditore. Saremo lieti di fornirVi informazioni sul rivenditore a Voi più
vicino.
Entretien
A
i
ii
iii
a
b
c
d
iv
v
vi
Vii
B
C
Lewmar garanterar att företagets produkter i normalt bruk är fria från defekter
med avseende på material och utförande under en period av tre år från
och med datum för inköp av den ursprungliga köparen med förbehåll för
de villkor, begränsningar och undantag enligt nedanstående förteckning.
Någon del som visar sig vara defekt i normalt bruk under denna treårsperiod
kommer att repareras eller bytas ut av Lewmar.
VILLKOR OCH BEGRÄNSNINGAR.
Lewmars ansvarsskyldighet skal begränsas till reparation eller utbyte av
de artiklar eller de delar som är bristfälliga med avseende på material eller
utförande.
Att fastställa materialets lämplighet för den av köparen avsedda
andvändningen är uteslutande köparens ansvar och Lewmar skall inte ha
någon ansvarsskyldighet med anknytning till sådan lämplighet.
Lewmar skall inte på något sätt vara ansvarig för:
Bristfälligheter, förlust eller skada till följd av produkternas användning inom
områden, som de inte är avsedda för.
Bristfälligheter, förlust eller skada till följd av korrosion, ultraviolett
nedbrytning, förslitning eller felaktig installation.
Bristfälligheter, förlust eller skada till följd av felaktigt underhåll.
Bristfälligheter, förlust eller skada till följd av förhållanden som överskrider
produktens prestandaspecifikation.
Produkt som är föremål för anspråk enligt garantin måste returernas till
Lewmar för undersökning såvida ej annat förfaringssätt skriftligen har
medgivits av Lewmar.
Lewmar skall inte vara ansvarig för speditionsavgifter eller arbetskostnader
för installation i samband med något anspråk enligt garantin.
Underhållsarbete av någon annan person eller firma än av Lewmars
auktoriserade representanter gör denna garanti ogiltig om detta arbete
inte överensstämmer med Lewmars riktlinjer och normer för utförande.
Lewmars produkter är ämnade för endast marint bruk. Kunder vilka har
för avsikt att använda produkterna till annat ändamål, måste söka råd från
Lewmar och Lewmar kan aldrig belastas för användning som Lewmar inte
har godkänt.
UNDANTAG
Garantin begränsas till en period av ett år från inköpsdatum, för följande
produkter:
• Bogpropellrar
• Elmotorer och elektrisk utrustning
• Elektroniska styranordningar
• Hydrauliska pumpar, ventiler och stäIldon
• Väderbeständiga förslutningar
• Produkter som används i “Grand Prix-tävlingar”
ANSVAR
Lewmar skall inte ansvara för:
• Någon indirekt förlust inklusive (utan begränsning) förväntade vinster,
fördärvat rykte, eller goodwill, förlust av framtida affärer, skador kostnader
eller utgifter till tredje part eller någon annan indirekt kostnad
• Någon skada på farkost eller utrustning
• Dödsfall eller personlig skada (förutsatt att ej åsamkats av Lewmars
försumlighet).
Det finns inga garantier i syfte på säljbarhet av något slag, uttryckligen
eller antydd, och inga garantier skall göras gällande enligt lag. Varaktigheten
av sådana garantier som inte desto mindre görs gällande enligt lag till
förmån för konsumenten skall begränsas tiIl en period av ett år från och
med nyinköp av användaren. I vissa länder medges inte begränsningar
på hur länge en antydd garanti varar, varför ovanstående kanske inte gäller
för Er.
Servicio
D DELNINGS KLAUSUL
Lewmar skall inte vara ansvarig för följdskador på segelbåtar, utrustning
eller annan egendom eller personer till följd av någon bristfällighet hos
Lewmars utrustning. I vissa länder medges inte uteslutning eller
begränsning av oförutsedda skador eller följdskador, varför ovanstående
uteslutning kanske inte gäller för Er.
E Denna garanti ger Er bestämda laga rättigheter och Ni kan även ha andra
laga rättigheter som kan avvika från land till land.
Lewmar Marine Ltd. förbehåller sig rätten att ändra konstruktion och
specifikation utan förvarning.
ALLMÄNNA FÖRSÄLJNINGS VILLKOR
Våra detaljerade försäljningsvillkor kan anskaffas från vårt inregistrerade
kontor i Havant, England. Vid en pågående reklamation under de gällande
försäljnings villkoren från respektive part. Om eventuell konflikt mellan
dessa parter skulle uppstå, gäller Lewmars generella försäljningsvillkor.
Priser
Samtliga priser underkastas förändringar utan förvarning till följd av
fluktuerande kostnader av material och arbetslöner. Priserna är fritt från
lager och är de som gäller vid datum för avsändning och exklusive moms
som kommer att debiteras enligt gällande förordningar.
Offerter
Alla offerter avges med förbehåll för godtagande under en period om 30
dagar från och med offertdatum. Offerter kan endast betraktas som fasta
offerter när de avlämnas skriftligen (muntliga beräkningar avges endast i
angivande syfte).
Returnering av varor
RETURNERADE VAROR KOMMER INTE ATT ACCEPTERAS ELLER
KREDITERAS SÅVIDA INTE RETURNERINGEN SKRIFTLIGEN ÄR
BEMYNDIGAD AV LEWMAR.
Ett bemyndigande kommer att utfärdas vid godkännande av returneringen.
Alla transportkostnader på returnerade varor måste vara förutbetalda.
Alla returvaror som accepterats och som därefter returernas till vårt lager
blir föremål för en återlagringsavgift av 15% av varans pris. Artiklar som
returernas i skadat skick kommer inte att krediteras till fullt värde.
Specialtillverkade artiklar eller delar kommer inte att accepteras för
returnering.
Kataloger
Produktbroschyrer kan anskaffas från Lewmar på begäran. Dessa kan
dessutom beställas över vår Hemsida på Internet.
Tillgänglighet
Varor kan anskaffas från Er lokala båtbyggare eller, återförsäljare av
båtutrustning.
Manutenzione
Underhåll
25
● Appendix
● Anhang
● Annexe
● Apéndice
● Appendice
● Appendix
Servicing
Wartung
Entretien
Servicio
Manutenzione
Underhåll
26
● Appendix
● Anhang
● Annexe
● Apéndice
● Appendice
● Appendix
Servicing
Wartung
Entretien
Servicio
Manutenzione
Underhåll
27
ISO 9001
Certificate No. 3486
Lewmar UK/Rest of World
Lewmar Ltd, Southmoor Lane, Havant,
Hampshire, PO9 1JJ, UK
Lewmar Southern Europe
Lewmar Ltd, Place Bernard Moitessier, 17000
La Rochelle, France
Lewmar Northern Europe
Lewmar Marin AB, Hälleflundregatan 24,
S - 426 58 Västra Frölunda, Sweden
tel +44 (0)23 9248 5700
fax +44 (0)23 9248 5710
e-mail [email protected]
tel +33 (0)5 46 50 50 46
fax +33 (0)5 46 50 59 04
e-mail [email protected]
tel +46 (0)31 769 7700
fax +46 (0)31 769 7710
e-mail [email protected]
Lewmar USA
Lewmar Inc,
351 New Whitfield Street,
Guilford, CT 06437, USA
Lewmar Southern Europe (Cannes)
Lewmar Ltd, Allée Charles Nungesser, Parc
D'Activités de la Siagne, 06210 Mandelieu,
France
Lewmar Northern Europe (Finland)
Lewmar Marin AB (Finland),
Laaksotie 10 A-B, 02700,
Kauniainen, Finland
tel +1 (203) 458 6200
fax +1 (203) 453 5669
e-mail [email protected]
tel +33 (0)4 93 48 80 48
fax +33 (0)4 93 48 37 50
e-mail [email protected]
tel +358 (0)9 5489 5110
fax +358 (0)9 5489 5111
e-mail [email protected]
Lewmar Mid Europe
Lewmar Ltd, Branderweg 19, 8042 PD
Zwolle, The Netherlands
Lewmar Southern Europe (Spain)
Lewmar Ltd, Sucursal en Espana, Joan de
Borbó 92, 08039 Barcelona, Spain
Lewmar Limited
Southmoor Lane, Havant,
Hampshire, PO9 1JJ, UK
tel +31 (0)38 427 34 90
fax +31 (0)38 421 56 42
e-mail [email protected]
tel +34 93 221 94 37
fax +34 93 225 19 49
e-mail [email protected]
tel +44 (0)23 9247 1841
fax +44 (0)23 9248 5720
e-mail [email protected]
website www.lewmar.com
Protection
IP66
Copyright © 1999/2001 Lewmar Scotland. All Rights Reserved. 541-200 (D1150-1)