1
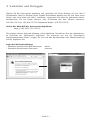
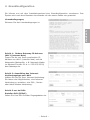
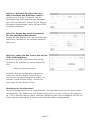
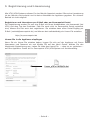
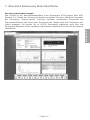
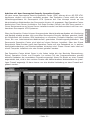
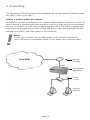
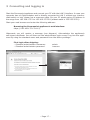
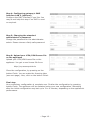
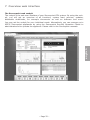
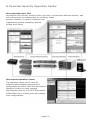
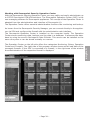
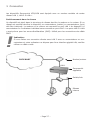
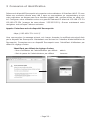
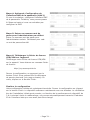
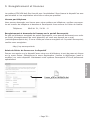
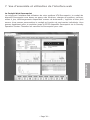
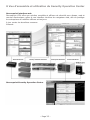
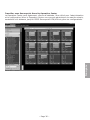
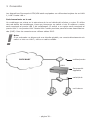
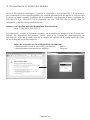
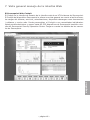
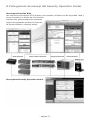
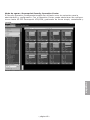
Securepoint UTM and VPN Security Systems
español
français
english
deutsch
Installation Manual v11
Inhalt
Kostenloser, exzellenter, schneller, deutscher Support
Seite 2
1 Anschließen
Seite 3
2 Werkseinstellungen
Seite 4
3 Verbinden und Einloggen
Seite 5
4 Grundkonfiguration
Seite 6
5 Registrierung und Lizensierung
Seite 8
6 Fehlersuche
Seite 9
7 Übersicht Bedienung Web-Oberfläche
Seite 10
8 Übersicht Bedienung Security Operation Center
Seite 11
– Seite 1 –
Kostenloser, exzellenter, schneller, deutscher Support
Bitte befolgen Sie diese Installationshilfe für die Securepoint UTM und VPN Security
Systeme und wenden Sie sich im Problemfall gern an den kostenlosen Support von
Securepoint:
Telefon: ++49 (0) 41 31 - 24 01 - 0
(kostenloser Support für Fachhändler und Systemhäuser)
E-Mail: [email protected]
Weitere Informationen und Webseiten:
Securepoint Produkt-Registrierung/-Lizensierung:
http://my.securepoint.de/
Securepoint Web-Support:
http://www.securepoint.de/support/
Securepoint Wiki und How-tos:
http://wiki.securepoint.de/
Software-Downloads, Dokumente und Schulungsvideos:
http://download.securepoint.de/
DynDNS-Service:
http://www.spdns.de/
– Seite 2 –
deutsch
oder schicken Sie eine E-Mail mit Angabe des Problems an:
1 Anschließen
Die Securepoint UTM- und VPN-Systeme sind je Nach Hardware mit einer unterschiedlichen
Anzahl von Netzwerkkarten LAN 1, LAN 2 bis LAN n ausgerüstet.
Positionierung im Netzwerk
Eine Appliance wird in der Netzwerkstruktur hinter dem Modem oder Router platziert. Wird
hinter der Appliance noch ein Netzwerk betrieben, muss ein Switch oder ein Hub zwischengeschaltet werden. Das Modem oder der Router wird an Port LAN 1 der Appliance
angeschlossen. Der Switch oder ggf. der einzelne Computer wird an den Port LAN 2 angeschlossen. Die Ports LAN 3 bis LAN n sind für DeMilitarisierte Zonen (DMZ) vorgesehen.
Zum Verbinden werden RJ45 Kabel verwendet!
!
Hinweis:
Falls Ihr Rechner keine Gigabit-Schnittstelle besitzt und Sie sich ohne einen Switch
oder Hub direkt mit LAN 2 verbinden, verwenden Sie bitte ein gekreuztes Kabel.
Modem
oder Router
INTERNET
LAN 1
Securepoint
Appliance
LAN 2
Switch
oder Hub
Internes
Netzwerk
– Seite 3 –
2 Werkseinstellungen
Sie erreichen die Securepoint Appliance mit Ihrem Web-Browser über die IP-Adresse des
internen Interface LAN 2 auf Port 11115 mit dem https (SSL) Protokoll. Diese IP-Adresse
ist von Werk aus auf 192.168.175.1 eingestellt.
!
192.168.175.1
Aufruf der Web-Oberfläche der Securepoint Appliance:
https://192.168.175.1:11115/
Hinweis:
Die Web-Oberfläche der Securepoint Appliance ist optimiert für Internet Explorer
>=8, Firefox >=13 und Chrome >=20. Sie sollten für die Web-Oberfläche einen
PC mit mindestens Pentium 4 Prozessor, 1.8 GHz oder höher, und einen
Arbeitsspeicher von 512 MB oder mehr verwenden.
Zurücksetzen auf Werkseinstellung:
Im Webinterface des Systems können Sie die Appliance auf die Werkseinstellungen zurücksetzen. Klicken Sie im Menü Configuration auf Factory Defaults. Dies setzt die Konfiguration
auf Werkseinstellung zurück. Die bestehende Konfiguration wird dabei überschrieben. Die
zweite Möglichkeit die Appliance auf die Werkseinstellung zu setzen, ist die Neu-Installation
mittels des Securepoint ISO-Image oder per USB-Image per Stick. Sie finden das Image
und ein How-to auf der Securepoint Website:
Software-Downloads, Dokumente und Schulungsvideos:
http://download.securepoint.de/
– Seite 4 –
deutsch
Werkseinstellung:
LAN 2, IP des internen Interface:
3 Verbinden und Einloggen
Starten Sie die Securepoint Appliance und verbinden Sie Ihren Rechner mit der LAN 2
Schnittstelle. Falls Ihr Rechner keine Gigabit-Schnittstelle besitzt und Sie sich ohne einen
Switch oder Hub direkt mit LAN 2 verbinden, verwenden Sie bitte ein gekreuztes Kabel.
Konfigurieren Sie auf Ihrem Rechner eine IP-Adresse aus dem Bereich zwischen:
192.168.175.2 bis 192.168.175.254 (Netzwerk-Maske: 255.255.255.0).
Aufruf der Web-GUI der Securepoint Appliance:
https://192.168.175.1:11115/
Sie erhalten danach folgende Meldung, siehe Abbildung. Akzeptieren Sie das selbstsignierte Zertifikat der Securepoint Appliance. Sie kommen nun auf die Securepoint
Administrationsober-fläche. Loggen Sie sich mit den Benutzerdaten der Werkseinstellung
auf der Appliance ein:
Login bei Werkseinstellung:
– Standard Administrator-Benutzername:
– Standard Administrator-Kennwort:
admin
insecure
– Seite 5 –
4 Grundkonfiguration
Sie können nun mit dem Installationswizard eine Grundkonfiguration vornehmen. Das
System wird nach dem Beenden des Wizards mit den neuen Daten neu gestartet.
deutsch
Lizenzbedingungen;
Stimmen Sie den Lizenzbedingungen zu.
Schritt 1: Ändern Gateway-IP-Adresse
LAN 2 (internes Netz)
Tragen Sie die von Ihnen gewünschte IPAdresse von LAN 2 (internes Netz) und die
Netzmaske (Netzgröße, z. B. Netzwerk-Maske
im Bitcount-Format: 24 d. h. 255.255.255.0)
des Gateways ein.
Schritt 2: Auswählen des InternetVerbindungstyps auf LAN 1
Wählen Sie die Art Ihrer Internet-Verbindung.
Sie haben drei Möglichkeiten, eine InternetVerbindung zu erstellen: eine DSL-, Routeroder Kabel-Modem-Verbindung.
Schritt 3 nur bei DSL:
Erstellen DSL (PPPoE)
Geben Sie Ihre DSL-Provider-Zugangsdaten ein.
– Seite 6 –
Schritt 4: Optional: Konfiguration des
DMZ-Interfaces des Gateways (LAN 3)
Konfigurieren Sie die IP-Adresse und die
Netzmaske das DMZ-Interface des Gateways,
wenn Sie es wünschen. Diesen Schritt können
Sie jedoch überspringen, wenn Sie keine DMZ
einrichten möchten.
Schritt 5: Setzen des neuen Kennworts
für den Standard-Administrator
Setzen Sie das Kennwort für den Administrator
admin neu. Wählen Sie ein sicheres Passwort
dafür aus!
Schritt 6: Laden Sie das Lizenz-File auf die
UTM-/VPN-Appliance
Laden Sie Ihr UTM-/VPN-Lizenz-File auf die
Appliance. Sie erhalten ein neues Lizenz-File
von:
http://my.securepoint.de
Schließen Sie die Konfiguration danach ab,
indem Sie auf den Button Finish drücken.
Sie können die Lizensierung auch später vornehmen (siehe nächste Seite). Klicken Sie
auch dann auf den Button Finish.
Abschluss der Konfiguration
Ihre Erst-Konfiguration ist nun abgeschlossen. Die Appliance wird nun mit Ihren Daten
neu gestartet. Der Reboot von der Ersteinrichtung kann je nach Leistung der Appliance
ca. 2 bis 4 Minuten dauern! Nach erfolgtem Reboot werden Sie automatisch auf die von
Ihnen eventuell geänderte IP-Adresse der Web-Oberfläche weitergeleitet.
– Seite 7 –
5 Registrierung und Lizensierung
Registrieren und Lizensieren per E-Mail oder am Securepoint Portal
Zur Registrierung senden Sie uns eine E-Mail mit Ihren Kundendaten, der Useranzahl (bei
UTM) und dem Typ des Produktes. Falls Sie noch nicht im Securepoint Portal registriert
sind, können Sie sich auch dort registrieren. Sie erhalten dann einen Portal-Zugang per
E-Mail ([email protected]) und können dort selbstständig ein Lizenz-File erstellen:
http://my.securepoint.de
Lizenz-File in die Appliance einpflegen
Wenn Sie ein Lizenz-File erhalten haben, loggen Sie sich auf der Appliance mit Ihrem
Usernamen und Passwort ein und klicken Sie auf das Menü Extras. Wählen Sie den
Menüpunkt Registrierung aus. Laden Sie bitte das Lizenz-File – ohne sie zu verändern –
auf Ihre Appliance. Damit ist Ihr Securepoint UTM-/VPN-System voll funktionsfähig.
– Seite 8 –
deutsch
Alle UTM-/VPN-Systeme müssen für den Betrieb lizensiert werden! Ohne eine Lizensierung
ist der Betrieb nicht erlaubt und ist keine Aktualität der Appliance gegeben. Ein sicherer
Betrieb ist nicht möglich!
6 Fehlersuche
Bevor Sie eine Neu-Installation des Gateways durchführen, prüfen Sie bitte die unten
genannten Fehlermöglichkeiten und Lösungen!
Scheinbar kein Reboot des Systems
Der Reboot nach der Ersteinrichtung kann ca. 2 bis 4 Minuten dauern, da eine Initialisierung
durchgeführt wird und Schlüssel erzeugt werden. Diese Vorgänge sind sehr rechenintensiv!
Sollte nach 4 Minuten im Browser kein sichtbares Reboot erfolgen, ist davon auszugehen,
dass Sie die IP-Adresse des internen Interface (LAN 2) geändert haben! In diesem Fall müssen Sie die von Ihnen eingetragene IP-Adresse für das interne Interface in Ihrem Browser
eingeben, sonst kommen Sie nicht auf die Web-Oberfläche des Gateways. Geben Sie also
ein:
https://“Ihre neue IP-Adresse von LAN 2“:11115/
Prüfen des Netzwerkbereichs Ihres Administrationsrechners
Falls Sie die IP-Adresse von LAN 2 (internes Netz: standardmässig 192.168.175.1, Port
11115) auf der Appliance geändert haben, müssen Sie die IP-Adresse Ihres Rechners auf
den neuen Netzbereich einstellen, sonst kommen Sie nicht auf die Web-Oberfläche des
Gateways!
Direkte Supportanfragen und Unterstützung
Wenden Sie sich im Problemfall gern an den kostenlosen Support von Securepoint:
Telefon: ++49 (0) 41 31 - 24 01 - 0
(kostenloser Support für Fachhändler und Systemhäuser)
oder schicken Sie eine E-Mail mit Angabe des Problems an:
E-Mail: [email protected]
Securepoint Web-Support:
http://www.securepoint.de/support/
– Seite 9 –
7 Übersicht Bedienung Web-Oberfläche
deutsch
Das Securepoint Web-Cockpit
Das Cockpit ist die Web-Bedienoberfläche Ihres Securepoint UTM-Systems oder VPNSystems. Im Cockpit der Securepoint Appliances erhalten Sie einen Überblick hinsichtlich
der Funktionen, System-Lasten, Services, Updates, verfügbaren Downloads wie
Dokumente/Software und vieles mehr. Sie können das Cockpit nach Ihren Wünschen individuell anpassen. Sie können bis zu 65.535 Securepoint Appliances auch über das
Securepoint Operation Center verwalten und bedienen. Beachten Sie hierzu die Securepoint
Handbücher.
– Seite 10 –
8 Übersicht Bedienung Security Operation Center
Securepoint Web-Oberfläche
Securepoint UTM-Lösungen bieten eine komplette, effiziente Netzwerk-, Web- und MailSicherheit mittels einer intuitiv bedienbaren BrowserBenutzerschnittstelle, um Unternehmen vor
den aktuellen Internetgefahren effizient
und jederzeit aktuell zu schützen.
Securepoint Security Operation Center
Das Security Operation Center kann ebenfalls
wie gewohnt für die Administration und Konfiguration eingesetzt werden! Mit dem Security
Operation Center (SOC) können bis zu 65.535
Securepoint UTM- und VPN-Systeme einfach,
zentral, remote administriert, Konfigurationen
verwaltet, Monitoring und Backups durchgeführt werden.
– Seite 11 –
Über das Operation Center können übergeordnete Administrationsaufgaben wie Monitoring
und Backup erledigt werden. Wie vom alten Securepoint Security Manager gewohnt, bleibt
die Möglichkeit der direkten SSH-Verbindung zu einzelnen Firewalls bestehen und bietet
Ihnen die vom Administrations-Webinterface gewohnten Einstellungsmöglichkeiten. Das
Securepoint Operation Center wird lokal auf einem Rechner installiert. Über den Dienst
Securepoint Data-Provider greift das Operation Center auf eine Datenbank zu, in welcher
Konfigurationsbackups und Monitoringdaten hinterlegt sind. Dieser Dienst kann lokal auf
einem Computer installiert sein oder zentral gehalten werden.
Das Operation Center bietet Ihnen in der linken Leiste die vier Bereiche Überwachung,
Extras, Operation Center und Firewalls. Im rechten Teil des Programmfensters werden
aktuelle Lastdaten der verwalteten Firewalls angezeigt. Wenn Sie direkt an einer Firewall
angemeldet sind, wird in dem rechten Fenster das Administrations-Webinterface der jeweiligen Firewall angezeigt. Es kann immer nur eine direkte Verbindung zu einer Firewall aufgebaut werden.
– Seite 12 –
deutsch
Arbeiten mit dem Securepoint Security Operation Center
Mit dem neuen Securepoint Security Operation Center (SOC) können bis zu 65.535 UTMAppliances einfach und sicher verwaltet werden. Das Operation Center stellt die neue
Verwaltungssoftware für Securepoint UTM Systeme dar. Das Konzept wurde an das
Administrations-Webinterface der Securepoint Version 10 angepasst. Das Operation Center
besitzt eine Client Server Architektur. Der Data-Provider (Server) des SOC kann zentral in
Ihrem Rechenzentrum auf einem Server installiert werden und kommuniziert mit Ihren vorhandenen Securepoint UTM Systemen.
Contents
Excellent and fast support, free of charge, is available
Page 14
1 Connecting
Page 15
2 Factory settings
Page 16
3 Connecting and logging in
Page 17
4 Basic configuration
Page 18
5 Registering and licensing
Page 20
6 Detecting errors
Page 21
7 Overview web interface
Page 22
8 Overview Security Operation Center
Page 23
– Page 13 –
Excellent and fast support, free of charge, is available
Please follow this installation guide for Securepoint UTM Security Systems. In case
of problems, please contact our Securepoint support team at no charge.
Phone: 0049 41 31 - 24 01 - 0
(support free of charge for dealers and system retailers)
or send an e-mail specifying the problem to:
Securepoint product registration/product license:
http://my.securepoint.de/
Securepoint support forum:
http://www.securepoint.de/support/
Software downloads, documents and videos:
http://download.securepoint.de/
DynDNS service:
http://www.spdns.de/
– Page 14 –
english
Securepoint Wiki and How-tos:
http://wiki.securepoint.de/
1 Connecting
The Securepoint UTM/VPN systems come equipped with varying numbers of network adapters LAN 1, LAN 2 up to LAN n.
Finding a location within the network
An appliance should be positioned in the network directly behind a modem or router. In
case a network is operated behind the appliance, a switch or hub has to be interconnected.
Connect your modem or router with the appliance's port LAN 1. The switch or another computer has to be plugged into port LAN 2. Ports LAN 3 up to LAN n are designated for demilitarized zones (DMZ). Use RJ45 cables for all connections.
!
Notice:
In case your computer has no Gigbit adapter and is directly connected to
LAN 2, without any intermediate switch or hub, please use a crossover cable.
Modem
or router
INTERNET
LAN 1
Securepoint
appliance
LAN 2
Switch
or hub
Internal
network
– Page 15 –
2 Factory settings
You may log into the securepoint appliance from your web browser by using the IP address
of the internal interface LAN 2 on port 11115 via https (SSL) protocol. This IP address is
set by default to 192.168.175.1.
Factory settings:
LAN 2, IP address of the internal interface: 192.168.175.1
Notice:
The Securepoint appliance's user interface has been optimized for Internet
Explorer >=8, Firefox >=13 and Chrome >=20. You should run the browser based
interface on a PC with the following minimal requirements: Pentium 4 processor
with at least 1.8 GHz and volatile memory (RAM) of 512 MB or more.
Resetting to factory settings:
The system's web interface allows you to restore factory settings. In menu Configuration
please click Factory Defaults. This will set the configuration back to default values. The existing configuration will be overwritten! Another way of restoring the appliance's default settings is by installing the Securepoint ISO image or from an USB image. You can find the
image and a how-to papers on Securepoint's website:
Download Securepoint ISO image (download area) from:
http://download.securepoint.de/
– Page 16 –
english
!
Browsing the Securepoint appliance GUI:
https://192.168.175.1:11115/
3 Connecting and logging in
Start the Securepoint appliance and connect your PC with the LAN 2 interface. In case your
computer has no Gigbit adapter and is directly connected to LAN 2, without any intermediate switch or hub, please use a crossover cable. On your PC please set an IP address in
the range from 192.168.175.2 to 192.168.175.254 (subnet mask is 255.255.255.0).
Start your web browser and enter the following address:
Browsing the Securepoint appliance's web interface:
https://192.168.175.1:11115/
Afterwards you will receive a message (see diagram). Acknowledge the appliance's
self-signed certificate. You will then see the administrator login screen. Log into the appliance by using the standard name and password from the factory settings:
First login after shipping:
– Standard administrator username:
– Standard administrator password:
– Page 17 –
admin
insecure
4 Basic configuration
You may now set up the basic configuration using the installation wizard. After the wizard
is closed, the system will be restarted using the new data.
Step 1: Changing gateway's LAN 2 IP
(internal network)
Enter the IP address for LAN 2 and subnet mask
(e. g. net mask in bitcount format: 24, same
like 255.255.255.0) of the gateway as desired.
Step 2: Choosing the Internet connection
type on LAN 1
Please choose the Internet connection type.
There are three choices to set up an Internet
connection: DSL, router or cable modem.
Step 3: Only DSL. Setting DSL (PPPoE)
Enter your DSL provider data.
– Page 18 –
english
License Terms
Agree to the license terms.
Step 4: Configuring gateway's DMZ
interface LAN 3 (optional)
Configure the DMZ interface if you like. You
may as well skip this step if no DMZ is used
or required.
Step 5: Changing the standard
administrator's password
Change the password for the administrator
admin. Please choose a fairly safe password.
Step 6: Upload your UTM/VPN license file
on the appliance
Upload your UTM/VPN license file on the
appliance. You get a new license file from:
http://my.securepoint.de
Close the configuration, by pressing on the
button Finish. You can make the licensing later
(see next page). Also, click on the button Finish.
Final step
Your preliminary configuration is complete now. Finalize the configuration by pressing
button Finish. The appliance will be restarted using your new configuration. Rebooting
after the initial configuration may last up to 2 to 4 minutes, depending on the appliance's
performance.
– Page 19 –
5 Registering and licensing
All UTM/VPN systems have to be licensed for proper operation. Without acquiring a
license, the appliance may be outdated and safe operation is impossible.
Registering per phone
You can register your system by phone. Please call us at the telephone number below and
Securepoint will send you a license file. We need the customer data, number of users and
type of product!
Phone: 0049 41 31 / 24 01 - 0
Registering and licensing with e-mail
Send us an e-mail ([email protected]) with your registration data (customer data,
number of users and type of product). Soon afterwards you will receive a mail containing
the admission license file. You can try our registration portal, too:
Setting the appliance's licence file
Log into the appliance with your username and password and click on menu Extras. Choose
the entry Registration. Load the license file (without any changes) onto the appliance. By
doing so your Securepoint UTM system will become fully functional.
– Page 20 –
english
http://my.securepoint.de
6 Detecting errors
Prior to reinstalling the gateway, please check for possible errors and their solutions as
mentioned below!
Apparently system does not reboot
Rebooting after initial configuration may last 2 to 4 minutes, since the system is
reinitialized and keys are being generated. These processes are very time consuming. In
case your browser shows no reboot after 4 minutes, you have surely changed the IP
address of the internal interface LAN 2. In this case, you must specify the interface's IP
address in your web browser, otherwise the gateway's web interface will be unreachable.
Please enter:
https://“Your new IP address on LAN 2“:11115/
Validating the network address range on your administrator PC
In case you have changed the IP address for LAN 2 (default for internal network:
192.168.175.1, Port 11115) on the appliance, you must set your PC's IP address within the
new network range, else the gateway's web interface is unreachable.
Securepoint support
In case of problems, please contact our Securepoint support team at no charge.
Phone: 0049 41 31 - 24 01 - 0
(support free of charge for dealers and system retailers)
or send an e-mail specifying the problem to:
e-mail: [email protected]
You may as well use the Securepoint web support forum. In case of problems or any
questions please consult:
Securepoint web support and how-tos under link support:
http://www.securepoint.de/support/
– Page 21 –
7 Overview web interface
english
The Securepoint web cockpit
The cockpit is the web user interface of your Securepoint UTM system. By using the cockpit, you will get an overview of all functions, system load, services, updates,
attainable downloads, for example documents as well as software and more.
You may set the cockpit for your individual needs. Alternatively, you can manage up to
65535 Securepoint appliances by using the Securepoint Security Operation Center to
administrate and to operate the appliance. Please refer to the Securepoint manuals.
– Page 22 –
8 Overview Security Operation Center
Securepoint Browser GUI
Securepoint UTM security solutions offer high-level, complete and efficient network, web
and mail security by implementing an intuitively usable
browser interface, to protect companies and
organizations against prevailing Internet
threats at all times.
Securepoint Operation Center
The operation center can be used for
advanced administrative purposes and
configuration as before. With the Securepoint
Operation Center you may remotely
administrate easily up to 65,535 Securepoint
UTMs/VPNs from a central point and manage
their configurations.
– Page 23 –
Working with Securepoint Security Operation Center
With the Securepoint Security Operation Center you may safely and easily administrate up
to 65535 Securepoint UTM/VPN solutions. The Securepoint Operation Center (SOC) is the
new managing software for Securepoint appliances. The concept of the Operation Center is
adopted from the administration web interface of Securepoint 10.
The Operation Center offers essential administrative functions like monitoring and backup.
The Operation Center on the left side offers four categories Monitoring, Extras, Operation
Center and Firewalls. The right side of the program window shows actual load data of the
managed firewalls. If the SOC is connected to a firewall, in the right area of the window
the administration of the respective firewall is displayed.
– Page 24 –
english
As known from the Securepoint Security Manager, you can connect directly to the appliances via SSH and configure the firewall with the administrative web interface.
The Securepoint Operation Center is installed on the computer locally. The Operation
Center stores monitoring data, backups and log data in a database. It accesses the database by using the service Securepoint Data Provider. This service can be installed on the
same com-puter or can be stored centrally on a server.
Sommaire
Support technique gratuit, excellent et rapide
Page 26
1 Connecter
Page 27
2 Réglages d’usine
Page 28
3 Connexion et identification
Page 29
4 Configuration de base
Page 30
5 Enregistrement et licences
Page 32
6 Dépannage
Page 33
7 Vue d’ensemble et utilisation de l’interface web
Page 34
8 Vue d’ensemble et utilisation du Security Operation Center
Page 35
– Page 25 –
Support technique gratuit, excellent et rapide
Veuillez suivre cette aide à l’installation pour les systèmes de sécurité Securepoint UTM et
contacter le support technique gratuit de Securepoint en cas de problèmes:
Téléphone:
0049 41 31 - 24 01 - 0
(Support technique gratuit pour les revendeurs et les intégrateurs de systèmes)
ou envoyer un courriel électronique avec les détails du problème à:
e-mail:
[email protected]
Securepoint enregistrement et licences:
http://my.securepoint.de/
Securepoint support forum:
http://www.securepoint.de/support/
Securepoint Wiki et How-tos:
http://wiki.securepoint.de/
Software downloads, documents et videos:
http://download.securepoint.de/
français
DynDNS service:
http://www.spdns.de/
– Page 26 –
1 Connecter
Les dispositifs Securepoint UTM/VPN sont équipés avec un nombre variable de cartes
réseau LAN 1, LAN 2 à LAN n.
Positionnement dans le réseau
Un dispositif est placé dans la structure du réseau derrière le modem ou le routeur. Si un
réseau est exploité derrière le dispositif, un commutateur (switch) ou concentrateur (hub)
doit être interposé. Le modem ou le routeur est connecté au port LAN 1 du dispositif. Le
commutateur ou l'ordinateur individuel sera connecté au port LAN 2. Les ports LAN 3 à LAN
n sont prévus pour les zones démilitarisées (DMZ). Utilisé pour les connections des câble
RJ45!
!
Indication:
Si vous faites une connexion directe avec LAN 2 sans un commutateur ou concentrateur et votre ordinateur ne dispose pas d'une interface gigabit LAN, veuillez
utiliser un câble croisé.
Modem/routeur
INTERNET
LAN 1
Securepoint
appliance
LAN 2
Switch/hub
Réseau
interne
– Page 27 –
2 Réglages d’usine
Vous pouvez atteindre le dispositif Securepoint avec votre navigateur web en utilisant l'adresse IP de l'interface interne LAN 2 sur le port 11115 avec le protocole https (SSL). Cette
adresse IP est réglée par défaut à l’usine à 192.168.175.1.
Réglage d’usine:
LAN 2, IP de l'interface interne: 192.168.175.1
Indication:
L'interface utilisateur du dispositif Securepoint est optimisé pour Internet Explorer
>=8, Firefox >=13 et Chrome >=20. Avec l'interface utilisateur, il est conseillé
d’utiliser un PC avec au moins un processeur Pentium 4, 1,8 GHz ou supérieur, et
une mémoire de 512 MB ou plus.
Réinitialisation aux réglages d’usine:
Dans l'interface web du système, vous pouvez réinitialiser le dispositif aux réglages d'usine. Cliquez Factory Defaults dans le menu Configuration. Ceci réinitialise la configuration
aux réglages d'usine. La configuration existante est remplacée. La deuxième façon de réinitialiser le dispositif aux réglages d'usine, est la réinstallation via Securepoint image ISO
ou avec une clé image USB. Vous pouvez trouver l'image et un how-to sur le site internet
de Securepoint:
Télécharger Securepoint (UTM système) image ISO:
http://download.securepoint.de/
– Page 28 –
français
!
Appeler l'interface web du dispositif Securepoint:
https://192.168.175.1:11115/
3 Connexion et identification
Démarrez le dispositif Securepoint et connecter votre ordinateur à l’interface LAN 2. Si vous
faites une connexion directe avec LAN 2 sans un commutateur ou concentrateur et que
votre ordinateur ne dispose pas d'une interface gigabit LAN, veuillez utiliser un câble croisé. Configurer votre ordinateur entre une gamme d’adresse IP allant de 192.168.175.2 à
192.168.175.254 (masque de sous-réseau: 255.255.255.0). Ouvrez maintenant votre
navigateur web et tapez l'adresse suivante:
Appeler l'interface web du dispositif Securepoint:
https://192.168.175.1:11115/
Vous recevez alors le message suivant, voir image. Acceptez le certificat auto-signé émis
par le dispositif de Securepoint. Maintenant vous arrivez sur l'interface d'administration de
Securepoint. Connectez-vous au dispositif Securepoint avec l’identifiant d’utilisateur par
défaut du réglage d'usine:
Identifiant par défaut du réglage d’usine:
– Nom d'utilisateur de l’administrateur par défaut:
– Mot de passe de l’administrateur par défaut:
– Page 29 –
admin
insecure
4 Configuration de base
Vous pouvez maintenant procéder à une configuration de base avec l'assistant d'installation. Le système redémarre avec les nouvelles données lorsque vous quittez l'assistant.
Etape 1: Modification de l'adresse IP du
LAN 2 (réseau interne) de la passerelle
Taper l’adresse IP souhaitée pour LAN 2 (réseau
interne) et le masque de sous-réseau (taille du
réseau, par exemple le masque de sous-réseau
en format bitcount: 24 à savoir 255.255.255.0)
de la passerelle.
Etape 2: Choix d'un type de connexion
Internet pour LAN 1
Choisissez le type de votre connexion Internet.
Vous avez trois possibilités pour créer une
connexion Internet: connexion DSL, routeur ou
modem câble.
Etape 3: Créer une connexion DSL (PPPoE)
Voici un exemple avec un fournisseur de DSL.
– Page 30 –
français
Termes de la Licence
Entrez vos données fournisseur d'accès DSL.
Etape 4: Optionnel: Configuration de
l’interface DMZ de la passerelle (LAN 3)
Si vous le souhaitez, configurez l'interface DMZ
de la passerelle. Toutefois, vous pouvez passer
à l’étape suivante si vous ne souhaitez pas
configurer la DMZ.
Etape 5: Entrer un nouveau mot de
passe pour l'administrateur par défaut
Entrer un nouveau mot de passe pour
l'administrateur admin. Choisissez pour cela
un mot de passe sécurisé!
Etape 6: Télécharger le fichier de licence
UTM/VPN sur l'appareil
Téléchargez votre fichier de licence UTM/VPN
sur le appareil. Vous obtenez un nouveau fichier
de licence:
http://my.securepoint.de
Fermer la configuration, en appuyant sur la
bouton Finish. Vous pouvez faire la délivrance
de permis plus tard (voir page suivante). En
outre, cliquez sur le bouton Finish.
Finaliser la configuration
Votre configuration initiale est maintenant terminée. Fermer la configuration en cliquant
sur le bouton Finish. Le dispositif redémarre maintenant avec vos données. La réinitialisation de l'installation initiale peut prendre, en fonction de la performance du dispositif, de
2 à 4 minutes! Après le redémarrage, vous serez automatiquement transmis à l'adresse
IP de l'interface web que vous avez peut-être changé.
– Page 31 –
5 Enregistrement et licences
Le système UTM/VPN doit être licencié pour l'exploitation! Sans licence le dispositif ne sera
pas actualisé et une exploitation sécurisée ne sera pas possible!
Licence par téléphone
Vous pouvez demander une licence pour votre système par téléphone, veuillez nous appelez au numéro de téléphone ci-dessous et Securepoint vous enverra un fichier de licence:
Téléphone:
0049 41 31 / 24 01 - 0
Enregistrement et demande de licences sur le portail Securepoint
En tant qu'utilisateur enregistré du portail Securepoint, vous pouvez facilement vous créer
un fichier d’enregistrement de votre dispositif, qui vous sera envoyé par e-mail
([email protected]). Si vous n'êtes pas encore enregistré sur le portail Securepoint,
veuillez vous enregistrer:
http://my.securepoint.de
français
Saisie de fichier de licence sur le dispositif
Ouvrez une session sur le dispositif avec votre nom d'utilisateur et mot de passe et cliquez
sur le menu Extras. Sélectionnez le menu Registration. Veuillez le téléchargez (sans le
modifier) sur votre dispositif. Maintenant votre système Securepoint UTM est pleinement
opérationnel.
– Page 32 –
6 Dépannage
Avant d'effectuer une nouvelle installation du dispositif, veuillez vérifier les possibilités d'erreur et solutions mentionnées ci-dessous!
Apparemment, aucun redémarrage du système
Le redémarrage, après l'installation initiale, peut prendre de 2 à 4 minutes, puisqu’une
initialisation est effectuée et des clés sont générées. Ces opérations comprennent de nombreux calculs! Si après 4 minutes, le redémarrage du dispositif n'est pas visible dans le
navigateur, il est alors supposé que vous avez modifié l'adresse IP de l'interface interne
(LAN2)! Dans ce cas, vous devez taper l'adresse IP de l'interface interne que vous avez entrée dans votre navigateur, sinon vous ne pourrez pas appeler l'interface web du dispositif.
Tapez alors:
https://“Votre nouvelle adresse IP de LAN 2“:11115/
Vérifiez la zone de réseau de votre ordinateur d’administration
Si vous avez modifié l'adresse IP du LAN 2 (réseau interne: par défaut 192.168.175.1, port
11115) du dispositif, vous devez ajuster l'adresse IP de votre ordinateur à la nouvelle zone
de réseau, sinon vous ne pourrez pas appeler l'interface web du dispositif!
Securepoint support
Veuillez suivre cette aide à l’installation pour les systèmes de sécurité Securepoint UTM et
contacter le support technique gratuit de Securepoint en cas de problèmes:
Téléphone:
0049 41 31 - 24 01 - 0
(Support technique gratuit pour les revendeurs et les intégrateurs de systèmes)
ou envoyer un courriel électronique avec les détails du problème à:
e-mail:
[email protected]
Si vous avez des problèmes ou questions, vous pouvez également utiliser le forum de
support Securepoint sur Internet:
Securepoint web support/how-tos:
http://www.securepoint.de/support/
– Page 33 –
7 Vue d’ensemble et utilisation de l’interface web
français
Le Cockpit Web Securepoint
Le cockpit est l'interface web utilisateur de votre système UTM Securepoint. Le cockpit du
dispositif Securepoint vous donne un aperçu des fonctions, charges du système, services,
mises à jour, téléchargements disponibles comme de documents / logiciels et bien plus
encore. Vous pouvez personnaliser le cockpit en fonction de vos besoins individuels. Vous
pouvez également gérer et exploiter jusqu'à 65535 dispositifs Securepoint via le Security
Operation Center. Consulter les manuels de Securepoint pour cela.
– Page 34 –
8 Vue d’ensemble et utilisation du Security Operation Center
Securepoint interface web
Securepoint UTM offre une solution complète et efficace de sécurité pour réseau, web et
courrier électronique, grâce à une interface intuitive du navigateur web, afin de protéger
les entreprises de manière efficace et toujours
à jour contre les dernières menaces
Internet.
Securepoint Security Operation Center
– Page 35 –
français
Travailler avec Securepoint Security Operation Center
Le Operation Center peut également, comme d'habitude, être utilisé pour l'administration
et la configuration! Avec le Operation Center vous pouvez administrer de manière simple,
centralisée et à distance jusqu’à 65535 Securepoint UTM/VPN et gérer les configurations.
– Page 36 –
Indice
Soporte: Gratuito, excelente, rápido
página 38
1 Conexión
página 39
2 Ajustes de fábrica
página 40
3 Conectarse e inicio de sesión
página 41
4 Configuración básica
página 42
5 Registro y licencia
página 44
6 Solución de problemas
página 45
7 Vista general manejo de la interfaz Web
página 46
8 Vista general de manejo del Security Operation Center
página 47
– página 37 –
Soporte: Gratuito, excelente, rápido
Por favor, utilize este manual de instalación para los sistemas Securepoint UTM Security y
contacte al soporte técnico gratuito de Securepoint cuando surjan problemas.
Teléfono:
0049 41 31 - 24 01 - 0
(soporte gratuito para los concesionarios especializados y sistemas
concesionarios)
o envíe un correo electrónico con los detalles del problema:
e-mail:
[email protected]
Securepoint registro y licencia:
http://my.securepoint.de/
Securepoint support forum:
http://www.securepoint.de/support/
Securepoint Wiki, How-tos:
http://wiki.securepoint.de/
Software downloads, documents, videos:
http://download.securepoint.de/
español
DynDNS service:
http://www.spdns.de/
– página 38 –
1 Conexión
Los dispositivos Securepoint UTM/VPN están equipados con diferentes tarjetas de red LAN
1, LAN 2 hasta LAN n.
Posicionamiento en la red
Un cortafuegos se coloca en la estructura de la red detrás del módem o router. Si utiliza
otra red detrás del cortafuegos, tiene que interponer un switch o hub. El módem o router
será conectado al puerto LAN 1 del cortafuegos. El switch o un equipo será conectado al
puerto LAN 2. Los puertos LAN 3 hasta LAN n están previstos para las zonas desmilitarizadas (DMZ). Para las conexiones se utilizan cables RJ45.
!
Nota:
Si su ordenador no dispone de una interfaz gigabit y se conecta directamente sin
switch o hub con LAN 2, utilice un cable cruzado.
módem/router
INTERNET
LAN 1
Securepoint
appliance
LAN 2
switch/hub
red interna
– página 39 –
2 Ajustes de fábrica
Se puede conectar al Securepoint cortafuegos utilizando su navegador Web con la dirección
IP interna de la interfaz LAN 2 y el puerto 11115 con el protocolo HTTPS (SSL). Esta dirección IP está ajustada desde fábrica a 192.168.175.1.
Ajustes de fábrica
LAN 2, dirección IP interna de la interfaz: 192.168.175.1
!
Conectarse a la interfaz web del Securepoint cortafuegos:
https://192.168.175.1:11115/
Nota:
La interfaz web del dispositivo Securepoint es optimizado para Internet Explorer
>=8, Firefox >=13 y Chrome >=20. Para utilizar la interfaz web, necesita un PC
con un procesador mínimo Pentium 4, 1.8 GHz o superior y una memoria de 512
MB o use más.
Restablecer por defecto:
En la interfaz web del sistema, puede restablecer el aparato a los ajustes de fábrica. Haga
clic en Factory Defaults en el menú de configuración. Esto restablece la configuración por
defecto. La configuración existente se sobrescribirá. La segunda manera de restablecer por
defecto el dispositivo es la reinstalación a través de las imágenes ISO de Securepoint o a
través de USB imáge. En la página web Securepoint puede encontrar la imagen y un howto.
español
Descargar imáge ISO Securepoint:
http://download.securepoint.de/
– página 40 –
3 Conectarse e inicio de sesión
Inicie el Securepoint cotafuegos y conecte el ordenador a la interfaz LAN 2. Si su ordenador no dispone de una interfaz gigabit y se conecta directamente sin switch o hub con LAN
2, utilice un cable cruzado. Configure en su ordenador una dirección IP entre la gamas de:
192.168.175.2 a 192.168.175.254 (Máscara de red: 255.255.255.0). Ahora abra su
navegador y escriba la siguiente dirección:
Llamar a la interfaz web del dispositivo Securepoint:
https://192.168.175.1:11115/
A continuación, recibirá el siguiente mensaje, ver la ilustración. Acepte el auto-firmado certificado del dispositivo Securepoint. Ahora llega a la interfaz de administración de
Securepoint. Inicio de la sesión usando el usuario por defecto de la configuración de fábrica en el dispositivo de Securepoint:
Inicio de la sesión en la configuración de fábrica:
– Administrador nombre de usuario por defecto:
admin
– Administrador contraseña por defecto:
insecure
– página 41 –
4 Configuración básica
Ahora puede hacer una configuración básica con el asistente de instalación. El sistema se
reiniciará con los nuevos datos después de terminar el asistente.
Terminos de la licencia
De acuerdo con los términos de la licencia.
Paso 2: Elegir un tipo de conexión
a Internet para LAN 1
Seleccione el tipo de conexión a Internet. Tiene
tres posibilidades para crear una conexión a
Internet: conexión DSL, router o modem por
cable.
Paso 3: Sólo con DSL. Crear DSL (PPPoE)
Introduzca los datos del proveedor de DSL.
– página 42 –
español
Paso 1: Cambio de dirección IP LAN 2
(red interna) de la puerta de enlace
Ingrese su dirección deseada IP para LAN 2 (red
interna) y la máscara de red (tamaño de la red,
como la máscara de red en formato bitcount:
24, es decir 255.255.255.0) de la puerta de
enlace.
Paso 4: Opcional: Configuración de la
interfaz DMZ de la puerta de enlace
(LAN 3)
Si lo desea, configure la interfaz DMZ de la
puerta de enlace. Si no quiere crear una DMZ,
puede saltar este paso.
Paso 5: Establecer la nueva contraseña
para el administrador por defecto.
Ingrese la nueva contraseña admin para el
administrador. !Elija una contraseña segura!
Paso 6: Descargue el archivo de licencia
en el dispositivo UTM/VPN
Descargue el archivo de licencia en la UTM/VPN
aparato. Usted obtiene un nuevo archivo de
licencia a partir de:
http://my.securepoint.de
Cierre la configuración, pulsando sobre el botón
Finish. Puede hacer que el otorgamiento de
licencias más adelante (ver página siguiente).
También, haga clic en el botón Finish.
Finalización de la configuración
Su configuración inicial se ha completado. Cierre la configuración pulsando el botón
Finish. El dispositivo reinicia ahora con sus datos. El Reboot de la configuración inicial
puede durar aproximadamente de 2 a 4 minutos, dependiendo del rendimiento del dispositivo. Después del Reboot usted será automáticamente enviado a su eventualmente
cambiada dirección IP de la interfaz web.
– página 43 –
5 Registro y licencia
!El sistema UTM/VPN debe tener una licencia para la operación! !Sin licencia no podrá
actualizar el dispositivo y la operación segura con el dispositivo no será posible!
Licencia por teléfono
Usted puede licenciar su sistema por teléfono, llámenos al número de teléfono mencionado y Securepoint le enviará un archivo con licencia:
Teléfono:
0049 41 31 / 24 01 - 0
Inscripción y obtención de licencia al Portal Securepoint
Como usuario registrado en el portal de Securepoint, usted puede crear fácilmente un
archivo de registro para su dispositivo. Este será enviado por e-mail. Si usted no está registrado en el Portal Securepoint, regístrese allí. Usted recibirá un acceso al portal por e-mail
([email protected]):
http://my.securepoint.de
español
Importación de licencia de archivos en el dispositivo
Inicie sesión al dispositivo con su nombre de usuario y contraseña y haga clic en el menú
Extras. Seleccione la opción de menú Registration. Descargue por favor el archivo con
licencia – sin modificarlo – en su dispositivo. Al fin su Securepoint sistema UTM funciona
plenamente.
– página 44 –
6 Solución de problemas
Antes de realizar una instalación limpia del dispositivo, revise antes por favor, las posibilidades de error a continuación y soluciones.
Al parecer no reinicia el sistema
El reinicio después de la instalación inicial puede durar de 2 a 4 minutos, dado que se realiza una inicialización y clave generada. !Estas operaciones son muy intensivas en cálculo!
Si el reinicio no es visible en el navegador después de 4 minutos, se supone que usted cambió la dirección IP de la interfaz interna (LAN 2) En este caso, debe ingresar la dirección IP
que ha utilizado para la interfaz interna en su navegador web, sino no podrá llamar la interfaz web del dispositivo. Ingrese a continuación:
https://“Su nueva dirección IP de LAN 2“:11115/
Compruebe el área de la red de su equipo de administración.
Si usted cambió la dirección IP de LAN 2 (red interna: por defecto 192.168.175.1, puerto
11115) en el dispositivo, debe establecer la dirección IP de su ordenador a la red de área
nueva, sino no podrá llamar la interfaz Web del dispositivo.
Securepoint soporte
Por favor, utilize este manual de instalación para los sistemas Securepoint UTM Security y
contacte al soporte técnico gratuito de Securepoint cuando surjan problemas.
Teléfono:
0049 41 31 - 24 01 - 0
(soporte gratuito para los concesionarios especializados y sistemas
concesionarios)
o envíe un correo electrónico con los detalles del problema:
e-mail:
[email protected]
Si tiene problemas o preguntas también puede utilizar el foro de soporte Securepoint en
Internet:
Securepoint web soporte/how-tos:
http://www.securepoint.de/support/
– página 45 –
7 Vista general manejo de la interfaz Web
español
El Securepoint Web Cockpit
El Cockpit es la interfaz de usuario de la interfaz web de su UTM sistema de Securepoint.
El Cockpit del dispositivo Securepoint le ofrece una vista general en cuanto a las funciones,
las cargas del sistema, servicios, actualizaciones, disponible descargas como documentos
/ software y mucho más. Puede personalizar el Cockpit a sus necesidades individuales.
Usted puede administrar y operar hasta 65.535 dispositivos de Securepoint también a través del Securepoint Security Operation Center. Tenga en cuenta los detalles de los manuales de Securepoint.
– página 46 –
8 Vista general de manejo del Security Operation Center
Securepoint Interfaz Web
Las soluciones Securepoint UTM ofrecen una completa, eficiente red de seguridad, Web y
correo electrónico a través de una intuitiva
interfaz web, para proteger las empresas
contra las amenazas actuales de Internet
de forma eficiente y siempre actual.
Securepoint Security Operation Center
– página 47 –
español
Modo de operar: Securepoint Security Operation Center
El Security Operation Centerpuede también ser utilizado como de costumbre para la
administración y configuración. Con el Operation Center puede administrar las configuraciones hasta 65.535 Securepoint UTM/VPN, gestionado de forma simple, centralizada y
remota.
– página 48 –
Securepoint GmbH
Salzstrasse 1
21335 Lueneburg
Germany
phone: ++49 (0) 41 31 / 24 01 - 0
fax:
++49 (0) 41 31 / 24 01 - 50
mail:
web:
web:
[email protected]
www.securepoint.de
www.securepoint.cc (english)
Version 15.10.2012, Installation Manual
Securepoint UTM/VPN Security Systems v11