1
INSTALLATION
(IN-DASH MOUNTING)
EINBAU
(IM ARMATURENBRETT)
INSTALACIÓN (MONTAJE EN EL TABLERO DE
INSTRUMENTOS)
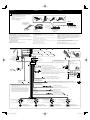
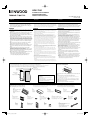
The following illustration shows a typical installation. If you have any
questions or require information regarding installation kits, consult
your Kenwood Car Audio dealer or a company supplying kits.
• If you are not sure how to install this unit correctly, have it installed
by a qualified technician.
• Make sure not to block the fan on the rear panel to maintain proper
ventilation when installed.
Die folgende Abbildung zeigt einen typischen Einbau. Wenn Sie weitere
Fragen haben oder Informationen zu Einbausätzen benötigen, wenden Sie
sich an Ihren Kenwood-Autoradiohändler oder an eine Bezugsquelle für
Einbausätze.
• Sind Sie sich über den richtigen Einbau des Geräts nicht sicher, lassen Sie
es von einem qualifizierten Techniker einbauen.
• Sicherstellen, dass nicht das Gebläse an der Rückseite verdeckt wird, um
richtige Ventilation beim Einbau zu gewährleisten.
La siguiente ilustración muestra una instalación típica. Si tiene
preguntas o requiere información concerniente a los juegos de
instalación, póngase en contacto con su distribuidor de audio para auto
Kenwood o con la compañía suministradora de los juegos.
• Si usted no está seguro de cómo instalar correctamente la unidad,
hágala instalar por un técnico cualificado.
• Asegúrese de no bloquear las rendijas de ventilación del panel trasero,
para poder mantener una buena ventilación una vez instalado.
Do the required electrical connections.
Nehmen Sie die erforderlichen elektrischen
Anschlüsse vor.
Realice las conexiones eléctricas
requeridas.
Do not block the fan.
Nicht das Gebläse blockieren.
No tape las rejillas de
ventilación.
*1 When you stand the unit,
be careful not to damage
the fuse on the rear.
1
* Beim Aufstellen des Geräts
darauf achten, daß die
Sicherung auf der Rückseite
nicht beschädigt wird.
Bend the appropriate tabs to hold the
sleeve firmly in place.
* Al poner la unidad
vertical, tenga cuidado
de no dañar el fusible
provisto en la parte
posterior.
1
When using the optional stay / Beim Verwenden der AnkerOption / Cuando emplea un soporte opcional
Die geeigneten Zapfen biegen, um die
Manschette sicher festzuhalten.
Doble las lengüetas apropiadas para
retener firmemente la manga en su lugar.
When installing the unit without using the sleeve / Beim Einbau des Geräts ohne Halterung / Instalación
de la unidad sin utilizar la cubierta
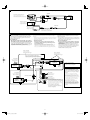
In a Toyota car for example, first remove the car radio and install the unit in its place.
Stay (option)
Zum Beispiel in einem Toyota zuerst das Autoradio ausbauen und dann das Gerät an seinem Platz einbauen.
Anker (Option)
En un automóvil Toyota, por ejemplo, en primer lugar desmonte el autorradio e instale la unidad en su lugar.
Soporte (opción)
Fire wall
Feuerwand
Tabique a prueba
de incendios
Flat type screws—M5 x 8 mm *2
Senkkopfschrauben—M5 x 8 mm *2
Tornillos tipo plano (M5 × 8 mm) *2
*2 Not included for this unit.
*2 Für diesen Receiver nicht mitgeliefert.
*2 No suministrado con esta unidad.
Dashboard
Armaturenbrett
Tablero de
instrumentos
Bracket *2
Konsole *2
Ménsula *2
Screw (option)
Schraube (Option)
Tornillo (opción)
Pocket
Taschen
Compartimiento
Bracket *2
Konsole *2
Ménsula *2
Install the unit at an angle of less than 30˚.
Stellen Sie das Gerät mit einem Winkel von
weniger als 30° auf.
Instale la unidad a un ángulo de menos de
30˚.
Flat type screws—M5 x 8 mm *2
Senkkopfschrauben—M5 x 8 mm *2
Tornillos tipo plano—M5 x 8 mm *2
Note:
When installing the unit on the mounting bracket, make sure to use the 8 mm-long screws. If longer screws are
used, they could damage the unit.
Hinweis:
Beim Anbringen des Gerät an der Konsole sicherstellen, daß 8 mm lange Schrauben verwendet werden. Werden längere
Schrauben verwendet, können sie das Gerät beschädigen.
Nota:
Cuando instala la unidad en la ménsula de montaje, asegúrese de utilizar los tornillos de 8 mm de longitud. Si se
utilizan tornillos más largos, éstos pueden dañar la unidad.
Removing the unit
Ausbau des Geräts
Extracción de la unidad
Before removing the unit, release the rear section.
Vor dem Ausbau des Geräts den hinteren Teil freigeben.
Antes de extraer la unidad, libere la sección trasera.
Insert the two handles, then pull them as
illustrated so that the unit can be removed.
Die beiden Handgriffe einsetzen und dann ziehen
wie in der Abbildung gezeigt, so daß das Gerät
entfernt werden kann.
Inserte las dos manijas y, a continuación,
extráigalas de la manera indicada en la ilustración
para poder desmontar la unidad.
2
KDV-7241_E_install_EGS.indb 2
08.4.18 2:53:40 PM