1
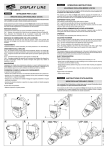
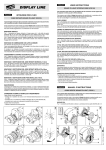
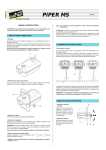
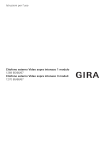
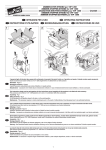
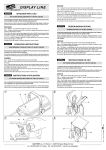
ENGLISH
®
DISPLAY LINE
USER INSTRUCTIONS
STROBE (C52145)
This instructions sheet must be read together with the instructions manual supplied with
the projector on which you plan to fit this accessory.
ITALIANO
ISTRUZIONI PER L’USO
STROBO (C52145)
Il presente foglio di istruzioni deve essere letto unitamente al manuale di istruzioni fornito
con il proiettore sul quale si intende montare questo accessorio.
This accessory may be fitted on Display Line projectors with electrified rails, in combination with
the lens holder mounting (supplied as standard with the projector) and with a lens.
It can be mounted on its own or with other accessories.
SINGLE ASSEMBLY
Questo accessorio può essere montato sui proiettori Display Line provvisti di guide elettrificate,
in abbinamento con il supporto portaobiettivo (fornito di serie con il proiettore) e con un obiettivo.
Può essere montato singolarmente o in combinazione con altri accessori.
Fig. 1 - The accessory can be placed above or below the two electrified rails (A), with the wheel
facing either towards the lens or towards the lighting fixture. Make sure the switch (B) is on
central OFF position «O».
Fig. 2 - Turn the two fixing clips (C) outwards, insert the accessory on the guides (A) and find
the best position. Then secure it by turning the fixing clips (C) inwards so they click home.
MONTAGGIO SINGOLO
ASSEMBLY IN COMBINATION WITH OTHER ACCESSORIES
Fig. 1 - L’accessorio può essere collocato al di sopra oppure al di sotto delle due guide
elettrificate (A) con la ruota rivolta indifferentemente verso l’obiettivo oppure verso il corpo
illuminante. Assicurarsi che l’interruttore (B) sia in posizione di spento «O».
Fig. 2 - Ruotare verso l’esterno le due mollette di fissaggio (C), inserire l’accessorio sulle guide
(A) e ricercare la migliore posizione, quindi fissarlo ruotando verso l’interno le mollette di
fissaggio (C) fino allo scatto
Refer to the instructions for using the other accessories. As general rule, pay attention when
fitting, so as not to let the moving parts of the different accessories come into contact with each
other.
MONTAGGIO IN COMBINAZIONE CON ALTRI ACCESSORI
MAINTENANCE
Fare riferimento alle istruzioni per l’uso degli altri accessori.
Come norma generale fare attenzione, nel montaggio, a non fare entrare in contatto fra loro le
parti in movimento dei diversi accessori.
The accessory requires no routine maintenance and, in case of malfunctioning, the work must
be assigned to an authorized technician.
AUTOMATIC OPERATION
Fig. 3 - The accessory operates automatically; to start, turn the switch (B) to «I».
CORRECTING STRAIGHTFORWARD OPERATING TROUBLE
FUNZIONAMENTO AUTOMATICO
Fig. 3 - L’accessorio funziona in maniera automatica, per avviarlo posizionare su «I» l’interruttore (B).
MANUTENZIONE
L’accessorio non richiede alcuna manutenzione ordinaria, e in caso di malfunzionamento deve
essere affidato a un tecnico autorizzato.
The Stobe wheel does not turn properly:
• Check that the projector is on and the switch (B) of the accessory is on position «I».
• Check there is contact between the fixing clips (C) and the electrified rails (A).
• Ascertain that the wheel is not blocked by contact with other accessories.
CORREZIONE DI SEMPLICI ANOMALIE DI FUNZIONAMENTO
La ruota Strobo non gira regolarmente:
• Verificare che il proiettore sia acceso e che l’interruttore (B) dell’accessorio sia in posizione «I».
• Accertarsi che vi sia contatto fra le mollette di fissaggio (C) e le guide elettrificate (A).
• Accertarsi che la ruota non sia bloccata dal contatto con altri accessori.
2
A
B
C
studio
1
Rev. 1 07/00 Cod. 099568
A
FRANÇAIS
MANUEL D’INSTRUCTIONS
ESPAÑOL
INSTRUCCIONES DE USO
STROBO (C52145)
Lire la présente fiche d'instructions en même temps que le manuel d'instructions fourni
avec le projecteur sur lequel cet accessoire doit être monté.
Cet accessoire peut être monté sur les projecteurs Display Line équipés de guides électrifiés,
en association avec le support d'objectif (fourni de série avec le projecteur) et avec un objectif.
Il peut être monté seul ou en combinaison avec d'autres accessoires.
MONTAGE SEUL
Fig. 1.- L’accessoire peut être placé au-dessus ou au-dessous des deux guides électrifiés (A)
en orientant le disque vers l’objectif ou vers le corps éclairant. S'assurer que le commutateur (B)
est en position éteinte «O».
Fig.2 - Tourner les deux ressorts de fixations (C) vers l'extérieur, placer l'accessoire sur les
guides (A) et rechercher la meilleure position, puis le fixer en tournant vers l'intérieur les
ressorts de fixation (C) jusqu'au déclic.
MONTAGE EN COMBINAISON AVEC D'AUTRES ACCESSOIRES
Se reporter aux instructions relatives à l'utilisation des autres accessoires. En règle générale,
veiller pendant le montage à ce que les parties en mouvement des différents accessoires
n'entrent pas en contact entre elles.
FONCTIONNEMENT AUTOMATIQUE
Fig. 3 - L’accessoire fonctionne en automatique. Pour le démarrer, positionner sur «I»
l’interrupteur (B).
ENTRETIEN
L'accessoire ne nécessite aucun entretien ordinaire et en cas de mauvais fonctionnement, il doit
être confié à un technicien agréé.
CORRECTION DE SIMPLES ANOMALIES DE FONCTIONNEMENT
La roue strobo ne tourne pas correctement:
• S'assurer que le projecteur est allumé et que l'interrupteur (B) de l'accessoire est sur «I».
• S'assurer qu'il y a un contact entre les ressorts de fixation (C) et les guides électrifiés (A).
• S'assurer que le disque n'est pas bloqué par un éventuel contact avec d'autres accessoires.
DEUTSCH
GEBRAUCHSANLEITUNG
ESTROBO (C52145)
La presente hoja de instrucciones debe leerse junto con el manual de instrucciones del
proyector en el cual se montará este accesorio.
Este accesorio puede montarse en los proyectores Display Line provistos de guías
electrificadas, junto con el soporte portaobjetivo (que se suministra de serie con el proyector) y
un objetivo.
Es posible montarlo sólo o en combinación con otros accesorios.
MONTAJE INDIVIDUAL
Fig. 1 - El accesorio puede colocarse encima o debajo de las dos guías electrificadas (A), con
la rueda orientada hacia el objetivo o hacia el cuerpo luminoso. Cerciórese de que el interruptor
(B) esté en la posición central de apagado «O».
Fig. 2 - Gire hacia afuera los dos clips de fijación (C), monte el accesorio en las guías (A) y
busque la mejor posición, luego fíjelo girando hacia adentro los clips de fijación (C) hasta que
se enganchen.
MONTAJE EN COMBINACIÓN CON OTROS ACCESORIOS
Consulte las instrucciones de uso de los demás accesorios. Como norma general, durante el
montaje, tenga cuidado de que las partes móviles de los diversos accesorios no se toquen
entre sí.
FUNCIONAMIENTO AUTOMÁTICO
Fig. 3 - El accesorio funciona de manera automática. Para activarlo, ponga el interruptor (B) en
la posición «I».
MANTENIMIENTO
El accesorio no requiere ningún tipo de mantenimiento ordinario y ante cualquier desperfecto,
acuda a un técnico autorizado.
SOLUCIÓN DE SIMPLES ANOMALÍAS
La rueda Estrobo no gira correctamente:
• Compruebe que el proyector esté encendido y que el interruptor (B) del accesorio esté en la
posición «I».
• Compruebe que haya contacto entre los clips de fijación (C) y las guías electrificadas (A).
• Observe si la rueda está bloqueada por contacto con otros accesorios.
12
3
8
9
10
4
6
STROBO (C52145)
11
Diese Bedienungsanleitung sollte parallel mit dem Bedienungshandbuch des Projektors,
mit dem dieses Zubehörteil benutzt wird, gelesen werden.
Dieses Zubehörteil kann ausschliesslich an den mit Stromschienen ausgestatteten Display-Line
Projektoren montiert werden, und zwar in Verbindung mit dem (serienmässig mit dem Projektor
mitgelieferten) Objektivhalter und einem Objektiv.
Es kann einzeln oder in Kombination mit anderen Zubehörteilen montiert werden.
7
EINZELMONTAGE
5
Abb. 1 - Das Zubehörteil kann über oder unter den zwei Stromschienen (A) angebracht werden,
das Rad kann wahlweise gegen das Objektiv oder zum Lampengehäuse gerichtet werden.
Sicherstellen, dass der Schalter (B) sich in der abgeschalteten Position «O» befindet.
Abb. 2 - Die zwei Befestigungsfedern (C) nach aussen drehen, das Zubehörteil auf den
Schienen (A) einsetzen und die optimale Position bestimmen. Anschliessend wird das
Zubehörteil an den Schienen befestigt, indem die Befestigungsfedern (C) bis zum Einrasten
nach innen gedreht werden.
MONTAGE IN KOMBINATION MIT ANDEREN ZUBEHÖRTEILEN
Auf die Gebrauchsanleitung der anderen Zubehörteile Bezug nehmen. Als allgemeine
Grundregel gilt, während der Montage darauf zu achten, dass die beweglichen Teile der
verschiedenen Zubehörteile nicht miteinander in Berührung kommen.
1
AUTOMATISCHER BETRIEB
Abb. 3 - Das Zubehörteil funktioniert automatisch, zum Starten den Schalter (B) auf «I» stellen.
WARTUNG
Das Zubehörteil bedarf keiner ordentlichen Wartung und bei Auftreten von Betriebsstörungen
muss seine Reparatur einem autorisierten Techniker anvertraut werden.
BEHEBUNG EINFACHER BETRIEBSSTÖRUNGEN
Unregelmässiges Drehen des Strobo-Rads.
• Prüfen, ob der Projektor eingeschaltet ist und ob der Schalter (B) auf «I» steht.
• Sicherstellen, dass zwischen den Befestigungsfedern (C) und den Stromschienen (A) Kontakt
besteht.
• Sicherstellen, dass das Rad nicht durch die Berührung mit anderen Zubehörteilen blockiert ist.
CLAY PAKY SPA - Via Giovanni Pascoli,1 - 24066 PEDRENGO ( Bergamo) Italy
Tel. 035 / 65 4311 - Telefax 035 / 66 59 76 - Internet: www.claypaky.it
2
13