1
INT-200
Intercomunicador para puerta
V0611a
Manual de instrucciones
S6-B
INTERCOMUNICADOR
PARA PUERTA
INT-200
Gracias
por la compra de este producto Steren.
Este manual contiene todas las funciones de operación y solución de problemas
necesarias para instalar y operar su nuevo Intercomunicador para puerta Steren.
Por favor revise este manual completamente para estar seguro de instalar
y poder operar apropiadamente este producto.
Para apoyo, compras y todo lo nuevo que tiene Steren, visite nuestro sitio Web en:
www.steren.com
2
IMPORTANTE
• El equipo debe ser colocado en un lugar con ventilación adecuada, para prevenir humedad,
polvo o la luz directa del sol.
• Siempre utilice un paño suave y seco para limpiar el equipo. No utilice solventes.
• No intente abrir su equipo puede dañarlo y anulará la garantía.
• Si el cordón de alimentación es dañado, éste debe ser reemplazado por el fabricante o su
agente de servicio o por personal calificado para evitar algún riesgo.
• Si no ocupa su equipo por un tiempo prolongado desconecte el cable de corriente del
contacto eléctrico.
CARACTERÍSTICAS
• Permite la comunicación con el exterior de la casa u oficina.
• Control de chapa eléctrica (Chapa no incluida)
• Para chapa eléctrica no requiere de transformador.
• Tono de llamada
• Fácil de instalar.
3
CONTROLES
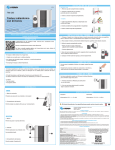
1. Botón de apertura de puerta.
2. Auricular.
3. Interruptor de volumen.
4. Entrada para conectar el auricular.
5. Entrada de cable de corriente.
6. Botón de llamada.
7. Bocina.
8. Micrófono.
4
INSTALACIÓN
INSTALANDO EL TIMBRE
Se recomienda que fije el timbre a una altura de 1,45 m a 1,6 m.
1. Seleccione el lugar donde desee instalar el timbre y realice las
perforaciones correspondientes de acuerdo a la placa de plástico.
Posteriormente fije la placa con tornillos.
2. En el timbre instale un cable de 2 vías (se recomienda cable de 2
vías calibre 22). Oprima los botones hasta sujetar firmemente el cable.
3. Coloque el timbre en la base
previamente instalada y atornille.
5
INSTALANDO EL INTERCOMUNICADOR
Se recomienda que fije el intercomunicador a una
altura de 1,45 m a 1,6 m.
1. Fije la base de plástico utilizando tornillos y
taquetes a la altura deseada.
2. En el intercomunicador, una el cable del timbre de
acuerdo al número correspondiente.
En caso de contar con una cerradura eléctrica (no
incluida) conecte los cables en la entrada S1 y S2 del
intercomunicador.
3. Inserte el intercomunicador en la base de plástico
previamente instalado.
4. Conecte el cable de corriente a un contacto
eléctrico cercano al intercomunicador.
6
CONEXIONES
INTERCOMUNICADOR
1
TIMBRE
1 2 3
2
S1
S2
CERRADURA ELÉCTRICA
(NO INCLUIDA)
7
OPERACIÓN
1. Cuando el visitante oprima el botón de llamada, se escuchará un timbre en el intercomunicador.
2. Levante el auricular para hablar con el visitante.
3. Después de hablar con el visitante, presione el botón de apertura de puerta en caso de tener
instalada una cerradura eléctrica.
ESPECIFICACIONES
Intercomunicador:
Alimentación: 110V~ 60Hz 15Wmáx.
Salida: 12 V - - - 8Wmáx.
Dimensiones: 225 x 190 x 62 mm
Peso: 1657gr.
Timbre
Alimentación: 12 V - - - 8Wmáx.
Salida: 12 V - - Consumo nominal: 2,64 kWh/mes
Consumo en espera: 1,13 kWh/mes
El diseño del producto y las especificaciones pueden cambiar sin previo aviso.
8
Producto: Intercomunicador para puerta
Modelo: INT-200
Marca: Steren
PÓLIZA DE GARANTÍA
Esta póliza garantiza el producto por el término de un año en todas sus partes y mano de obra, contra cualquier defecto
de fabricación y funcionamiento, a partir de la fecha de entrega.
CONDICIONES
1.- Para hacer efectiva la garantía, presente ésta póliza y el producto, en donde fue adquirido o en Electrónica Steren
S.A. de C.V.
2.- Electrónica Steren S.A de C.V. se compromete a reparar el producto en caso de estar defectuoso sin ningún cargo al
consumidor. Los gastos de transportación serán cubiertos por el proveedor.
3.- El tiempo de reparación en ningún caso será mayor a 30 días, contados a partir de la recepción del producto en
cualquiera de los sitios donde pueda hacerse efectiva la garantía.
4.- El lugar donde puede adquirir partes, componentes, consumibles y accesorios, así como hacer válida esta garantía es
en cualquiera de las direcciones mencionadas posteriormente.
ESTA PÓLIZA NO SE HARA EFECTIVA EN LOS SIGUIENTES CASOS:
1.- Cuando el producto ha sido utilizado en condiciones distintas a las normales.
2.- Cuando el producto no ha sido operado de acuerdo con el instructivo de uso.
3.- Cuando el producto ha sido alterado o reparado por personal no autorizado por Electrónica Steren S.A. de C.V.
El consumidor podrá solicitar que se haga efectiva la garantía ante la propia casa comercial donde adquirió el producto.
Si la presente garantía se extraviara, el consumidor puede recurrir a su proveedor para que le expida otra póliza de
garantía, previa presentación de la nota de compra o factura respectiva.
ELECTRONICA STEREN S.A. DE C.V.
DATOS DEL DISTRIBUIDOR
Nombre del Distribuidor
Número de serie
Fecha de entrega
En caso de que su producto presente alguna falla, acuda al centro de distribución más
cercano a su domicilio y en caso de tener alguna duda o pregunta por favor llame a
nuestro Centro de Atención a Clientes, en donde con gusto le atenderemos en todo lo
relacionado con su producto Steren.
Centro de Atención a Clientes
01 800 500 9000
Camarones 112, Obrero Popular, 02840, México, D.F.
RFC: EST850628-K51
STEREN PRODUCTO EMPACADO S.A. DE C.V.
Biólogo MaximIno Martínez No. 3408 Int. 3 y 4, San
Salvador Xochimanca, México, D.F. 02870,
RFC: SPE941215H43
ELECTRONICA STEREN DEL CENTRO, S.A. DE C.V.
Rep. del Salvador 20 A y B, Centro, 06000, México.
D.F. RFC: ESC9610259N4
ELECTRONICA STEREN DE GUADALAJARA, S.A.
López Cotilla No. 51, Centro, 44100, Guadalajara, Jal.
RFC: ESG810511HT6
ELECTRONICA STEREN DE MONTERREY, S.A.
Colón 130 Pte., Centro, 64000, Monterrey, N.L. RFC:
ESM830202MF8
ELECTRONICA STEREN DE TIJUANA, S.A. de C.V.
Calle 2a, Juárez 7636, Centro, 22000, Tijuana, B.C.N.
RFC: EST980909NU5
9
INT-200
Door intercom system
V0611a
10
Instruction Manual
S6-B
DOOR INTERCOM SYSTEM
INT-200
Thank You
on purchasing your new Steren product.
This manual includes all the feature operations and troubleshooting necessary to install and
operate your new Steren´s Door intercom system. Please review this manual thoroughly to
ensure proper installation and operation of this product.
For support, shopping, and everything new at Steren, visit our website:
www.steren.com
11
IMPORTANT
• This device must be placed in an area with adequate ventilation in order to avoid humidity and
dust.
• Always use a soft dry cloth in order to clean this device.
• Do not attempt to open this device. Doing so could cause malfunctions and the voiding of the
warranty.
• If the power cord is damaged, it must be replaced. See the manufacturer, a service agent, or
qualified personnel in order to replace the power cord.
• If you will not be using this device for an extended period of time, make sure to disconnect the
power cable from the electrical outlet.
HIGHTLIGHTS
•
•
•
•
•
12
Allows for the identification and communication with people outside your home or office.
Electric door lock opening control (door lock is not included in the package)
Transformer is not required for door lock.
Call tone.
Easy to install.
CONTROLS
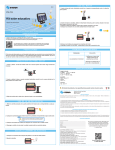
1. Unlock button.
2. Handset.
3. Volume.
4. Input handset
5. Power cable.
6. Call button.
7. Speaker.
8. Microphone.
13
INSTALLATION
INSTALL DOOR BELL
It is recommended that you install the camera at a height of 4.5 – 5 feet.
1. Select the location where you want to install the door bell and
make corresponding drilling according to the plastic sheet. Then fix
the plate with screws.
2. Install a 2-way cable (recommended cable caliber 22). Press the
buttons to firmly hold the cable.
3. Place the bell at the base previously
installed and screw.
14
INSTALLING INTERCOM
It is recommended that you install the camera at a
4.5 – 5 feet height.
1. Select the location where you want to install
the intercom and make corresponding drilling
according to the plastic sheet. Then set the plate
with screws.
2. Connect the intercom cable of buzzer according
to the corresponding number.
In case of an electric lock (not included), connect
the cables in S1 and S2 intercom.
3. Hold the intercom at the base of plastic
previously installed.
4. Connect the power cord to an electrical contact
near the intercom.
15
CONECTIONS
INTERCOM
1
DOOR BELL
1 2 3
S2
ELECTRIC LOCK
(NOT INCLUDED)
16
2
S1
OPERATION
1. When visitors push the call button will hear a bell on the intercom.
2. Pick up the handset to talk with the visitor.
3. After talking with visitors, press the button for opening door in case you have an electric lock
installed.
SPECIFICATIONS
Intercom
Input: 110V~ 60Hz 15Wmax
Output: 12 V - - - 8Wmax
Dimensions: 225 x 190 x 62 mm
Weight: 1657gr.
Door bell
Input: 12V - - - 8Wmax
Output: 12V - - Nominal consumption: 2.64 kWh/month
Stand-by power consumption: 1.13 kWh/month
Product design and specifications are subject to change, without notice.
17
NOTAS / NOTES
18
Product: Door intercom system
Part number: INT-200
Brand: Steren
WARRANTY
This Steren product is warranted under normal usage against defects in workmanship and
materials to the original purchaser for one year from the date of purchase.
CONDITIONS
1.- This warranty card with all the required information, invoice, product box or package, and
product, must be presented when warranty service is required.
2.- If the product stills on the warranty time, the company will repair it free of charge.
3.- The repairing time will not exceed 30 natural days, from the day the claim was received.
4.- Steren sell parts, components, consumables and accessories to customer, as well as
warranty service, at any of the addresses mentioned later.
THIS WARRANTY IS VOID IN THE NEXT CASES:
If the product has been damaged by an accident, acts of God, mishandling, leaky batteries,
failure to follow enclosed instructions, improper repair by unauthorized personnel, improper
safe keeping, among others.
a) The consumer can also claim the warranty service in the purchase establishment.
b) If you lose the warranty card, we can reissue it, if you show the invoice or purchase ticket.
19
www.steren.com
Este instructivo puede mejorar con tu ayuda, llámanos a:
Help us to improve this instruction manual, call us to:
01800 500 9000
Centro de Servicio a Clientes
Customer Service Center