1
1. Before plugging in the machine, ensure that the power
supply voltage corresponds to what is stated on the machine's
characteristics plate.
2. Danger, keep hands clear of the working area.
3. Do not grasp the underside of the machine while it is
running.
4. Inspect the surface to be cut and remove all nails before
beginning to work.
5. Ensure that the machine slides back freely without getting
stuck. Never block the recoil mechanism.
6. When replacing the saw blade, only genuine VIRUTEX
blades should be used.
7. Do not use saw blades that are warped or damaged. Do
not use blades made of self-hardening steel.
8. Unplug the machine from the electrical outlet before
performing any maintenance operations.
9. Never use the machine where there are liquids or excessive moisture.
10. The dust produced during cutting may prove to be toxic
or harmful to one's health. Always connect the machine to
an aspirator and use a protective mask.
11. SPARE PARTS: Only use genuine spare parts.
2. SPECIFICATIONS
Input power.........................................................................1,300 W
Max. cutting depth............................................................47 mm
Minimum cutting height.....................................................8 mm
Maximum height over base.........................................35 mm
RPM (no load)..........................................................................5,000
Weight............................................................................5.6 Kg
Weighted equivalent continuous
acoustic pressure level A..................................................94 dBA
Acoustic power level A....................................................105 dBA
Uncertainty...................................................................K = 3 dbA
Wear ear protection!
Vibration total values..........................................ah: <2.5 m/s2
Uncertainty................................................................K: 1.5 m/s 2
doors.
Diamond disk D.150 Ref. 7040193 for direct masonry cutting.
It may be used to cut brick, breeze blocks, terrazzo, clinker,
concrete, granite, ceramics, porcelain and stoneware.
Side handgrip Ref. 7045728.
5. APPLICATIONS
The RZ270S trimming machine is especially designed to
enable the simple, precise trimming of door bottoms and
skirtings in order to facilitate the installation of all types
of flooring, carpeting and parquet floors without having
to dismount the aforementioned elements.
6. ADJUSTMENTS
6.1 ADJUSTING THE CUTTING HEIGHT
Unplug the machine from the electrical
outlet before making any adjustments on it.
In order to adjust the cutting height, proceed as follows:
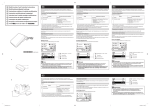
Loosen the screws A (Fig. 1) at the sides of the base with
the service key and adjust to the desired cutting height by
spinning the knobs B (Fig. 1) in the same direction and at the
same time. The regulation markings C (Fig. 1 and 2) located
on both sides of the base should line up exactly with the
measurement to be cut. Then retighten the fastening screws.
If the markings C on both sides do not
coincide, the saw will not be parallel to the
base and will cause the machine to overheat,
producing a faulty cut (Fig. 2).
6.2 ADJUSTING THE CUTTING DEPTH
Unplug the machine from the electrical
outlet before making any adjustments on it.
3. STANDARD EQUIPMENT
Inside the case you will find the following items:
1. RZ270S trimming machine
2. 24-tooth hard metal saw blade Ø 165
3. 3-mm. Allen key
4. 5-mm. Allen key
5. 8-mm. Allen key
6. Aspiration tube
7. 4 u. tube-cable brackets
8. Screwdriver
9. Oil flask
10. Operating instructions and miscellaneous documentation
4. OPTIONAL ACCESSORIES AND TOOLS
Hard-metal disk D.165 24z Ref. 7040314, for cutting wooden
doors and skirting boards.
Hard-metal disk D.165 30z Ref. 7040316, for cutting metal
parts, ideally suited for cutting steel sheet for reinforced
8
In order to adjust the cutting depth, loosen the screw D (Fig.
3) with the service key, slide the stop rule E to the desired
measurement and retighten the screw D (Fig. 3).
6.3 HANDGRIP POSITION
The two handgrips J may be placed either at an angle to the
base (Fig. 1) or vertically (Fig. 4), whichever is more comfortable for the user. To change position, loosen the screws A1
(Fig. 4) and attach the handgrips in the required position).
7. STARTING UP THE MACHINE
After making the necessary adjustments to the machine,
proceed as follows for its start-up:
- Ensure that there is no type of foreign object obstructing
the saw blade cutting area.
- Plug the machine into the electrical outlet, ensuring that