1
Installation
Instalación
Montering
Instalação
Precautions
Precauciones
Säkerhetsföreskrifter
Precauções
• Choose the mounting location carefully, observing the following:
— The unit is not subject to temperatures exceeding 55°C (such as in a car
parked in direct sunlight).
— The unit is not subject to direct sunlight.
— The unit is not near heat sources (such as heaters).
— The unit is not exposed to rain or moisture.
— The unit is not exposed to excessive dust or dirt.
— The unit is not subject to excessive vibration.
— The fuel tank should not be damaged by the tapping screws.
— There should be no wire harnesses or pipes under the place where you are
going to install the unit.
— The spare tire, tools or other equipment in or under the trunk should not be
interfered with or damaged by the screws or the unit itself.
• Be sure to use only the supplied mounting hardware for a safe and secure
installation.
• Use only the supplied screws.
• Elija cuidadosamente el lugar de montaje, teniendo en cuenta lo siguiente:
— La unidad no queda sometida a temperaturas superiores a los 55°C (como
en un automóvil aparcado a la luz solar directa).
— La unidad no queda sometida a la luz solar directa.
— La unidad no queda cercana a fuentes térmicas (como aparatos de
calefacción).
— La unidad no queda expuesta a la lluvia o a la humedad.
— La unidad no queda expuesta a polvo o suciedad excesivos.
— La unidad no queda sometida a vibraciones excesivas.
— El depósito de combustible no deberá dañarse con los tornillos
autorroscantes.
— No deberá haber mazos de conductores ni tubos debajo del lugar donde
vaya a instalar la unidad.
— La rueda de repuesto, las herramientas, u otros equipos situados dentro o
debajo del portaequipajes no deberán verse interferidos ni dañados por los
tornillos ni por la propia unidad.
• Para realizar una instalación segura, emplee solamente la ferretería de
montaje suministrada.
• Utilice sólo los tornillos suministrados.
• Var noga vid monteringslägets val. Observera följande:
— Utsätt inte enheten för temperaturer som överstiger 55°C (som t ex i en bil
parkerad i direkt solljus).
— Utsätt inte enheten för direkt solljus.
— Placera inte enheten i närheten av värmekällor (som varmluftsventler
m.m.).
— Undvik att enheten utsätts för regn eller fukt.
— Undvik att enheten utsätts för mycket damm eller smuts.
— Undvik att enheten utsätts kraftiga vibrationer eller skakningar.
— Att bränsletanken inte skadas när du drar åt de självgängande skruvarna.
— Att det inte finns några kabelhärvor, rör, ledningar eller slangar under
platsen där CD-skivväxlaren monteras.
— Att reservdäcket, verktygen i bagageutrymmet eller delarna under det inte
skadas när du drar åt skruvarna eller av CD-växlare.
• Var noga med att endast använda de medföljande monteringstillbehören för
att vara säker på att CD-skivväxlaren monteras ordentligt och på ett korrekt
sätt.
• Använd endast medföljande skruvar.
• Seleccione cuidadosamente o local de montagem, observando os seguintes pontos:
— O aparelho não está sujeito a temperaturas superiores a 55°C (tal como no interior
de automóveis estacionados sob a luz solar directa);
— O aparelho não está sujeito à luz solar directa;
— O aparelho não está próximo de fontes de calor (tais como aquecedores);
— O aparelho não está sujeito à chuva ou humidade;
— O aparelho não está exposto a muito pó ou sujidade;
— O aparelho não está sujeito a vibrações excessivas.
— Verificar se os parafusos de fixação não vão danificar o depósito de combustível
— Verificar se não existem feixes de cabos ou tubos no local onde será instalado o
aparelho.
— Verificar se o aparelho ou os parafusos de fixação não vão danificar ou interferir
com os pneus sobresselentes, as ferramentas ou outros equipamentos colocados no
porta-bagagens.
• Para que a instalação fique bem feita e seja segura, utilize unicamente o material
fornecido para a montagem.
• Utilize apenas os parafusos fornecidos.
How to install the unit
Forma de instalar la unidad
Montering
Como instalar o aparelho
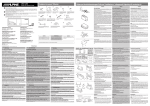
Horizontal installation
Instalación horizontal
Liggande i horisontellt läge
Instalação horizontal
1
2
3
2
HORIZONTAL
3
Align with the marked position.
Alinee en la posición marcada.
1
Anpassa till det markerade läget.
2
Alinhe com o ponto marcado.
1
ø 3.5 mm
Instalación vertical
Vertical installation
Stående i vertikalt läge
Instalação vertical
2
1
3
2
Align with the marked position.
VERTICAL
3
Alinee en la posición marcada.
1
Anpassa till det markerade läget.
Alinhe com o ponto marcado.
2
1
ø 3.5 mm
Suspended installation
Instalación suspendida
Hängande montering
Instalação suspensa
When the unit is to be installed under the rear tray etc. in the trunk
compartment, make sure the following provisions are made.
• Choose the mounting location carefully so the unit can be installed
horizontally.
• Make sure the unit does not hinder the movement of the torsion bar spring
etc. of the trunk lid.
Cuando desee instalar la unidad debajo de la bandeja trasera, etc. en el interior
del portaequipajes, tenga en cuenta lo siguiente:
• Elija cuidadosamente el lugar de montaje de forma que la unidad pueda
instalarse horizontalmente.
• Cerciórese de que la unidad no impida el movimiento del resorte de la barra
de torsión, etc., de la tapa del portaequipajes.
Observera följande när CD-växlare monteras i bagageutrymmet, under
hatthyllan längst bak i bilen osv:
• var noga när du väljer monteringsläge för att vara säker på att CDskivväxlaren kan monteras liggande i horisontell ställning,
• var noga med att kontrollera att CD-växlaren inte hindrar fjäderns rörelser i
torsionsarmen eller liknande i bakluckan.
Se for instalar o aparelho por baixo prateleira traseira, no porta-bagagens, etc., tome as
seguintes precauções:
• escolha um local de instalação que permita que o aparelho seja montado na horizontal;
• certifique-se de que o aparelho não atrapalhará o movimento da mola do fecho da
porta do porta bagagens, etc.
2
1
ø 3.5 mm
Align with the marked position.
HORIZONTAL
Alinee en la posición marcada.
1
Anpassa till det markerade läget.
Alinhe com o ponto marcado.
2
1
2
3
3
Inclined installation
Instalación sobre una superficie inclinada
Placera på lutande underlag
Instalação inclinada
After installing the unit, align the dials with one of the marks so the arrows are
as vertical as possible.
Después de instalar la unidad, alinee los diales con una de las marcas, de forma
que la flecha quede orientada en posición vertical tanto como sea posible.
När du har placerat enheten där du vill ha den, justerar du vridreglaget till den
markering som gör att pilen är så nära lodrät position som möjligt.
Depois de ter instalado o aparelho, alinhe os selectores com uma das marcas para que a
seta fique o mais próximo possível da posição vertical.
L
TA
ON
RIZ
ICA
RT
RT
ICA
L
HO
RIZ
ON
TA
L
L
VE
HO
VE
L
TA
ON
RIZ
VE
HO
L
ICA
RT
Note
Be sure to align the left and right dials with the same mark.
Nota
Asegúrese de alinear los diales derecho e izquierdo con la misma marca.
Observera
Kom ihåg att justera både det vänstra och det högra vridreglaget till samma markering.
Nota
Alinhe os selectores do lado direito e do lado esquerdo com a mesma marca.