1
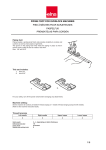
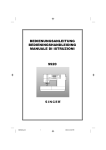
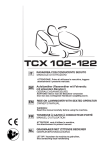
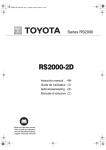
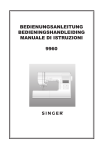
NA07D403_Darning Foot.fm Page 1 Wednesday, July 4, 2007 1:43 PM
Instruction for accessories
Information zum Zubehör
Instructies voor de accessoires
• Read the Instruction Manual of your sewing machine carefully before using this foot and
always follow the instructions.
• Lesen sie die Anleitung ihrer Nähmaschine genau bevor sie diesen Nähfuß verwenden
und folgen sie dann dieser.
• Lees de handleiding van Uw machine zorgvuldig voordat U deze voet gaat gebruiken en
volg altijd de instructies op.
Darning Foot
Stopffuß
Maasvoet
Pied-de -biche pour raccommoder
Piedino rammendo
Prensatelas móvil
Remove the power plug from the outlet when changing the presser feet.
Not doing so could cause an injury.
Before sewing, be sure to turn the handwheel toward you
slowly to check that the needle does not touch the presser
foot. Not doing so could cause an injury.
Caution
An incorrect operation
could result in an injury or
damage to the machine.
Schalten sie die Maschine beim Füßchenwechseln aus.
Nichtbefolgung kann zu Verletzungen führen.
Bevor sie zu nähen beginnen drehen sie das Handrad langsam
zu sich, um zu sehen, daß die Nadel den Nähfuß nicht berührt.
Nichtbefolgung kann zu Verletzungen führen.
Vorsicht
GB
USE:
DE
Anwendung: Verwenden sie diesen Nähfuß zum freien Sticken.
NL
Gebruik:
Use this presser foot for free motion embroidery.
Gebruik deze persvoet om uit de hand te borduren
Eine fehlerhafte Bedienung
kann zu Verletzungen oder
zu Beschädigungen an der
Maschine führen.
Verwijder altijd de stekker uit het stopcontact wanneer U
van persvoet verwissel.
Wanneer U dit niet doet, kan U zich verwonden.
Voordat U gaat naaien, controleert U eerst of de naald de
persvoet niet raakt.
Dit doet U door het handwiel rustig naar U toe te draaien.
Wanneer U dit niet doet, kan U zich verwonden.
Waarschuwing
Onjuist gebruik kan leiden tot letsel of schade
aan de machine.
■ Sewing machine settings:
■ Nähmaschinen Einstellung:
■ Naaimachine instellingen:
Fabric : For medium weight ~ heavy Weight
Stitch selection :
Straight/Zigzag
Stitch length : 0 mm
Sewing speed : Slow speed ~ Medium speed
Material : Für leichte und mittelschwere Stoffe.
Sticheinstellung :
Geradstich/ Zick Zack Naht
Stichlänge : 0 mm
Nähgeschwindikeit : langsam bis mittlere Geschwindigkeit
Set machine with drop feed mode. For the machine with- Senken sie den Transporteur ihrer Maschine. Sollten sie
out drop feed function, please use a darning adapter. For eine Maschine ohne versenkbaren Transporteur haben
using drop feed or darning adapter, please refer to the in- verwenden sie die Stopfplatte.
struction manual of your sewing machine.
■ Changing the presser feet:
■ Wechseln des Nähfußes:
■ Verwisselen van de persvoet:
2
1
Materiaal : Voor stoffen met een gemiddeld gewicht.
Steekkeuze :
Recht/Zigzag
Steeklengte : 0 mm
Naaisnelheid: Langzaam ~ Gemiddelde snelheid.
Stel de machine in op het verzonken transport. Voor de
machine met verzonken transport functie, gebruikt U
deze. Voor de machine zonder deze functie, gebruikt U
het stopplaatje
A
B
1. Remove the presser foot and the presser foot holder by 1. Wechseln Sie den Nähfuß und die Stichplatte mit Hilfe
des Schraubenzieher aus dem Maschinenzubehör.
using a needle plate screw driver as standard accesso2. Befestigen sie den Stopffuß an der Nadelstange so wie
ries with your machine.
auf der Abbildung A. Dann ziehen sie die Schraube B
2. Attach the darning foot to the presser bar, by placing
mit Hilfe des Nadelplattenschraubenziehers fest.
spring A as shown in the fig..2. And then tighten the
screw B of the presser foot holder by using needle
plate screw driver.
■ Sewing
■ Nähen
■ Naaien
Caution
Waarschuwing
Vorsicht
Pulling upper thread too much causes needle
breakage. Please be careful not to pull upper
thread excessively to avoid needle breakage.
1
1. Verwijder de persvoet en naaldplaat door gebruik te
maken van de standaard meegeleverde schroevendraaier.
2. Bevestig het maasvoetje aan de persvoetstang, plaats
veertje A als in het voorbeeld. Draai schroef B vast met
de bijgeleverde naaldplaatschroevendraaier.
Zu festes ziehen am Oberfaden kann
Nadelbruch verursachen.
Te hoge spanning op de bovendraad kan naaldbreuk
veroorzaken.Wees voorzichtig met een te hoge spanning op de bovendraad om naaldbreuk te vermijden.
2
1. Trace your design on the material and center it in an
1. Zeichnen Sie Ihr Motiv auf den Stoff und spannen Sie 1. Teken uw ontwerp op het materiaal en plaats dit in het
embroidery hoop. Make sure the material is taut.
midden van een borduurhoepel. Zorg ervoor dat het
es in einen Stickrahmen ein. Stellen Sie sicher, dass
Lay stabilizer underneath when embroidering thin fabric.
materiaal strak gespannen is.
das Material straff gespannt ist.
Pull out lower thread by turning the Handwheel towards
Leg vliseline onder het borduurwerk als u fijne stof borduurt
Beim Sticken von dünnen Stoffen Verstärkung unterlegen.
Om de onderdraad op te halen, draait U het handwiel
you while holding the upper thread lightly, with pulling
Der Unterfaden wird durch drehen des Handrades zu
naar U toe terwijl U de bovendraad vast houd.Trek de
out upper thread/lower threads together by 10cm.
sich nach oben geholt. Danach ziehen Sie beide Fäden
onder-en bovendraad samen een 10cm eruit.
Pick up lower thread then make two or three stitches.
( Ober- und Unterfaden) 10 cm hinter den Nähfuß.
Cut off excess threads.
Laat de persvoet zakken.
Nähfuß senken.
2. Start sewing along the outline of the design. Guide the
Neem de onderdraad op en naai twee of drie steken.
Unterfaden aufnehmen und dann zwei oder drei Stiche
hoop by hand.
Knip de overtollige draad af.
machen. Überschüssige Fäden abschneiden
Sew several straight stitches at the end of the stitching
2. Begin te naaien langs de buitenkant van het ontwerp.
2. Beginnen Sie entlang der Umrandung des Motivs zu
for reinforcement.
Geleid de hoepel met de hand.
nähen. Führen Sie den Stickrahmen per Hand.
Naai enkele rechte steken aan het einde ter versteviging.
NOTE: When refitting the presser foot holder ensure that
Nähen Sie am Ende zur Verstärkung mehrere gerade LET OP: Plaats de normale persvoethouder terug en
the fixing screw is fully tightened by using the neeStiche.
schroef hem vast.
dle plate screwdriver.
Achtung: Schrauben sie den Nähfußhalter wieder fest.
679132-CCB10
NA07D403_Darning Foot.fm Page 2 Wednesday, July 4, 2007 1:43 PM
• Veuillez lire le mode d'emploi de votre machine avant l'utilisation de ce pied de biche et
Mode d'emploi des accessoires
Istruzioni per accessori
Guía para los accesorios
bien suivre les instructions.
• Leggete le istruzioni sul manuale della vostra macchina per cucire attentamente prima
di usare questo piedino e seguite sempre le istruzioni.
• Lea el manual de instrucciones cuidadosamente antes de usar el prensatelasy siga
siempre sus indicaciones.
Darning Foot
Stopffuß
Maasvoet
Pied-de -biche pour raccommoder
Piedino rammendo
Prensatelas móvil
Retirez le cordon électrique de la machine avant de changer
votre pied de biche.
Sinon il y a risque de blessure.
Avant de coudre, veillez à touner le volant vers vous afin
que l'aiguille ne touche pas le pied de biche.
Sinon il y a risque de blessure.
Précaution
Une manoeuvre incorrecte peut causer des
blessures ou endommager la machine.
Attenzione
FR
Utilisation: Ce pied de biche est utilisé pour les travaux de broderie.
IT
USO:
Usate questo piedino per ricamo a mano libera
ES
Uso:
Use este prensatelas para bordar a mano
Togliete la spina dalla presa elettrica quando cambiate il piedino.
In caso contrario sussiste il rischio di lesioni.
Prima di iniziare la cucitura assicurarsi che l'ago non tocchi
sul piedino facendo girare la macchina a mano.
In caso contrario sussiste il rischio di lesioni.
Qualsiasi operazione non
corretta potrebbe causare lesioni o guasti della macchina.
Sace el enchufe de corriente cuando cambie el prensatelas.
No efectuar esta operación le podría causar daños físicos.
Antes de empezar a coser, asegúrese de girar el volante
hacia Usted suavemente para comprobar que la aguja
no toque el presantelas. No efectuar esta operación le
podría causar daños físicos.
Precaución
El uso incorrecto de la
máquina puede provocarle lesiones o daños
a la máquina.
■ Point utilisé
■ Utilizzare questo programma
■ Ajustes para la máquina:
Tissu : pour tissu standard.
Sélection de points :
Droit/Zig zag
Longueur de point : 0 mm
Vitesse de couture : Vitesse lente - Vitesse moyenne.
TESSUTO : utilizzare su tessuti leggeri e di medio peso.
SELEZIONE PROGRAMMA :
Dritto/Zig zag
LUNGHEZZA PUNTO : 0 mm.
Velocita' di cucitura : utilizzare una velocita' bassa o media durante la lavorazione.
Retirez le pied de biche d'origine de la machine. Pour les
machines qui n'ont pas de système de séparation du pied Selezionate la macchina togliendo la griffa di trasporto. Per
de biche, utilisez-le. Sinon utilisez un support pour repris- le macchine che hanno la funzione di abbassamento della
age.
griffa di trasporto, usatela. Per le macchine che non hanno
il dispositivo di abbassamento, usate una placca adatta.
■ Changement du pied de biche:
■ Sostituzione del piedino:
■ Cambio del prensatelas:
Tejido : Para tejidos medios.
Selección de puntada :
Recto / zig-zag
Longitud de la puntada 0 mm.
Velocidad : Baja - media
En la máquina con alimentación superior. Uselo para trabajar con la función de alimentación por arriba, para la
máquina con función SIN alimentación superior use el
adaptador para zurzir
2
1
A
B
1. Togliete il piedino premistoffa e la placca ago utilizza- 1. Cambiar el prensatelas y el placa agujas usando el
1. Retirez le pied de biche et la plaque aiguille en vous
destornillador de los accesorios standard que contiene
ndo un cacciavite standard negli accessori della vostra
aidant du tournevis fourni dans vos accessoires standsu máquina.
macchina.
ard.
2. Fixez le pied de biche à la barre aiguille, en plaçant le 2. Mettete la placca rammendo nell'apposito attacco, po- 2. Agregar el prensatelas de zurzir a la barra prensatelas,
colocando el muelle A tal y como se indica. Después
sizionando la molla A come mostrato. Quindi stringete
ressort A comme indiqué. Serrez la vis B du support
atornille el tornillo B del soporte del prensatelas usanla vite B dell'aggancio piedino premistoffa usando il
pied de biche en utilisant un tournevis plaque aiguille.
do el destornillador del placa agujas.
cacciavite per la placca ago.
■ Couture
■ CUCITURA.
■ Coser
Précaution
Attenzione
Si vous tirez trop le fil supérieur vous risquez de casser l'aiguille. Veuillez à ne
pas trop tirer sur le fil supérieur.
1
1. Tracer le motif sur le tissu et le centrer à l’intérieur d’un
cercle à broder, assurez vous que le tissu est tendu.
Placez une viseline en-dessous du tissu pour broder.
Récupérez le fil inférieur en tournant le voalnt vers
vous tout en tenant légèrement le fil supérieur; tirez les
deux fils sur 10 cm.
Récupérez le fil inférieur et réalisez deux ou trois
points.
Coupez l’excédent de fil comme.
2. Commencez à coudre le long des contours du dessin.
Guidez le cercle avec la main.
Coudre plusieurs points droits à la fin de la couture afin
de renforcer l’ouvrage.
NOTE: Remettez le support de pied de biche d'origine à
sa place et vissez le.
Precaución
Tirare troppo il filo superiore può causare la rottura
dell'ago. Per favore, fate attenzione a non tirare eccessivamente il filo superiore per evitare la rottura dell'ago.
Tensar el hilo superior demasiado puede causar la rotur ade la aguja. Por favor asegúrese de no tensar el
hilo superior en exceso para evitar la rotura de la aguja.
2
1. Tracciare il modello sulla stoffa da ricamare e centrarlo 1. Dibuje el diseño en la tela y centre el bastidor de borsul cerchietto da ricamo. Accertarsi che la stoffa da
dado. Asegúrese que el material quede tirante.
ricamare sia ben tesa.
Coloque un estabilizador bajo la tela, cuando borde un
Per ricamare tessuti molto sottili, inserite un leggero
material muy delgado.
foglio di carta sotto al tessuto”
Sacar el hilo inferior girando el volante hacia Ud.,
mientras estire del hilo superior ligeramente, sacando
Tirate fuori il filo inferiore girando il volantino verso di voi
el hilo superior y inferior conjuntamente unos 10 mm.
mentre trattenete leggermente il filo superiore, quindi tiTome el hilo inferior, luego haga 2 o 3 puntadas.
rate fuori insieme i fili superiore ed inferiore di circa 10 cm.
Corte el exceso de hilo.
Prendete il filo inferiore quindi fate due o tre punti.
2. Comience a coser a lo largo de la línea exterior del disTagliate il filo in eccesso.
eño. Guíe el bastidor con la mano.
2. Tenete i due fili ed iniziate a cucire lungo i contorni del
Cosa varias puntadas rectas al final de la costura, para
motivo con il punto a cordoncino. Continuate a ricareforzar.
mare guidando il cerchio con la mano.
Per terminare cucite alcuni punti regolando la larghez- NOTA: Afloje el tornillo del soporte del prensatelas y
za del zigzag su 0.
colóquelo en su posición y atorníllelo.
NOTA: Avvitare il gambo del piedino nella posizione iniziale e stringere la vite.
679132-CCB10