1
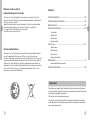
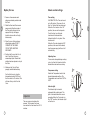
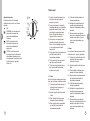
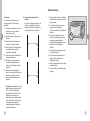
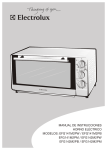
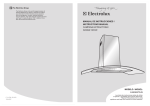
MANUAL DE INSTRUCCIONES /
INSTRUCTIONS MANUAL
HORNO ELÉCTRICO / ELECTRIC OVEN
FFF126M2PW / FFF126M2PB
FFF126M2PM
Lea todas las instrucciones antes de utilizar el aparato y guardelas para futuras referencias.
Read all instructions prior to using appliance and keep this manual for future reference.
Contents
Thank you for choosing Frigidaire for your electric oven brand. Our electric
ovens are developed with high technical and quality standards, with features to
offer you even more comfort.
Read all instructions before using this appliance. This book contains valuable
information about operation, care and service. Keep it in a safe place.
You expect all this from Frigidaire…and we deliver.
Your kitchen never looked so good.
Product description .......................................................................03
Important safety instructions..........................................................04
Before first use................................................................................07
About control settings.....................................................................08
Time setting
Ajusting time
Indicator light
Function setting
How to use......................................................................................10
Environmental Advices
This product can not be treated as household waste. Instead shall be handed
over to the applicable collection point for the recycling of electrical and
electronic equipment. By ensuring this product is disposed of correctly, you will
help prevent potential negative consequences for the environment and human
health, which could otherwise be caused by inappropriate waste handling of
this product. For more detail information about recycling of this product, please
contact your local city office, your household waste disposal service or the
shop where you purchased the product.
Toast function
Bake Function
Broil function
About the grid levels
Maintenance...................................................................................12
How to clean the tray for crumbs
Technical information......................................................................26
Important
The apliance you bought might be different from the one shown on the figures
of this user manual, however the overview image should be similar. Please read
the information regarding to operation.
This electric oven is for household use only.
The electric oven you bought might have a different plug from the one shown
on the figures of this user manual, however the one you bought is according to
your country requirements.
1
2
ENG
ENG
Welcome to the world of
simple handling and no worries
Name of parts
When using electrical appliance, basic
safety precautions should always be
followed, including the following:
10. Do not let cord hang over edge of
table or counter, or touch hot
surface.
1. Read all instructions before using.
11. DO NOT place the electric oven
inside an heated oven or near a
hot flame or electric burner.
2. iTo protect against any electrical
hazards, DO NOT place unit or
cord in water or any other liquids.
7
6
4
5
2
3
1 Stainless steel heating element
5 Time knob
2 Baking rack
6 Temperature knob
3 Baking tray
7 Door handle
4 Indicator light
12. DO NOT operate this appliance if
the cord or plug is damaged.
3. iDO NOT touch any hot surfaces.
Return appliance to the nearest
Use oven mitts for removing or
authorized
service facility for
touching any hot parts. Always
examination,
repair, or adjustment.
place toast oven on heat protected
surface.
13. DO NOT use outdoors.
4. iClose supervision is always
necessary when this appliance is
used by or near children.
1
5. iLEAVE about 100-150mm open
space all around the exterior of
this appliance. Place the appliance
on a dry, horizontal surface.
6. iUNPLUG the unit from outlet when
not in use and before cleaning.
Always allow to cool before
attaching or removing any parts.
7. iThe use of accessory attachments
not recommended by the
appliance manufacturer may
cause injuries.
3
ENG
Important safety instructions
ENG
Product description
14. If the electric circuit is overloaded
with other appliances, this
appliance may not operate
properly. The electric oven should
be operated on a separate
electrical circuit from other
operating appliances.
15. The temperature of accessible
surfaces may be high when the
appliance is operating. If the
supply cord is damaged, it must
be replaced by the manufacturer
or its service agent or a similarly
qualified person in order to avoid a
hazard.
8. iDo not use any accessories other
than the ones provided with this
product.
16. Store only the accessories
provided with this unit inside the
oven when not in use. Do not
store any other materials.
9. iAlways pull the plug out from the
wall – never pull the cord. Remove
the plug from the wall before
moving the appliance. Use both
hands to move the appliance.
17. A fire may occur if the appliance is
covered or touching flammable
material, including curtains,
draperies, walls, and the like,
when in operation. Do not put any
4
18. Do not place any cardboard,
paper or plastic inside the oven.
19. In order to switch off this
appliance, rotate the timer knob
to “OFF” position and then
remove plug from wall outlet.
20. All containers placed inside the
oven must not be airtight. Also,
they need to have enough room
to allow for expansion of fluids.
21. Clean this appliance regularly as
build – up of grease may cause a
fire. Make sure that this appliance
is not placed near curtains, any
drapery, or other flammable
material.
22. Do not clean with metal scouring
pads. Pieces can break off the
pad and touch electrical parts
involving a risk of electric shock.
26. Oversize foods or metal utensils
must not be inserted in a toast
oven as they may create a fire or
risk of electric shock.
27. Do not cover crumb tray or any
part of the oven with metal foil.
This will cause overheating of the
oven.
28. Extreme caution should be
exercised when using containers
constructed of other than metal or
glass.
SHORT CORD INSTRUCTIONS:
1. A short power-supply is provided
to reduce the risks resulting from
entanglement or tripping over a
longer cord.
ENG
ENG
items on top of the appliance
when in operation.
2. Longer detachable power cords or
extension cords are available and
may be used if care is exercised in
their use.
3. If a longer extension cord is used:
a. The marked electrical rating of
the detachable power supply cord
or extension cord should be at
least as great as the electrical
rating of the appliance.
b. Arrange the longer cord so that
it will not drape over the counter
top or table top where it can be
pulled on by children or tripped
over unintentionally.
23. In order to prevent accidental
burns, always use the handle and
knobs to operate this appliance.
Important
24. DO NOT TOUCH ANY HOT
SURFACES such as the oven
door top or sides.
This appliance has a polarized plug
25. Use only a soapy damp rag to
clean the glass on oven door –
DO NOT use any sharp utensils
as this may damage the glass and
possibly cause breaking of the
glass. ALWAYS LET THIS
APPLIANCE COOL BEFORE
CLEANING.
(One blade is wider than the other). As
a safety feature to reduce the risk of
electric shock, this plug will fit in a
polarized outlet only one way. If the
plug does not fit fully in the outlet,
reverse the plug. If it still does not fit,
contact a qualified electrician. Do not
attempt to defeat this safety feature.
5
6
About control settings
1. Remove all accessories and
shipping materials packed inside
the Oven.
Time setting
0-60 MINUTES: The Time can be set
up to 60 minutes. The oven will not
turn “on” without the timer being set.
When the Time knob is in the “off”
position, the oven will not operate.
2. Wash the Rack and Pan in warm
soapy water. Wipe the inside of
the Oven with a damp cloth or
sponge. Blot dry with paper
towels to be sure the unit is dry
before using.
ENG
ENG
Before first use
To set the time, turn the knob
clockwise to the desired time.
Indicator Light is lit only when Time
has been set.
3. Place Oven on a flat counter or
other stable surface DO NOT
OPERATE ON THE SAME
CIRCUIT WITH ANOTHER
APPLIANCE.
When the Timer has traveled to OFF
position, a bell sound will be heard,
also the power supply will be cut off
automatically.
4. Position the Oven so that it is at
least 2 inch (5cm) from any
surrounding object. Ensure that
nothing has been placed on top of
the Oven.
Adjusting time
Timer can be changed during cooking
cycle. Just turn the timer knob to the
desired time and continue cooking.
5. Make sure the Crumb Tray is
properly installed before using.
Temperaure setting
Rotate the Temperature knob to the
desired temperature setting. The
Temperature can be set from 150ºF to
450ºF.
For the first time only, turn the
temperature knob to 450ºF and
the timer knob to 15 minutes. This
will burn off any oils still on the
Oven.
Indicator light
Important
The oven may smoke during this
process. This is normal for a new
oven and will not last more than 10-15
minutes.
7
The Indicator light is located
underneath the control panel. The
light is illuminated when the oven is
operating. When the Time knob is in
the “OFF” position, the Indicator Light
will not be on.
8
How to use
This Oven offer 3 differents functions
for versatile cooking all in one
appliance.
OFF
BAKE: The lower straight
electric heating elements are
working during this function..
BROIL: The upper electric
straight heating elements are
working during this cycle.
TOAST: The upper and lower
straight electric heating
elements are working during
this function. It is perfect for
baking pizza, bread and cookies
and Toasting pork, steaks and
Toasts.
1. Place the Baking Rack in position
that will accommodate the height
of the food to be cooked.
2. Set the food on the Rack. Make
sure that you always use an
ovenproof container in the oven,
never use plastic or cardboard
containers in the Oven
3. Never use glass or ceramic pans
or lids.
4. DO NOT let juices run to the
bottom of the oven. Use the Drip
Tray and Crumb Tray when
cooking.
5. Set the temperature as suggested
by the recipe or as desired.
6. Securely shut the door and set the
cooking time to begin operating
the oven.
1. Toast function
Use the Toast function for foods such
as corn, bread, cookies and heating
food.
1.1. Place the baking rack to the
desired height.
1.7. Always remove food with oven
mitts. Food and oven are very hot.
2. Bake function:
Use the bake function for foods such
as less tender cuts of meat, soups and
stews.
2.1. Place the baking rack to the
desired height.
2.2. Set the Function Knob to “Bake”.
2.3. Select the length of time you want
to “Bake” the food.
2.4. Rotate the Temperature knob
clockwise to desired temperature.
2.5. Continuing baking for desired
length of time.
2.6. Check food temperatures before
moving to ensure that proper
internal temperatures have been
reached.
2.7. Always remove food with oven
mitts. Food and oven are very hot.
1.2. Set the Function Knob to “Toast”
3. Broil function:
1.3. Select the length of time you
want to “Toast” the food.
The Broil Function is ideal for fish,
beef, steak, vegetables, etc.
1.4. Rotate the Temperature knob
clockwise to desired temperature
3.1. Place the baking rack to the
desired height.
1.5. Continuing Toasting for desired
length of time.
3.2. Set the Function Knob to “Broil”
1.6. Check food temperatures before
moving to ensure that proper
9
internal temperatures have been
reached.
3.3. Select the length of time you want
to “Broil” the food.
3.4. Rotate the Temperature knob
10
ENG
ENG
Function setting
Maintenance
ENG
3.5. Continuing broiling for desired
length of time.
3.6. Check food temperatures before
moving to ensure that proper
internal temperatures have been
reached.
3.7. Always remove food with oven
mitts. Food and oven are very
hot.
Note: There is a starting angle for
the thermostat with degree from
45º-75º, when turning the
Temperature knob clockwise
within this degree, the power is
cut at all events. If exceeds, the
power supply can be get through
after you setting the cooking
time.
3. About the grid levels
There are two levels for the grid.
The grill or baking trays can slip on
the rows of each level.
1. Before cleaning unplug the electric
oven and let it cool completely.
2. Wash all the attachments with
mild, soaped water including the
rack and the baking tray.
ENG
clockwise to desired
temperature.
3. Do not use abrasive cleansers,
scrubbing brushes and chemical
cleaner as this will cause damage
to the non-stick coating of baking
tray.
4. Using a wet cloth to wipe the inner
of the oven.
5. To clean the door by using a wet
cloth saturated with detergent or
soap.
6. Never immerse the unit in water or
other liquid.
7. Clean the tab of crumb.
How to clean the tab for crumbs
To empty the crumbs, simply tilt the
unit backwards and push the tab of
crumb tray towards the rear as arrow
illustrated to release the crumb tray,
and allow dropping on counter top.
Wipe interior of crumb tray with a
damp cloth. After cleaning, close the
crumb tray to the bottom of oven and
then pull the tab downward to fasten
the crumb tray in position.
Washing of the interior of the crumb
tray is accomplished by placing unit
on its back side and allow crumb tray
to fall forward for easy cleaning.
11
12
Índice
Gracias por elegir Frigidaire como marca para su horno eléctrico.
Los hornos eléctricos Frigidaire han sido concebidos bajo altísimos estándares
técnicos. Poseen características especiales desarrolladas para ofrecer aun
más comodidad al usuario.
Para que usted pueda disfrutar todos los recursos que su nuevo horno
eléctrico ofrece, Frigidaire creó este manual. Con orientaciones simples y
prácticas usted conocerá sus funciones y aprenderá la manera de operar este
aparato de modo adecuado y seguro.
Lea las instrucciones sobre instalación y operación antes de utilizar su horno
eléctrico y guárdelas en un lugar seguro para futuras consultas. Frigidaire una
vez más fabrica lo mejor en lo que se refiere a electrodomésticos.
Descripción....................................................................................15
Cuidados importantes....................................................................16
Antes de usarlo por primera vez......................................................19
Sobre las perillas de control............................................................20
Ajuste de tiempo
Reajustando el tiempo
ESP
ESP
Bienvenido al mundo del
manejo simple y sin preocupaciones
Luz indicadora
Ajuste de función
Como usar.......................................................................................22
Tostar
Asar
Consejos ambientales
Hornear
Acerca de los niveles de la parrilla
Mantenimiento................................................................................24
El material del embalaje es reciclable.
Procure separar plásticos, espuma flex,
papel y cartón y enviarlos a las
compañias de reciclaje.
De acuerdo con la directriz de la RAEE
(Residuos de Aparatos Eléctricos y
Electrónicos), en inglés WEEE (Waste
of Electrical and Electronic Equipment),
se debe colectar y disponer de los
residuos de aparatos eléctricos y
electrónicos separadamente. Si
futuramente usted necesita desechar
este electrodoméstico, NO lo haga
echándolo con el resto de la basura
doméstica. Sírvase enviar el aparato a
los puntos de colecta de RAEE donde
los haya disponibles.
13
Limpieza de la bandeja de migajas
Informaciones técnicas...................................................................26
Importante
El aparato que usted ha comprado puede ser ligeramente diferente del que se
muestra en las figuras de este manual, la forma en general deberá ser la misma.
Este horno eléctrico ha sido proyectado para uso doméstico. No se recomienda
su uso para fines comerciales, industriales y/o en laboratorios.
El aparato que usted ha comprado puede tener un enchufe diferente del que se
muestra en las figuras de este manual, siendo que el que viene en el producto
cumple la especificación eléctrica de su país.
14
Cuidados importantes
Nombre de las partes
Al usar un electrodoméstico siempre
deben tomarse algunas precauciones
básicas de seguridad, entre las que se
incluye las siguientes:
ESP
6
4
5
1
2
3
1 Elemento calentador de acero inoxidable
5 Perilla del timer
2 Parrilla de asar
6 Perilla de la temperatura
3 Bandeja de asar
7 Manita de la puerta
4 Luz indicadora de encendido
2. A fin de evitar descargas eléctricas,
NO ponga el aparato o su cable de
alimentación sobre agua o otros
líquidos.
9. Siempre retire el cable de
alimentación del tomacorriente
tomándolo por el enchufe nunca
tire directamente del cable de
alimentación. Retire el enchufe del
tomacorriente antes de mover el
aparato. Use ambas manos para
mover el aparato.
3. NO toque superficies calientes.
Use guantes de cocina para retirar
o tocar partes calientes. Ponga el
horno eléctrico apenas sobre
superficies protegidas contra el
calor.
10. No permita que el cable de
alimentación cuelgue del borde
de la mesa o superficie sobre la
que se ha instalado ni que entre
en contacto con superficies
calientes.
4. Es necesario que un adulto vigile
de cerca el funcionamiento del
aparato siempre que algún niño lo
esté usando o haya niños cerca en
su uso.
11. NO ponga el horno eléctrico en el
interior de un horno caliente ni
cerca de llamas o de quemadores
eléctricos.
1. Lea las instrucciones antes de usar
el aparato.
7
5. DEJE un espacio de
aproximadamente 100 a 150mm al
rededor del aparato. Instálelo
sobre una superficie seca y
nivelada.
6. DESCONECTE el aparato del
tomacorriente cuando no lo esté
usando y antes de limpiarlo. Deje
que la unidad se enfríe siempre
que sea necesario poner o retirar
alguna pieza.
7. El uso de accesorios no
recomendados por el fabricante
del aparato podría provocar
lesiones.
8. No use otros accesorios sino los
15
que se suministran con este
producto.
12. NO haga funcionar este
electrodoméstico si su cable de
alimentación o enchufe está
damnificado. Lleve el aparato al
taller de mantenimiento
autorizado más cercano para que
se lo examine, repare o ajuste
según el caso.
13. NO use el horno eléctrico al aire
libre.
14. Si en un circuito hay conectados
otros electrodomésticos, no
conecte también el horno
eléctrico al mismo circuito, pues
el aparato podría no funcionar
adecuadamente. El horno
eléctrico debe conectarse a un
circuito eléctrico individual.
16
ESP
Descripción
16. Deje en el interior del horno
apenas los accesorios
suministrados con él cuando no
los esté usando. No almacene en
el horno ningún otro material.
21. Conserve el horno eléctrico
siempre limpio, pues la
acumulación de grasa podría
ocasionar incendios. Asegúrse de
no poner este electrodoméstico
cerca de cortinas y otros
materiales inflamables.
22. No lo limpie con estropajos o
esponjas metálicas. Pedazos de
dichos materiales podrían
engancharse en partes del
aparato y tocar partes eléctricas
ocasionando descargas
eléctricas.
17. Podría ocurrir un incendio si se
cubre el electrodoméstico o si se
pone en contacto con materiales
inflamables, como cortinas o
similares, mientras está en
funcionamiento. No ponga ningún
objeto sobre el horno durante su
funcionamiento.
23. Para evitar quemaduras
accidentales, use siempre la
manija y las perillas para hacerlo
funcionar.
18. No ponga cartón, papel o plástico
en el interior del horno.
25. Use apenas un paño húmedo con
una solución jabonosa para
limpiar el cristal de la puerta del
horno NO use utensilios afilados
pues estos podrían dañar dicho
cristal y incluso romperlo.
SIEMPRE DEJE QUE ESTE
ELECTRODOMÉSTICO SE
ENFRÍE ANTES DE LIMPIARLO.
19. Para desconectar este
electrodoméstico, gire la perilla del
timer dejándola en la posición OFF
(apagado) y retire la enchufe del
tomacorriente.
20. Al poner un envase en el interior
del horno fíjese que no esté
cerrado herméticamente. De la
misma forma, dichos envases
deben conservar espacio
suficiente para permitir la
expansión de los líquidos
contenidos en ellos.
17
24. NO TOQUE LAS SUPERFICIES
CALIENTES, tales como la parte
superior de la puerta del horno o
sus lados.
26. No se debe colocar alimentos
muy grandes o utensilios
metálicos en un horno eléctrico
puesto que podrían provocar
incendios y ocasionar descargas
eléctricas.
27. No cubra la bandeja para migajas
y otras partes del horno con papel
de estaño; hacerlo causará un
sobrecalentamiento del horno.
28. Debe tomarse mucho cuidado al
usar envases que no sean
metálicos o de vidrio.
INSTRUCCIONES PARA EL CABLE
DE ALIMENTACIÓN CORTO:
1. Este aparato posee un cable de
alimentación de energía
deliberadamente corto para reducir
el riesgo de tropiezos o la
posibilidad de enredarse en él.
Importante
Este electrodoméstico tiene enchufe
polarizado (una de sus clavijas es más
ancha que la otra) como característica
de seguridad para reducir el riesgo de
descargas eléctricas. Este enchufe se
conectará a un tomacorriente
polarizado de una manera apenas.
Si el enchufe no se encaja
completamente en el tomacorriente,
invierta su posición. Si aún así no es
posible conectarlo, llame un
electricista calificado. No intente
eliminar esta característica de
seguridad.
2. Pueden usarse cables de
alimentación removibles más
largos o extensiones si es
necesario despues que se tome
los debidos cuidados de seguridad
para tal.
3. Si se usa una extensión del cable
de alimentación más larga:
a. El voltaje nominal de tal extensión
o cable de alimentación removible
debe ser, como minimo, igual al del
voltaje del aparato.
b. El cable de alimentación más largo
debe acomodarse de manera que
no cuelgue del aparador o de la
mesa, para evitar que un niño tire
de él o que alguien se tropiece
accidentalmente.
18
ESP
ESP
15. La temperatura de las superficies
externas del aparato puede ser
elevada durante su
funcionamiento. Si el cable de
alimentación está dañado, el
fabricante del aparato, un agente
de servicio autorizado o similar
persona calificada deberá
sustituirlo a fin de evitar el peligro.
Sobre las perillas de control
1. Retire todos los accesorios y
materiales de empaque que están
dentro del horno.
Ajuste de tiempo
Se puede ajustar el tiempo de 0 a 60
minutos. El horno no funcionará hasta
que se ajuste el tiempo. Cuando la
perilla de tiempo está ajustada en
OFF el horno no funcionará.
2. i Lave la parrilla y la bandeja con
agua jabonosa tibia. Limpie el
interior del horno con un paño
húmedo o con una esponja.
Séquelo con toallas de papel para
asegurarse de que está
completamente seco antes usarlo.
Para ajustar el tiempo, gire la perilla
de tiempo en sentido horario hasta el
tiempo deseado. La luz indicadora se
encenderá cuando el tiempo esté
ajustado.
3. Ponga el horno sobre un aparador
nivelado o otra superficie firme,
NO LO HAGA FUNCIONAR EN EL
MISMO CIRCUITO CON OTRO
ELECTRODOMÉSTICO.
Cuando la perilla vuelva a la posición
OFF, sonará un zumbido y el horno se
desconectará automáticamente.
4. Ubique el horno de manera que
esté alejado por lo menos 2
pulgadas (5cm) de cualquier
objeto a su alrededor. Asegúrese
de que no se haya colocado nada
sobre el horno.
Reajustando el tiempo
El tiempo puede cambiarse durante el
ciclo de cocción. Para esto gire la
perilla hasta el tiempo deseado y
continúe cociendo.
5. Asegúrese de que la bandeja para
migajas esté instalada
adecuadamente antes de usar el
aparato.
Al usar el horno eléctrico por
primera vez, gire la perilla de la
temperatura a 450ºF y marque 15
minutos con la perilla del timer.
Eso quemará cualquier grasa que
aún se encuentre en el horno.
Ajuste de temperatura
Gire la perilla de la temperatura en
sentido horario hasta la temperatura
deseada. La temperatura puede
ajustarse de 150ºF a 450ºF.
Luz indicadora
Importante
El horno puede emitir un poco de
humo durante este procedimiento.
Eso es normal en un horno nuevo y
no durará más que 10 ó 15 minutos.
19
ESP
ESP
Antes de usarlo por primera vez
La luz indicadora está localizada
debajo la perilla de ajuste de función.
La luz se enciende cuando el horno
está funcionando. Cuando la perilla de
tiempo está en la posición OFF, la luz
indicadora estará apagada.
20
Cómo usar
Este horno ofrece 3 funciones
diferentes de cocción en el mismo
aparato.
OFF
ESP
HORNEAR: en esta posición
solamente funcionan los
elementos calentadores
inferiores.
ASAR: en esta posición
solamente funcionan los
elementos calentadores
superiores.
TOSTAR: en esta posición
funcionan tanto los elementos
calentadores inferiores como
los superiores. Es perfecto para
tostar pizza, pan, galletas,
carne, etc.
1. Coloque la parrilla de asar en la
altura que sea mejor para el
alimento a cocinar.
2. Ponga el alimento en la parrilla.
Asegúrese de usar un contenedor
apropiado para el horno, nunca
use plástico o papel para este
horno. Nunca use cazuelas o
tapas de vidrio o cerámica.
3. No deje que se caigan jugos o
líquidos en la parte inferior del
horno. Use la bandeja para goteo
y la de migajas cuando esté
cocinando.
4. Gire la perilla de la temperatura en
sentido horario hasta la
temperatura deseada.
5. Gire la perilla de función para el
tipo de cocción deseada.
1.6. Verifique la temperatura de la
comida para asegurase que
alcanzó la temperatura interna
deseada.
1.7. Siempre retire la comida del
horno con cuidado utilizando los
guantes, pues tanto el horno
como la comida estarán muy
calientes.
2. Asar
Use la función de asar para cocinar
cortes de carne, sopas y guisados.
2.1. Coloque la parrilla de asar en la
altura que sea mejor para el
alimento a cocinar.
6. Cierre bien la puerta del horno y
gire la perilla de tiempo para
empezar la cocción.
2.2. Ajusta la perilla de función para
Asar.
1. Tostar
2.4. Gire la perilla de la temperatura
en sentido horario hasta la
temperatura deseada.
Use la función de tostar para cocinar
maíz, pan, galletas y calentar comida.
1.1. Coloque la parrilla de asar en la
altura que sea mejor para el
alimento a cocinar.
1.2. Ajusta la perilla de función para
Tostar
1.3. Gire la perilla de tiempo para
escoger el tiempo deseado.
1.4. Gire la perilla de la temperatura
en sentido horario hasta la
temperatura deseada.
21
1.5. Continúe tostando durante el
tiempo programado.
2.3. Gire la perilla de tiempo para
escoger el tiempo deseado.
2.5. Continúe asando durante el
tiempo programado.
2.6. Verifique la temperatura de la
comida para asegurase que
alcanzó la temperatura interna
deseada.
2.7. Siempre retire la comida del
horno con cuidado utilizando los
guantes, pues tanto el horno
como la comida estarán muy
calientes.
22
ESP
Ajuste de función
Mantenimiento
Use la función de hornear para
cocinar pescado, carne de res y
vegetales.
ESP
3.1. Coloque la parrilla de asar en la
altura que sea mejor para el
alimento a cocinar.
3.2. Ajusta la perilla de función para
Hornear
3.3. Gire la perilla de tiempo para
escoger el tiempo deseado.
3.4. Gire la perilla de la temperatura
en sentido horario hasta la
temperatura deseada.
3.5. Continúe horneando durante el
tiempo programado.
3.6. Verifique la temperatura de la
comida para asegurase que
alcanzó la temperatura interna
deseada.
3.7. Siempre retire la comida del
horno con cuidado utilizando los
guantes, pues tanto el horno
como la comida estarán muy
calientes.
3. Acerca de los niveles de la
parrilla
Hay dos niveles para la parrilla. La
bandeja o la parrilla de hornear
pueden deslizarse por los surcos
correspondientes a cada nivel.
1. Antes de limpiar el horno eléctrico
desconéctelo y deje que se enfríe
por completo.
2. Lave todos los accesorios con
agua levemente jabonosa,
inclusive la parrilla y la bandeja de
hornear.
3. No use limpiadores abrasivos,
cepillos ni limpiadores químicos
pues estos pueden dañar el
revestimiento antiadherente de la
superficie de la bandeja de
hornear.
ESP
3. Hornear
4. Use un paño mojado para limpiar
el interior del horno.
5. Limpie la puerta empleando un
paño mojado saturado con
detergente o jabón.
6. Nunca sumerja el aparato en agua
o otros líquidos.
7. Limpie la base de la bandeja para
migajas.
Observación: El ángulo de inicio
para el termostato está entre 45°
y 75°. Al girar la perilla de la
temperatura en sentido horario
dentro de ese intervalo, se
interrumpe la alimentación para
todos los eventos. Si se excede,
el suministro de energía se
reanuda después de ajustar el
tiempo de horneado.
23
24
Technical information / Informaciones técnicas
Para limpiar las migajas, simplemente
incline el aparato hacia atrás y empuje
el broche deslizante de la bandeja
para migajas hacia atrás y hacia
abajo, permitiendo de esta manera
que caiga sobre la superficie del
aparador.
Limpie el interior de la bandeja para
migajas con un paño húmedo.
Después de limpiarla, deslice el
“broche deslizante de la bandeja para
migajas” sobre las lengüetas para
volver a trabarla.
Las especificaciones técnicas pueden alterarse sin aviso, debido a las mejoras
en los productos.
FFF126M2PW / FFF126M2PB / FFF126M2PM
Dimension / Dimensiones
Net Weight / Peso Neto
Voltage / Voltaje
Power / Potencia
Color
226 x 380 x 290 mm
3,35 kg
120 V / 60 Hz
1200 W
Blanco / Negro / Gris
Para lavar el interior de la bandeja
para migajas ponga el aparato sobre
su parte trasera permitiendo que la
bandeja para migajas caiga hacia
adelante, de esta manera su limpieza
es más fácil.
25
ENG
Este electrodoméstico posee una
bandeja para migajas que se abre, en
la base de la cámara de horneado.
Primeramente desconecte este
electrodoméstico del tomacorriente y
permita que se enfríe.
The technical specifications might change without notice, due to improvements
in products.
ESP
ESP
Como limpiar la bandeja para
migajas
26
G008F_BILING_081211R