1
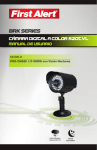
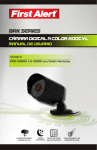
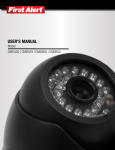
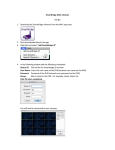
ENGLISH
DVR QUICK START GUIDE
Product Contents
CAMERA(S)
DVR
POWER SPLITTER
FOR DVR AND
CAMERAS
POWER SUPPLY for DVR & CAMERAS
(9 way supplied with 8 Camera systems;
5 way supplied with 4 camera systems)
WARNING
THESE PREMISES ARE UNDER
24 HOUR VIDEO SURVEILLANCE
PROTECTED BY
SECURITY STICKERS
RJ45 ETHERNET CABLE
BNC VIDEO & DC POWER CABLE
(1 supplied with each camera)
REMOTE CONTROL & USB 2.0 MOUSE
Step 1: Connect the DVR to your Monitor or TV
(Monitor Option)
1
Connect a VGA cord (not included) from your monitor to the VGA
Output port on the back of your DVR.
3
(TV Option)
1
Connect the end of the BNC-RCA (BNC SIDE ONLY) cable to the
back of the DVR labeled “Video Output”
2
Connect the BNC-RCA (RCA SIDE ONLY) cable to an open Input on
your TV/Monitor (note the input name or number)
3
Turn on your TV and select the appropriate input (noted above)
2
VGA
1
1
Step 2: Connecting the Cameras / DVR
1
Connect the BNC & power from camera with BNC power cable
using the side labeled "Camera Side”
2
Using other side of BNC power cable connect BNC to BNC video
input on DVR
3
Connect power cable to one of the multi power splitter ends
4
Plug (red) connector on power splitter to 12V DC input on DVR
5
Plug DVR power supply into wall outlet
3
(5 or 9-Way Power Splitter)
(Attach for each camera)
3
3
Front of DVR
Connect the USB mouse to the USB slot on the back (on front of
some models) Note: Please ensure the mouse is installed in USB slot marked
for mouse.
2
1
5
Step 3: Connecting your Mouse and Ethernet Cable
1
2
4
BACK of DVR
2
Connect the Ethernet cable to the back of the DVR labeled either
LAN or RJ45
Connect the other end of the cable directly to your router,
modem or high speed internet connection input
(Front USB port available
on some units)
1
Note: Please consult the networking section of your manual to configure the DVR
for remote viewing.
Go to firstalert.com and search for model # to find complete
instruction manual of your First Alert DVR.
© 2012 BRK Brands, Inc. All rights reserved. Distributed by BRK Brands, Inc., Aurora, Illinois 60504. BRK Brands,
Inc. is a subsidiary of Jarden Corporation (NYSE: JAH). First Alert® is a registered trademark of the First Alert Trust.
Due to continuing product development, the product inside the packaging may look slightly different than the one on
the package. To obtain warranty service, contact the Consumer Affairs Division at 1-800-323-9005, Monday through
Friday, 7:30 a.m. - 5 p.m., Central Standard Time.
ESPAÑOL
GUÍA DE INICIO RÁPIDO DE LA DVR
Contenido del Producto
FUENTE DE PODER para
LA DVR Y LAS CÁMARAS
CÁMARA(S)
DVR
DIVISOR DE
ALIMENTACIÓN PARA LA
DVR Y LAS CÁMARAS
(de 9 tomas proporcionado con sistemas de
8 Cámaras; de 5 tomas proporcionado
con sistemas de 4 Cámaras)
WARNING
THESE PREMISES ARE UNDER
24 HOUR VIDEO SURVEILLANCE
PROTECTED BY
CALCOMANÍAS DE SEGURIDAD
CABLE BNC DE VIDEO Y CABLE
DE ALIMENTACIÓN DE CD
(1 proporcionado con cada cámara)
CABLE ETHERNET RJ45
CONTROL REMOTO Y MOUSE USB 2.0
Paso 1: Conecte la DVR a su Monitor o Televisión
(Opción de Monitor)
1
Conecte un cabe VGA (no incluido) desde su monitor al puerto
de Salida VGA en la parte posterior de su DVR.
3
(Opción de Televisión)
1
2
Conecte la punta del cable BNC-RCA (ÚNICAMENTE DEL LADO BNC)
en la parte posterior de la DVR etiquetada “Video Output”
2
VGA
1
Conecte la punta del cable BNC-RCA (ÚNICAMENTE DEL LADO RCA) a
una Entrada disponible en su Televisión/Monitor (tome nota del
nombre o del número de la entrada)
3
1
Encienda su Televisión y seleccione la entrada apropiada
(observado anteriormente)
Paso 2: Conectar las Cámaras/DVR
1
Conecte el BNC y la corriente desde la cámara con el cable
BNC de alimentación de poder usando el lado etiquetado
“Camera Side”
2
Usando el otro extremo del cable BNC de alimentación de poder
conecte el BNC a la entrada de video BNC en la DVR
3
Conecte el cable de alimentación a uno de los extremos del
divisor de alimentación
4
Enchufe el conector (rojo) en el divisor de alimentación a la
entrada de 12V CD en la DVR
5
Enchufe la fuente de poder de la DVR en un tomacorriente
3
(Divisor de Alimentación de 5 ó 9 Tomas)
(Conectar para cada cámara)
2
3
Conecte el mouse USB al puerto USB en la parte posterior (en el
frente en algunos modelos) Nota: Por favor asegúrese que el mouse esté
instalado en el puerto USB marcado para el mouse.
3
PARTE POSTERIOR de la DVR
Parte Frontal de la DVR
2
Conecte el cable Ethernet en la parte posterior de la DVR
etiquetado LAN o RJ45
Conecte el otro extremo del cable directamente a la entrada de
su router, módem o conexión de internet de alta velocidad
1
5
Paso 3: Conectar su Mouse y el Cable de Ethernet
1
2
4
(Puerto USB frontal
disponible en
algunas unidades)
1
Nota: Por favor consulte en la sección de redes de su manual para configurar la
DVR para la vigilancia remota.
Vaya a firstalert.com y busque según el número de modelo para
encontrar el manual de instrucciones completo de su
DVR First Alert.
© 2012 BRK Brands, Inc. Todos los derechos reservados. Distribuido por BRK Brands, Inc., Aurora,
Illinois 60504. BRK Brands, Inc. es un subsidiario de Jarden Corporation (NYSE: JAH). First Alert®
es una marca registrada de First Alert Trust. Debido al desarrollo continuo del producto, el producto
dentro del paquete puede lucir levemente diferente al del paquete. Garantía Limitada de 1 Año – vea
adentro para los detalles.