1
4.)
CD
CD
CD
z
Cl)
-I
C)
rc
c—I
MPORTANTES NSTRUCCIONES DE SEGURIDAD
Cuando se usa un aparato eléctrico, debe seguirse unas precauciones básicas y que vienen
incluidas a continuación.
leer las instrucciones antes do usar a rnáquina de coser.
PEUGRO
—
Para reducir el riesgo de una descarga eléctrica.
1
La máquina no debe dejarse nunca desatendida mientras esté conectada. Desconectar Ia
maquina de Ia red eléctrica inmediatamente después de su uso y ames de limpiarla.
2. Desconectar Ia máquina de a red ames de cambiar Ia bombilla.
Colocar una bombilla del mismo bpo con una potoncia de 15 Watios.
Pars reducir el riesgo ae quemaduras, fuego, doscargas eléctncas 0 causar
CUIDADO — dartos
a personas.
1. No ussr Ia maquina como un luguete.
Prestar atencion si fuese necesario cuando Ia méquina esté siendo usada per niños 0
cores de ellos.
2. Usar Is maquina de coser solamente como se describe en este manual.
Usar unicamente los accesorios recomendados per el tabricante y quo vionon
ospecificados en este manual.
3. No trabajar nunca con Ia máquina en case de que tenga el cable o ol enchufo en males
condiciones, si no cose correctamente, en caso de que so haya caido, haya side dañada
0 Se haya mojado.
4. No ussr Ia máquina con los orificios de ventilación bloqueados. Mantoner los orificios do
ventilación do Ia méquina do coser y el pedal sin acumulaciôn do polvo, suciedad y restos
do tejido.
5. No introducir no inserter objetos on los orificios do vontilación,
6. No usar al airo libro.
7. No ussr miontras so ostén utilizando productos aerosoles (spray) o en lugaros donde so
osté administrando oxigono.
8. Para desconoctar, girar el interrupter hasta Ia posición Off (“0”), luego desconectar ol
onchufo do Ia rod.
9. No desconoctar el onchufe tirarido del cable. Pars dosconoctar, tirar de Ia davija, no del cablo.
10. Mantener los dodos alojados do todas las partes movibles do a mãquina, Tenor un
cuidado especial con Ia aguja.
11. Usar siompro Ia placa do agujas apropiada. Una placa do agujas impropia puode producir
Ia rotura do Ia aguja.
12. No usar agulas dospuntadas.
13, No presionar ni tirar del tojido mientras so ostá cosiondo. Esto podrIa doblar a aguja y
romporla.
14. Situar el interrupter principal do Ia méquina on posiciän Off (“0”) cuando so realico algân
ajusto on ol area do Ia aguja coma enhebrar Ia aguja, cambiar Ia aguja, cambiar Ia
canilla, cambiar el pie prensatelas y similares.
15. Deaconectar siompro Ia máquina de Ia rod oléctrica cuando so rotireri las tapes, pare
lubricar, a cuando so realice algin otro tipo do ajuste mocánieo moncionado en ol manual
do instruacionos.
CONSERVE ESTE MANUAL DE INSTRUCCIONES
Esta màquina de coser es para usa doméstco
CONTENIDO
FABLE OF CONTENTS
‘Aachine identification
ccessories
Setting up your machine
Foot control, Power/light switch,
Needle Up/down switch,
Sewing speed control, Spool pin. Presser foot lever
Ninding bobbin
rhreading the bobbin thread
Jeedle, thread and fabric chart
rhreading top thread
nicking up bobbin thread
tijusting top thread tension
t
Changing presser feet. Feed dog control
Stitch selector and indicato
Stitch length/super (stretch) stitch control
Super(stretch) pattern group selecto
Reverse stitch lever, Pressure regulato
Stitch width control, Converting to tree-arm sewing
4achine setting chart
Straight stitch
Starting to sew, Removing fabric,
Turning a square corner,
Inserting zippers and piping, Darning
3gzag stitch
Overcasting, Satin stitch
Blind stitch
Three-step zigzag, Double-action stitch
ingerie stitch
aggoting
Stretch stitch
Triple straight stitch, Ric-rac stitch, Overlock stitch,
Slant overedge stitch, Smocking stitch, Feather stitch,
Elastic overlook stitch, Surf stitch, Fishbone stitch,
Wish-bone stitch, Stretch overlock stitch, Double overlock stitch,
Stretch patching stitch. Herringbone stitch
Decorative embroidery designs
Tips on design stitching
Buttonhole making
Automatic one-step buttonhole, Adjusting stitch balance,
5-step buttonhole, Corded buttonholes,
Dptional accessories
Straight stitch foot, Overcasting toot, Satin stitch foot,
Rolled hemmer, Roller toot, Button sewing foot
Twin needle sewing
Threading twin needle,
Turning a corner with a twin needle
Caring for your machine
Cleaning the feed dogs and shuttle area,
Changing light bulb
Check chart for performance problems
Repacking the machine
4 5
6
7 5
.
12
9
10
11
13
14
15
16
-
17
17
18
18
19
20 22
23 26
.
-
26
27
28
29
30
30 34
-
35
36 37
-
38 40
-
41
-
42
42 43
43
-
ldentificaciOn de a máquina
Accesorios
Preparación de Ia máquina
Control por pedal, lnterruptor corriente/luz,
Interruptor aguja arribalabajo, control de velocidad,
Porta carretes. Pslanca pie prensatelas
Devanado de Ia canilla
Enhebrado del hilo de Ia canilla
Tabla de hilo, aguja y material
Enhebrado del hilo superb
Recogida del hilo de Ia canilla
Ajuste de Is tension del bib superio
Cambio del pie prensatelas
Indicador y selector puntadas
Control longitud puntada y puntadas super eltisticas
Selector grupo de puntadas elesticas
Pabanca data puntada de retroceso, Regulador de presiOn
Selector ancho puntada, ConversiOn pars Ia costura con brazo
Esquema tie ajuste de Ia maquina
Puntada recta
Inicio de Ia costura, Sacando el tejido, Giro en esquinas en ángulo facto,
lnserciOri de cremalleras y vivo. Zurcido
Puntadas zig-zag
Sobrehilado, Puntada de relleno
Puntada invisible
Zig-zag tie tres puntadas, Puntada tie accion doble
Puntada tie lenceria
Diente de rata
Puntada elàsticas
Puntada recta triple, Puntada zig-zag a dos agujas, Puntada overlock,
Puntsda i clinatia de sobrehilar, Puntada nido tie abaja, Puntada plums,
Puntada overlock elastics, Puntada surf, Puntatia rasps, Punto tie bruja,
Puntads overlook elastica, Puntada overlock tioble, Puntadas eléstica tie parches,
Puntada espiga
Diseitos tie bordados decorativos
Tipos tie puntadas decorativas
Confección tie ojales
Oales automaticos, Ajuste tie Ia compensaciOn
puntadas ojal, Pasos para ojales, Ojales con cordOn
Accesorios opcionales
Pats puntada recta, Pats pars overlocatio, Pie prensatelas pars
puntadas tie satén, Doblatilllo rodillo. Prerisatelas tie rodullo,
Aplicacion de botones
Aplicacion tie dos agujas
Enhebrado tie dos agujss,
Giro en esquinas con tios agujas
Cuide su maquina
Limpiar el area del transportador y Ia lanzatiera,
Can’ibio tie Ia bombilla
Cuatiro tie examen pars los problemas tie ejecucion
Volver a embalar Ia maquina
4 5
6
7 8
-
-
9
10
11
12 13
14
15
16
17
17
18
18
19
20 22
23- 26
-
-
26
27
28
29
30
30 34
-
35
36- 37
38 40
-
41
-
42
42 43
43
-
3
IMPORTANT SAFETY NSTRUCTONS”
“When using an electrical appliance, basic safety precautions should always be followed,
including the following.”
“Read all instructions before using this sewing machine.”
11
DAN G ER
—
To reduce the risk of electric shock;
1. “This sewing machine should never be left unattended when plugged in. Always unplug
this sewing machine from the electric outlet immediately after using and before cleaning.”
2. Always unplug before replacing light bulb. Replace bulb with same type rated 15 watts.”
To reduce the risk of bums, fire, electric shock, or inlury to
persons;
“Do not allow to be used as a toy. Close attention is necessary when this sewing machine
is used by or near children.”
“Use this sewing machine only tor its intended use as described in this manual. Use only
attachments recommended by the manufacturer as contained in this manual’
“Never operate this sewing machine if it has a damaged cord or plug, if it is not working
properly, if it has been dropped or damaged, or dropped into water. Return the sewing
machine to the nearest authorized dealer or service center for examination, repair,
electrical or mechanical adjustment.”
“Never operate the sewing machine with any air openings blocked. Keep ventilation
openings of the sewing machine and foot control free from the accumulation of lint, dust.
and loose cloth.”
“Never drop or insert any oblect into any opening.”
“Do not use outdoors.”
“Do not operate where aerosol (spray> products are being used or where oxygen is being
administered.”
“To disconnect, turn switch to the off (“0”) position, then remove plug from outlet,”
“Do not unplug by pulling on cord. To unplug, grasp the plug, not the cord.”
“Keep fingers away from all moving parts. Special care is required around the sewing
machine needle.”
“Never sew with a damaged needle plate as this can cause needle to break.”
AI
1
2.
3.
4.
5.
6.
7.
8.
9.
10.
11.
12. “Do not use bent needles.”
13. “Do not pull or push fabric while stitching, It may deflect the needle causing it to break.”
14. “Switch the sewing machine off (“0”) when making any adjustments in the needle area,
such as threading needle, changing needle, threading bobbin or clianging presser foot etc.”
is. “Always unplug sewing machine from the electrical outlet when removing covers, lubricating, or
alien making any other user servicing adjustments mentioned in the instruction manual,”
A i FTif’M
sJ F
Moving parts—To reduce risk of injury, switch off before servicing.
Close cover before operating machine.”
SAVE THESE INSTRUCTIONS”
“This product is for household use, or equivalent.”
FOOT CONTROL (USA only)
ELECTRONIC MODEL
Use Matsushita Electric. Model 4C-3378 iwi”h sewing machine model 979.
ELECTRIC MODEL
Use Matsushita Electric. Model 4C-3 168 with sewing machine mudel 970 and 972.
POLARIZED PLUGS CAUTION
This appliance has a polarized plug (One blade eerier than me other). To reduce the risk of
electric shoc& this plug it intended to fit in a polarized outlet only one way. If the plug does not
fit fully in the outlet reverse the plug. If it still does not fit contact a qualified electricrnn to
install the proper outlet. Do not modify the plug in any way.
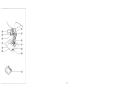
ACHNE DEN11F!CATION
1
2.
3.
4.
5.
*6.
7.
8,
9.
10.
11.
12.
13.
14,
15.
16.
‘17.
‘18.
19.
20,
21.
22.
‘23.
24.
25.
26.
27.
‘28,
‘29.
30.
31.
32.
33.
34.
35.
36.
37.
38.
39.
40.
*
Bobbin winder tension disc
Pressure regulator
Thread take-up
Thread tension control
Face cover
Needle up/down switch
Thread cutler
Extension table
Feeddogcontrol
Reverse stitch lever
Stitch width control
Bobbin winder shsft
Bobbin winder stop
Stitch indicator
Stitch length control
Stitch selector
Super pattern group selector
Sewing speed control
Hand wheel
Power/light switch
Plug socket
Identification plate
Buttonhole Stitch adluster
Retractable spool pin
Horizontal spool pin
Buttonhole lever
Presser foot lever
Automatic needle threader
Thread guide
Thread guide
Presser foot screw
Needle
Bobbin cover plate
Needle clamp screw
Foot release lever
Presser toot
Feed dogs
Needle plate
Bobbin cover release button
Foot control
Model 979 only
Model 979, 972 only
DENTflCATlON DE
LA MAQUNA
2.
3.
4.
5.
*6
7,
8.
9.
10.
1
12.
13.
14.
15.
16.
*17
*18
19.
20.
21.
22.
**23
24.
25.
26.
27.
**28
**29
30.
31.
32.
33.
34.
35.
36.
37.
38.
39.
40.
*
**
Disco tensor del devanador de
canillas
Regulador de presión
Tria-hitos
Control tension hilo
Cubierta frontal
Interruptor aguja arriba/abajo
Cortador tie hilo
Base de extensiOn
Control de dientes
Palanca puntada tie
retroceso
Selector ancho puntada
Ee devanador canilla
Tope devanador canilla
Indicadør tie puntadas
Control longitud puritada
Selector do puntadas
Selector grupo tie puntadas elesticas
Control do velocidad
Volante
lnterruptor corriente/luz
Enchufe del control per
pedal
Placa tie ideritificaciOn
Dispositivo tie ajuste puntada oial
Pasador carrete
Pasador carrete
Palanca pare ojalea
Palanca pie prensatelas
Enhebrador automatico aguja
Guia hilo
Guia bib
Tomilto pie prensatelas
Aguja
Tapa de canilta
Tornilbo tie sujeciOn aguja
Palanca do desprendimiento
prensatelas
Pie prensatelas
Transporte do dientes
Plancha aguja
BotOn tie aperlura tapacanilla
Control per pedal (Reostato)
SOlo el modebo 979
SOlo el modelo 979, 972
U’
9
©
4003
gqgsAuj Pe4und ep
L
(Aguo
q
9
qos p(J
gapo)
gs. Jo
3 oo3 agoquo
9
We3sAs da
(oL6 ofapow °f9S) Sagefo ajed
(6 L6 olapow °19S)
saggo e.wd 40ed 0 I
ap sgaWsuaJd 6
(E)aoV)
(Aguo L6 6L6 gapo)
Jo3 4003 9
agoquo9n
WasAs
I00
.
JpMa,Q
(Hews) Jai
9
9
(ouanbad) Jopawwo4saQ
4s$
L
!da
3
°ll
(a6Jg) Ja
Jauado 8
agotgtjo
•,
,
addjz 6
JaiJo o
ç
(aPue,6) 1
JOpfliwO
S
Sageio ap Jopuqy
od
dE3 ted go
9
03ajja, °psad gap
L
9
.
-
iqqo
9
su
salpeaN
-
3EHoss
3
S
SOIHOS333V
SETflNG UP YOUR MACHINE
PREPARACION DE LA MAQUINA
Be sure to wipe off any surplus oil from needle plate area
before using your machine the first time.
Asegurarse de limpiar cualquier aceite sobrante del area de
Ia plancha de aguja, antes de user, por primers vez, Ia
máquina.
FOOT CONTROL
Connect the plug of the foot control into the machine socket
(1) and your wall outlet (2) as illustrated.
SAFETY FEATURE OF ELECTRONIC MODEL
CONTROL POR PEDAL
Conecte el pedal a a máquina (1) y el enchufe a Ia
alimentaciOn de corriente (2) tal como Se ye en el dibujo.
MEDIDAS DE SEGURIDAD
If the machine is jammed, it will stop with three beep
sounds. After the cause of jamming is removed, step on
Lthe foot control and it will run in normal condition
Si Ia máquina se bloquea se para emitiendo tres pitidos.
Una vez desbloqueada, el uso de nuevo del pedal
reanudará su funcionarniento normal.
POWER/UGHT SWITCH
NTERRUPTOR CORRENTE/ LLJZ
Your machine will not operate until the power/light switch is
turned on. The same switch controls both the power and the
light.
When servicing the machine, or changing needles or lamps,
etc., machine must be disconnected from the main power
supply.
La máquina no funcionará hasta que se conecte el
interruptor de corriente/luz. El rnismo intorruptor controls Ia
corriente y Ia luz. Cuando se está utilizando Is máquina, o se
estãn cambiando agujas o bobillas, etc., Ia máquina se debe
desconectar de los suministros principales,
Illustration I : Foot control
II: Power/light switch
llustración I Control per pedal
Ii: lnterruptor corriente/luz
NEEDLE UP/DOWN SWITCH
INTER RUPTOR AGUJA ARRIBA / ABAJO
(Electronic model 979 only)
Your machine is electronically controlled so that the needle
will always rise to the up’ position whenever you stop
(Sélo el modelo 979 electrónico)
Su máquina lleva un control electrónico pars que Ia
rnàquina pare siempre con Ia aguja arriba.
sewing.
If you wish to lower the needle, press the switch and a beep
sound will be heard and the needle will move to the down
position. Push it again or activate the foot control and the
needle will move back to the ‘up position.
Si desea bajar Ia aguja, pulse el interruptor, sonará un
pitido y bajará Ia aguja a su posición inferior. Vuelva a
pulsar o active el pedal y Ia aguja volverá a subir.
SEWING SPEED CONTROL
CONTROL DE VELOCIDAD
(Electronic model 979 only)
The sewing speed is achieved by using the sewing speed
control in conjunction with the foot control. The sewing speed
control is moved horizontally to determine the zone of speed
required.
(5610 el modelo 979 eledtrónico)
La velocidad de costura se regula mediante el control de
velocidad conjuntamente con eI pedal. El control de
velocidad se mueva horizontalmente para determinar Ia
velocidad desesda.
Illustration I
B
Ilustración I
Needle upfdown switch
Sewing speed control
II
Interruptor aguja arriba/abajo
Control velocidad costura
SPOOL PINS
PORTA CARRETES
Place a spool of thread on the spool pin. Secure it with the
spool cap (A) leaving a gap between the spool cap and the
reel of thread to allow the reel to rotate freely.
Coloque un carrete de hilo en el porta.carretes. Fiielo con
Ia tapa (A) asegurándose una salida fluids del hilo.
Pull up the spool pin (B) This is used for bobbin winding
when the machine is already threaded.
Tire de Ia barrita (B). Eats se utiliza para el llenado de
canilla cuando Is máquina ya esté enhebrada.
PRESSER FOOT LEVER
PALANCA PIE PRENSATELAS
There are three positions for your presser foot.
1. Lower the presser foot to sew.
2. Raise the lifter to the middle position to insert or remove
fabric.
3. Uft it to its highest position to change the presser foot or
to remove thick fabric.
Su prensatelas tiene tres posiciones.
1. Bajar el prensatelas para coser.
2. Levantar a palanca a Ia posición media pars nsertar o
mover Ia tela.
3. Levantar a Ia posición mits alta pars cambiar el
prensatelas o pars mover at material grueso.
B
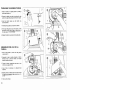
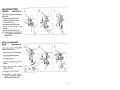
WNDNG BOBBN
Pass thread from spool through thread
guides as shown.
2. Pull end of thread through hole in bobbin
as shown.
3. Push bobbin winder shaft to far left
position, if it is not already there. Place
bobbin onto shaft with end of thread
coming from top of bobbin. Push bobbin
winder shaft to right until it clicks. Hold
Onto end of thread.
4. Depress foot control to wind bobbin. The
thread that is held will snap. Bobbin will
cease turning when completely filled.
Push shaft to left to remove bobbin.
DEVANADO DE LA
CANILLA
1. Pasar et hilo desde et carrete, a través
del gula hilo. tal como está mostrado.
2. Estirar el extremo del hilo, a través del
agujero en Ia canilla, tal como está
mostrado,
3. Empujar el eie del devanador canilla
hacia a posicion maxima izquierda, si no
está ya ahi. Colocar Ia canilla en el ele,
con el extremo del hilo saliendo por Ia
parte superior de Ia canilla. Empujar
hacia Ia derectia el eje del devanador,
hasta que se sients un golpe seco.
Retener el extremo del hilo.
••
4. Poner en marcha Ia máquina. El hub que
está retenido se soltarã. La canilla
cesarâ de girar cuando se hays Ibenado
por completo. Empujar hacia Ia izquierda
el eje para sacar Ia canilla.
“N,
H
_
-__
____
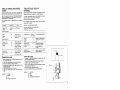
THREADING THE BOBBIN THREAD
1
Raise the needle to its highest position by rotating the
hand wheel towards you.
2. Remove the bobbin cover plate by pushing the release
button to the right while pushing the left corner of plate.
3. Insert the bobbin
counter-clockwise.
making sure the bobbin
rotates
4
Pull thread through the slot (A) and then to the left.
S
With a finger held gently on top of the bobbin, pull thread
through the slot (B) until you hear a clicking sound, and
then leave about 6(15 cm) of thread.
6. Replace the bobbin cover plate Onto the needle plate.
ENHEBRADO DEL HILO DE LA
CANILLA
1. Eteve Ia aguja hasta su posición más alta girarido el
volante hacia Vd.
2. Desmontar Ia tapa de canilla empujando el boton de
Iiberación hacia Ia derecha mientras se empuja Ia
esquina izquierda de a placa.
3
Coloque Ia bobina. asegurándose que gire en sentido
contrario a las agujas del relol.
4. Lleve el hilo por Ia abertura (A) y después hacia Ia
izquierda.
5. Mientras presiona Ia bobina pase eI hilo por a abertura
(B) hasta oir un chasquido y deje entonces unos 15 cm.
de hilo.
6. Vuolva a cerrar Is tapa.
2
TABLA DE HILO, AGUJA Y
MATERIAL
NEEDLE, THREAD AND FABRIC
CHART
Use the standard needles. The size of your needle should
match the size of the thread and both should match the fabric.
For normal sewing, the same size and type of thread should
be used in the bobbin as on the upper part of the machine.
Never use a bent or blunt needle.
For successful sewing of stretch fabrics use stretch stitch
needles.
Cotton 60 100
Synthetic
stretch stitch
needle
Para coser normalmente, usar el mismo tamaño y el mismo
tipo tie hilo tanto en a aguja como en a bobina.
Never use a bent or dull needle,
For successful sewing of stretch fabrics use stretch stitch
needles with blue ahank.
Nunca usar una aguja torcida 0 obtusa.
Fabric
Needle Size
Thread Size
Usar las agujas normales. El tamafio de su aguja y el del hilo
deben armonizar con el material. Vet a tabla slguiente.
Pace coser materiales con buen éxito, usar
agujas pars punto elástico.
All Stretch fabrics
Machine embroidery
I
Algodrin del 60-100
Cotton
70
Sheer cottons, silk
Synthetic
Silk A
or
80
synthetics, fine laces.
batiste. dim5g.
Cotton 60 80
80
Mercerized 50 60
Synthetic
or
Medium weight cottons.
medium weight synthetics.
poplin, seersucker,
gingham. velvet, 1i915
ht woolens, linen.
9
wei
Heavy weight cottons.
Cotton 30 60
Mercerized heavy
duty
90
-
ioo
70
o
80
Algodôn puro, saris, material
sintritico, batista, muselina.
AlgodOn 60 80
Mercerizado 50 -60
Sintético
60
AIgodon dv peso mediano,
material sintAtico de peso
mettiano. popeliri, linde,
terciopelo
AJgodrin 30 60
Mercerizaclo pesado
coO
Algodôn
Sintético
Machine embroidery
Sada
.
.
medium to heavy
weight woolens, denim,
1. Raise the needle bar to its highest position by turning the
hand wheel toward you.
2. Loosen the needle clamp screw by turning it toward you.
3. Remove the needle by pulling it downward.
4. Insert the new needle into the needle clamp with the Sat
side away from you.
5. Push the needle up as far as it can go.
6. Tighten the needle clamp screw firmly with the screw
driver.
—
1.
IV: Flat side away from you.
90
AlgodÔrr pesado. lana mediano
a pesado, vaqueros
Levantar Ia barra de a aguja a Ia posición mits aSs
girando el volante hacia Ud..
2. aftojar el tomillo que sujeta Ia aguja giráridoto hacia Ud.
3. Guitar Ia aguja sacándola hacia abajo.
4 Insertar a aguja nueva en Ia brida porta-aguja con el lado
pIano hacia Ia perle posterior.
5 Empuiar Ia aguja 10 más arriba posible.
6. Apretar el tornitlo timemente con el destornillador.
llustración
Flat side
I
II: Needle
III: Pin
o
niltin
Camblo de Ia aguja
Changing the need’e
Illustration
Todos Ins materiales elàsticos
Agula para
punto elástico
I : Lado pIano
II : Aguja
ifi Pasador
IV Lado piano hacia fuera de Vd.
i1READNG THE TOP
HREAD
Raise the presser foot lever.
Raise the needle to its highest position
by rotating the hand wheel towards you.
Thread the machine in the following
order as illustrated.
SUPEROR
1. Levantar a palanca prensatelas,
2. Levantar a aguja a Ia posición más
elevada girando el volante de a
maquina hacia usted.
3. Enhebrar a máqulna siguiendo el orden
de a ilustración.
USNG AUTOMA11C NEEDLE
THREADER
(Model 979,972 only)
©
Raise the needle to its highest position by rotating the hand
wheel towards you.
1 Hook thread under thread guide as illustrated.
2. Pull down lever while holding the end of thread.
3. Turn the lever as far as it will go.
4. Guide thread into hooked end and pull it upward.
5. Return the lever and needle wit? be threaded
automatically.
6. Release the lever and pull thread away from you.
NOTE: For smooth threading it is recommended to set the
machine at straight stitching (center position) when
using needle threader.
EMPLEO DEL ENHEBRADOR
AGUJA
(Solo modelo 979,972)
Levantar Ia aguja a Ia posicion más elevada girando el
volante de Ia maquina hacia uated.
I
Enhebrar el fib en el guia bib como indica a ilustraciãn.
2. Bajar a palanca sujetando el extremo del fib.
3. Girar Ia palanca fasts el final
4. Cobocar el hilo en Pa horquibla de enganche y eatirarlo
hacia arriba.
5. Retornar a palanca a su posición y Pa aguja será
enhebrada automâticarnente
6
Sobtar Ia palanca y tirar del hibo hacia usated.
Nota: Pars conseguir un enhebrado correcto con el
enhebrador, se recornienda poner el selector de a
máquina en puntada recta (posición central).
1:
PCKNG UP BOBBIN
THREAD
1
Raise the presser foot lever.
RECOGDA DEL HLO DE
LA CANILLA
1. Alzar a palanca del pie prensatelas.
2, Holding needle thread loosely with your
left hand, turn hand wheel towards you
one revolution with your rtght hand until
the needle comes to its highest position.
2. Manteniendo fiojo el hilo de a aguja con
Ia mano izquierda, girar hacia Vd. el
votante con Ia mano derecha, hasta que
Ia aguja atcance su posiciôn más alta.
3. Lightly pull up the top thread, and pick
up bobbin thread, which will appear
through the needle plate slot.
3. Tirar ligeramente del hilo superior y
de a canilla, que
recoger el bib
aparecerá a través de Ia abertura de Ia
plaricha de aguja.
4. Pull both top and bobbin threads
together towards back ot machine under
the presser foot, leaving about 6 (15
cm) tail.
4, Tirar de ambos hilos juntos, hacia atrás
de Ia maquina, por debajo del pie
prensatelas, dejando atrededor de 15
cm. de bib.
ADJUSTING TOP THREAD
TENSION
AJUSTE DE LA TENSION DEL
HILO SUPERIOR
STRAIGHT STITCHING
COSTURA RECTA
The quality of your stitching is largely determined by the
balanced tension of both top and bobbin threads. The
tension is well balanced when these two threads ‘lock’ in the
middle of layers of fabric you are sewing.
Set the tension control at the AUTO position or 3 for normal
sewing.
If, when you start to sew, you find that the stitching is
irregular, you will need to adjust the tension control. Make
any adjustments with presser foot down.
El buen aspecto de Ia costura generalmente está
determinado por Ia tension equilibrada de ambos hilos
superior a inferior.
Ponga el control de tensiOn en Ia posiciOn AUTO” a 3 para
costura normal.
Si se encuentra que Ia costura es irregular, Se necesitará
ajustar el control de Ia tensiOn.
Cualquier ajuste as ha de realizar con eI pie prensatelas
abajo.
ZIGZAG STITCHING
COSTURA ZIG-ZAG
The top thread may appear on the bottom depending on the
thread, fabric, type of stitch and sewing speed, but the
bobbin thread should never appear on the top of the fabric.
El hito superior puede aparecer en Ia parts inferior, segun el
hilo, telido, tipo de puntada y velocidad de costura, pare el
hilo de Ia canilla nunca deberá aparecer en Ia parts superior
del tejido.
Illustration I : STRAIGHT STITCHING
1: Underside
2: Top side
3: Well balanced
4 Decrease tension
5: Increase tension
6: Top stitch too tight
7: Top stitch too loose
llustraciOn I : COSTURA RECTA
I: Reverso
2: Cara
3: Bien equilibrada
4: Disminuir tension
5: Aumentar tensiOn
6: Puntada superior demasiado apretada
7: Puritada superior demasiado fioja
U. ZIGZAG STITCHING
II: COSTURA ZIG-ZAG
BOBBIN TENSION
TENSION BOBINA
The bobbin tension has been correctly set at the factory, so
you do not need to adjust it.
Esta ha sido ajustada correctamente en fábnca per 10 qua
no as necesario realizar ning(jn ajuste.
6
7
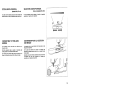
CHANGING PRESSER FEET
Be sure needle is in the up position.
lever.
Raise presser foot
Raise font release lever to remove the foot. (Fig.1)
2. Place the desired foot on the needle plate aligning needle
holes. (Fig.1)
3. Lower the presser foot lever so that the ankle snaps on
the foot. (Fig. 2)
Illustration I Foot release lever
U: Ankle
CAMBIO DEL PIE PRENSATELAS
Asegurarse de que Ia aguja está en Ia posicion superior.
Alzar Ia palanca del pie prensatelas.
I
1. Alzar Ia pafanca de desprendimiento prensatelas pars
sacar el prensatelas (Fig,1).
2. Colocar el prensaetefas deseado sobre Ia plancha de
agujas, alineando los agujeros aguja (Fig. 1>.
3. Bajar Ia palanca pie prensatelas, de manera que el
sujetador prensatelas se cierre de golpe en el
prensatelas (Fig. 2).
llustración I Palanca de desprendimiento prensatelas
U : Suietador prensatelas
I
Fig. 1
Fig. 2
FEED DOG CONTROL
CONTROL DE DIENTES
The feed dogs control the movement of the fabric that is
being sewn. They should be raised for all general sewing
purposes and lowered for darning, freehand embroidery and
monogramming so that you, and not the feed dogs, are
moving the fabric,
Los dientes controlan el movimiento del género quo so
esta cosiendo. deben estar elevados durante as
operaciones de costura y bajados durante el remendado,
bordado con bastidor y colocación do ariagramas de modo
que sea Vd. y rio los dientes quien mueva vi gdnero.
d4d
STITCH SELECTOR AND
NDCATOR
1
To select a stitch, be sure needle is out
of fabric at its highest position
2. Then turn the selector until the required
stitch is indicated by the red symbol on
the indicator panel.
Stitch indicator
Illustration
U: Stitch selector
SELECTOR E NDCADOR
DE PUNTADAS
puntada
una
seleccionar
1. Pars
asegurarse que Ia aguja està fuera del
tejido y en so posición más alta.
2. Entonces girar el selector hasta que el
indicador rojo aparezca en a puntada
requerida.
4
S
•S
/
•e0•
S
•
•
S
•
S
S
J
llustración I Indicador de puntadas
U : Selector de puntadas
I
)
STITCH LENGTH ISUPER
(STRETCH) STECH
CONTROL
CONTROL LARGO DE
PUNTADA V PUNTADA
SUPER (ELASTCA)
Stitch length can be selected easily
according to thickness and type of fabric.
Super (stretch) stitch patterns can be
selected by turning the same dial to e mark
where tine adjustment can be made.
El largo de puntada puede ser seleccionado
fticilmente do acuercio con el tipo de
material y su grosor.
El grupo do puntadas super (eláslicas)
pueden ser seleccionadas girando el mismo
dial hasta a marca 4 en donde so podrti
hacer on ajuste mtis fino.
HLZU
SUPER(STRETCH) PATTERN
GROUP SELECTOR (Model 979 ordy)
SELECTOR GRUPO DE PUNTADAS
ELESTCAS (Solo el modelo 979)
To select orange patterns, push down the selector. Push it
up for green patterns.
Para seleccionar grupo de puntadas rtaranja
palanca. Sübala para grupos de puntadas verdes.
REVERSE STITCH LEVER
PALANCA DE LA PUNTADA DE
RETROCESO
It is recommended to begin, or end seams with several
stitches in reverse for reinforcement. As long as you are
pressing down this lever while sewing, the machine will
continue to feed the fabric backwards,
ELECTRON IC MODEL
When depressing the lever, a beep sound will be heard and
the machine will sew slowly in reverse. When it is released, a
beep sound will be heard again
baje Ia
Al empezar 0 floalizar las costuras se recomienda realiza
diversas puntadas con el retroceso para eI refuerzo de Ia
costura. Mientras se asIa presionando hacia abajo esta
seguira
máquina
Ia
Ia costura,
palanca durante
transportando hacia atrás el tejido.
MODELO ELECTRÔNICO
Al bajar Ia palanca sonarà un pitido y Ia máquina coserá a
velocidad ants en retroceso. Al soltarla volverit a oirse e
pitido.
PRESSURE REGULATOR
REGULADOR DE PRESON
This control regulates the pressure of the presser foot on to
the feed-dogs. Insufficient pressure may cause poor feeding
of the fabric, skipped stitches, or difficulty in guiding the
fabric. Too much pressure may result in feed-dogs or presser
foot marks appearing on the fabric.
Este control regula Ia presión de Ia pata prensatelas sobre el
transporte de dientes. Una presión insuficiente puede causar
Un pobre transporte del material, saltos cia puntada 6
diflcultades en guiar el tejido. Demasiada presiôn puede
producir marcas en el tejido, por causa de los denIes del
transporte 0 Ia pata prensatelas.
Para Ia mayoria de tejidos, poner el control al n2. 3. Para
tejidos gruesos poner at flt. 4 y para finos reducir Un
nUmero.
For most fabrics set the control at 3 For thicker ones
increase it to 4 and for finer ones decrease to a lower
number.
STITCH WIDTH CONTROL
(iode 979, 972 oney)
The width of all the stitches produced on this machine can be
made narrower or wider by adjusting the stitch width control.
SELECTOR ANCHO PUNTADA
(Sob & mod&o 979, 972)
En esta maquina puede regularse el aricho de puntada
ajustando el selector ancho puntada.
(__
CONVERTING TO FREE-ARM
SEWING
CONVERSION PARA LA COSTURA
CON BRAZO
Your machine can be used either as a fiat-bed, or as a
free-arm model.
With the extension table in position, it provides a large
working surface as a standard fiat-bed model.
By removing the extension table (just pull it off to the left as
shown), the machine converts into a free-arm model.
La máquina tanto Se puede utilizar coma base plana 0 una
mAquina de brazo libre.
Con Is base de extension en posiciOn se consigue una
superflcie de trabajo grande como a de un modelo normal
de base plans.
Sacando Ia base de extension (estirándola hacia fuera hacia
a izquierda, tal como está mostrado), Ia mitquina se
canvierte en un modelo de brazo libre.
(-fl
19
MAQUNA (1)
ACHINE SETflNG CHART (1) I ESQUEMA DE AJUSTE DE LA
ESPAiOL
ENGLJSK
4/
1
0
?
BUTTONHOLE
OJALES
STRAIGHT (Center position)
RECTA (al centro)
L’—---.
21
ENGUSH
OVERLOCK IZQUIERDA
LEFT OVERLOCK
OVERLOCK ELASTICO
ELASTIC OVERLOCK
I-—
123 (
SUPER DECORATIVE
SUPER DECORATIVAS
/
SUPER DECORATIVE
SUPER DECORATIVAS
SUPER DECORATIVE
SUPER DECORATIVAS
SUPER DECORATIVE
SUPER DECORATIVAS
FISHBONE
RASPA
28
STRETCH OVERLOCK
OVERLOCK ELASTICO
DECORATIVAS FESTON
2t
STRETCH PATCHING
PARCHEADO ELASTICO
DECORATIVE DOMINO
DECORATIVAS DOMINO
3(
11
DECORATIVE DIAMOND
DECORATIVAS DIAMANTE
31
FEATHER
12
DECORATIVE ARROWHEAD
DECORATIVAS PUNTA DE
32
SLANT OVEREDGE (Left)
13
DOUBLE ACTION
DOBLE ACCION
3
LINGERIE
LENCERIA
0
STRAIGHT (Left position)
RECTA (a Ia izquierda)
ZIGZAG
ZIG-ZAG
BLIND
INVISIBLE
THREE-STEP ZIGZAG
ZIG ZAG TRES PUNTADAS
7
FOUR-POINT LINGERIE
LENCERIA CUATRO PUNTOS
fr
B
STRETCH BLIND
INVISIBLE SUPER ELASTICO
9
DECORATIVE SCALLOP
It
3
5
v
6
16
17
11
19
0
0
*
4
6
j
7
7
-
SLANT OVEREDGE (Right)
SOBREHLADO INCLINADO
PLUMA
SOBREHILADO INCLINADO
SURF
SURF
3
SUPER DECORATIVE
SUPER DECORATIVAS
FAGOTING
35
SUPER DECORATIVE
SUPER DECOFIATIVAS
TRBLE STRAIGHT
(Center position)
PUNTADA TRIPLE (aI centro)
3
SUPER DECORATIVE
SUPER DECORATIVAS
TRIPLE STRAIGHT (Left position)
PUNTADA TRIPLE (a Ia izquierda)
3
SUPER DECORATIVE
SUPER DECORATIVAS
ZIG-ZAG
3
WISH-BONE
PUNTO CE BRUJA
RIC-RAC
RIGHT OVERLOCK
OVERLOCKDERECHA
39
DOUBLE OVERLOCK
OVERLOCK DOBLE
NIDO DE ABEJA
4(
HERRINGBONE
ESPIGA
SMOCKING
3
]
ILACHINE SEfl1NG CHART (2)
O
MODEL
‘\
3
a7o379q7a
0
‘I
tE
1
Q
P
\
MODEL
19 000
00
1
0
12345
C
:1:
I
/
T
21000
2200
INDICATOR
(U
4f1f,’Io
;-i—
0
®
STITCH LENGTH CONTROL
HiE Hfti
5
6
—
0
0
010
01°
LvW’
(4) SUPER PATTERN GROUP
SELECTOR
*
k
26
1-4
MID. MAX
1-4
MID. MAX
-
-
/i
B
/
A
A
1-4
MID-MAX
s
1
j/
B. Blind stitch fool
A. Zigzag toot
0
13
0
gI
I
/
0
A
300
33°F
MID.
-
MAX
MID. MAX.
350
VI
/
/
i
16
0
17
°
2__J_
-
//
T
A
37 0
380
—
390
40
0
/
*
up
]
360
1-4
0
Model 970 only
0
3201
05
1600
15
V Zipper foot
DOWN
310
140
C. Buttonhole toot
MAX,
—
110
© PRESSER FOOT
-
27 0
29
90
12
MID.
25 0
V
0
100
Model 979 only
0
A
240
—
—
,
1-4
0
() STITCH WIDTH CONTROL
Model 979, 972 only
23
0
2
/
7Z /
1-4
I
10101
101
1
I
D
21
QUEMA DE AJUSTE DE LA
AQUINA(2)
-
MODELO
‘za
0
©
D
/,
0
-/
0
12346
© ©
c
:1;
C
/
:1:
979 972 970
19[0i0l0
26
T
220
-
—
®
MODELO
\
U
0
0.
2(
,,
A
MED. MAX
5
6
0
0
-—
--
k
) CONTROL ANCHO PUNTADA
SôIo el mOdelo 979,
972
1-4
010
——-—
1-4
.
!2_L___
B
MED. MAX
-
MED. MAX.
MED. MAX
-
/
/
--
A
29j
/
3/
B
I
-7
0
30 0
A
3110
32)0
100
j
28Q
90
9610 ci modelo 979
ABAJO
2
•
0
0
-
2f
K9N.-MAX
0
Z]
®
—
r
24.0
(
©
—
05
__
110
B. Pata para puntada
A. Pata para
13
35
0
Invisible
zig-zag
1401
1
A
Solo el modes, 970
CONTROL DIENTES
D. Pata para
CrecnafleraS
cp
161010
;;t-—
i/z I:z
—-
--
>
/
MED. MAX
0
36Q
1-4
15 0
C. Pata para ojales
3401
MED. MAX.
12 0
PRENSAYELAS
rL
-
ARRIBA
J
I
38101
rFZZ
I
0
/
INSERCION DE CF1EMALLEP as
1-41
MIN. MAX.
-
IooI
101
/
—i
0
__—iz
L
/[
‘4,
/_
/1 _L—V I/ 1
PUNTADA RECTA
STRAIGHT STfCH
(I) Straight stitch at center needle position with
following
settings;
MODEL 979, 972
Stitch solector
,
—
‘aD
Stitch width control
MODEL 970
Stitch selector
—
C)
—
/
Straight stitch at left needle position with following
settings;
MODEL 979, 972
Stitch selector
—
Stitch width control
MODEL 970
Stitch selector
—
—
(0 Puntada recta posición aguja en el centro realizar los
siguientes ajustes:
MODELO 979, 972
Selector puntada
—
aD
Selector ancho puntads
—
MODELO 970
Selector puritada
—
c) Puntada recta en posición aguja en Ia izquierda realizar
los ajustes siguientes:
MODELO 979, 972
Selector puntada
—
Selector ancito puntsda
MODELO 970
Selector puntada
—
—‘
STARliNG TO SEW
INICIO DE LA COSTURA
Before placing the material on the machine, see that the
ends of the threads have been drawn about 6 (15 cm) to the
rear of the machine Hold on thethreads during the sewing of
the first 3 or 4 stitches of the seam.
Antes de colocar el telido en Ia mãquina, asegurarse de que
los extremos de los hilos Se hayan estirado unos IS cm. por
detrás de Ia máquina. Sostener los hilos durante Ia costura
de las 3 6 4 primeras puntadas.
Fasten each seam by back tacking at the beginning and end
of the seam.
Asegurar cada costura realizando el atacado at principlo y al
final de Ia costura.
1EMOVING FABRIC
SACANDO EL TEJIDO
rat turn the handwheel towards you until the needte is at its
ighest position, then raise the presser foot, draw materials
the rear and cut off excess thread with the thread cutter
cated on the left end of worlong surface or on the presser
ar.
Gire et volante hacia Vd. hasta que ta aguja se encuentre
en su posicián màs alta, cuba Ia pata prensatetas lieve el
matarial hacia atras y corte et hilo sobrante con el cortador
Situado en et extremo izquierdo del area de trabajo o en a
barra del prensatelas.
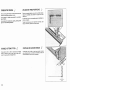
EURMNG A SQUARE CORNER
GIRO EN ESQUNAS EN ANGULO RECTO
‘o turn a square corner 5/8 (1.6 cm) from the fabric edge,
top stitching with the needle tip piercing the fabric, when
eaching the cornering guide as shown. Raise the presser
oot, turn fabric.
Para girar en una esquina en ángulo recto a 16 mm, del
borde del tejido, parar Ia coatura con Ia punta de Ia aguia
atravesando el tejido, cuando se estit alcanzando Ia gula de
esquinas, tat como estã mostrado. Aizar eI pie prensatelas y
girar el tejido.
ew stitching line will align with 5/8” (1 .6 cm> seam guide on
ide of needle plate. Lower the presser foot and begin
titching in new direction.
tluatration I
Cornering guide
La nueva linea de pespuntes se alinearã con Ia guia de
costura de 16 mm, en el lateral de Ia plancha de aguja. Bajar
el pie prensatetas y empezar Ia costura en Ia direcciôn
nueva.
tlustración I : Guia de esquinas
24
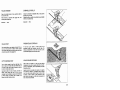
INSERTING ZIPPERS AND PIPING
SETTING
Use zipper toot which allows you to sew to the right or left of
the zipper or close to the cord.
Illustration I : Needle to left of foot
if: Needle to right of foot
INSERTING ZIPPERS
To sew down the right side, attach left side of zipper foot to
presser foot holder so that the needle passes through the
opening on the left side of the foot.
To sew down the left side, attach right side of foot to foot
holder
PIPING
To pipe soft furnishings, cover cord with a bias strip of fabric
and pin or tack it to the main piece of fabric.
Attach right side of zipper foot to foot holder so that needle
passes through the opening on the right side of the foot.
INSERCION DE CREMALLERAS Y VIVO
Utilizar el prensatelas de crernalleras que permite coser a Ia
derecha o Ia izquierda de Ia cremallera o cerca del cordon
vivo.
IlustraciOn I : Aguja a Ia izquierda del prensatelas
II: Aguja a Ia derecha del prensatelas
INSERCION DE CREMALLERAS
Para coser el lado derecho, aplicar el lado izquierdo del
prensatetas de cremalleras al sujetador pie prensatelas. de
manera que Ia aguja pase a través de Ia abertura en el ado
izquierdo del prensatelss.
Para coser el lado izquierdo, aplicar el lade derecho del
prensatelas al sujetador prensstelas,
VIVEADO
Pars vivear articulos blandos, cubrir el cordOn con una cinta
de tejido al bies y suietarta con un alfller o atacarla a Ia pieza
principal de tejido.
Aplicar el lado derecho del prensatelas de cremalleras al
suietador prerisatelas. de manera que Ia aguja pase a través
de Ia abertura en el lado derecho del prensatelas.
IARNING
ZURCIDO
ower feed dogs and remove presser foot.
tretch fabric in an embroidery hoop with the hole at center.
:olding the needle thread, take one stitch and pick up bobbin
tread through the fabric. Lower presser bar and start sewing
a stow to medium speed, moving the fabric back and forth
tih a steady rhythm. Turn fabric and sew another layer of
titching over the first layer of stitching.
Baja los dientes y saque Ia pata prensatelas. Con at
bastidor de bordar tense el material con at agujero en el
centro. Sujete at hilo aguja y coja at hilo de Ia bobina a
través del género. Baje Ia barra prensatelas y comience a
coser a velocidad de tents a media, moviendo el genero de
adelante hacia atrás con un ritmo constante. Gire el
material y de otra capa de puntadas cruzada encima de Ia
primers.
IGZAG STITCH
PUNTADA ZIG-ZAG
)VERCASTING
SOBREHILtDO
This is one of the more frequently used zigzag stitches for
tarment construction.
‘lace material under the presser foot so that the right swing
)f the needle sews along right edge of fabric.
SA11N STITCH
This is a closely spaced attractive stitch used for appliqué,
bar-tacking, etc. Slightly loosen top thread tension for satin
stitching.
Use a backing of stabilizer or interfacing for sheer materials
to avoid puckering.
26
Esta es una de las puntadas zig-zag más frecuentemente
usadas en Ia fabricación do prendas. Colocar el tejido debajo
del pie prensatelas, de manera que Ia agula penetre un poco
el horde exterior.
PUNTADA DE RELLENO
Esta es una puntada atractiva compactamente espadada,
usada pars aplicaciones, atacados, etc.. Pars Ia puntada de
relleno afiojar ligeramente Ia tension del hilo superior. Para
evitar el arrugado en materiales finos, utilizar en el raves un
papel tejido o entretela.
PUNTADA INVISIBLE
BLIND STITCH
VVYV
W%jfMj
1
—
—
Regular
fabrics
blind
stitch
Elastic blind stitch
stretchable fabrics
for
for
soft,
First neaten the edge. For lightweights turn up and baste
about 3/8 (1 cm). For heavyweights overcast.
2. Fold garment away from hem leaving about 1f4 (0.6 cm)
of hem edge extending.
3.
4.
Place garment under blind stitch foot with the fold of the
garment against guide and adjust it by turning screw so
that the zigzag just catches the fold.
Press both sides of the finished hem. The right side of
the garment will show only the blind stitches.
Illustration I
II
III:
IV
V;
VI:
Inside of dress
Final hem length
Neatened raw edge
Adjustment screw
Guide
Right side of finished hem
V’1V
normal
.-
—
1.
I
Puntada invisible regular para las
telas normales.
Puntada invisible super eléstico
para las telas suves, elástico
Primero pulir el borde. Los tejidos Iigeros se doblan e
hilvanan airededor de 10 mm. Los tejidos gruesos se
sobrehilan.
2. Doblar Ia prenda hacia fuera del dobladitlo, dejando que
se extienda el borde del dobladiUo alrededor de 6 mm.
3. Colocar Ia prenda debajo del prensatelas de puntada
invisible, con el doble de Ia prenda contra a guia y
desplazarla girando el tornillo, de manera que el zig-zag
coja el doble.
II
ifi
4. Planchar ambos lados del dobladillo acabado. El ado
derecho tie a prerida rnostrará solo las puntadas
invisibles.
IlustraciOn I REVES DE L PREN0A
II: LONGITUD FINAL DEL DOBLADILLO
ill:
1V:
V:
VI:
BOADE PULIDO
TORNILLO
GUIA
DERECHO DEL DOBLADILLO ACA8AOO
27
THREE-STEP ZIGZAG
ZIG-ZAG DE TRES PUNTADAS
This Is a strong stitch because it makes three short stitches
Esta es una puntada fuerte, ya que como su nombre implica,
resliza tres puntadas cortas donde el zig-zag normal 5610
realiza una.
Por esta razOn es muy recomendada para ci sobrehilado de
todo tipo de telidos.
Tambien as ideal para zurcir desgarrones, parches. coser
toallas remiendos y aplicacion de elastico pIano.
where the normal zig-zag makes only one.
For this reason it is highly recommended for overcasting all
types of fabrics.
It is also ideal for mending tears, patching, sewing towelling,
patch-work and attaching flat elastic.
DOUBLE-ACTION STITCH
PUNTADA DE ACCION DOBLE
Double-action stitch is ideal for producing flat overlapped
seams on almost any type of fabric and a bolder effect will
result from sewing with contrasting thread
Puntada de accion doble as ideal para producir costura
pans doblada sobre casi todos tipos de tepdos y efeclo de
borde resultara de cosido con hilos contrastes
-
;
1
!W
.,
“
c
5
.
-
.
.
.
-
5mm
28
LINGERIE STITCH
PUNTADA DE LENCERIA
Ungerie stitch is for seaming and overcasting sheer, soft
fabrics in one operation. It also produces a delicate shell
hem on lingerie and other fine garments.
La puntada de lenceria Ca para coser y sobrehilar en una
operac,ón tejidos finos y suaves, También produce un
dobladillo do concha delicado en lenceria y otras prendas
finas.
SEAM AND OVERCAST IN ONE
COSTURA Y SOBREHILADO EN UNO
Place the right sides of the fabric together and position under
the presser foot so that the zig-zag part of the stitch sews
just over the raw edge.
Cotocar los derechos dot tejido juntos y posidonar debajo del
pronaatelaa, tie manera quo Ia parte del zig-zag do Ia
Illustration
I : Regular lingerie stitch
Four-point lingerie stitch
U
SHELL HEM
Turn under the raw edge and press. Place the fabric right
side up so that the zig-zag part of the stitch sews Just over
the folded edge, pulling the fabric in to form a shell hem.
Trim away excess fabric close to the stitching line.
Regular shell stitch
Regular shell stitch produces a tiny shell hem on lingerie and
other fine garments.
Four-point shell stitch
If bigger size of shell pattern is desired, use four-point shell
stitch
puritada cosa sobre el borde del tejido.
ttustración I
PUNTADA DC LENCERIA CORRIENTE
U: PUNTADA DC LENCERIA DC CUATRO
PUNTADAS
DOBLAD(LLO DE CONCHA
Girar hacia abajo el borde del tejido y ptanchar. Colocar el
derecho del tejido arriba, tie manera quo Ia parte del zig-zag
tie a puntada cosa sobre at borde doblado, estirando el
tejido y formando un dobladitlo tie concha.
Recortar el tejido sobrante cerca tie Ia linea do puntadas.
Puntada de concha normal
La puntada tie concha normal produce un dobladitto do
concha dimiriuta en lenceria y otras prendas flnaa.
Puntada de concha de cuatro puntos
Si quiere tamafto más grande, ussr Ia puntada do concha de
cuatro puntos.
I
II
AGGOTNG
FAGOTNG (Dente de rata)
X
his is a popular decorative stitch (used in sleeves or fronts
of
blouses and dresses). To attach two separate pieces
tbric together, leave a little space in between. To prepare
e fabric:
old under the seam allowances on the cut edges, and
ress. Baste folded edges to stabilizer with about lI8 (0.3
m) space between. Stitch over the 1/8” (0.3 cm) allowance,
ist catching the fabric fold on both sides with needle.
lemove bastings and stabilizer; press.
X
Eats es una puntada rnuy popular (usada en mangas 0
delanteros de blusas y vestidos).
Pars sujetar dos piezas separadas tie teiido dejar un
pequeno espacio entre ellas. Para preparar el tejido: Doblar
el tejido hacia abalo y preaionarlo. Hilvanar los bordes do
blados al papal tie soda, dejando Un espacio de 1/8”. Coser
por encima del espacio tie if 8. cogiendo con Ia aguja el
género doblado per ambos lados. Sacar los hilvanes y el
papal; planchar.
“-44r-.--
.t•.•
,,J1
j:
j’.f..•
l”
PUNTADAS ELASTCAS
STRETCH STTCHES
3tretch stitches are mainly for use on knit, or stretchable
abrics, but can also be used on ordinary materials.
Las puntadas elásticas se utilizan principalmente en géneros
tie punto 0 materiales elásticos, pero también se puede usar
en materiales corrientes.
Utilizar Is aguja de puntada elastics con tronco azul, cuando
se cosan tejidos elásticos. Utilizar las agujas normales pars
los tejidos no elásticos.
DJUSflNG STRETCH STITCH BALANCE
AJUSTE FINO PUNTADA ELASTICA
I
‘4
Stitch length/super (stretch) stitch control should be at
mark for most materials. Depending upon the type of fabric
used, you may need to adjust this Control to match forward
stitches of stretch sewing with reverse motion stitches. If the
the
stitches are too open, turn the Control to S position; if
stitches overlap, turn the Control to L position.
Illustration
I: Ric-Rac Stitch
B: Smocking Stitch
TRIPLE STRAIGHT STITCH
llustración I : Puntada zig-zag a do agujas
U: Puntada nido tie abeia
,9
Triple straight stitch is far stronger than ordinary straight
and
stitch because it locks three times-forwards, backwards
forwards.
of
It is particularly suitable for reinforcing the seams
sportswear in stretch and non-stretch fabrics, and for curved
seams which take a lot of strain.
and
Use this stitch also to top-stitch round lapels, collars
cuffs to give a professional finish to your garments.
RIC-RAC STITCH
*
Ric-rac is a quiclc method of finishing a raw edge and
providing a decorative top-stitch in one operation, It is ideal
for edging neck-bands, armholes, sleeves and hems.
30
El control del largo tie puntada/super (elastics), debe de
estar en Ia marca ‘4 para Ia mayoria de materiales.
Dependiendo del tipo de material a coser, usted deberé
ajustar este control para conseguir igualar las puntadas
hacia adelante con as puntadas tie atrás. Si las puntadas
son demasiado abiertas girar el control a Ia posición S; silas
puntadas se sobreponen, gear el control a Is posicién L.
PUNTADA RECTA TRIPLE
,‘
La puntada recta triple es mucho más fuerte que Ia puntada
recta corriento, ya que entrelaza tres veces—hacia adelarite,
hacia atrás y hacia adelante.
Es particularrnente atiecuada para reforzar las costuras tie
prendas tieportivas tie tejidos elásticos y no elásticos y para
costuras curvas que requreren una gran resistencia.
Utilizar también eats puntada para sobrecoser solapas
redondeadas, cuellos y punos, ya que proporciona Un
acabado profesional a las prendas.
PUNTADA ZIG-ZAG A DOS AGUJAS
*
El zig-zag as un método râpido tie acabado tie un bortie y
proporciona una sobrecostura decorativa en una operaciôn.
Es ideal pars escotes, sisas, mangas y dobladillos.
U
:1 :I1
4
OVERLOCK STITCH
PUNTADAOVERLOCK
This is the same type stitch used by the garment industry in
making sportswear it forms and finishes the seam In one
operation.
Its very effective for use in repairing raw or worn edges of
older garments.
Este es el mismo tipo de puntada usada por a industria de a
confección en Ia fabricación de prendaa. Se forma y acaba Ia
coatura en una operacion.
Es muy efectiva para el uso en Ia reparación de bordes
gastados de prendas usadas.
SLANT OVEREDGE STITCH
PUNTADA INCL1NADA DE
,
Execellent for hemstitching table and bed cover with an
etegant touch. Picot-like stitch can also be made on sheer
materials. Sew along the raw edge of fabric and trim close to
the outside of the stitching.
SMOCKING STITCH
I
Make a straight line of gathers across the fabric that you
wish to smock.
2. With a narrow strip of fabric directly under the line of
gathering, stitch over the gathers. The design will be a
series of small diamonds.
7
ç
SOBREHILAR
Es excelente para dobladiltar manteles y sobrecamas
dando un toque de elegancia. La puntada tipo picot
tambiérr puede aplicarse en géneros finos, Cosa por eI
canto del material y recorte el sobrante del exterior de Ia
costura.
PUNTADA NIDO DE ABEJA
1. Realiza una linea recta de fruncidos a través del tejido
que se desea adornar con nido de abeja.
2. Con una tira estrecha de tejido. directamerrte debajo de
Ia linea de fruncido, coser sobre los fruncidos. El diseflo
seré una serie de diamantes pequenos.
31
FEATHER STITCH
The pleasing appearance of this stitch enables it to be used
for top stitching, or attaching lace or inset panels when
making lingerie or girdles.
ELASTIC OVERLOCK STITCH
for
Use this stitch in preference to regular overlock stitch
overcasting stretch or knit fabrics where strength and
flexibility are required.
SURF STITCH
-7
It is an attractive stitch for border design.
32
PUNTADAPLUMA
El aspecto agradable de eats puntada permite su uso como
adorno o a aplicación de encaje o pansIes internos en
lenceria o fajas,
PUNTADA OVERLOCK ELASTICA
Utlice preferenternente esta puntada antes que el overlocl<
normal para operaciones en géneros elásticos 0 de punto,
donde Se require fuersa y ftexibiidad.
PUNTADA SURF
.7
Se trata de una puntada atractiva para diseños en
dobladillos.
FISHBONE STITCH
PUNTADARASPA
Use to create decorative borders and for embroidery.
Utiticela para
bordados.
WISH-BONE STITCH
PUNTODEBRUJA
of
Use to sew and finish elastic fabrics or for decoration
borders,
Usela pars coser y acabar tejidos eláslicos o en
decoracion de dobladitlos.
STRETCH OVERLOCK STITCH
PUNTADA OVERLOCK ELASTICA
Stretch overlock seams and overcasts in one to produce a
narrow, supple seam, particularly suited to swimwear,
sbortswear, 1-shirts, babywear in stretch nylon, stretch
towelling, jersey and cotton jersey.
Las costuras overlock etásticas producen una costura
estrecha y elástica particularmente adecuada para prendas
de baho, prendas tie sport, camisetas T, prendas de niños
de nilOn elástico, toalta elástica, jersey y algodón,
crear
dobtadillos
decorativos
y
para
Ia
33
PUNTADA OVERLOCK DOBLE
DOUBLE OVERLOCK STITCH
for
Double overlock has three maw uses. It is perfect
attaching flat elastic when making or repairing lingerie; and
for overcasting and seam and overcast in one on slightly
stretch fabrics and non-stretch ones such as linen, tweed,
and medium to heavy-weight cotton.
STRETCH PATCHING STITCH
PUNTADA ELASTICA DE PARCHES
j
is
Stretch patching stitch, as well as being a decorative stitch,
ideal for patching stretch fabrics such as jersey and knitwear
34
puntada
La puntada elastics cia parches, además de ser una
decorativa es ideal pars poner perches en géneros elásticos,
tales como jersey y genero de punto
PUNTADAESPIGA
HERRINGBONE STITCH
It is a versatile stitch used for joining fabric pieces
embroidery.
Overlock doble tiene tres principal usos. Es perfecto juntar
elastico pIano al hacer o reparar lencerla; y para sobrehilado
elàsticos
y costura y sobrehilado en uno sobre los tejidos
de
ligeramente y las rion—elàsticos como linen, mezclilla
lana, algodOn de peso medio a pesado.
and
Puntada versátil qua se utiliza para unir piezas de género y
bordado.
DECORA11VE EMBRODERY
DESIGNS
DSENOS DE BORDADOS
DECORA11VOS
Your Machine will produce a wide range of
Su mâquina producirá una ampha gama de
herrnosas puntadas decorativas, tal como
se ilustran en el panel da puntadas.
Simplemente selecione el disefto a su gusto
y proceda a coser, el dibujo Se reproduciré
automáticamente.
beautiful decorative embroidery patterns as
illustrated on the Stitch indicator panel.
Simply select the design of your choice and
proceed to sew, the pattern will be produced
automatically. The final effect of each design
will depend on stitch length setting.
liPS ON DESIGN STITCHING
1
Always make a practice design on a
scrap of the fabric you plan to use.
2. Start with a full bobbin and plenty of
thread on the spool to avoid running out
of thread in the middle of your design.
3. Reduce the top thread tension slightly.
4. On a very soft fabric you may want to
use a stabilizer backing or organdy that
can be cut away afterwards.
Illustration I
II
Ill
W:
Scallop pattern on collar
Diamond on narrow hem
Domino on bias tape
Arrowhead on lapel
*$*
WwWW.
—‘
*
TIPOS DE PUNTADAS
DECORATIVAS
1
Practique el dibujo siempre en su trozo
de tela que vaya a ussr.
2. Empezar con el carete y Ia canilla llenos
para evitar coser sin hilo a mitad de su
disefto.
3. Reducir ligeramente Ia tensiOn del hilo
superior.
II
I
4. En materiales muy suaves, puede set
necesario usar papal ó organdi, qua
puede ser quitado posteriormente.
llustracjOn I Dibujo de ondas de cuello
II: Diamantes en dobladillo
estrecho
III: DominO en cintas al bias
W: Punta de flecha en solapa
•1
III
j.(
IV
35
BUTTONHOLE MAKING
AUTOMA11C ONE-STEP BUTTONHOLE
CONFECCION DE OJALES
OJALES AUTOMATICOS
(Solo el modelo 979, 972)
(Model 979, 972 only)
1. Carefully mark the position of buttonhole on your
garment.
Ia
1. Marque cuidadosamento Ia posicion del ojal en
prenda
2. Slide open the button carrier and insert the button.
2. Deslice el porta botones e inserte el botón.
3. Attach the buttonhole foot.
3. Ponga Ia pata para ojates.
4. Place the garment under the foot so that the needle
pierces the fabric at the beginning of buttonhole.
5. Lower the buttonhole lever and the presser toot lever.
6. Push the buttonhole lever away from you.
7. Start machine to complete entire buttonhole.
NOTE: When buttonholes are completed, be sure to raise
the buttonhole lever as far as it can go.
ADJUSTING STITCH BALANCE
Stitch length differences in forward and reverse stitches of
the buttonhole are equalized with the buttonhole stitch
adjuster.
If the reverse stitches are too close together, turn the
adjuster slightly clockwise using a coin as illustrated; if they
are too tar apart, turn counter-clockwise.
36
4. Coloque Ia prenda debajo de Ia pats de forma que a
aguja traspase el género al inicio del ojal.
5. Baje Ia palanca para ojates y Ia tie Ia pata prensatelas.
6. Suba Ia palanca pars ojales.
7. Arranque Ia maquina para completar at ojal.
Nota: Una vez completados los ojales asegárese de subir Ia
palanca hasta su posición más alta.
AJUSTE DE LA COMPENSACION
PUNTADAS OJAL
Las diferencias de longitud puntada en las punladas hacia
adelante y hacia atrás del ojal, se igualan con at dispositivo
de ajuste puntada ojal.
Si las puntadas hacia atrás son demasiado compactas, girar
ligeramente el dispositivo de ajuste. usando una moneda
como ostá ustrado. Si están demasiado separadas, girar en
el sentido contrario.
—STEP BUTTONHOLE (Model 970 only)
Bartack 4 or 5 stitches. Stop sewing at the left stitch and
raise needle to its highest position.
• Stitch forward to the end of buttonhole mark. Stop sewing
at the left stitch and raise needle.
• Bartack 4 or 5 stitches. Stop sewetg at the right stitch and
raise needle.
• Straight stitch backward until needle reaches beginning
of buttonho4e.
Stitch forward to the end of buttonhole mark to complete
buttonhole.
DORDED BUTTONHOLES
look filler cord (crochet thread or buttonhole twist) under the
;pur/hook at back of foot and pull both ends of the cord
orward under the foot in grooves. Sew buttonhole with
iqzag stitches covering the cord.
Nhon completed, release the cord from foot, pull ends of
ord forward and snip off extra length.
tustration I Spur/hook
U: Model 970 only
PASOS PARA OJALES (Sélo modelo 970)
1. Atacar 4 0 5 puntadas. Parar de coser a Ia Izquierda y
levantar Ia aguja hasta Ia posiciOn más alta.
2. Coser hacia adelante heats at final de Ia marca del ojal.
Parar de coser a Ia izquierda y elevar Pa aguja.
3. Atacar 4 6 5 puntadas. Parar de coser a La derecha y
elevar Ia aguja.
4. Pespuntear hacia atréS heats que Ia aguja Ilegue at
principle del ojal.
5. Pespuntear hacia adelante hasta el final de Ia marca del
ojal hasta completarlo.
D
LF©[ ®Et©
OJALES CON CORDON
Enganchar el cordOn de relleno al saliente de Pa gula y
estirar ambos extremos del cordOn hacia adelante, por
debago de Ia gula. Coser el ojal do fonaa quo las puntadas
de zig-zag cubran el cordon,
Cuando so haya terminado, softer el cordon, tirar hacia
adelante do los extremos y cortar el sobrante.
IlusfraciOn 1: Salierrte
II: SOlo Modelo 970
37
OPTONAL ACCESSORIES
ACCESOROS OPCIONALES
Optional Accessories described in this section are not
supplied with this machine as standard equipment, but can
be obtained from the dealer who supplied your machine or
by contacting us directly.
Los accesorios opcionales descritos en esta sección no se
entregan con Ia máquina como eguipo standard, pero
pueden ser obtenidos del vendedor de Ia máquina ó
contactando directarnente con nosotros.
STRAIGHT STITCH FOOT
PATA PUNTADA RECTA
Use this foot when close control is needed according to the
type of fabric or stitching procedure.
Use esta pata cuando requiera Un control proximo segün el
tipo de género 0 de coatura.
OVERCASTING FOOT
PATA PARA OVERLOCADO
This foot is used to guide fabric when overcasting. Place
your fabric under the foot with its edge against the edge
guide and start to sew.
Este pats se utiliza para gular el material durante el
overlocado. Situe el género baio Ia pata con su borde
contra el canto de a guia y comience a coser.
Illustration I
Edge guide
SATIN STITCH FOOT
Satin stitch foot is grooved to permit dense stitching to pass
under it easily.
Closely spaced zig-zag stitches are called satin stitches. This
is an attractive stitch used for sppliqueing, bar tacking.
Slightly loosen top thread tension for satin stitching
Use a backing of stabilizer or interfacing for the sheer
materials to avoid puckering.
38
Ilustraciôn. I
Canto de guia
PIE PRENSATELAS PARA COSER
EN SATEN
El pie prensatelas para tejido sated está rebajado pars
permitir que las puntadas densas pasen fácilmente balo a
pata,
La puntada de zig-zag corta. se llama puntada satén. Esta
as una puntada atractiva usada pars apliques. atacados y
presillas.
Aflojar suavemente Ia tension del hilo superior para eats
puntada.
Usar papal de seda 6 entretela no feuds. para evitar las
arrugas en materiales finos.
ROLLED HEMMER
DOBRADILLO RODILLO
Snap on the rolled hemmer and sew, guiding the fabric into
the scroll of the foot.
Alled hemming is performed with zigzag stitch, narrow
hemming with straight stitch,
Colocar el prensatelas de dobladillo rodillo y coser guiando
Illustration I
Scroll
el tejido en el rollo de pie.
Dobladillo rodillo es cumptdo con puritada zig-zag. dobladillo
estrecho con puntada recta.
llustración I: Rollo
ROLLER FOOT
PRENSATELAS DE RODILLO
When sewing leather, suede, plastic and velvet, fit the roller
root to aid the smooth flow of fabric. However, especially
when sewing softer leather and suede, better results may be
ichieved by using the normal zigzag foot.
Al coser piel, cuero, plástico y velludo, ajustar el pie
prensatelas rodillo pare corriente suave de tejido. Sin
embargo. especialmente al coser p1st mâs suave y cuero,
pie prensatelas zigzag normal da mejor results.
BUHON SEWING FOOT
Snap on button sewing foot and lower feed dogs. Fix the
button in place on the fabric with clear adhesive tape. Align
wo holes of button with the slot of presser foot. and lower
the foot to hold the button securely.
Adjust stitch width to the holes of buttons, and fake 5 or 6
stitches, Finish sewing with extra 2 (5 cm) of thread
remaining. Draw the threads to reverse side of the fabric and
tie. When sewing a flat button, place a needle or a pin
between the holes of button as shown,
APLICACION DE BOTONES
Fijar el botch en el tejido en su sitio con cinta adhesiva
transparente. Alinear los dos agujeros del botón con Ia aber
tura del pie prensatelas y bajar el prensatelas pars sujetar
firmemente el bolón.
Ajuatar el ancho de a punlada con respecto a los agujeros
de los botones y realizar 5 0 6 puritadas. Acabar Ia costura
con 5 cm. extras de hilo sobrarite. Pasar los fibs al revés
del tejido y anudar. Cuando se estè cosiendo un botch
pIano, cobocar una aguja o un alfiler entre los agujeros del
botón, tal como está mostrado.
TWIN NEEDLE
(Model 979, 972 only)
A twin-needle produces two rows of parallel stitches for pin
tucks, double top stitching and decorative sewing.
When using twin-needles, the stitch width should never be
set above twin needle mark, regardless of the stitch you
have selected. Doing so will result in broken needles and
possible damage to your machine.
THREADING THE TWIN NEEDLE
Place a spool on each spool pin. Thread the two threads
as one except double thread guides are provided. Draw
one thread through each of these and through each
needle front to back.
2. Pick up bobbin thread as for single needle sewing. Pull
the three threads together under the presser foot to the
back of the machine, leaving about 6 (15 cm)clear.
NOTE: Needle threader cannot be used to thread the twin
needle.
TURNING A CORNER WITH A TWIN NEEDLE
APUCACION DE DOS AGUJAS
(Solo modelo 979, 972)
Dos-agujas produce dos riña de puntadas pararelas para
atforza de alfiler, puntadas superiores dobles y puntadas
decorativos.
Cuando utilice agujas dobles’, eI ancho de Ia costura no
deberá nunca ajustarse por encima de Ia separación de
Ia aguja doble, sin importar Ia puntada seleccionada. De
no hacerlo asi Se romperán las agujas y podrIa resultar
danada Ia máquina.
ENHEBRADO DE DOS AGUJAS
I. Colocar el carrete sobre cada pasador. Enhebrar dos
hilos donde gula del hilo dobre exceptivo es proveido.
Tirar un hilo a través de cada de gula y a través de cads
aguja deade delante a atrás.
2. Recoger el hilo de bobina como el costura del aguia solo.
Tirar tres hilos juntos bajo de pie prensatelas de delante
a atrás . deiando alrededor de 15 cm.
GIRO EN ESQUINAS CON DOS AGUJAS
1. Use hand wheel to stop stitching with the left-hand needle
(the longer of the two) just piercing the fabric. Raise
presser foot, turn the fabric by 45 and lower the foot.
1. Ussr el volante pars parer Ia costura con el aguja de
mano derecha (más largo de dos) sálo atravesando el
tejido. Alzar el pie prensatelas y girar el tejido por 45, y
bajar at pie.
2. Take one stitch, leaving the left-hand needle piercing the
fabric. Raise presser foot, turn fabric by further 45, lower
the foot, and continue sewing.
2. Coser urla puntada.dejando a aguja de mano zquierda
atravesando el tejido, Alzar el pie pransatelas y girar el
tejido por más 45’, bajar el pie y continuer de coser.
CARNG FOR YOUR
MACHNE
To ensure the best possible operation of
your machine, it is necessary to keep the
essential parts clean at at! times.
Always disconnect the machine from power
supply by removing the plug from the
socket-outlet.
CIeanng the feed dogs and
shuttle area
1. Raise the needle to its highest position.
2,
Remove the needle plate (1).
3.
Remove the bobbin case (2).
CUDE SU MAQUNA
Es necesario que mantenga las psezas
esenciales limpras siempre, pars obtener un
funcionamiento eficáz de su mtiquina
Siempre desconectar desenchufando el
cordon de Ia corriente electrica.
Limpiar e area de
transportador y b lanzadera
.
Levarster a aguja a a
2.
Quite Ia placa aguja (1)
3.
Quite Ia ctipsula (2)
4
Limpiar el tires del transportador y de Is
lanzadera con el cepillo tie hilachas
‘‘‘i’’’
)
‘‘:,
j
ATENCION Echar una gota de aceste
pars mtiquina de coser por el
eie Central cia Ianzadera y el
carril tie lanzadera como estti
indicado con las flechas.
Put a drop of sewing machine oil
on the shuttle race as indicated
by the arrows.
Replace the bobbin case with the
projection (3) positioned against the
spring (4). Replace the needle plate.
/___
posiciOn mtis sits
I
4. Clean the feed dogs and shuttle area
with the lint brush.
NOTE :
1+
Uo
5.
Vuelva a colocar Ia cápsula con el
resalte (3) contra el muelle (4)
Coloque de nuevo Ia placa aguja
-,..--
.-..
\l\5
(3)
\\\
(4)
41
Changing light bulb
screw in
Remove the face cover, Unscrew the bulb and firmly
a new bulb. Replace the face cover.
ng a bulb.
Disconnect from main power supply before changi
Do not use a bulb of more than 15 watts.
Camblo de Ia bombilla
lla y roscar
Quitar Ia tapa frontal, desenroscar Ia bombi
frontal.
firmemente una nueva. Volver a colocar Ia taps
lls. No
Desenchufar Ia corriente antes de cambiar Ia bombi
usar una bombilla de màs de 15 watioa
CHECK CHART FOR PERFORMANCE PROBLEMS
GENERAL PROBLEMS
Machine does not sew.
*Foot control is not connected. See page 7.
Turn on the switch.
Power switch is turned off
amsns.
-
41).
Thread is caught in sfluttte. Clean shuttle (see page
Needte is damaged. Replace needle (see page 1 1).
Fabric does not move.
*Presser foot is not lowered Lower presser foot.
*Stitch length is set at 0. Set it at I to 4.
—
—
llustración I
lllustración I : Light bulb
U: Face cover
UI: Screw
Bombilla
It : Cubierta frontal
lIt: Guia
—
—
ST1CHING PROBLEMS
Machine skips stitches.
*Nte is not all the way up into needle clamp. See page 11.
*Needte is bent or blunt. Replace needle (see page 11).
Machine is not threaded correctly. See page 12
*Thread is caught in shuttle. Clean shuttle (see page 41)
Use stretch stitch needle
Fabric is a certain knit or synthetic.
(see page 11).
Stitches are irregular.
It
Needie size is not correct for thread arid fabric. See page
Machine is not threaded correctly. See page 12.
15.
page
See
loose.
too
is
tension
Top thread
action.
fabric is being pulled or pushed against niacitine feeding
—
—
—
—
—
—
-
Guide it gently.
•Bobbin has not been wound evenly.
—
—
Rewind bobbin.
Needle breaks.
*Fabric is being pulled or pushed against machine feeding action.
Guide it gently.
11.
Needle size is not correct for thread and fabric. See page
*Needte is not all the way up into the needle clamp (seepage ii).
—
—
THREAD PROBLEMS
Thread bunches.
too
Top and bobbin threads are not drawn back under presser
before starting seam.
(IC
inches
Draw both threads back under presser foot about 4
cml and hold until a few stitches are formed.
Needle thread breaks.
Machine is not threaded correctly. See page 12.
See page 15.
Top thread tension is too tight
*ffeedle is bent, —Replace needle (see page 11).
See page t 1
*Needle size is not correct for thread and fabric.
—
—
—
Bobbin thread breaks.
See page 10.
Bobbin case is not threaded correctly.
Remove lint )Ser
9Jni accumulates in bobbin case or shuttle.
page 41)
cuckers.
*Top thread tension is too tight. Adlust thread tension (see pagi
15).
Shorten stifct
*Stitch length is too long for sheer or soft fabric,
—
—
—
—
length.
42
REPACKING THE MACHINE
CUADRO DE EXAMEN PARA LOS
PROBLEMAS 0€ EJECUCION
PROBLEMAS GENERALES
Maguina no cone.
1 cordon eldctrico no asia conectado (yea pdgna 7).
a
0
‘El riterrupior de potencla estit desconectado. Cortectelo.
Máguina so atasca/rechina
‘El Silo asia enradado an a lanzadera. Limpiar Ia Ianzadera.
‘La aguja Sc rompe. Reponer Ia agula (yea páqina 11).
—
Save the packing materIal (or ttiture ea’ It iiiay lii gale
ior p ii hug “-w
1
necessary to transport the machole I ii
rn-li liii
result in damage during transit When tep,ukila I
follow the instructions Illustrated.
VOLVER A EMBALAR LA MAQUINA
,iliilri
tie
iiiiti if.i)i’
iiI.ii 1’ ji i04
1!Ii_il_Sit .Iitii
I ii I’,,, itt. , 1
liii
iii
ii
p II l
p..- 0
iii,iii
ai
ir.’
ii.
,i.-lt-r-r-.-tI
di
I
I ‘oil,
tei er
ii.ipoii I liii
I—-tail,, .i,,i.
ii,
‘‘il it.,
—
La lola no so mueve.
Baiar ci prensatelas.
‘El prensatelas no asia balado perfectamente
Prolonger Ia longitud del
‘LOngifud dcl punto en demasiado corfo.
punto.
Quitar Ia placa do
‘La placa la cubierla do transportador so instala
cubiorta tIe transportador.
-
—
—
PROBLEMAS bE PUNTO
La rnaquina salta puntos.
pagina 11).
[a agua no aSIa tijada cola brida portaagulas (sea
La agua estd torc,da a obtuse.— Reponor a agua Inca pagina 11).
10 máquina no enhebra correctamenta (yea pagina 12).
Use Ia agula de talon azul (yea
:t material as do punts a sintetico.
pagina 11)
I untos son irregulares.
II ni[mero de Ia agula no en correcto para el hilo ni el material (yea
?gina 11)
a rnaquina no enhabra correctamerite (yea pagina 12).
a tensiOn del Silo
—
superior
material
estO
tirado
a
as
demasiado
empujado
Contra
(lola
Ia
pagina
(sea
accidri
do
15).
alimentaciOn.
Guiario suavemente.
Redevanar Ia
a bobina no se ha devanado tIe un modo goal.
shine.
aguja se rompe
ado contra el acciOn tIe alimentacidn.
1
• I material estO tirado o empu
I I namero do Ia agula no as correcto para el bOo ni el material (yea
lagina 111
1 1 aguja no asia fijada en Ia brida portaagulas (van pagina 1 1).
—
i
•
tOBLEMAS bE HILO
unitan
ii hilos se 1
Los Silos superior a inferior no están sacados dabalo del prarrsatelas
Sacar ambos Silo debao del
autos de empezar a coser,
.-
vrennafelao unos 10 cm y manterrer hasta qua
,iocos puntos.
Se
fornien unos
.1 agua oe rompe
a rnOqurna no eritrebra correctamente (sea pagina 12).
‘La tensiOn del hilo superior en demasiado apretada (yea pagina 15)
a (yea pagina 11)
1
Cambiar Ia ag
a agula cola torcida.
El namers de Ia aguja no en correctS para el hilo ni el material (yea
pagiria 11)
El hilo inferior se rompe.
‘La capsula tIe portacanilla no enhebra correctarnente (yea pageta to).
Quitarias
‘Las hilas se acumulan en Ia capsula o en Ia ianzadera.
(yea pagina 41).
L.a ida no queda plana
‘Las tensiories del Silo superior e inferior estOn oemasiado apreladas.
ustar las tensiones del Silo (yea pagina lot
1
A
‘La ongitud del punts en demasiado largo para material fino o suave.
Acortar Ia louugitud del punts.
—
—
—
—
43